


Square Taper Adjustable Cup not Screwing in
 10-15-20, 10:54 AM
#1
Senior Member
Thread Starter
Square Taper Adjustable Cup not Screwing in
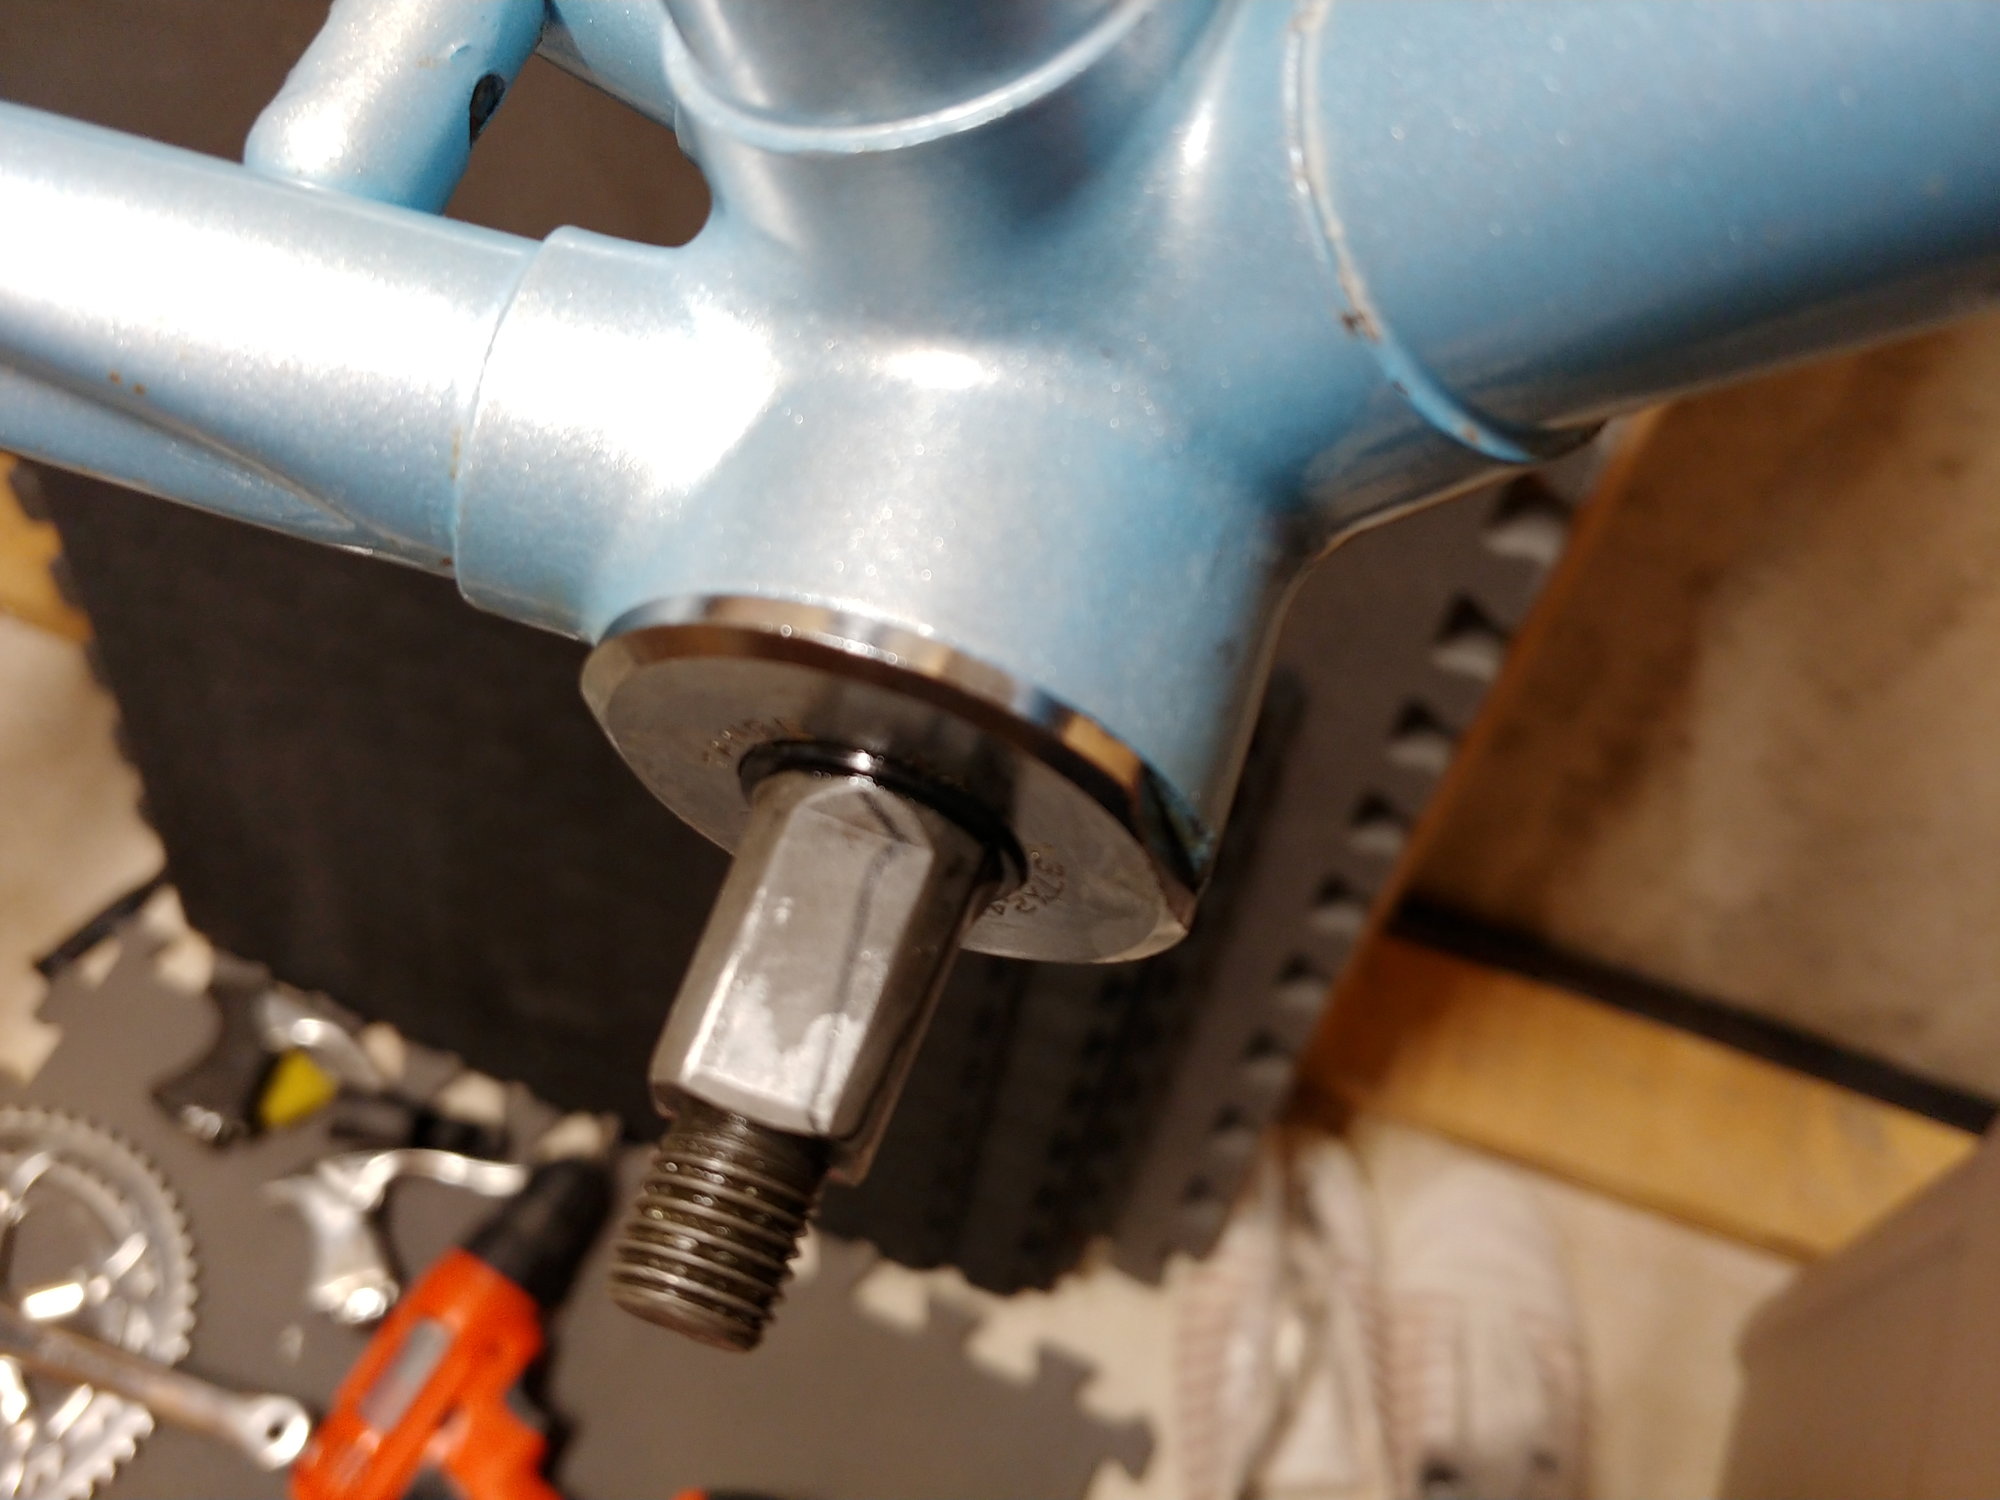
I recently took apart my bottom bracket to service it. When putting it back together, the spindle becomes impossible to spin after the adjustable cup is only screwed in a few threads.
I installed the lock ring just to see and there is still play in the spindle. I then installed the crank arms and the Drive-side is very close to the chainstays whereas the non-drive side is further away.
So far I've tried:
Any suggestions?


I installed the lock ring just to see and there is still play in the spindle. I then installed the crank arms and the Drive-side is very close to the chainstays whereas the non-drive side is further away.
So far I've tried:
- Flipping the cage bearings inside out
- Made sure the longer side of the spindle was on the Drive-side
- Greased the threads and packed with more grease
- Test fitted both cups without the spindle to ensure they went all the way in.
Any suggestions?
 10-15-20, 11:31 AM
#2
Senior Member
I've had the same problem. A mechanic shared a trick that involves lightly turning the bracket BACKWARDS in the cup with your hand until you feel it "click" into place. It sometimes takes what feels like an hour, but you will eventually feel the click, and then you will be able to tighten it all the way.
10-15-20, 11:45 AM
#3
Senior Member
Thread Starter
I've had the same problem. A mechanic shared a trick that involves lightly turning the bracket BACKWARDS in the cup with your hand until you feel it "click" into place. It sometimes takes what feels like an hour, but you will eventually feel the click, and then you will be able to tighten it all the way.
10-15-20, 12:37 PM
#4
Really Old Senior Member

Do the bearings have retainers?
Backwards?
We typically toss retainers and use 11 balls and grease to hold them in place.
Backwards?
We typically toss retainers and use 11 balls and grease to hold them in place.
10-15-20, 02:01 PM
#6

Droid on a mission

Join Date: May 2018
Location: Palm Coast, FL
Posts: 1,005
Bikes: Diamondback Wildwood Classic
Mentioned: 4 Post(s)
Tagged: 0 Thread(s)
Quoted: 317 Post(s)
Liked 280 Times
in
195 Posts
Did you possibly put the spindle in backward, they are not always symmetrical. There should be some printing on the spindle and it would orientate as if you were looking at it from the bicycle seat.
Another possibility is the cage for the bearings is not perfectly round or the cage is hanging on an edge so they are not properly seated taking up additional space. Use plenty of sticky grease to make sure they stay in place while assembling it. make sure the "ball" side of the cage is facing the cups (facing outwards). Your situation almost sounds like the bearings are not seated into the fixed cup side.
This video covers most of the points
.
Another possibility is the cage for the bearings is not perfectly round or the cage is hanging on an edge so they are not properly seated taking up additional space. Use plenty of sticky grease to make sure they stay in place while assembling it. make sure the "ball" side of the cage is facing the cups (facing outwards). Your situation almost sounds like the bearings are not seated into the fixed cup side.
This video covers most of the points
__________________
JoeTBM (The Bike Man) - I'm a black & white type of guy, the only gray in my life is the hair on my head
 www.TheBikeMenOfFlaglerCounty.com
JoeTBM (The Bike Man) - I'm a black & white type of guy, the only gray in my life is the hair on my head
www.TheBikeMenOfFlaglerCounty.com
10-15-20, 02:13 PM
#7
I'm good to go!
Join Date: Jul 2017
Location: Mississippi
Posts: 14,992
Bikes: Tarmac Disc Comp Di2 - 2020
Mentioned: 51 Post(s)
Tagged: 0 Thread(s)
Quoted: 6195 Post(s)
Liked 4,810 Times
in
3,318 Posts
You didn't change anything? Only cleaned, greased and attempted to reassemble, right? Have you ever done this before or is this a first?
edit... are you sure you didn't just put the caged bearings in backwards?
edit... are you sure you didn't just put the caged bearings in backwards?
Last edited by Iride01; 10-15-20 at 02:32 PM.
10-15-20, 03:00 PM
#8
The dropped

Join Date: Oct 2018
Location: Columbus, OH
Posts: 2,144
Bikes: Pake C'Mute Touring/Commuter Build, 1989 Kona Cinder Cone, 1995 Trek 5200, 1973 Raleigh Super Course FG, 1960/61 Montgomery Ward Hawthorne "thrift" 3 speed, by Hercules (sold) : 1966 Schwinn Deluxe Racer (sold)
Mentioned: 10 Post(s)
Tagged: 0 Thread(s)
Quoted: 1739 Post(s)
Liked 1,014 Times
in
696 Posts
It just looks like you haven't fully seated the spindle through the cup seals. It might be because the bearing cage has caught on the edge of the cup. Your flats will never be that close to the outside of the cups. Did you put the bearings on the spindle first?
When I do this work, I prefer to take my bearings, loose or caged, and tuck them into a nice cozy bed of grease in the cup, not on the spindle. Then I install the fixed cup and push the DS of the spindle through without nudging the bearings as best as I can. They don't have to be perfect because the spindle race will push them into the proper position. Slide that adjustable cup over the NDS spindle and lock it into place
When I do this work, I prefer to take my bearings, loose or caged, and tuck them into a nice cozy bed of grease in the cup, not on the spindle. Then I install the fixed cup and push the DS of the spindle through without nudging the bearings as best as I can. They don't have to be perfect because the spindle race will push them into the proper position. Slide that adjustable cup over the NDS spindle and lock it into place
10-15-20, 05:38 PM
#9
Senior Member
Thread Starter
Did you possibly put the spindle in backward, they are not always symmetrical. There should be some printing on the spindle and it would orientate as if you were looking at it from the bicycle seat.
Another possibility is the cage for the bearings is not perfectly round or the cage is hanging on an edge so they are not properly seated taking up additional space. Use plenty of sticky grease to make sure they stay in place while assembling it. make sure the "ball" side of the cage is facing the cups (facing outwards). Your situation almost sounds like the bearings are not seated into the fixed cup side.
This video covers most of the points
https://www.youtube.com/watch?v=aMSZ8Z8i-KY
.
Another possibility is the cage for the bearings is not perfectly round or the cage is hanging on an edge so they are not properly seated taking up additional space. Use plenty of sticky grease to make sure they stay in place while assembling it. make sure the "ball" side of the cage is facing the cups (facing outwards). Your situation almost sounds like the bearings are not seated into the fixed cup side.
This video covers most of the points
https://www.youtube.com/watch?v=aMSZ8Z8i-KY
.
It just looks like you haven't fully seated the spindle through the cup seals. It might be because the bearing cage has caught on the edge of the cup. Your flats will never be that close to the outside of the cups. Did you put the bearings on the spindle first?
When I do this work, I prefer to take my bearings, loose or caged, and tuck them into a nice cozy bed of grease in the cup, not on the spindle. Then I install the fixed cup and push the DS of the spindle through without nudging the bearings as best as I can. They don't have to be perfect because the spindle race will push them into the proper position. Slide that adjustable cup over the NDS spindle and lock it into place
When I do this work, I prefer to take my bearings, loose or caged, and tuck them into a nice cozy bed of grease in the cup, not on the spindle. Then I install the fixed cup and push the DS of the spindle through without nudging the bearings as best as I can. They don't have to be perfect because the spindle race will push them into the proper position. Slide that adjustable cup over the NDS spindle and lock it into place
I've ordered 1/4" loose balls which I think will help and I'll follow your steps. Thanks!
10-15-20, 06:05 PM
#10
Really Old Senior Member
The spindle doesn't appear to be protruding as far on the DS as it should.
Without even installing any NDS parts-
Try pushing the spindle in with the DS retainer/bearings seated in both orientations.
I'm pretty sure you have at least that retainer backward.
Without even installing any NDS parts-
Try pushing the spindle in with the DS retainer/bearings seated in both orientations.
I'm pretty sure you have at least that retainer backward.
10-16-20, 04:01 PM
#11
Senior Member
Thread Starter
I think you were right, the retainers regardless of which way they are installed don't sit properly against the spindle. I received my loose ball bearings today so I will try and install those instead.
10-17-20, 06:23 AM
#12
Senior Member
Thread Starter
So I installed the loose ball bearings (11 on each side) and packed them with an insane amount of grease. I also ensured the longer side of the spindle was on the Drive-side.
At this point there is a bit of a scratching noise and still a little bit of play in the spindle, even though I can't screw the adjustable cup any further. If I do, it gets too tight and the spindle won't move.
Any suggestions?

At this point there is a bit of a scratching noise and still a little bit of play in the spindle, even though I can't screw the adjustable cup any further. If I do, it gets too tight and the spindle won't move.
Any suggestions?
10-17-20, 07:05 AM
#13
Senior Member
I realize that you've put time into this, but simply buying a sealed bb with the proper length axle is generally an inexpensive item and totally worth it in the long run if you plan to use the bike.
Even a very moderately priced shimano un24 or whatever is fine, although the very good quality un55 model is an excellent price/quality item that will last for ages and ages without any maintenance.
Even a very moderately priced shimano un24 or whatever is fine, although the very good quality un55 model is an excellent price/quality item that will last for ages and ages without any maintenance.
Likes For djb:
10-17-20, 07:08 AM
#14
Senior Member
Join Date: Feb 2012
Location: Golden, CO and Tucson, AZ
Posts: 2,837
Bikes: 2012 Specialized Elite Disc, 1983 Trek 520
Mentioned: 13 Post(s)
Tagged: 0 Thread(s)
Quoted: 676 Post(s)
Liked 741 Times
in
430 Posts
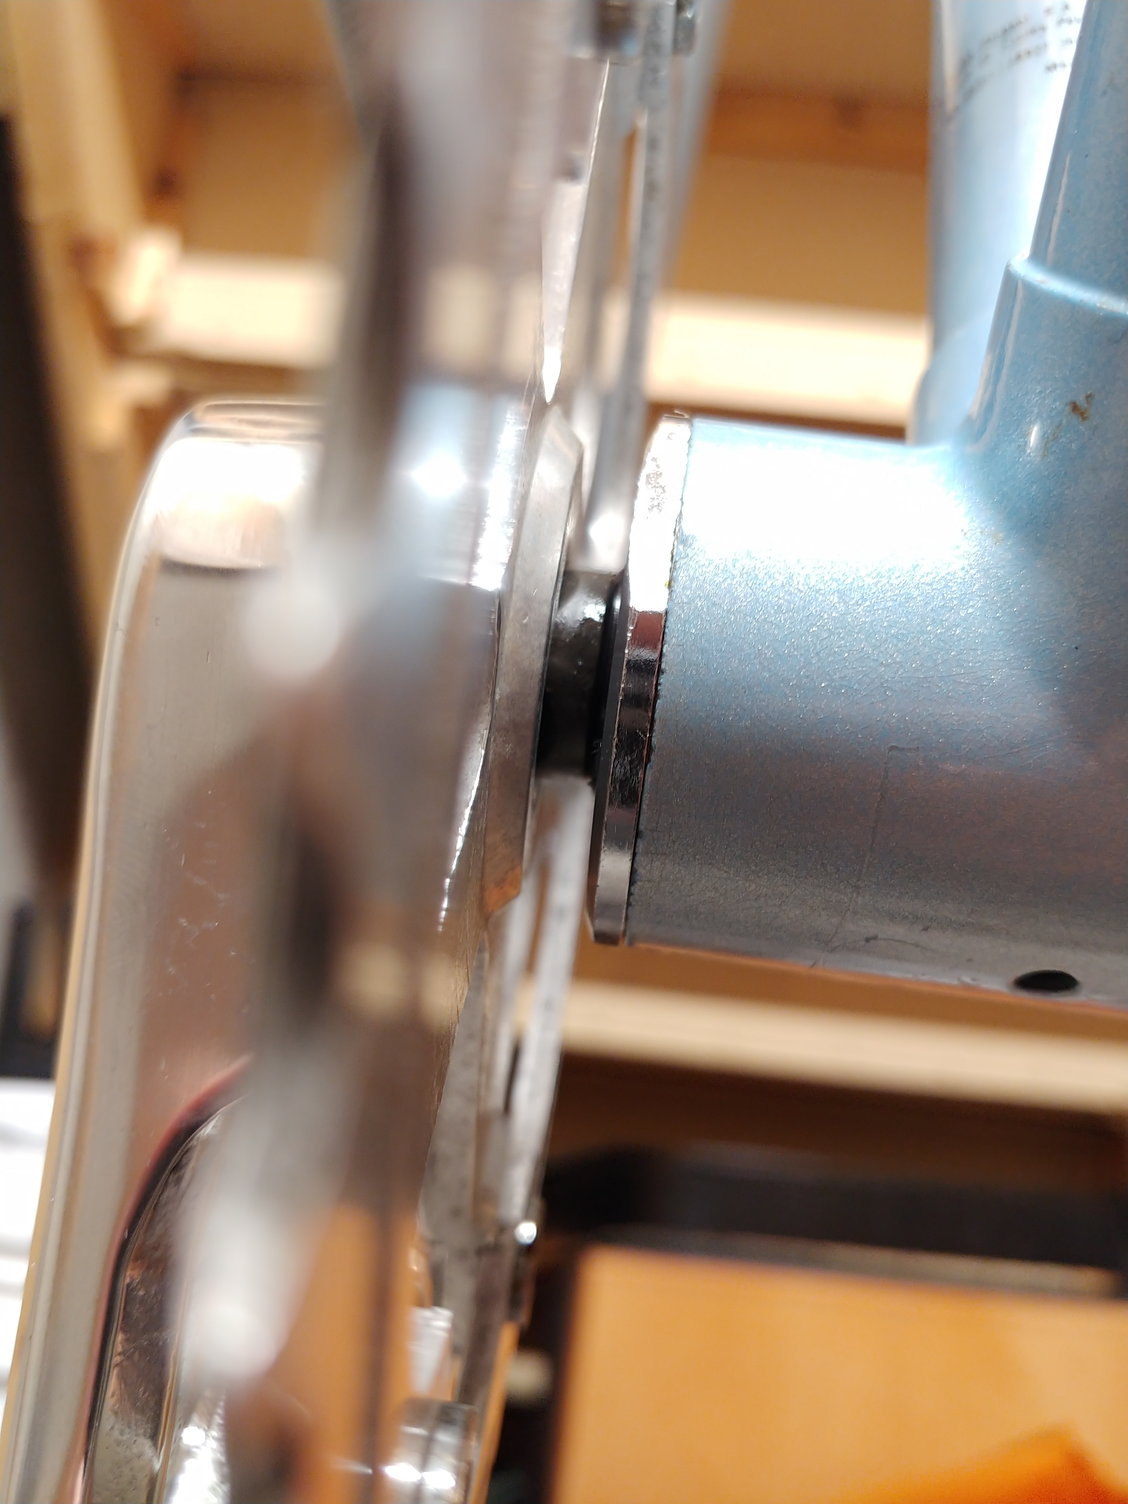
If the spindle is asymmetrical, you should be able to see more clearance between the start of the square taper and the bearing cup on the drive side (DS) than on the non-drive side (NDS).
In your first set of photos, the DS shows no clearance to the start of the taper, the NDS shows negative clearance. That's clearly wrong.
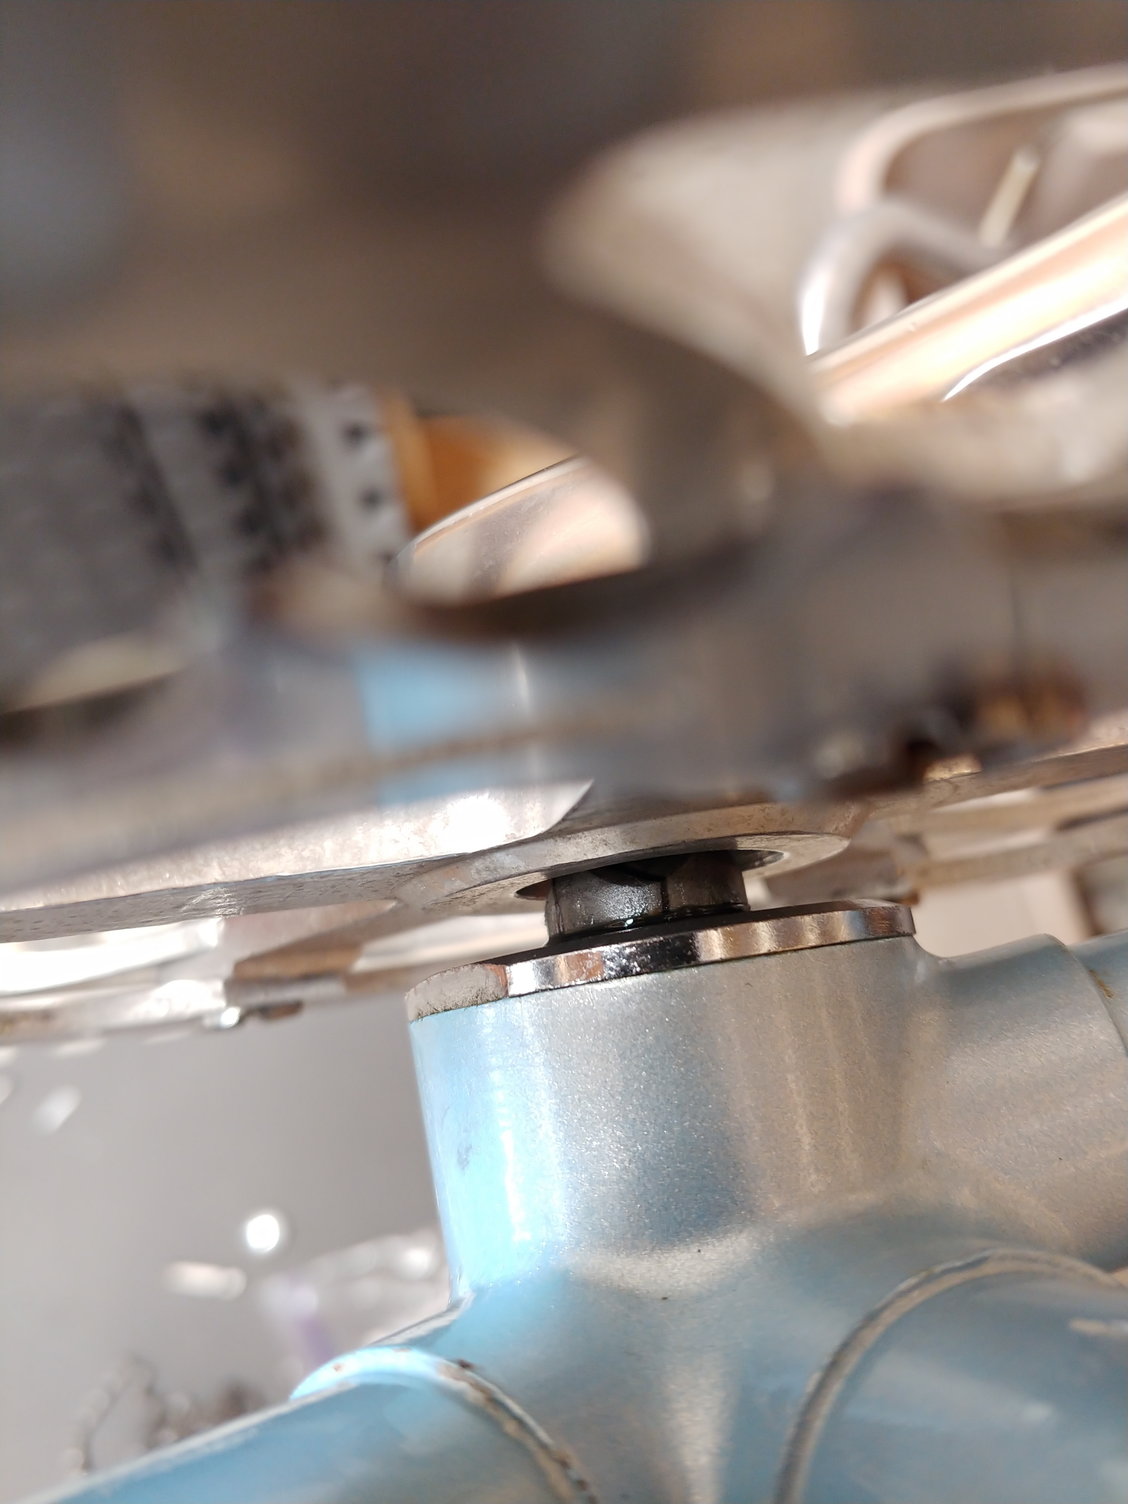
Your last photo only shows the NDS, and it shows zero clearance, which may be correct, but we can't see the DS.
If I were there, I'd disassemble everything, and assemble each bearing on the bench, getting visual confirmation the spindle race is contacting the bearing correctly in the cup, and noting the clearances mentioned above.
In your first set of photos, the DS shows no clearance to the start of the taper, the NDS shows negative clearance. That's clearly wrong.
Your last photo only shows the NDS, and it shows zero clearance, which may be correct, but we can't see the DS.
If I were there, I'd disassemble everything, and assemble each bearing on the bench, getting visual confirmation the spindle race is contacting the bearing correctly in the cup, and noting the clearances mentioned above.
10-17-20, 07:31 AM
#15
Senior Member
If the spindle is asymmetrical, you should be able to see more clearance between the start of the square taper and the bearing cup on the drive side (DS) than on the non-drive side (NDS).
In your first set of photos, the DS shows no clearance to the start of the taper, the NDS shows negative clearance. That's clearly wrong.
Your last photo only shows the NDS, and it shows zero clearance, which may be correct, but we can't see the DS.
If I were there, I'd disassemble everything, and assemble each bearing on the bench, getting visual confirmation the spindle race is contacting the bearing correctly in the cup, and noting the clearances mentioned above.
I know I've installed an axle wrong way around or other mistakes. Been a long time but I remember finding things not matching up at reassembly point before and then figuring it out eventually.
10-17-20, 07:32 AM
#16
Senior Member
Thread Starter
I realize that you've put time into this, but simply buying a sealed bb with the proper length axle is generally an inexpensive item and totally worth it in the long run if you plan to use the bike.
Even a very moderately priced shimano un24 or whatever is fine, although the very good quality un55 model is an excellent price/quality item that will last for ages and ages without any maintenance.
Even a very moderately priced shimano un24 or whatever is fine, although the very good quality un55 model is an excellent price/quality item that will last for ages and ages without any maintenance.
The Shimano ones seemed to be JIS. Any suggestions?

If the spindle is asymmetrical, you should be able to see more clearance between the start of the square taper and the bearing cup on the drive side (DS) than on the non-drive side (NDS).
In your first set of photos, the DS shows no clearance to the start of the taper, the NDS shows negative clearance. That's clearly wrong.
Your last photo only shows the NDS, and it shows zero clearance, which may be correct, but we can't see the DS.
If I were there, I'd disassemble everything, and assemble each bearing on the bench, getting visual confirmation the spindle race is contacting the bearing correctly in the cup, and noting the clearances mentioned above.
In your first set of photos, the DS shows no clearance to the start of the taper, the NDS shows negative clearance. That's clearly wrong.
Your last photo only shows the NDS, and it shows zero clearance, which may be correct, but we can't see the DS.
If I were there, I'd disassemble everything, and assemble each bearing on the bench, getting visual confirmation the spindle race is contacting the bearing correctly in the cup, and noting the clearances mentioned above.

 10-17-20, 08:06 AM
#17
Senior Member
re sealed bb's.
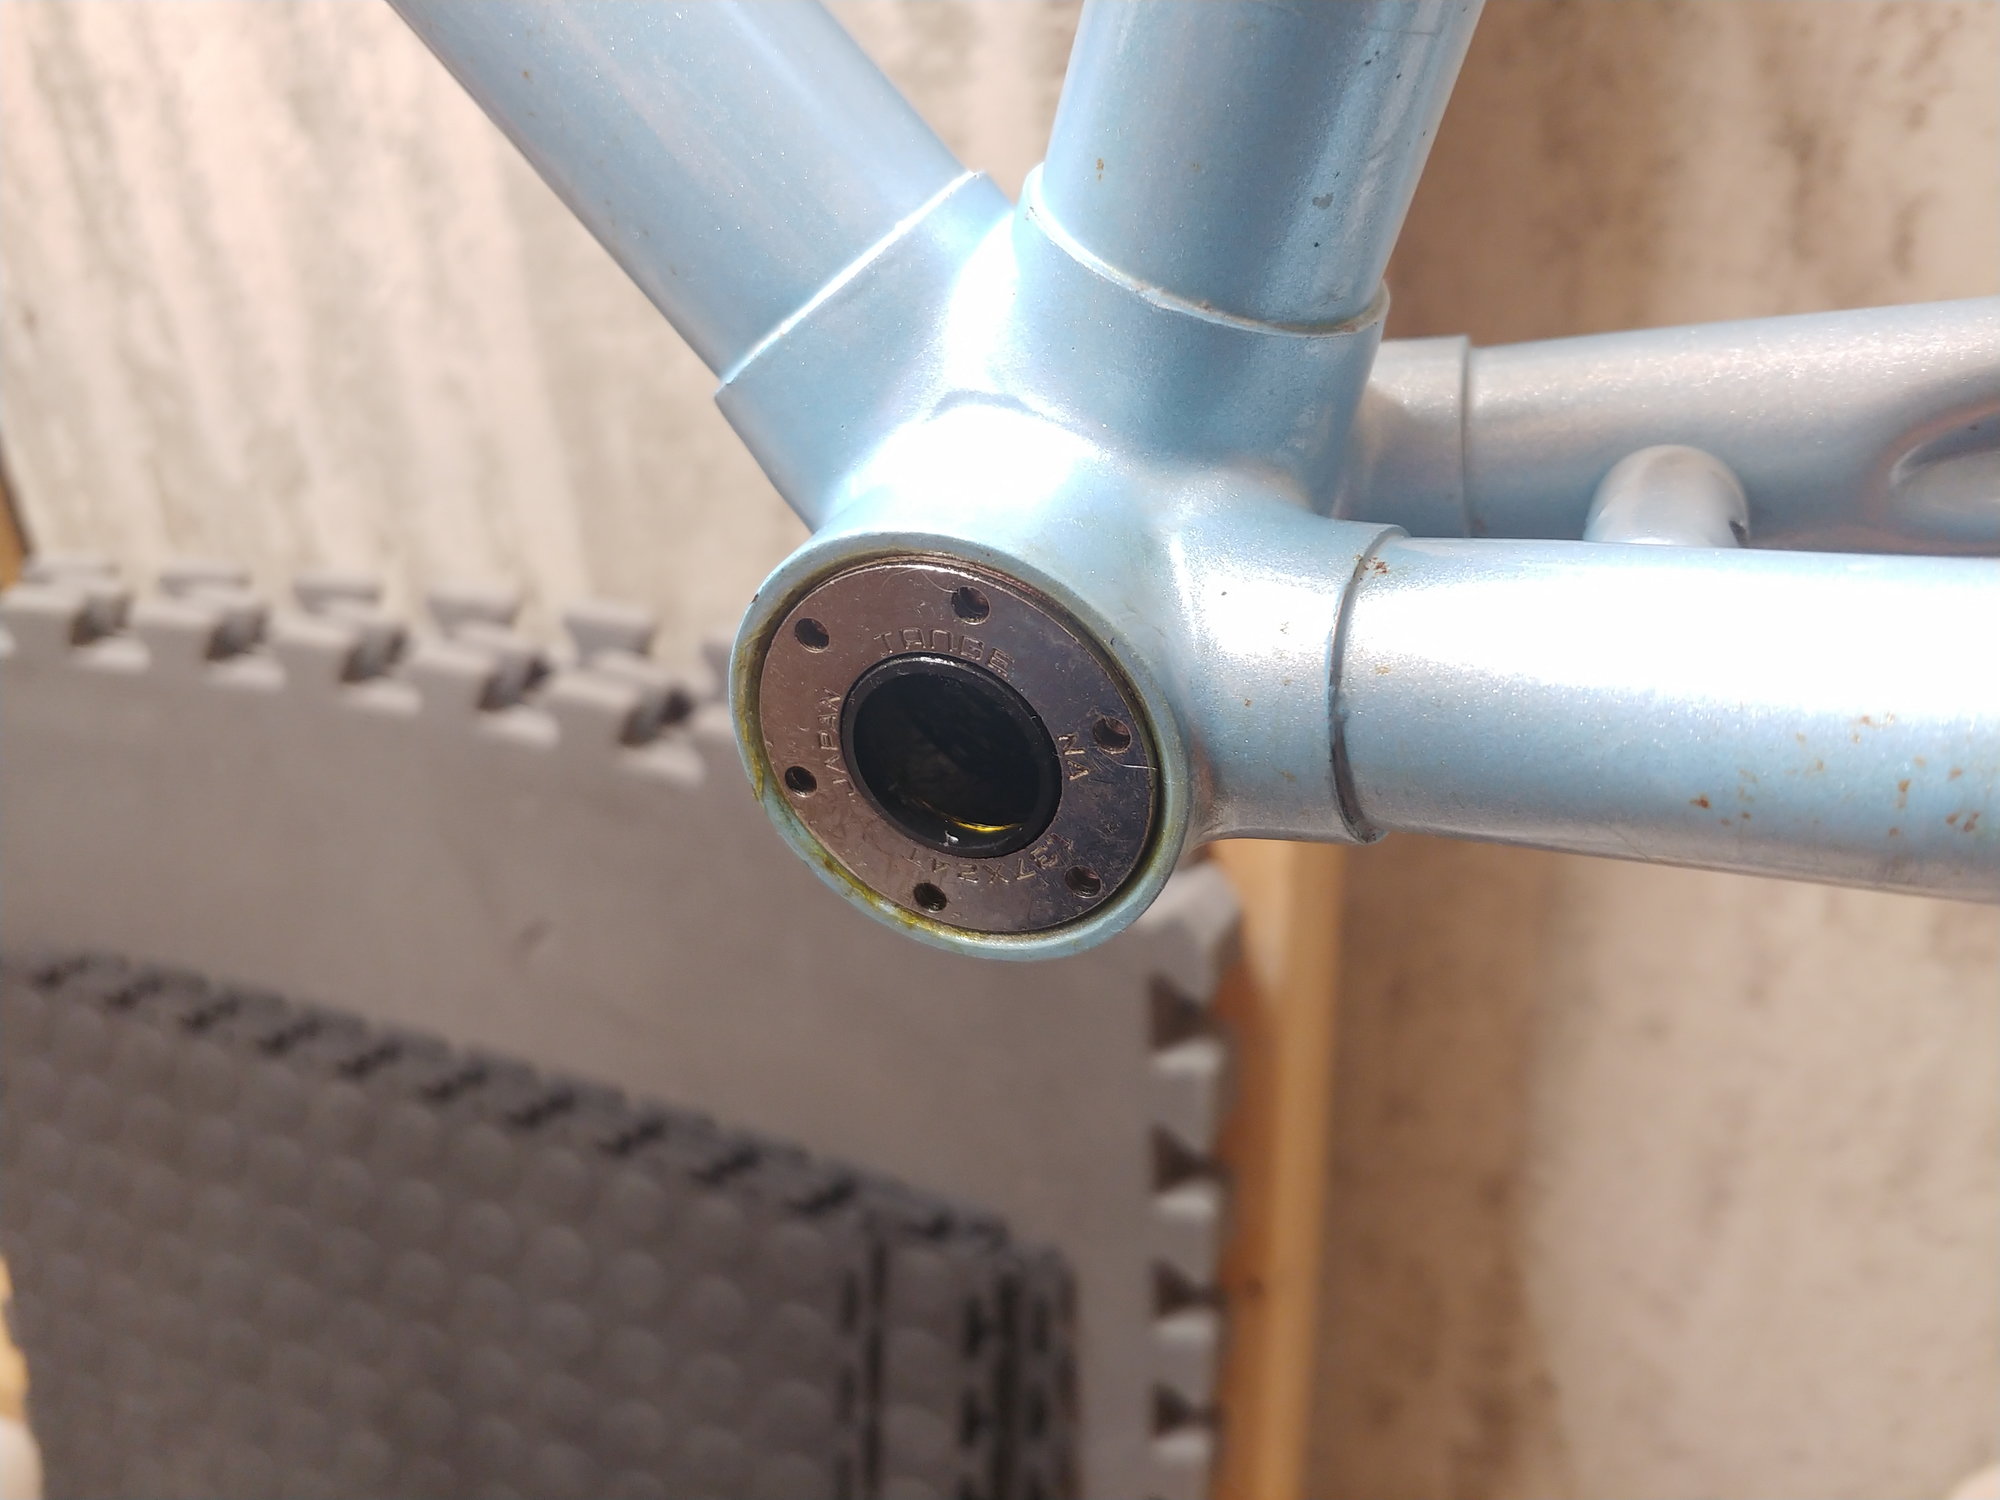
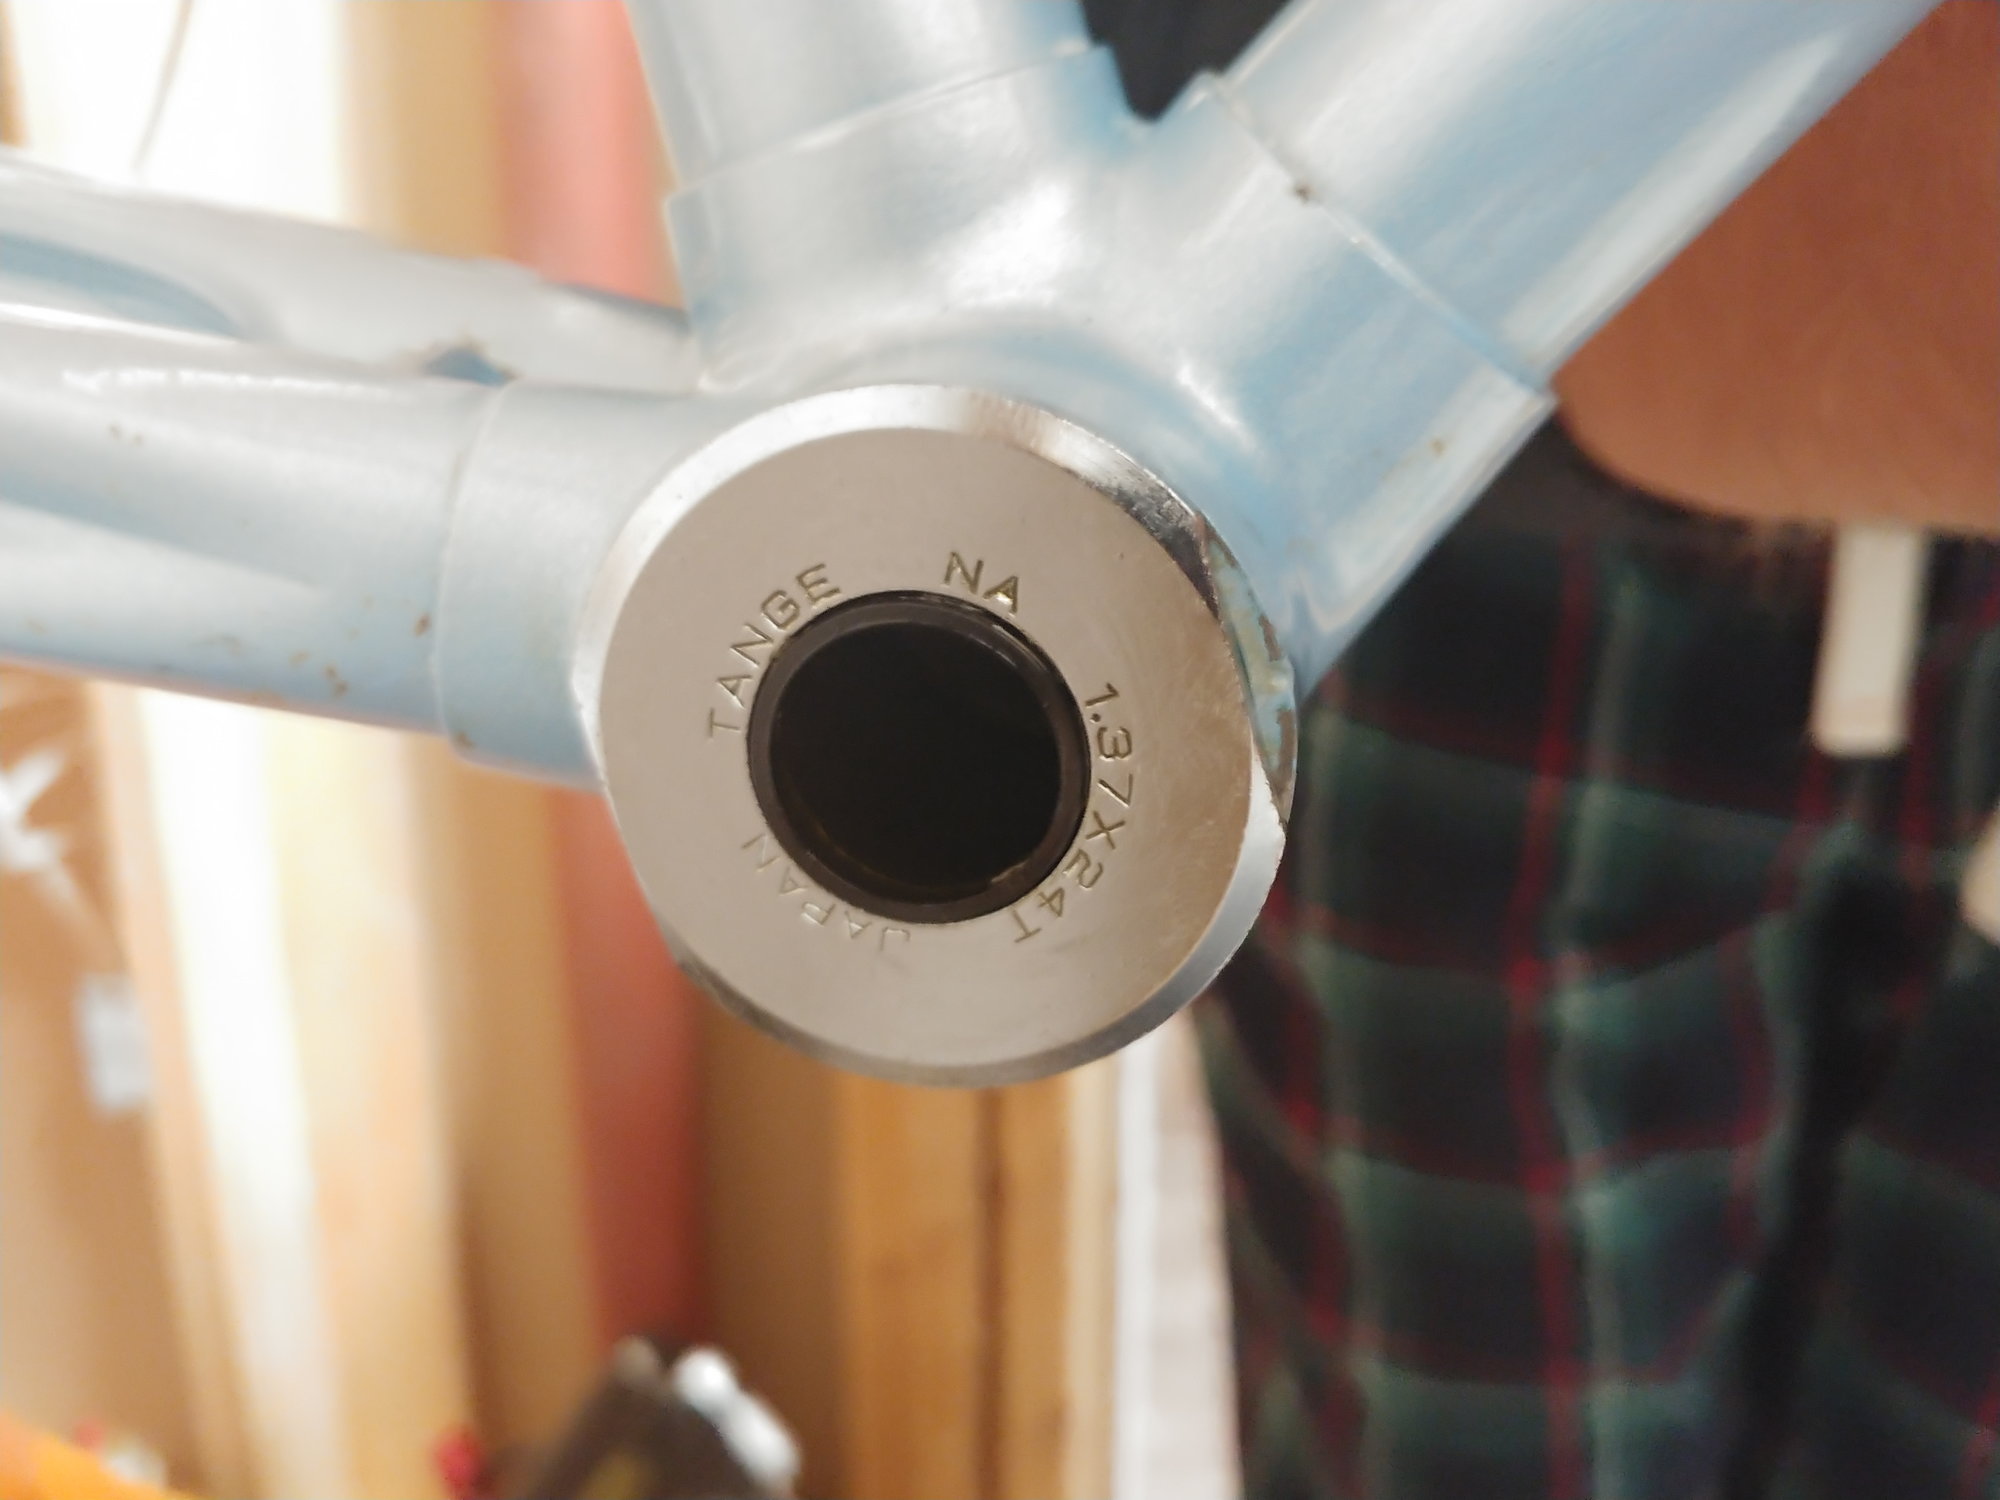
If you do go this route, just remember that unless you have the specific tool to remove the side with "tange na" etc on it, you can use a bench vice if you have one. Last year or something I overhauled my wifes commuter bike, an old hybrid that had original ball bearing bb, and bought a un24 or 25 or whatever it is (20 bucks maybe). I didnt have the specific tool for that side, but was able to use my bench vice to clamp onto the small edges of that cup, and rotate the bike the proper direction and loosen the part for removal.
I did have to check and double check the thread direction, but it worked out in the end. (actually dont recall the details of which direction it is on that side.....sorry)
also, although its been a long time since Ive had a store install a sealed square taper, if its easier, just have them do it, probably adds 20 dollars or something to the cost of the bb.
10-17-20, 08:57 AM
#18
Senior Member
Bottom line here is if you are putting all of the original parts back in (i.e. just cleaning and re-greasing) AND it's not going back together so that everything looks the way it did before you disassembled it, you're doing it wrong! Getting a properly sized sealed bearing unit is likely a better fix but if the OEM components are not damaged (i.e. no gouges on the cups or cones and balls still shiny and round) the work you are trying to do should provide good results. It's too late now but taking photos as you take things apart can be quite useful when reassembling! Since that wasn't done, I agree that an "in vitro" (out of the bike) assembly may prove most useful. I would do this using the the ball cages Andy without grease, as it will show the proper orientation of the cage to the bearing surfaces of the cups and cones of the spindle. This might be beyond obvious but have you inspected the inside of the bottom bracket to see if anything in there might be blocking the correct positioning of the spindle? In the absence of that possibility, you just shouldn't be having so much trouble with reassembly!
As sugested by another reply and mentioned above, getting a sealed unit may end up being your solution but for your own personal satisfaction, you just may want to solve the original problem .
.
As sugested by another reply and mentioned above, getting a sealed unit may end up being your solution but for your own personal satisfaction, you just may want to solve the original problem
.
10-17-20, 09:12 AM
#19
Senior Member
My earlier advice seems to have been washed over, but I'm telling you, I was totally convinced I had the wrong bb, the wrong thread pattern, and the wrong technique until I backed it off about thirty times and finally, FINALLY caught the threads.
Likes For Papa Tom:
10-17-20, 09:35 AM
#20
The dropped
Join Date: Oct 2018
Location: Columbus, OH
Posts: 2,144
Bikes: Pake C'Mute Touring/Commuter Build, 1989 Kona Cinder Cone, 1995 Trek 5200, 1973 Raleigh Super Course FG, 1960/61 Montgomery Ward Hawthorne "thrift" 3 speed, by Hercules (sold) : 1966 Schwinn Deluxe Racer (sold)
Mentioned: 10 Post(s)
Tagged: 0 Thread(s)
Quoted: 1739 Post(s)
Liked 1,014 Times
in
696 Posts
It's good advice, frequently overlooked when giving advice to a new wrench.
10-17-20, 03:03 PM
#21
Senior Member
Join Date: Feb 2012
Location: Golden, CO and Tucson, AZ
Posts: 2,837
Bikes: 2012 Specialized Elite Disc, 1983 Trek 520
Mentioned: 13 Post(s)
Tagged: 0 Thread(s)
Quoted: 676 Post(s)
Liked 741 Times
in
430 Posts
You're suggesting the OP has the adjustable cup cross-threaded? If so, look at the fourth photo in the OP. And it looks like the lock ring is parallel to the shell face in those photos.
10-18-20, 05:04 PM
#22
Really Old Senior Member
re sealed bb's.
If you do go this route, just remember that unless you have the specific tool to remove the side with "tange na" etc on it, you can use a bench vice if you have one. Last year or something I overhauled my wifes commuter bike, an old hybrid that had original ball bearing bb, and bought a un24 or 25 or whatever it is (20 bucks maybe). I didnt have the specific tool for that side, but was able to use my bench vice to clamp onto the small edges of that cup, and rotate the bike the proper direction and loosen the part for removal.
I did have to check and double check the thread direction, but it worked out in the end. (actually dont recall the details of which direction it is on that side.....sorry)
also, although its been a long time since Ive had a store install a sealed square taper, if its easier, just have them do it, probably adds 20 dollars or something to the cost of the bb.
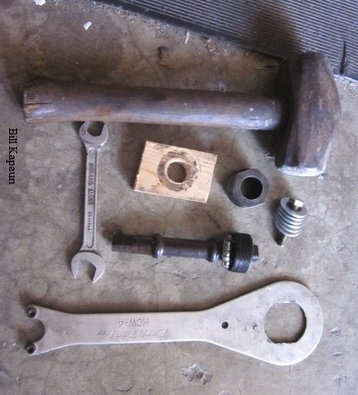
A large fender washer could be used instead of the block of wood. A large socket could be used instead of my BB tool.
I used what was expedient.

Last edited by Bill Kapaun; 10-18-20 at 05:26 PM.
10-18-20, 07:35 PM
#23
Senior Member
Join Date: Apr 2012
Location: Nor Cal
Posts: 6,016
Mentioned: 17 Post(s)
Tagged: 0 Thread(s)
Quoted: 1814 Post(s)
Likes: 0
Liked 923 Times
in
569 Posts
So I installed the loose ball bearings (11 on each side) and packed them with an insane amount of grease. I also ensured the longer side of the spindle was on the Drive-side.
At this point there is a bit of a scratching noise and still a little bit of play in the spindle, even though I can't screw the adjustable cup any further. If I do, it gets too tight and the spindle won't move.
Any suggestions?
At this point there is a bit of a scratching noise and still a little bit of play in the spindle, even though I can't screw the adjustable cup any further. If I do, it gets too tight and the spindle won't move.
Any suggestions?
What about accepting that that is as far as it should screw in?
10-18-20, 11:15 PM
#24

Insane Bicycle Mechanic

Join Date: Mar 2008
Location: other Vancouver
Posts: 9,841
Mentioned: 34 Post(s)
Tagged: 0 Thread(s)
Quoted: 807 Post(s)
Liked 710 Times
in
379 Posts
I would not. As long as no parts have been changed from the original setup the cup should screw all the way in.
At this point I'd suspect that one of the balls has come out of place somehow, particularly since the OP has switched to all loose balls. Either that or one side of the bottom bracket has too many balls.
IMO, it's best to take everything apart and start over from square one. Take both cups out, clean out the bearings and grease, and dry-fit everything without installing the parts in the BB shell. Back when I was working in a shop (early '80's) this showed where I had goofed.
__________________
Jeff Wills
Comcast nuked my web page. It will return soon..
Jeff Wills
Comcast nuked my web page. It will return soon..
10-19-20, 09:05 AM
#25
Senior Member
Thread Starter
One good whack has never failed me. Eventually the wrench will get too "stretched", but $/fixed cup removed, I'll consider it a consumable.
A large fender washer could be used instead of the block of wood. A large socket could be used instead of my BB tool.
I used what was expedient.
A large fender washer could be used instead of the block of wood. A large socket could be used instead of my BB tool.
I used what was expedient.
You may be right, it was my fault for not taking pictures of what it looked like before hand. For all I know, its screwed in as much as it should be.
My main point of reference is the bottom bracket/crankset on my Campagnolo Nuovo Record setup on my other bike. Both the fixed and adjustable cups sit flush against the shell, and the crank arms sit very close as well on the spindle.
I would not. As long as no parts have been changed from the original setup the cup should screw all the way in.
At this point I'd suspect that one of the balls has come out of place somehow, particularly since the OP has switched to all loose balls. Either that or one side of the bottom bracket has too many balls.
IMO, it's best to take everything apart and start over from square one. Take both cups out, clean out the bearings and grease, and dry-fit everything without installing the parts in the BB shell. Back when I was working in a shop (early '80's) this showed where I had goofed.
At this point I'd suspect that one of the balls has come out of place somehow, particularly since the OP has switched to all loose balls. Either that or one side of the bottom bracket has too many balls.
IMO, it's best to take everything apart and start over from square one. Take both cups out, clean out the bearings and grease, and dry-fit everything without installing the parts in the BB shell. Back when I was working in a shop (early '80's) this showed where I had goofed.
Still a pinch of noise but I can live with that. I'll finish the build and ride it a few KM's to see how it is. Worst case, I disassemble again, clean and pack with different grease OR look for a sealed cartridge BB.
Last edited by black02em2; 10-19-20 at 09:10 AM.