


Wheel rim brake damage
 05-09-20, 05:49 PM
#1
Full Member
Thread Starter
Wheel rim brake damage
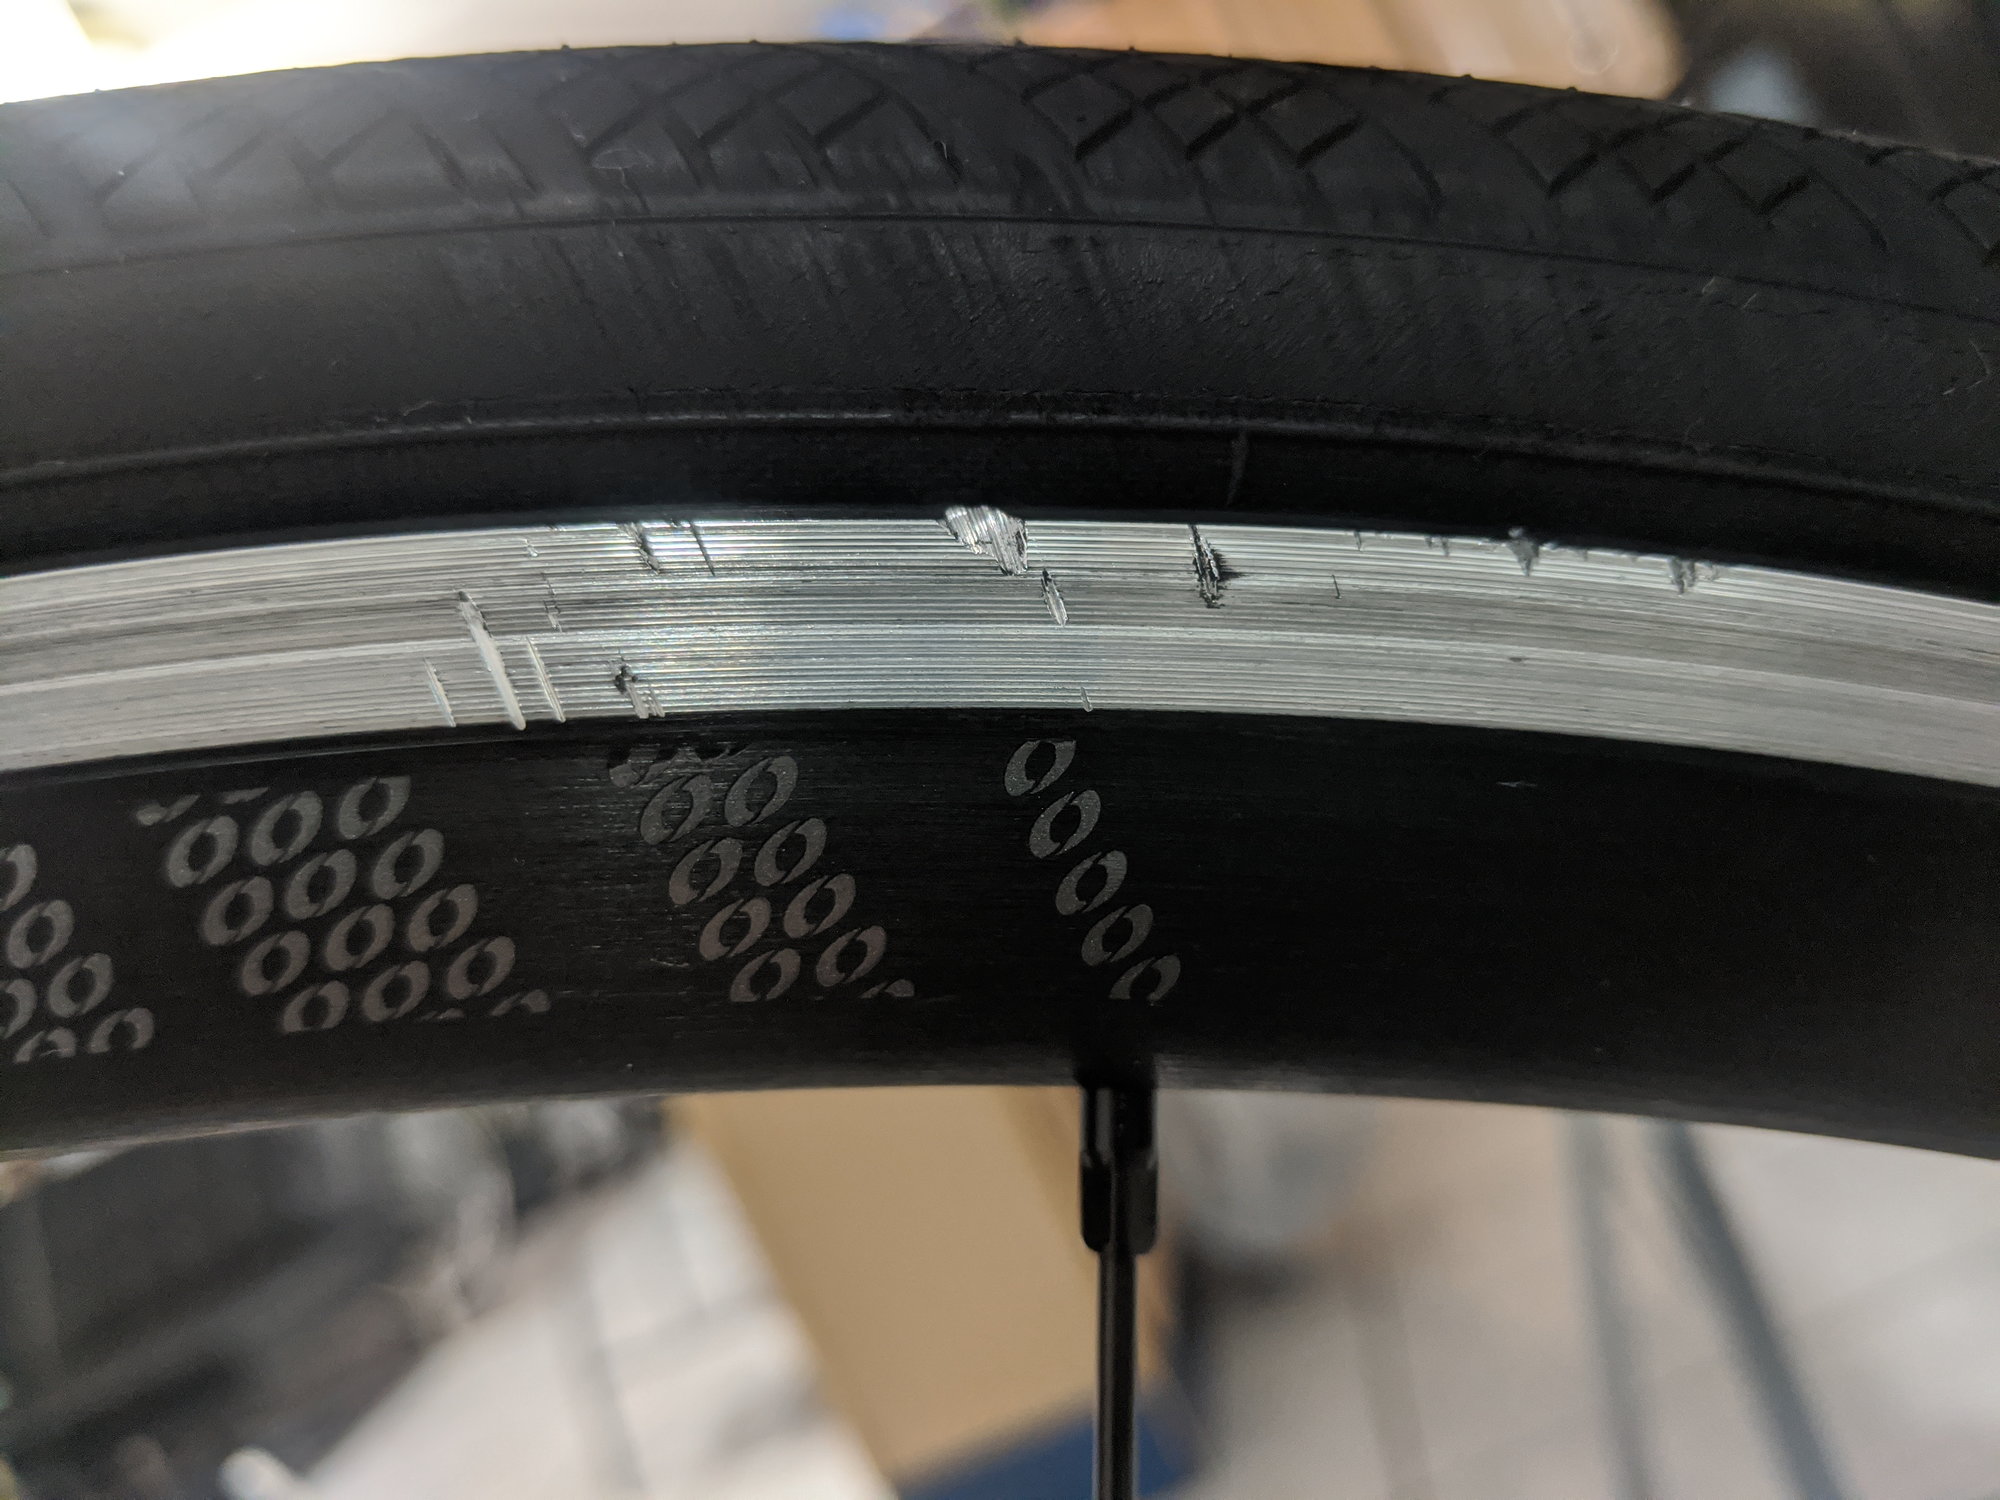
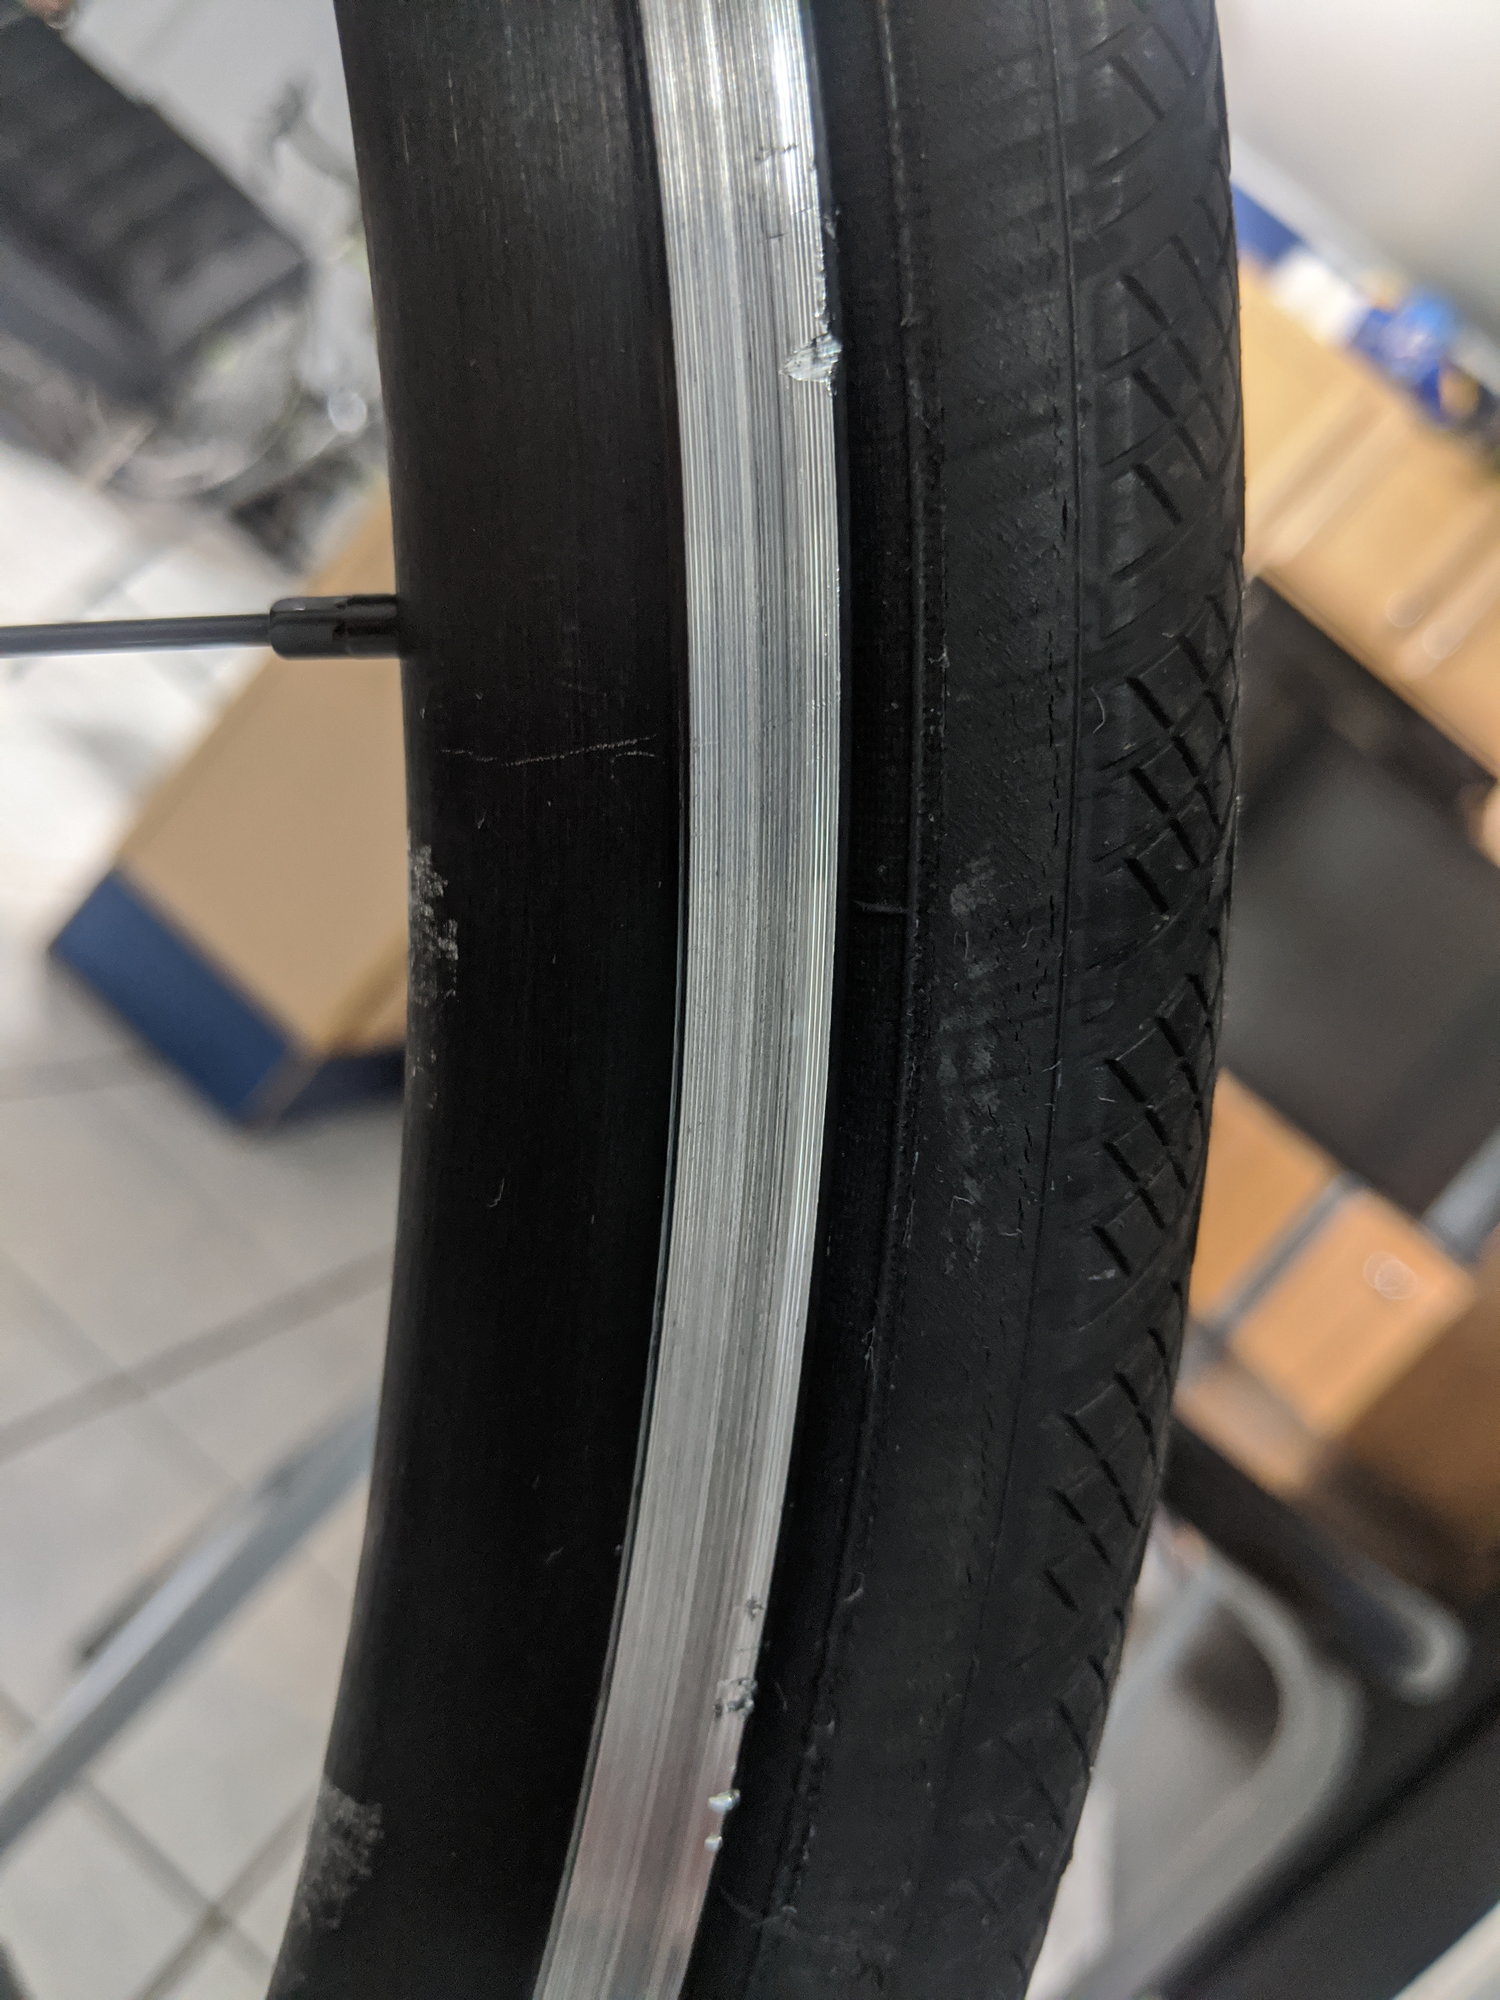
So I recently upgraded parts on my bike, had some drive train issues and ended up crashing for the first time ever. Initial assessment I had thought i got away with minimal scratches but later noticed a rhythmic rubbing sound on my front brakes at the same frequency of the wheel rotation. I cleaned the wheel looking for an area of debris and found an area of dammage that I believe is the source of the problem. Changing brake calipers and realigning breaks and giving them a toe in didn't alleviate the noise. The dammaged break surface makes sense as the source because it would also explain the intermittancy and the ocurrence at the same frequency as wheel rotation.
What's your assessment? Is my wheelset useless now? If the breaks are maintaining stopping power can I continue to use it and hope they somehow smooth out the dammage over time? Is there a way to fix or replace the break surface?
Wheel is the front Oval 527 tubeless sitting on an old 9 speed trek 5000. I'm new to cycling and not sure how good those wheels are considered but I really liked the ride feel a they're lightweight so if there's a chance I keep them I'd rather go for that 😕
 05-09-20, 06:08 PM
#2
Senior Member
Join Date: May 2003
Location: Mountain Brook. AL
Posts: 4,002
Mentioned: 14 Post(s)
Tagged: 0 Thread(s)
Quoted: 303 Post(s)
Likes: 0
Liked 136 Times
in
104 Posts
Untreated the divots in the rim will wear out your pads much faster than normal. Since each divot has a slightly raised
rim on each side if you want to continue using the rim you need to get rid of the raised edges on each and every
divot in the rim. Remove the tire for best access, you can sand them down or what I would do is take a sharp edge
(knife/chisel etc) and carefully remove any elevated edge on each divot and lightly sand. Use your fingernail and
a magnifier to get every last bit of elevated edge. You will not be able to sand out the divots so the brake grab
will always be there but the pads will last longer, until you finally realize you really need a new rim.
Since most of the divots are closer to the tire perhaps you can lower the pads enough to clear the bigger divots?
This will reduce the grab more but it will never go away.
Last edited by sch; 05-09-20 at 06:15 PM.
05-09-20, 06:31 PM
#3
Senior Member

Join Date: Aug 2017
Location: Northern Virginia
Posts: 727
Bikes: Current: 2016 Bianchi Volpe; 1973 Peugeot UO-8. Past: 1974 Fuji S-10-S with custom black Imron paint by Stinsman Racing of PA.
Mentioned: 2 Post(s)
Tagged: 0 Thread(s)
Quoted: 215 Post(s)
Liked 204 Times
in
142 Posts
Been there, fixed that using a fingernail emory board and carefully following the machining lines of the wheel. For the deeper dents, first use the emory board, then using a Dremel or other rotary tool, and a small polishing wheel and some polish LIGHTLY hit the sharp edges (only) of the divot. You want to smooth the sharp edge left by the gouge, but not polish the braking track, or it may be grabby or squeal. Then lightly use the emory board as in the first step following the machining groove to make is a bit rough.
The advantage of the emory board is the varying grits and it is slightly flexible. You can use a fine file for the first step to remove the higher ridges, but the board works as you can localize pressure.
Then clean suing alcohol to remove any grit and or contaminants.
Also lower the pad a tiny bit as recommended by sch above.
05-09-20, 07:59 PM
#4
Full Member
Thread Starter
Been there, fixed that using a fingernail emory board and carefully following the machining lines of the wheel. For the deeper dents, first use the emory board, then using a Dremel or other rotary tool, and a small polishing wheel and some polish LIGHTLY hit the sharp edges (only) of the divot. You want to smooth the sharp edge left by the gouge, but not polish the braking track, or it may be grabby or squeal. Then lightly use the emory board as in the first step following the machining groove to make is a bit rough.
The advantage of the emory board is the varying grits and it is slightly flexible. You can use a fine file for the first step to remove the higher ridges, but the board works as you can localize pressure.
Then clean suing alcohol to remove any grit and or contaminants.
Also lower the pad a tiny bit as recommended by sch above.
The advantage of the emory board is the varying grits and it is slightly flexible. You can use a fine file for the first step to remove the higher ridges, but the board works as you can localize pressure.
Then clean suing alcohol to remove any grit and or contaminants.
Also lower the pad a tiny bit as recommended by sch above.
05-09-20, 09:01 PM
#5
SE Wis
Join Date: Apr 2005
Location: Milwaukee, WI
Posts: 10,515
Bikes: '68 Raleigh Sprite, '02 Raleigh C500, '84 Raleigh Gran Prix, '91 Trek 400, 2013 Novara Randonee, 1990 Trek 970
Mentioned: 40 Post(s)
Tagged: 0 Thread(s)
Quoted: 2747 Post(s)
Liked 3,398 Times
in
2,057 Posts
make sure there are no chunks stuck in your brake pads too.
05-10-20, 12:27 AM
#7
Senior Member
Join Date: Aug 2017
Location: Northern Virginia
Posts: 727
Bikes: Current: 2016 Bianchi Volpe; 1973 Peugeot UO-8. Past: 1974 Fuji S-10-S with custom black Imron paint by Stinsman Racing of PA.
Mentioned: 2 Post(s)
Tagged: 0 Thread(s)
Quoted: 215 Post(s)
Liked 204 Times
in
142 Posts
It quieted it down, but not to silence. But it kept getting quieter. Die to the smoothed edges of the scratches that side did not wear any more than the unscratched side.
05-10-20, 08:35 AM
#8
Junior Member
Join Date: Feb 2018
Posts: 118
Mentioned: 1 Post(s)
Tagged: 0 Thread(s)
Quoted: 95 Post(s)
Liked 12 Times
in
11 Posts
The new problem you now have is because you filed down an important structural part of the wheel�the brake track, you have now inadvertently decreased the life of your wheel and increased the likelihood of an tire blowout.
05-10-20, 01:22 PM
#9

Senior Member
Take tire off, Use a mill bastard file (yes officious monitors, I said the word, but its a term of art, probably something you can't comprehend) to file out the rim cuts, then I would take 60 grit paper and sand down the braking surfaces so the braking surfaces all have the same consistency.
__________________
Il faut de l'audace, encore de l'audace, toujours de l'audace
1980 3Rensho-- 1975 Raleigh Sprite 3spd
1990s Raleigh M20 MTB--2007 Windsor Hour (track)
1988 Ducati 750 F1
Il faut de l'audace, encore de l'audace, toujours de l'audace
1980 3Rensho-- 1975 Raleigh Sprite 3spd
1990s Raleigh M20 MTB--2007 Windsor Hour (track)
1988 Ducati 750 F1
05-10-20, 01:40 PM
#10
working on my sandal tan

Join Date: Aug 2011
Location: CID
Posts: 22,629
Bikes: 1991 Bianchi Eros, 1964 Armstrong, 1988 Diamondback Ascent, 1988 Bianchi Premio, 1987 Bianchi Sport SX, 1980s Raleigh mixte (hers), All-City Space Horse (hers)
Mentioned: 98 Post(s)
Tagged: 0 Thread(s)
Quoted: 3871 Post(s)
Liked 2,568 Times
in
1,579 Posts
I have a couple rims gouged up like that from a freak crash when my wheels dropped into a pavement seam. I filed down what little high spots there were, and the rims have been fine to use since. You don't have to file and sand it until it's perfectly smooth... that will happen naturally as you continue to use the wheels.
05-10-20, 05:48 PM
#11
Full Member
Thread Starter
Thanks guys. I did all steps. Filed off the raised edges, sand paper, repositioned brake pad. The process got rid of the noise successfully ( at least if there is still noise its not loud enough to be heard above my freewheel). Brake stopping power is preserved!
