


1964 Moulton Restoration
 09-28-20, 05:17 PM
#1
Member
Thread Starter
1964 Moulton Restoration
Near the end of June 2020, I realized that I had an opportunity to take on a fun pandemic lockdown project that had been available for many years.
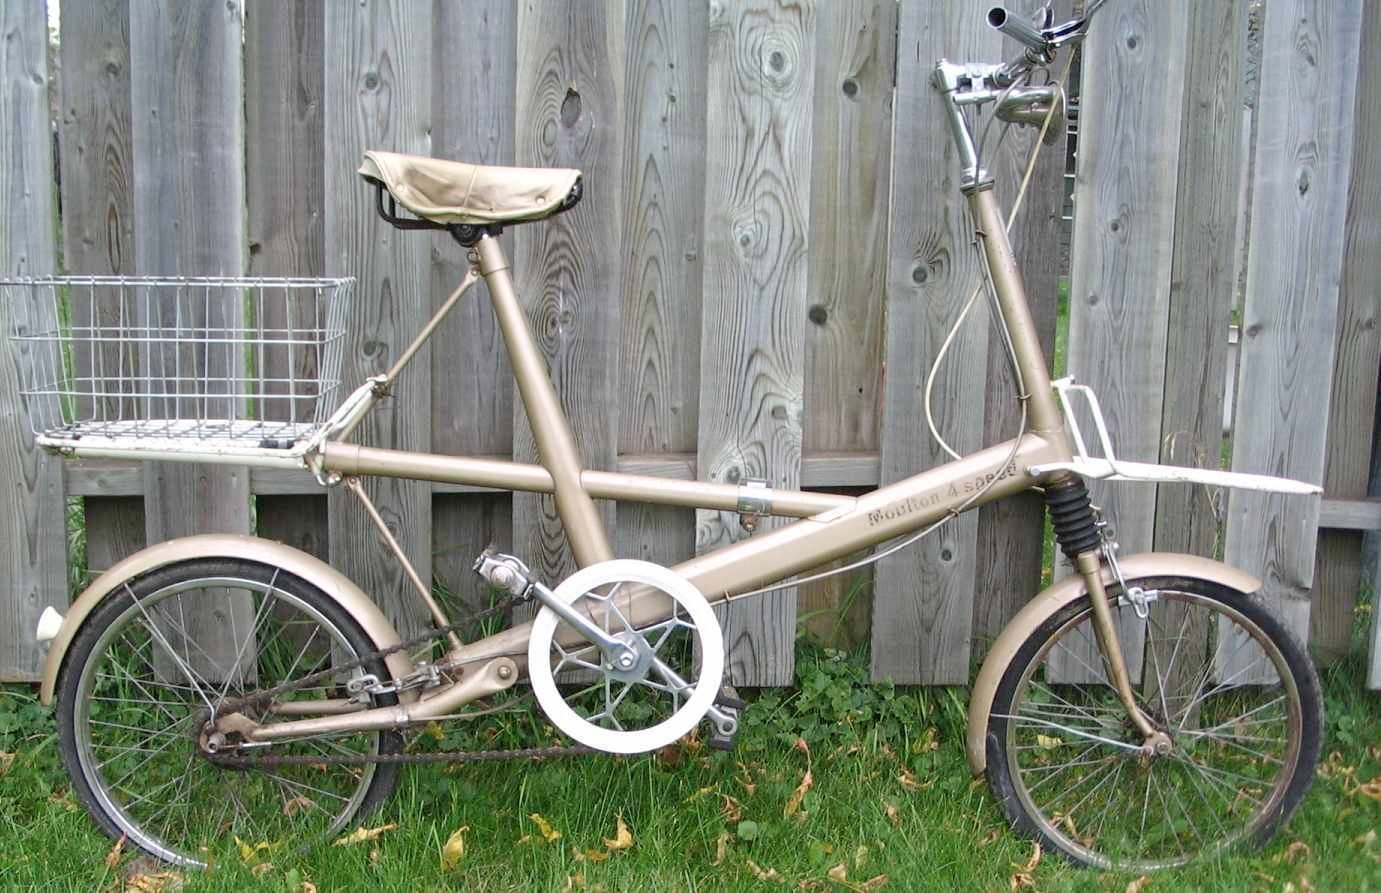
My mother purchased a Moulton 4 speed bicycle from Huffy in 1964. At the time, it was a popular chic "bicycle of the future" from England with its small wheels and full suspension. Moulton Bicycles in England offered the following models in its first years of production: Standard, Deluxe, Safari, Speed, and Stowaway. The name printed on this frame is �Moulton 4 speed� and that name was only available in the US through Huffy�s distribution along with the the Stowaway. The Moulton 4 speed is very similar to a Deluxe with its Sturmey Archer FW hub and front and rear racks, but the 4 speed�s rear rack is removable with a quick release lever like the Stowaway.
I grew out of my Schwinn Stingray in the 1970s and regularly rode mom�s Moulton. I loved its unique appearance, comfortable ride, wide gear ratio, and ample cargo space. It was oyster pearl gray with D shaped wicker baskets that perfectly fit the racks. It has been sitting outside in heartbreaking condition for decades at my parents home. Mom is at an age that she can no longer ride a bicycle, so I hoped she was willing to let it go as I informed her that I was �taking the Moulton."
More to follow, as I document the day by day journey to a complete restoration.

Likes For Noossab:
09-28-20, 05:25 PM
#2

Phyllo-buster

Join Date: Jan 2010
Location: Nova Scotia
Posts: 8,847
Bikes: roadsters, club bikes, fixed and classic
Mentioned: 133 Post(s)
Tagged: 0 Thread(s)
Quoted: 2298 Post(s)
Liked 2,054 Times
in
1,254 Posts
A fave of mine. Things to look at during your restoration is adding a reinforced plate on the rear 'fork'. It was a weak spot in the MkII F frames. The rubber replacement bits should be available from the Mouton club in the UK. You won't regret it, they're a fantastic riding bike.
Here's my '64. I went all alloy, no steel parts.

Here's my '64. I went all alloy, no steel parts.
Likes For clubman:
09-28-20, 05:34 PM
#3
Senior Member

Join Date: Apr 2007
Location: Thunder Bay, Ontario, Canada - burrrrr!
Posts: 11,674
Bikes: 1958 Rabeneick 120D, 1968 Legnano Gran Premio, 196? Torpado Professional, 2000 Marinoni Piuma
Mentioned: 210 Post(s)
Tagged: 0 Thread(s)
Quoted: 1372 Post(s)
Likes: 0
Liked 1,751 Times
in
938 Posts
That should be a fun project and a nice bike to zip around town on. Years ago, I found this one at the dump...
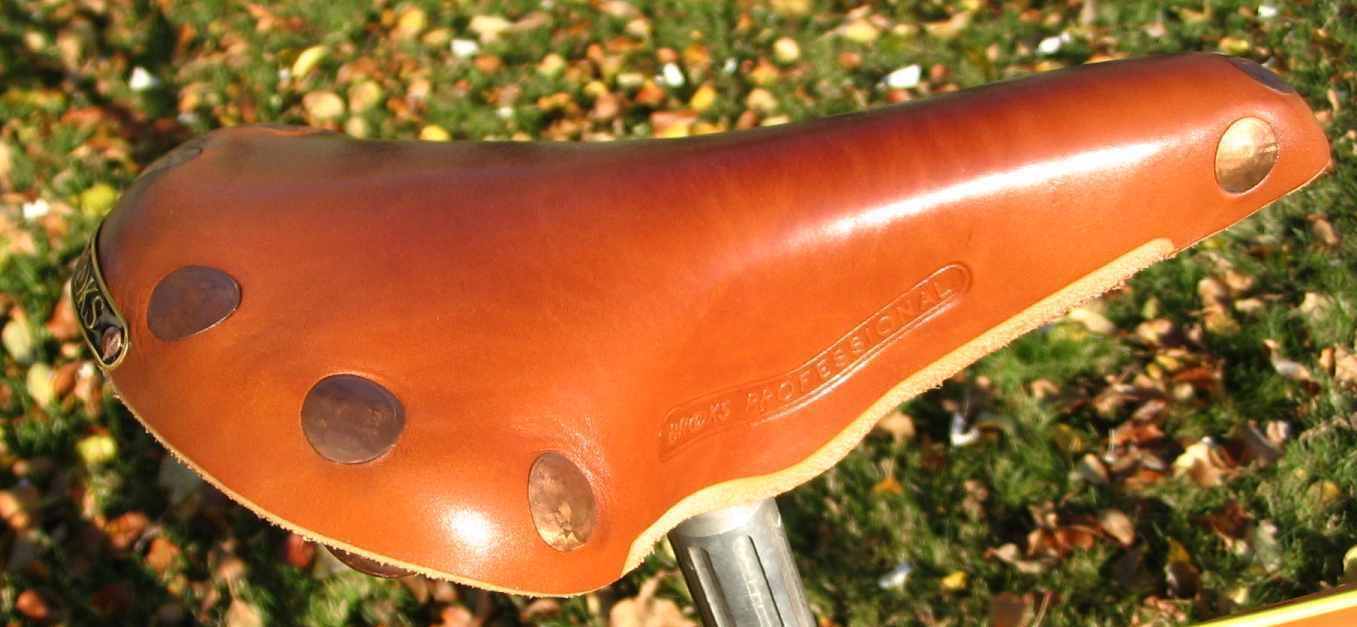
I swapped it for this Brooks Pro saddle...
Both have found new homes.
I swapped it for this Brooks Pro saddle...
Both have found new homes.
__________________
"98% of the bikes I buy are projects".
"98% of the bikes I buy are projects".
09-28-20, 05:54 PM
#4
Member
Thread Starter
09-28-20, 06:20 PM
#5
Phyllo-buster
Join Date: Jan 2010
Location: Nova Scotia
Posts: 8,847
Bikes: roadsters, club bikes, fixed and classic
Mentioned: 133 Post(s)
Tagged: 0 Thread(s)
Quoted: 2298 Post(s)
Liked 2,054 Times
in
1,254 Posts
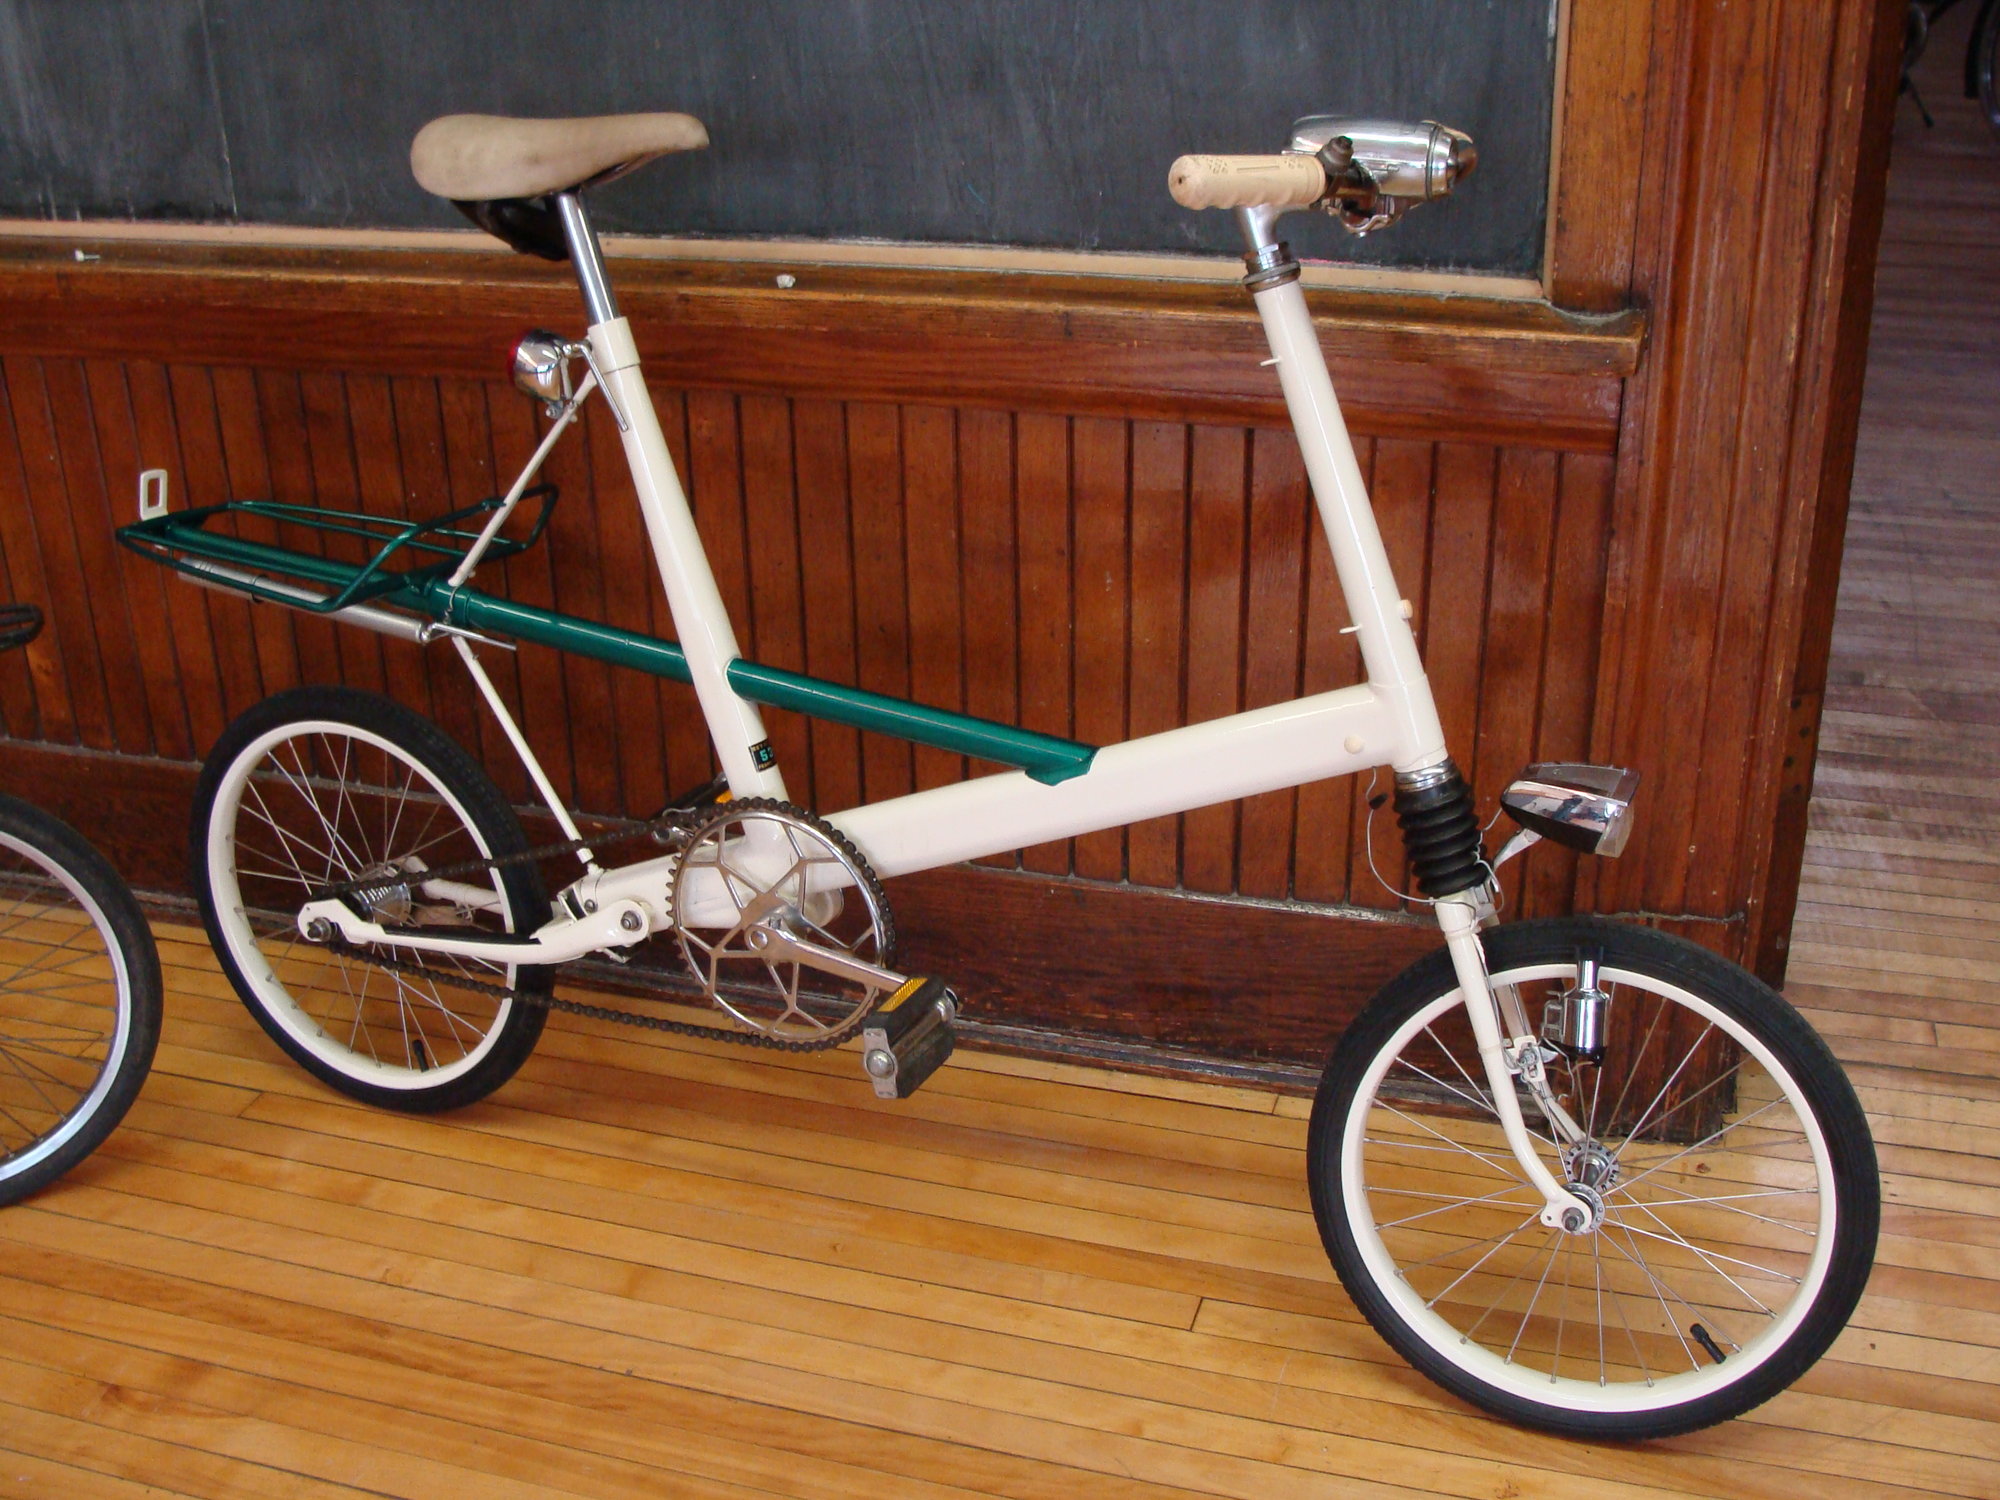
I'm beyond help I'm afraid. I saw this one at a bike show a few years ago and just may have to take the red pill and jump down this rabbit hole. 2 Speed Duomatic. Check out the horn. Stealth baby.
Likes For clubman:
09-28-20, 07:04 PM
#6
Senior Member

Join Date: Jun 2018
Location: The Urban Shores Of Michigami
Posts: 1,749
Bikes: ........................................ .....Holdsworth "Special"..... .......Falcon "Special".......... .........Miyata 912........... ........................................
Mentioned: 11 Post(s)
Tagged: 0 Thread(s)
Quoted: 702 Post(s)
Liked 672 Times
in
420 Posts
Nice bike and great project !
So which one is your mom, Goldie Hawn, the Star Trek lady or The Avengers lady?
So which one is your mom, Goldie Hawn, the Star Trek lady or The Avengers lady?
09-28-20, 08:29 PM
#8
Member
Thread Starter
09-28-20, 08:33 PM
#9
Member
Thread Starter
Likes For Noossab:
09-29-20, 03:44 AM
#10
Senior Member
Join Date: Feb 2020
Posts: 2,819
Mentioned: 49 Post(s)
Tagged: 0 Thread(s)
Quoted: 1106 Post(s)
Likes: 0
Liked 1,327 Times
in
783 Posts

I never learned to weld, but the guy I take stuff to fixes car frames all day and he told me when I got it back "Don't worry, something else will break before this does."
There are other suggestion for reinforcement but more involved:
https://fietssite.jouwweb.nl/21/21e
Strengthen Moulton Rear Forks
And as rust is a fine crack initiator, so yours is a prime suspect.
Yours also has the (likely FW) 4-speed. It needs a very small sprocket which can be hard to source. Shimano casette sprockets fit if you grind away six of the nine nubs.
Disassembling the front fork will require a VERY long flat-blade screwdriver, good lighting, and a balance of luck and bad language.
Likes For oneclick:
09-29-20, 06:17 AM
#11
Zip tie Karen
Join Date: Aug 2009
Location: Fair Oaks Ranch, TX
Posts: 7,004
Bikes: '13 Motobecane Fantom29 HT, '16 Motobecane Turino Pro Disc, '18 Velobuild VB-R-022, '21 Tsunami SNM-100
Mentioned: 26 Post(s)
Tagged: 0 Thread(s)
Quoted: 1465 Post(s)
Liked 1,542 Times
in
806 Posts
Emma Peel for the win.
Likes For Phil_gretz:
09-29-20, 07:08 AM
#12
Phyllo-buster
Join Date: Jan 2010
Location: Nova Scotia
Posts: 8,847
Bikes: roadsters, club bikes, fixed and classic
Mentioned: 133 Post(s)
Tagged: 0 Thread(s)
Quoted: 2298 Post(s)
Liked 2,054 Times
in
1,254 Posts
 09-29-20, 07:47 AM
#13
Member
Thread Starter
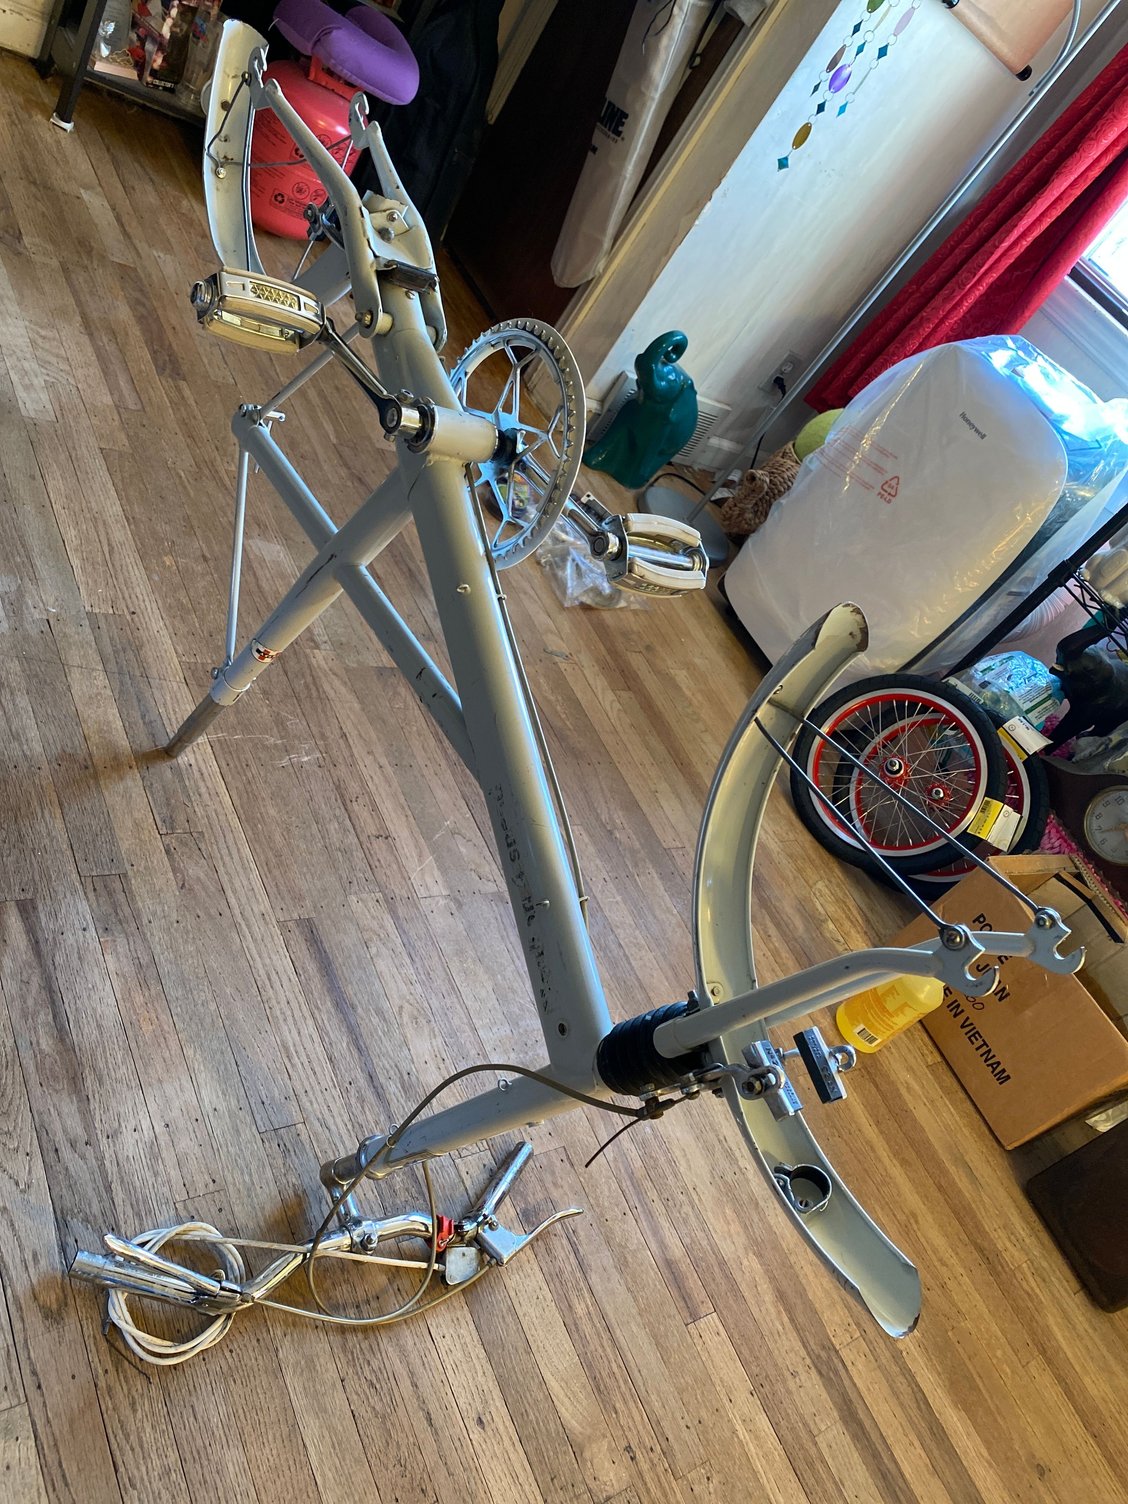
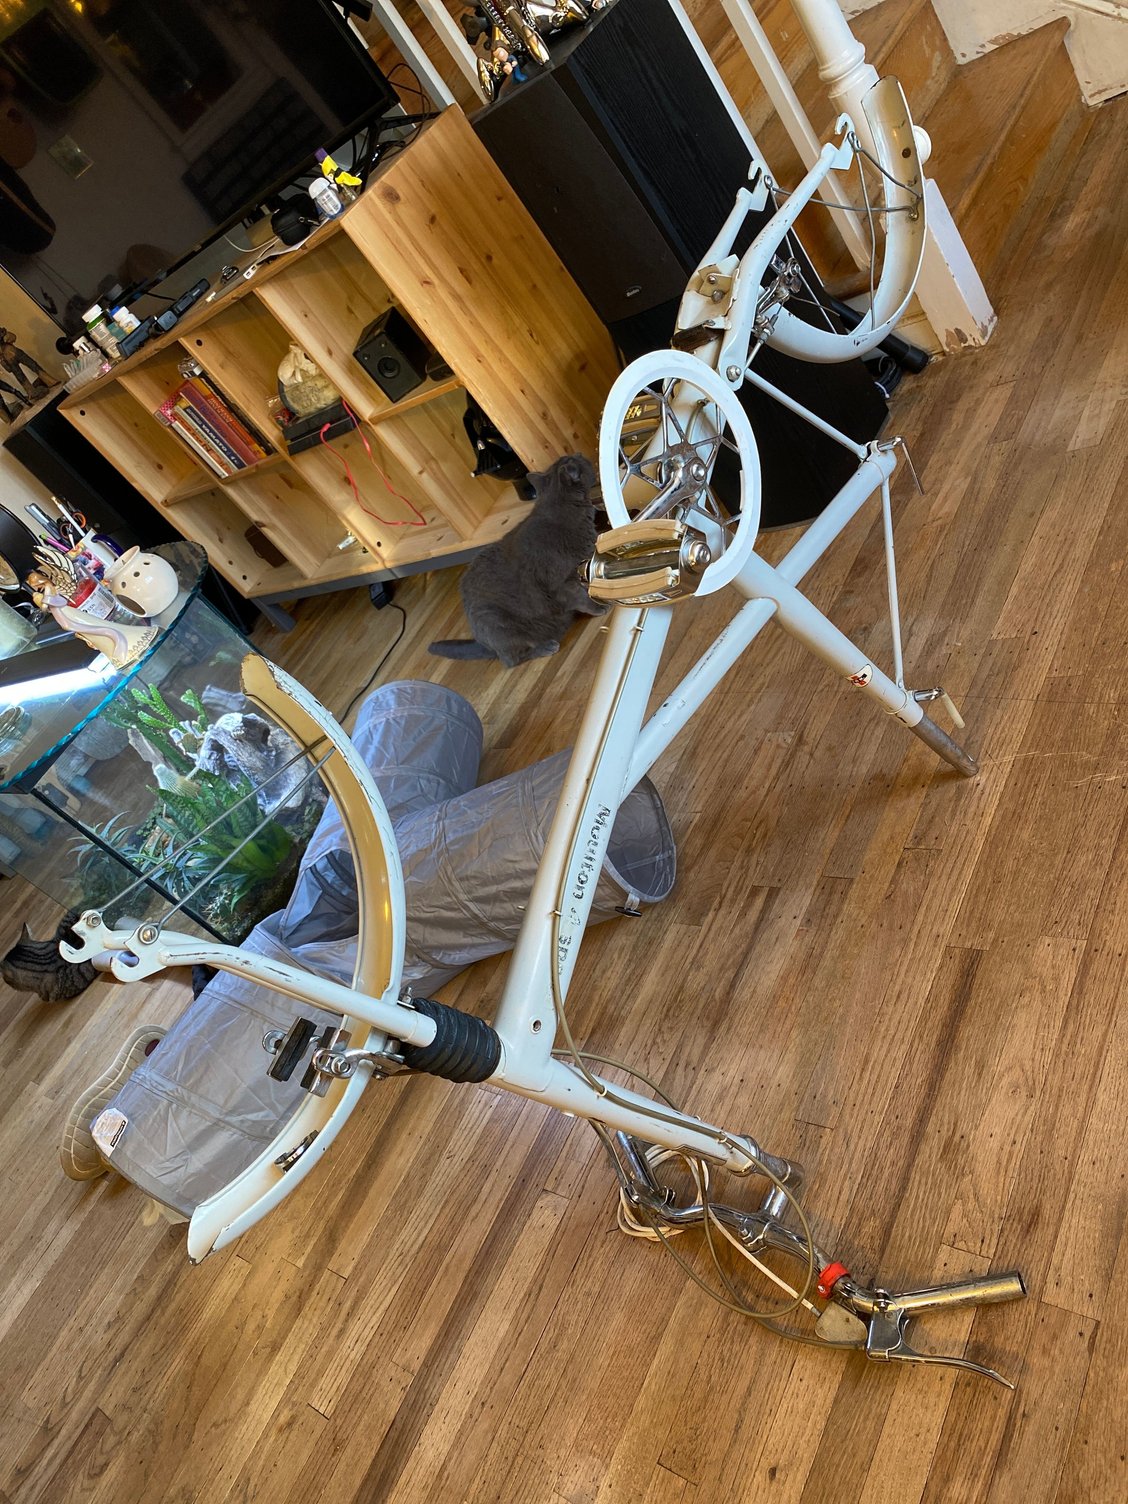
The bike has considerable rust causing various parts to be frozen including the chain, shift indexing chain, front axle, brake calipers, cables, seat post, and quick release clamp mechanisms. The frame seems solid with no apparent rust through or rot. The front shock is frozen, but the rear shock is good. The shift selector is readable and working. The indicator chain only retracts to second gear. The seat is unusable due to front/rear separation, deteriorated mattress springs, and a heavily rusted structure. The pump, kickstand, and front wicker basket are missing. The rear wicker basket has some broken fibers and appears gray with dirt and age. The tires are too old and cracked to be usable. The mudguards are badly rusted and decaying. The front mudguard is a total loss because it is crumbling away at the leading edge. The rear mudguard has blistered paint and rot around the fittings. The front rack is bent to the left. The Moulton badge (Bradford on Avon) is faded and corroded. The pedals are in very good condition. The frame has stickers from Manhattan Beach bicycle registration and from the store where it was originally purchased. The serial number is legible. 64240178 means 1964, 24th week, 178th unit that week.
I sprayed WD40 lubricant on all the fittings, fasteners, chains, axles, seatpost, and pivot points. I came back later and pumped up the tires and to my surprise, they held air. The chain and brakes started to move. I sprayed into rear hub axle and the shift indicator started to free up. The front wheel started to turn more easily, so I tightened the front axle bolts. The rear brake started to function. The chain began to unevenly move and rotate. I worked on the seatpost clamp bolt and got the QR opened. With a little effort, the seatpost was moving around. I rode the bike up and down the driveway! I was able to use 1st and 2nd gears only.
For frame restoration, I was concerned about typical trouble spots: seatpost, steerer, and bottom bracket. This bike also has a removable rear rack and rear fork, both of which will need to detach. Since the seatpost is no longer a problem, I moved on to loosen the top bolt of the steer tube, sprayed lube inside, and gave the bolt a few whacks with a rawhide mallet. The bolt dropped in as it should and the stem moved back and forth in the steer tube. Yay! Next, I loosened the rear rack QR with a bit of effort and the rack wiggled free. That leaves only the bottom bracket as a possible roadblock.
Not bad for my first day at this. I still need to disassemble the front end and work on the shock absorber, remove the cranks, assess the bottom bracket, and disassemble the rear swing arm. I intend to completely disassemble the bicycle for frame de-rusting, possible blasting and/or repair, and painting.
09-29-20, 08:13 AM
#14
Touring Rocks
I learned to ride on a Moulton 4 my brother bought with his paper route money. It was such a smooth ride. I don't know what happened to it but I do remember it having a problem with the SA 4 speed and due to lack of parts it was converted to a 3 speed.
I also remember it was quite high geared.
My brother's greatest fun was to tuck in behind the "racer types" (his words) and hang with them for a couple of miles while they tried to figure out what he was riding.
The cost of the bike was about $120 CDN in 1965 and the bike shop owner took payments on it because it was a year old and he was having trouble selling it.
Likes For Oldbill:
09-29-20, 11:34 AM
#15
Senior Member
Looks like quite a project. As a long time Moulton fan, I'll be paying close attention to this thread.
Are you going to have the chrome parts rechromed? At first view, that looks like it will be the biggest part of this restoration. The rest of it looks fairly straight forward, at least as far as Moultons go.
Are those wheels 14 or 16"?
Are you going to have the chrome parts rechromed? At first view, that looks like it will be the biggest part of this restoration. The rest of it looks fairly straight forward, at least as far as Moultons go.
Are those wheels 14 or 16"?
Likes For Salamandrine:
09-29-20, 01:12 PM
#16
Senior Member

Join Date: May 2008
Location: Fredericksburg, Va
Posts: 9,579
Bikes: '65 Frejus TDF, '73 Bottecchia Giro d'Italia, '83 Colnago Superissimo, '84 Trek 610, '84 Trek 760, '88 Pinarello Veneto, '88 De Rosa Pro, '89 Pinarello Montello, '94 Burley Duet, 97 Specialized RockHopper, 2010 Langster, Tern Link D8
Mentioned: 73 Post(s)
Tagged: 0 Thread(s)
Quoted: 1607 Post(s)
Liked 2,216 Times
in
1,103 Posts
Wanted one ever since I became aware of them.
I think all you need to do is buff it. Patina is cool!
I think all you need to do is buff it. Patina is cool!
__________________
Bikes don't stand alone. They are two tired.
Bikes don't stand alone. They are two tired.
Likes For SJX426:
09-29-20, 04:20 PM
#17
Phyllo-buster
Join Date: Jan 2010
Location: Nova Scotia
Posts: 8,847
Bikes: roadsters, club bikes, fixed and classic
Mentioned: 133 Post(s)
Tagged: 0 Thread(s)
Quoted: 2298 Post(s)
Liked 2,054 Times
in
1,254 Posts
Here's the CCM wholesale brochure from '65. Dealers paid $95.

Likes For clubman:
10-01-20, 06:38 PM
#18
Member
Thread Starter
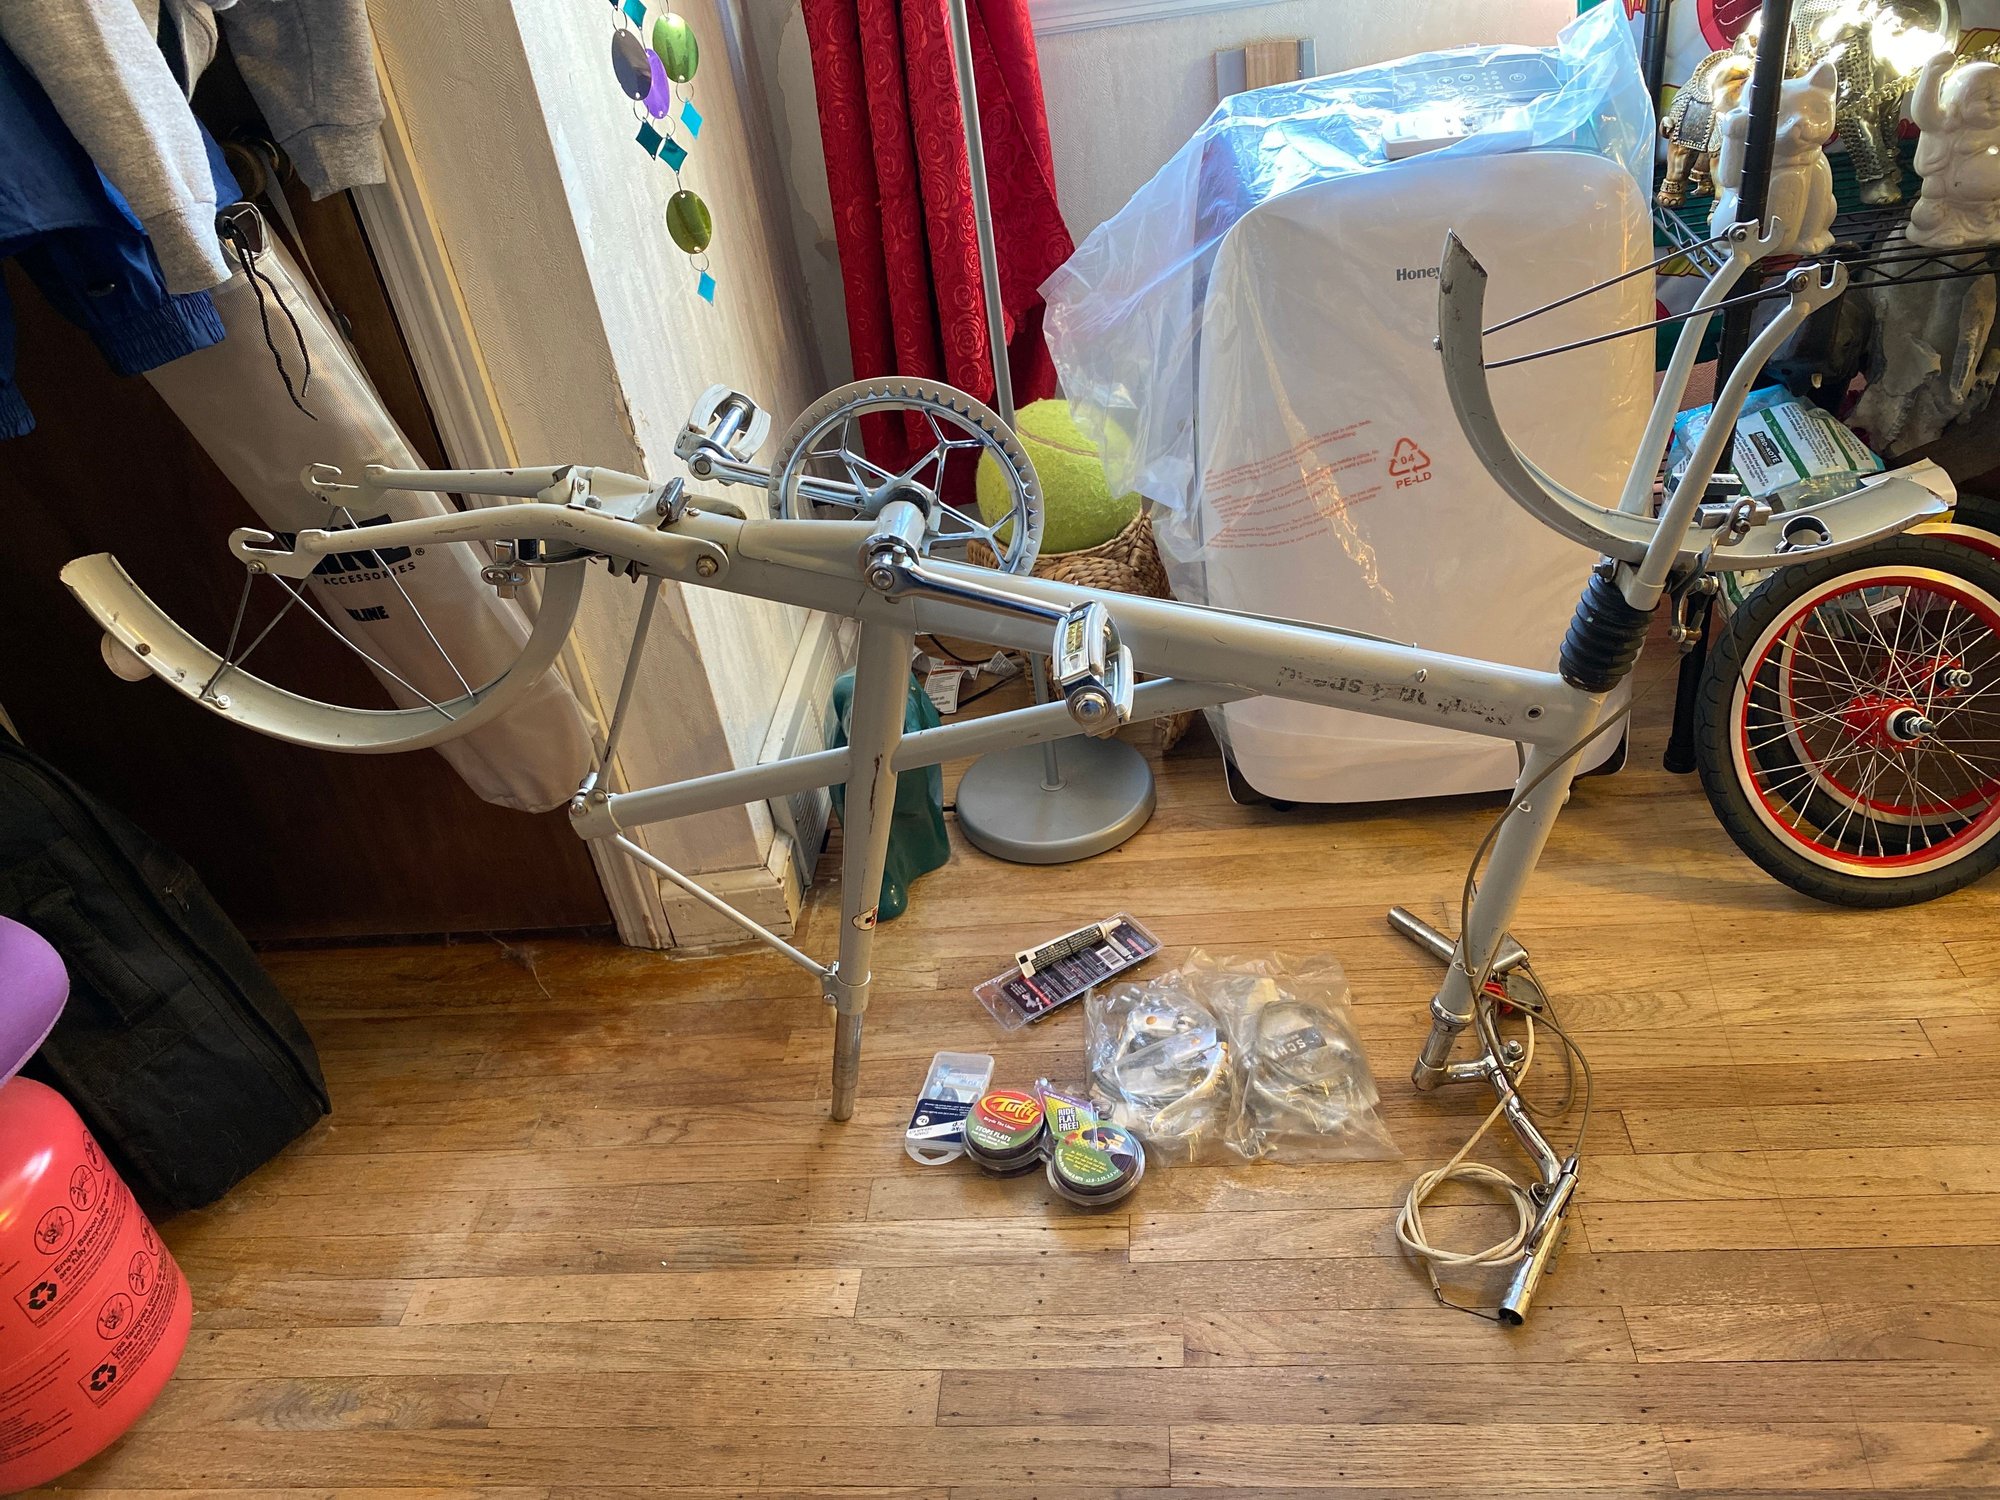
I have one that cracked - this pic shows the weld line where the crack(s) were - apparently both sides always crack. It also shows the repair and the gusset meant to fix the problem.
And as rust is a fine crack initiator, so yours is a prime suspect.
Yours also has the (likely FW) 4-speed. It needs a very small sprocket which can be hard to source. Shimano casette sprockets fit if you grind away six of the nine nubs.
Disassembling the front fork will require a VERY long flat-blade screwdriver, good lighting, and a balance of luck and bad language.
10-01-20, 07:17 PM
#19
Member
Thread Starter
I found a vintage Middlemore �mattress� seat in beautiful condition on Etsy. It looks like it has been sitting in a garage for decades.
The rear hub indicator completely freed up and moved through its entire range of motion making all gear ratios available.
I removed and discarded the drive chain. I have a Sram single speed chain in my bike repair supplies that will work perfectly.
I removed the rear wheel. The threaded cable anchor unscrewed from the indicator assembly, but the small lock nut was frozen. I applied oil and very gentle pressure, but the threaded section broke off with the nut still frozen in place. I thought that might happen. The shift indicator rods unscrewed easily from the hub. This indicator assembly is difficult to replace because it is unique to this 4 speed hub that went out of production in the 1960s. The Moulton Bicycle Club has several resources for replacement parts. However, SA 3 speed hubs are still in use and the indicator chain has the same threaded end that connects to the cable. I imagine I could remove the chain from a new 3 speed indicator and find a way to attach it to my old 4 speed indicator rods. I just read online that others have successfully done this. Voila, a $6 solution!
The chrome rims and hubs are covered with rust spots and grime. I carefully scrubbed the surfaces with a brush. Surprisingly, they cleaned up very nicely. The hubs look nice, but the rims are in poor condition. There are impact dents on the braking surface that caused the brake pads to unevenly wear away the chrome. The bare metal dents are rusted. The rims must be replaced. Velocity Dyad 16� 349 rims are $88 each and seem to be the best option. I'll deal with that later.
I�ve been checking out Misti Washington Gourd and Basket Guild about basket repair and fabrication.
Purchased online:
* 16x1.35 (37-349) Schwalbe Marathon tires (BikeInn.com has the best price). Tubes available at JensenUSA.
* Zefal pump 250-285 length found on eBay. The rear rack mount is about 280 mm.
10-01-20, 08:38 PM
#20
Phyllo-buster
Join Date: Jan 2010
Location: Nova Scotia
Posts: 8,847
Bikes: roadsters, club bikes, fixed and classic
Mentioned: 133 Post(s)
Tagged: 0 Thread(s)
Quoted: 2298 Post(s)
Liked 2,054 Times
in
1,254 Posts
The 3 speed indicator won't work. The 4 speed hubs often have two indicators from each side that screw into each other for doing adjustments. Different threads iirc.
edit. I see, you're using the rods with a new chain. Yes.
Check out Tony Hadlands blogs and the Moultoneers to get the full skinny. You probably have.
edit. I see, you're using the rods with a new chain. Yes.
Check out Tony Hadlands blogs and the Moultoneers to get the full skinny. You probably have.
Last edited by clubman; 10-01-20 at 08:43 PM.
Likes For clubman:
10-02-20, 08:34 AM
#21
Member
Thread Starter
I am investigating new brake and shifter cables. I removed the rusted screw from the right brake lever to investigate the cable anchor, but couldn�t loosen the lever enough to see it. The other rusted screws and nuts are going to be a problem. I may need to cut or grind them off.
I removed the nuts from the crank cotters. I gave each cotter a few whacks on the threaded ends with a hammer, but they wouldn�t budge. Used a socket and C clamp on the drive side to ramp up pressure. I used a wrench handle against the clamp�s tightening pin to force the clamp tighter until the clamp started to deform. I gave the C clamp spindle end a few whacks and the cotter broke free. I tried the same setup on the left side with no joy. I tightened the clamp beyond stress limits and whacked the spindle until it severely bent. No cotter movement. I drilled through the cotter with progressively larger bits. The hole is off center and the larger drill started to slightly grind the crank on the threaded end. I�m getting tired and frustrated. Should I have invested in a cotter press if I only use it for this project?
9.5 mm cotters
~3 mm spanner holes on the bottom bracket cup.
I found a Sturmey Archer shift cable kit on Amazon with the correct anchor fitting for the shift selector. The kit includes an adjustment fitting that clamps to the other end of the cable and attaches to the indicator chain. The package also includes a black cable housing; I need white.
Ordered:
Original style white Hunt Wilde handlebar grips
Shifter cable kit
White shift cable housing
Three speed indicator chain
Original fenders from the UK
Spanner wrench with 2.9mm pins
10-02-20, 08:39 AM
#22
Phyllo-buster
Join Date: Jan 2010
Location: Nova Scotia
Posts: 8,847
Bikes: roadsters, club bikes, fixed and classic
Mentioned: 133 Post(s)
Tagged: 0 Thread(s)
Quoted: 2298 Post(s)
Liked 2,054 Times
in
1,254 Posts
I'd apply heat carefully to the crank and either press or hammer. That pin's about to give up.
10-02-20, 03:07 PM
#23

K2ProFlex baby!

Join Date: Feb 2007
Location: My response would have been something along the lines of: "Does your bike have computer controlled suspension? Then shut your piehole, this baby is from the future!"
Posts: 6,133
Bikes: to many to list
Mentioned: 0 Post(s)
Tagged: 0 Thread(s)
Quoted: 16 Post(s)
Liked 56 Times
in
31 Posts
All I need to make my build complete is a set of Moulton 4 Speed wheels

Last edited by ilikebikes; 10-02-20 at 03:16 PM.
10-02-20, 06:11 PM
#24
Member
Thread Starter
If you search ebay with "sturmey archer fw 4 speed", you will see some 4 speed hubs for sale from the UK. At least that is a start. If you can find a front hub, you can install both hubs on Velocity Dyad rims. It will cost a few bucks, but they will be awesome.
10-02-20, 06:24 PM
#25
Member
Thread Starter
I continued to drill out the remaining stuck cotter. I grabbed what was left of the protruding round end with a vice grip and gave it a good squeeze to pull the edges inward. Then, I whacked what was left of the threaded end with a hammer and carefully aimed punch. Voila! The cotter gave out and I removed the crank.
I removed the screws holding the rear mudguard stays. I cut off a frozen nut from the front bolt of that mudguard with a Dremel cutting disk. Then, I loosened the rear brake bolt and took off the mudguard and the brake assembly.
I removed almost everything from the frame today except for the front rack and the bottom bracket. This stage of disassembly went smoothly, but I did cut off a few nuts and bolts and I snipped the brake and shift cables. I still need to disassemble the bottom bracket, the front shock, and the rear shock. Everything needs lots of cleaning and de-rusting. I am researching how to open the SA hub to de-gunk the moving parts and repack the bearings. The axle doesn�t turn freely and the shift indicator didn�t move easily (before it broke) so the hub needs some love.
Ordered:
Brake cables and white housing
Evaporust