


Broken RD Tension Spring - one fix
 03-10-19, 04:13 PM
#1

Senior Member
Thread Starter
Join Date: Nov 2013
Location: Near Pottstown, PA: 30 miles NW of Philadelphia
Posts: 2,186
Bikes: 2 Trek Mtn, Cannondale R600 road, 6 vintage road bikes
Mentioned: 83 Post(s)
Tagged: 0 Thread(s)
Quoted: 472 Post(s)
Liked 1,028 Times
in
404 Posts
Broken RD Tension Spring - one fix
This topic has come up a couple of times recently - the most recent by Deal4Fuji on the 8th in the "Dumbest Thing" thread. So I'm posting what I've done in the two occasions when I had the problem.
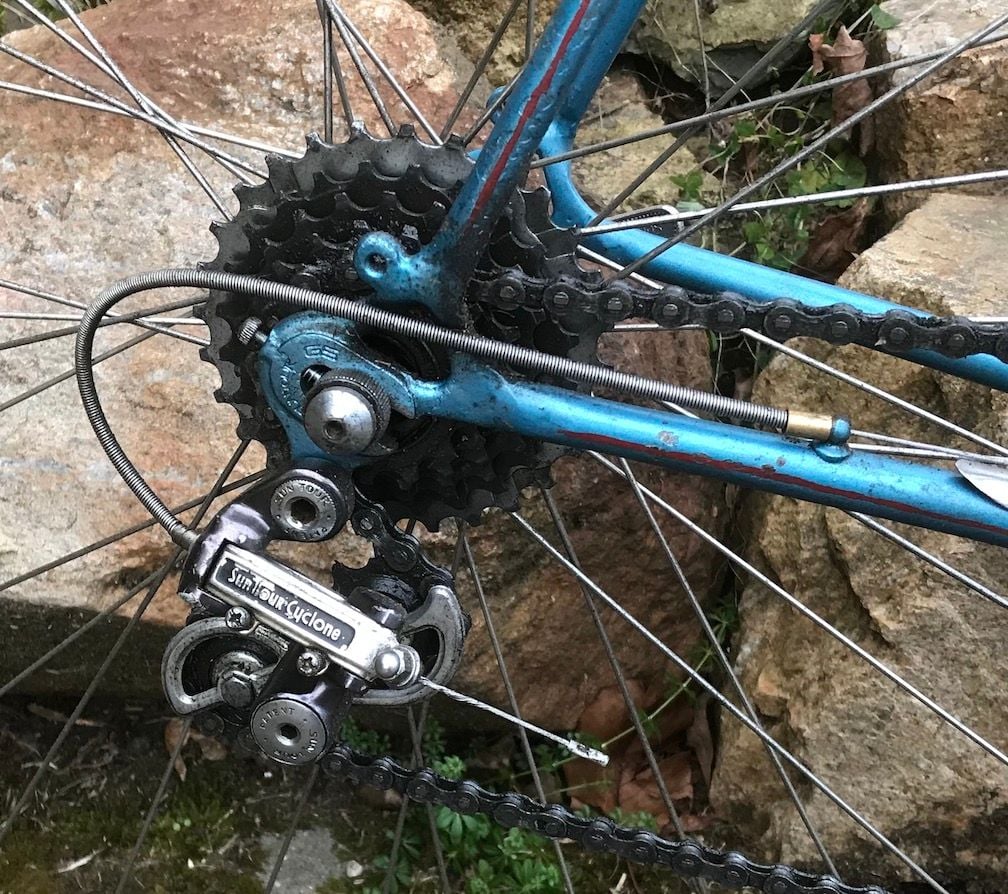
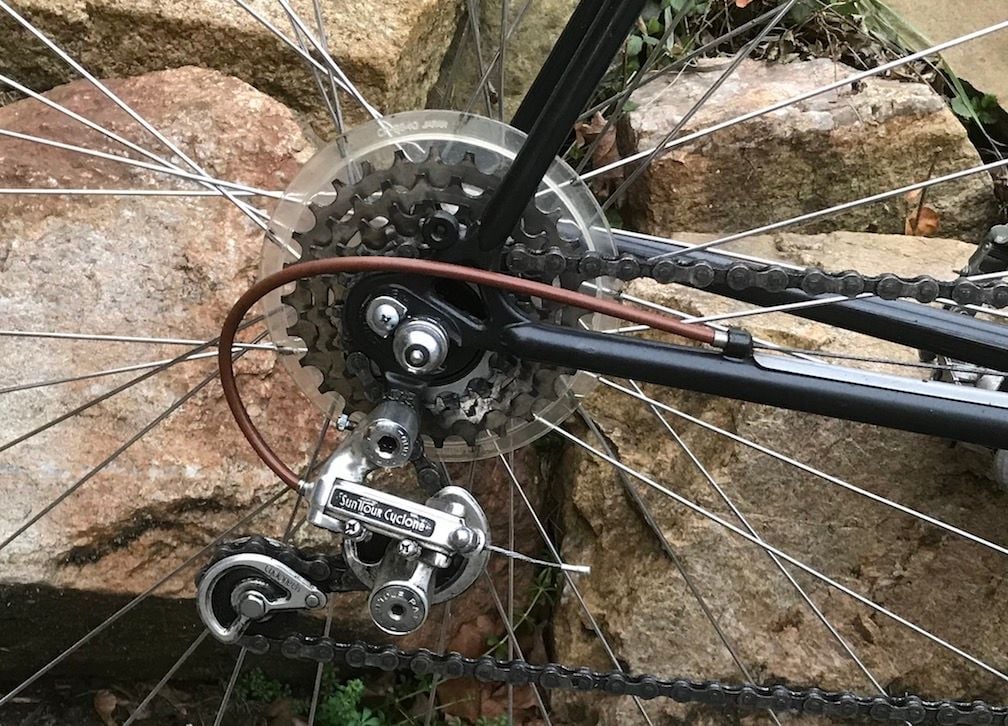
Both times were on Suntour Cyclone RDs. One was broken when I bought it and the other broke on a 60 mile ride, fortunately only about 5 miles from the car. On both occasions, when I opened the RD I found that the spring's tap on the bottom, the one that engages the RD body, had broken off. The attached photo may help. NOTE: all the RDs are different. Suntour RDs have numerous designs alone so how to get them apart varies quite a bit. And there are several different torsion spring sizes so, as JimMuller once pointed out, getting a replacement spring may not be an option. For me, I just decided that the spring was useless anyway so the RD was useless, so why not try. I frequently say "OK, I'll either fix it or destroy it."
In both of the cases I have done the RDs have gone back to work and are serving quite well for many miles. So far So good.

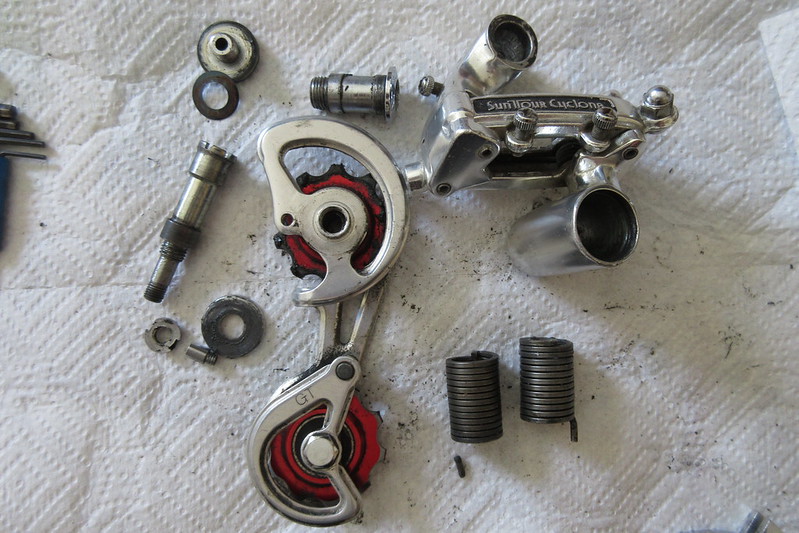
To disassemble you'll probably need to remove the pin that keeps the cage rotated, under tension, at it's "rest" location - no chain installed. This 'rest' position has the torsion spring wound a little bit. On my RDs its generally 30 or 40 degrees. I varies and depends on how the bike is set up. On the RD shown I had to pull the body away from the cage a bit to let the spring unwind. You then remove the cap that is over the spring, shown at the bottom of the photo. That cap was screwed into that shaft mounted on the cage, has a "castellated" top - like a rook in chess, like the round tower at the corner of a castle with the notches for archers to hide behind and shoot - that shaft has a green arrow pointing to it on the photo. The top of the spring has an end bent inwards (the other green arrow on the photo) that engages a notch in the castellated top. Which notch depends on how much tension you want at the "rest" position of the RD. No one answer. I've not seen this top, inward bent end break off. Must have done somewhere, sometime. Not for me yet. Note: The spring with the charming green arrow is NOT the right on for this RD. Its from a trashed Suntour RD but it gives you the idea.
The tension spring end that broke in my two cases was the other end (with the wee blue arrow pointed at it). That end is bent 'down' from the spring at a 90deg angle - engages a hole in the RD body (where the other wee blue arrow is pointing). Some RDs have 2 holes in the body. Some have that and two holes in the cage. All of that gives you degrees of freedom on how you set up the RD and its spring tension to suit your application. Nuttin's easy, eh?
I carefully pry the broken end of the spring away from the rest until I can grab that end with strong needle nose pliers. I then gently and slowly bend a new tap down - but not fully to 90deg. It helps to gently hold the spring in a vice, holding the other spring coils while you bend that last coil. I've left my two ends at closer to 80deg to avoid the sharp angle bend. The RDs do not seem to need a full 90deg bend. The tab will engage the RD body just fine and work just fine that way. I think a sharp bend is a failure point so avoided it. Check to be sure you have full engagement with the RD body (or the body and the cage if that's needed) and trim off any excess - I used my Dremel tool - nice and need. No burrs, no excess. This is probably a sliding joint do keep it clean.
Close it all up and away you go. No, not really! You need to confirm the spring tension is correct for your bike. Take it apart and reset if needed. On my second RD that broke I found that the PO had sized the chain wrong, 2 links, 1 inch short. So that RD was always under more tension than needed. I corrected that.
Hope this helps a bit. Works for me.
Both times were on Suntour Cyclone RDs. One was broken when I bought it and the other broke on a 60 mile ride, fortunately only about 5 miles from the car. On both occasions, when I opened the RD I found that the spring's tap on the bottom, the one that engages the RD body, had broken off. The attached photo may help. NOTE: all the RDs are different. Suntour RDs have numerous designs alone so how to get them apart varies quite a bit. And there are several different torsion spring sizes so, as JimMuller once pointed out, getting a replacement spring may not be an option. For me, I just decided that the spring was useless anyway so the RD was useless, so why not try. I frequently say "OK, I'll either fix it or destroy it."
In both of the cases I have done the RDs have gone back to work and are serving quite well for many miles. So far So good.
To disassemble you'll probably need to remove the pin that keeps the cage rotated, under tension, at it's "rest" location - no chain installed. This 'rest' position has the torsion spring wound a little bit. On my RDs its generally 30 or 40 degrees. I varies and depends on how the bike is set up. On the RD shown I had to pull the body away from the cage a bit to let the spring unwind. You then remove the cap that is over the spring, shown at the bottom of the photo. That cap was screwed into that shaft mounted on the cage, has a "castellated" top - like a rook in chess, like the round tower at the corner of a castle with the notches for archers to hide behind and shoot - that shaft has a green arrow pointing to it on the photo. The top of the spring has an end bent inwards (the other green arrow on the photo) that engages a notch in the castellated top. Which notch depends on how much tension you want at the "rest" position of the RD. No one answer. I've not seen this top, inward bent end break off. Must have done somewhere, sometime. Not for me yet. Note: The spring with the charming green arrow is NOT the right on for this RD. Its from a trashed Suntour RD but it gives you the idea.
The tension spring end that broke in my two cases was the other end (with the wee blue arrow pointed at it). That end is bent 'down' from the spring at a 90deg angle - engages a hole in the RD body (where the other wee blue arrow is pointing). Some RDs have 2 holes in the body. Some have that and two holes in the cage. All of that gives you degrees of freedom on how you set up the RD and its spring tension to suit your application. Nuttin's easy, eh?
I carefully pry the broken end of the spring away from the rest until I can grab that end with strong needle nose pliers. I then gently and slowly bend a new tap down - but not fully to 90deg. It helps to gently hold the spring in a vice, holding the other spring coils while you bend that last coil. I've left my two ends at closer to 80deg to avoid the sharp angle bend. The RDs do not seem to need a full 90deg bend. The tab will engage the RD body just fine and work just fine that way. I think a sharp bend is a failure point so avoided it. Check to be sure you have full engagement with the RD body (or the body and the cage if that's needed) and trim off any excess - I used my Dremel tool - nice and need. No burrs, no excess. This is probably a sliding joint do keep it clean.
Close it all up and away you go. No, not really! You need to confirm the spring tension is correct for your bike. Take it apart and reset if needed. On my second RD that broke I found that the PO had sized the chain wrong, 2 links, 1 inch short. So that RD was always under more tension than needed. I corrected that.
Hope this helps a bit. Works for me.
 03-10-19, 06:28 PM
#2
Phyllo-buster

Join Date: Jan 2010
Location: Nova Scotia
Posts: 8,847
Bikes: roadsters, club bikes, fixed and classic
Mentioned: 133 Post(s)
Tagged: 0 Thread(s)
Quoted: 2298 Post(s)
Liked 2,054 Times
in
1,254 Posts
Thanks for the push. I've got a Cyclone ready to be fixed except mine snapped in the middle of the spring, Water got into it over the years, the spring rusted and oh snap, there it went. I'll wait around for a 'proper' broken spring to show up. 
A little simple regular maintenance of a WD-40 flush may extend the lifespan of these gears. Many have already gone 40 years, which is remarkable when you think about it.
A little simple regular maintenance of a WD-40 flush may extend the lifespan of these gears. Many have already gone 40 years, which is remarkable when you think about it.
 03-10-19, 07:33 PM
#3
Mr. Anachronism
Join Date: Jan 2013
Location: Somewhere west of Tobie's
Posts: 2,087
Bikes: fillet-brazed Chicago Schwinns, and some other stuff
Mentioned: 29 Post(s)
Tagged: 0 Thread(s)
Quoted: 526 Post(s)
Liked 256 Times
in
165 Posts
Thanks for tip.
Worth a shot, until we collectively get enough broken ones to warrant commissioning some repops.
Worth a shot, until we collectively get enough broken ones to warrant commissioning some repops.
__________________
"My only true wisdom is in knowing I have none" -Socrates
"My only true wisdom is in knowing I have none" -Socrates
 03-11-19, 05:59 AM
#5
Senior Member

I should point out that this is a lot easier on the 'short cage' versions of these derailleurs. On the GT versions, the same shaft also runs through the guide pulley, so it's a slightly more annoying fix.
 03-11-19, 09:12 AM
#7
Senior Member

Join Date: Feb 2008
Location: Peoria, IL
Posts: 4,476
Mentioned: 86 Post(s)
Tagged: 0 Thread(s)
Quoted: 1829 Post(s)
Liked 3,376 Times
in
1,580 Posts
Always good to see a trusty derailleur patched up and back in service!
I had a similar broken spring in a Cyclone derailleur. Fortunately, I was able to scavenge one from an old derailleur in the parts box.
Here's a photo of the disassembled derailleur, along with the broken spring and its replacement....
As noted in an earlier post, this degree of assembly requires removing a nut off of the back of the shaft and then unthreading the pulley cage from the shaft. Definitely not a simple process, especially since it requires a little two-prong tool to get the little nut off.
I'm impressed that @Prowler was able to bend the spring to fix it! I would have guessed that it might be too brittle (based on no experience at all).
Steve in Peoria
03-11-19, 02:34 PM
#8
Ride, Wrench, Swap, Race

Join Date: Jan 2010
Location: Northern California
Posts: 9,194
Bikes: Cheltenham-Pedersen racer, Boulder F/S Paris-Roubaix, Varsity racer, '52 Christophe, '62 Continental, '92 Merckx, '75 Limongi, '76 Presto, '72 Gitane SC, '71 Schwinn SS, etc.
Mentioned: 132 Post(s)
Tagged: 0 Thread(s)
Quoted: 1565 Post(s)
Liked 1,296 Times
in
866 Posts
These nut tools still turn up for the serious repair folks:
Funny how since buying it years ago, I still have yet to need it!

Funny how since buying it years ago, I still have yet to need it!
03-11-19, 07:29 PM
#10
Me duelen las nalgas
Join Date: Aug 2015
Location: Texas
Posts: 13,513
Bikes: Centurion Ironman, Trek 5900, Univega Via Carisma, Globe Carmel
Mentioned: 199 Post(s)
Tagged: 0 Thread(s)
Quoted: 4560 Post(s)
Liked 2,802 Times
in
1,800 Posts
I've reduced the torsion spring tension in my Suntour GPX and older Shimano 600 rear derailleurs, in part to extend the spring life. Easy with the Shimano 600 which had two settings for torsion spring tension. With the GPX I had to drill a second hole -- there was the beginning of a pilot hole for the spring leg, but it wasn't drilled completely through. I wasn't sure how easy it would be to find replacements for those older RD springs. Hopefully reducing the tension a bit will prolong the life.
I'd also hoped it would reduce drivetrain friction with the GPX but the problem turned out to be unrelated to RD torsion spring tension. The problem was friction from the original sintered bushing bearing. Replacing the pulleys with aftermarket sealed bearing pulleys cured that problem.
I'd also hoped it would reduce drivetrain friction with the GPX but the problem turned out to be unrelated to RD torsion spring tension. The problem was friction from the original sintered bushing bearing. Replacing the pulleys with aftermarket sealed bearing pulleys cured that problem.
03-11-19, 10:54 PM
#11
Ride, Wrench, Swap, Race
Join Date: Jan 2010
Location: Northern California
Posts: 9,194
Bikes: Cheltenham-Pedersen racer, Boulder F/S Paris-Roubaix, Varsity racer, '52 Christophe, '62 Continental, '92 Merckx, '75 Limongi, '76 Presto, '72 Gitane SC, '71 Schwinn SS, etc.
Mentioned: 132 Post(s)
Tagged: 0 Thread(s)
Quoted: 1565 Post(s)
Liked 1,296 Times
in
866 Posts
...I'd also hoped it would reduce drivetrain friction with the GPX but the problem turned out to be unrelated to RD torsion spring tension. The problem was friction from the original sintered bushing bearing. Replacing the pulleys with aftermarket sealed bearing pulleys cured that problem.
Suntour pullies used a very large-diameter steel bushing that made for a lot of friction if gummed up, but also afforded plenty of surface area for an oil film to support chain tension loading. I normally just flood one of each pulley's dust covers with motor oil while the bike is on it's side, then the pulleys spin freely as can be.
The Suntour pulleys I've taken apart have no pressed-in bushing, so the plastic pulley spins directly on the stationary thick steel bushing. The dimensions seem to be entirely copied from Simplex pulleys, but use much stronger/tougher plastic than Simplex did.
03-11-19, 11:55 PM
#12
Me duelen las nalgas
Join Date: Aug 2015
Location: Texas
Posts: 13,513
Bikes: Centurion Ironman, Trek 5900, Univega Via Carisma, Globe Carmel
Mentioned: 199 Post(s)
Tagged: 0 Thread(s)
Quoted: 4560 Post(s)
Liked 2,802 Times
in
1,800 Posts
Suntour pullies used a very large-diameter steel bushing that made for a lot of friction if gummed up, but also afforded plenty of surface area for an oil film to support chain tension loading. I normally just flood one of each pulley's dust covers with motor oil while the bike is on it's side, then the pulleys spin freely as can be.
The Suntour pulleys I've taken apart have no pressed-in bushing, so the plastic pulley spins directly on the stationary thick steel bushing. The dimensions seem to be entirely copied from Simplex pulleys, but use much stronger/tougher plastic than Simplex did.
The Suntour pulleys I've taken apart have no pressed-in bushing, so the plastic pulley spins directly on the stationary thick steel bushing. The dimensions seem to be entirely copied from Simplex pulleys, but use much stronger/tougher plastic than Simplex did.
I disassembled the GPX rear derailleur and pulleys, checked every bearing surface for roughness, etc., but found nothing that would explain the high drivetrain friction.
I tried various lubes on the GPX RD pulley bearings but nothing made any difference: Phil's green grease, Park CL-1 chain lube, Tri-Flow, Boeshield T-9, nothing helped. I went back to running the original sintered bearings dry as Suntour recommended. Didn't make it any worse.
When I used finger pressure to slightly relieve torsion spring tension in the pulley cage, it reduced drivetrain friction significantly. But that's impractical for riding. Reducing torsion spring tension too much caused chain slap and poor shifting.
On a whim I tried a set of inexpensive Tacx sealed bearing pulleys a month or so ago. Fixed the problem immediately with the Suntour GPX RD.
I don't know how much advantage sealed bearing pulleys would make with other rear derailleurs, like my old Shimano 600 that already runs smoothly. The GPX is the first RD I've had with that particular problem, my own and other older bikes I've checked with various component groups. And it may be unique only to my particular sample of the GPX RD -- I haven't tried another to see if it's a design flaw.
03-12-19, 12:33 AM
#13
Ride, Wrench, Swap, Race
Join Date: Jan 2010
Location: Northern California
Posts: 9,194
Bikes: Cheltenham-Pedersen racer, Boulder F/S Paris-Roubaix, Varsity racer, '52 Christophe, '62 Continental, '92 Merckx, '75 Limongi, '76 Presto, '72 Gitane SC, '71 Schwinn SS, etc.
Mentioned: 132 Post(s)
Tagged: 0 Thread(s)
Quoted: 1565 Post(s)
Liked 1,296 Times
in
866 Posts
I must have been thinking only of the older Suntour pullies with the huge stationary bushing.
It sounds like Suntour started copying the others at some point.
I've never noticed high friction with Shimano's pulleys having a pressed bushing running on a steel sleeve bushing.
I have also installed ball-bearing pullies from modern sources as well as from old Huret derailers on many of my bikes over the years.
03-12-19, 02:44 AM
#14
Me duelen las nalgas
Join Date: Aug 2015
Location: Texas
Posts: 13,513
Bikes: Centurion Ironman, Trek 5900, Univega Via Carisma, Globe Carmel
Mentioned: 199 Post(s)
Tagged: 0 Thread(s)
Quoted: 4560 Post(s)
Liked 2,802 Times
in
1,800 Posts
It's possible the stamped metal dust cap was part of the problem. I finally got tired of trying to fix it just for the sake of keeping it original. The inexpensive Tacx sealed bearing pulleys fixed the problem. I kept the originals in case I ever get another bike with the Suntour GPX group for comparison. The '89 Ironman with GPX group isn't too rare so another may show up, although I'll probably be more interested in the frame as the basis for a more up to date conversion.
11-30-19, 07:15 AM
#15
Senior Member
Thread Starter
Join Date: Nov 2013
Location: Near Pottstown, PA: 30 miles NW of Philadelphia
Posts: 2,186
Bikes: 2 Trek Mtn, Cannondale R600 road, 6 vintage road bikes
Mentioned: 83 Post(s)
Tagged: 0 Thread(s)
Quoted: 472 Post(s)
Liked 1,028 Times
in
404 Posts
Update after a year on the road
Its been a year now since I applied this fix to the broken body spring on my Crescent's Cyclone RD (short cage). And it's been about 6 years since I applied the same fix to the Cyclone (long cage) on my Nishiki International. FYI both RDs have served for many miles since being fixed, in all sorts of terrain. They are both functioning just great, good a new. I don't know if my repair method is proper or not but my experience base of 2 says "yes".
1974 Crescent 92319
1980 Nishiki International
1974 Crescent 92319
1980 Nishiki International
Likes For Prowler:
11-30-19, 08:51 PM
#16
Ride, Wrench, Swap, Race
Join Date: Jan 2010
Location: Northern California
Posts: 9,194
Bikes: Cheltenham-Pedersen racer, Boulder F/S Paris-Roubaix, Varsity racer, '52 Christophe, '62 Continental, '92 Merckx, '75 Limongi, '76 Presto, '72 Gitane SC, '71 Schwinn SS, etc.
Mentioned: 132 Post(s)
Tagged: 0 Thread(s)
Quoted: 1565 Post(s)
Liked 1,296 Times
in
866 Posts
Did you even heat the spring before bending it?
Many springs go through a hardening treatment after bending, so we might expect it to break before yielding to a sharp, 90-degree bend.
I would expect that riding on bumpy roads would fatigue the springs much faster. The only one that I've ever broken was the cage tension spring on a 1990's XT rear derailer used on an mtb.
12-01-19, 05:29 AM
#17
Senior Member
Thread Starter
Join Date: Nov 2013
Location: Near Pottstown, PA: 30 miles NW of Philadelphia
Posts: 2,186
Bikes: 2 Trek Mtn, Cannondale R600 road, 6 vintage road bikes
Mentioned: 83 Post(s)
Tagged: 0 Thread(s)
Quoted: 472 Post(s)
Liked 1,028 Times
in
404 Posts
I did not heat the spring first. I don't even know how I would have, heated just the last 1/2 inch of coil I needed to work with. But I agree with your concern, which is why I did not go to 90deg. Stopped bending at around 80deg. Good enough to engage the hole in the body. I did examine the bend area and did not see any cracking or damage. Used a 10x jeweler's loop.
Remember the guy who jumped off the Empire State Building - when passing the 44th floor he said "Everything's going just fine, so far". Well, many miles down the road and Everything's going just fine, so far.
Remember the guy who jumped off the Empire State Building - when passing the 44th floor he said "Everything's going just fine, so far". Well, many miles down the road and Everything's going just fine, so far.
Likes For Prowler:
12-01-19, 06:31 PM
#18
curmudgineer

Join Date: Dec 2009
Location: Chicago SW burbs
Posts: 4,417
Bikes: 2 many 2 fit here
Mentioned: 8 Post(s)
Tagged: 0 Thread(s)
Quoted: 263 Post(s)
Liked 112 Times
in
70 Posts
I agree, attempting to temper or anneal fine spring wire would be a very delicate operation. I would worry about the fatigue strength of the final material (with its reduced yield strength). I think the OP's method is sound... if the wire doesn't break as a result of the bending operation, it is probably good to go.
12-02-19, 08:47 AM
#19
Senior Member

Join Date: Sep 2011
Location: Baltimore MD
Posts: 3,332
Bikes: '72 Motobecane Grand Record, '72 Gitane tandem, '72 Raleigh Super Course, '73 Raleigh Gran Sport, '73 Colnago Super, '76 Fiorelli Coppi, '78 Raleigh SBDU Team Pro, '78 Trek 930, '81 Holdsworth Special 650B, '86 Masi GC, ’94 Bridgestone RB-T
Mentioned: 67 Post(s)
Tagged: 0 Thread(s)
Quoted: 786 Post(s)
Liked 520 Times
in
281 Posts
Glad to hear this worked. I have a few busted Cyclone springs, and am now going to attempt this.
It's frustrating how no other Suntour RD springs fit the Cyclone. I have found that Vx and BL springs are identical, as are the castellated posts. I've done a few transplants that worked great.
It's frustrating how no other Suntour RD springs fit the Cyclone. I have found that Vx and BL springs are identical, as are the castellated posts. I've done a few transplants that worked great.
__________________
The man who dies with the most toys�is dead. - Rootboy
The man who dies with the most toys�is dead. - Rootboy
12-02-19, 10:17 AM
#20
Senior Member
Join Date: Dec 2016
Location: Long Island, NY
Posts: 2,109
Bikes: Trek 800 x 2, Schwinn Heavy Duti, Schwinn Traveler, Schwinn Le Tour Luxe, Schwinn Continental, Cannondale M400 and Lambert, Schwinn Super Sport
Mentioned: 14 Post(s)
Tagged: 0 Thread(s)
Quoted: 809 Post(s)
Liked 1,023 Times
in
665 Posts
Thanks @Prowler. I am partial to SunTour stuff and keeping them going is good. Now that I know this fix, it may never happen, but if it does. I know what to do. Great pictures by the way. I also would think that heat would be needed to make the bend, but it looks like the temper is not that hard.
12-02-19, 12:20 PM
#21
Some Weirdo

Join Date: Dec 2017
Location: Rexburg, ID
Posts: 502
Bikes: '86 Schwinn Prelude, '91 Scott Sawtooth, '73 Raleigh "Grand 3"
Mentioned: 3 Post(s)
Tagged: 0 Thread(s)
Quoted: 223 Post(s)
Liked 141 Times
in
92 Posts
Quick tip for older Suntour RD disassembly: Use a Park Tool (haven't checked thickness on other brands) cone wrench on the "spring selector" bit. When taking the inner cage off the body, you have to unthread the spring holder. If you try to use a massive screwdriver, it probably won't have enough torque and might slip and mar the slots. Solution: take a cone wrench and use the side in the slots. Put it right in the middle to minimise the risk of bending it. It should fit perfectly.
12-02-19, 12:50 PM
#22
Senior Member
Now...Does anyone have the same write up for first generation Chorus derailleurs? i have been fiddle-f***ing around with mine for weeks. had way too low of spring tension, and I rotated it 180* and got way too much spring tension, and to get the thing together, i had to tighten the top pulley screw so hard that the pulley wont spin.
10-01-21, 12:17 PM
#23
Newbie
Join Date: Oct 2021
Posts: 2
Mentioned: 0 Post(s)
Tagged: 0 Thread(s)
Quoted: 0 Post(s)
Likes: 0
Liked 1 Time
in
1 Post
Hi--I just joined this forum in order to thank you (years later) for this post. The 90 degree bend on the spring in my Cyclone GT (on a 1977 Nishiki International) broke yesterday and I was able to rebend it today and it looks like it will work. Many thanks!
Likes For keeponridin:
10-02-21, 06:03 AM
#24
Senior Member
Thread Starter
Join Date: Nov 2013
Location: Near Pottstown, PA: 30 miles NW of Philadelphia
Posts: 2,186
Bikes: 2 Trek Mtn, Cannondale R600 road, 6 vintage road bikes
Mentioned: 83 Post(s)
Tagged: 0 Thread(s)
Quoted: 472 Post(s)
Liked 1,028 Times
in
404 Posts
I'm glad these ideas have proven useful. I posted this just for this reason - help someone down the road. As Arlo Guthrie once wrote: "if you know someone in a similar situation or if you are in a similar situation....."
The two RDs I mentioned in that OP are still in regular service and going strong. A fine RD, IMO.
BTW, when the Cyclone on my Crescent broke we went through a lot a bother turning the bike into a SS so I could get those 5 miles to the car. I was luck someone had a chain breaker (removed 2 links) and another had a tiny screw driver so I could remove the adjuster screws. Whew! Then I heard from jimmuller who suggested simply carrying a couple of "zip ties". Use them as needed to hold the ends of the pulley cage in place on one cog. Then ride home. AH!
I still do carry a couple of zip ties. A talisman that prevents RD failure. I've had no further RD failures - 11 bikes in service.
Likes For Prowler:
10-04-21, 03:29 PM
#25
Newbie
Join Date: Oct 2021
Posts: 2
Mentioned: 0 Post(s)
Tagged: 0 Thread(s)
Quoted: 0 Post(s)
Likes: 0
Liked 1 Time
in
1 Post
I'm glad these ideas have proven useful. I posted this just for this reason - help someone down the road. As Arlo Guthrie once wrote: "if you know someone in a similar situation or if you are in a similar situation....."
The two RDs I mentioned in that OP are still in regular service and going strong. A fine RD, IMO.
BTW, when the Cyclone on my Crescent broke we went through a lot a bother turning the bike into a SS so I could get those 5 miles to the car. I was luck someone had a chain breaker (removed 2 links) and another had a tiny screw driver so I could remove the adjuster screws. Whew! Then I heard from jimmuller who suggested simply carrying a couple of "zip ties". Use them as needed to hold the ends of the pulley cage in place on one cog. Then ride home. AH!
I still do carry a couple of zip ties. A talisman that prevents RD failure. I've had no further RD failures - 11 bikes in service.
The two RDs I mentioned in that OP are still in regular service and going strong. A fine RD, IMO.
BTW, when the Cyclone on my Crescent broke we went through a lot a bother turning the bike into a SS so I could get those 5 miles to the car. I was luck someone had a chain breaker (removed 2 links) and another had a tiny screw driver so I could remove the adjuster screws. Whew! Then I heard from jimmuller who suggested simply carrying a couple of "zip ties". Use them as needed to hold the ends of the pulley cage in place on one cog. Then ride home. AH!
I still do carry a couple of zip ties. A talisman that prevents RD failure. I've had no further RD failures - 11 bikes in service.