


Improving seatpost performance
 04-01-13, 10:49 AM
#1
Merckx wannabe
Thread Starter

Join Date: May 2007
Location: Zagreb, Croatia
Posts: 254
Bikes: Rampon EL/OS 5700 groupset
Mentioned: 0 Post(s)
Tagged: 0 Thread(s)
Quoted: 1 Post(s)
Likes: 0
Liked 0 Times
in
0 Posts
Improving seatpost performance
This might fit to mechanics podforums, but I'm not sure.
Here's the problem:


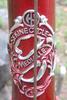
No name 26.4 seatpost, probably Gipiemme, as you can see on the photos there is no microtilt threads on the part of the post where the seat holder tightens, and therefore after some time, alot of vibrations, the whole seat holder starts to slip, usually backwords and previously mounted seat in flat position turns the nose upwards. It's really frustrating and I have to recheck my seat every couple of days, not to mention this happens during a long ride.
Is there any diy way to improve the seat holder, not to slip under load, or after vibrations?
Here's the problem:


No name 26.4 seatpost, probably Gipiemme, as you can see on the photos there is no microtilt threads on the part of the post where the seat holder tightens, and therefore after some time, alot of vibrations, the whole seat holder starts to slip, usually backwords and previously mounted seat in flat position turns the nose upwards. It's really frustrating and I have to recheck my seat every couple of days, not to mention this happens during a long ride.
Is there any diy way to improve the seat holder, not to slip under load, or after vibrations?
 04-01-13, 11:05 AM
#2

surly old man

Join Date: Sep 2006
Location: Carlisle, PA
Posts: 3,392
Bikes: IRO Mark V, Karate Monkey half fat, Trek 620 IGH, Cannondale 26/24 MTB, Amp Research B3, and more.
Mentioned: 0 Post(s)
Tagged: 0 Thread(s)
Quoted: 46 Post(s)
Likes: 0
Liked 42 Times
in
18 Posts
Frankly, I find that even when they have the "micro-adjust" grooves, they still sometimes slip. So, even if you can find grooves onto it, it still may be a problem. I am a clyde and I have moved away from Laprade style posts on my bikes to more modern two-bolt styles.
Solutions?
-clean it up as much as possible and carefully grease all the threads so that you can crank it down as tightly as possible
-use a two-bolt post.
jim
Solutions?
-clean it up as much as possible and carefully grease all the threads so that you can crank it down as tightly as possible
-use a two-bolt post.
jim
__________________
Cross Check Nexus7, IRO Mark V, Trek 620 Nexus7, Karate Monkey half fat, IRO Model 19 fixed, Amp Research B3, Surly 1x1 half fat fixed, and more...
--------------------------
SB forever
Cross Check Nexus7, IRO Mark V, Trek 620 Nexus7, Karate Monkey half fat, IRO Model 19 fixed, Amp Research B3, Surly 1x1 half fat fixed, and more...
--------------------------
SB forever

 04-01-13, 11:08 AM
#4
multimodal commuter

Join Date: Nov 2006
Location: NJ, NYC, LI
Posts: 19,808
Bikes: 1940s Fothergill, 1959 Allegro Special, 1963? Claud Butler Olympic Sprint, Lambert 'Clubman', 1974 Fuji "the Ace", 1976 Holdsworth 650b conversion rando bike, 1983 Trek 720 tourer, 1984 Counterpoint Opus II, 1993 Basso Gap, 2010 Downtube 8h, and...
Mentioned: 584 Post(s)
Tagged: 0 Thread(s)
Quoted: 1908 Post(s)
Liked 574 Times
in
339 Posts
I have a somewhat similar 3ttt post that came with a thin piece of steel, deeply grooved on both sides, that goes between the two pieces of aluminum that are sliding against one another. When you tighten the bolt, the steel digs into the aluminum enough to prevent slippage. Could you do something like that?
On the same idea, perhaps if you put rough steel shavings between the parts before tightening it up, they would dig in on both sides and give enough grip?
You could always drill and tap a hole through the back, behind the bolt, and put a set screw in there; but before doing that I would try something less drastic.
04-01-13, 11:08 AM
#5
aka: Dr. Cannondale
Join Date: Jul 2009
Posts: 7,737
Mentioned: 234 Post(s)
Tagged: 0 Thread(s)
Quoted: 2156 Post(s)
Liked 3,414 Times
in
1,209 Posts
Use a Dremel tool with a fibreglass reinforced cuttign wheel to cut new grooves in the adjusting section. Fixed.
__________________
Hard at work in the Secret Underground Laboratory...
Hard at work in the Secret Underground Laboratory...
04-01-13, 11:11 AM
#6
Senior Member
Join Date: Apr 2012
Location: Minneapolis, MN
Posts: 211
Bikes: 1991 Eddie Merckx Corsa, 1991 Cannondale 3.0 Road Race, 2008 Bianchi Pista
Mentioned: 0 Post(s)
Tagged: 0 Thread(s)
Quoted: 0 Post(s)
Likes: 0
Liked 0 Times
in
0 Posts
Roughing up the contact area with coarse sandpaper should help.
04-01-13, 11:12 AM
#7
Merckx wannabe
Thread Starter
Join Date: May 2007
Location: Zagreb, Croatia
Posts: 254
Bikes: Rampon EL/OS 5700 groupset
Mentioned: 0 Post(s)
Tagged: 0 Thread(s)
Quoted: 1 Post(s)
Likes: 0
Liked 0 Times
in
0 Posts
I have not tried loctite blue, though I have it actually in my drawer, and I don't feel as the bolt comes loose, sometimes the whole thing moves, not sure if the bolt looseness at all.
Any recommendations for a two bolt type of seatpost? It's 26.4mm, a bit non standard, I see 27.2 is still around, and easily findable from various manufacturers, but before that I'll try to roughen the contact area...
Any recommendations for a two bolt type of seatpost? It's 26.4mm, a bit non standard, I see 27.2 is still around, and easily findable from various manufacturers, but before that I'll try to roughen the contact area...
04-01-13, 11:26 AM
#8
Senior Member

BikeParts.com has 6 26.4 posts but they are all 1 bolt.
https://www.bikeparts.com/categories/...1&f%5B%5D=1869
I just searched for "seatpost 26.4" on EBay and there's a bunch of 2-bolt types.
https://www.bikeparts.com/categories/...1&f%5B%5D=1869
I just searched for "seatpost 26.4" on EBay and there's a bunch of 2-bolt types.
04-01-13, 11:40 AM
#9
Senior Member
Join Date: Jul 2009
Posts: 11,128
Bikes: 1986 Alan Record Carbonio, 1985 Vitus Plus Carbone 7, 1984 Peugeot PSV, 1972 Line Seeker, 1986(est.) Medici Aerodynamic (Project), 1985(est.) Peugeot PY10FC
Mentioned: 22 Post(s)
Tagged: 0 Thread(s)
Quoted: 150 Post(s)
Likes: 0
Liked 33 Times
in
27 Posts
I never had a seatpost loosen up as such, but I guess it only takes a couple of times with the clamp loosening and moving around to mess up any serrations it might have to when it just won't stay in adjustment anymore....
Frankly, I'd just say to heck with the old post, get a fresh one to replace it and remember to tighten up the clamp bolt adequately, the first time it's installed so the problem does not come back again.....
As already noted, a two bolt clamp type post as a replacement would even be a better idea.....
04-01-13, 12:03 PM
#10
Senior Member
Join Date: Apr 2007
Location: Thunder Bay, Ontario, Canada - burrrrr!
Posts: 11,676
Bikes: 1958 Rabeneick 120D, 1968 Legnano Gran Premio, 196? Torpado Professional, 2000 Marinoni Piuma
Mentioned: 210 Post(s)
Tagged: 0 Thread(s)
Quoted: 1372 Post(s)
Likes: 0
Liked 1,753 Times
in
940 Posts
Consider the position of your saddle. Move it forward, if you can and still achieve good fit. Moving the saddle forward, even a little bit, will dramatically reduce the propensity for tilting back. If you can't move the saddle forward...
Get some machinist's dye and dye the seat post where the tapers fit. Rock the top back and forth a few times under a wee bit of load. Take the assembly apart. Sand or file ever so slightly the areas where the machinist's dye has been rubbed off. Dye the taper again. Rock back and forth again. File again. The dye rubs off where the tapers meet. The greater the area of contact, the less likely it will be for the assembly to slip.
This sounds like a lot of work but it should not take long to get close to full contact. Hope, if you give it a try, that it works for you.
__________________
"98% of the bikes I buy are projects".
"98% of the bikes I buy are projects".
04-01-13, 12:16 PM
#11
Full Member

Join Date: Sep 2009
Posts: 354
Bikes: team miyata, '73 p-14, MB-3, centurion lemans, Mystery TT, mongoose atb '85
Mentioned: 0 Post(s)
Tagged: 0 Thread(s)
Quoted: 1 Post(s)
Likes: 0
Liked 0 Times
in
0 Posts
funny. I've actually sanded the groves away on seat posts like that because I found them impossible to set the saddle angle "correctly". Maybe you could place a thin piece of coarse sandpaper along the contact area?
04-01-13, 12:24 PM
#12
Senior Member
Join Date: Jul 2009
Posts: 11,128
Bikes: 1986 Alan Record Carbonio, 1985 Vitus Plus Carbone 7, 1984 Peugeot PSV, 1972 Line Seeker, 1986(est.) Medici Aerodynamic (Project), 1985(est.) Peugeot PY10FC
Mentioned: 22 Post(s)
Tagged: 0 Thread(s)
Quoted: 150 Post(s)
Likes: 0
Liked 33 Times
in
27 Posts
BTW, JPR (J.P. Routens of France) made a very good two bolt micro adjust seatpost that worked very well with very easy to access bolts. I had one as original equipment on my Peugeot since I got it in 84 and it never gave me any trouble. I think I still see them at eBay once in a while for sale. One should show up at 26.4mm diameter if you watch out for them. Prices are all over the place for them but don't get fooled by some sellers saying that they are rare and worth so much......It's just all those mega price sellers trying to drive up the price on anything French C&V they have for sale.....
04-01-13, 12:25 PM
#13
Senior Member
Join Date: May 2008
Location: Fredericksburg, Va
Posts: 9,579
Bikes: '65 Frejus TDF, '73 Bottecchia Giro d'Italia, '83 Colnago Superissimo, '84 Trek 610, '84 Trek 760, '88 Pinarello Veneto, '88 De Rosa Pro, '89 Pinarello Montello, '94 Burley Duet, 97 Specialized RockHopper, 2010 Langster, Tern Link D8
Mentioned: 73 Post(s)
Tagged: 0 Thread(s)
Quoted: 1609 Post(s)
Liked 2,216 Times
in
1,103 Posts
I would try an adhesive like rubber cement or contact cement between the two mating surfaces. Both are soluable with the right solution and can be seperated. Another though would be to use 320 sandpaper glued to once side and let the rough surface mate with the other part.
Funny that we don't want seat post or stems to stick in the tube but we can't get the saddle mount to keep from moving!
Funny that we don't want seat post or stems to stick in the tube but we can't get the saddle mount to keep from moving!
04-01-13, 12:33 PM
#14
likes to ride an old bike
Join Date: Dec 2010
Location: Madison
Posts: 669
Mentioned: 0 Post(s)
Tagged: 0 Thread(s)
Quoted: 0 Post(s)
Likes: 0
Liked 1 Time
in
1 Post
When this was happening to me, it was because a crack had developed in the fixing bolt. It warned me by creaking, but I didn't heed. Eventually it broke completely. After replacement with a good bolt, problem solved.
04-01-13, 01:33 PM
#15
Senior Member
Join Date: Jul 2004
Location: Yukon, Canada
Posts: 8,759
Mentioned: 13 Post(s)
Tagged: 0 Thread(s)
Quoted: 113 Post(s)
Likes: 0
Liked 16 Times
in
14 Posts
Randy's advice is the best so far. You can do it on the cheep by just sanding one mating surface with say 80 grit emery cloth and then attaching the seat and moving it.. it should smooth out the contact patches and you can work from there. With the surfaces worked over a bit and now rough from the 80 grit I would add assembly paste, aka carbon compound, this is primarily used for carbon assembly to add friction and it works! I use it to prevent my aluminum seatpost in my aluminum frame from slipping. The surfaces should be cleaned with alcohol prior to applying the paste. If you follow randy's advice and make sure the surfaces are mating with maximum area and add some compound (usually red, might even get a free packet from your high zoot LBS (often new frames come with a packet and it is more than is necessary to assemble one frame) you fix your issue.
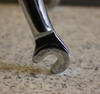
Edit: looking at photo 2 you can see where the black is worn away. Those are the main contact points... give them a file stroke or two and get ride of the black on the whole surface.
Edit: looking at photo 2 you can see where the black is worn away. Those are the main contact points... give them a file stroke or two and get ride of the black on the whole surface.
__________________
1 Super Record bike, 1 Nuovo Record bike, 1 Pista, 1 Road, 1 Cyclocross/Allrounder, 1 MTB, 1 Touring, 1 Fixed gear
1 Super Record bike, 1 Nuovo Record bike, 1 Pista, 1 Road, 1 Cyclocross/Allrounder, 1 MTB, 1 Touring, 1 Fixed gear
04-01-13, 06:02 PM
#16
multimodal commuter
Join Date: Nov 2006
Location: NJ, NYC, LI
Posts: 19,808
Bikes: 1940s Fothergill, 1959 Allegro Special, 1963? Claud Butler Olympic Sprint, Lambert 'Clubman', 1974 Fuji "the Ace", 1976 Holdsworth 650b conversion rando bike, 1983 Trek 720 tourer, 1984 Counterpoint Opus II, 1993 Basso Gap, 2010 Downtube 8h, and...
Mentioned: 584 Post(s)
Tagged: 0 Thread(s)
Quoted: 1908 Post(s)
Liked 574 Times
in
339 Posts
Yes, that is a good technique with many applications. Chalk, pencil lead, or even an ink marker can be used; the basic technique is the same. But in the present case, where there are two curves that need to match at all angles, but where the concave one is not accessible to a file, I'm not sure how much good you can do.
I suggest you cut a piece of a steel can, maybe 1x2cm (or whatever fits between the pieces that need to mate) and punch through it repeatedly with a sharp nail, to make a kind of cheese grater texture. Punch it from both sides, making as many as possible tiny little holes, each surrounded by a crown of jagged broken steel. Put this between the two curved pieces, set the angle of the saddle, and tighten the **** out of it. I think this will take care of the issue.
I suggest you cut a piece of a steel can, maybe 1x2cm (or whatever fits between the pieces that need to mate) and punch through it repeatedly with a sharp nail, to make a kind of cheese grater texture. Punch it from both sides, making as many as possible tiny little holes, each surrounded by a crown of jagged broken steel. Put this between the two curved pieces, set the angle of the saddle, and tighten the **** out of it. I think this will take care of the issue.
04-02-13, 05:15 PM
#17
Banned.
Join Date: Dec 2007
Posts: 27,199
Mentioned: 34 Post(s)
Tagged: 1 Thread(s)
Quoted: 378 Post(s)
Liked 1,410 Times
in
910 Posts
Increase the coefficient of friction between the cradle and rocker.
You can cut, drill, grind, buff, or add super-glue. Then get it fit correctly.
You can cut, drill, grind, buff, or add super-glue. Then get it fit correctly.
04-02-13, 06:21 PM
#18
Restore, ride, repeat...
Join Date: Aug 2009
Location: Chicago
Posts: 403
Mentioned: 4 Post(s)
Tagged: 0 Thread(s)
Quoted: 3 Post(s)
Likes: 0
Liked 0 Times
in
0 Posts
This might sound too simple but I use baking soda toothpaste. I get a natural baking soda toothpaste from Trader Joe's and it always works very well on Campagnolo C record seatposts. I'm 190 lbs, not a very light rider.
04-02-13, 06:29 PM
#19
Senior Member
Join Date: Nov 2012
Posts: 693
Mentioned: 0 Post(s)
Tagged: 0 Thread(s)
Quoted: 3 Post(s)
Likes: 0
Liked 15 Times
in
2 Posts
I would inspect the bolt and threads closely. I would also cut a section of used tube and use it like a washer between the two pieces, maybe let it fold over the edges a bit for a little extra grip.
04-02-13, 06:34 PM
#20
Senior Member

I had a Gipiemme post that looked just like yours. It also slipped, and when I tried to tighten the bolt it stripped the threads. If yours are not already stripped, be careful with tightening it.

Thread
Thread Starter
Forum
Replies
Last Post
SurlyLaika
General Cycling Discussion
18
11-23-11 05:43 PM
ZhanDVG
Classic & Vintage
1
08-20-10 04:04 PM
