


Vintage Raleigh Bottom Bracket Nightmare - Help
 09-10-19, 02:48 PM
#1
Newbie
Thread Starter
Vintage Raleigh Bottom Bracket Nightmare - Help
I recently resumed restoration on a vintage 70's Raleigh Grand Prix that I started a while back.
See Grand Prix Restoration:
Major headaches with the bottom bracket - countless hours trying to convert cottored crank to square-taper cottorless.
Now it's down to this choice:
(1) Either use 1/4 ball bearings with my (third) square-taper replacement axle and then I'm done.
OR
(2) Use slightly smaller 6mm ball bearings - as Sheldon Brown recommends for conversions - but then I would need to (a) further re-size the bottom bracket shell - because the non-drive cup sinks in too far for the lockring or (b) look for yet another replacement axle with a longer middle section (to push the cups out further)
In other words, with the 1/4 bearings, the cups are spaced correctly and the non-drive/adjustable cup is exposed enough for the lockring; And to my eye, the bearings do *seem* to ride in an acceptable zone on the axle...
BUT, this doesn't strictly follow the Sheldon Brown recommendation to use 6mm ball bearings.
See Sheldon Brown Materials:
PHOTOS AT THE END/BOTTOM SHOWING COMPARISON OF
ASSEMBLY WITH 1/4 INCH BEARINGS VERSUS 6 MM BEARINGS
The painful background on what I've done and learned (maybe it will help someone in the future):
FIRST AXLE
1. The length measurements of the cottoredveruscottorless are not at all comparable (One major difference is the large chainwheel offset on the cottored crank). So, using the original cottored crank length as a reference isn't useful. The first axle I tried was close in length to the Raleigh original - but a complete mismatch... non-symmetrical and chainline was way off... Then I started to get a little more scientific.
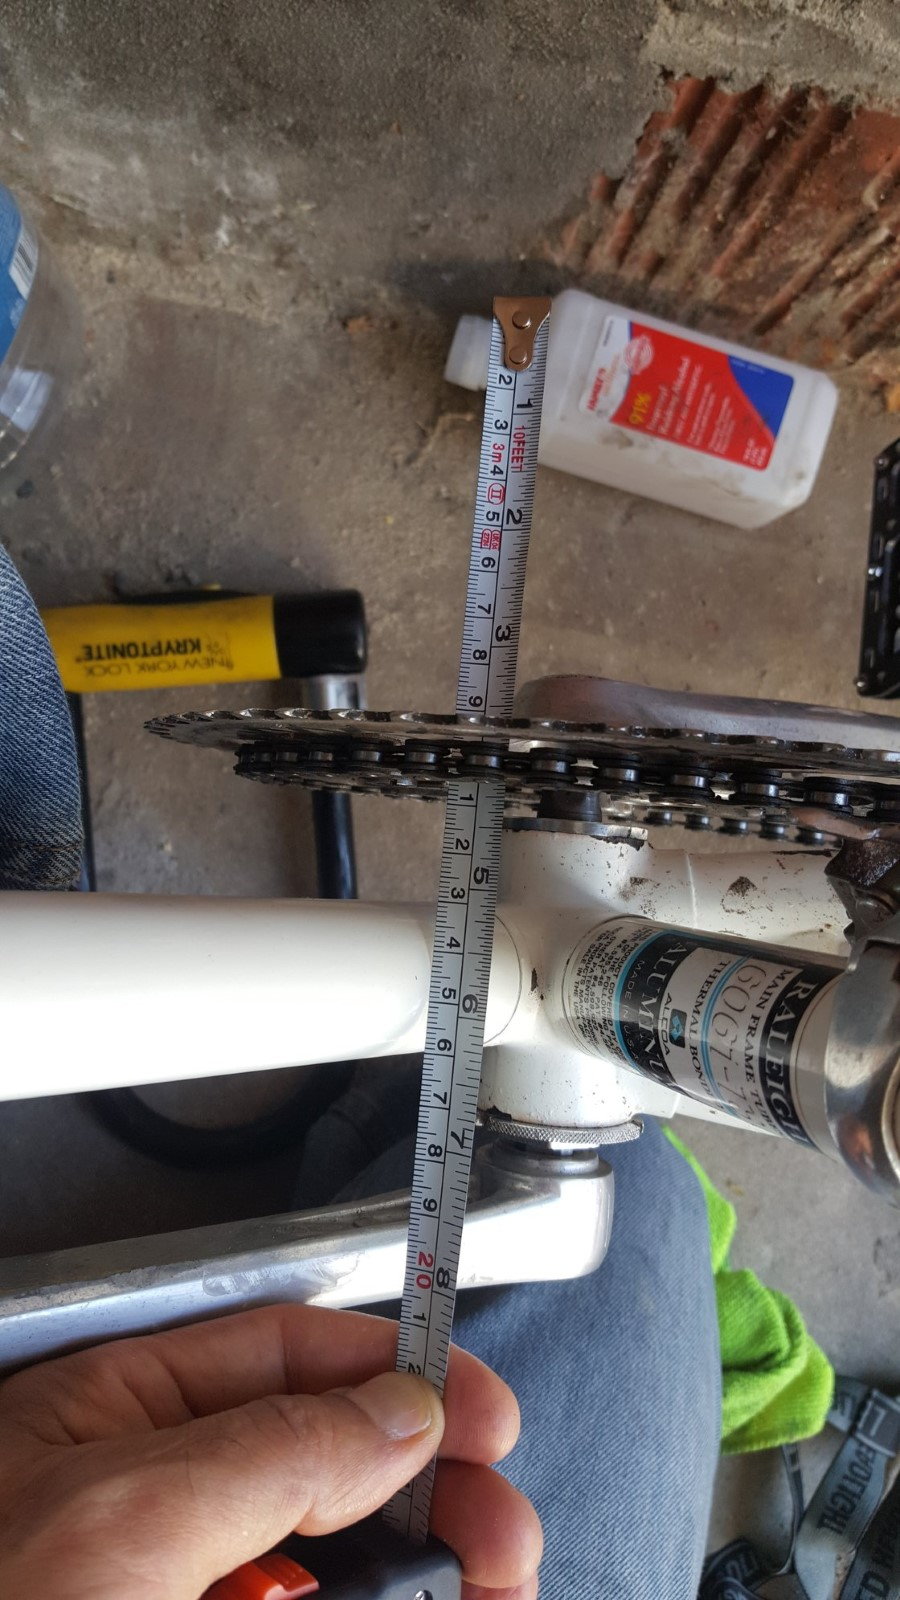
2. YMMV, but on my Grand Prix, the chainline is about the "standard" 43.5 mm (virtual center)...
3. However, the original crankarms on my 70's Raleigh are absolutely NOT symmetrical - the non-drive crank-arm is notably displaced - about a 10mm difference!

The chainline is about 43.5mm - standard for a double. But the non-symmetrical spacing of the original crank-arms is fairly apparent.
SECOND AXLE
4. You can easily purchase "5" series (and presumably "7" series) replacement axles online. (As per recommendations from Sheldon Brown)
Recognizing I had a 71 mm frame (actually 71.5mm), I initially ordered a "5" series replacement axle from a supplier on the auction site name firecloud (nice guy). The overall length was 135mm and the center to center 56mm, but I ended up with a chainline of about 47.5mm. This axle was marked "5S".

SECOND AXLE. This is "5" series bottom bracket axle about 135mm

With this 135mm (overall length) axle, the chainline is about 47.5mm
5. Incidentally, I did have another bike with a 47.5mm chainline - a 1989 Raleigh Technium BUT the 1989 Raleigh has 130mm rear hub spacing. *Apparently, the wider hub (and spacers used) moves the rear freewheel outwards (and allows for a larger chainline).
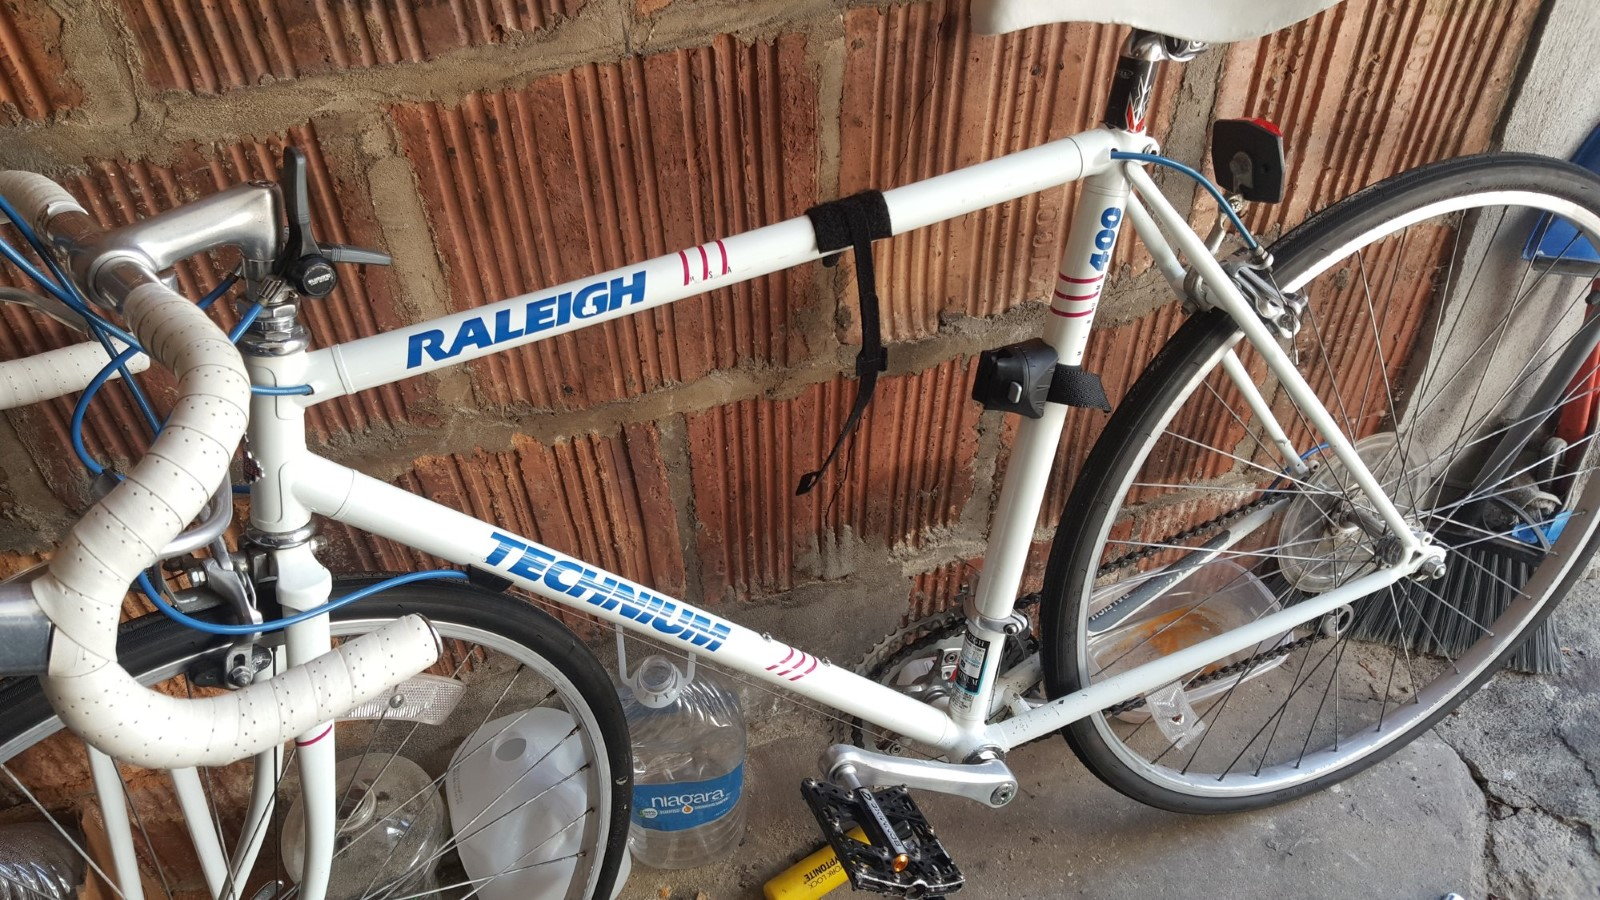
1989 Raleigh Technium 400 (for chainline reference)
The 1989 Raleigh incidentally also has a chainline of about 47.5mm
6. In contrast however, the 70's Grand Prix rear hub is/was only 120mm or so. This limits the range of chainline by moving the freewheel closer to the lateral center of the frame.
7. In attempts to better match the chainline, I stretched out the rear dropouts to 126mm... and rebuilt the wheel with a 126mm axle to move the freewheel out as much as possible (to accommodate the larger chainline). BUT based on sight lines and measurements, I could only get up to about 45mm from lateral center - still about 2mm to 3mm off.
8. Note that it took a stretch of about 140mm to spring back and stay at about 126mm. I was tempted to push to 130mm, but I didn't want to destroy anything
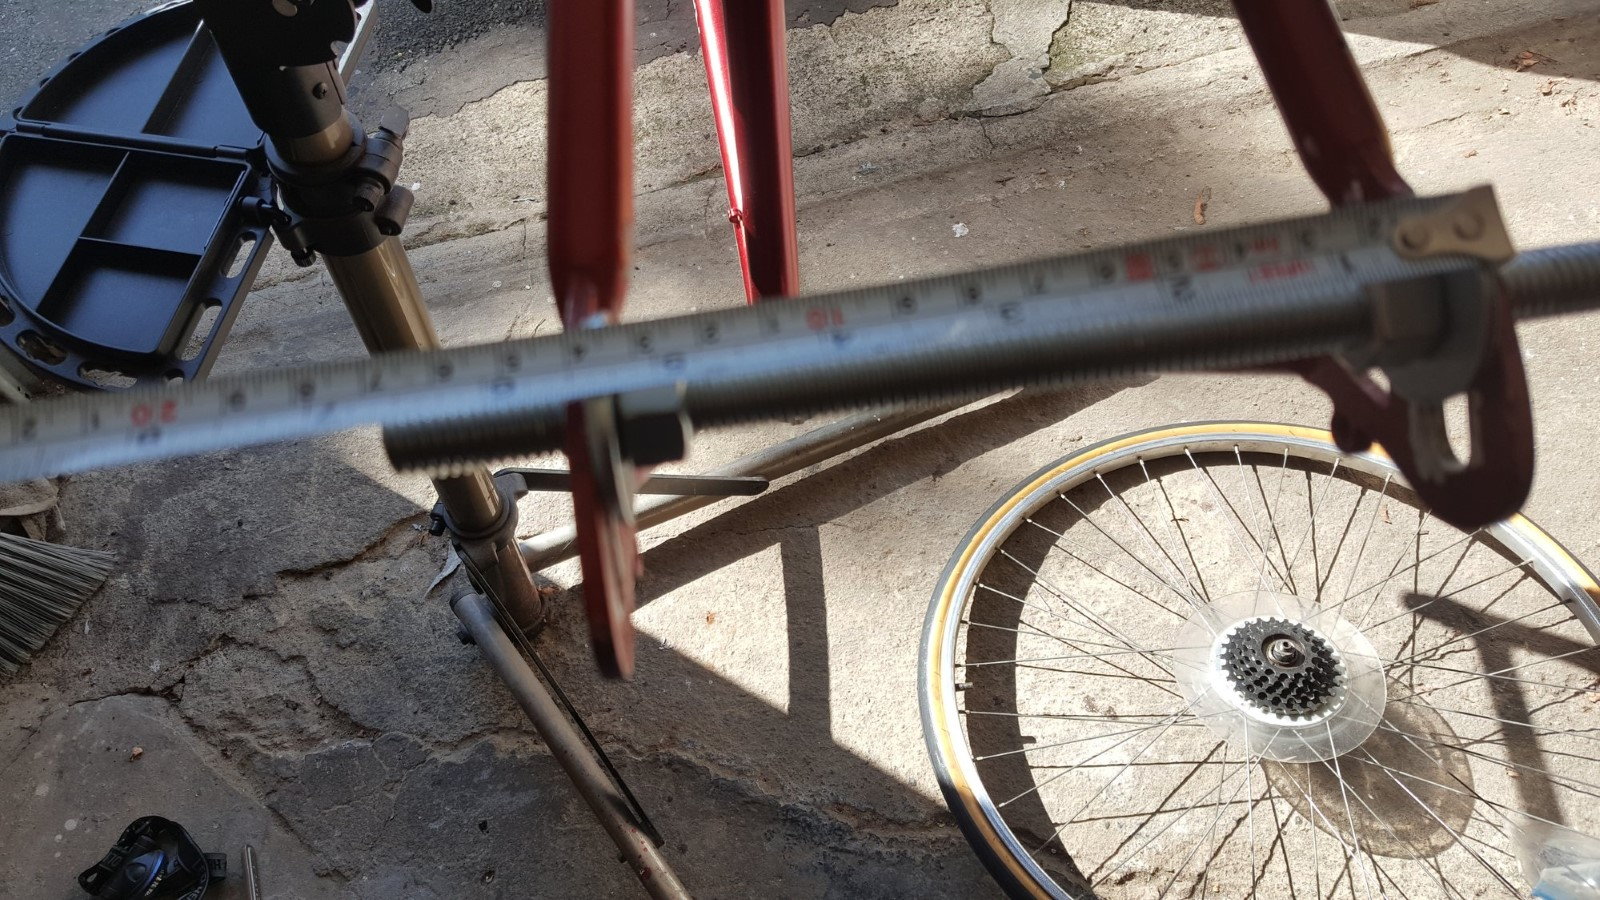
I had to stretch out to about 140mm or so...
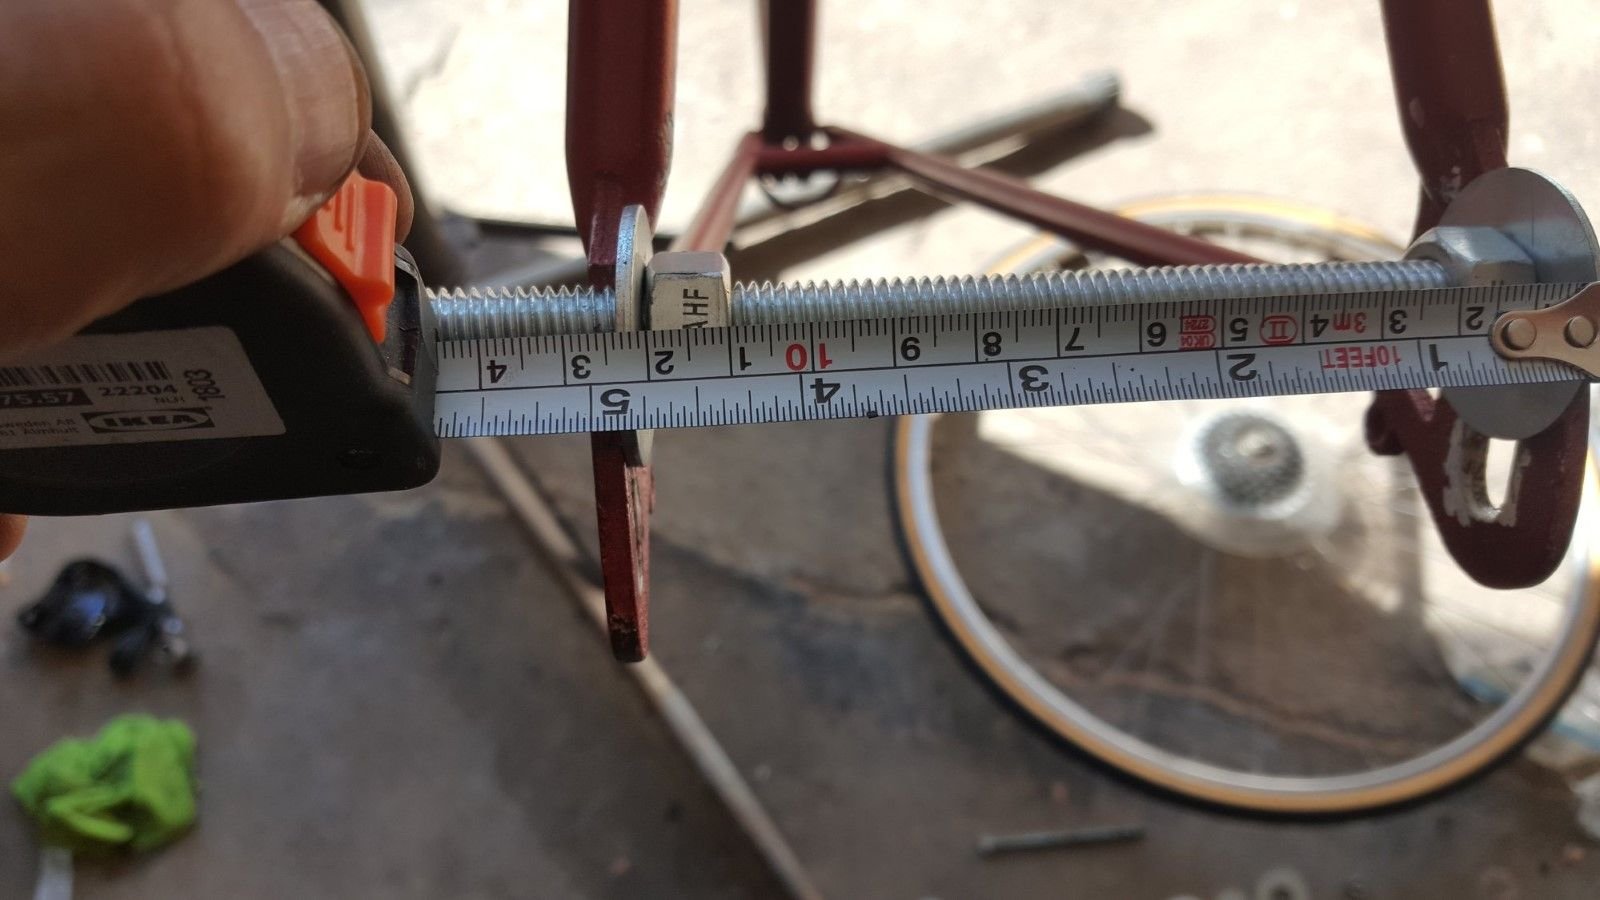
After the stretching the frame "snapped back" to about 125-126mm. The wider hub axle would allow me to move the rear freewheel further out from lateral center - an effort to accommodate the larger chainline
Yet, I could only get up to about 45mm from lateral center - still about 2mm to 3mm off.
See Grand Prix Restoration:
Major headaches with the bottom bracket - countless hours trying to convert cottored crank to square-taper cottorless.
Now it's down to this choice:
(1) Either use 1/4 ball bearings with my (third) square-taper replacement axle and then I'm done.
OR
(2) Use slightly smaller 6mm ball bearings - as Sheldon Brown recommends for conversions - but then I would need to (a) further re-size the bottom bracket shell - because the non-drive cup sinks in too far for the lockring or (b) look for yet another replacement axle with a longer middle section (to push the cups out further)
In other words, with the 1/4 bearings, the cups are spaced correctly and the non-drive/adjustable cup is exposed enough for the lockring; And to my eye, the bearings do *seem* to ride in an acceptable zone on the axle...
BUT, this doesn't strictly follow the Sheldon Brown recommendation to use 6mm ball bearings.
See Sheldon Brown Materials:
PHOTOS AT THE END/BOTTOM SHOWING COMPARISON OF
ASSEMBLY WITH 1/4 INCH BEARINGS VERSUS 6 MM BEARINGS
The painful background on what I've done and learned (maybe it will help someone in the future):
FIRST AXLE
1. The length measurements of the cottoredveruscottorless are not at all comparable (One major difference is the large chainwheel offset on the cottored crank). So, using the original cottored crank length as a reference isn't useful. The first axle I tried was close in length to the Raleigh original - but a complete mismatch... non-symmetrical and chainline was way off... Then I started to get a little more scientific.
2. YMMV, but on my Grand Prix, the chainline is about the "standard" 43.5 mm (virtual center)...
3. However, the original crankarms on my 70's Raleigh are absolutely NOT symmetrical - the non-drive crank-arm is notably displaced - about a 10mm difference!
The chainline is about 43.5mm - standard for a double. But the non-symmetrical spacing of the original crank-arms is fairly apparent.
SECOND AXLE
4. You can easily purchase "5" series (and presumably "7" series) replacement axles online. (As per recommendations from Sheldon Brown)
Recognizing I had a 71 mm frame (actually 71.5mm), I initially ordered a "5" series replacement axle from a supplier on the auction site name firecloud (nice guy). The overall length was 135mm and the center to center 56mm, but I ended up with a chainline of about 47.5mm. This axle was marked "5S".
SECOND AXLE. This is "5" series bottom bracket axle about 135mm
With this 135mm (overall length) axle, the chainline is about 47.5mm
5. Incidentally, I did have another bike with a 47.5mm chainline - a 1989 Raleigh Technium BUT the 1989 Raleigh has 130mm rear hub spacing. *Apparently, the wider hub (and spacers used) moves the rear freewheel outwards (and allows for a larger chainline).
1989 Raleigh Technium 400 (for chainline reference)
The 1989 Raleigh incidentally also has a chainline of about 47.5mm
6. In contrast however, the 70's Grand Prix rear hub is/was only 120mm or so. This limits the range of chainline by moving the freewheel closer to the lateral center of the frame.
7. In attempts to better match the chainline, I stretched out the rear dropouts to 126mm... and rebuilt the wheel with a 126mm axle to move the freewheel out as much as possible (to accommodate the larger chainline). BUT based on sight lines and measurements, I could only get up to about 45mm from lateral center - still about 2mm to 3mm off.
8. Note that it took a stretch of about 140mm to spring back and stay at about 126mm. I was tempted to push to 130mm, but I didn't want to destroy anything
I had to stretch out to about 140mm or so...
After the stretching the frame "snapped back" to about 125-126mm. The wider hub axle would allow me to move the rear freewheel further out from lateral center - an effort to accommodate the larger chainline
Yet, I could only get up to about 45mm from lateral center - still about 2mm to 3mm off.
Last edited by djordan; 09-10-19 at 03:11 PM.
 09-10-19, 02:54 PM
#2
Newbie
Thread Starter
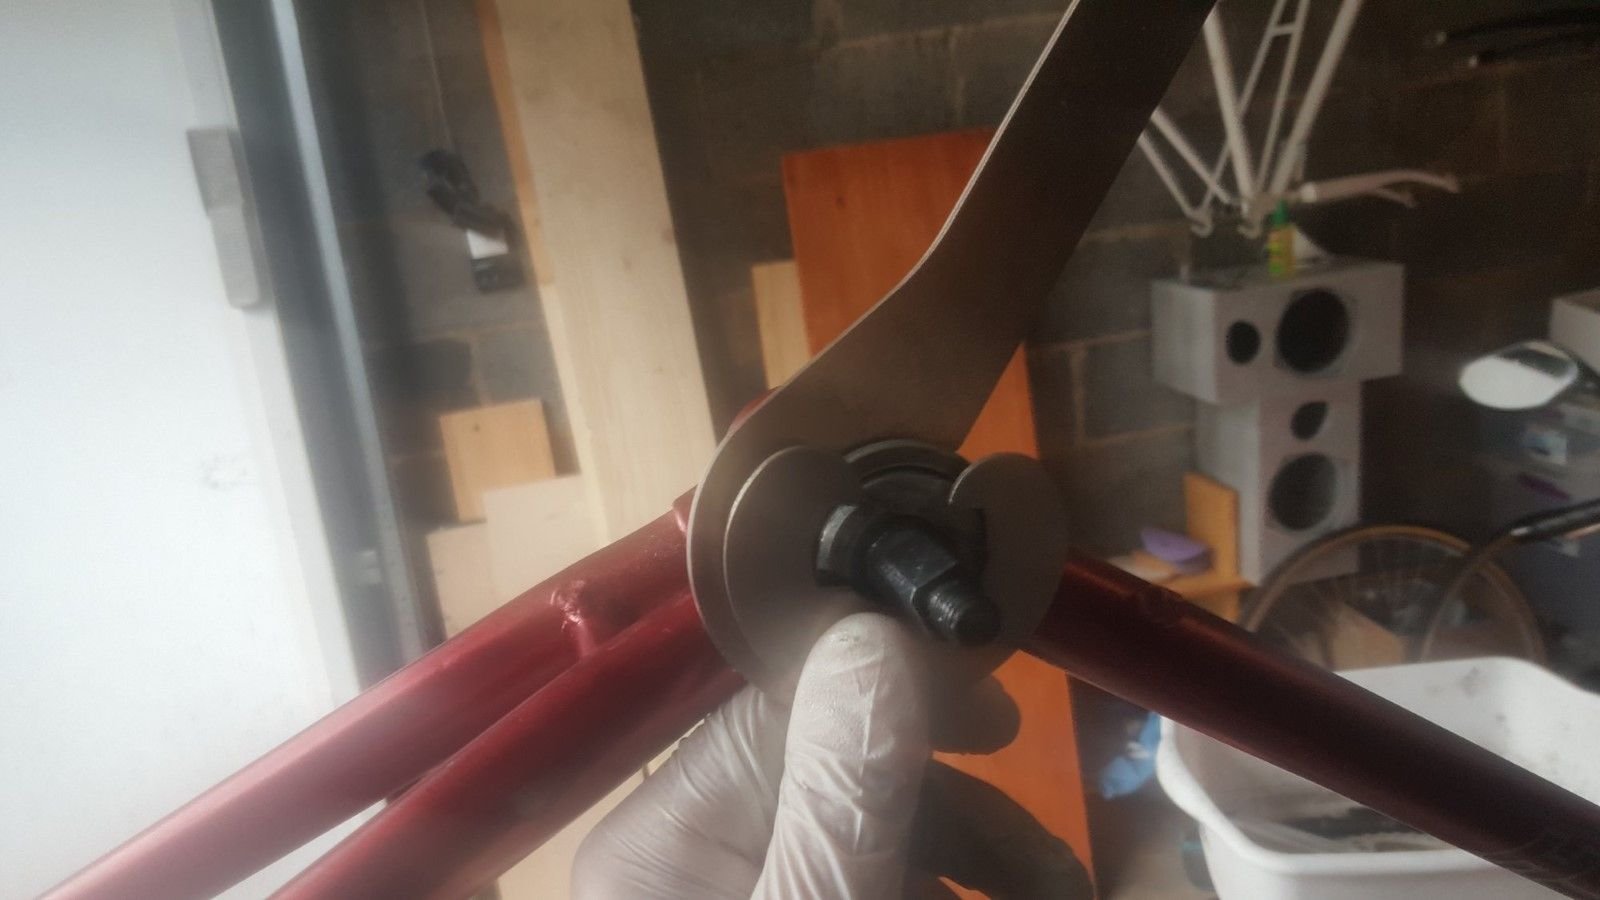
THIRD (CURRENT) AXLE
9. Then, based upon the Seller's reference chart, I ordered another "5S" axle from a US seller "iweld" about 127.5mm in overall length
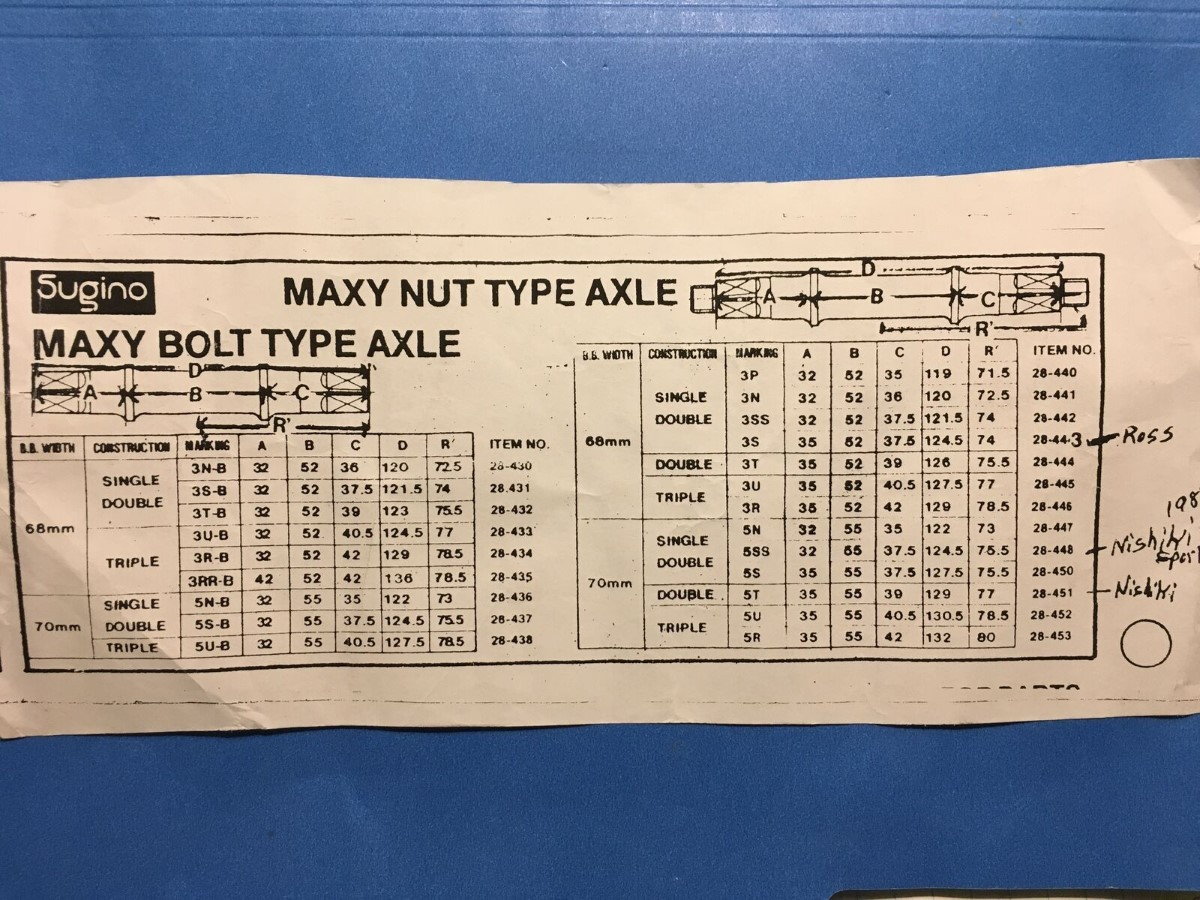
The sellers reference chart for BB axles. Sheldon Brown has a similar one on his site
Now, a perfect chainline of 43.5mm... (with the shorter 127.5mm overall length axle) but the non-drive/adjustable cup was threading in too far for the lockring!
10. In desperation, I went ahead and started sanding down the shell to make it narrower - and I succeeded!

I know. Anyone whos read this far is now going Oh No! WTF!
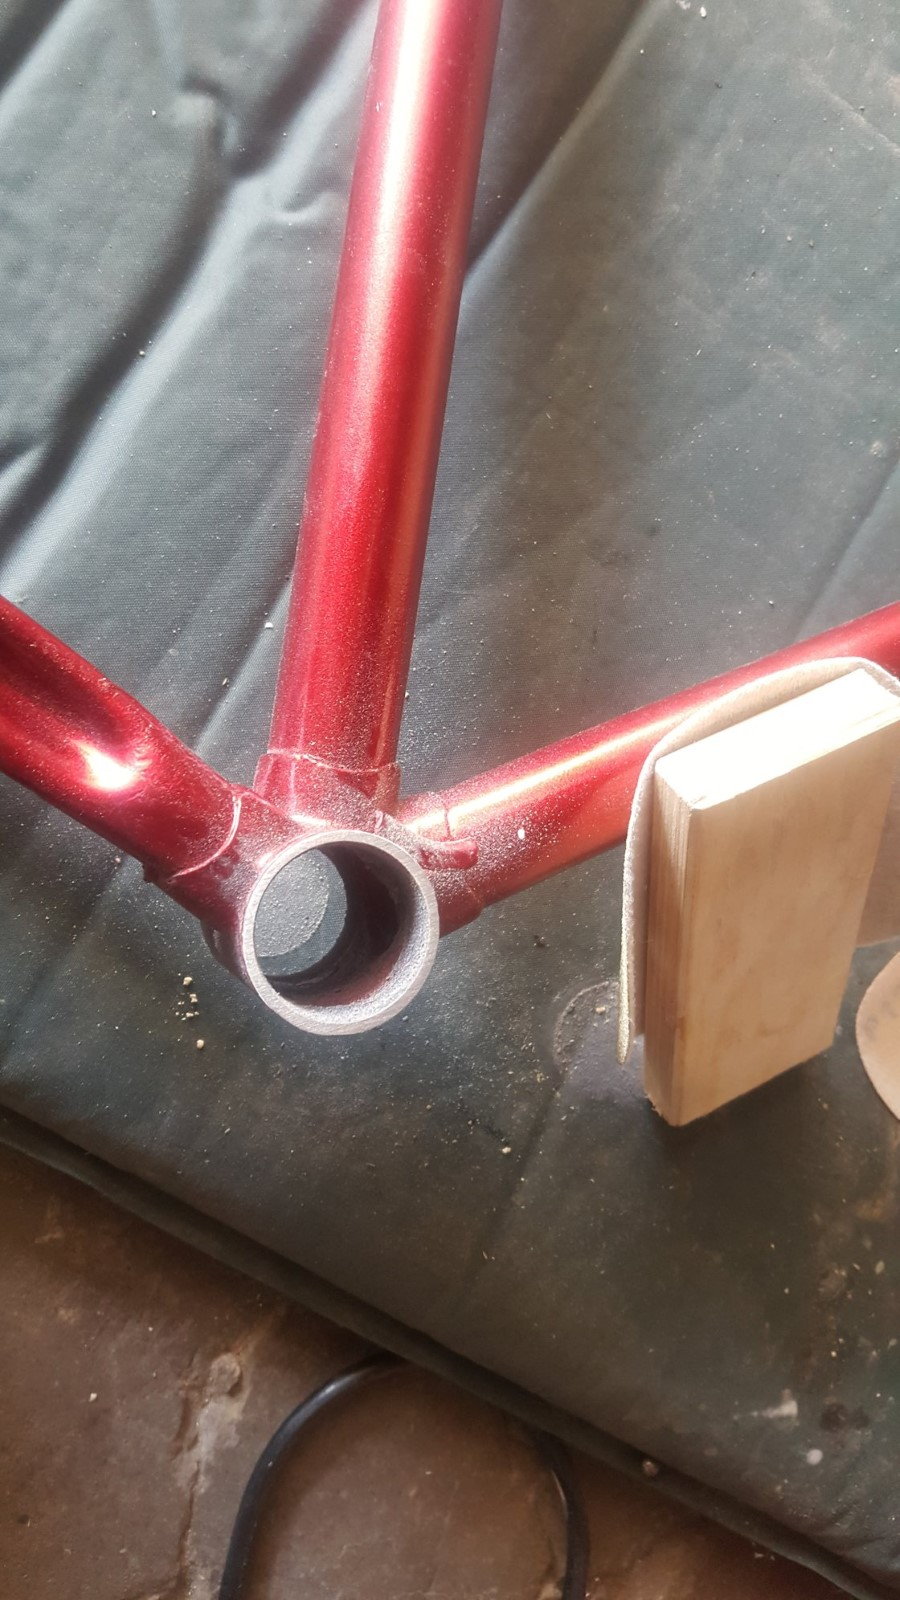
Sanding down to a nice smooth flat surface (or so I thought it was flat)
11. Unfortunately, no longer "square" to the frame!
Lesson Learned: You really need the right tools, techniques and expertise to do this properly!

Amazed when I saw this - how just a tiny bit of grinding/sanding resulted in making the shell no longer square
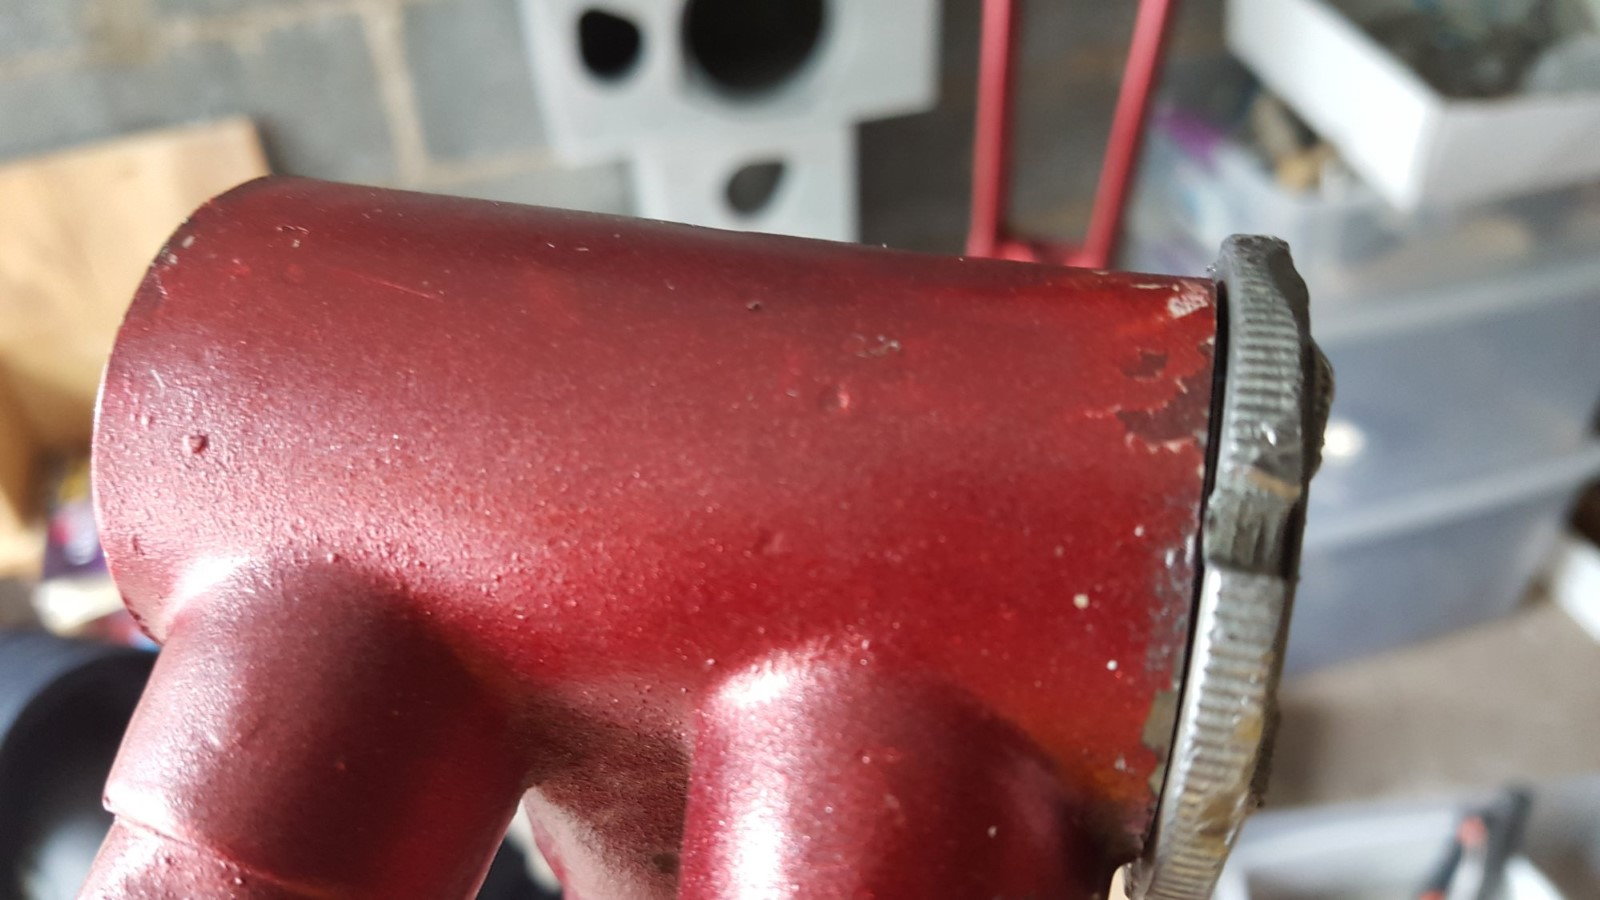
You can see the gap between lockring and shell
2. So yesterday, I found a machine shop to square it up. The dude dosen't even work on bikes, but he did a great job - it's square again... (and the overall BB shell is now reduced to 69 mm)
Shell is square again (parallel to the frame). The bottom bracket shell is now 69mm - 2.5mm shorter than where it started.
BUT
EVEN WITH THE 2.5mm reduction in width, with the 6mm bearings, the non-drive/adjustable cups STILL thread in too far with not quite enough threads for the lockring. So I'm back to my original question...
9. Then, based upon the Seller's reference chart, I ordered another "5S" axle from a US seller "iweld" about 127.5mm in overall length
The sellers reference chart for BB axles. Sheldon Brown has a similar one on his site
Now, a perfect chainline of 43.5mm... (with the shorter 127.5mm overall length axle) but the non-drive/adjustable cup was threading in too far for the lockring!
10. In desperation, I went ahead and started sanding down the shell to make it narrower - and I succeeded!
I know. Anyone whos read this far is now going Oh No! WTF!
Sanding down to a nice smooth flat surface (or so I thought it was flat)
11. Unfortunately, no longer "square" to the frame!
Lesson Learned: You really need the right tools, techniques and expertise to do this properly!
Amazed when I saw this - how just a tiny bit of grinding/sanding resulted in making the shell no longer square
You can see the gap between lockring and shell
2. So yesterday, I found a machine shop to square it up. The dude dosen't even work on bikes, but he did a great job - it's square again... (and the overall BB shell is now reduced to 69 mm)
Shell is square again (parallel to the frame). The bottom bracket shell is now 69mm - 2.5mm shorter than where it started.
BUT
EVEN WITH THE 2.5mm reduction in width, with the 6mm bearings, the non-drive/adjustable cups STILL thread in too far with not quite enough threads for the lockring. So I'm back to my original question...
09-10-19, 03:01 PM
#3
Newbie
Thread Starter
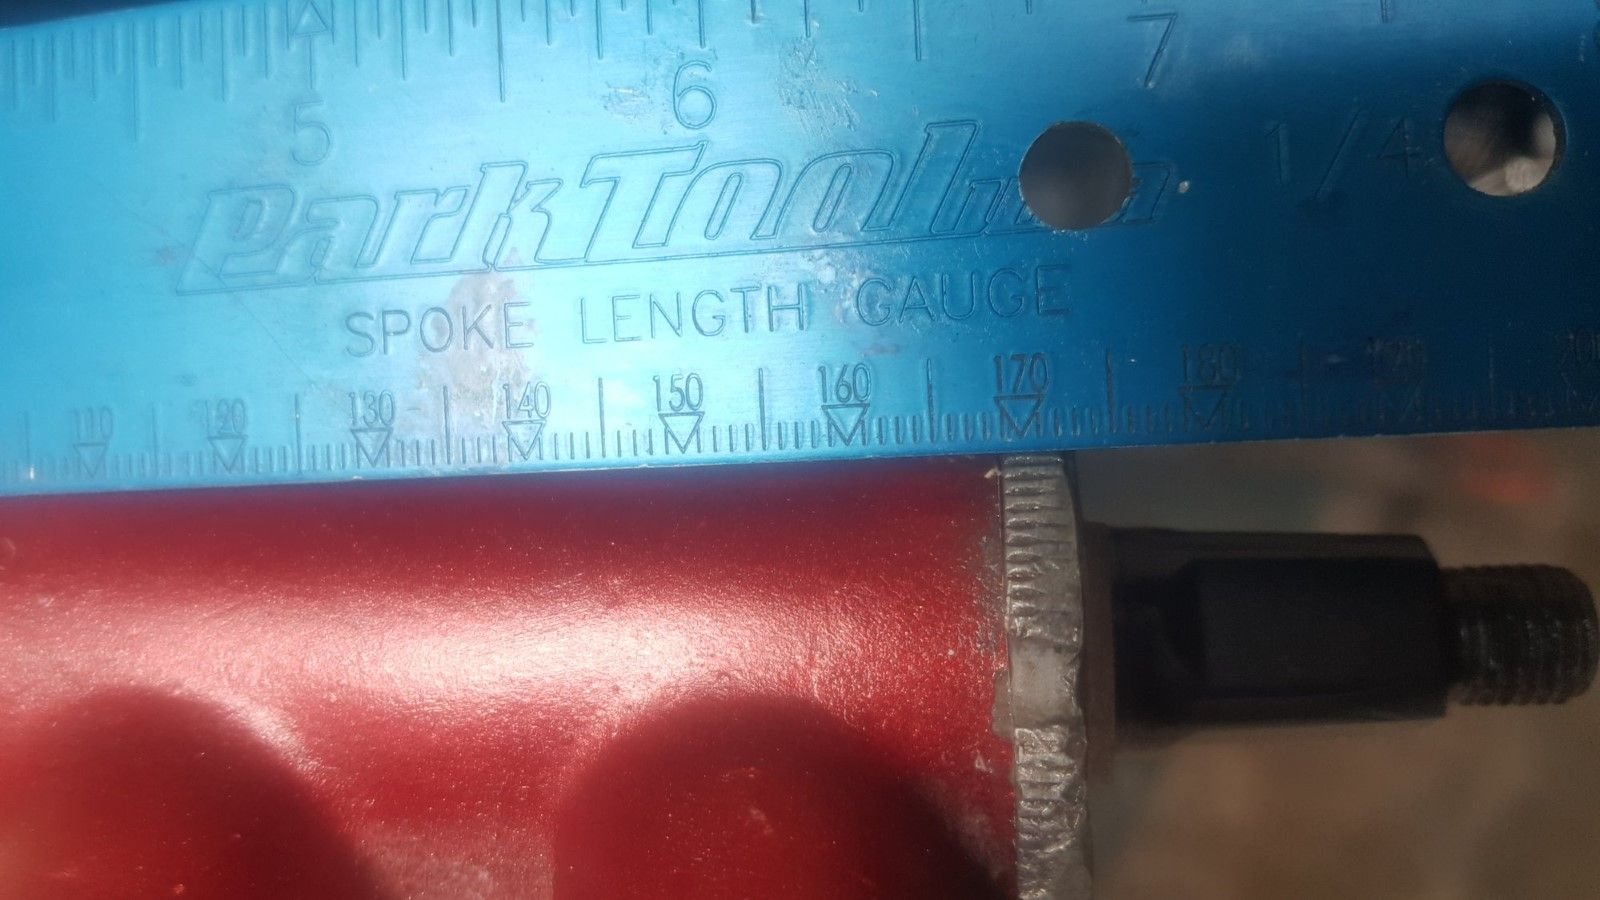
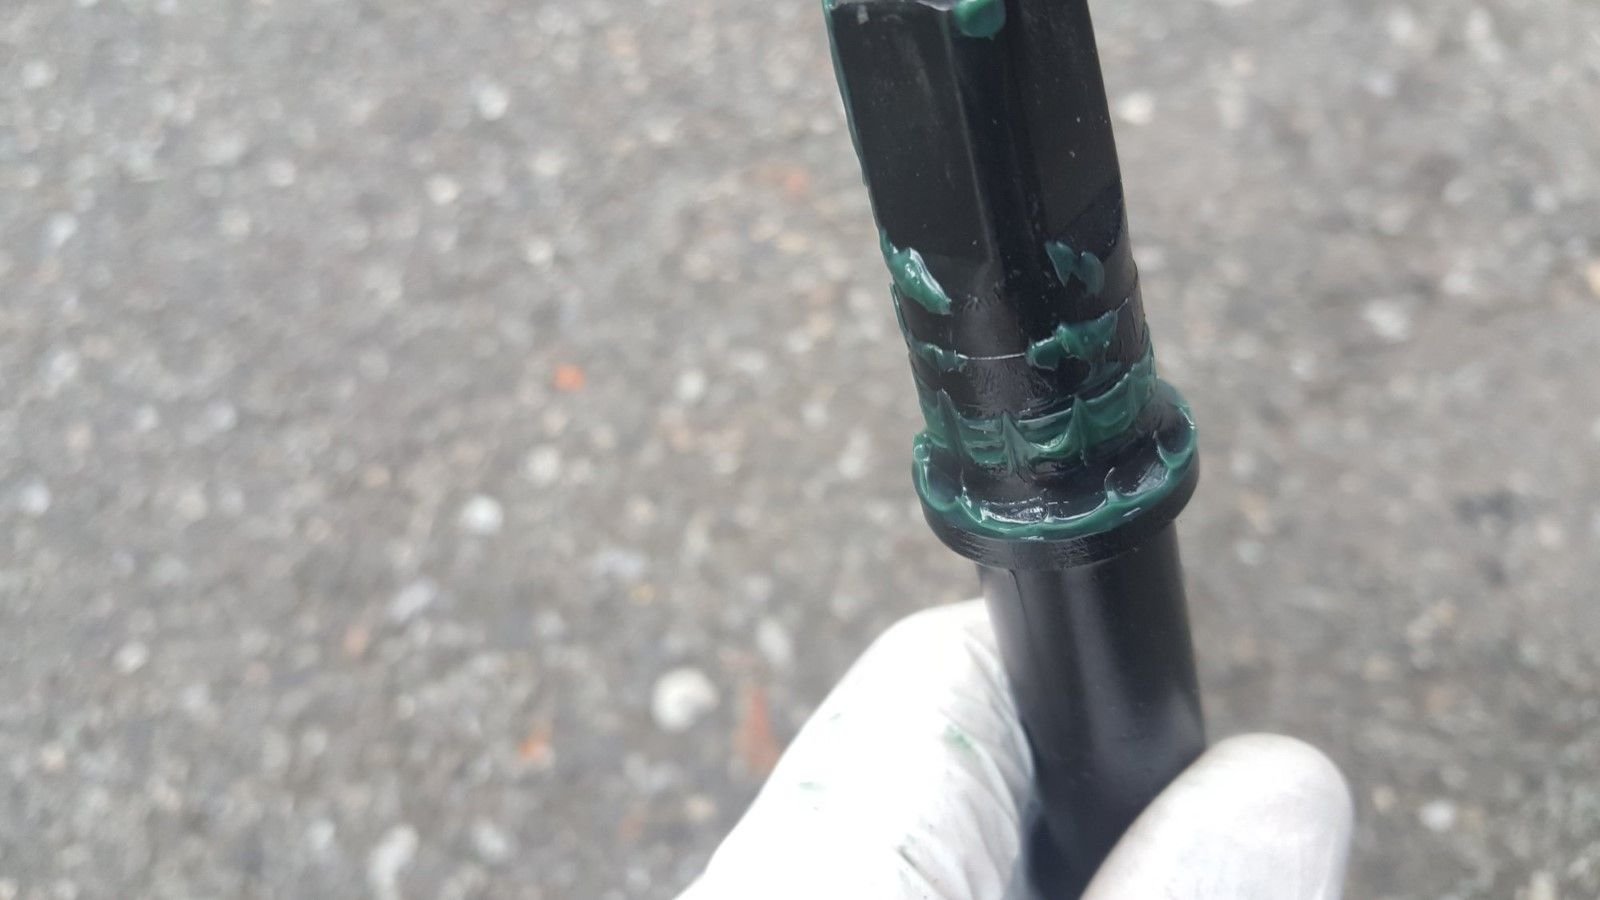
COMPARISON OF LOCKRING POSITION / BEARINGS RIDING ON AXLE:
1/4 INCH BEARINGS:
RIDING POSITIONS ON AXLE / LOCKRING
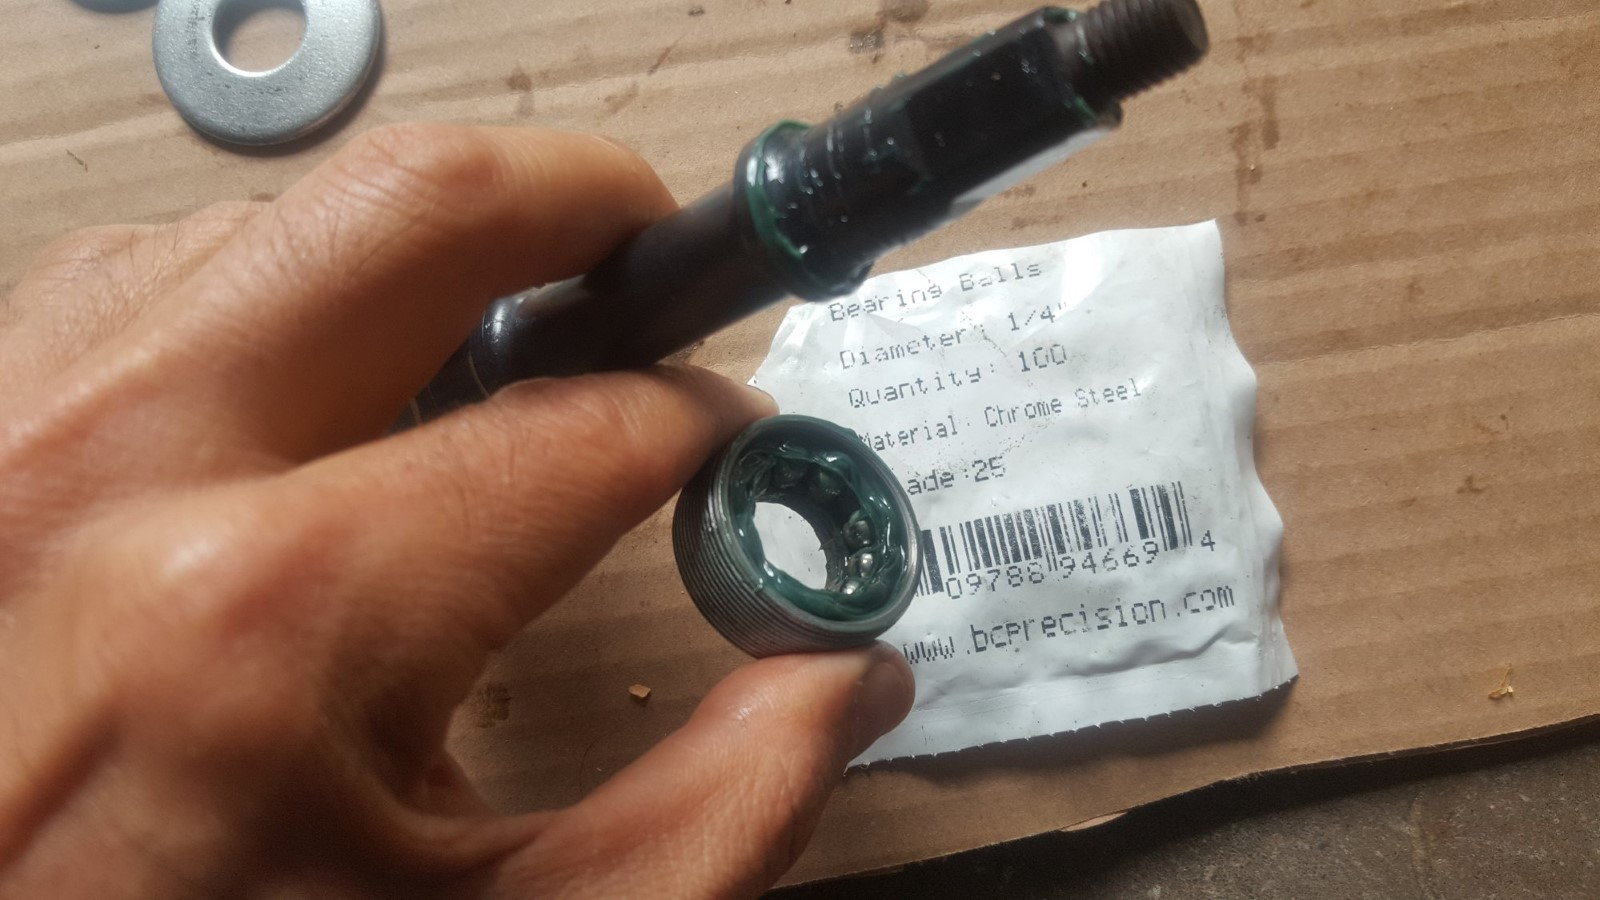
Assembly with 1/4 inch bearings

Checking the where bearings are riding on the axle (per Sheldon Brown). I did some rotations after this photo
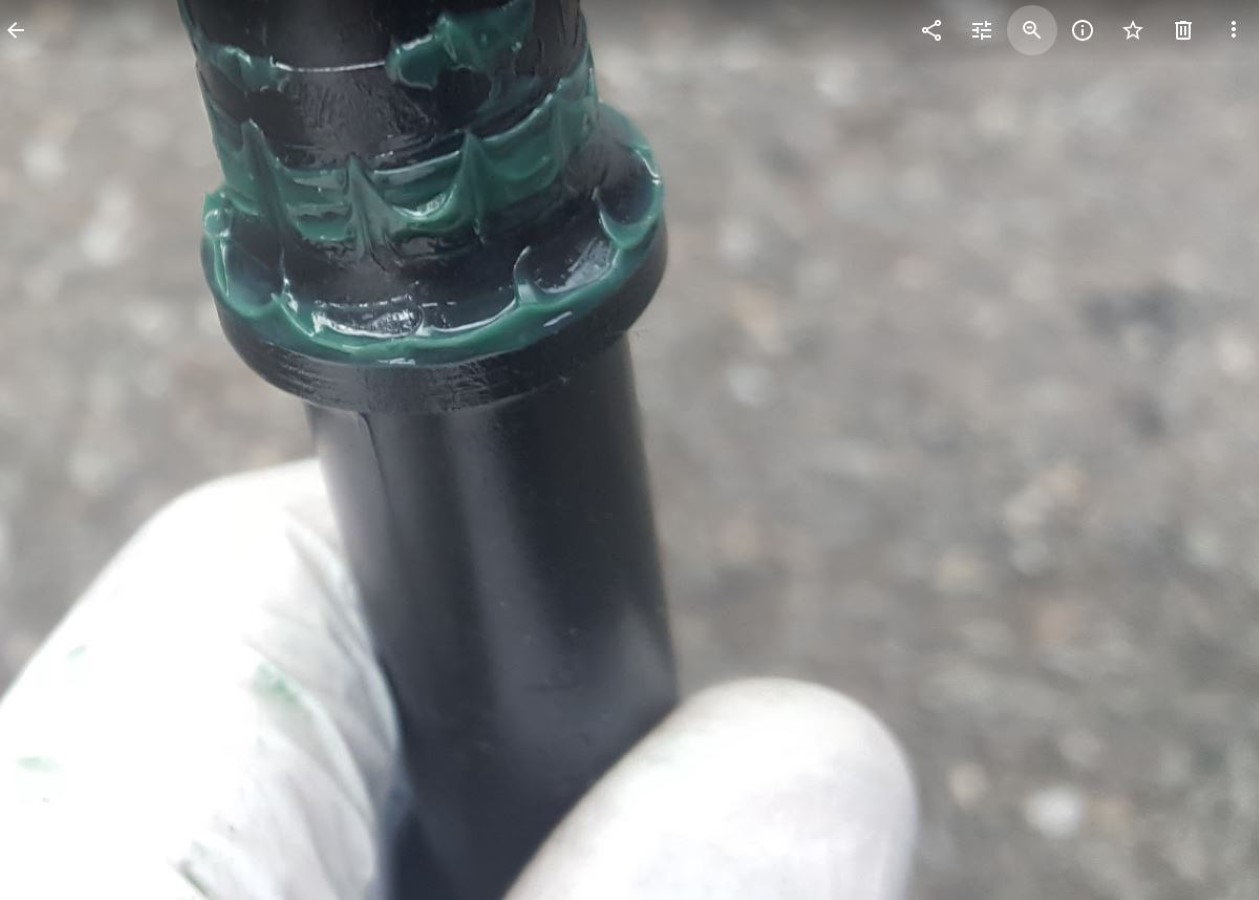
After rotation testing - Bearings *seem to be* riding in an acceptable position.
After rotation testing - Bearings *seem to be* riding in an acceptable position.
Lockring and cup tools can be used together (not possible if cup goes in too far)

Sufficient thread to hold lockring on securely
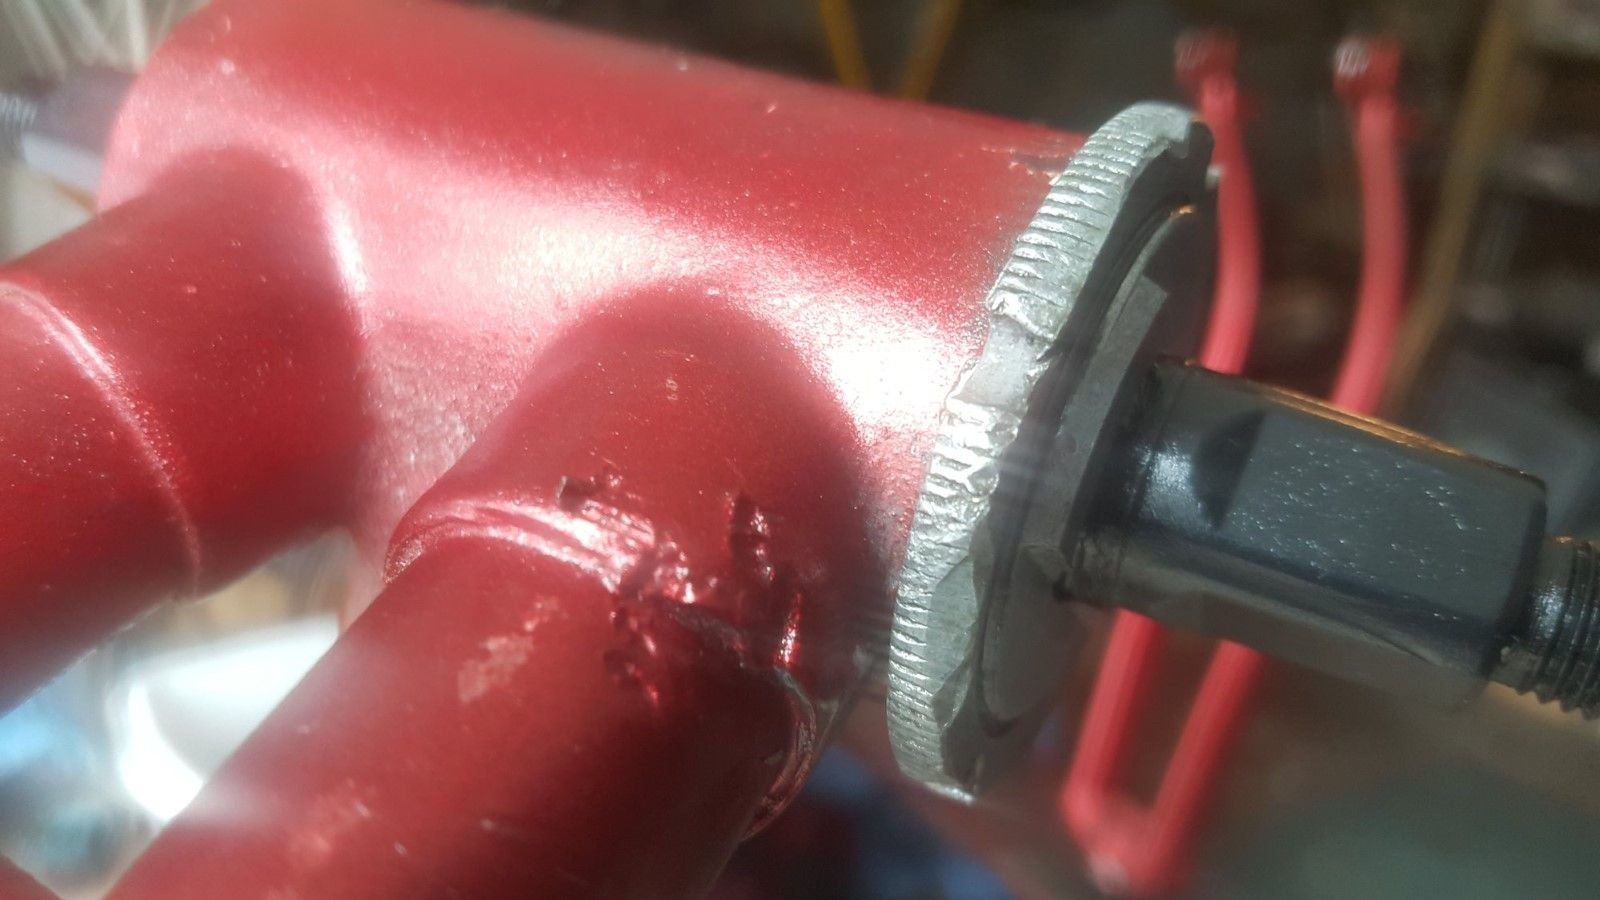
1/4 inch bearings leave a sufficient amounts of threads for lockring
SEE VIDEO
https://photos.app.goo.gl/wBDFrSMUMrWGjKov7
1/4 INCH BEARINGS:
RIDING POSITIONS ON AXLE / LOCKRING
Assembly with 1/4 inch bearings
Checking the where bearings are riding on the axle (per Sheldon Brown). I did some rotations after this photo
After rotation testing - Bearings *seem to be* riding in an acceptable position.
After rotation testing - Bearings *seem to be* riding in an acceptable position.
Lockring and cup tools can be used together (not possible if cup goes in too far)
Sufficient thread to hold lockring on securely
1/4 inch bearings leave a sufficient amounts of threads for lockring
SEE VIDEO
https://photos.app.goo.gl/wBDFrSMUMrWGjKov7
09-10-19, 03:04 PM
#4
Newbie
Thread Starter
6 MM BEARINGS
RIDING POSITIONS ON AXLE / LOCKRING

Assembly with the 6mm bearnings
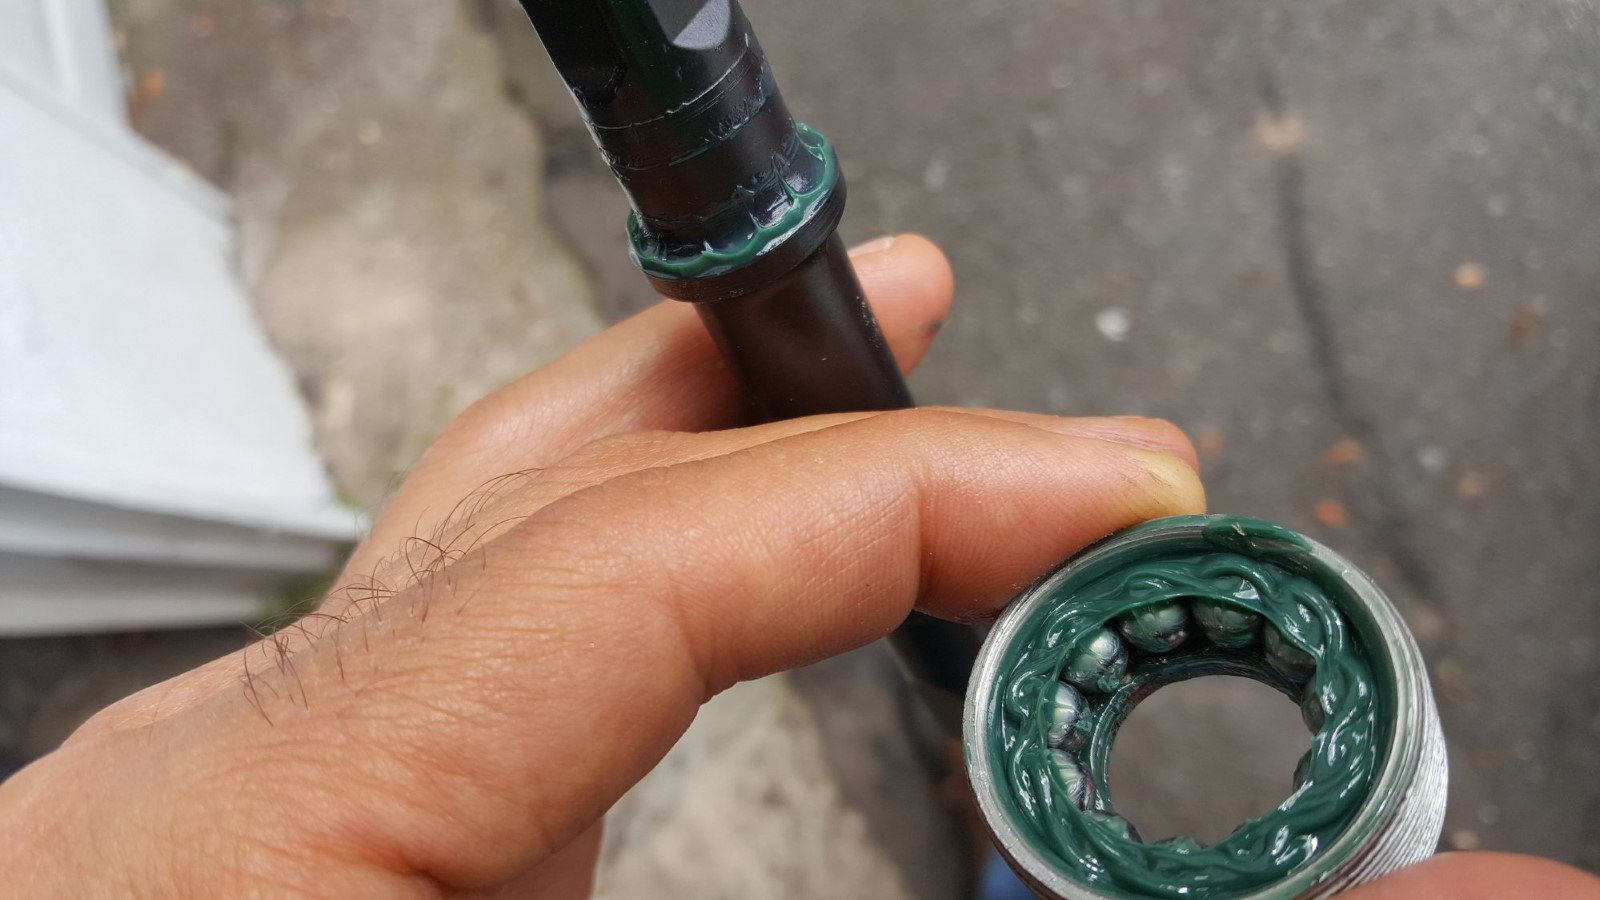
Assembly with the 6mm bearnings

Riding position of 6mm bearing after rotation
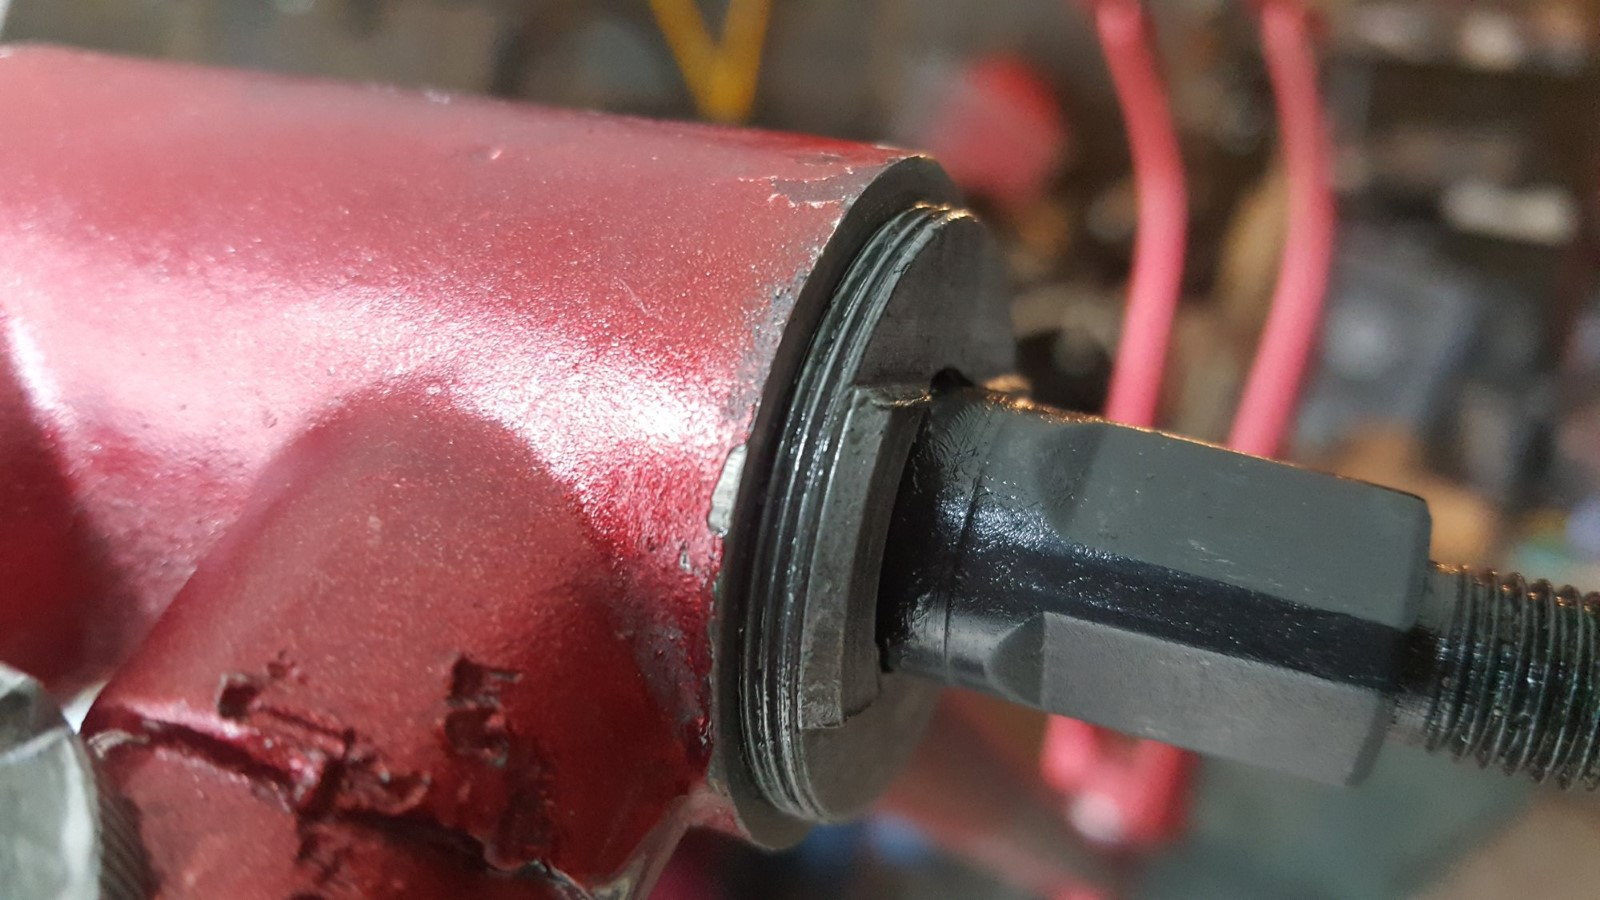
Cups go in just a bit too far - barely enough exposed threads for lockring

Cups go in just a bit too far - barely enough exposed threads for lockring
RIDING POSITIONS ON AXLE / LOCKRING
Assembly with the 6mm bearnings
Assembly with the 6mm bearnings
Riding position of 6mm bearing after rotation
Cups go in just a bit too far - barely enough exposed threads for lockring
Cups go in just a bit too far - barely enough exposed threads for lockring
09-10-19, 03:22 PM
#5
Newbie
Thread Starter
So my inclination at the moment is to leave it assembled with the 1/4 bearings and proceed with the rebuild.
I'm going to sell the bike (that was my original plan all long). I can leave the buyer with advice to pay attention to how the bottom bracket feels - and check it out in any event in a few months or a year.
I'll tell him *if needed* he can grind down the shell another mm - and I'll leave him with a fresh set of 6mm bearings!
09-10-19, 03:30 PM
#6

Friendship is Magic

Join Date: Nov 2010
Location: Sacramento, CA
Posts: 22,984
Bikes: old ones
Mentioned: 304 Post(s)
Tagged: 0 Thread(s)
Quoted: 26402 Post(s)
Liked 10,374 Times
in
7,203 Posts
...not sure I see the problem with using the 1/4" bearings and being done. What am I missing ? If you're worried about exactly following a recommendation from the Sheldon site, you ought to realize that the late Sheldon Brown was the king of the kludge. If it looks like you've got it workable with those 1/4" bearings, use them and ride your bike.
I didn't even know you could still source those 5 series Maxy axles. That was always the most painful part of doing the conversions. Thanks for the info.
I didn't even know you could still source those 5 series Maxy axles. That was always the most painful part of doing the conversions. Thanks for the info.
 09-10-19, 03:40 PM
#7
Friendship is Magic
Join Date: Nov 2010
Location: Sacramento, CA
Posts: 22,984
Bikes: old ones
Mentioned: 304 Post(s)
Tagged: 0 Thread(s)
Quoted: 26402 Post(s)
Liked 10,374 Times
in
7,203 Posts
....oh yeah, if you ever have to do something like this again, find someone with a piloted facing tool. And it's generally considered best practice to face equal amounts off each side of the shell to do the width reduction. But it often ends up easier and cheaper to just ream it out and retap Italian. The sealed BB units for Italian threading are readily available, often cheap, and are designed with an Italian BB shell width of 70mm in mind.
But again, I would call that working right now. Life is short.
But again, I would call that working right now. Life is short.
09-10-19, 04:00 PM
#8
Newbie
Thread Starter
Thanks for the encouragment 3alarmer
I'd expect you to be extra cautious with that name
Yes - just leave it and move on. What's the worst thing that could happen?
The BB would send out signals to the rider long before any kind of catastrophic failure
- and it's now only 1 mm away (on the drive side) from being able to nicely fit a friction-type cartridge bottom bracket.
Note that I was tempted to but didn't investigate any of the professional shop options.
I thought it would be big $ and that they wouldn't have the correct 26 tpi jigs to begin with...
But I didn't consider re-tapping with the Italian threading - and I could see how purchasing the correctly designed three/four pieces together would make life much easier.
Regarding the symmetrical re-facing... its' not applicable for re-using the 26 tpi cups because the fixed cup threads in to a fixed depth regardless of shell width (I think)
But yes, any other kind of retrofit, symmetry is called for
From what I saw, I'd also say that any reasonably competent metal worker can accurately grind down a bottom bracket.
(The guy I stumbled into was just the first guy I found in the industrial area of my town).
After my first fiasco, I realized that to achieve "squareness" you can simply thread the cup in and out and mark the high/low spots as you go along.
09-10-19, 04:02 PM
#9
Senior Member
Join Date: Aug 2005
Location: Pittsburgh, PA
Posts: 33,656
Bikes: '96 Litespeed Catalyst, '05 Litespeed Firenze, '06 Litespeed Tuscany, '20 Surly Midnight Special, All are 3x10. It is hilly around here!
Mentioned: 39 Post(s)
Tagged: 0 Thread(s)
Quoted: 2026 Post(s)
Likes: 0
Liked 1,096 Times
in
742 Posts
A friend owns a '72' Raleigh Surper Course that also came with a cottered crank which we replaced with a square taper spindle and SR crank. We reused both cups from the original (Stronglight?) crank's bottom bracket and 1/4" bearing balls. The adjustable cup threaded in fine and we certainly didn't agonize over a mm or 2 for the chainline. He rode it for several years with no problems at all.
09-10-19, 04:10 PM
#10
Newbie
Thread Starter
Cool. A vote to not drive myself crazy with elusive perfectionism. Thanks HillRider!
09-10-19, 04:22 PM
#11
Friendship is Magic
Join Date: Nov 2010
Location: Sacramento, CA
Posts: 22,984
Bikes: old ones
Mentioned: 304 Post(s)
Tagged: 0 Thread(s)
Quoted: 26402 Post(s)
Liked 10,374 Times
in
7,203 Posts
09-10-19, 04:26 PM
#12
Friendship is Magic
Join Date: Nov 2010
Location: Sacramento, CA
Posts: 22,984
Bikes: old ones
Mentioned: 304 Post(s)
Tagged: 0 Thread(s)
Quoted: 26402 Post(s)
Liked 10,374 Times
in
7,203 Posts
...I don't know why somebody like one of the major makers like Shimano doesn't manufacture a Raleigh threaded sealed unit. Not enough demand for the retooling, I guess. Phil makes them, but geez they cost a lot.
09-11-19, 08:23 AM
#13
Senior Member
Join Date: Aug 2005
Location: Pittsburgh, PA
Posts: 33,656
Bikes: '96 Litespeed Catalyst, '05 Litespeed Firenze, '06 Litespeed Tuscany, '20 Surly Midnight Special, All are 3x10. It is hilly around here!
Mentioned: 39 Post(s)
Tagged: 0 Thread(s)
Quoted: 2026 Post(s)
Likes: 0
Liked 1,096 Times
in
742 Posts
Another alternative is the Velo Orange threadless bottom bracket which is pretty much a universal threaded road frame fit including older Raleighs. It's more expensive than Shimano's UN-series but not nearly as high as a Phil.
09-11-19, 09:28 AM
#14
Senior Member
Join Date: Jul 2005
Posts: 7,487
Mentioned: 1 Post(s)
Tagged: 0 Thread(s)
Quoted: 140 Post(s)
Liked 162 Times
in
89 Posts
My advice: with a really old Raleigh like your Grand Prix, don't agonize over the small stuff and don't expect that any two bikes, even the same model, are going to measure out to exactly the same "standards" when it comes to things like chainline, bb width, etc. They were generally sloppily built with little or no QC, and you can just look at it as a fun way to do whatever you have to do to "make it work." Many of those old Raleighs are still happily on the road, blemishes and all. Just look at it as "Raleigh charm."
Likes For well biked:
09-11-19, 10:12 AM
#15
The dropped

Join Date: Oct 2018
Location: Columbus, OH
Posts: 2,144
Bikes: Pake C'Mute Touring/Commuter Build, 1989 Kona Cinder Cone, 1995 Trek 5200, 1973 Raleigh Super Course FG, 1960/61 Montgomery Ward Hawthorne "thrift" 3 speed, by Hercules (sold) : 1966 Schwinn Deluxe Racer (sold)
Mentioned: 10 Post(s)
Tagged: 0 Thread(s)
Quoted: 1739 Post(s)
Liked 1,014 Times
in
696 Posts
I can go to IKEA for a cheap sufficiently long metric tape! Thanks for sharing!!
09-11-19, 11:36 AM
#16
Newbie
Thread Starter
I get caught up in my scrappiness / thriftiness
- but I suppose if you take the initiative to save a bike from the scrap heap, you deserve to make the project a little bit easier!
09-11-19, 12:00 PM
#17
Friendship is Magic
Join Date: Nov 2010
Location: Sacramento, CA
Posts: 22,984
Bikes: old ones
Mentioned: 304 Post(s)
Tagged: 0 Thread(s)
Quoted: 26402 Post(s)
Liked 10,374 Times
in
7,203 Posts
...I've never tried it, but the other alternative that's relatively cheap and straightforward to do the conversion on these is the Velo Orange threadless square taper unit. Most of the reports I've seen here have been positive on their use. But it still costs 70 bucks, which in the world of saving bicycles is not an insignificant investment. I lean toward the solutions for which I already have the tooling, like most people.
All the affordable alternatives I know of for piloted BB tooling seem to come from Europe (Cyclo or Cyclus brands), and you have to buy them from places like the UK or Netherlands. When I bought mine, the cost was about a hundred bucks American. But by now I'd be very surprised if there is not a Taiwan of China version of them that is competitive in price.
Like the other Grand Cru BBs, these have sealed cartridge bearings, so they require no servicing and should have a very long life. Taper is JIS. So far, we have tried these on British, French, and Swiss BB shells and they work perfectly. Customers report that they also work in Raleigh frames with a 71mm wide BB shell.

Thread
Thread Starter
Forum
Replies
Last Post
jeirvine
Classic and Vintage Sales
17
12-08-18 10:44 PM
Cyclist0084
Clydesdales/Athenas (200+ lb / 91+ kg)
107
04-01-16 06:07 AM
largefarva
Clydesdales/Athenas (200+ lb / 91+ kg)
47
03-01-16 08:58 AM
