


Problem removing Bottom Bracket
 01-26-19, 08:02 AM
#1
Senior Member
Thread Starter
Join Date: Jul 2016
Posts: 111
Mentioned: 1 Post(s)
Tagged: 0 Thread(s)
Quoted: 55 Post(s)
Likes: 0
Liked 4 Times
in
4 Posts
Problem removing Bottom Bracket
I bought a new crankset for my old 1997 Trek 820 beater as the current one is the original. To make a long story short, I stripped the inner threads on the drive side crank arm and cannot get the crank arm off the square shaft BB. I did manage to get the non-drive side crank arm off.
I thought of taking off and replacing the Bottom Bracket as a remedy off but I cannot access the BB nut on the drive side with the crank/chainring still on.
I am going to take it to the LBS unless I get some solid info from the experts here
Thanks in advice.
I thought of taking off and replacing the Bottom Bracket as a remedy off but I cannot access the BB nut on the drive side with the crank/chainring still on.
I am going to take it to the LBS unless I get some solid info from the experts here
Thanks in advice.
 01-26-19, 08:23 AM
#2
On Holiday

Join Date: Apr 2017
Posts: 1,014
Bikes: A bunch of old steel bikes
Mentioned: 14 Post(s)
Tagged: 0 Thread(s)
Quoted: 394 Post(s)
Likes: 0
Liked 14 Times
in
12 Posts
Jacobs Wedges (#6 recommended). Here's a link to some of the posts involving their use. Of course if you plan to trash your old crank, a hacksaw would work as well.
01-26-19, 08:26 AM
#3
Senior Member
Join Date: Mar 2015
Location: Martinsburg WV Area
Posts: 1,704
Bikes: State 4130 Custom, Giant Trance 29
Mentioned: 7 Post(s)
Tagged: 0 Thread(s)
Quoted: 422 Post(s)
Liked 182 Times
in
123 Posts
I bought a new crankset for my old 1997 Trek 820 beater as the current one is the original. To make a long story short, I stripped the inner threads on the drive side crank arm and cannot get the crank arm off the square shaft BB. I did manage to get the non-drive side crank arm off.
I thought of taking off and replacing the Bottom Bracket as a remedy off but I cannot access the BB nut on the drive side with the crank/chainring still on.
I am going to take it to the LBS unless I get some solid info from the experts here
Thanks in advice.
I thought of taking off and replacing the Bottom Bracket as a remedy off but I cannot access the BB nut on the drive side with the crank/chainring still on.
I am going to take it to the LBS unless I get some solid info from the experts here
Thanks in advice.
01-26-19, 08:44 AM
#4
Senior Member
Thread Starter
Join Date: Jul 2016
Posts: 111
Mentioned: 1 Post(s)
Tagged: 0 Thread(s)
Quoted: 55 Post(s)
Likes: 0
Liked 4 Times
in
4 Posts
Some progress....another question
OK, I was able to remove the BB nut on the non drive side amazing easy considering it's been on for 20 years.
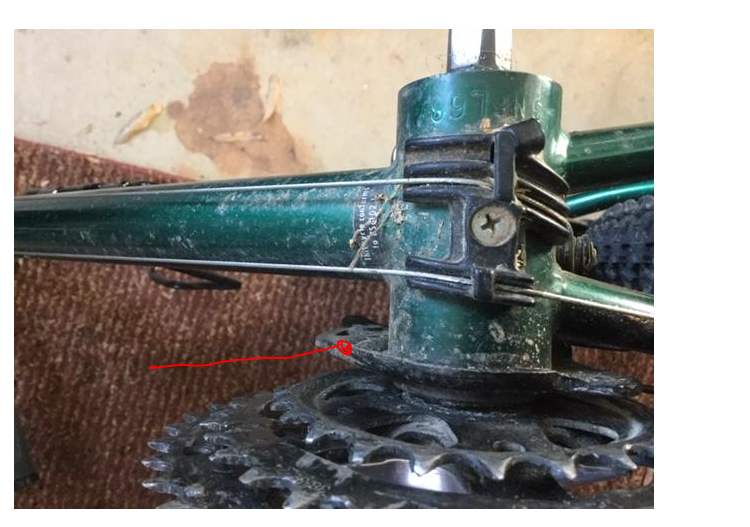
The drive side is a mystery. There isn't a nut but a fairly large metal piece that covers the end of the BB. Does anyone know how to remove it?
The drive side is a mystery. There isn't a nut but a fairly large metal piece that covers the end of the BB. Does anyone know how to remove it?
01-26-19, 09:06 AM
#5

Old fart

Join Date: Nov 2004
Location: Appleton WI
Posts: 24,784
Bikes: Several, mostly not name brands.
Mentioned: 153 Post(s)
Tagged: 0 Thread(s)
Quoted: 3587 Post(s)
Liked 3,400 Times
in
1,934 Posts
The plate is where the front derailleur mounts. To remove it, you first remove the drive side arm, then remove the cup behind which the plate is mounted.
01-26-19, 10:29 AM
#6
Senior Member
Join Date: Jan 2004
Location: Madison, WI USA
Posts: 6,154
Mentioned: 50 Post(s)
Tagged: 0 Thread(s)
Quoted: 2363 Post(s)
Liked 1,749 Times
in
1,191 Posts
Why exactly are you replacing the crankset? Does it have riveted-on chainrings that are worn?
If you don't opt for one of the wedge / puller options above, and you want to just replace the BB along with the crankset, a 36mm Park bottom bracket wrench (it's only a few mm thick) should be able to slide in between that inner chainring and the front der mount. Might be a time to swap in a cartridge. Just remember, that side is reverse threaded.
Oh, um, is it cartridge that's in there now? If so, your only options are the wedge or puller method.
Last edited by madpogue; 01-26-19 at 10:35 AM.
01-26-19, 10:43 AM
#7
Full Member
 01-26-19, 07:21 PM
#8
Senior Member
Thread Starter
Join Date: Jul 2016
Posts: 111
Mentioned: 1 Post(s)
Tagged: 0 Thread(s)
Quoted: 55 Post(s)
Likes: 0
Liked 4 Times
in
4 Posts
It's done.
I decided to take the bike in to the LBs and have it removed. He had a special forked tool and easily removed it.
It turned out the new crank I bought which was a 42-32-22 tooth caused a problem for the old front der as it couldn't clear the 42 tooth. The old crank had a 38-28-18. Since the front der was attached to the bracket as you mentioned and not adjustable, he had to replace it with a new Altus front der.
In the end I got a new Acera 22-32-42 crankset, Altus front der, BB, cassette and chain. The mechanic installed and tweaked it all and it in the end it was around $180.
A lot of money but the bike is in great shape and is ideal for greenway and gravel riding so I'm OK with it.
I can't wait to get out and ride tomorrow - shifting was much smoother
Last edited by Carbonated; 01-26-19 at 07:25 PM.
01-27-19, 03:02 PM
#9
On Holiday
Join Date: Apr 2017
Posts: 1,014
Bikes: A bunch of old steel bikes
Mentioned: 14 Post(s)
Tagged: 0 Thread(s)
Quoted: 394 Post(s)
Likes: 0
Liked 14 Times
in
12 Posts
Excellent!

Thread
Thread Starter
Forum
Replies
Last Post
banerjek
Bicycle Mechanics
28
03-30-14 04:36 AM
akdmx
Singlespeed & Fixed Gear
14
07-16-11 05:43 PM
the lobster
Bicycle Mechanics
20
03-06-11 11:25 PM
