


DIY Tools for your bike work


 02-07-21, 01:41 AM
#28
Friendship is Magic

Join Date: Nov 2010
Location: Sacramento, CA
Posts: 22,984
Bikes: old ones
Mentioned: 304 Post(s)
Tagged: 0 Thread(s)
Quoted: 26419 Post(s)
Liked 10,380 Times
in
7,208 Posts
...the electrician's plier I have has a number of holes for shortening small machine screws (handy when wiring and fitting cover plates on boxes). Anyway, I don't do that much electrical work any more, but I do find myself replacing a lot of bent or otherwise compromised dropout adjustment screws.
If you re-tap the closest size to 3mm hole to 3mm, it works very well to cut a 3mm machine screw to whatever size is appropriate to the dropout you're working on.

If you re-tap the closest size to 3mm hole to 3mm, it works very well to cut a 3mm machine screw to whatever size is appropriate to the dropout you're working on.
02-07-21, 02:18 AM
#29
Clark W. Griswold
Join Date: Mar 2014
Location: ,location, location
Posts: 13,519
Bikes: Foundry Chilkoot Ti W/Ultegra Di2, Salsa Timberjack Ti, Cinelli Mash Work RandoCross Fun Time Machine, 1x9 XT Parts Hybrid, Co-Motion Cascadia, Specialized Langster, Phil Wood Apple VeloXS Frame (w/DA 7400), R+M Supercharger2 Rohloff, Habanero Ti 26
Mentioned: 54 Post(s)
Tagged: 0 Thread(s)
Quoted: 4355 Post(s)
Liked 3,994 Times
in
2,665 Posts

Likes For veganbikes:
02-07-21, 03:00 AM
#31
Senior Member
Join Date: Dec 2019
Posts: 956
Mentioned: 3 Post(s)
Tagged: 0 Thread(s)
Quoted: 321 Post(s)
Liked 263 Times
in
212 Posts

Truing stand. The two symmetrical halves can be positioned at any spacing you like and then you just do it up with the clamp. There's no caliper, you just clip bits of card to the legs.
02-07-21, 07:29 AM
#32
Biker
Join Date: Jul 2008
Location: New Mexico
Posts: 263
Bikes: Boone McReynolds, Centurion Pro Tour
Mentioned: 0 Post(s)
Tagged: 0 Thread(s)
Quoted: 49 Post(s)
Liked 109 Times
in
61 Posts
Based on the price of copper sweat fittings now, your stand would be a mighty expensive one (equivalent to a Parke)?
02-07-21, 10:49 AM
#33
Bike Butcher of Portland

Join Date: Jul 2014
Location: Portland, OR
Posts: 11,639
Bikes: It's complicated.
Mentioned: 1299 Post(s)
Tagged: 0 Thread(s)
Quoted: 4682 Post(s)
Liked 5,800 Times
in
2,284 Posts
Thanks! Well done to @scarlson. The spattery flux-core welding and burnt paint made made me assume this was a junk frame being made into a tool. Not that we were looking at the final "brazed"-on part!!
I used a piece of angle iron, brazed on a 1/4" slice for the 6mm offset, then filed it down until it was just right. I used my flat table to make sure I kept everything parallel. The roughly cut out section clears the jig's chainstay.
__________________
If someone tells you that you have enough bicycles and you don't need any more, stop talking to them. You don't need that kind of negativity in your life.
If someone tells you that you have enough bicycles and you don't need any more, stop talking to them. You don't need that kind of negativity in your life.
Last edited by gugie; 02-07-21 at 10:52 AM.
Likes For gugie:
02-07-21, 11:20 AM
#34
Senior Member
Join Date: Dec 2019
Posts: 956
Mentioned: 3 Post(s)
Tagged: 0 Thread(s)
Quoted: 321 Post(s)
Liked 263 Times
in
212 Posts
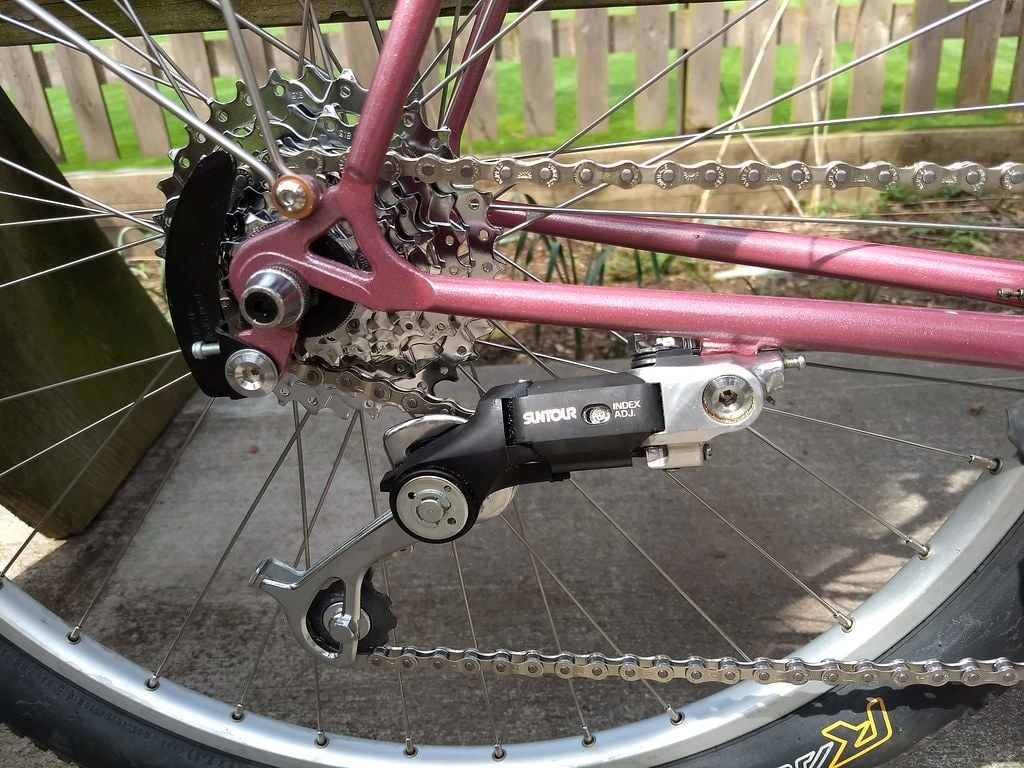
I don't have a welding setup, so everything gets brazed. Since this was a one use tool, it's pretty rough, but it is very accurate. The SunTour S-1 derailleur location spec is pretty tight.
I used a piece of angle iron, brazed on a 1/4" slice for the 6mm offset, then filed it down until it was just right. I used my flat table to make sure I kept everything parallel. The roughly cut out section clears the jig's chainstay.
I used a piece of angle iron, brazed on a 1/4" slice for the 6mm offset, then filed it down until it was just right. I used my flat table to make sure I kept everything parallel. The roughly cut out section clears the jig's chainstay.
It looks like a good fixture because the main thing is to get the orientation right (although it can presumably be bent a little bit if necessary afterwards, like a regular hanger).
I recently attached some V-brake bosses with a literally one-use fixture. Two M6 bolts were tacked onto a bit of square tube at the right spacing, and then adjusted to be nice and square. The bosses were then screwed onto the bolts and the whole thing balanced on the seat-stays (the frame was resting on a bit of tubing clamped to the side of the table with the back of the seatstays facing vertically upwards) with a "third hand". Once the bosses are then tacked to the frame there is no way to remove the fixture other than cutting the square tube down the middle to unscrew both sides! But I figured this was easier than making something reusable.
02-07-21, 11:34 AM
#35
Bike Butcher of Portland
Join Date: Jul 2014
Location: Portland, OR
Posts: 11,639
Bikes: It's complicated.
Mentioned: 1299 Post(s)
Tagged: 0 Thread(s)
Quoted: 4682 Post(s)
Liked 5,800 Times
in
2,284 Posts
 02-07-21, 11:46 AM
#36
Senior Member
Join Date: Apr 2012
Location: Nor Cal
Posts: 6,016
Mentioned: 17 Post(s)
Tagged: 0 Thread(s)
Quoted: 1814 Post(s)
Likes: 0
Liked 923 Times
in
569 Posts
...the electrician's plier I have has a number of holes for shortening small machine screws (handy when wiring and fitting cover plates on boxes). Anyway, I don't do that much electrical work any more, but I do find myself replacing a lot of bent or otherwise compromised dropout adjustment screws.
If you re-tap the closest size to 3mm hole to 3mm, it works very well to cut a 3mm machine screw to whatever size is appropriate to the dropout you're working on.
If you re-tap the closest size to 3mm hole to 3mm, it works very well to cut a 3mm machine screw to whatever size is appropriate to the dropout you're working on.
That's a good idea, were you able to tap the hardened metal? If it worked, I'd do it for 4mm. Cabinet pulls have either 8/32, or 4mm screws, and sometimes need a length to within 1/4".
You can cut the 8/32 ones to fit, but there is no (AFAIK) equivalent 4mm screw cutter & one is stuck with stupid break-off screws.
02-07-21, 12:41 PM
#38
Friendship is Magic
Join Date: Nov 2010
Location: Sacramento, CA
Posts: 22,984
Bikes: old ones
Mentioned: 304 Post(s)
Tagged: 0 Thread(s)
Quoted: 26419 Post(s)
Liked 10,380 Times
in
7,208 Posts
That's a good idea, were you able to tap the hardened metal? If it worked, I'd do it for 4mm. Cabinet pulls have either 8/32, or 4mm screws, and sometimes need a length to within 1/4".
You can cut the 8/32 ones to fit, but there is no (AFAIK) equivalent 4mm screw cutter & one is stuck with stupid break-off screws.
You can cut the 8/32 ones to fit, but there is no (AFAIK) equivalent 4mm screw cutter & one is stuck with stupid break-off screws.
02-07-21, 02:01 PM
#39
Passista
Join Date: Jul 2005
Posts: 7,598
Bikes: 1998 Pinarello Asolo, 1992 KHS Monta�a pro, 1980 Raleigh DL-1, IGH Hybrid, IGH Utility
Mentioned: 5 Post(s)
Tagged: 0 Thread(s)
Quoted: 866 Post(s)
Liked 721 Times
in
396 Posts
Some more:

Top to bottom: extractor for 2-notch singlespeed freewheel, BB lockring pliers, master link pliers, Campagnolo style chain wear checker, Rohloff style sprocket wear checker. The last 2 weren't very useful - measuring pin distance over 12" is more accurate for chains, and in the case of sprockets, by the time they wouldn't pass the test the wear is evident to the naked eye.

I like the patina on these 2, made from old salvaged pliers.
Top to bottom: extractor for 2-notch singlespeed freewheel, BB lockring pliers, master link pliers, Campagnolo style chain wear checker, Rohloff style sprocket wear checker. The last 2 weren't very useful - measuring pin distance over 12" is more accurate for chains, and in the case of sprockets, by the time they wouldn't pass the test the wear is evident to the naked eye.
I like the patina on these 2, made from old salvaged pliers.
02-07-21, 02:49 PM
#40
Full Member
I found that my homemade headset press worked much better if I epoxied the washers together
02-07-21, 06:44 PM
#41
Senior Member
Join Date: Nov 2005
Location: NW Ohio
Posts: 3,419
Bikes: 1984 Miyata 310, 1986 Schwinn Sierra, 2011 Jamis Quest, 1980 Peugeot TH8 Tandem, 1992 Performance Parabola, 1987 Ross Mt. Hood, 1988 Schwinn LeTour, 1988 Trek 400T, 1981 Fuji S12-S LTD, 197? FW Evans
Mentioned: 24 Post(s)
Tagged: 0 Thread(s)
Quoted: 531 Post(s)
Liked 1,005 Times
in
514 Posts
I made a simple one armed wheel truing stand in about 10 minutes with some scraps I had laying around.

One-armed wheel truing stand.
This dishing tool took longer for the finish to dry than to make it. I used a spare rim for the pattern to cut the curves. I drilled and tapped it for 1/4-20 and used a long bolt. The wood has enough friction to hold the setting.
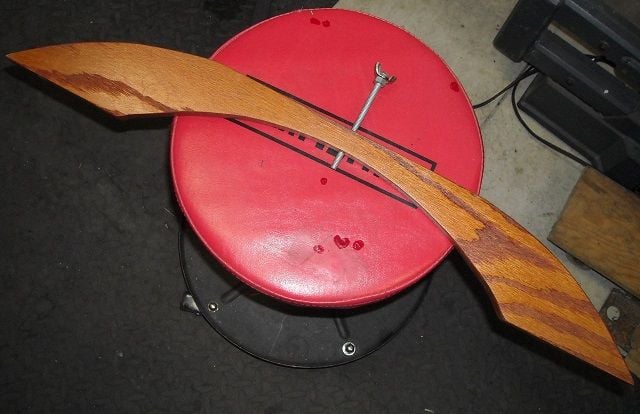
Homemade dishing tool.
One-armed wheel truing stand.
This dishing tool took longer for the finish to dry than to make it. I used a spare rim for the pattern to cut the curves. I drilled and tapped it for 1/4-20 and used a long bolt. The wood has enough friction to hold the setting.
Homemade dishing tool.
02-07-21, 07:50 PM
#42

multimodal commuter

Join Date: Nov 2006
Location: NJ, NYC, LI
Posts: 19,808
Bikes: 1940s Fothergill, 1959 Allegro Special, 1963? Claud Butler Olympic Sprint, Lambert 'Clubman', 1974 Fuji "the Ace", 1976 Holdsworth 650b conversion rando bike, 1983 Trek 720 tourer, 1984 Counterpoint Opus II, 1993 Basso Gap, 2010 Downtube 8h, and...
Mentioned: 584 Post(s)
Tagged: 0 Thread(s)
Quoted: 1908 Post(s)
Liked 574 Times
in
339 Posts
Likes For oneclick:
02-09-21, 11:26 PM
#44
Senior Member

Join Date: Oct 2016
Location: San Mateo,Ca.
Posts: 3,988
Bikes: TRIMMED DOWN THE HERD
Mentioned: 46 Post(s)
Tagged: 0 Thread(s)
Quoted: 1092 Post(s)
Liked 936 Times
in
601 Posts
My headset cup tool from conduit:
 60408926075__0199E8F4-4401-4D85-B9A4-2B3313489A9C by 2cam16, on Flickr
60408926075__0199E8F4-4401-4D85-B9A4-2B3313489A9C by 2cam16, on Flickr
02-09-21, 11:49 PM
#45
Mad bike riding scientist

Join Date: Nov 2004
Location: Denver, CO
Posts: 27,362
Bikes: Some silver ones, a red one, a black and orange one, and a few titanium ones
Mentioned: 152 Post(s)
Tagged: 1 Thread(s)
Quoted: 6219 Post(s)
Liked 4,218 Times
in
2,365 Posts
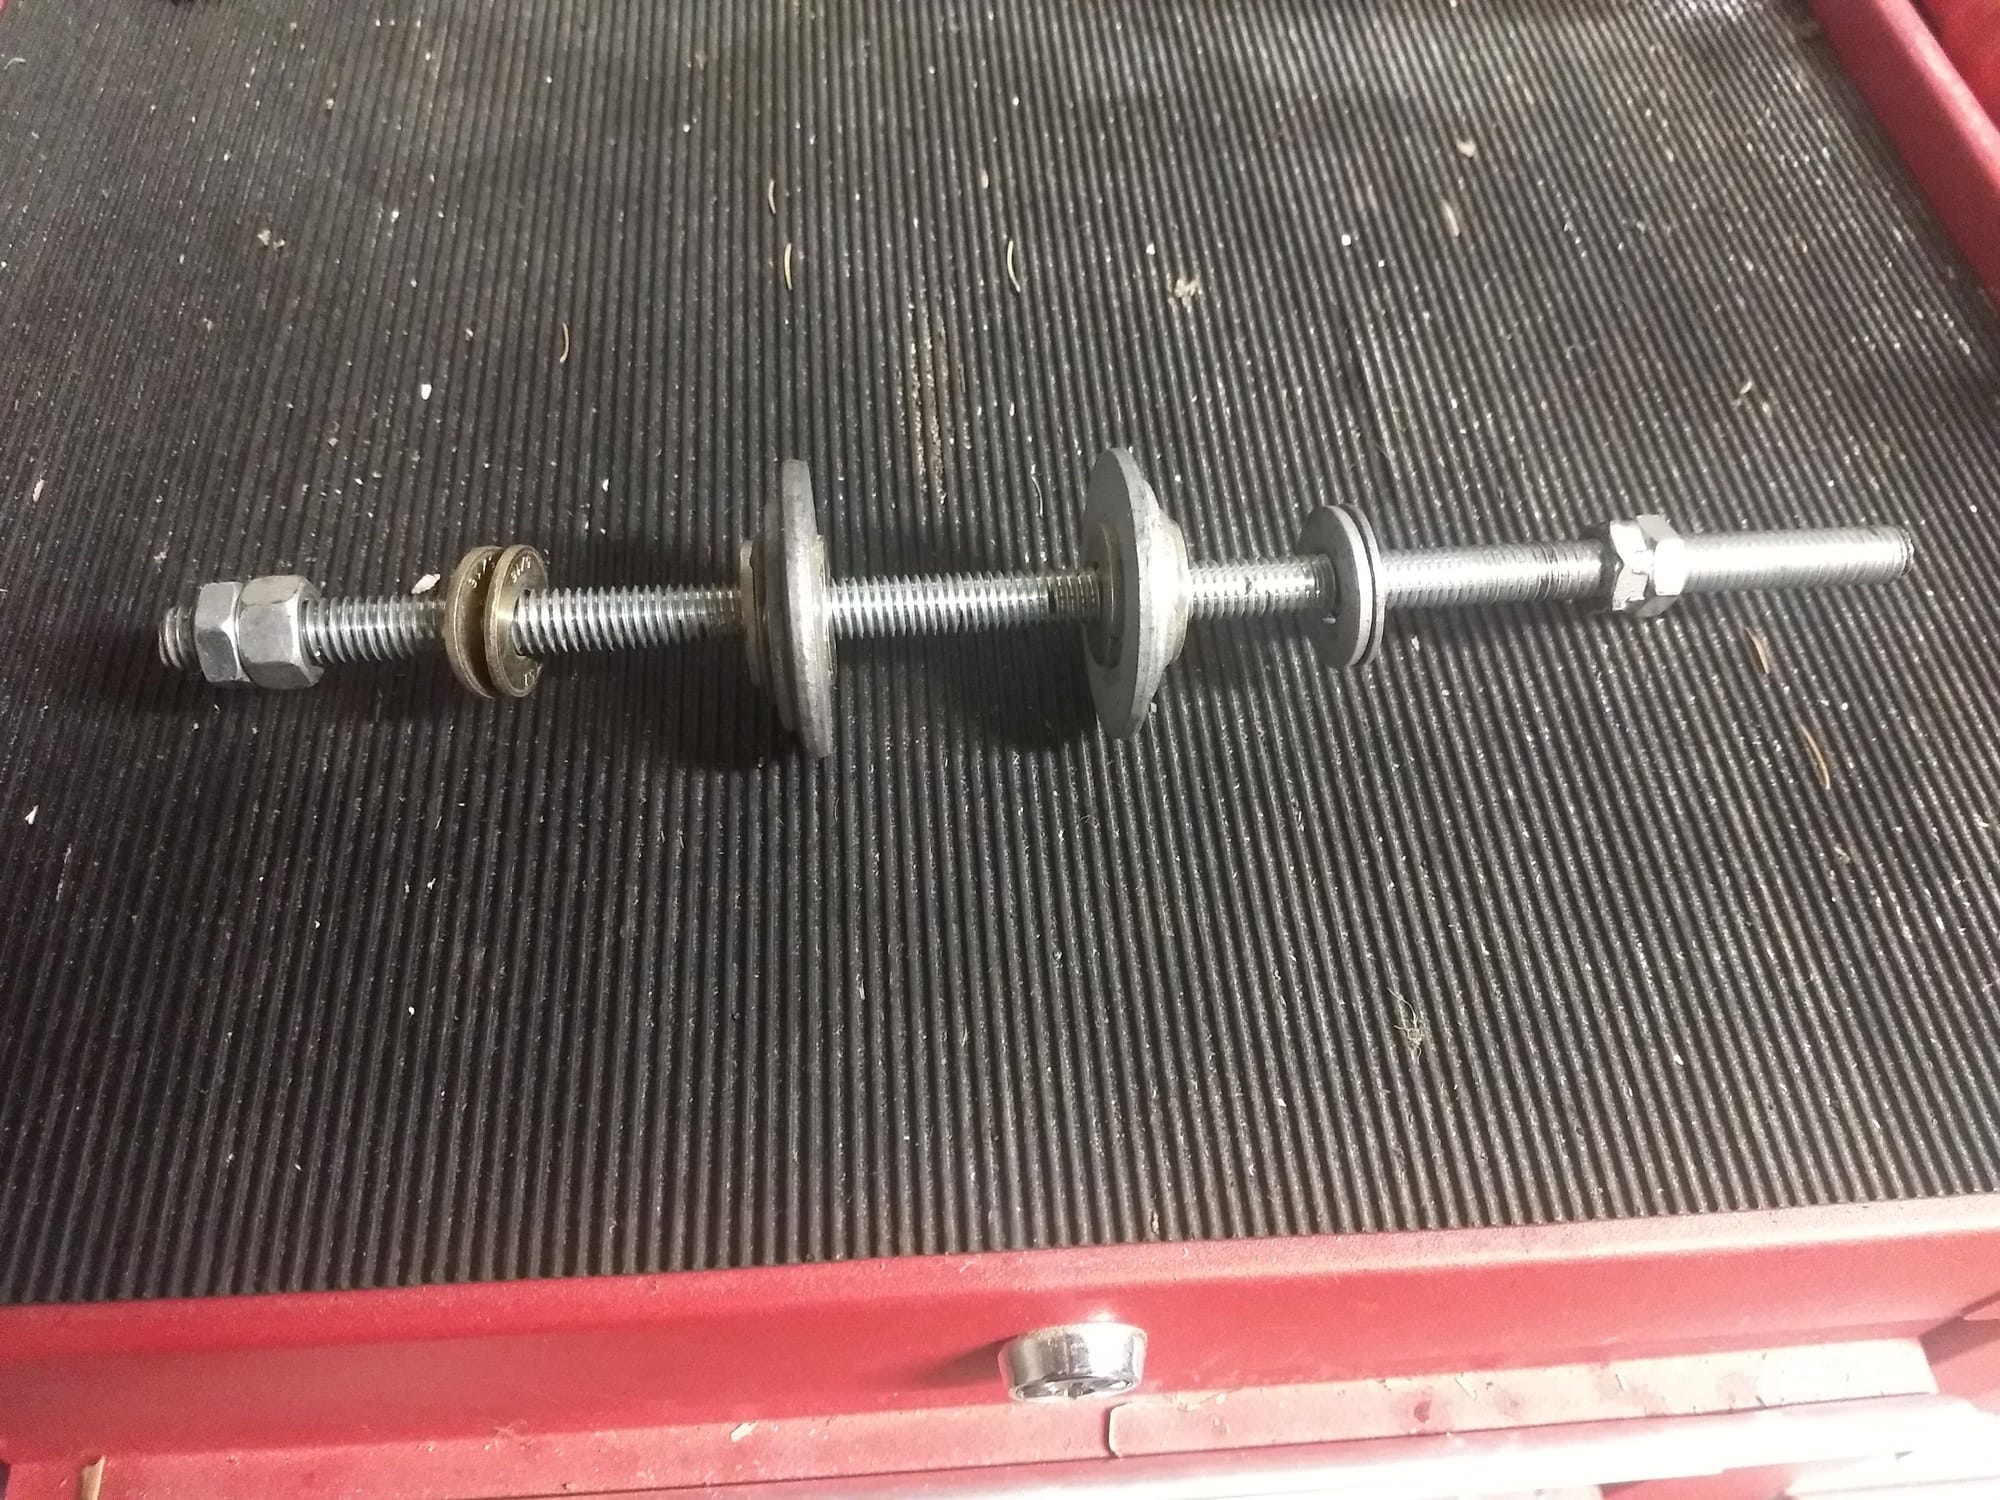
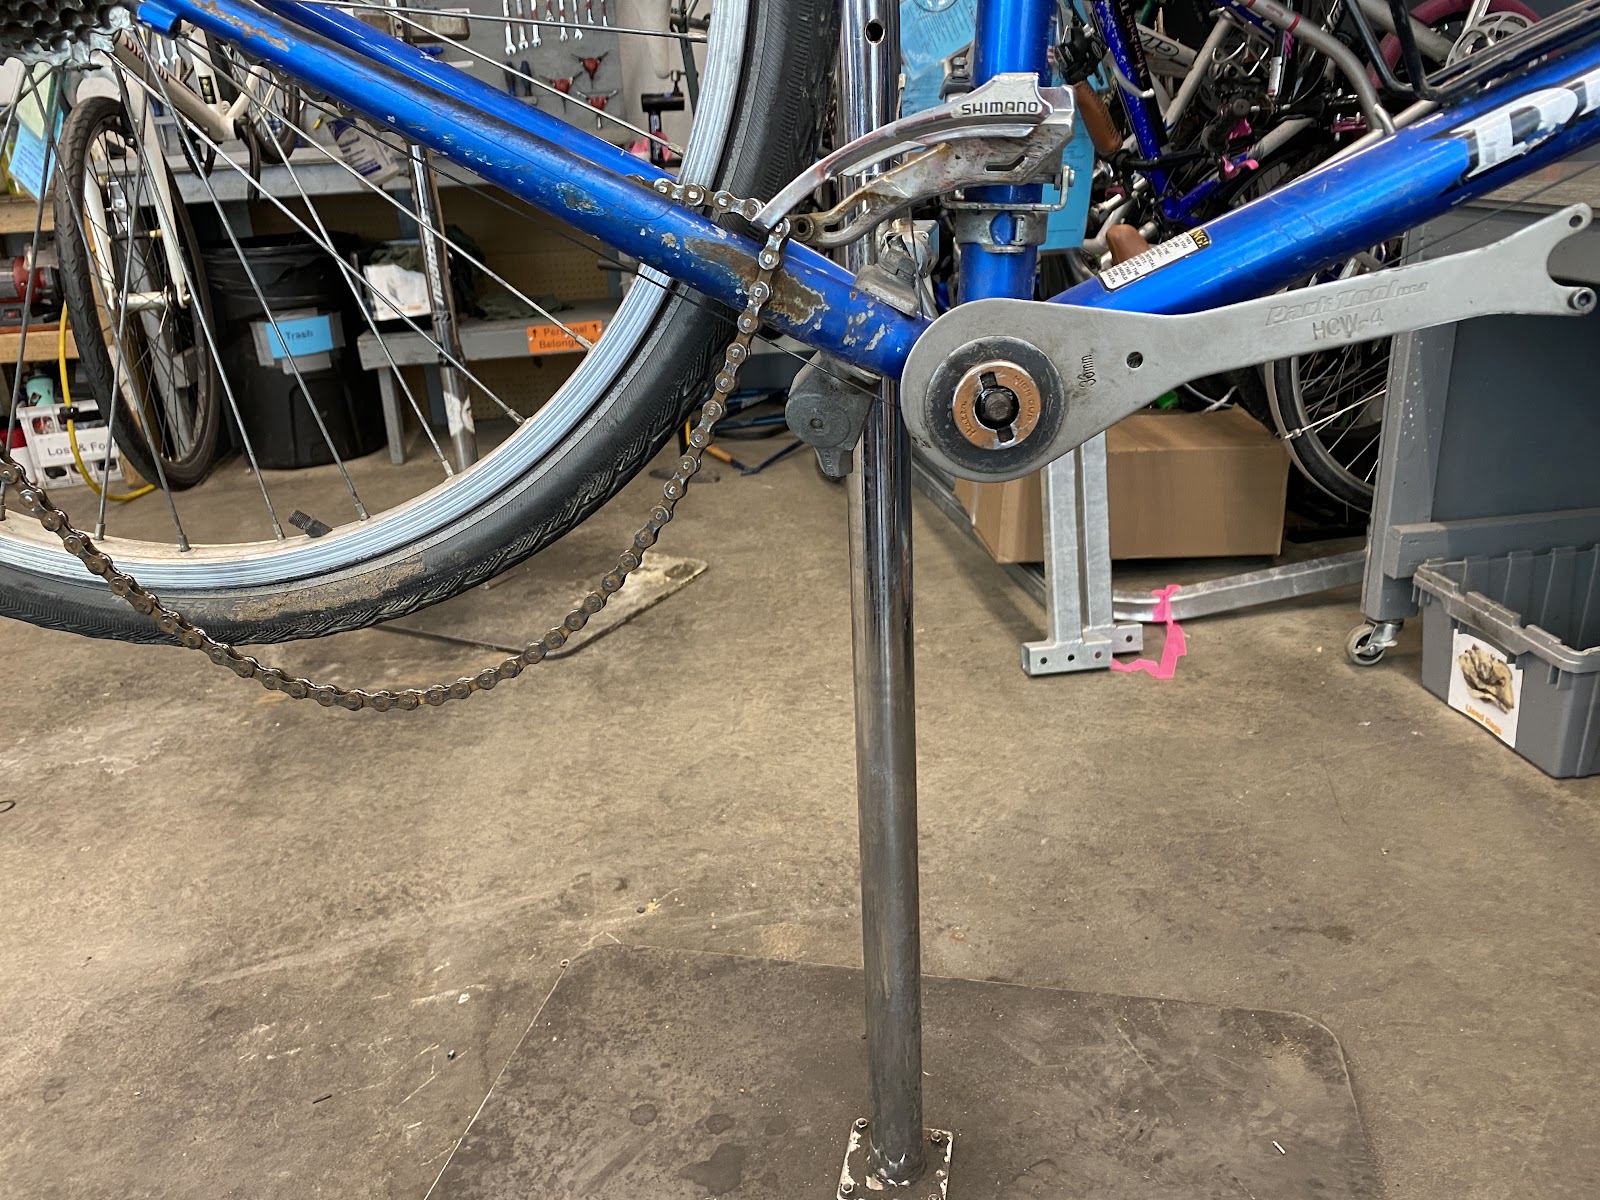
My homemade tool is for removing the fixed cup on the bottom bracket.
I�ve come to the conclusion that we have been taught to remove fixed cups wrong for a long time. I, like most everyone, have been taught to remove the adjustable cup first, followed by the fixed cup. We avoid removing the fixed cup because it can be difficult to remove. I realized that I needed to stand the procedure on its head. Remove the fixed cup first since it is the hardest one and the wrench needs the most stabilization. The spindle can be used to hold the tool but it will allow the wrench to turn with the cup so that the tool doesn�t even need to be removed to completely remove the fixed cup.
Since there are 2 types of spindle, the procedure and fastener used will depend on which spindle is present. The nut or bolt used on the spindle can be used to hold everything in place.
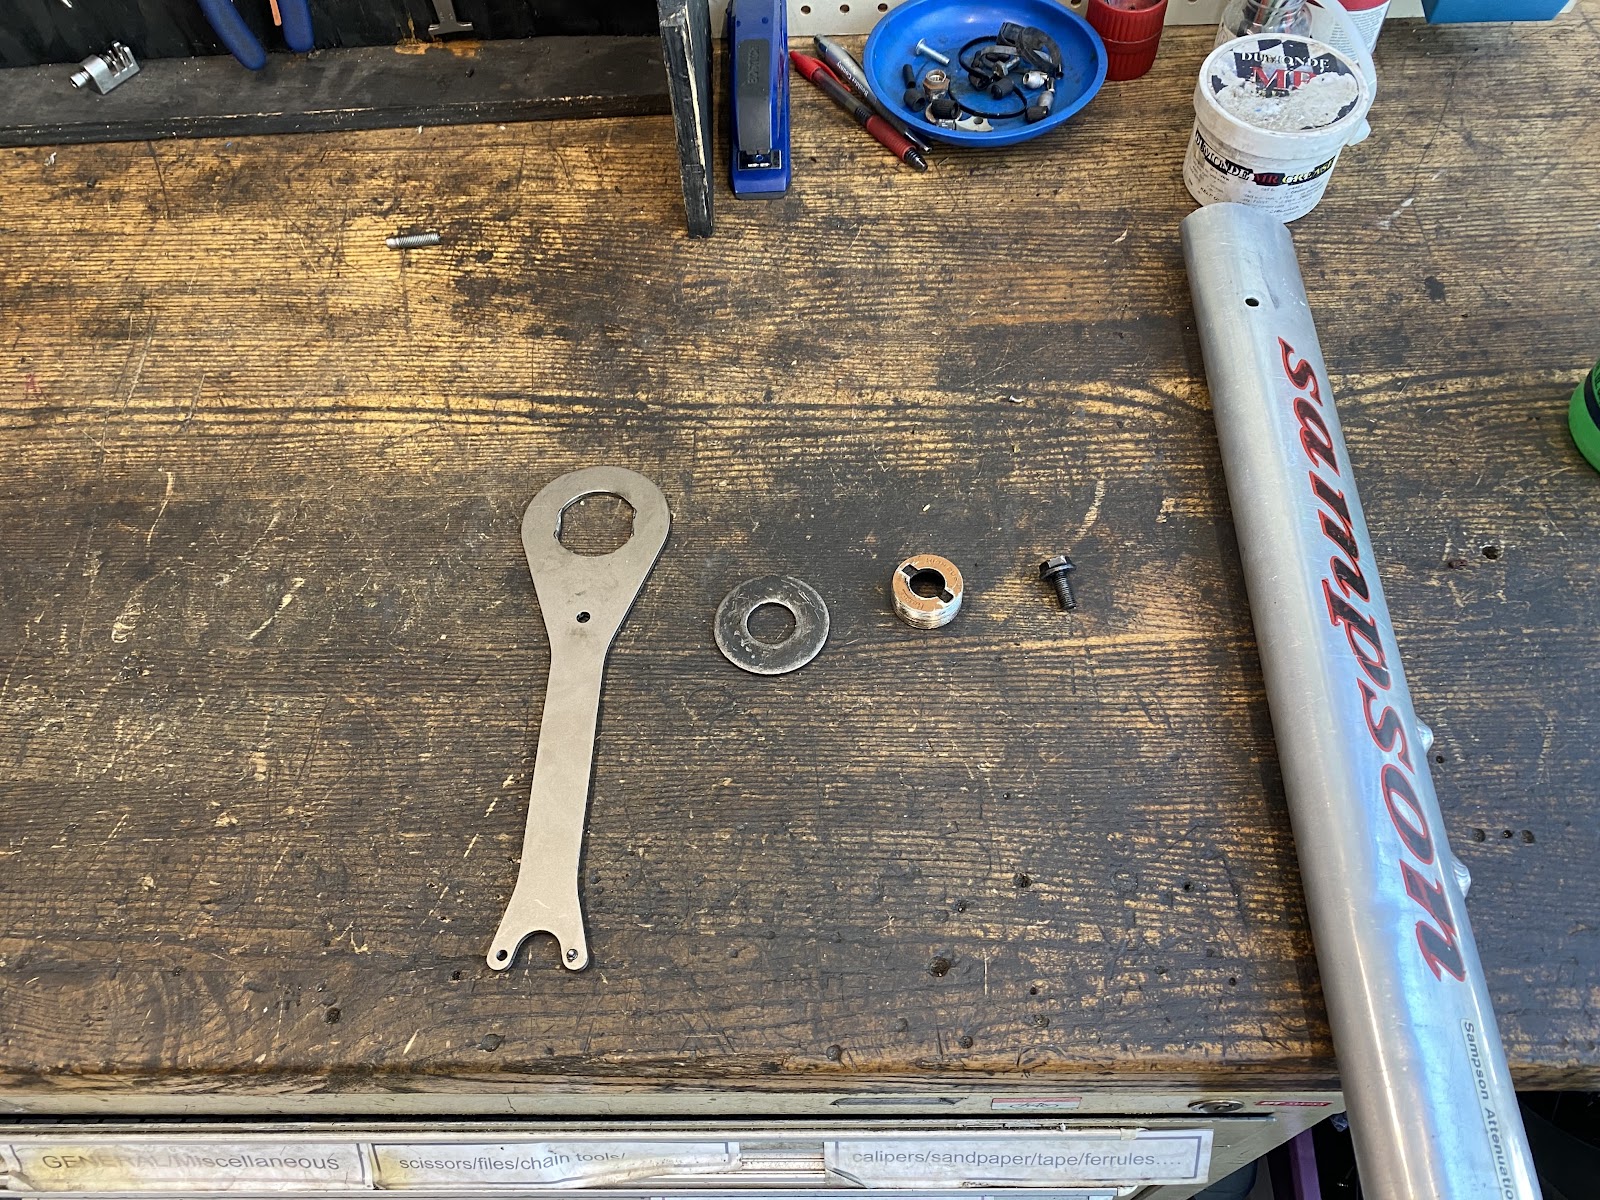
Tool Assembly
The parts for the nutted spindle needed are shown here. Most everything can be found in just about any shop. The large fender washer is probably the only thing you�ll have to go to a hardware store for.
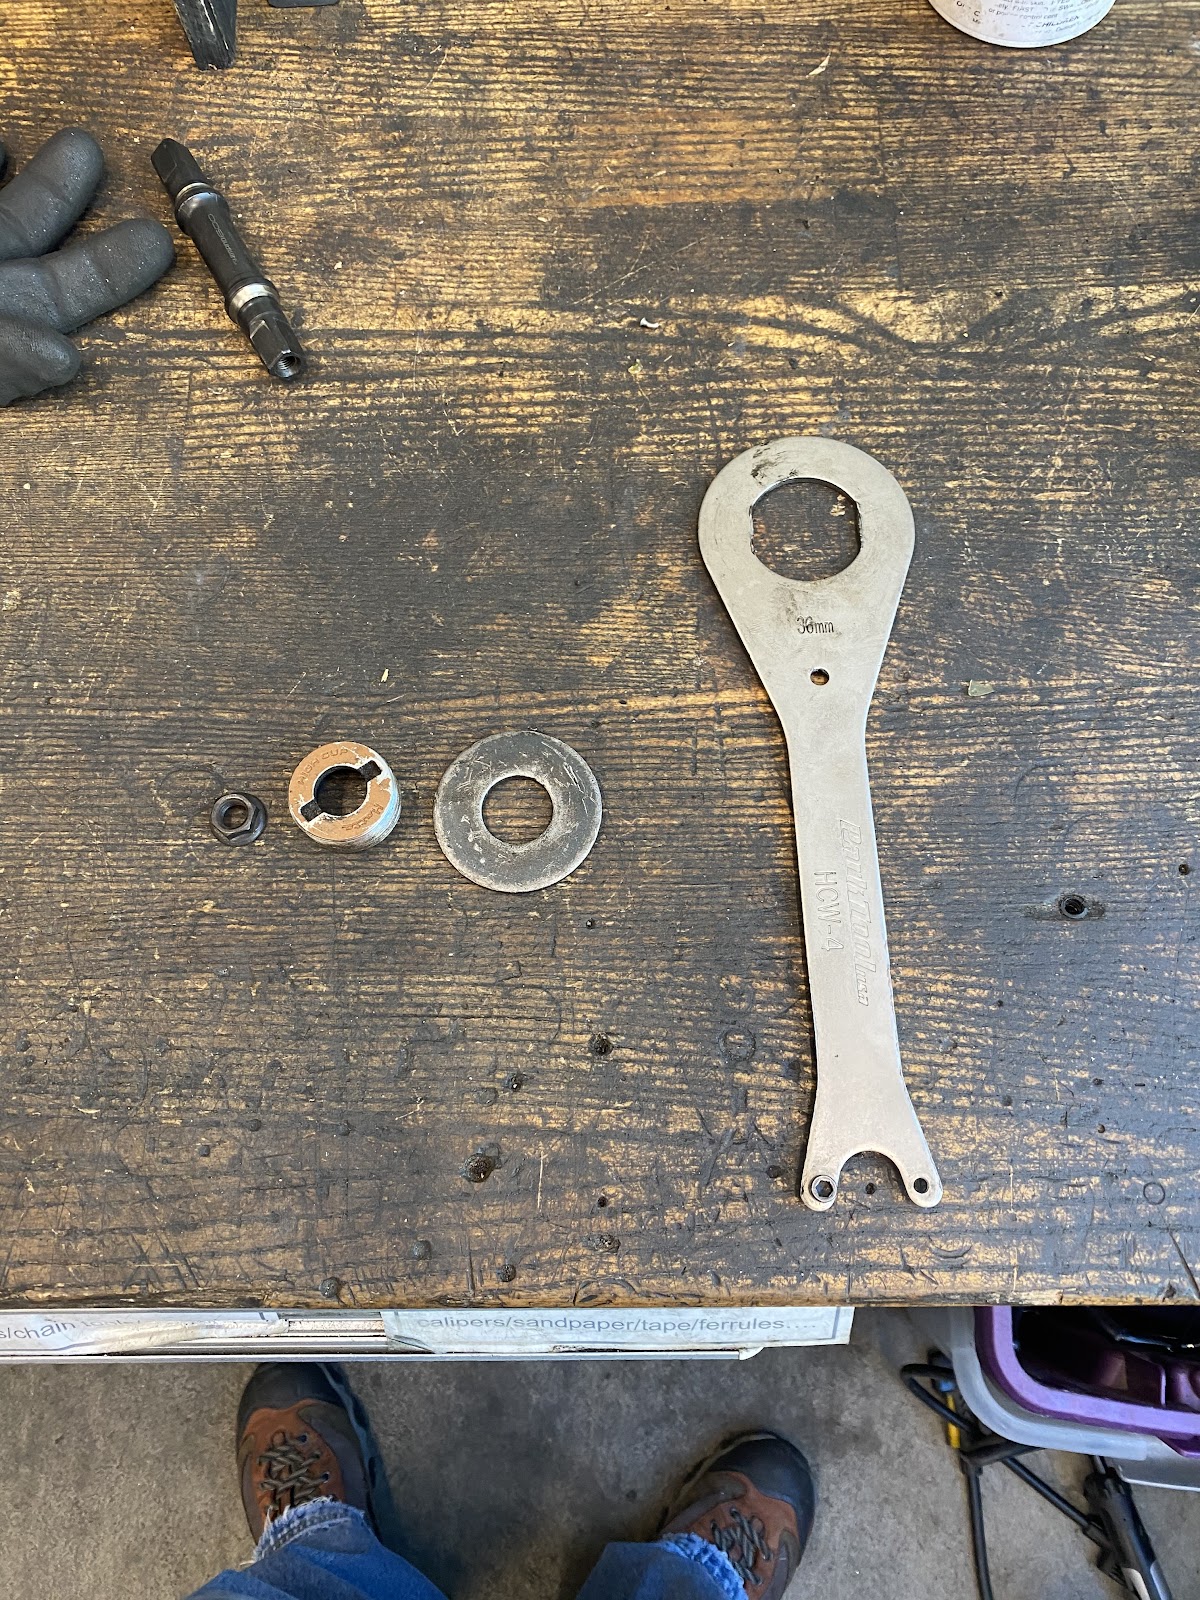
A large fender washer, an adjustable cup, and the spindle nut are needed. Another washer may be needed to get the spacing right. The order of assembly follows
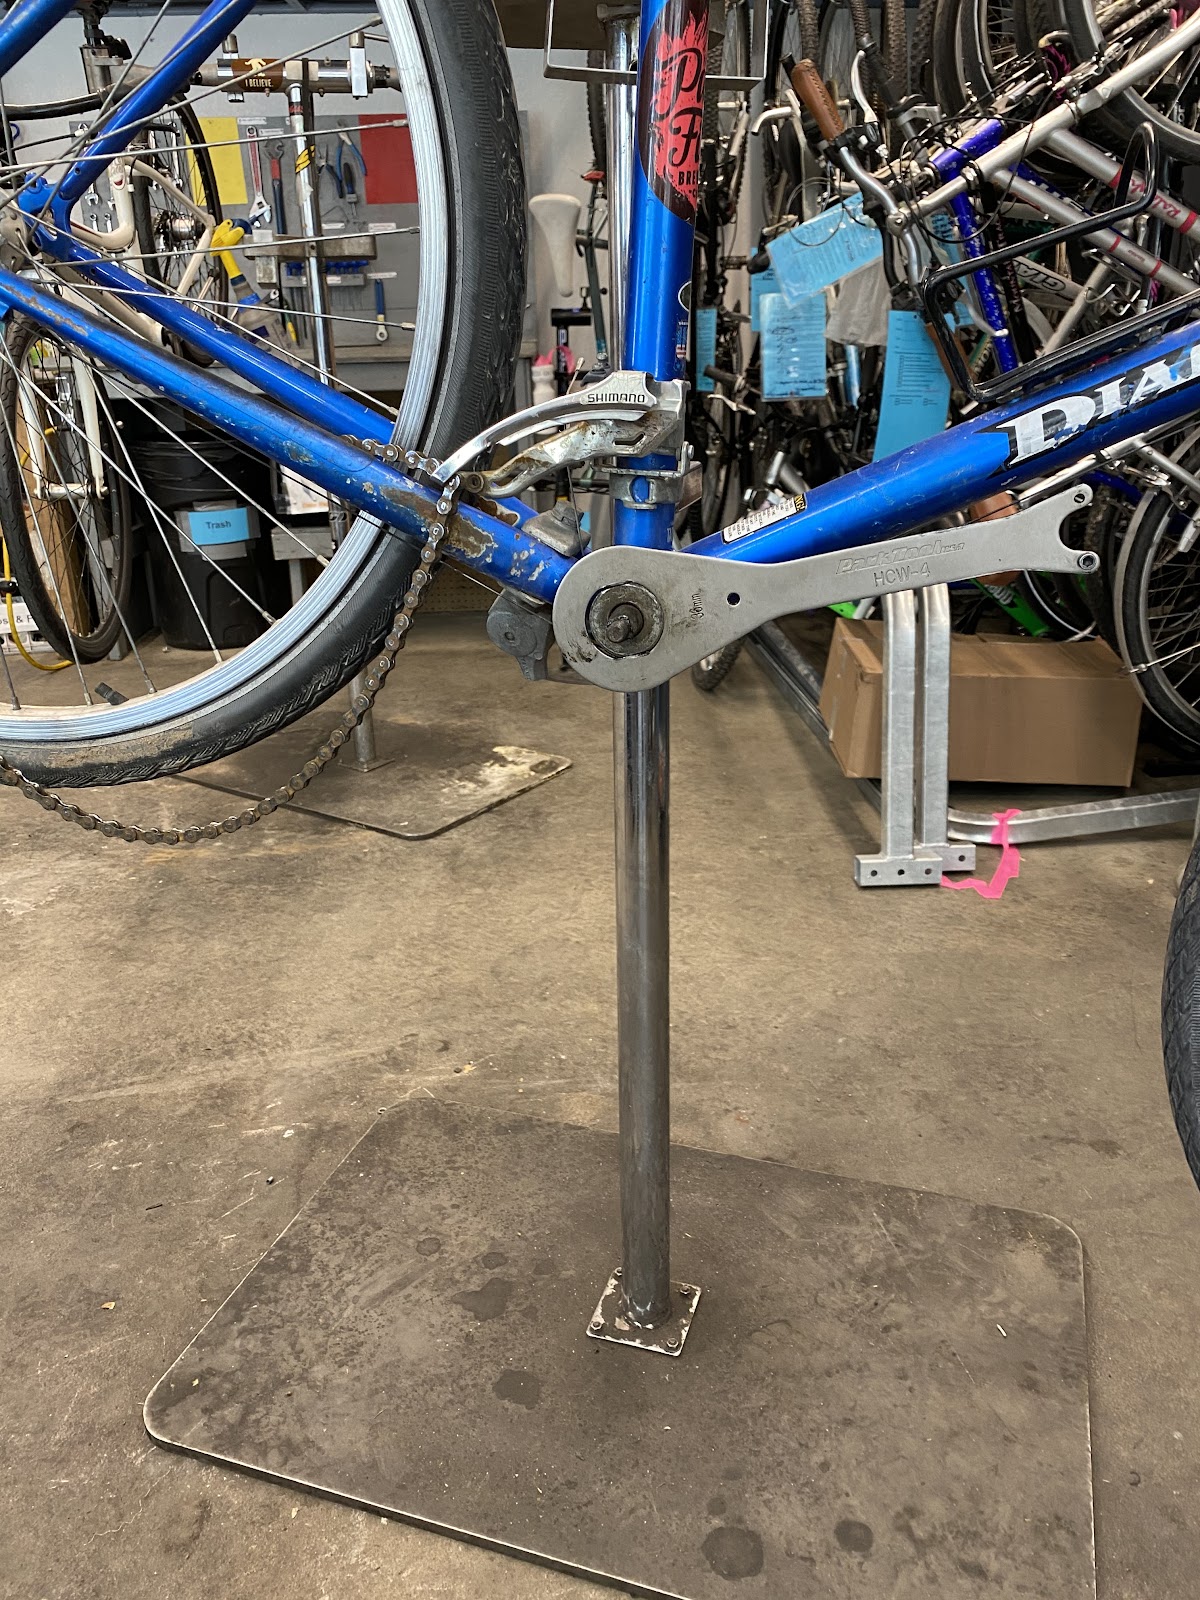
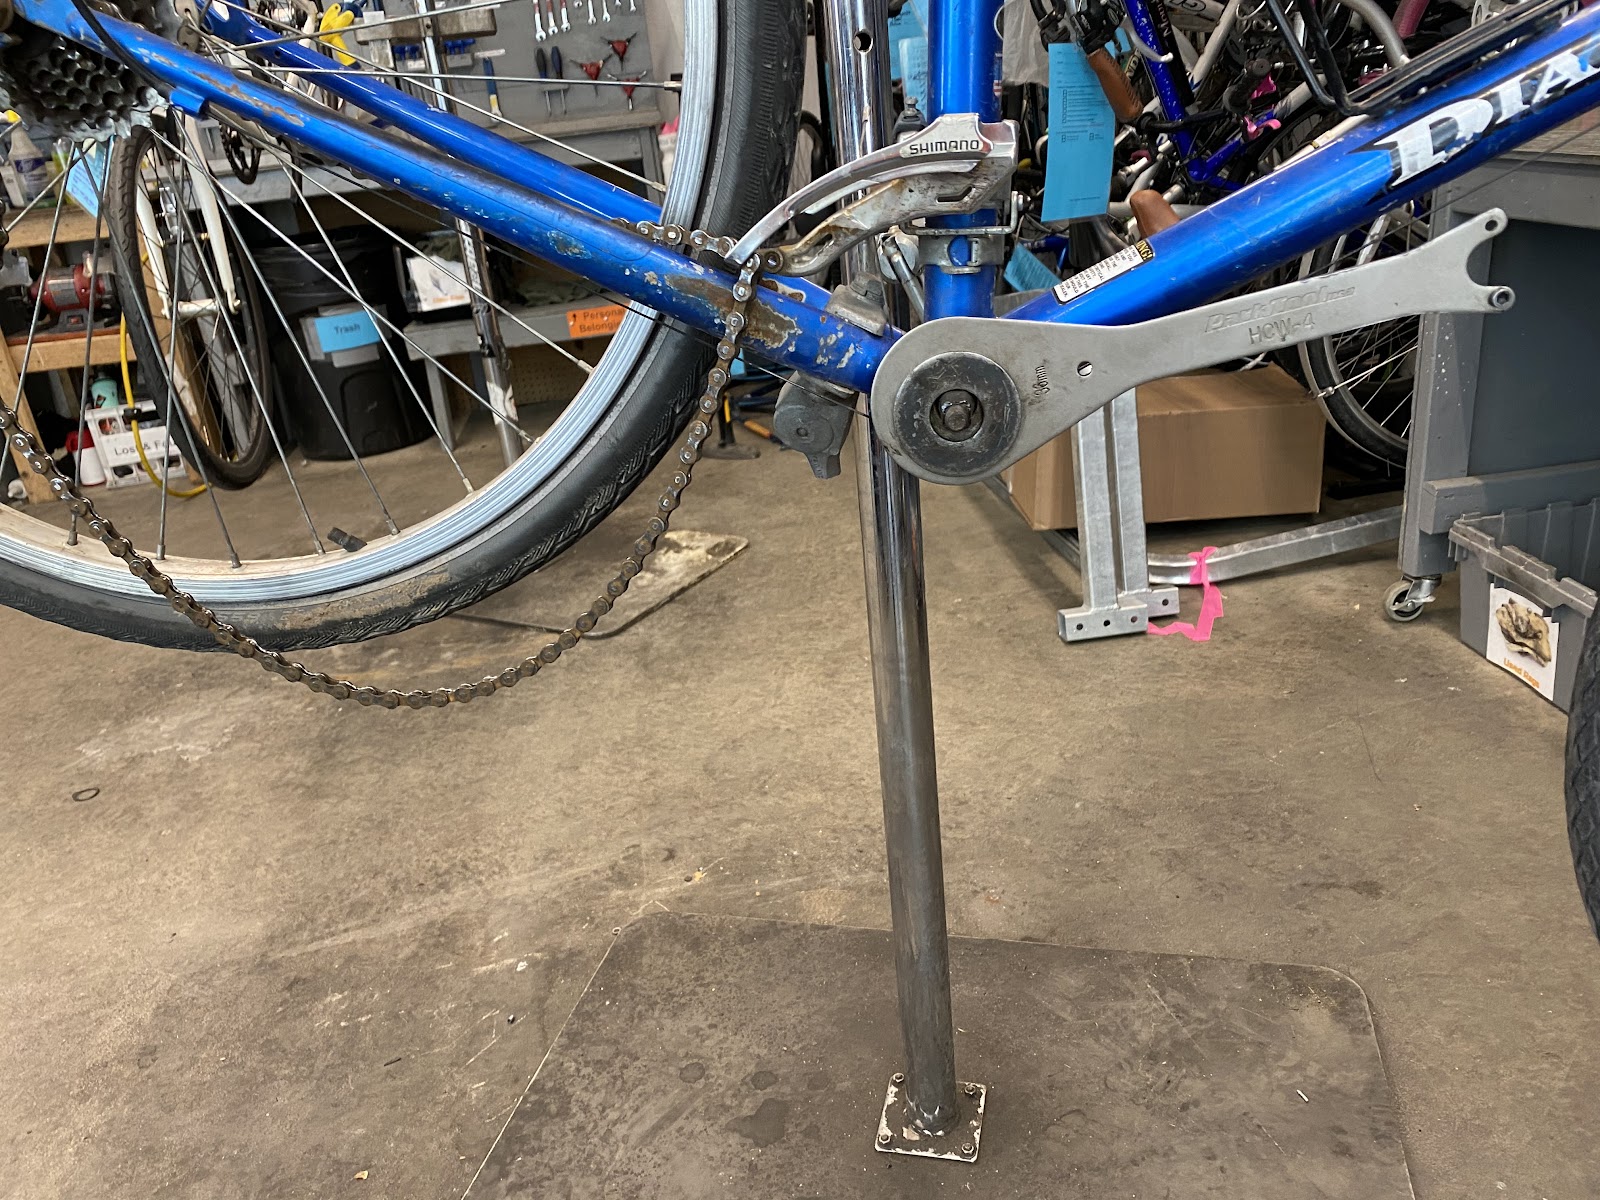

From above it should look like this

Turn the wrench as usual. If more leverage is needed, a cheater bar is needed.

For bolted spindles, the order of assembly is the same except a bolt is needed.

This method is much easier to use than other methods I�ve used. The spindle stabilizes the wrench and turns with it much like a cartridge bearing does. It makes it easier to remove the fixed cup and results in less blood spilled.
I�ve come to the conclusion that we have been taught to remove fixed cups wrong for a long time. I, like most everyone, have been taught to remove the adjustable cup first, followed by the fixed cup. We avoid removing the fixed cup because it can be difficult to remove. I realized that I needed to stand the procedure on its head. Remove the fixed cup first since it is the hardest one and the wrench needs the most stabilization. The spindle can be used to hold the tool but it will allow the wrench to turn with the cup so that the tool doesn�t even need to be removed to completely remove the fixed cup.
Since there are 2 types of spindle, the procedure and fastener used will depend on which spindle is present. The nut or bolt used on the spindle can be used to hold everything in place.
Tool Assembly
The parts for the nutted spindle needed are shown here. Most everything can be found in just about any shop. The large fender washer is probably the only thing you�ll have to go to a hardware store for.
A large fender washer, an adjustable cup, and the spindle nut are needed. Another washer may be needed to get the spacing right. The order of assembly follows
From above it should look like this
Turn the wrench as usual. If more leverage is needed, a cheater bar is needed.
For bolted spindles, the order of assembly is the same except a bolt is needed.
This method is much easier to use than other methods I�ve used. The spindle stabilizes the wrench and turns with it much like a cartridge bearing does. It makes it easier to remove the fixed cup and results in less blood spilled.
__________________
Stuart Black
Plan Epsilon Around Lake Michigan in the era of Covid
Old School�When It Wasn�t Ancient bikepacking
Gold Fever Three days of dirt in Colorado
Pokin' around the Poconos A cold ride around Lake Erie
Dinosaurs in Colorado A mountain bike guide to the Purgatory Canyon dinosaur trackway
Solo Without Pie. The search for pie in the Midwest.
Picking the Scablands. Washington and Oregon, 2005. Pie and spiders on the Columbia River!
Likes For cyccommute:
02-10-21, 12:03 AM
#46
Mad bike riding scientist
Join Date: Nov 2004
Location: Denver, CO
Posts: 27,362
Bikes: Some silver ones, a red one, a black and orange one, and a few titanium ones
Mentioned: 152 Post(s)
Tagged: 1 Thread(s)
Quoted: 6219 Post(s)
Liked 4,218 Times
in
2,365 Posts
Spoke setting tool
 Untitled by Stuart Black, on Flickr
Just a crank arm but it’s effective and doesn’t cut into the spokes like a screw driver does.
I also have an ERD measurement tool that Reddog3, a poster on BikeForums, long ago (2011) developed an easy homemade tool to make for determining the ERD. Here’s what I put together for my wheel building class.
A metal rule is drilled at both ends and a fender bolt or pinch bolt from a brake cable is used to clamp two spokes to the rule. Each spoke is cut to a known length from the seat of the spoke nipple. 250 mm is a good dimension for 700C and 26” wheels. The cut spokes are clamped in the fender bolts like the figure below.
The distance between the two ends is read directly off the rule and added to the overall length of the two spokes as shown in the picture below.

In this case the length added is 36mm for a total ERD of 536mm.
The hardest part of the process was finding the rule.
Untitled by Stuart Black, on FlickrJust a crank arm but it’s effective and doesn’t cut into the spokes like a screw driver does.
I also have an ERD measurement tool that Reddog3, a poster on BikeForums, long ago (2011) developed an easy homemade tool to make for determining the ERD. Here’s what I put together for my wheel building class.
A metal rule is drilled at both ends and a fender bolt or pinch bolt from a brake cable is used to clamp two spokes to the rule. Each spoke is cut to a known length from the seat of the spoke nipple. 250 mm is a good dimension for 700C and 26” wheels. The cut spokes are clamped in the fender bolts like the figure below.
The distance between the two ends is read directly off the rule and added to the overall length of the two spokes as shown in the picture below.
In this case the length added is 36mm for a total ERD of 536mm.
The hardest part of the process was finding the rule.
__________________
Stuart Black
Plan Epsilon Around Lake Michigan in the era of Covid
Old School�When It Wasn�t Ancient bikepacking
Gold Fever Three days of dirt in Colorado
Pokin' around the Poconos A cold ride around Lake Erie
Dinosaurs in Colorado A mountain bike guide to the Purgatory Canyon dinosaur trackway
Solo Without Pie. The search for pie in the Midwest.
Picking the Scablands. Washington and Oregon, 2005. Pie and spiders on the Columbia River!
Stuart Black
Plan Epsilon Around Lake Michigan in the era of Covid
Old School�When It Wasn�t Ancient bikepacking
Gold Fever Three days of dirt in Colorado
Pokin' around the Poconos A cold ride around Lake Erie
Dinosaurs in Colorado A mountain bike guide to the Purgatory Canyon dinosaur trackway
Solo Without Pie. The search for pie in the Midwest.
Picking the Scablands. Washington and Oregon, 2005. Pie and spiders on the Columbia River!
02-10-21, 12:14 AM
#47
Senior Member

Join Date: Jan 2008
Location: Beaverton, OR
Posts: 14,744
Bikes: Yes
Mentioned: 525 Post(s)
Tagged: 0 Thread(s)
Quoted: 3230 Post(s)
Liked 3,868 Times
in
1,439 Posts
As I was reading this thread, I thought to myself, "I don't really use a lot of DIY tools." Mostly, it's just this:

Oh, and this one:

And sometimes this:

Followed by this:

And then this:

Also, these:

Does the piece of PVC pipe I use to seat fork crown races count as a tool I made? I did put tape on one end.
What about the crank arm I use to stress relieve spokes?
OK, yeah, I guess I sometimes use DIY tools. I may have watched a few of RJ's videos.
Oh, and this one:
And sometimes this:
Followed by this:
And then this:
Also, these:
Does the piece of PVC pipe I use to seat fork crown races count as a tool I made? I did put tape on one end.
What about the crank arm I use to stress relieve spokes?
OK, yeah, I guess I sometimes use DIY tools. I may have watched a few of RJ's videos.
__________________
My Bikes
My Bikes
02-10-21, 12:15 AM
#48
Mad bike riding scientist
Join Date: Nov 2004
Location: Denver, CO
Posts: 27,362
Bikes: Some silver ones, a red one, a black and orange one, and a few titanium ones
Mentioned: 152 Post(s)
Tagged: 1 Thread(s)
Quoted: 6219 Post(s)
Liked 4,218 Times
in
2,365 Posts
I also have a Lezyne floor pump. I hate the screw on chuck so I use a Silca chuck. I don�t have much need for the Schrader chuck and I seldom use it. However, sometimes I need to fill the tire on my wheelbarrow and some kid tires. The thread on chuck for the Lezyne pump doesn�t work well in close quarters. I made a chuck that is easier to use in close quarters out of an old chuck, a Presta valve and a bit of Tygon tubing.
 Untitled by Stuart Black, on Flickr
 Untitled by Stuart Black, on Flickr
 Untitled by Stuart Black, on Flickr
Untitled by Stuart Black, on FlickrUntitled by Stuart Black, on FlickrUntitled by Stuart Black, on Flickr
__________________
Stuart Black
Plan Epsilon Around Lake Michigan in the era of Covid
Old School�When It Wasn�t Ancient bikepacking
Gold Fever Three days of dirt in Colorado
Pokin' around the Poconos A cold ride around Lake Erie
Dinosaurs in Colorado A mountain bike guide to the Purgatory Canyon dinosaur trackway
Solo Without Pie. The search for pie in the Midwest.
Picking the Scablands. Washington and Oregon, 2005. Pie and spiders on the Columbia River!
Likes For cyccommute:
02-14-21, 01:39 PM
#49
Senior Member
Join Date: Feb 2020
Posts: 2,820
Mentioned: 49 Post(s)
Tagged: 0 Thread(s)
Quoted: 1106 Post(s)
Likes: 0
Liked 1,328 Times
in
784 Posts
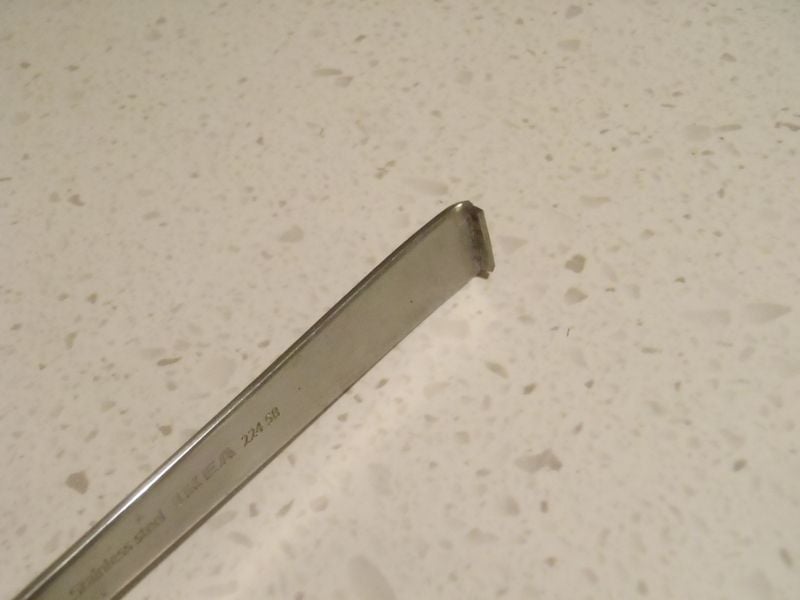
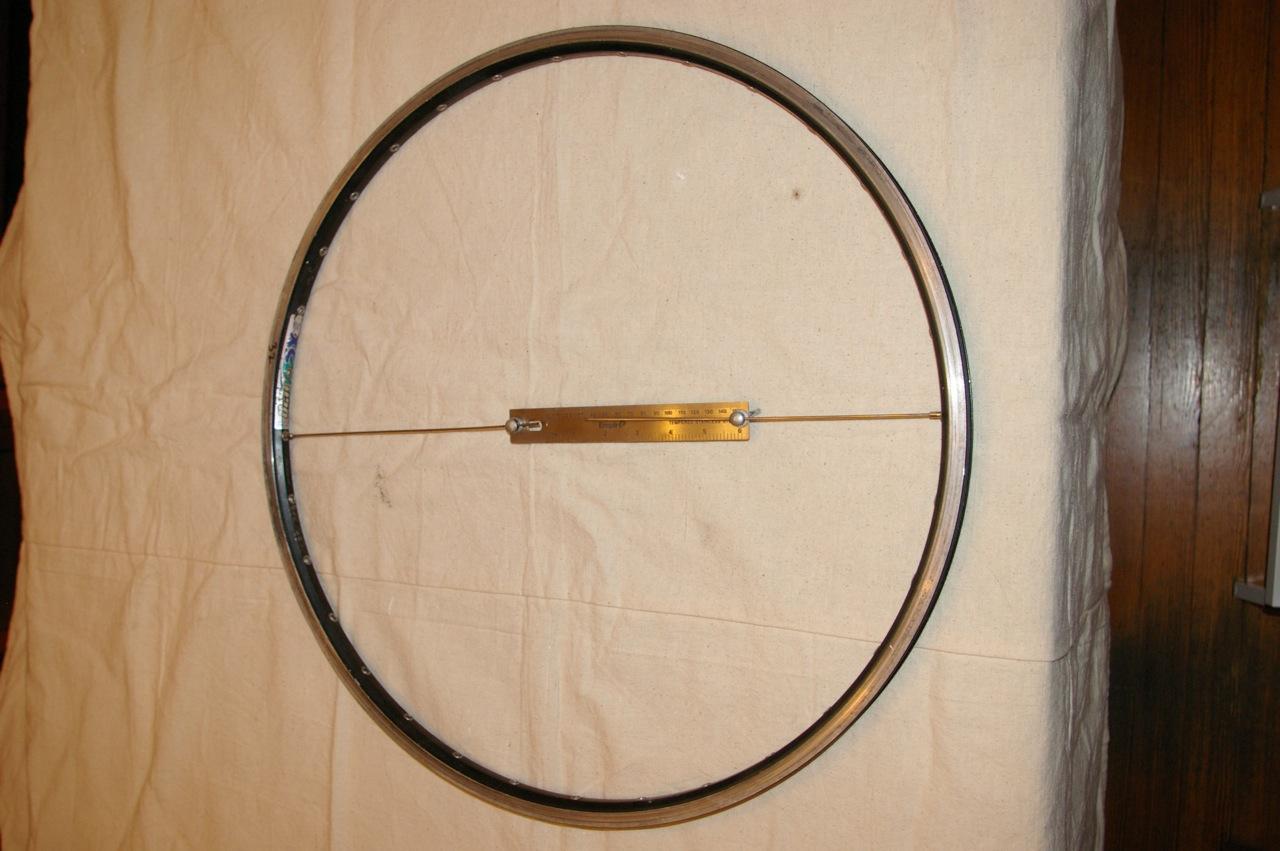
ERD checker
I got tired of having to look up what other people thought the ERD of the rims I'm lacing, plus some of them don't show up at all.
And then I got tired of having to hold three things with two hands AND measure.
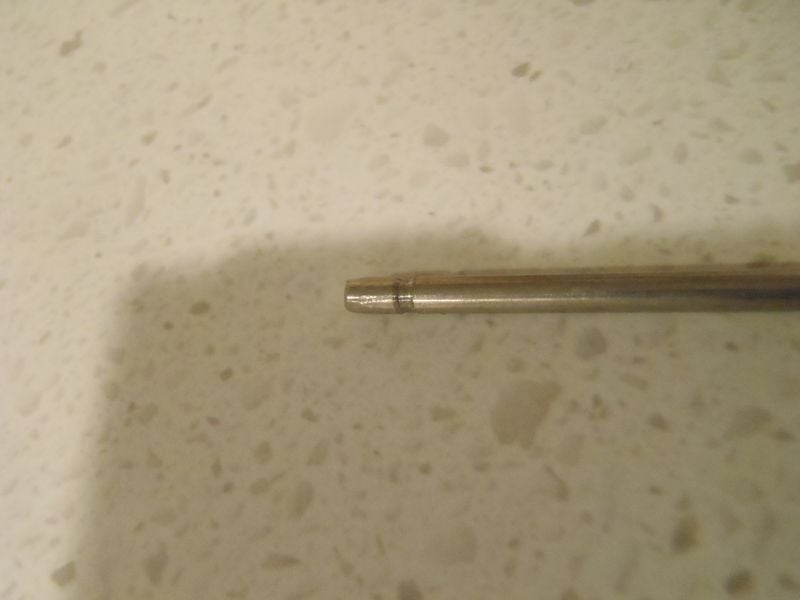
So I made this from a bit of 1/8" stainless, a philips-head screw and a washer, and some brass cutoffs. You put it through a spoke hole, count 1/2 the total(*), poke it though that hole, slide the stopper on and lock it. The notch is at 72.5cm, the stopper is 25mm, measure to the notch and subtract from 70. This rim says it's 621, it's an Araya 27 x 1 1/4".
* - yes, count, this rim had the (welded) joint 17 and 19 holes from the valve hole.


And then I got tired of having to hold three things with two hands AND measure.
So I made this from a bit of 1/8" stainless, a philips-head screw and a washer, and some brass cutoffs. You put it through a spoke hole, count 1/2 the total(*), poke it though that hole, slide the stopper on and lock it. The notch is at 72.5cm, the stopper is 25mm, measure to the notch and subtract from 70. This rim says it's 621, it's an Araya 27 x 1 1/4".
* - yes, count, this rim had the (welded) joint 17 and 19 holes from the valve hole.
02-14-21, 03:17 PM
#50
aka Tom Reingold

Join Date: Jan 2009
Location: New York, NY, and High Falls, NY, USA
Posts: 40,503
Bikes: 1962 Rudge Sports, 1971 Raleigh Super Course, 1971 Raleigh Pro Track, 1974 Raleigh International, 1975 Viscount Fixie, 1982 McLean, 1996 Lemond (Ti), 2002 Burley Zydeco tandem
Mentioned: 511 Post(s)
Tagged: 0 Thread(s)
Quoted: 7348 Post(s)
Liked 2,470 Times
in
1,435 Posts
@cyccommute, those are wonderful tricks! I'll remove a fixed cup that way next time, for sure.
__________________
Tom Reingold, tom@noglider.com
New York City and High Falls, NY
Blogs: The Experienced Cyclist; noglider's ride blog
�When man invented the bicycle he reached the peak of his attainments.� � Elizabeth West, US author
Please email me rather than PM'ing me. Thanks.
Tom Reingold, tom@noglider.com
New York City and High Falls, NY
Blogs: The Experienced Cyclist; noglider's ride blog
�When man invented the bicycle he reached the peak of his attainments.� � Elizabeth West, US author
Please email me rather than PM'ing me. Thanks.