


Single-speed Belt Drive Conversion – Photoblog
 06-30-12, 07:14 PM
#1
Junior Member
Thread Starter
Single-speed Belt Drive Conversion – Photoblog
I'm converting a Japanese Tange road frame to a single-speed belt-drive bike using the Gates Carbon Drive system, and would like to invite you to follow along.
https://www.flickr.com/photos/stevelu...7630151393730/
https://www.flickr.com/photos/stevelu...7630151393730/
 06-30-12, 07:14 PM
#2
Junior Member
Thread Starter
Step One: Splitting the frame
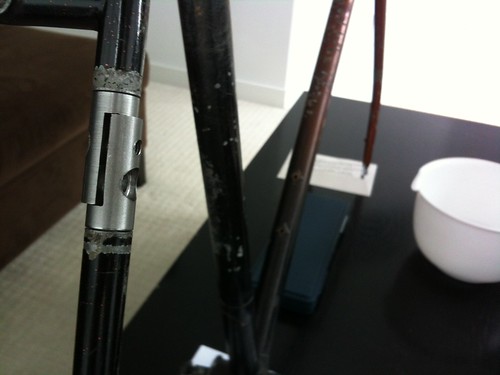
The major difference between a belt-drive build and a chain-drive build is a special demand placed on the frame itself. Take a look at your bike. Where you pedal, the chain sits outside the rear triangle, but where the chain drives the wheel it sits inside the rear triangle. This is accomplished by breaking the chain, threading it through the rear triangle, and re-joining it. You can do no such thing with a belt; it's a continuous, unbreakable loop. For this reason, you need a way of breaking the rear triangle instead. For my conversion project, this meant learning how to cut, machine, and weld metal.
I sketched out a design for a widget that could be inserted into a portion of the drive-side seatstay that would allow me to open and close the rear triangle to get a belt in and out. The device would be secured by two bolts, which when removed would allow me to bend one arm of the rear seatstay just enough to be able to pass a belt through the gap. This depends on your frame being made out of a flexible material. Steel works. I'm guessing that aluminum would not.
I was lucky enough to have a perfectly round seatstay, so I was able to cut it cleanly using a mini pipe cutter – the kind used to cut plumbing pipes.
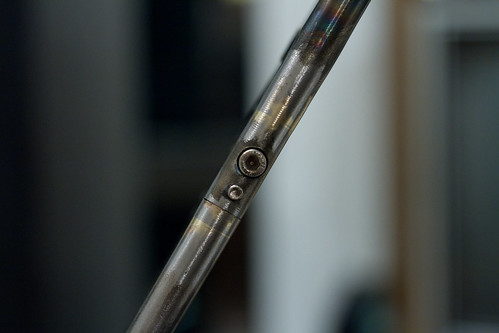
To machine the plug, I enlisted the help of newfound friend Tiago Santos. Together, we used a metal lathe and a mini mill to turn my sketches into a reasonably fine looking widget.
Here are photos of the finished plug, pre-welding.
Side view (click to enlarge)

Rear view (click to enlarge)
Next up, welding.
The major difference between a belt-drive build and a chain-drive build is a special demand placed on the frame itself. Take a look at your bike. Where you pedal, the chain sits outside the rear triangle, but where the chain drives the wheel it sits inside the rear triangle. This is accomplished by breaking the chain, threading it through the rear triangle, and re-joining it. You can do no such thing with a belt; it's a continuous, unbreakable loop. For this reason, you need a way of breaking the rear triangle instead. For my conversion project, this meant learning how to cut, machine, and weld metal.
I sketched out a design for a widget that could be inserted into a portion of the drive-side seatstay that would allow me to open and close the rear triangle to get a belt in and out. The device would be secured by two bolts, which when removed would allow me to bend one arm of the rear seatstay just enough to be able to pass a belt through the gap. This depends on your frame being made out of a flexible material. Steel works. I'm guessing that aluminum would not.
I was lucky enough to have a perfectly round seatstay, so I was able to cut it cleanly using a mini pipe cutter – the kind used to cut plumbing pipes.
To machine the plug, I enlisted the help of newfound friend Tiago Santos. Together, we used a metal lathe and a mini mill to turn my sketches into a reasonably fine looking widget.
Here are photos of the finished plug, pre-welding.
Side view (click to enlarge)
Rear view (click to enlarge)
Next up, welding.
Last edited by steveluscher; 06-30-12 at 09:21 PM. Reason: Hotlinking images.
06-30-12, 07:15 PM
#3
Junior Member
Thread Starter
Step Two: Welding the plug into the frame
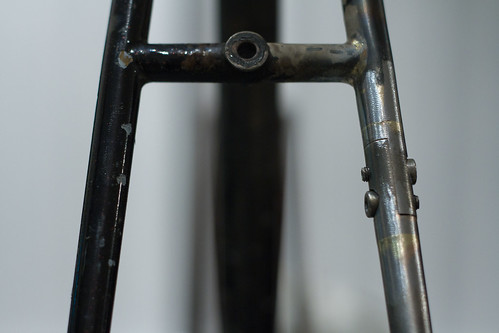
Welding the plug into the frame turned out better than I could have hoped. The seam between the plug and the seatstay all but disappeared. It should look seamless when repainted.
Justin Lemire-Elmore taught me how to use an oxy-propane torch to braze the device into place. Here, my fine soldering skills came in handy. Brazing is just like soldering electronics, but with fire.
After brazing and cooling the frame, I used a flat file to eliminate excess brass.
Here are photos of the finished plug, post-welding.
Side view (click to enlarge)
Rear view
Next up, sourcing the drivetrain.
Last edited by steveluscher; 06-30-12 at 09:23 PM. Reason: Hotlinking images.
06-30-12, 07:15 PM
#4
Junior Member
Thread Starter
Step Three: Sourcing the drivetrain
Gates holds the patent rights to the belt drive system, and are all-around great people to work with. They're very enthusiastic to help you find the right parts and give you the right advice for your build.
I used their iPhone app to calculate a couple of different sprocket, cog, and belt options to hit my target gain ratio and beltline. I settled on a 20 tooth cog for the hub, a 55 tooth sprocket for the crank, and a 113 tooth belt.
I decided to go with the newest Gates Carbon Drive technology, called CenterTrack. These belts feature a groove down the center, which helps to keep the belt on the ring when the beltline is less-than-perfectly-straight. Since there's no more retaining wall on the side of the rings, dirt and mud are ejected from both sides of the ring. Not that I plan on riding my single-speed road bike in the mud.
Most Gates cogs fit Shimano Hyperglide (9 spline) cassette freehubs. I would have loved to find a single-speed (short) freehub that met my design criteria for less than $1M, but one did not present itself after hours of internet research. I decided to go with a regular freehub, with the intent to use spacers to fill in the wasted space on the cassette.
Here's a photo of the loot, raring to go (click to enlarge).
Next up, finding a single-speed crank, cog spacers, then tweaking the beltline.
Last edited by steveluscher; 06-30-12 at 09:24 PM. Reason: Hotlinking images.
06-30-12, 07:44 PM
#5
Senior Member
nice work! good job on the connector and welding. Update on how it goes with belt drive performance.
it's encouraging that Gates is responsive- it looks like a great project to tackle when I have some time.
thanks for the writeup!
it's encouraging that Gates is responsive- it looks like a great project to tackle when I have some time.
thanks for the writeup!
06-30-12, 07:55 PM
#6

Senior Member

Join Date: Sep 2006
Location: Gnv, FL
Posts: 1,890
Mentioned: 0 Post(s)
Tagged: 0 Thread(s)
Quoted: 0 Post(s)
Likes: 0
Liked 0 Times
in
0 Posts
Right on. Looks great.


 07-01-12, 11:56 AM
#11
Junior Member
Thread Starter
07-01-12, 11:19 PM
#12
Senior Member
Join Date: Apr 2012
Location: Davis, CA
Posts: 88
Bikes: Leader 722ts
Mentioned: 0 Post(s)
Tagged: 0 Thread(s)
Quoted: 1 Post(s)
Likes: 0
Liked 0 Times
in
0 Posts
man so many questions as I had planned on doing this a while ago after the trek district came out (i ended up building a fixie with the same styling as the orange district). Anyways I ended up scrubbing my plans do to the fact that there were too many restrictions with the system.
I am interested about the new center drive system and wonder if it will prevent some of the stretching issues on the belt that I have heard about with the original system.
I like that you made the break in your frame at the chain stay as well since I have now heard from a fellow district rider who's frame has a break at the dropouts that there are tension issues that can develop in the belt if there is a break at the dropouts and from what I have heard Is the reason why the new districts have the break in the chain stays now to accept the belt.
how did you do your spacing on your hyper glide hub? did you center it or put it out on the edge?
the one reason I strayed away from the idea was due to the fact that there weren't a lot of options in gearing and belt size and hub selection. But I may try to do another project eventually. I have been seeing really crazy and creative designs for this system lately in single speed bikes. Maybe if I get the dough I will try something with the Phil wood belt drive designs.
07-02-12, 01:25 AM
#13
Junior Member
Thread Starter
Gates does claim that CenterTrack belts have been designed with higher tensile strength. I'm curious as to the origin of your stretch stories, though. Chains certainly elongate over time as their bushings wear down, but from what I understand about carbon fibre, it does not stretch appreciably. I think there's this popular notion that belts are "rubbery". When people think of rubber, they imagine something that stretches. I doubt that the belt-stretch stories you've heard hold water. It's more likely that people who claim to have experienced belt stretch are actually experiencing their hubs slipping, their chainrings slipping, or some other part of the drivetrain moving around.
Just a small point, the break is in the seat stay. I haven't yet uploaded any full-bike photos, so I know that it's hard to tell what's where.
…since I have now heard from a fellow district rider who's frame has a break at the dropouts that there are tension issues that can develop in the belt if there is a break at the dropouts and from what I have heard Is the reason why the new districts have the break in the chain stays now to accept the belt.
Neat! I didn't notice that about the new Districts, but there it is. I have a belt drive Trek Soho with split dropouts, and I haven't touched the beltline in years. Runs smoother than the day I bought it.
The hub you see pictured there is a junker that I have lying around (anyone want to buy a 24h Xero Lite?). The real hub for this build is still in the mail. When I get it, I'm going to head into the shop and do two things. First, I'm going to shorten the bottom bracket spindle. The one that's in there right now was designed to handle road gearing; it's too long for a single speed. Once that's done, I'll put everything together and fiddle with spacers until the beltline is perfect. I'll post photos so you can see where they fell! My prediction is dead centre in the cassette.
That rings somewhat true today. You basically have the choice of any Shimano Hyperglide hub for most cog sizes. Your choices begin to dwindle if you want to belt drive a Nexus/Alfine/Rohloff. On the tail end there's a single cog choice for NuVinci hubs, and one 21t thread-on cog if you want to go fixie. Even though I had the option of using any 9-spline Hyperglide hub, I still managed to knock myself out looking for a black 24h single speed 126mm one. Eventually I gave up, and bought a black 24h 8-speed 130mm one.
Just a word of warning, Phil Wood stuff is still on the old system. Ask them when they're going to CenterTrack, or go it alone.


 07-04-12, 12:05 AM
#15
Senior Member
Join Date: Apr 2012
Location: Davis, CA
Posts: 88
Bikes: Leader 722ts
Mentioned: 0 Post(s)
Tagged: 0 Thread(s)
Quoted: 1 Post(s)
Likes: 0
Liked 0 Times
in
0 Posts
whoops yeah I meant to say seat stay instead of chain-stay, thanks for the reply's. by the way your coupling (plug) for the belt looks really nice you did a really good job keep up the good work cant wait to see it done.
07-04-12, 03:59 AM
#16
dino quadz!
Join Date: Mar 2012
Location: Tokyo, Japan
Posts: 77
Bikes: Salsa Mukluk Ti, Air 9 Carbon, Look 464, Astuto Road, BMC Trailfox 02
Mentioned: 0 Post(s)
Tagged: 0 Thread(s)
Quoted: 0 Post(s)
Likes: 0
Liked 0 Times
in
0 Posts
oh my god I love belt drive
I'm having a belt drive frame built for me next year (on the waiting list for Ron English)
this is rad I'll be following this thread
I'm having a belt drive frame built for me next year (on the waiting list
for Ron English) this is rad I'll be following this thread
07-04-12, 12:58 PM
#17
Senior Member

Join Date: Jan 2012
Location: Ithaca, NY
Posts: 4,852
Bikes: Click on the #YOLO
Mentioned: 1 Post(s)
Tagged: 0 Thread(s)
Quoted: 26 Post(s)
Likes: 0
Liked 12 Times
in
12 Posts
Very cool. Is there something along the lines of your split bung available on the market? I have a couple old frames and am working as a welder this summer for an artist friend of mine. I'd love to try my hand at this.
Next time this comes up, mention that a blower belt for a dragster can easily put up with four-digit amounts of horsepower. Granted, it's much wider, but even so, there's no way your legs can do anything to a belt at 1/8th the width.

See also: American v-twin bikes.

I think there's this popular notion that belts are "rubbery". When people think of rubber, they imagine something that stretches. I doubt that the belt-stretch stories you've heard hold water. It's more likely that people who claim to have experienced belt stretch are actually experiencing their hubs slipping, their chainrings slipping, or some other part of the drivetrain moving around.
See also: American v-twin bikes.
__________________

Shimano : Click :: Campy : Snap :: SRAM : Bang
Shimano : Click :: Campy : Snap :: SRAM : Bang
07-06-12, 12:55 AM
#18
Junior Member
Thread Starter
An honorable mention goes to Fixie Inc. for their seatstay splitter design, though I couldn't get them to reply to my emails, let alone sell me one.
07-06-12, 01:07 AM
#19
Junior Member
Thread Starter
Step Four: Beltline adjustment
The first thing that I did was to set about shortening the bottom bracket's spindle. It was long enough for road gearing when I bought it, but I didn't need it that long for my single-speed conversion. I rifled through the spindle bin at Our Community Bikes, but they didn't have anything shorter. I ended up buying the shortest cartridge bottom bracket they had (107mm) and replacing the entire thing. I'm sort of pumped to have a cartridge bottom bracket, on the promise that they're less prone to creaking. It's also new, so it runs super smooth.
With the 107mm spindle, I was able to get the sprocket this close to the frame. Close enough!
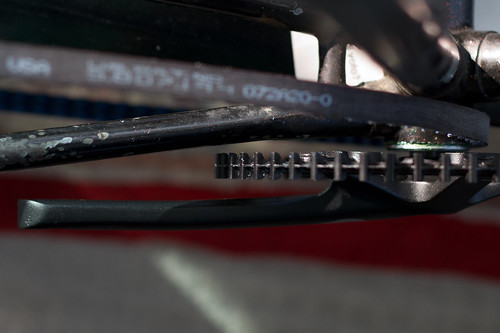
(Click to enlarge)
Then, I bought a single-speed cog spacer kit from Our Community Bikes and set to work aligning the rear cog.
Using a digital caliper, I measured the distance from the centerline of the bike to the edge of the belt on the front crank's sprocket. A measurement of the rear dropouts and some quick math told me exactly where I needed the rear cog to sit on the cassette. I tried a couple of different combinations of spacers before settling on the arrangement pictured. It looks a little janky to me, but I'm told that once it's tightened down tight, it will be alright.
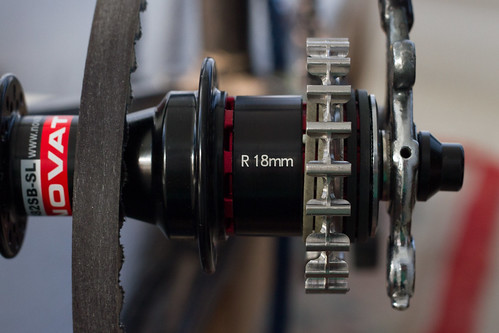
(Click to enlarge)
The color scheme of this bike is "black" so I wanted to source all-black parts for the crankset. I had to call 7 bike stores in Vancouver in search of black single-speed chainring bolts, before finding one that did: the unparalleled Jett Grrl Bike Studio.
I walked into Jett Grrl and was amazed to find a plethora of high-end gear that I'd (up until then) only been able to find on the internet. Tracy, the proprietor, stocks an amazing array of beautiful, quality bike parts. I can't wait for another excuse to visit. This time around, I made off with five black Origin8 single-speed chainring bolts, an Axiom bolt-on skewer set, and one black Pake crankset.
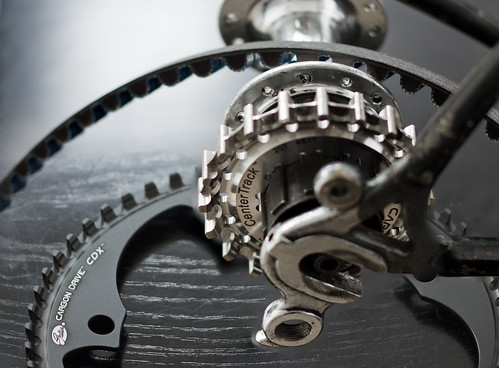
To install the 55 tooth Gates sprocket, I engaged the belt, lightly tightened the chainring bolts, then gave the crank a few turns. As I turned the crank, I could feel the belt loosen and tighten. At the tightest spot, I'd give the beltring a tap with a rubber mallet, tighten the bolts a bit, and repeat. Progressively, the tight spots disappeared as the beltring became centered on the crank spider. At this point, I started to really heave on the chainring bolts, to get them nice and tight. I discovered that this is something you don't do to aluminum chainring bolts – I tightened one far enough to destroy it. So much for sourcing all-black components!
I did manage to find a bolt in Our Community Bikes' bins. It matches closely enough. I'll live.
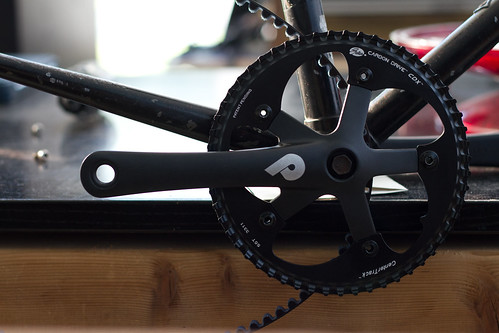
(Click to enlarge)
The completed drivetrain:
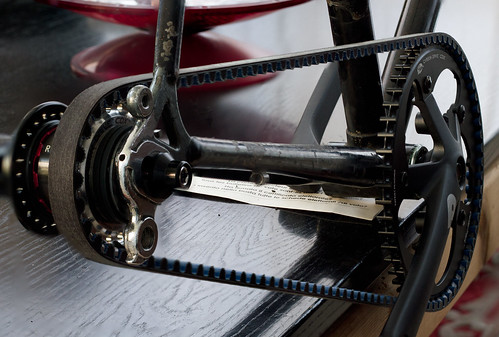
(Click to enlarge)
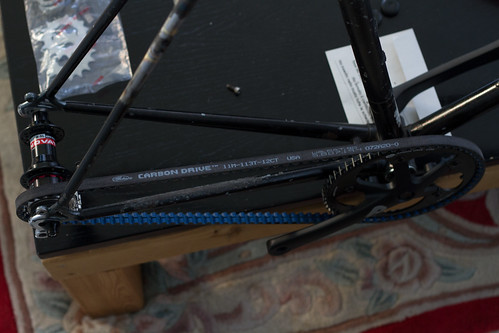
(Click to enlarge)
Next up, spokes, rims, and a custom wheelbuild!
The first thing that I did was to set about shortening the bottom bracket's spindle. It was long enough for road gearing when I bought it, but I didn't need it that long for my single-speed conversion. I rifled through the spindle bin at Our Community Bikes, but they didn't have anything shorter. I ended up buying the shortest cartridge bottom bracket they had (107mm) and replacing the entire thing. I'm sort of pumped to have a cartridge bottom bracket, on the promise that they're less prone to creaking. It's also new, so it runs super smooth.
With the 107mm spindle, I was able to get the sprocket this close to the frame. Close enough!
(Click to enlarge)
Then, I bought a single-speed cog spacer kit from Our Community Bikes and set to work aligning the rear cog.
Using a digital caliper, I measured the distance from the centerline of the bike to the edge of the belt on the front crank's sprocket. A measurement of the rear dropouts and some quick math told me exactly where I needed the rear cog to sit on the cassette. I tried a couple of different combinations of spacers before settling on the arrangement pictured. It looks a little janky to me, but I'm told that once it's tightened down tight, it will be alright.
(Click to enlarge)
The color scheme of this bike is "black" so I wanted to source all-black parts for the crankset. I had to call 7 bike stores in Vancouver in search of black single-speed chainring bolts, before finding one that did: the unparalleled Jett Grrl Bike Studio.
I walked into Jett Grrl and was amazed to find a plethora of high-end gear that I'd (up until then) only been able to find on the internet. Tracy, the proprietor, stocks an amazing array of beautiful, quality bike parts. I can't wait for another excuse to visit. This time around, I made off with five black Origin8 single-speed chainring bolts, an Axiom bolt-on skewer set, and one black Pake crankset.
To install the 55 tooth Gates sprocket, I engaged the belt, lightly tightened the chainring bolts, then gave the crank a few turns. As I turned the crank, I could feel the belt loosen and tighten. At the tightest spot, I'd give the beltring a tap with a rubber mallet, tighten the bolts a bit, and repeat. Progressively, the tight spots disappeared as the beltring became centered on the crank spider. At this point, I started to really heave on the chainring bolts, to get them nice and tight. I discovered that this is something you don't do to aluminum chainring bolts – I tightened one far enough to destroy it. So much for sourcing all-black components!
I did manage to find a bolt in Our Community Bikes' bins. It matches closely enough. I'll live.
(Click to enlarge)
The completed drivetrain:
(Click to enlarge)
(Click to enlarge)
Next up, spokes, rims, and a custom wheelbuild!
07-06-12, 10:59 AM
#21
Senior Member
Nice! You got me excited about this and thanks for all the links. I'm going to try this in a few months.
Tell us how it rides, curious what you discover on the road.
Tell us how it rides, curious what you discover on the road.
07-06-12, 12:45 PM
#22
Newbie
Join Date: Jun 2012
Posts: 1
Mentioned: 0 Post(s)
Tagged: 0 Thread(s)
Quoted: 0 Post(s)
Likes: 0
Liked 0 Times
in
0 Posts
Awesome thread, thanks for putting in so much great info. Belt drive is absolutely fascinating to me, would love to try a conversion out some day.
Extra awesome-sauce that you are using OCB for your build, I just finished my first FG conversion/ build there! Great people, great vibe to that place.
Extra awesome-sauce that you are using OCB for your build, I just finished my first FG conversion/ build there! Great people, great vibe to that place.
07-06-12, 12:53 PM
#24
Junior Member
Thread Starter
07-06-12, 12:55 PM
#25
Cat Enthusiast

Join Date: Aug 2011
Location: Plymouth, MI
Posts: 2,227
Bikes: All City Nature Boy
Mentioned: 0 Post(s)
Tagged: 0 Thread(s)
Quoted: 2 Post(s)
Likes: 0
Liked 0 Times
in
0 Posts
Could have gotten these: https://www.retro-gression.com/produc...d-2-crank-arms