


Hints and tricks thread
 10-15-15, 10:14 PM
#551
Senior Member
Join Date: Jun 2014
Location: Ontario, Canada
Posts: 4,624
Bikes: iele Latina, Miele Suprema, Miele Uno LS, Miele Miele Beta, MMTB, Bianchi Model Unknown, Fiori Venezia, Fiori Napoli, VeloSport Adamas AX
Mentioned: 16 Post(s)
Tagged: 0 Thread(s)
Quoted: 1324 Post(s)
Liked 927 Times
in
640 Posts
Not a mechanical hint but where to put this hint?
Sometimes we want to mount extra bottles on our bikes but we already use the under the saddle location for a seat bag. I discovered tonight that my old dual water bottle seat mount also will fit between the seatstays above the brake bridge. That's a real out of the way place. It's the same place those old Plesher rear racks fastened to.
Cheers
 10-31-15, 07:25 AM
#552
Senior Member
Join Date: Oct 2015
Location: NW Houston
Posts: 112
Bikes: 2008 Marin Kentfield FS, Sun EZ Sport AX
Mentioned: 0 Post(s)
Tagged: 0 Thread(s)
Quoted: 6 Post(s)
Likes: 0
Liked 1 Time
in
1 Post
Not sure if this has been posted or not.
Had an aha moment yesterday when working on the bike. Took my receiver mounted bike rack and clamped it to the work bench. Bike now off floor, no bending over, easier to work on, cleaned and oiled the chain, brakes adjusted, etc. and no additional expense of having to buy a work stand.
Had an aha moment yesterday when working on the bike. Took my receiver mounted bike rack and clamped it to the work bench. Bike now off floor, no bending over, easier to work on, cleaned and oiled the chain, brakes adjusted, etc. and no additional expense of having to buy a work stand.
11-02-15, 01:53 PM
#553
Member
Contact lens solution bottles work well too. Find someone who wears cleanable (not one-day) lenses and ask him/her to give you the bottles after running out of the solution. Free bottles! Bonus: Different bottles have nozzles of different sizes.
11-12-15, 07:55 PM
#554
Senior Member
Join Date: Mar 2013
Location: Southern Ontario, Canada
Posts: 873
Bikes: Too, too many....
Mentioned: 5 Post(s)
Tagged: 0 Thread(s)
Quoted: 125 Post(s)
Likes: 0
Liked 130 Times
in
57 Posts
Two things or 3 really.
First off, sometimes cone locking nuts are ridiculously tight. Cone wrenches are too thin to apply much pressure on without distorting them. If you have one bike, OK. But if you have 50 or more, or work on a lot of bikes, you need something better.
Park cone wrenches are stamped steel .075 thick.
Thats 75 one thousandths of an inch.
Pick up a couple of metric wrenches, the 13mm and 15mm to start with, and polish them on a grinder until they are the right thickness. Don't let them get too hot. You do not want to risk softening the steel by overheating it. Only grind for a few seconds and then cool. Repeat.
My 13mm wrench is .110" thick and my 15mm wrench is .120" thick. You may still find that there are some few cones with a narrow land that is too flat for the wrench but not very many. Raleigh 3-speeds, perhaps.


Secondly: Grease in a grease gun stays cleaner than grease in a tub. To make lubrication easier, get a nozzle on your grease gun - something that can squirt grease into bike axel bearings with the cone being backed off only so far that the balls can neither fall out or become misaligned. Something long enough to reach through the BB to lubricate the BB bearings behind the sprockets from the left side of the bike when the movable cup is removed .


Thirdly: Pineapples.
Aren't these lovely ??
Size 4 at Costco.

Pineapples have a lot of roughage and will keep you regular.
Binky
First off, sometimes cone locking nuts are ridiculously tight. Cone wrenches are too thin to apply much pressure on without distorting them. If you have one bike, OK. But if you have 50 or more, or work on a lot of bikes, you need something better.
Park cone wrenches are stamped steel .075 thick.
Thats 75 one thousandths of an inch.
Pick up a couple of metric wrenches, the 13mm and 15mm to start with, and polish them on a grinder until they are the right thickness. Don't let them get too hot. You do not want to risk softening the steel by overheating it. Only grind for a few seconds and then cool. Repeat.
My 13mm wrench is .110" thick and my 15mm wrench is .120" thick. You may still find that there are some few cones with a narrow land that is too flat for the wrench but not very many. Raleigh 3-speeds, perhaps.
Secondly: Grease in a grease gun stays cleaner than grease in a tub. To make lubrication easier, get a nozzle on your grease gun - something that can squirt grease into bike axel bearings with the cone being backed off only so far that the balls can neither fall out or become misaligned. Something long enough to reach through the BB to lubricate the BB bearings behind the sprockets from the left side of the bike when the movable cup is removed .
Thirdly: Pineapples.
Aren't these lovely ??
Size 4 at Costco.
Pineapples have a lot of roughage and will keep you regular.
Binky
11-12-15, 08:15 PM
#555

Senior Member

If you need heavier duty thin wrenches than Park Tool's, these are pretty nice for the price: V8 Tools (V8 8109) 9 Piece Super Thin Wrench Set - Combination Wrenches - Amazon.com
They are quite useful for automotive work, too (the real reason I bought them).
For very tight cones, I'll put regular wrenches on either side of the hub and torque until one nut comes loose. That's all I need to disassemble the hub and make my adjustment so whichever comes loose is fine by me.
They are quite useful for automotive work, too (the real reason I bought them).
For very tight cones, I'll put regular wrenches on either side of the hub and torque until one nut comes loose. That's all I need to disassemble the hub and make my adjustment so whichever comes loose is fine by me.
11-12-15, 10:57 PM
#556
Banned.
Join Date: Dec 2013
Location: Land of Enhancement
Posts: 426
Bikes: ...
Mentioned: 27 Post(s)
Tagged: 0 Thread(s)
Quoted: 6591 Post(s)
Liked 383 Times
in
334 Posts
I rinse out my old reagent bottles from my pool test kits. They come in a couple different sizes. I keep a small one in my pack, and the larger ones I keep in the side panel of my truck and one for the work bench. It's nice because the tips are "drop-wise," except for the cyanuric acid is more of a stream. They come in handy for my nail guns, too. I also fill one with old damper fluid for drilling lube.
11-13-15, 07:08 AM
#557
Senior Member
Join Date: Mar 2013
Location: Southern Ontario, Canada
Posts: 873
Bikes: Too, too many....
Mentioned: 5 Post(s)
Tagged: 0 Thread(s)
Quoted: 125 Post(s)
Likes: 0
Liked 130 Times
in
57 Posts
And another thing:
Penetrating oils....
WD-40 is OK
Kroil is good.
Liquid Wrench is good.
A mixture of 50% Acetone and 50% ATF (automatic transmission fluid) is BEST !!!
Binky
Penetrating oils....
WD-40 is OK
Kroil is good.
Liquid Wrench is good.
A mixture of 50% Acetone and 50% ATF (automatic transmission fluid) is BEST !!!
Binky
11-22-15, 02:10 PM
#558
Senior Member
Join Date: Jun 2014
Location: Ontario, Canada
Posts: 4,624
Bikes: iele Latina, Miele Suprema, Miele Uno LS, Miele Miele Beta, MMTB, Bianchi Model Unknown, Fiori Venezia, Fiori Napoli, VeloSport Adamas AX
Mentioned: 16 Post(s)
Tagged: 0 Thread(s)
Quoted: 1324 Post(s)
Liked 927 Times
in
640 Posts
For cold setting a stel frame rear triangle I now use an old rear wheel nutted axle with just two large washers and a wheel nut on either side. I place the axle in the dropout with the washers next to the inside of the dropout and with the nuts inboard of the washers. I tighten each nut by the same amount until the proper spacing is reached. A string from a droput up around the head tube and back to the opposite dropout allows you to make sure each side is spreading the same amount.
To make too wide a dropout distance narrower put the washers on the outside of the dropout and the nut outside of the washers then tighten the nuts until the wanted distance is reached.
Cheers
To make too wide a dropout distance narrower put the washers on the outside of the dropout and the nut outside of the washers then tighten the nuts until the wanted distance is reached.
Cheers
11-22-15, 02:31 PM
#559
Senior Member
Join Date: Jun 2014
Location: Ontario, Canada
Posts: 4,624
Bikes: iele Latina, Miele Suprema, Miele Uno LS, Miele Miele Beta, MMTB, Bianchi Model Unknown, Fiori Venezia, Fiori Napoli, VeloSport Adamas AX
Mentioned: 16 Post(s)
Tagged: 0 Thread(s)
Quoted: 1324 Post(s)
Liked 927 Times
in
640 Posts
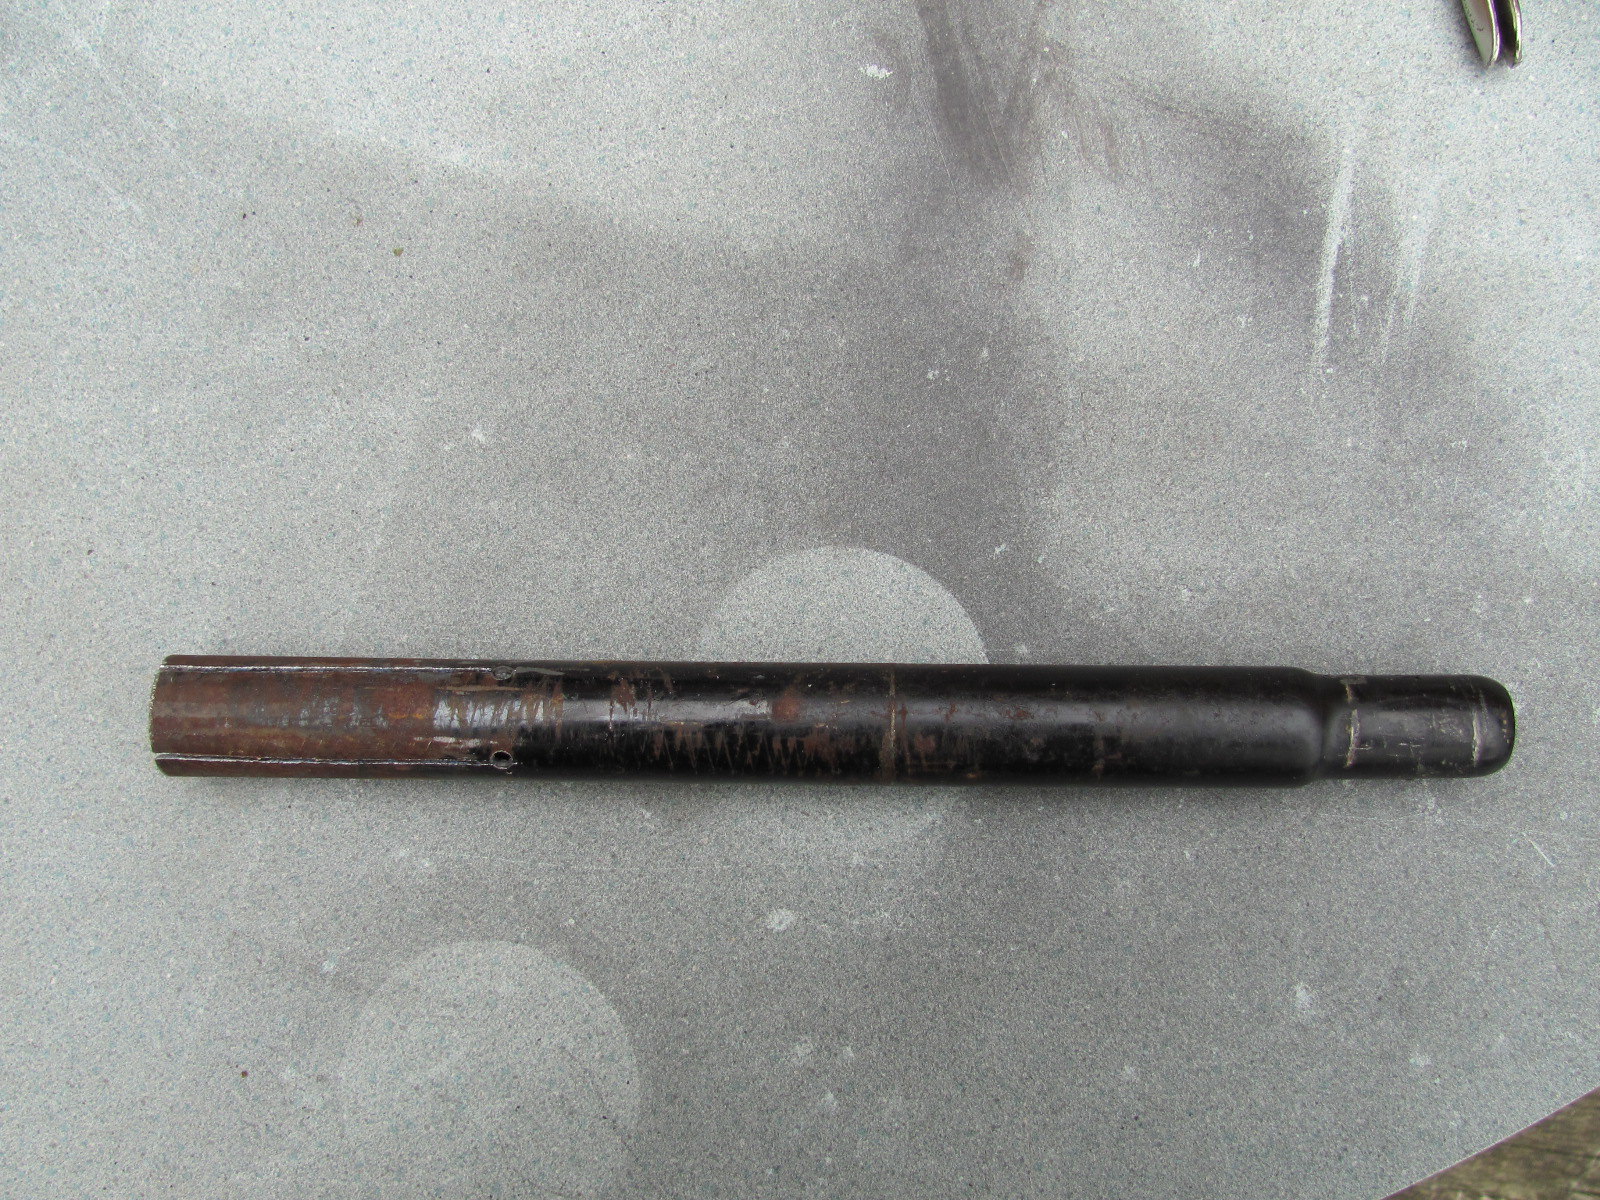
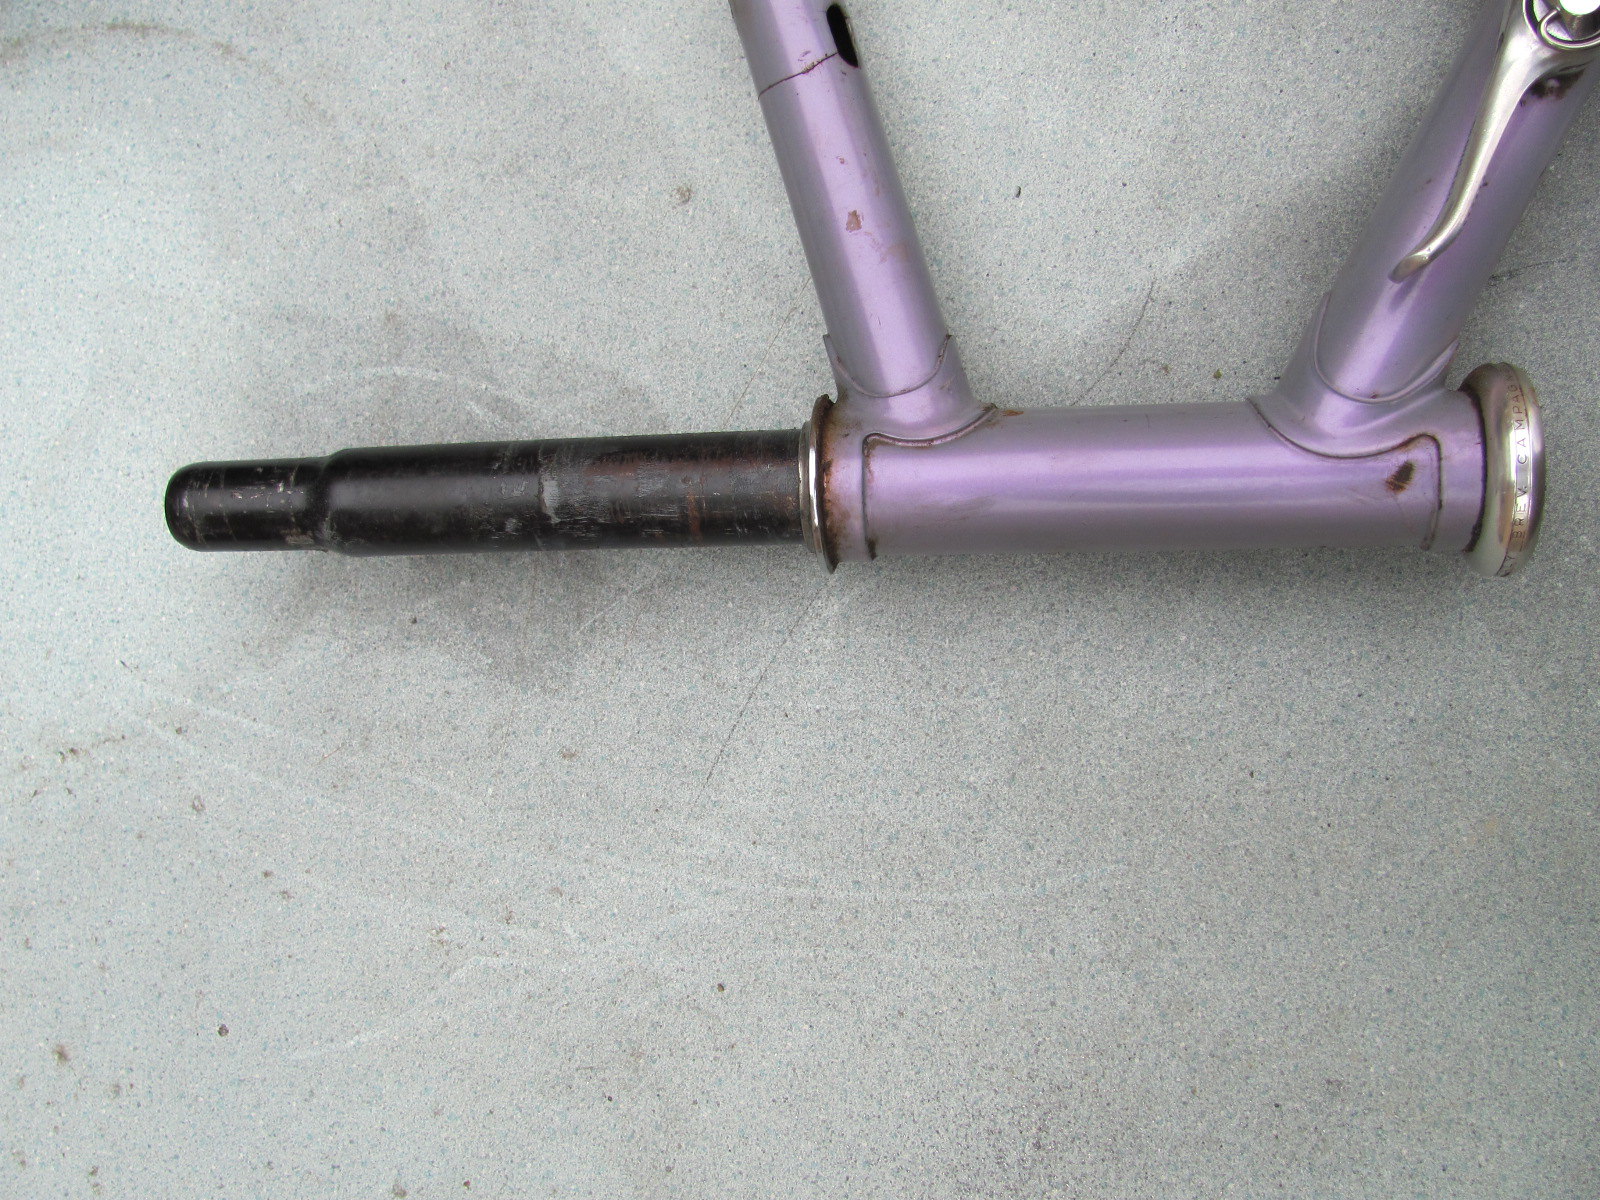
Homemade Bicycle Headset Cup Removal Tool
I used an old MTB straight seatpost minus the detachable seatpost clamp to make a headset cup removal tool.
 Seatpost 4 Headset Removal Tool 1 = Drilled by Miele Man, on Flickr
I driled two holes right through the seatpost a number of inches above the bottom and a right angles to each other.
Then I used a hacksaw to cut from the bottom of the seatpost to the drilled holes. Next I spread the pieces/prongs apart.
 Seatpost 4 Headset Removal Tool 2 = Slots Cut to Drilled Holes by Miele Man, on Flickr
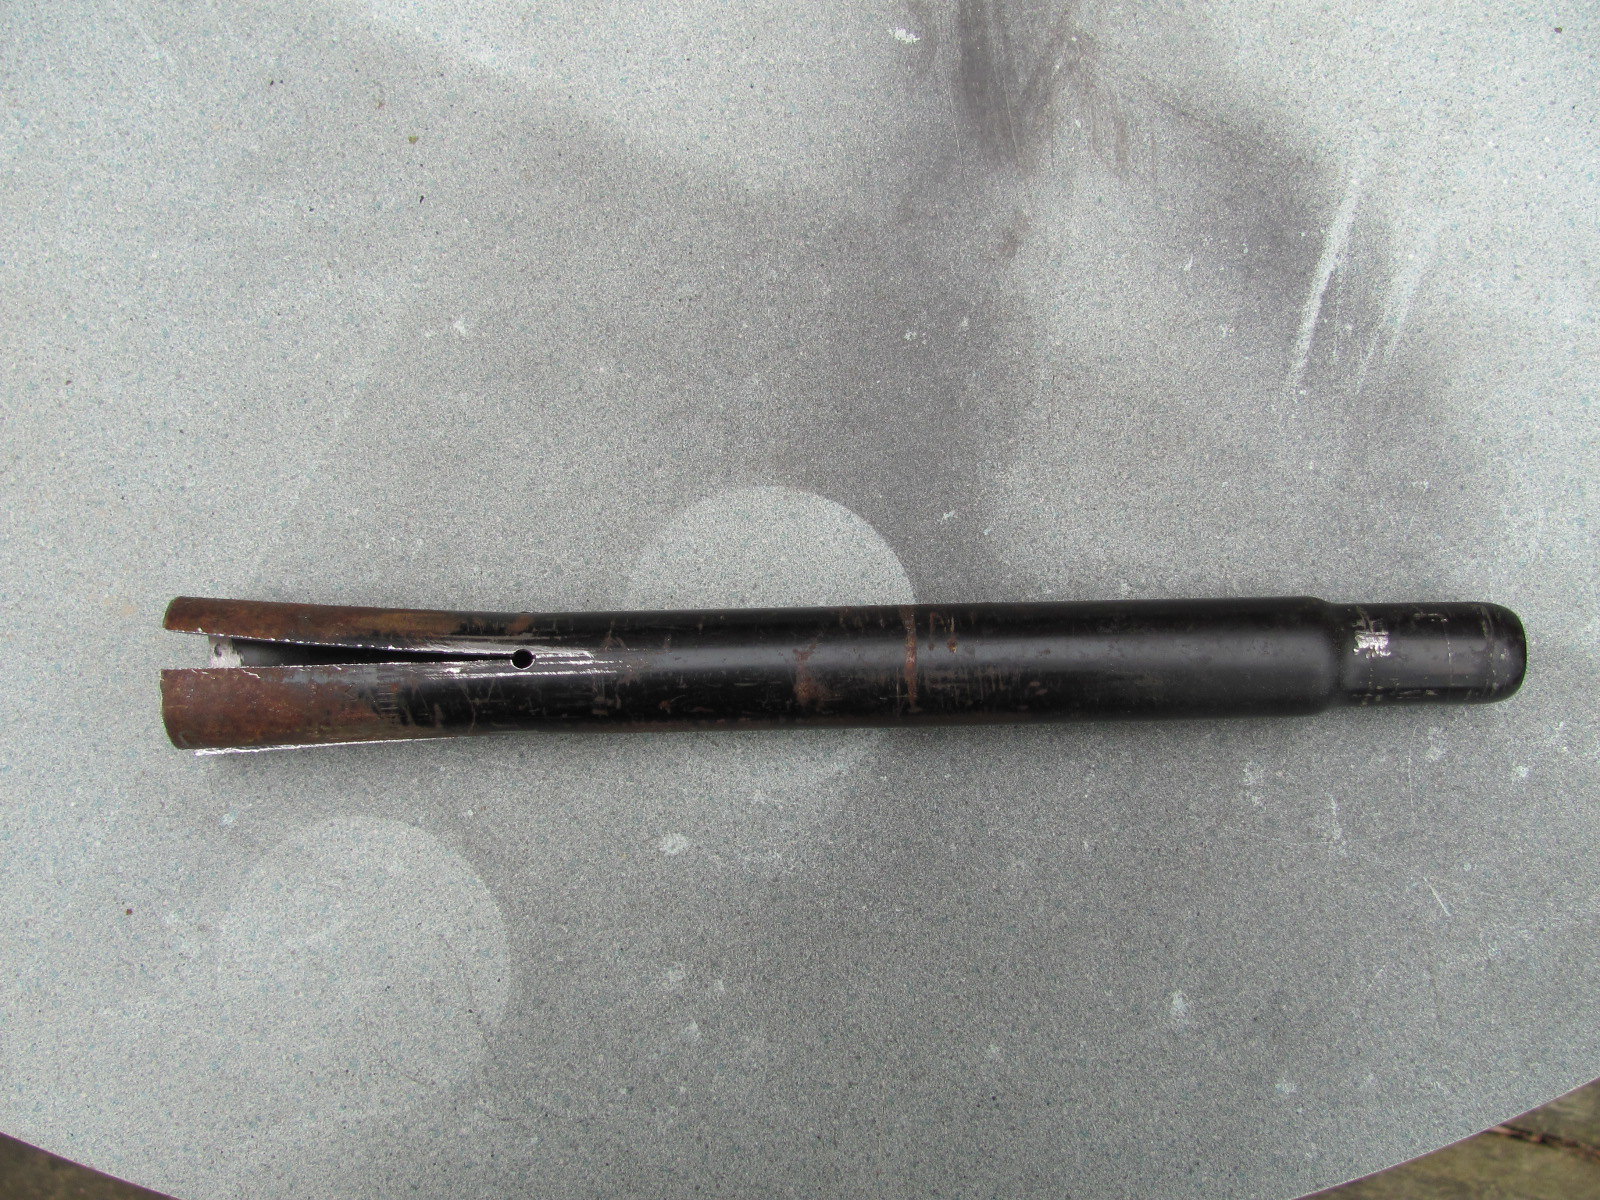 Seatpost 4 Headset Removal Tool 3 = Slots Being Spread by Miele Man, on Flickr
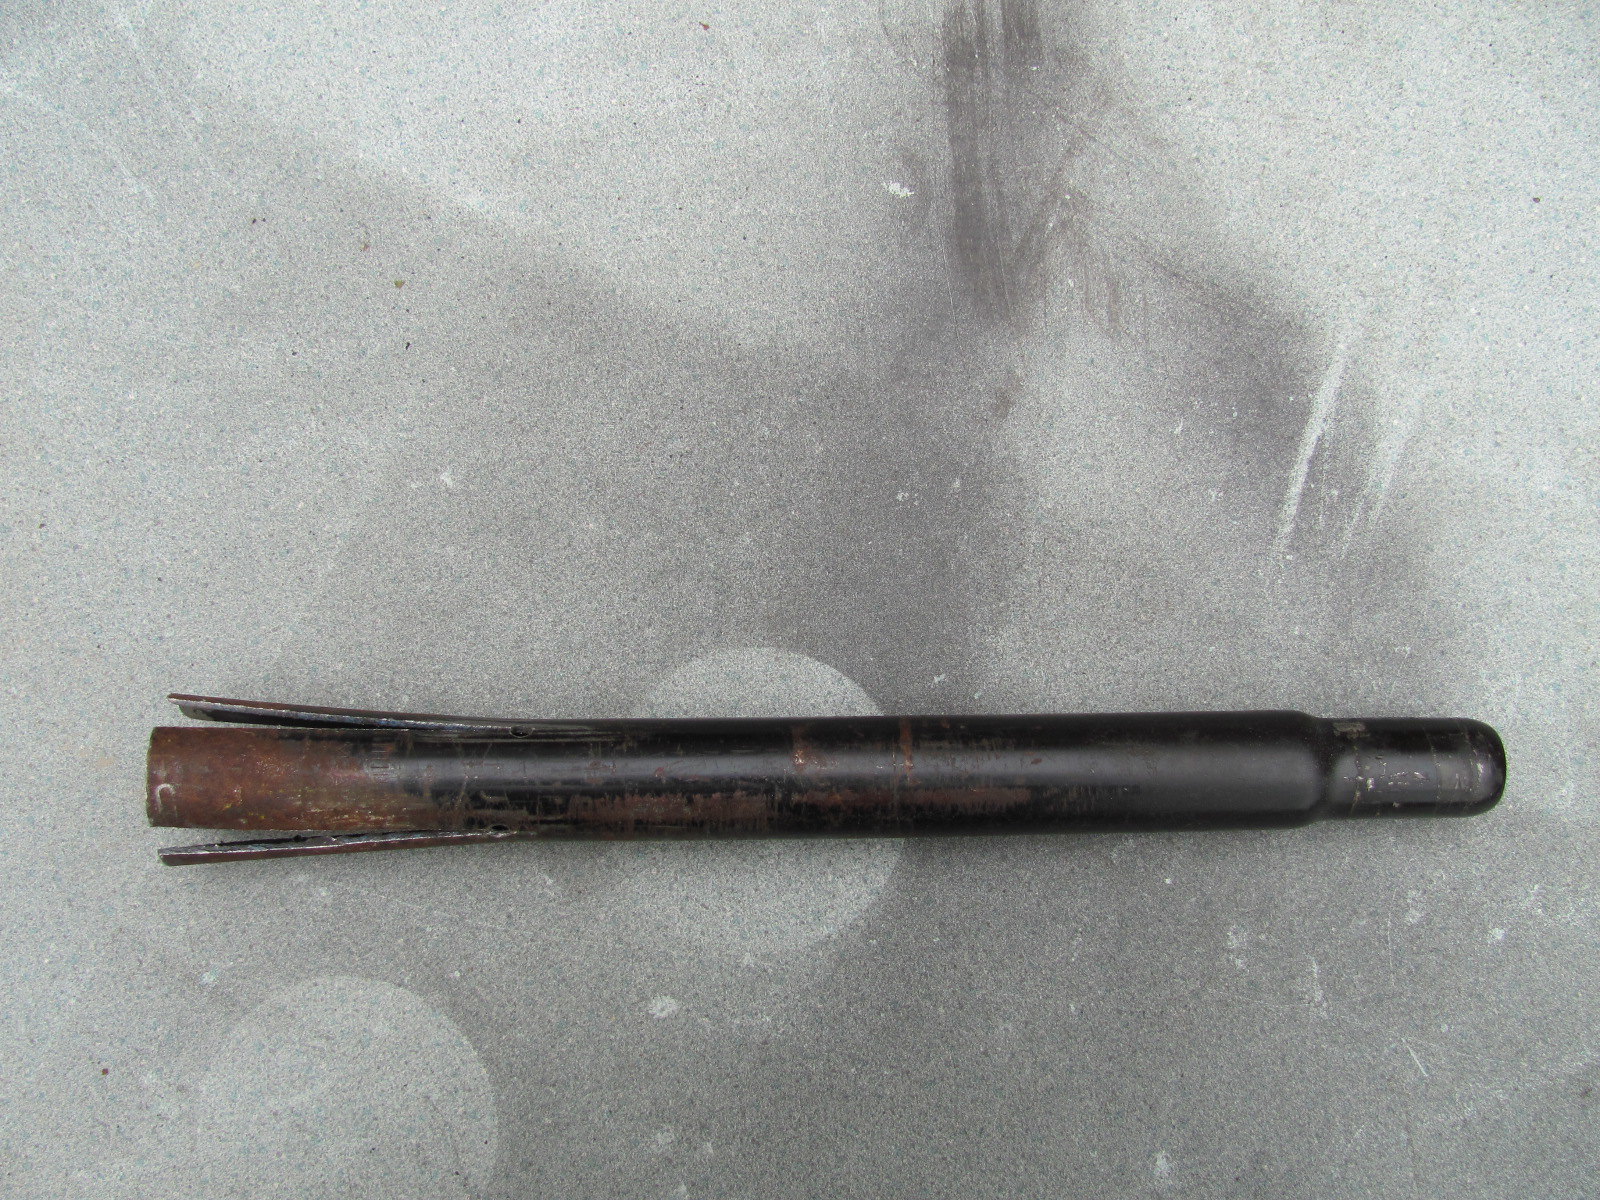 Seatpost 4 Headset Removal Tool 4 = Slots Spread by Miele Man, on Flickr
To use the tool you insert the top of the tool into the cup you want to remove and then pull the tool into the headtube until the 4 prongs snap into place behind the cup.
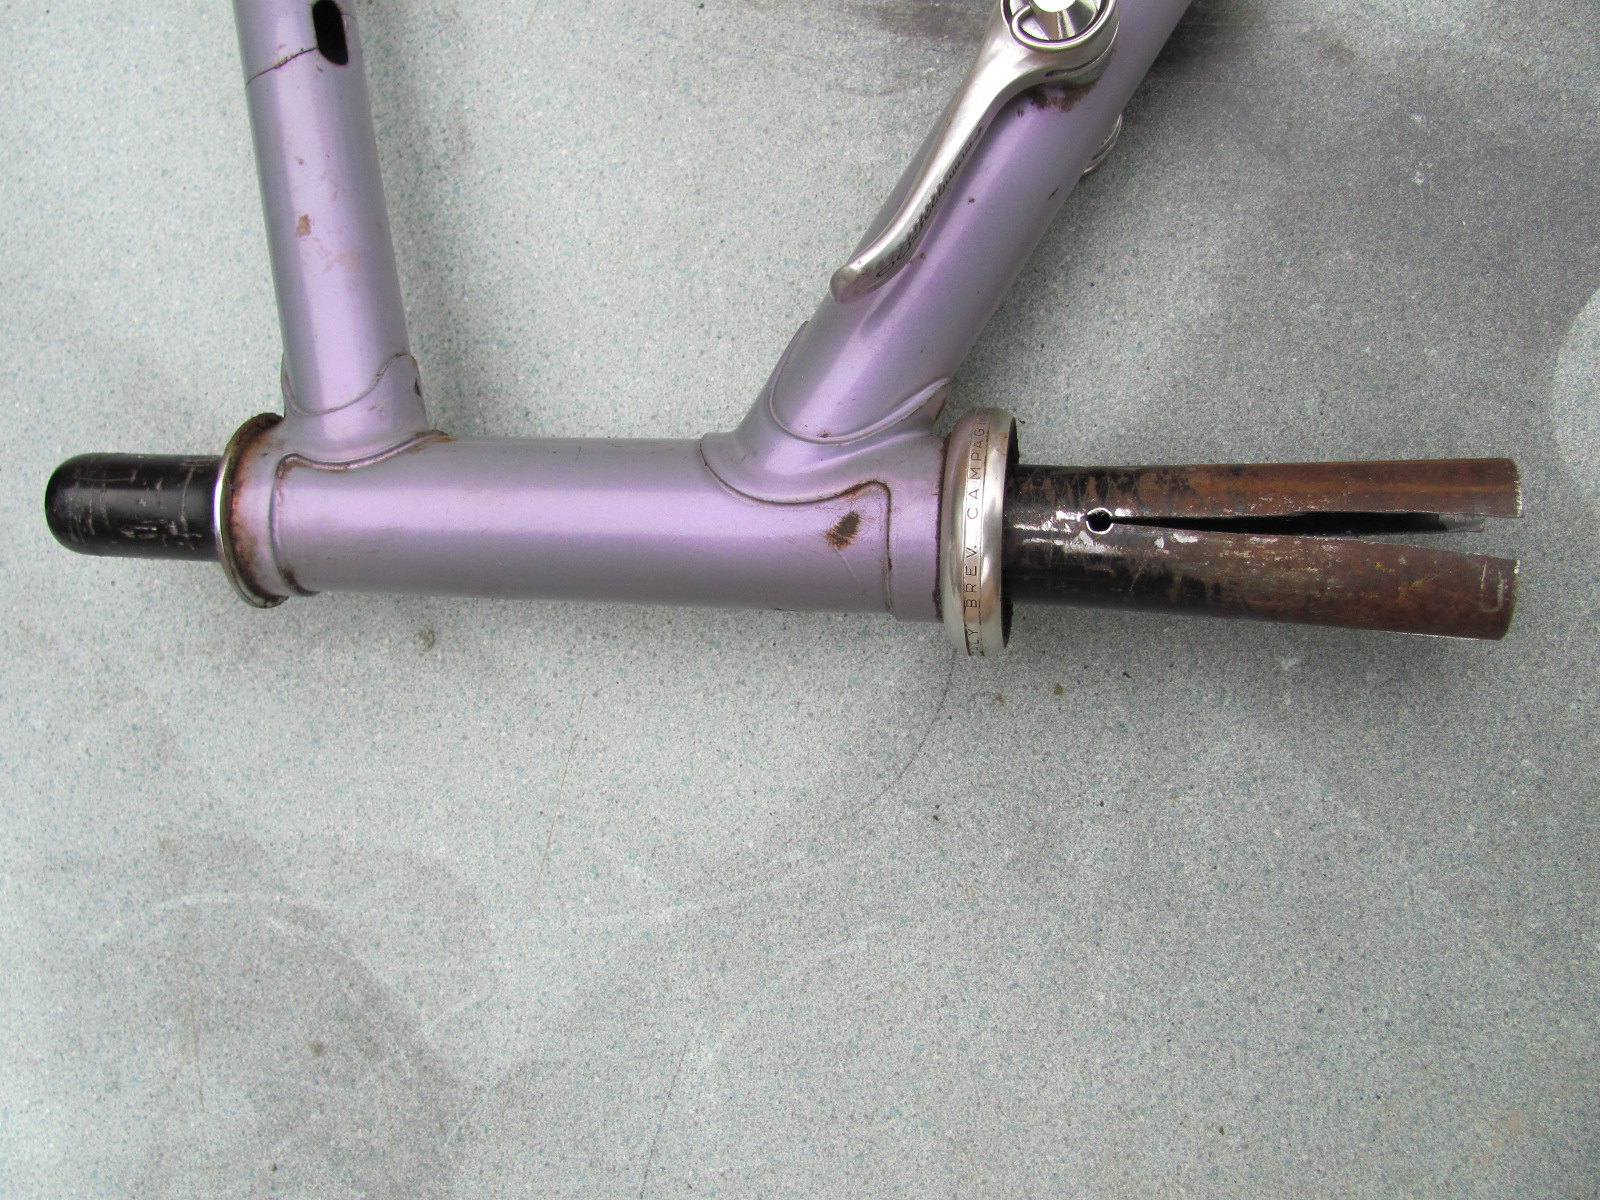 Tool Inserted Into Headtube by Miele Man, on Flickr
 Tool Ready to Remove Lower Cup by Miele Man, on Flickr
Give the tool a good whack on the protruding end to remove the cup without damage to the cup.
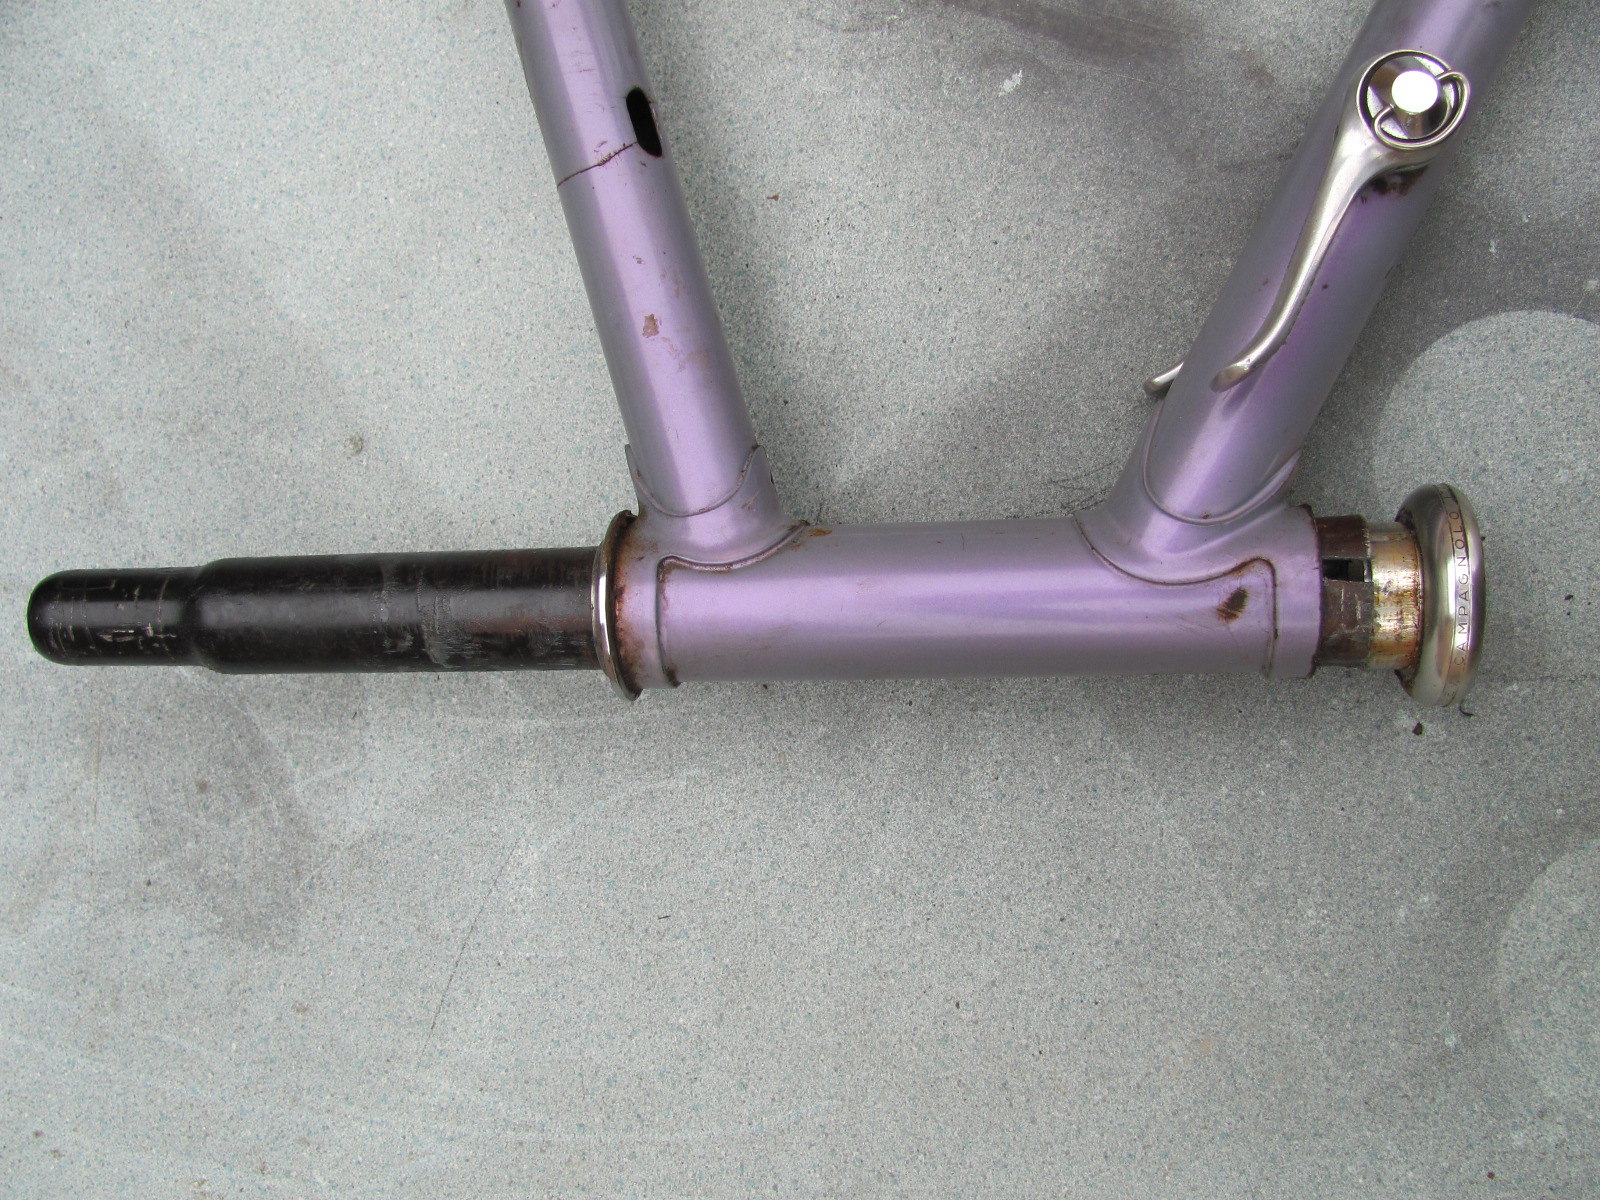 Tool With Lower Cup Removed by Miele Man, on Flickr
Cheers
I used an old MTB straight seatpost minus the detachable seatpost clamp to make a headset cup removal tool.
Seatpost 4 Headset Removal Tool 1 = Drilled by Miele Man, on FlickrI driled two holes right through the seatpost a number of inches above the bottom and a right angles to each other.
Then I used a hacksaw to cut from the bottom of the seatpost to the drilled holes. Next I spread the pieces/prongs apart.
Seatpost 4 Headset Removal Tool 2 = Slots Cut to Drilled Holes by Miele Man, on FlickrSeatpost 4 Headset Removal Tool 3 = Slots Being Spread by Miele Man, on FlickrSeatpost 4 Headset Removal Tool 4 = Slots Spread by Miele Man, on FlickrTo use the tool you insert the top of the tool into the cup you want to remove and then pull the tool into the headtube until the 4 prongs snap into place behind the cup.
Tool Inserted Into Headtube by Miele Man, on FlickrTool Ready to Remove Lower Cup by Miele Man, on FlickrGive the tool a good whack on the protruding end to remove the cup without damage to the cup.
Tool With Lower Cup Removed by Miele Man, on FlickrCheers
12-01-15, 10:24 AM
#560
Keepin it Wheel

Join Date: Aug 2011
Location: San Diego
Posts: 10,245
Bikes: Surly CrossCheck, Krampus
Mentioned: 0 Post(s)
Tagged: 0 Thread(s)
Quoted: 26 Post(s)
Liked 3,433 Times
in
2,540 Posts
Miele Man, that's nice work. For completeness sake, I'll (re)link Dave Moulton's similar solution, using scrap copper pipe.
Here's a cool one I found today: need to remove a freewheel (standard shimano/sunrace 12-spline) but don't have the freewheel removal tool? Any 13/16" hex shape should fit well into 6 of the 12 splines, so if you can grip it with vise grips or a pipe wrench, you can try to torque it out. One common example of a 13/16" hex? The back of a spark plug socket!
Here's a cool one I found today: need to remove a freewheel (standard shimano/sunrace 12-spline) but don't have the freewheel removal tool? Any 13/16" hex shape should fit well into 6 of the 12 splines, so if you can grip it with vise grips or a pipe wrench, you can try to torque it out. One common example of a 13/16" hex? The back of a spark plug socket!
12-16-15, 04:13 PM
#561
Keepin it Wheel
Join Date: Aug 2011
Location: San Diego
Posts: 10,245
Bikes: Surly CrossCheck, Krampus
Mentioned: 0 Post(s)
Tagged: 0 Thread(s)
Quoted: 26 Post(s)
Liked 3,433 Times
in
2,540 Posts
Hey two in a row from me, here's a clever way to DIY a air/pressure reservoir for inflating tubeless tires if you don't have an air compressor:
.be
Those plastic bottles are very strong, I occasionally make home made hard cider, and "after" fermentation when I seal the cider up in the original plastic bottle, the remaining CO2 pressure thrown off by the yeast expands the rectangular bottle you're used to with indents and such, into a taut cylinder! I've never had one explode, but you gotta be careful opening them up
Those plastic bottles are very strong, I occasionally make home made hard cider, and "after" fermentation when I seal the cider up in the original plastic bottle, the remaining CO2 pressure thrown off by the yeast expands the rectangular bottle you're used to with indents and such, into a taut cylinder! I've never had one explode, but you gotta be careful opening them up
12-30-15, 06:12 AM
#562
Newbie
Join Date: Dec 2015
Location: Isle of Man
Posts: 4
Bikes: Vitus Mach 3 flat bar, Vitus Venon carbon, Gary Fisher Hoo Koo e Koo, Peugeot Premier steel restored to as new
Mentioned: 0 Post(s)
Tagged: 0 Thread(s)
Quoted: 0 Post(s)
Likes: 0
Liked 0 Times
in
0 Posts
+1 I use one for chain lube and 1 for general lube, they work a treat and one drop per link is easy and clean and they get into tight places without wasting or spreading lube where you dont want it, using for months now and vape shops sell them dirt cheap
12-30-15, 06:20 AM
#563
Newbie
Join Date: Dec 2015
Location: Isle of Man
Posts: 4
Bikes: Vitus Mach 3 flat bar, Vitus Venon carbon, Gary Fisher Hoo Koo e Koo, Peugeot Premier steel restored to as new
Mentioned: 0 Post(s)
Tagged: 0 Thread(s)
Quoted: 0 Post(s)
Likes: 0
Liked 0 Times
in
0 Posts
My new favorite light lube dispenser is a Vape Juice Needle Tip bottle, like this:

I found an empty one in the street (labeled "Creme de Menthe"), rinsed it and squirted water through the needle, let it dry for a few days, then put some Tri-Flow in it. The long flexible applicator straw that comes with the Tri-Flow still has its particular uses (reaching that one RD pivot point way in the back), but for hitting accessible RD pivots with a few drops, or dropping lube into cable housing, the short, rigid needle is a perfect applicator! Easier to aim, and quicker to get lube through than the straw.
I use Chain-L for chain lube, I don't know how something that thick would do through that needle, but if I find another bottle I'll give it a try and report back...
03-04-16, 12:12 AM
#564
Newbie
Join Date: Mar 2016
Location: Tacoma Seattle
Posts: 4
Bikes: 1989 Trek 830 Antelope, 1996 Gary Fisher Wahoo, 2000 Fugi Outland
Mentioned: 0 Post(s)
Tagged: 0 Thread(s)
Quoted: 0 Post(s)
Likes: 0
Liked 0 Times
in
0 Posts
I'm new and I want to say that I'm glad I joined this sight. Great reading great ideas in bike mechanics
04-09-16, 11:59 PM
#565

Senior Member
Join Date: Nov 2014
Location: Saratoga calif.
Posts: 1,049
Bikes: Miyata 610(66cm), GT Vantara Hybrid (64cm), Nishiki International (64cm), Peugeot rat rod (62 cm), Trek 800 Burning Man helicopter bike, Bob Jackson frame (to be restored?) plus a never ending stream of neglected waifs from the Bike exchange.
Mentioned: 28 Post(s)
Tagged: 0 Thread(s)
Quoted: 339 Post(s)
Likes: 0
Liked 632 Times
in
229 Posts
For what it's worth I bought a plastic wall mount repair stand
https://www.amazon.com/BIKEHAND-Bicyc...ilpage_o05_s00
When I bought it a few months ago it was $40.
I have it mounted to a 4x4 support post in the middle of the garage.
I have found it works very well . One of the complaints I found on the amazon Web page was that the all plastic rotating holder strips out the teeth holding it in position. I can see this happening if you handle the tool carelessly . When the bike is clamped in the stand If you loosen the screw that holds the rotating clamp and the bike is not balanced it could cause the teeth on the rotation mechanism to shear or be ground off. If you balance the bike in the desired position by clamping the top tube and sliding the tube till you balance the bike and THEN clamp the rotating mechanism you will avoid putting shear stress on the mating teeth. A feature I especially like is the ability to rotate the bike from side to side through about 90 deg or more (with the mount attached to a post). This lets me swing the bike out of the way when necessary. in my crowded garage. The only thing I miss is the ability to raise or lower the clamp head. Generally Balancing the bike and rotating the clamp so that one end or the other is down is sufficient for most work.
05-11-16, 10:58 PM
#566
BF's Resident Dumbass

Join Date: Apr 2016
Location: Jeddah, Saudi Arabia
Posts: 1,566
Bikes: 1990 Raleigh Flyer (size 21"); 2014 Trek 7.6 FX (size 15"); 2014 Trek 7.6 FX (size 17.5"); 2019 Dahon Mu D9; 2020 Dahon Hemingway D9
Mentioned: 6 Post(s)
Tagged: 0 Thread(s)
Quoted: 792 Post(s)
Liked 1,494 Times
in
496 Posts
I don't know if this is too silly to be in here, but here goes anyway...
When I installed a pair of Bontrager metal fenders on my Shift, it turned out that the rear fender would bump violently into the frame, and the noise was especially annoying on coarse or rough surfaces. So I stuck a pair of felt tabs - the kind that goes on the tips of chair and table legs and the like - between the two to keep it all nice and quiet:

Problem solved.
When I installed a pair of Bontrager metal fenders on my Shift, it turned out that the rear fender would bump violently into the frame, and the noise was especially annoying on coarse or rough surfaces. So I stuck a pair of felt tabs - the kind that goes on the tips of chair and table legs and the like - between the two to keep it all nice and quiet:
Problem solved.
05-12-16, 09:19 AM
#567
working on my sandal tan

Join Date: Aug 2011
Location: CID
Posts: 22,629
Bikes: 1991 Bianchi Eros, 1964 Armstrong, 1988 Diamondback Ascent, 1988 Bianchi Premio, 1987 Bianchi Sport SX, 1980s Raleigh mixte (hers), All-City Space Horse (hers)
Mentioned: 98 Post(s)
Tagged: 0 Thread(s)
Quoted: 3871 Post(s)
Liked 2,568 Times
in
1,579 Posts
Not too silly at all, @sjanzeir. Fender rattle is a serious annoyance. I've used thin pieces of cork sheet secured by electrical tape for the same job. 
 05-12-16, 07:56 PM
#568
Old fart

Join Date: Nov 2004
Location: Appleton WI
Posts: 24,790
Bikes: Several, mostly not name brands.
Mentioned: 153 Post(s)
Tagged: 0 Thread(s)
Quoted: 3590 Post(s)
Liked 3,400 Times
in
1,934 Posts
Not too silly at all, @sjanzeir. Fender rattle is a serious annoyance. I've used thin pieces of cork sheet secured by electrical tape for the same job.

Leather Washers for Mounting Fenders - Accessories and Hardware - Fenders, Accessories, Hardware - Accessories
06-25-16, 02:27 PM
#570
Senior Member
Join Date: Apr 2012
Location: Nor Cal
Posts: 6,016
Mentioned: 17 Post(s)
Tagged: 0 Thread(s)
Quoted: 1814 Post(s)
Likes: 0
Liked 923 Times
in
569 Posts
Denatured alcohol in a standard spray bottle
for all purpose cleaning, degreasing, & hand cleaning.
Spray a little on a rag.
Available in gallons- much less expensive than rubbing alcohol.
Less toxic than OMS, etc..
for all purpose cleaning, degreasing, & hand cleaning.
Spray a little on a rag.
Available in gallons- much less expensive than rubbing alcohol.
Less toxic than OMS, etc..
07-19-16, 03:51 PM
#571
Senior Member

Join Date: Nov 2014
Location: Orlando, FL
Posts: 57
Bikes: 80/90's Specialized Crossroads (3), '91 Miyata Triplecross, '91 Bianchi Boardwalk, 2002 Schwinn Frontier, 2002 Gary Fisher Tarpon, 2009 Trek FX 7.2, 2014 Motobecane 400 HT
Mentioned: 0 Post(s)
Tagged: 0 Thread(s)
Quoted: 9 Post(s)
Likes: 0
Liked 1 Time
in
1 Post
You can save yourself a lot expense and trouble fixing a noisy bottom bracket by just attaching new pedals. You'd be surprised how often the pedals go bad, especially when you ride in the rain. And you can't always tell just by spinning them. If that doesn't stop the noise, well then you might need to do that bottom bracket after-all.
07-19-16, 04:11 PM
#572
Senior Member
Join Date: Nov 2014
Location: Orlando, FL
Posts: 57
Bikes: 80/90's Specialized Crossroads (3), '91 Miyata Triplecross, '91 Bianchi Boardwalk, 2002 Schwinn Frontier, 2002 Gary Fisher Tarpon, 2009 Trek FX 7.2, 2014 Motobecane 400 HT
Mentioned: 0 Post(s)
Tagged: 0 Thread(s)
Quoted: 9 Post(s)
Likes: 0
Liked 1 Time
in
1 Post
If you don't mind working on your bike outside, you make a bike stand cheap. Find a nice spot under a shade tree and sink a 4X4 post into the ground. Add some water while tamping the dirt around in the hole to make a wobble-free installment. Screw a $6 bike storage rack to the post and presto – a great place to wash and wrench your bike. Unlike a real bike stand, there's no clamp to deal with, so it's quick to use. If you need, spread a large square of outdoor carpet or something similar on the ground underneath to catch parts and prevent making a mud pie.
08-03-16, 02:55 PM
#573
Member
Pedals too tight? https://i.imgur.com/IWk1ZcB.jpg ;-)
08-26-16, 11:11 PM
#574
Senior Member
Join Date: Jun 2016
Posts: 214
Bikes: 630 Beach Bike Schwinn Hurricane ATB
Mentioned: 0 Post(s)
Tagged: 0 Thread(s)
Quoted: 35 Post(s)
Likes: 0
Liked 0 Times
in
0 Posts
How to form a 90 degree bend in a WD-40 spray tube
How to form a 90 degree bend in a WD-40 spray tube.
Take the tube off of the WD-40 nozzle.
Clear the tube of any remaining WD-40 and wipe with a towel
Straighten a small paper clip and leave a bend to help manipulate it with your fingers.
Insert 2 inches of the paper clip inside the tube.
Bend the tube and the paper clip 90 degrees at one inch from the
tip of the tube.
Use a flame from a lighter and wave the flame back and forth lightly under the
90 degree bend for 10 seconds. (the tube should be just warm to the touch)
Let the tube cool for a couple of minutes.
Pull the paperclip out with pliers.
Place the long end of the tube back in the WD-40 nozzle.
Now you can turn the tube at the bend to the desired angle while spraying with
the can of WD-40 in the upright position.
Helps save on propellant as well.
Last edited by ArmChairRider; 08-26-16 at 11:36 PM.
08-28-16, 12:16 AM
#575
Senior Member
Join Date: Jun 2016
Posts: 214
Bikes: 630 Beach Bike Schwinn Hurricane ATB
Mentioned: 0 Post(s)
Tagged: 0 Thread(s)
Quoted: 35 Post(s)
Likes: 0
Liked 0 Times
in
0 Posts
A tire tread depth gauge is handy for checking freeplay of a chain. Goes up to one inch and has metrics.
Camel Tru-Flate Tread depth gauge 40-395
by Camel
Link: https://amzn.com/B000BYM4VS
Also good for measuring other things.
If you don't know your own strength when flexing a chain by hand then here is a good reference.
Get a big paperclip and make a hook on one end that will hook a roller on your chain. Tie a string on the other end of the paperclip and dangle it down and make a loop and hang a plastic bottle with one pint of water in it. Hook the paperclip in the mid section of the chain.
Now you will always have a reference of 1.04 pounds of pull.
Last edited by ArmChairRider; 08-28-16 at 12:36 AM.