


Need help with 1x chainline
 12-15-20, 12:35 AM
#1
Junior Member
Thread Starter
Join Date: Aug 2020
Location: Los Gatos, CA
Posts: 161
Bikes: VeloBuild VB-R-022 // '89 Specialized Allez Full Dura-Ace 7400 // Santa Cruz Stigmata CC // Bridgestone MB-3 BoxTwo 1x Conversion // Bridgestone MB-6 // Santa Cruz Highball C // Ibis Spanky
Mentioned: 1 Post(s)
Tagged: 0 Thread(s)
Quoted: 67 Post(s)
Liked 19 Times
in
13 Posts
Need help with 1x chainline
Hey everyone -
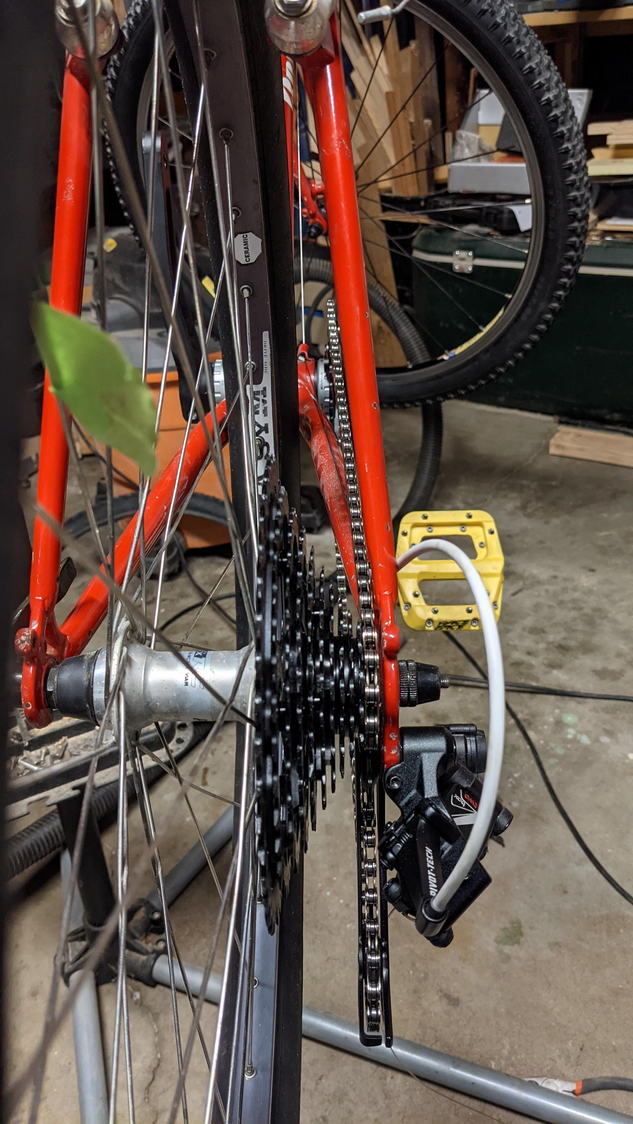
So I'm close to getting my Bridgestone MB-3 1x11 project done. I installed the rear derailleur and chain today and got it shifting (mostly) smoothly. My one gripe is that it is really noisy when in the biggest cog. It seems to be because of the chain line making the chain exit the rear derailleur pulley at a steep angle before getting onto the chainring. I already moved the chainring to the inner side of the crank and removed 1 of the 2 spaces on the drive side of the bottom bracket. What else can I do? Or is this the best it is gonna get? Here is a
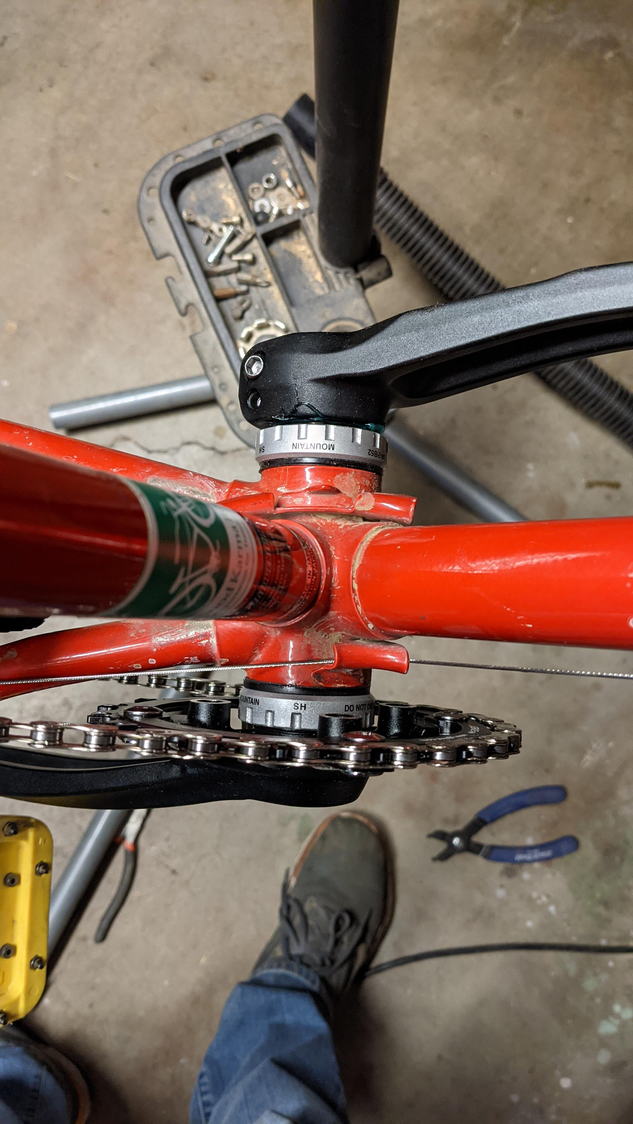
Here are some photos of the chainline + bb.


So I'm close to getting my Bridgestone MB-3 1x11 project done. I installed the rear derailleur and chain today and got it shifting (mostly) smoothly. My one gripe is that it is really noisy when in the biggest cog. It seems to be because of the chain line making the chain exit the rear derailleur pulley at a steep angle before getting onto the chainring. I already moved the chainring to the inner side of the crank and removed 1 of the 2 spaces on the drive side of the bottom bracket. What else can I do? Or is this the best it is gonna get? Here is a
Here are some photos of the chainline + bb.
 12-15-20, 07:39 AM
#2
Tortoise Wins by a Hare!
Join Date: Feb 2006
Location: Looney Tunes, IL
Posts: 7,398
Bikes: Wabi Special FG, Raleigh Roper, Nashbar AL-1, Miyata One Hundred, '70 Schwinn Lemonator and More!!
Mentioned: 22 Post(s)
Tagged: 0 Thread(s)
Quoted: 1549 Post(s)
Liked 941 Times
in
504 Posts
The chain looks pretty tight to me, maybe try adding a link.
12-15-20, 08:09 AM
#3
n00b
Join Date: Jan 2008
Location: Austin, TX
Posts: 1,397
Bikes: Surly Karate Monkey, Twin Six Standard Rando
Mentioned: 2 Post(s)
Tagged: 0 Thread(s)
Quoted: 428 Post(s)
Liked 466 Times
in
273 Posts
1. I think that chain is too short. on the biggest cog, the guide pulley (the top one, closest to the cassette) is barely making contact with the chain. can you let any tension out of the B-screw?

2. are you certain that the spacers are set up correctly on the bottom bracket? the arrangement for a conventional chainline is important, but you might not be using a conventional chainline at this point. IME, what's important is that the correct number of specific thickness washers are used to set the bearings at the correct width. below is an image from a Shimano manual (page 11) that is probably applicable to your situation. I think Shimano perviously just used two 2.5mm spacers, one on each side, for a 68mm shell, which looks like you have that. if you have the correct number of washers of the right thicknesses, you might be able to get away with moving them around to bring the chainring more inboard. if you put all the spacers on the left side of the crankset and that does not result in the crank arm hitting the chainstay, it could help. I am not certain that it will, but it's worth considering.


2. are you certain that the spacers are set up correctly on the bottom bracket? the arrangement for a conventional chainline is important, but you might not be using a conventional chainline at this point. IME, what's important is that the correct number of specific thickness washers are used to set the bearings at the correct width. below is an image from a Shimano manual (page 11) that is probably applicable to your situation. I think Shimano perviously just used two 2.5mm spacers, one on each side, for a 68mm shell, which looks like you have that. if you have the correct number of washers of the right thicknesses, you might be able to get away with moving them around to bring the chainring more inboard. if you put all the spacers on the left side of the crankset and that does not result in the crank arm hitting the chainstay, it could help. I am not certain that it will, but it's worth considering.
Last edited by mack_turtle; 12-15-20 at 08:13 AM.
12-15-20, 11:06 AM
#4
Junior Member
Thread Starter
Join Date: Aug 2020
Location: Los Gatos, CA
Posts: 161
Bikes: VeloBuild VB-R-022 // '89 Specialized Allez Full Dura-Ace 7400 // Santa Cruz Stigmata CC // Bridgestone MB-3 BoxTwo 1x Conversion // Bridgestone MB-6 // Santa Cruz Highball C // Ibis Spanky
Mentioned: 1 Post(s)
Tagged: 0 Thread(s)
Quoted: 67 Post(s)
Liked 19 Times
in
13 Posts
1. I think that chain is too short. on the biggest cog, the guide pulley (the top one, closest to the cassette) is barely making contact with the chain. can you let any tension out of the B-screw?
2. are you certain that the spacers are set up correctly on the bottom bracket? the arrangement for a conventional chainline is important, but you might not be using a conventional chainline at this point. IME, what's important is that the correct number of specific thickness washers are used to set the bearings at the correct width. below is an image from a Shimano manual (page 11) that is probably applicable to your situation. I think Shimano perviously just used two 2.5mm spacers, one on each side, for a 68mm shell, which looks like you have that. if you have the correct number of washers of the right thicknesses, you might be able to get away with moving them around to bring the chainring more inboard. if you put all the spacers on the left side of the crankset and that does not result in the crank arm hitting the chainstay, it could help. I am not certain that it will, but it's worth considering.
2. are you certain that the spacers are set up correctly on the bottom bracket? the arrangement for a conventional chainline is important, but you might not be using a conventional chainline at this point. IME, what's important is that the correct number of specific thickness washers are used to set the bearings at the correct width. below is an image from a Shimano manual (page 11) that is probably applicable to your situation. I think Shimano perviously just used two 2.5mm spacers, one on each side, for a 68mm shell, which looks like you have that. if you have the correct number of washers of the right thicknesses, you might be able to get away with moving them around to bring the chainring more inboard. if you put all the spacers on the left side of the crankset and that does not result in the crank arm hitting the chainstay, it could help. I am not certain that it will, but it's worth considering.
Yeah you're right, the chain does seem a bit tight. What would be the best way of adding back a link? Putting in another master link? I've read it's not okay to a push a pin halfway out then push it back in.
I can back on the B-tension screw a bit more so I'll try that too.
12-15-20, 11:08 AM
#5
n00b
Join Date: Jan 2008
Location: Austin, TX
Posts: 1,397
Bikes: Surly Karate Monkey, Twin Six Standard Rando
Mentioned: 2 Post(s)
Tagged: 0 Thread(s)
Quoted: 428 Post(s)
Liked 466 Times
in
273 Posts
you can add a master link of the appropriate width in. it's not ideal, but I can't say there's anything unsafe about it. you're correct that pushing a pin out and pushing it back it is probably not a good idea. once a regular pin is pushed out, it compromises the plate in the spot and it's very likely to fail under load.
12-15-20, 11:14 AM
#6
Junior Member
Thread Starter
Join Date: Aug 2020
Location: Los Gatos, CA
Posts: 161
Bikes: VeloBuild VB-R-022 // '89 Specialized Allez Full Dura-Ace 7400 // Santa Cruz Stigmata CC // Bridgestone MB-3 BoxTwo 1x Conversion // Bridgestone MB-6 // Santa Cruz Highball C // Ibis Spanky
Mentioned: 1 Post(s)
Tagged: 0 Thread(s)
Quoted: 67 Post(s)
Liked 19 Times
in
13 Posts
you can add a master link of the appropriate width in. it's not ideal, but I can't say there's anything unsafe about it. you're correct that pushing a pin out and pushing it back it is probably not a good idea. once a regular pin is pushed out, it compromises the plate in the spot and it's very likely to fail under load.
12-15-20, 11:16 AM
#7
n00b
Join Date: Jan 2008
Location: Austin, TX
Posts: 1,397
Bikes: Surly Karate Monkey, Twin Six Standard Rando
Mentioned: 2 Post(s)
Tagged: 0 Thread(s)
Quoted: 428 Post(s)
Liked 466 Times
in
273 Posts
no, I don't think the method you want to use is any different. it looks like you did it right... and then rounded down to make the chain shorter. I always use that method, but I err on leaving the chain one link too long rather than one link too short. if I then install the chain and make the adjustments and find that it's a bit too long, it's much easier to shorten it by one more link than to add a link.
Likes For mack_turtle:
12-16-20, 09:06 AM
#8
Senior Member
Join Date: Sep 2015
Location: Left Coast, Canada
Posts: 5,126
Mentioned: 24 Post(s)
Tagged: 0 Thread(s)
Quoted: 2236 Post(s)
Liked 1,314 Times
in
707 Posts
For 1x, without a formula, I usually wrap the chain around the big cog and crank and hold in place to see where the derailer looks good. Mark the link with a twist tie and wrap around the small cog. If it eye balls ok I then remove the left over chain, erring on the side of too long and connect it together. Then I fine tune. As Mack says, if it winds up a bit loose it's easy to remove an additional link or two.
