


A Long Time Coming
 01-31-21, 07:57 PM
#26

Senior Member
Thread Starter
Join Date: Feb 2012
Location: Rochester, NY
Posts: 18,063
Bikes: Stewart S&S coupled sport tourer, Stewart Sunday light, Stewart Commuting, Stewart Touring, Co Motion Tandem, Stewart 3-Spd, Stewart Track, Fuji Finest, Mongoose Tomac ATB, GT Bravado ATB, JCP Folder, Stewart 650B ATB
Mentioned: 0 Post(s)
Tagged: 0 Thread(s)
Quoted: 4197 Post(s)
Liked 3,849 Times
in
2,300 Posts
The amount of stay width that was removed is substantial, maybe about half the diameter. So I felt that a plate that adds real structural support was needed. The plate was a cut off from a shear at a local steel dealer, I visit it a couple of times a year for scrap that fits a project.
I'll continue adding shots as the process progresses. Andy
I'll continue adding shots as the process progresses. Andy
__________________
AndrewRStewart
AndrewRStewart
 02-01-21, 02:28 AM
#27
Senior Member
Join Date: Dec 2019
Posts: 954
Mentioned: 3 Post(s)
Tagged: 0 Thread(s)
Quoted: 321 Post(s)
Liked 263 Times
in
212 Posts
The amount of stay width that was removed is substantial, maybe about half the diameter. So I felt that a plate that adds real structural support was needed. The plate was a cut off from a shear at a local steel dealer, I visit it a couple of times a year for scrap that fits a project.
I'll continue adding shots as the process progresses. Andy
I'll continue adding shots as the process progresses. Andy
02-01-21, 08:16 AM
#28
Senior Member
Thread Starter
Join Date: Feb 2012
Location: Rochester, NY
Posts: 18,063
Bikes: Stewart S&S coupled sport tourer, Stewart Sunday light, Stewart Commuting, Stewart Touring, Co Motion Tandem, Stewart 3-Spd, Stewart Track, Fuji Finest, Mongoose Tomac ATB, GT Bravado ATB, JCP Folder, Stewart 650B ATB
Mentioned: 0 Post(s)
Tagged: 0 Thread(s)
Quoted: 4197 Post(s)
Liked 3,849 Times
in
2,300 Posts
All I know is that it's good old "merikan steel
Really I don't know the grade but by the way it worked I suspect a mid grade, maybe 1018/1020ish. Certainly cold rolled. Cost was $2 for the 30" length and that included a dollar tip to the place's pizza fund. Andy
Really I don't know the grade but by the way it worked I suspect a mid grade, maybe 1018/1020ish. Certainly cold rolled. Cost was $2 for the 30" length and that included a dollar tip to the place's pizza fund. Andy
__________________
AndrewRStewart
AndrewRStewart
Likes For Andrew R Stewart:
02-01-21, 09:18 PM
#29
Team Beer
Join Date: Apr 2004
Location: Sacramento CA
Posts: 6,339
Bikes: Too Many
Mentioned: 3 Post(s)
Tagged: 0 Thread(s)
Quoted: 114 Post(s)
Liked 159 Times
in
104 Posts
The last place like that here closed up this year. While it was never that cheap it was a good spot for practice welding bits. I will miss it.
__________________
I'm not one for fawning over bicycles, but I do believe that our bikes communicate with us, and what this bike is saying is, "You're an idiot." BikeSnobNYC
I'm not one for fawning over bicycles, but I do believe that our bikes communicate with us, and what this bike is saying is, "You're an idiot." BikeSnobNYC
02-11-21, 10:21 PM
#30
Senior Member
Thread Starter
Join Date: Feb 2012
Location: Rochester, NY
Posts: 18,063
Bikes: Stewart S&S coupled sport tourer, Stewart Sunday light, Stewart Commuting, Stewart Touring, Co Motion Tandem, Stewart 3-Spd, Stewart Track, Fuji Finest, Mongoose Tomac ATB, GT Bravado ATB, JCP Folder, Stewart 650B ATB
Mentioned: 0 Post(s)
Tagged: 0 Thread(s)
Quoted: 4197 Post(s)
Liked 3,849 Times
in
2,300 Posts
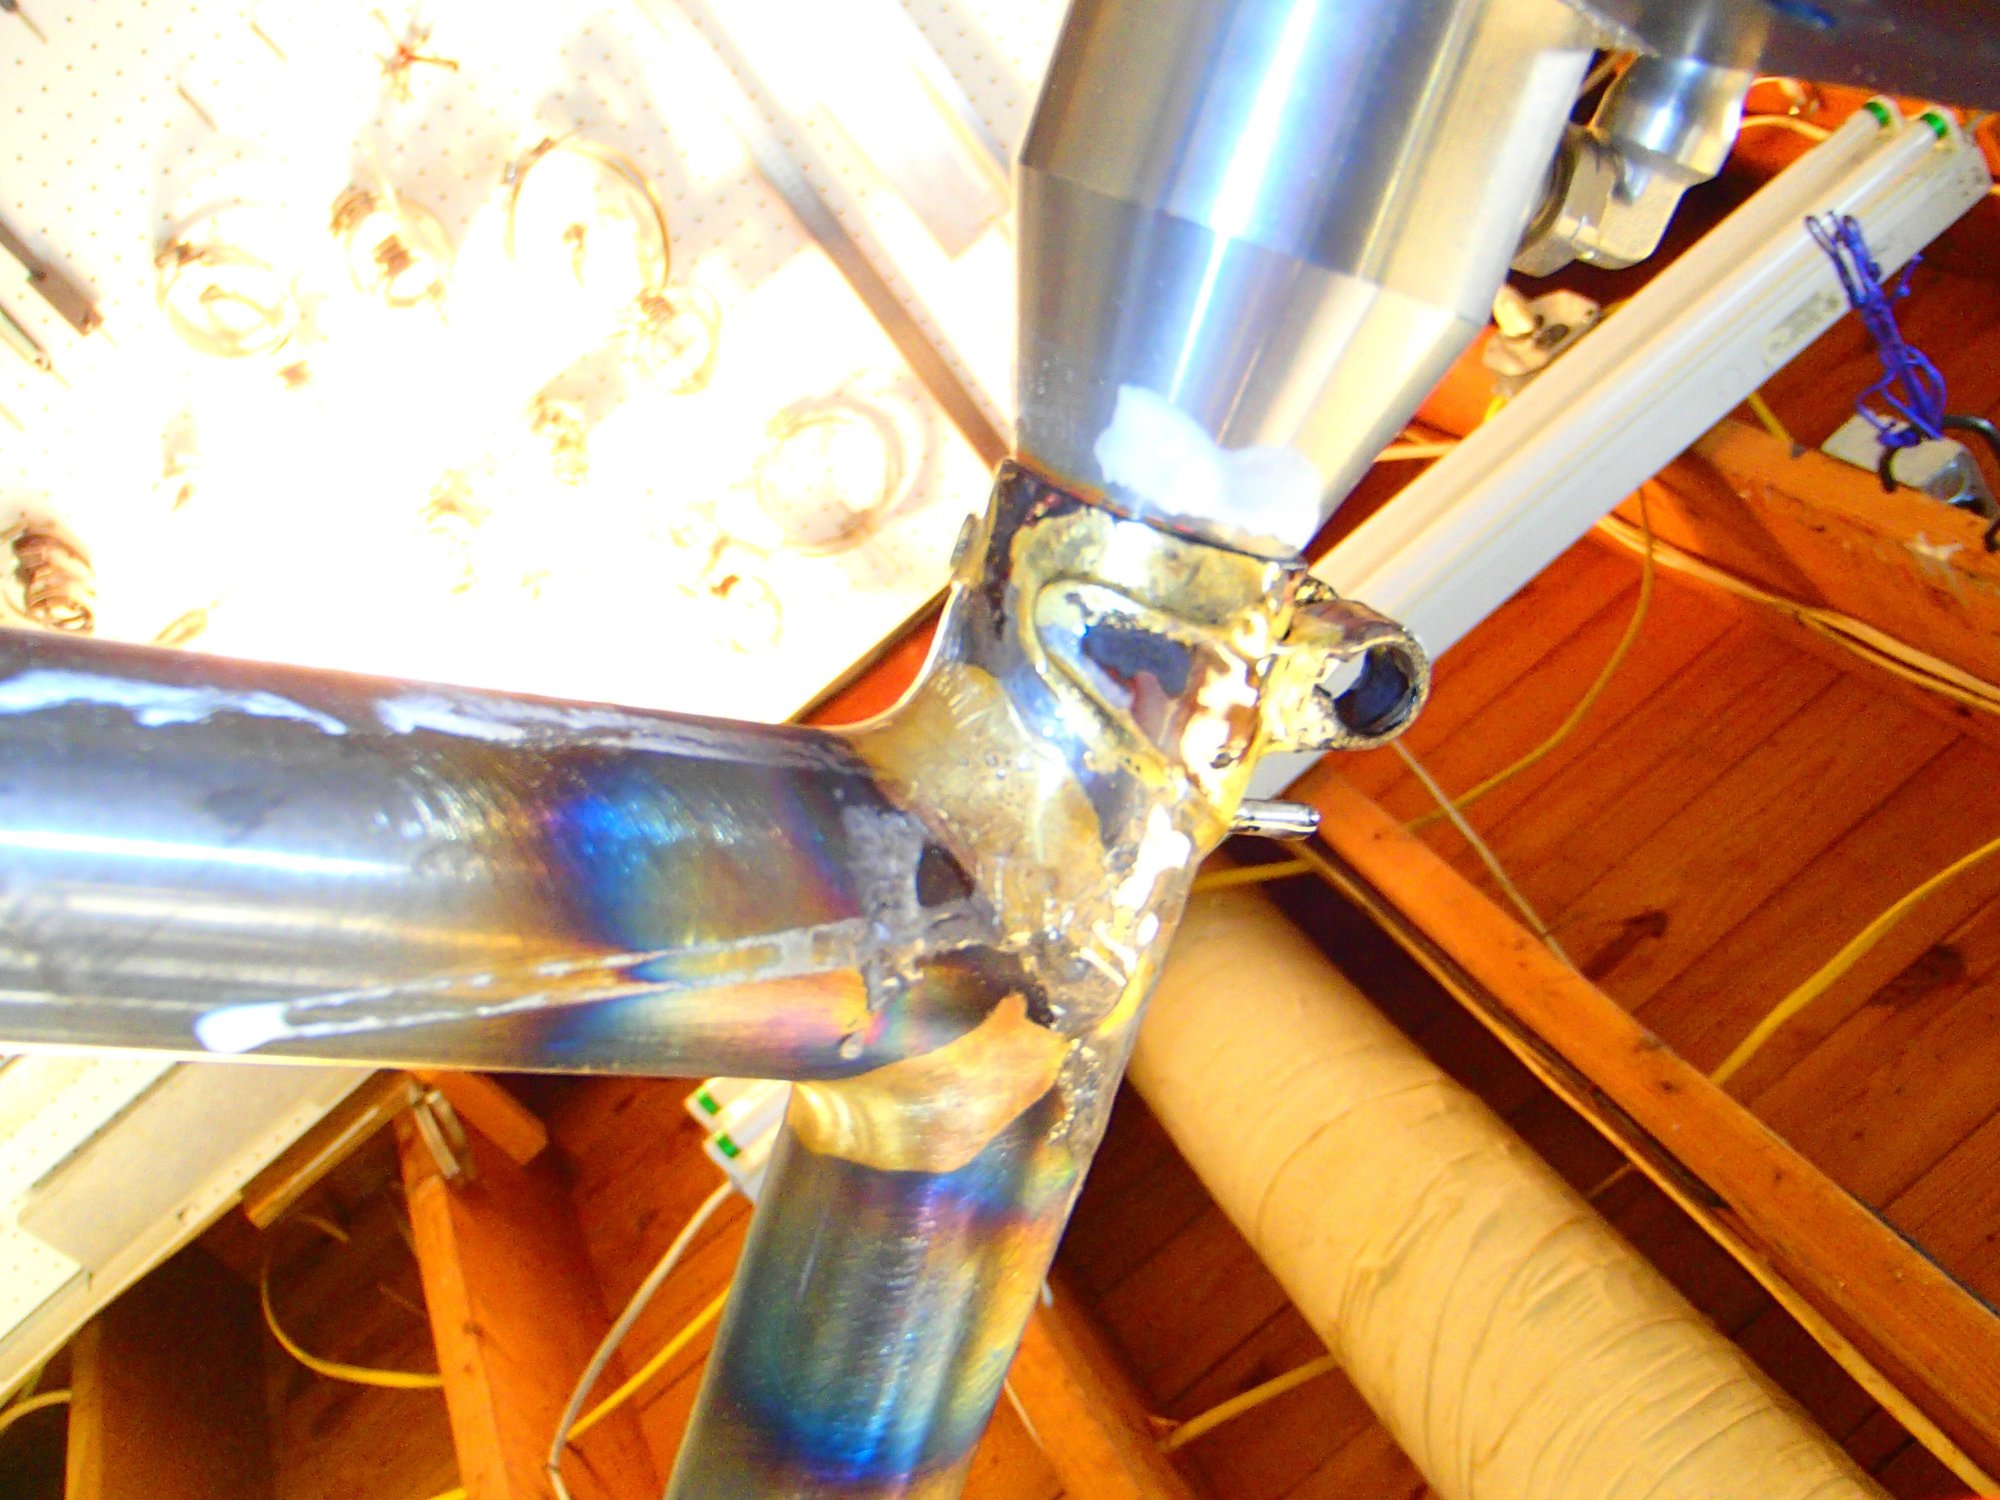
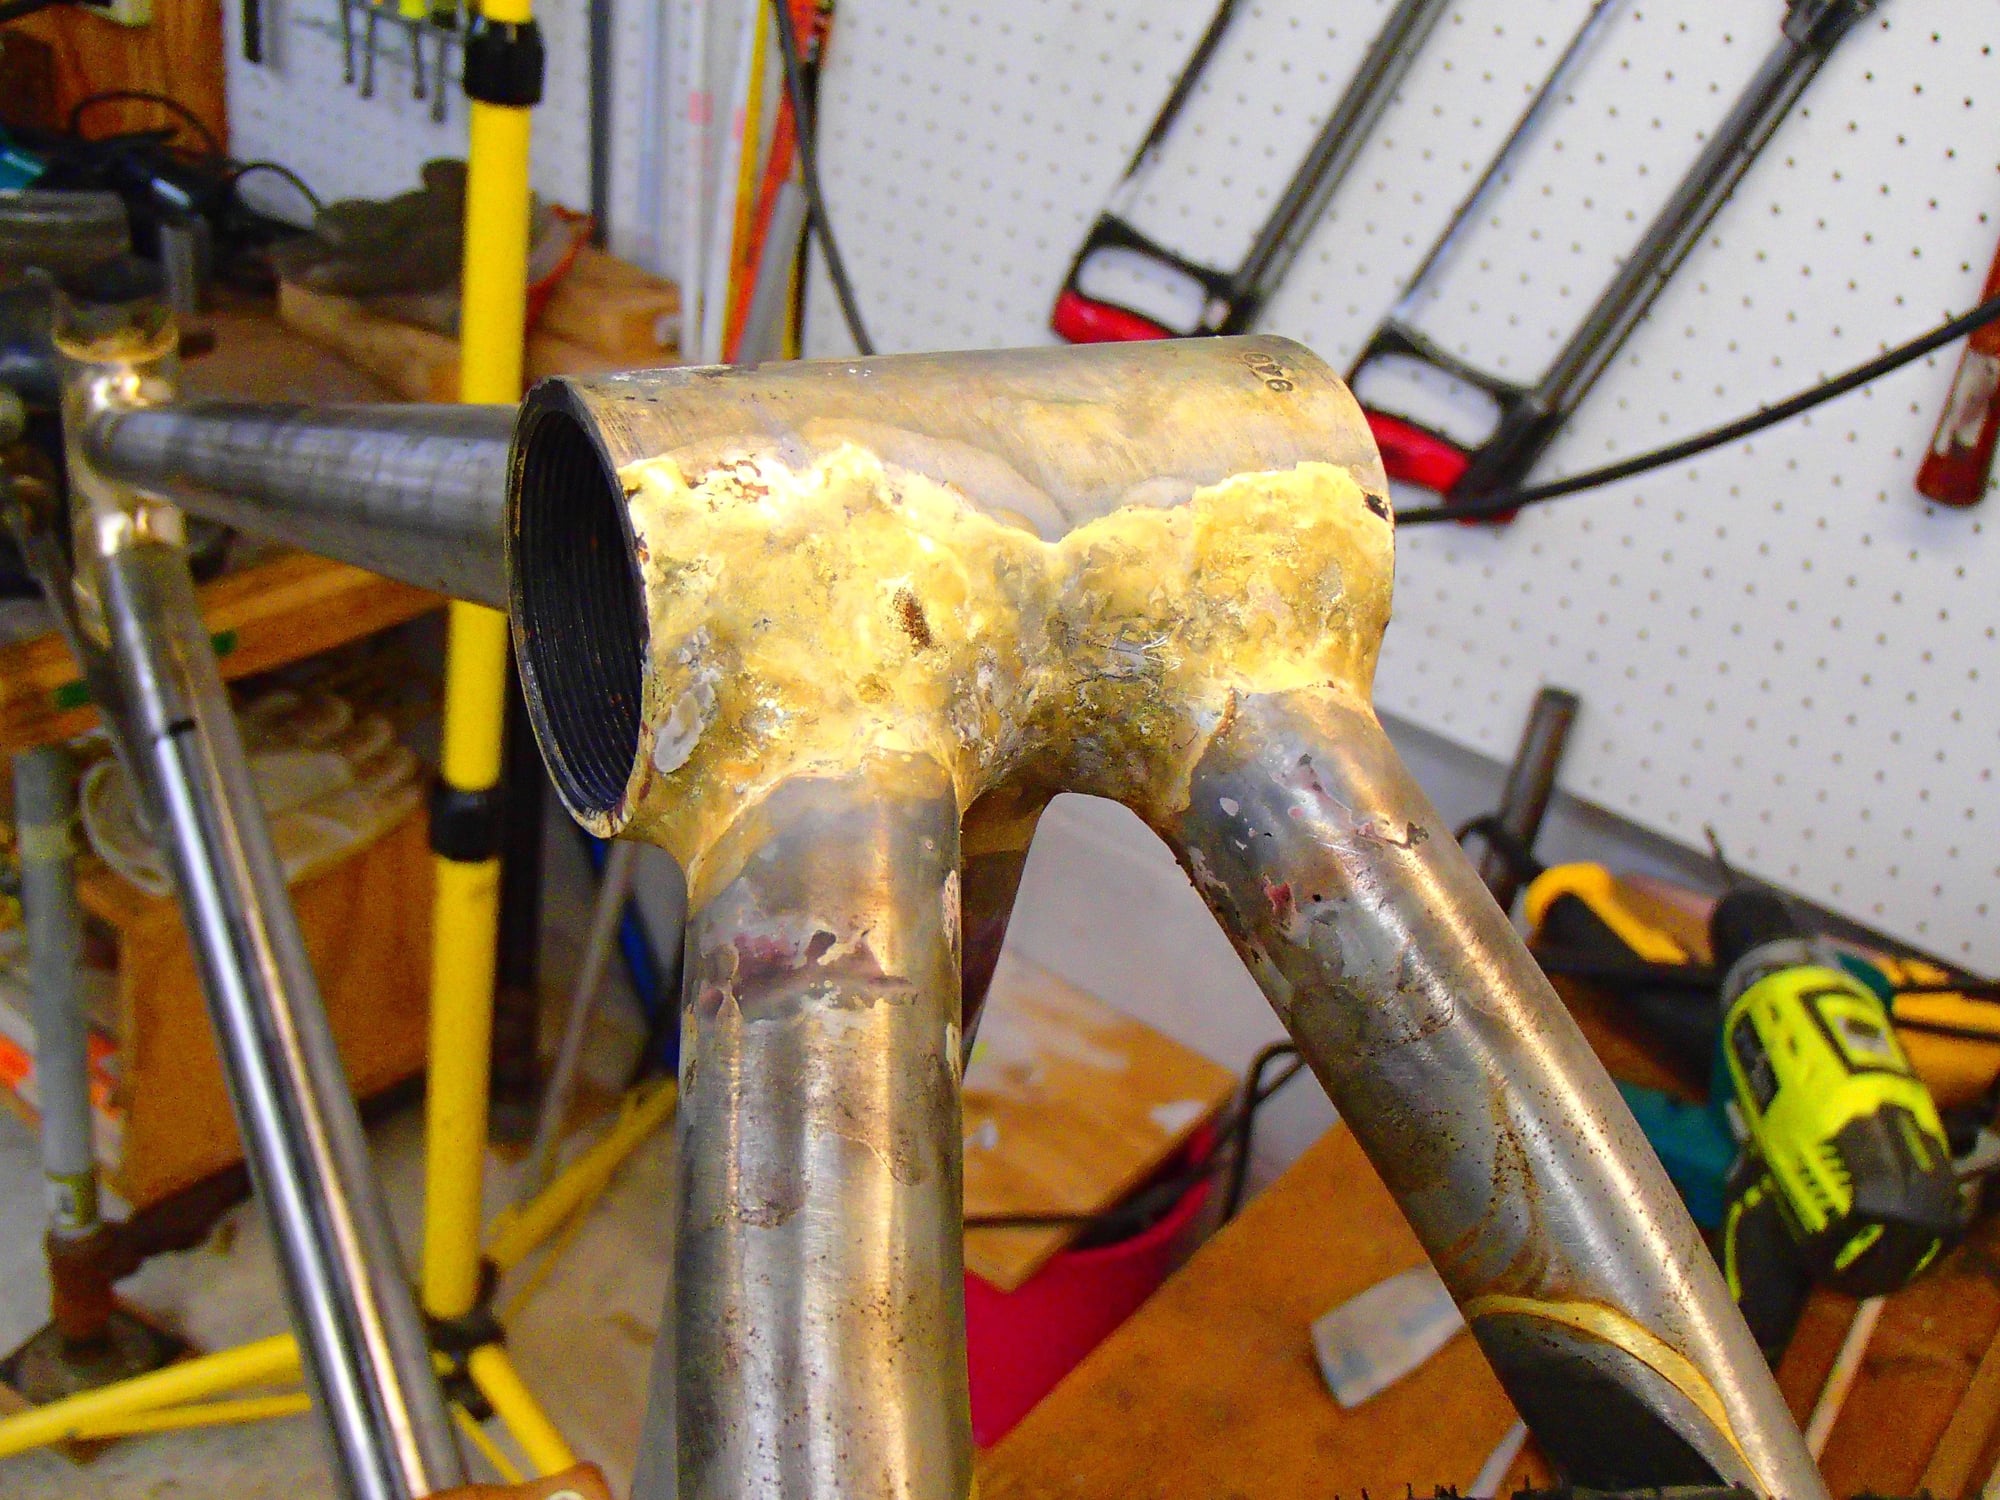
The main triangle is nearly all brazed up. Well all the joints are "fixed in place" but my poor fillet skills will have me doing a few spot "corrections" to the fillets for looks. Here's the ST/TT joint. The TT is 1.25" and the ST is 29.8 at the top's external butt. This motivated a different blending of the different diameters then the usual. The middle/upper "U" shaped feature will remain (the rest are lumps mostly filed down by now) and I hope to have the top of the SS mimic this... Andy

__________________
AndrewRStewart
AndrewRStewart
Likes For Andrew R Stewart:
02-12-21, 02:19 AM
#31
Senior Member
Join Date: Dec 2019
Posts: 954
Mentioned: 3 Post(s)
Tagged: 0 Thread(s)
Quoted: 321 Post(s)
Liked 263 Times
in
212 Posts
Looks like a good joint to me! Is the DT also 1.25" or even fatter? I only used 28.6 TTs on both the real "hard-tail" MTB I made and the recent "soft-roader".
02-12-21, 07:45 AM
#32
framebuilder
The main triangle is nearly all brazed up. Well all the joints are "fixed in place" but my poor fillet skills will have me doing a few spot "corrections" to the fillets for looks. Here's the ST/TT joint. The TT is 1.25" and the ST is 29.8 at the top's external butt. This motivated a different blending of the different diameters then the usual. The middle/upper "U" shaped feature will remain (the rest are lumps mostly filed down by now) and I hope to have the top of the SS mimic this... Andy
I am also wondering if when you are flicking your flame off of the joint (to control your heat like an off on switch), your flame motion - as it is leaving the joint - is along the brass fillet line? Maybe your exit motion was straight towards the head tube? Just making some guesses that may not correct. If your tubes are positioned so the brass is melting towards the bottom of a V and your flame is coming on and off the top tube's miter line, than your flicking on and off doesn't have to be quite as fast to prevent a sag. And the melted brass will form a nice contoured shape.
You have got to figure out a way to make a road trip to Niles so we can swap framebuilding stories while we work on something together. Maybe you can be my assistant when I host a T tool making party later after everyone is vaccinated?
02-12-21, 08:54 AM
#33
Banned.

Join Date: Jun 2004
Location: Torrance, CA
Posts: 3,061
Bikes: Homebuilt steel
Mentioned: 18 Post(s)
Tagged: 0 Thread(s)
Quoted: 2193 Post(s)
Liked 425 Times
in
337 Posts
Andy, your "poor fillet" would equal "over the moon" if I made that joint.
Enjoying your build. Keep going...
Enjoying your build. Keep going...
02-12-21, 09:59 AM
#34
Senior Member
Thread Starter
Join Date: Feb 2012
Location: Rochester, NY
Posts: 18,063
Bikes: Stewart S&S coupled sport tourer, Stewart Sunday light, Stewart Commuting, Stewart Touring, Co Motion Tandem, Stewart 3-Spd, Stewart Track, Fuji Finest, Mongoose Tomac ATB, GT Bravado ATB, JCP Folder, Stewart 650B ATB
Mentioned: 0 Post(s)
Tagged: 0 Thread(s)
Quoted: 4197 Post(s)
Liked 3,849 Times
in
2,300 Posts
Thanks guys.
Doug- I did two passes to achieve what you see. Lots of repositioning of the joints, trying to keep the aimed for area as level as I can. I had some really nice sections with globby ones adjacent. I need what I am unlikely to do, get a lot of daily practice, for many days.
Last night I started to clean up the joint I shared and the curved ends of the TT that are proud of the ST are now much more defined. As I was making the fork then the CS/rear drops I had some shapes that reached out to me and I'm trying to duplicate some of that elsewhere on this frame. Kind of odd as I view a MtB as a pretty basic tool. Sort of like a plow horse, not an athlete like a race horse (or road bike). Yet here I am doing embellishment that has no merit. But that's why we do this stuff, because we can. Andy
__________________
AndrewRStewart
AndrewRStewart
02-12-21, 10:40 AM
#35
framebuilder
Andy, you and I do a similar thing when we post on framebuilding forums and that is while I am responding to your post, I am really writing to a broader audience that might wonder how to get a better result but not exactly sure how to do it. One of the huge advantages of fillet brazing is that it can be done several times until one is satisfied with the final result.
Practicing can involve two factors. The 1st is self discovery about how to do some aspects better (like holding the rod at a better angle). The 2nd is getting more coordinated at execution. For example muscle memory allows some aspects (like the angle to hold the rod) to be automatic and doesn't require your attention to do it. A brazer's concentration can not be on what is happening at the joint and making adjustments to keep it going right.
Practicing can involve two factors. The 1st is self discovery about how to do some aspects better (like holding the rod at a better angle). The 2nd is getting more coordinated at execution. For example muscle memory allows some aspects (like the angle to hold the rod) to be automatic and doesn't require your attention to do it. A brazer's concentration can not be on what is happening at the joint and making adjustments to keep it going right.
02-12-21, 11:44 AM
#36
Senior Member
Join Date: Dec 2019
Posts: 954
Mentioned: 3 Post(s)
Tagged: 0 Thread(s)
Quoted: 321 Post(s)
Liked 263 Times
in
212 Posts
Practicing can involve two factors. The 1st is self discovery about how to do some aspects better (like holding the rod at a better angle). The 2nd is getting more coordinated at execution. For example muscle memory allows some aspects (like the angle to hold the rod) to be automatic and doesn't require your attention to do it. A brazer's concentration can not be on what is happening at the joint and making adjustments to keep it going right.
02-13-21, 12:04 AM
#37
Senior Member
Thread Starter
Join Date: Feb 2012
Location: Rochester, NY
Posts: 18,063
Bikes: Stewart S&S coupled sport tourer, Stewart Sunday light, Stewart Commuting, Stewart Touring, Co Motion Tandem, Stewart 3-Spd, Stewart Track, Fuji Finest, Mongoose Tomac ATB, GT Bravado ATB, JCP Folder, Stewart 650B ATB
Mentioned: 0 Post(s)
Tagged: 0 Thread(s)
Quoted: 4197 Post(s)
Liked 3,849 Times
in
2,300 Posts
Today's progress. I filed/sanded the seat junction to about near completion and prepped the binder collar.

The above shows what i was aiming for with the TT ends being proud of the ST. This joint took less filing then the others which is why i leave it for last among the main triangle. The binder collar had a shelf in it's top but I prefer a through hole. So I started to cut away and ended up with this.
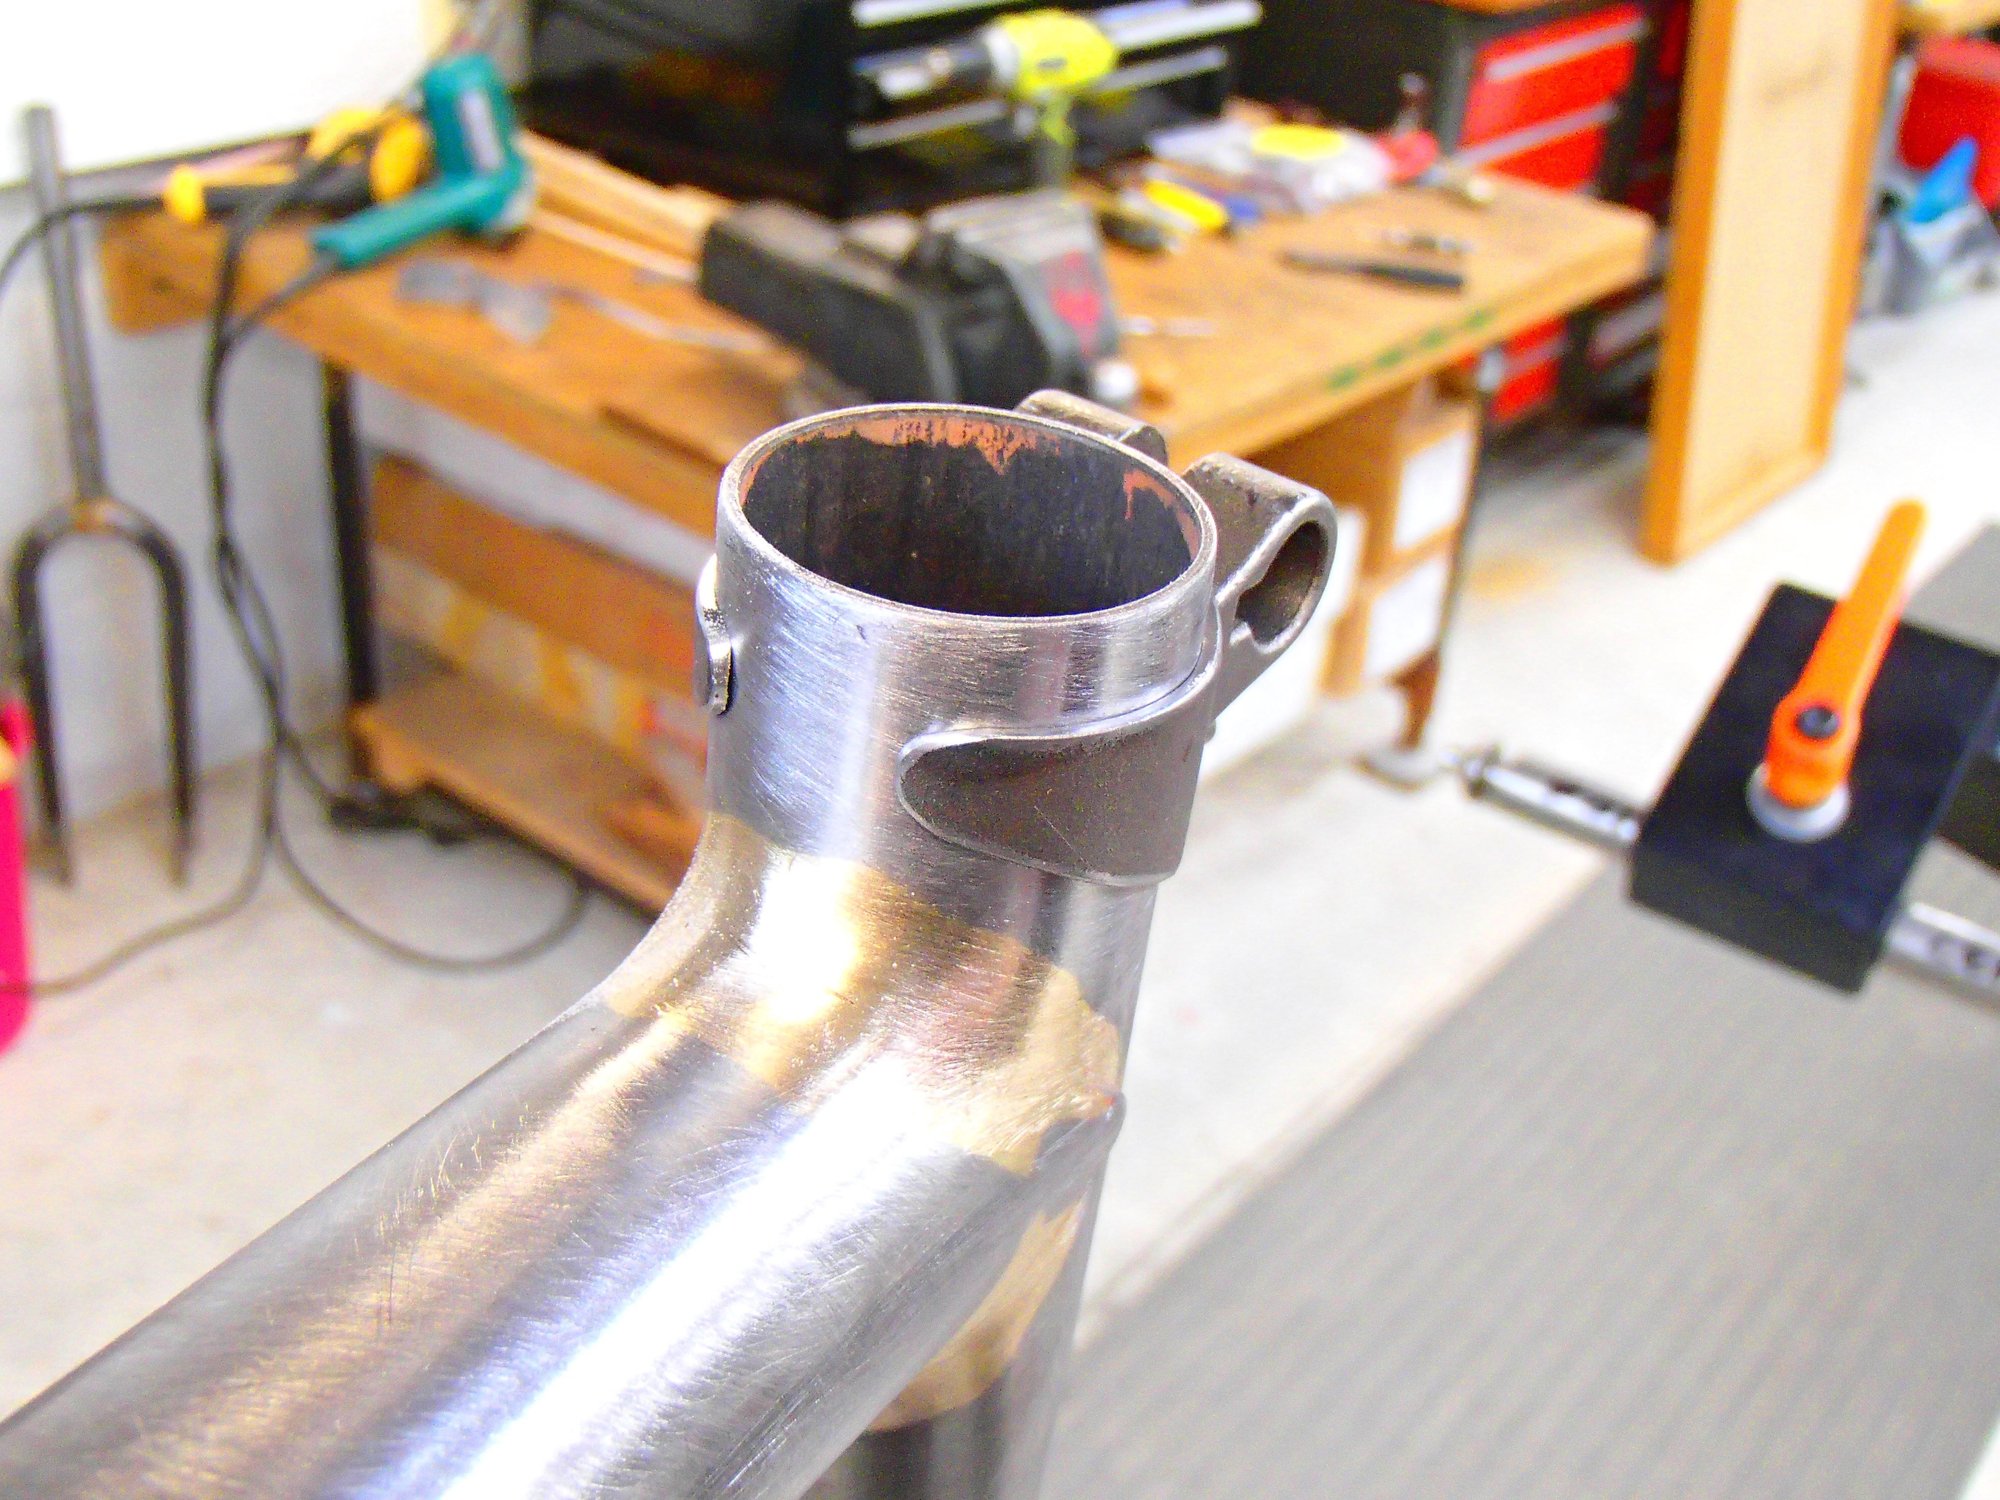
Not the usual collar I have more plans to further cut and curve the top. Tune in next week. Same bike time, same bike channel. Andy
The above shows what i was aiming for with the TT ends being proud of the ST. This joint took less filing then the others which is why i leave it for last among the main triangle. The binder collar had a shelf in it's top but I prefer a through hole. So I started to cut away and ended up with this.
Not the usual collar
I have more plans to further cut and curve the top. Tune in next week. Same bike time, same bike channel. Andy
__________________
AndrewRStewart
AndrewRStewart
Likes For Andrew R Stewart:
02-18-21, 10:27 PM
#38
Senior Member
Thread Starter
Join Date: Feb 2012
Location: Rochester, NY
Posts: 18,063
Bikes: Stewart S&S coupled sport tourer, Stewart Sunday light, Stewart Commuting, Stewart Touring, Co Motion Tandem, Stewart 3-Spd, Stewart Track, Fuji Finest, Mongoose Tomac ATB, GT Bravado ATB, JCP Folder, Stewart 650B ATB
Mentioned: 0 Post(s)
Tagged: 0 Thread(s)
Quoted: 4197 Post(s)
Liked 3,849 Times
in
2,300 Posts
More work done. First image is of the binder collar after brazing and before soaking off flux. It cleaned up well, I'll share an after shot soon.
Next up is the pre tacking set up for the chain stays. I needed a little weight and the stays needed to be kept apart/in place. The big round thing is one of my tube caps that I place over an otherwise open ended tube to reduce the chimney affect when brazing.
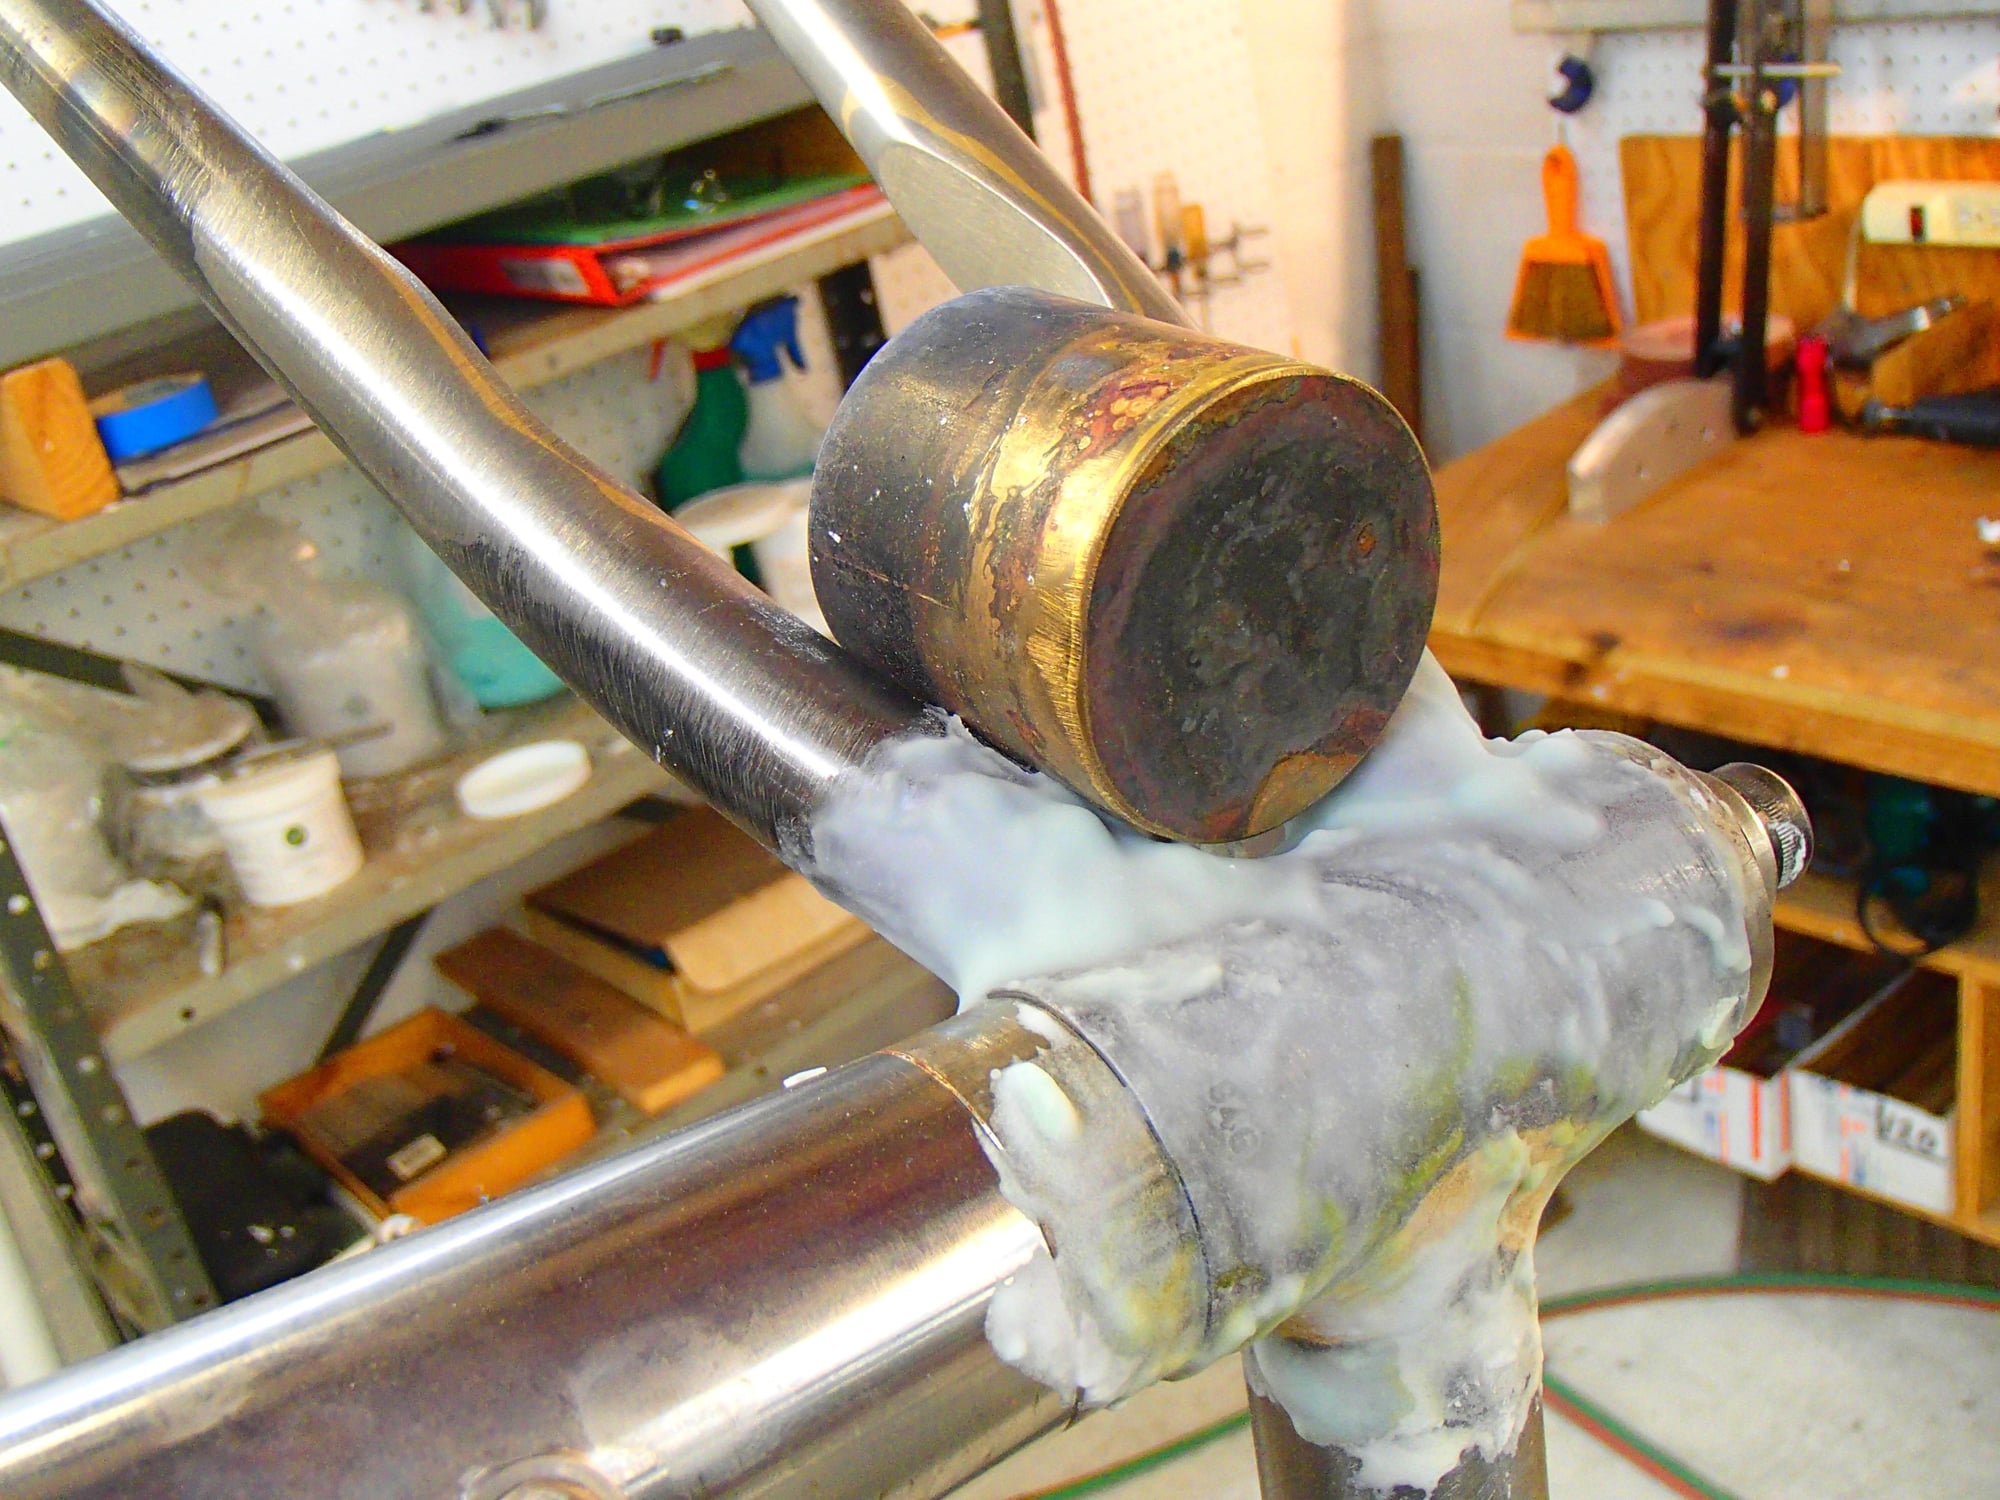
Third is the same but after tacking (should have shot this before the added flux was applied...) You can see the two tacks on the stay ends undersides. There's another pair of tacks on the stay's top points.
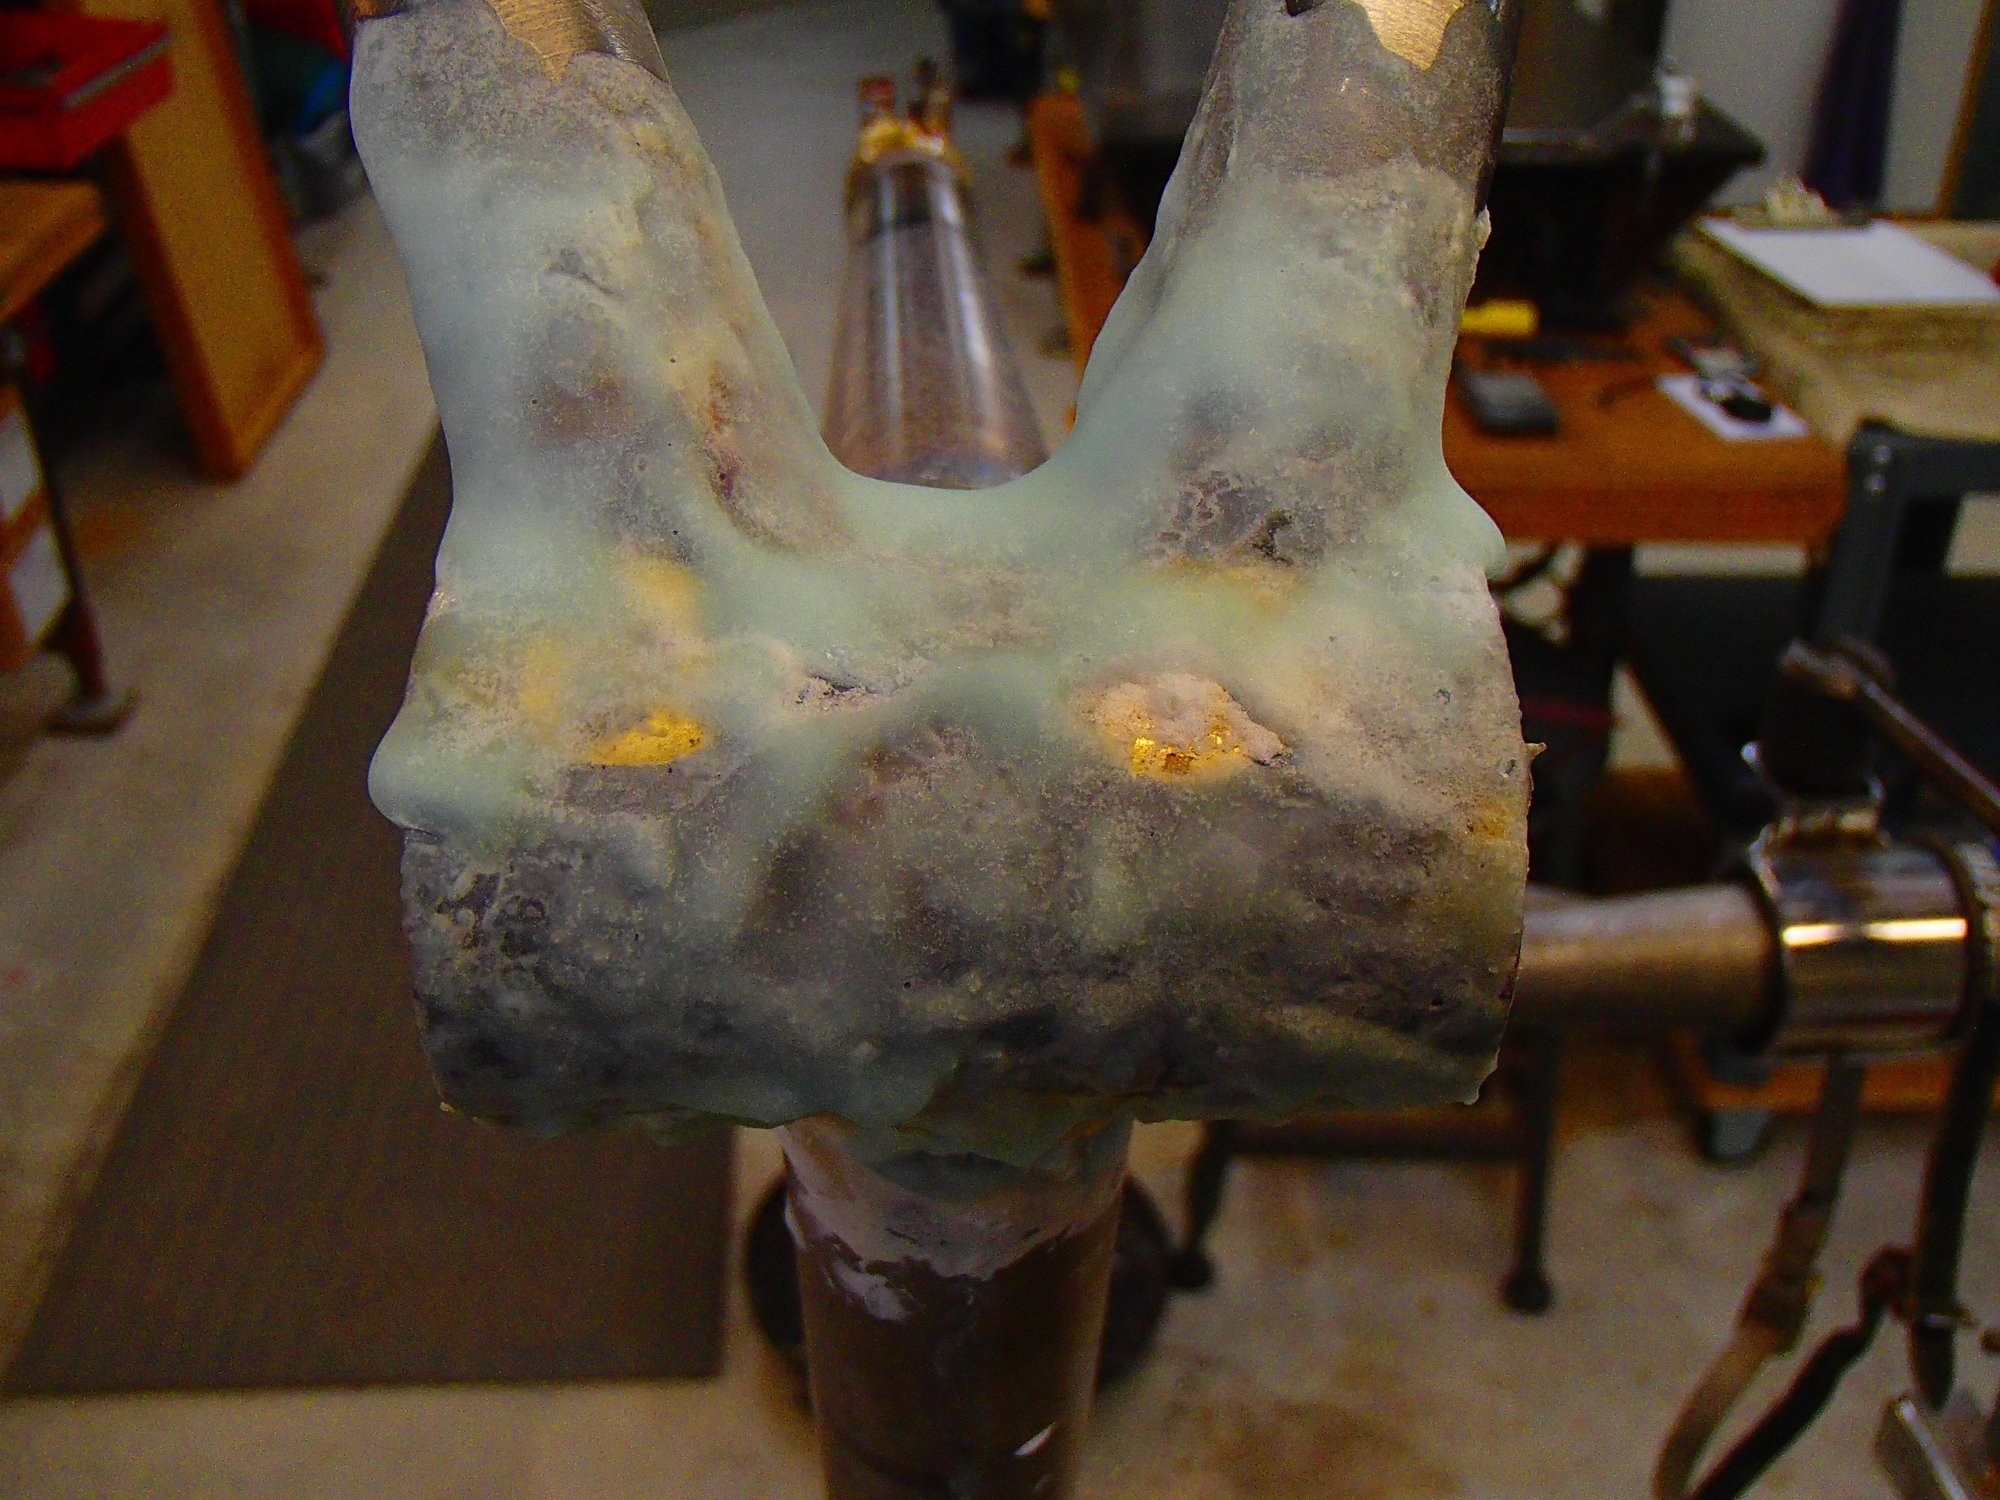
The after brazing and soak off state.
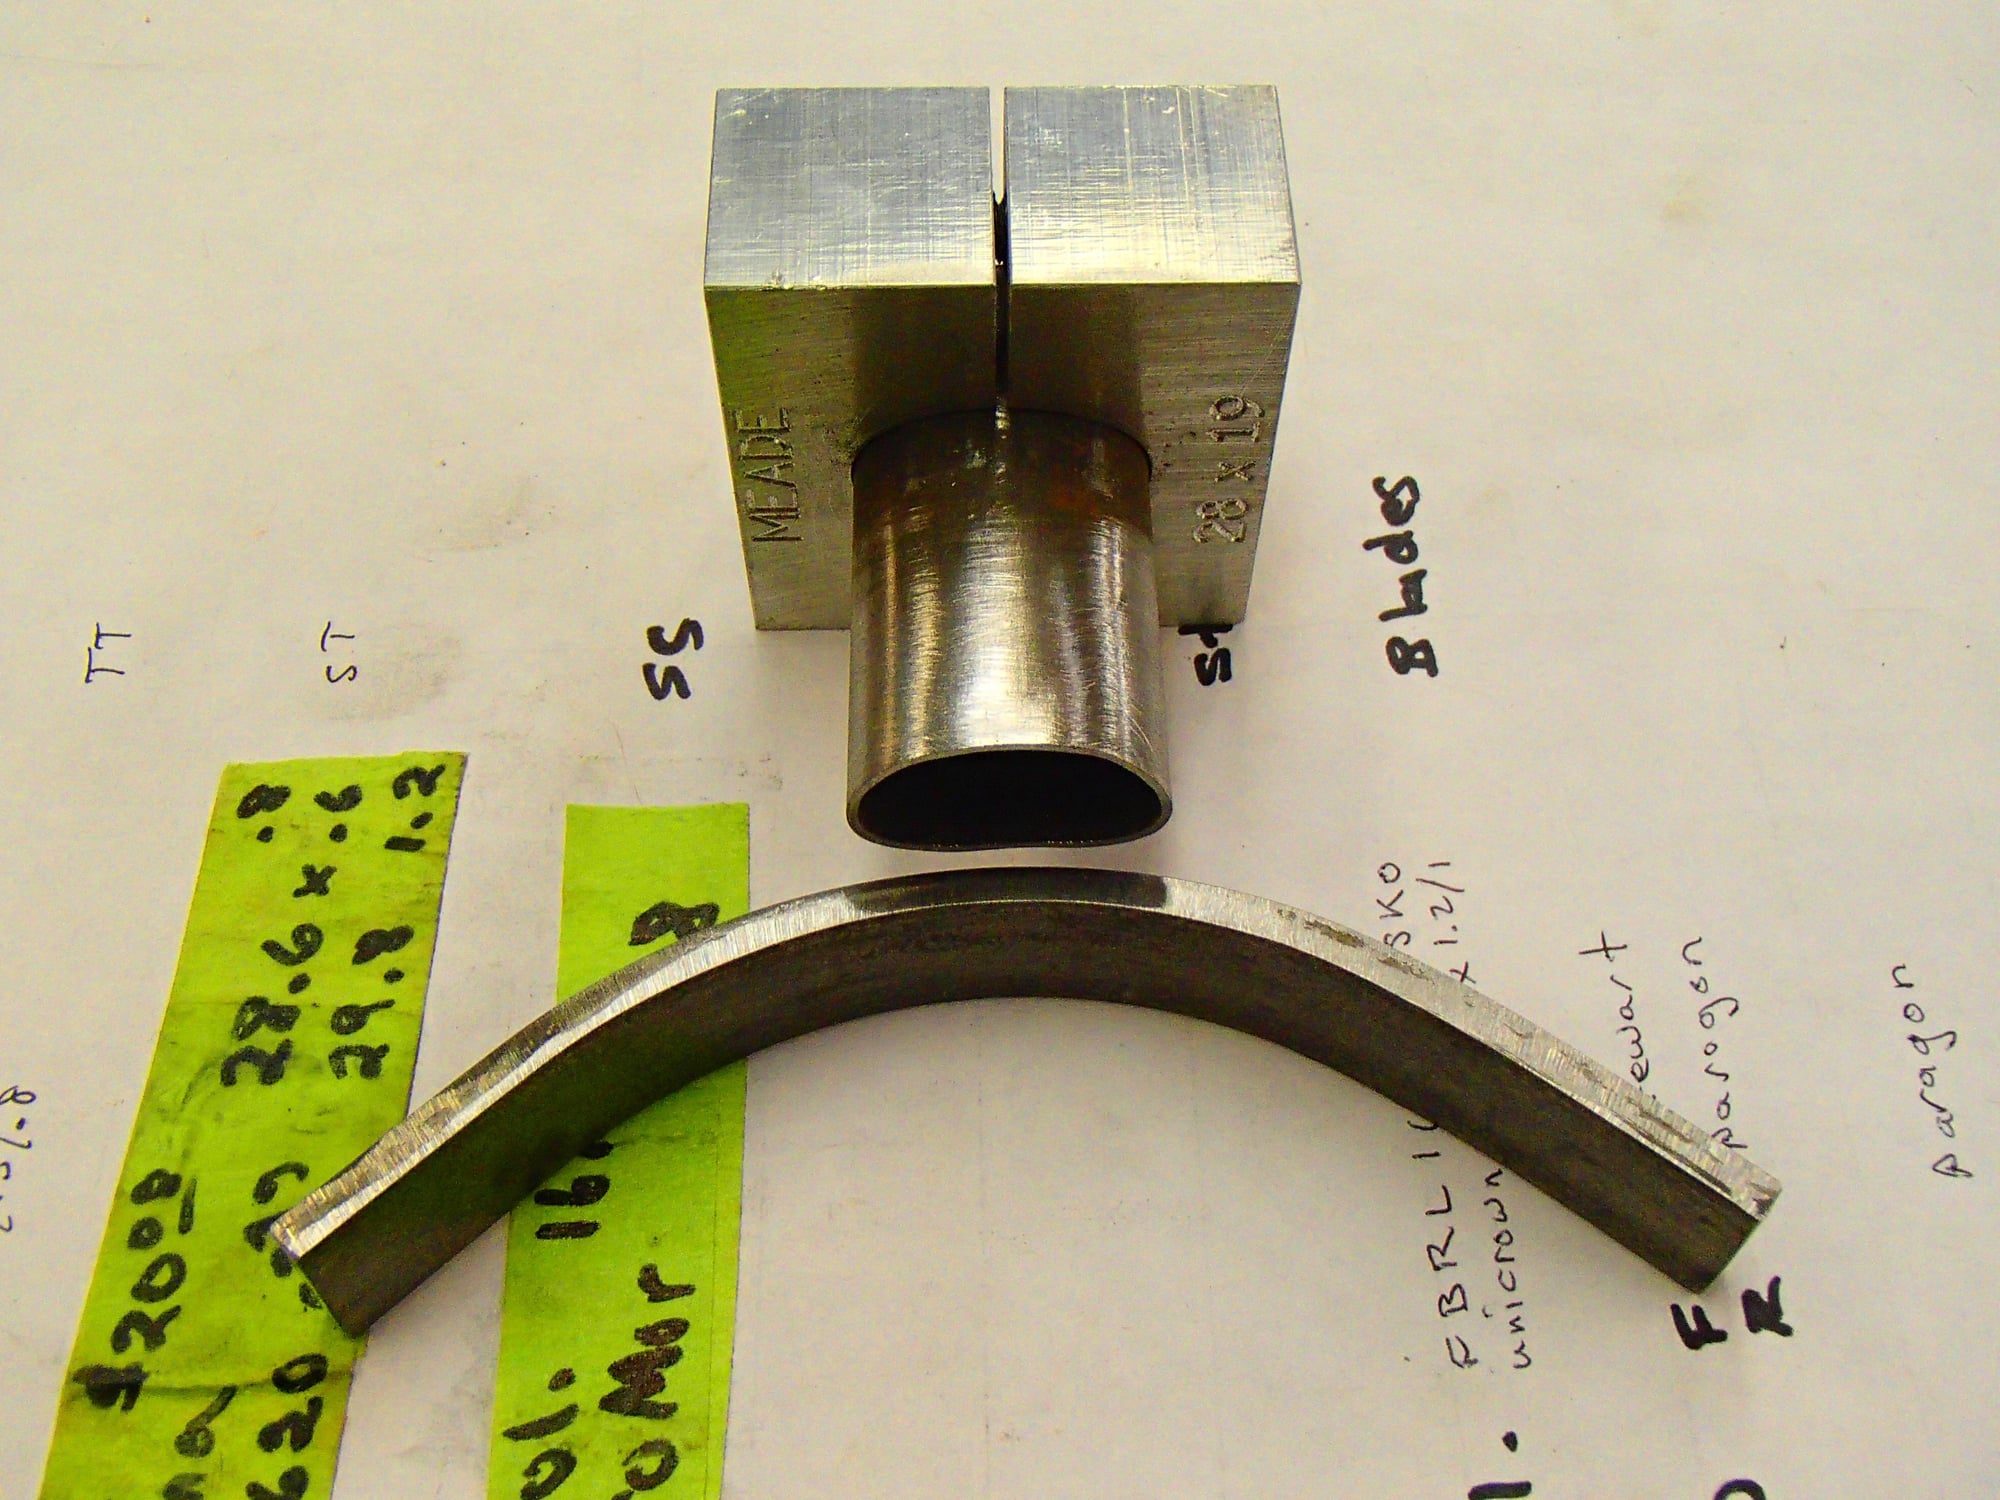
The seat stays with enough tire clearance is now in process. This took quite some thinking and trials. I first thought about bending the stays at the tire's widest point. I also wanted a "shot in" version of the stay/tube joint but the very small amount of stay between that point and the tube's backside is very short. I did some trial bends with straight cromo stock and found the tube was flaired too much at the bend to look good, the bend radius was too large (about 6") for the fit up and i was worried about the thinner walled stays being even more problematic to bend and come out nice. So i pivoted and thought about a bridge/monostay design. That seems to hit the right nail heads so this image is the early stages of that. The top few cm of a fork blade (likely from one of the 24" ft wheeled bikes I've done) and a hand curved strip. I hope to braze this up tomorrow and have filed enough to do the miter Sunday when it will be above freezing (just so) in the garage where the mill sits. Note Alex Meade's cool fork blade clamping block. Andy
Next up is the pre tacking set up for the chain stays. I needed a little weight and the stays needed to be kept apart/in place. The big round thing is one of my tube caps that I place over an otherwise open ended tube to reduce the chimney affect when brazing.
Third is the same but after tacking (should have shot this before the added flux was applied...) You can see the two tacks on the stay ends undersides. There's another pair of tacks on the stay's top points.
The after brazing and soak off state.
The seat stays with enough tire clearance is now in process. This took quite some thinking and trials. I first thought about bending the stays at the tire's widest point. I also wanted a "shot in" version of the stay/tube joint but the very small amount of stay between that point and the tube's backside is very short. I did some trial bends with straight cromo stock and found the tube was flaired too much at the bend to look good, the bend radius was too large (about 6") for the fit up and i was worried about the thinner walled stays being even more problematic to bend and come out nice. So i pivoted and thought about a bridge/monostay design. That seems to hit the right nail heads so this image is the early stages of that. The top few cm of a fork blade (likely from one of the 24" ft wheeled bikes I've done) and a hand curved strip. I hope to braze this up tomorrow and have filed enough to do the miter Sunday when it will be above freezing (just so) in the garage where the mill sits. Note Alex Meade's cool fork blade clamping block. Andy
__________________
AndrewRStewart
AndrewRStewart
02-19-21, 09:55 PM
#39
Senior Member
Thread Starter
Join Date: Feb 2012
Location: Rochester, NY
Posts: 18,063
Bikes: Stewart S&S coupled sport tourer, Stewart Sunday light, Stewart Commuting, Stewart Touring, Co Motion Tandem, Stewart 3-Spd, Stewart Track, Fuji Finest, Mongoose Tomac ATB, GT Bravado ATB, JCP Folder, Stewart 650B ATB
Mentioned: 0 Post(s)
Tagged: 0 Thread(s)
Quoted: 4197 Post(s)
Liked 3,849 Times
in
2,300 Posts
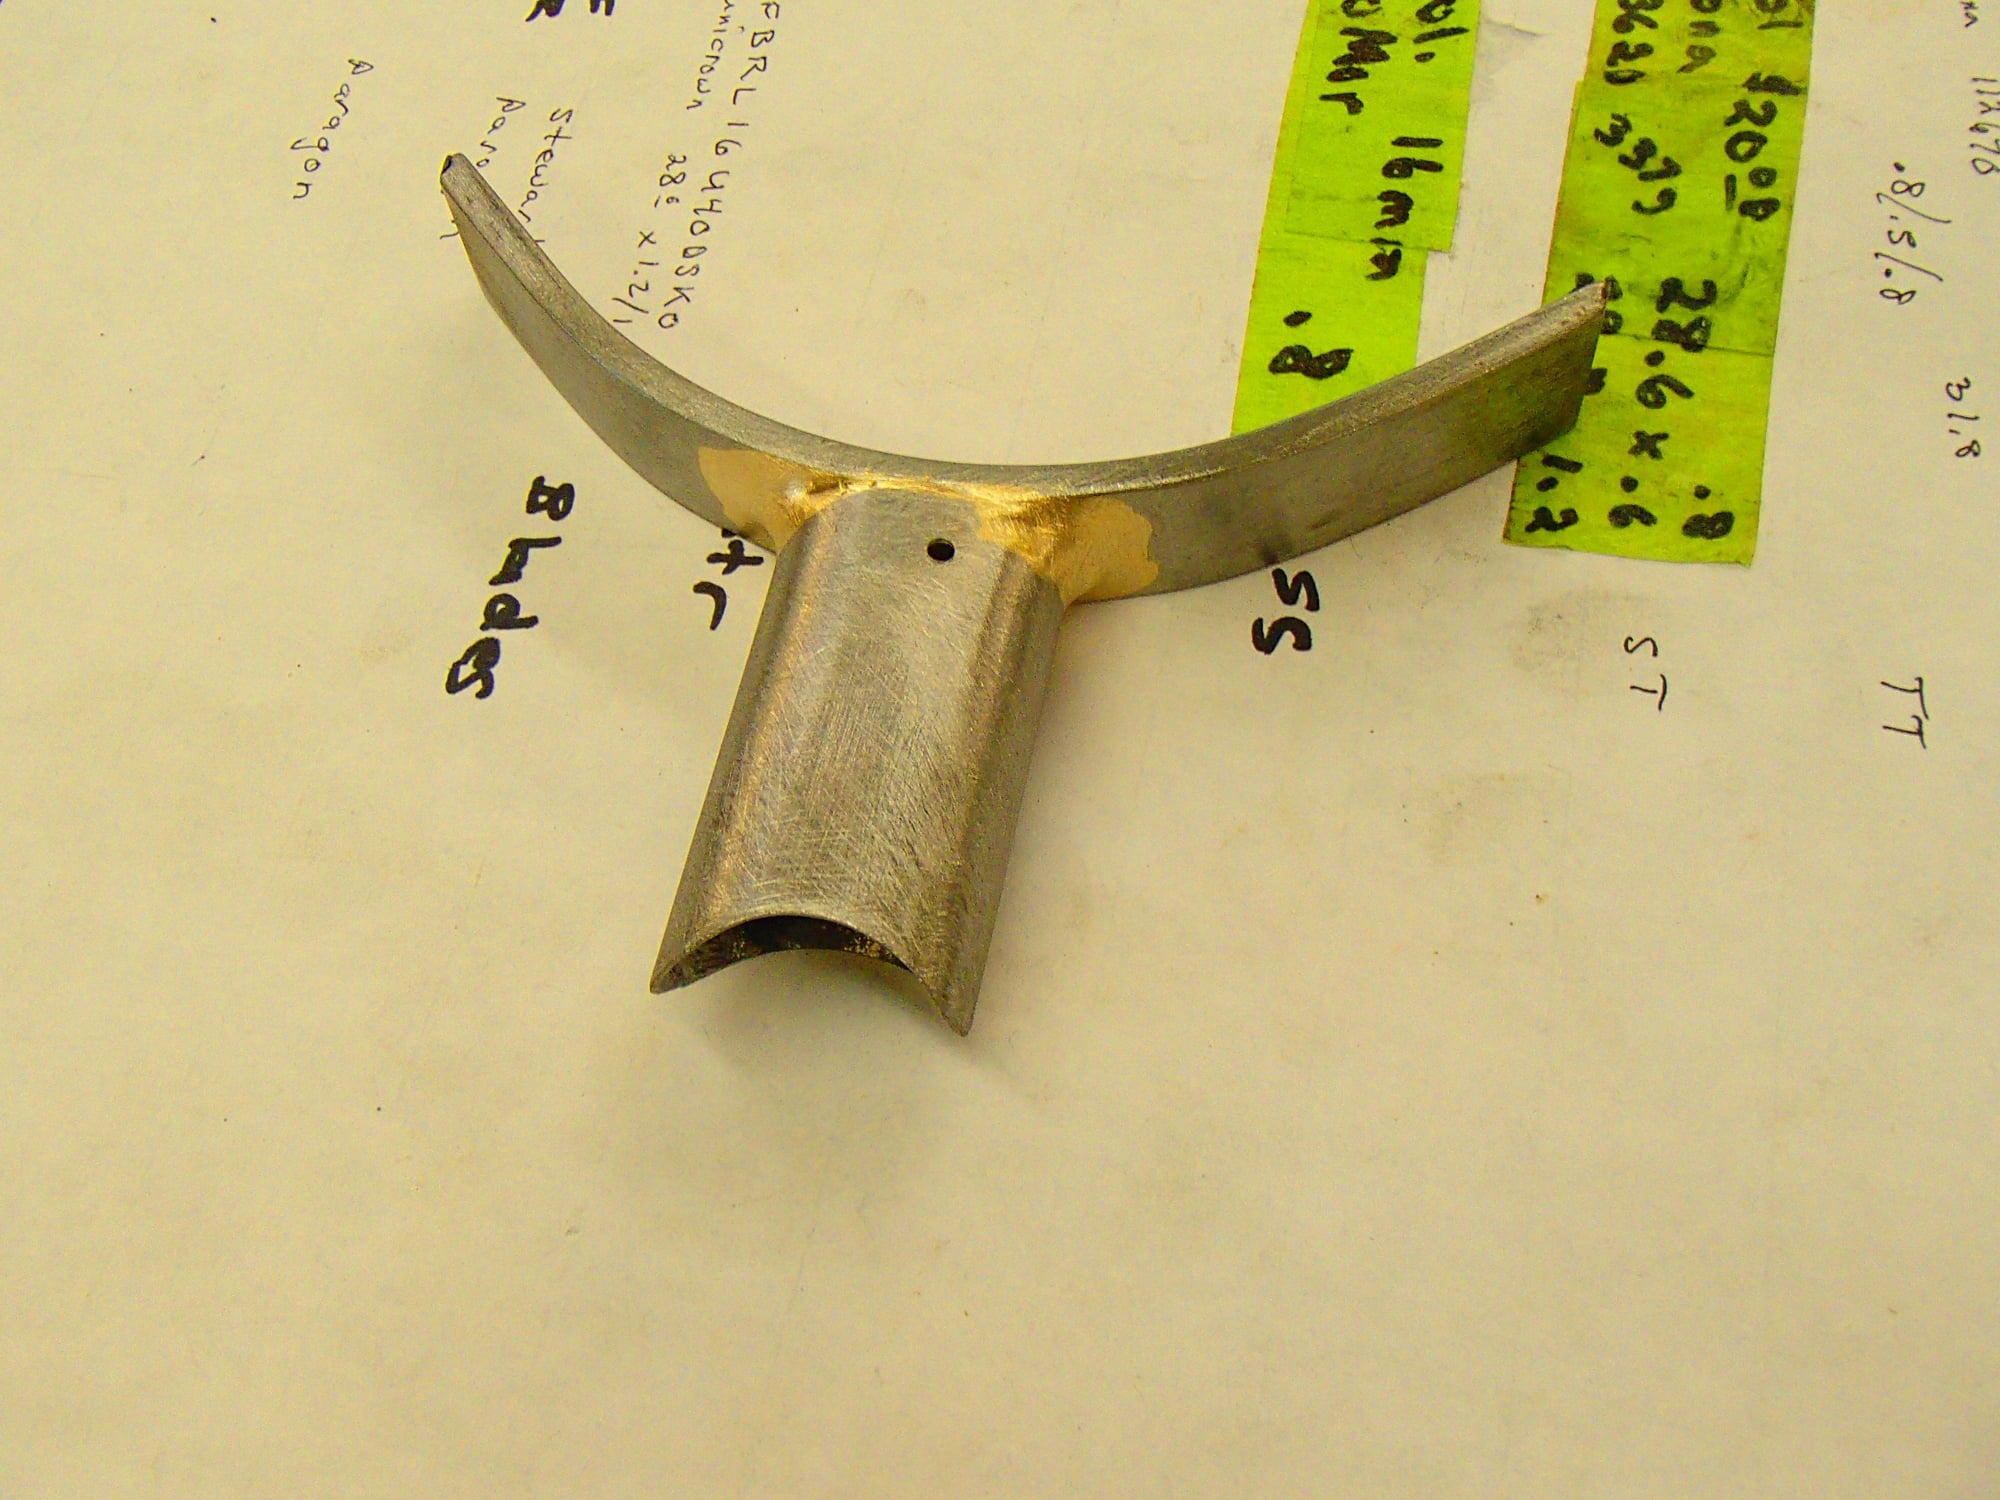
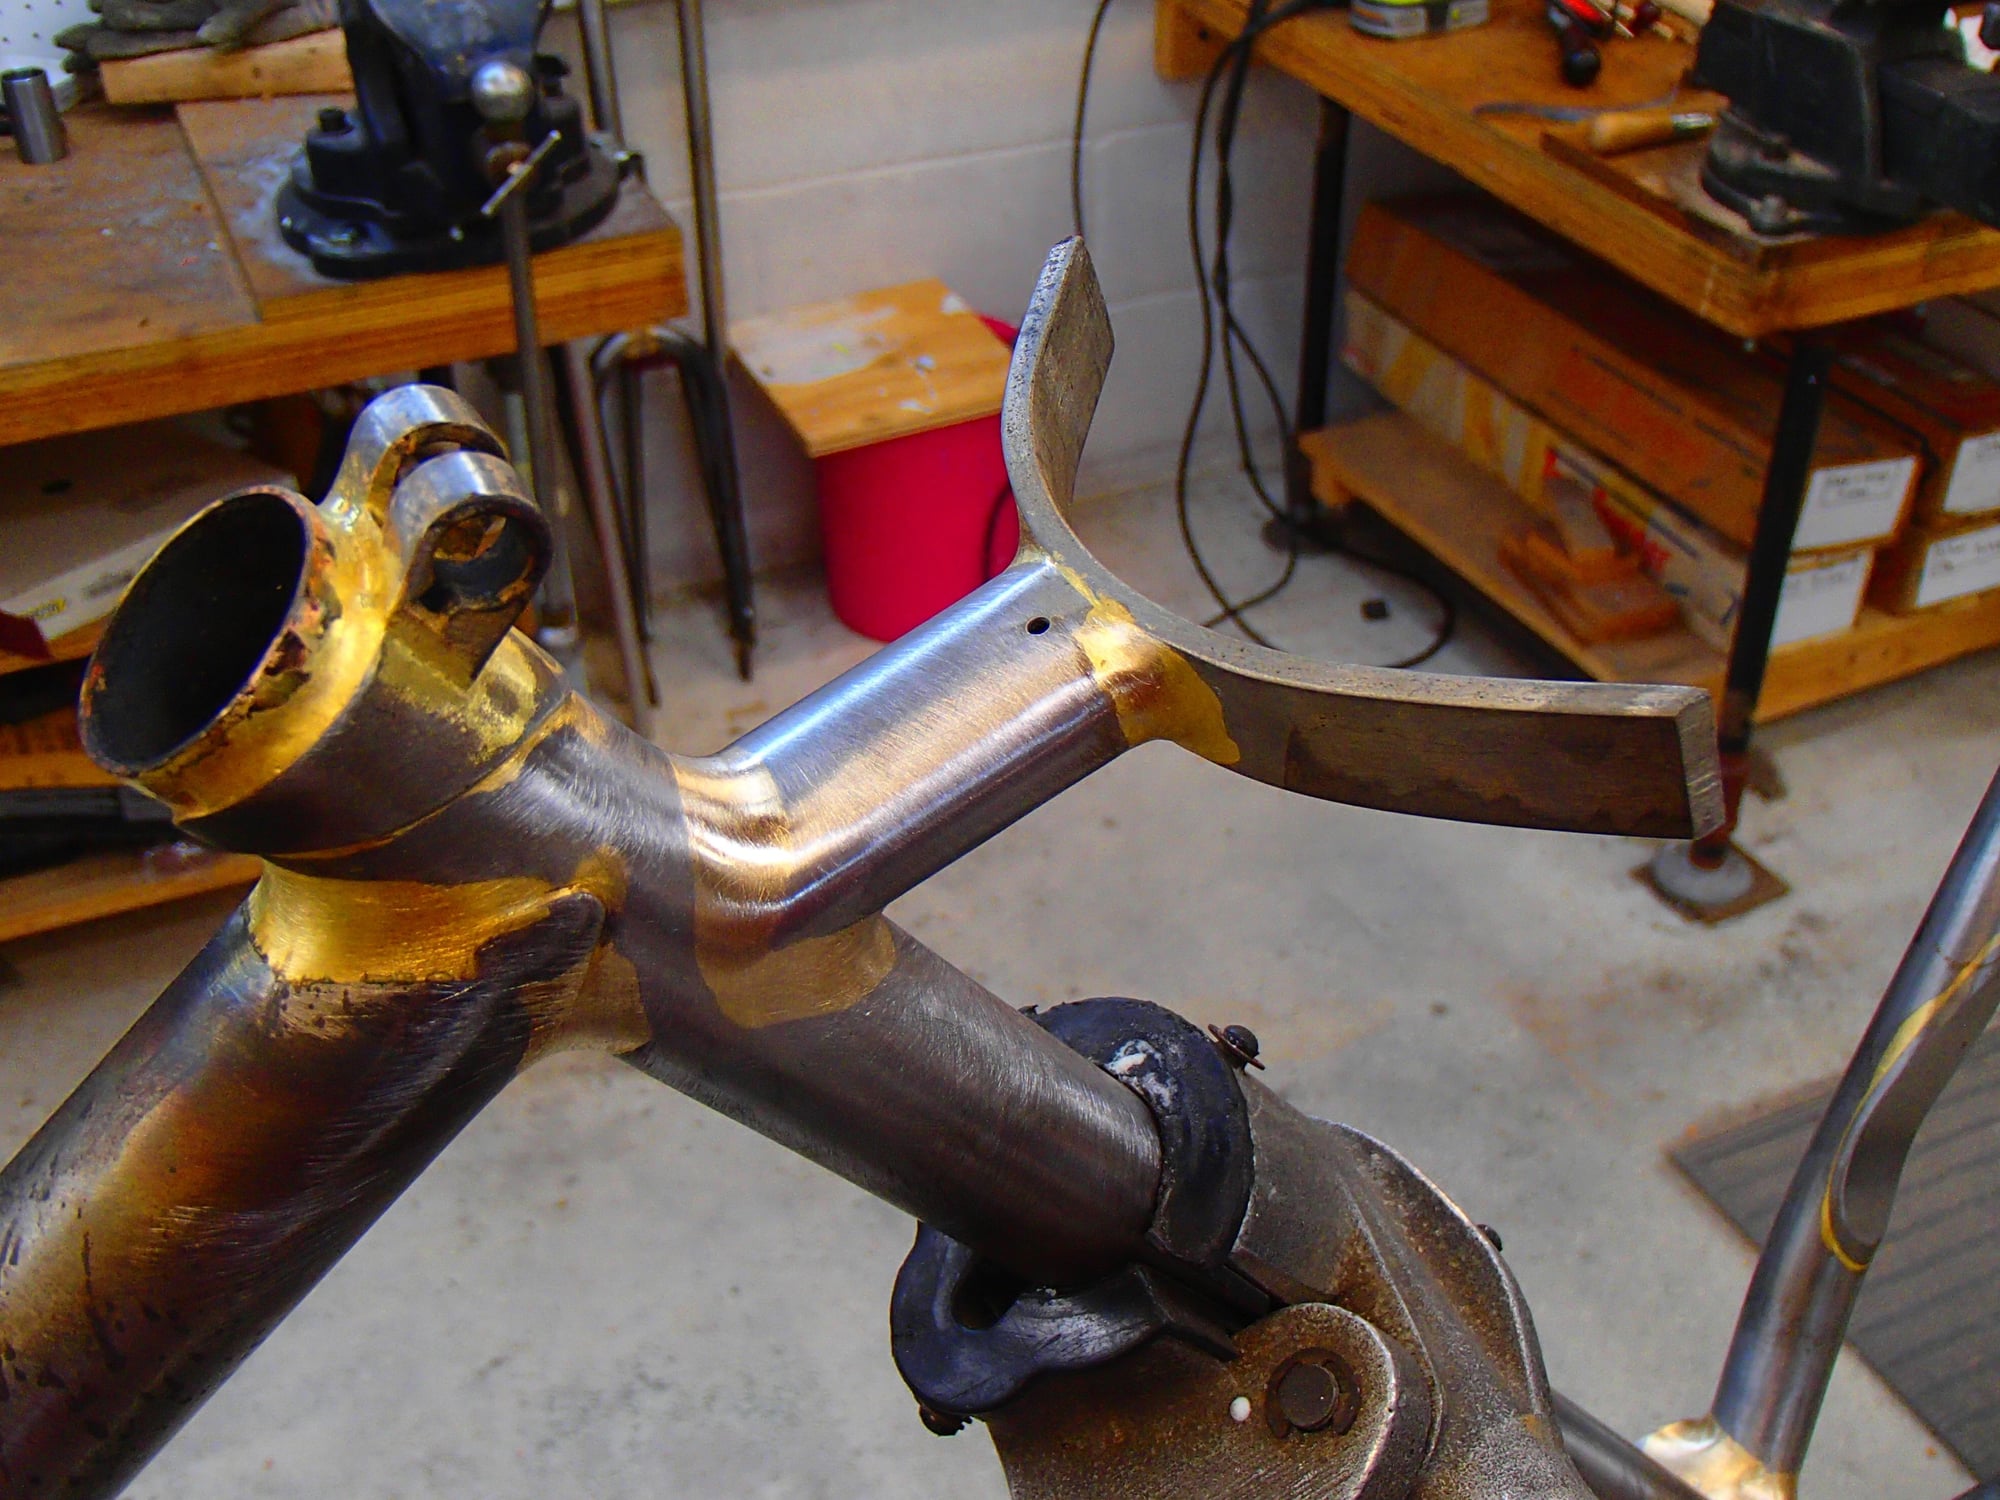
Another day in the basement, another step done. The started bridge/yoke was brazed up, cleaned up, mitered to fit and brazed to the ST. What you don't see is that I added a preform (just bent and looped 3/32" rod) to the monostay before I tacked it to the yoke. This time it worked well (I have done this loading of filler inside a joint before with less then grand results) with really good wet out and internal fillet. This is the first time I have done a monostay, let alone a self made one. So far I am happy with the looks but still wonder about the long term. Andy
__________________
AndrewRStewart
AndrewRStewart
Likes For Andrew R Stewart:
02-20-21, 02:12 AM
#40
Senior Member
Join Date: Dec 2019
Posts: 954
Mentioned: 3 Post(s)
Tagged: 0 Thread(s)
Quoted: 321 Post(s)
Liked 263 Times
in
212 Posts
Looks nice! My only concern with the design is the stiffness of the yoke. People use them made like that on chainstays but the main load there is at 90 degrees to what it is here. The stiffness of a flat bar like that might be 1/5 that of a 20mm thin-wall tube. On the other hand you do also have the chainstays to resist bending and it might actually give a beneficial suspension effect!
02-20-21, 10:25 AM
#41
Senior Member
Thread Starter
Join Date: Feb 2012
Location: Rochester, NY
Posts: 18,063
Bikes: Stewart S&S coupled sport tourer, Stewart Sunday light, Stewart Commuting, Stewart Touring, Co Motion Tandem, Stewart 3-Spd, Stewart Track, Fuji Finest, Mongoose Tomac ATB, GT Bravado ATB, JCP Folder, Stewart 650B ATB
Mentioned: 0 Post(s)
Tagged: 0 Thread(s)
Quoted: 4197 Post(s)
Liked 3,849 Times
in
2,300 Posts
I agree with your concerns and have already thought about some reinforcement...
This frame is an experiment in many ways. I bought a small spray gun and might try painting on the garage when the weather turns warm. The chain stays clearance thing, the unicrown fork and it's drop outs, the geometry, only my third disk braked frame, first running 584 MtB wheels, first real MtB. As I am nearing completion I am beginning to think about doing what I have mocked before. Clear coating only, then build it up and see how it rides before investing time and $ in real paint. So much so different, kind of reminds me of me when I was first starting out, little history to draw from and some disregard of what others will say (yet here am I writing about this)
Today will see a stay/ring dent get done and the start of fitting the seat stays. Andy
This frame is an experiment in many ways. I bought a small spray gun and might try painting on the garage when the weather turns warm. The chain stays clearance thing, the unicrown fork and it's drop outs, the geometry, only my third disk braked frame, first running 584 MtB wheels, first real MtB. As I am nearing completion I am beginning to think about doing what I have mocked before. Clear coating only, then build it up and see how it rides before investing time and $ in real paint. So much so different, kind of reminds me of me when I was first starting out, little history to draw from and some disregard of what others will say (yet here am I writing about this
) Today will see a stay/ring dent get done and the start of fitting the seat stays. Andy
__________________
AndrewRStewart
AndrewRStewart
Likes For Andrew R Stewart:
02-20-21, 04:49 PM
#42
Senior Member
Thread Starter
Join Date: Feb 2012
Location: Rochester, NY
Posts: 18,063
Bikes: Stewart S&S coupled sport tourer, Stewart Sunday light, Stewart Commuting, Stewart Touring, Co Motion Tandem, Stewart 3-Spd, Stewart Track, Fuji Finest, Mongoose Tomac ATB, GT Bravado ATB, JCP Folder, Stewart 650B ATB
Mentioned: 0 Post(s)
Tagged: 0 Thread(s)
Quoted: 4197 Post(s)
Liked 3,849 Times
in
2,300 Posts
I have trial fit the crankset and only had a couple of mms of chainstay/inner ring gap. So I made more clearance. If I had really done a best job at the planning and set up I would have done this before the stays were brazed onto the shell. But I didn't. One of my stay crimpers had to be taken apart and only the two layers that sandwich the stay were used. Since the big pressure screw was no longer available for the crimping I positioned the form and snugged up the 4 draw bolts to hold all in place while I applied a 5lb irresistible force (hammer). Crimp done. Andy


__________________
AndrewRStewart
AndrewRStewart
02-23-21, 09:42 PM
#43
Senior Member
Thread Starter
Join Date: Feb 2012
Location: Rochester, NY
Posts: 18,063
Bikes: Stewart S&S coupled sport tourer, Stewart Sunday light, Stewart Commuting, Stewart Touring, Co Motion Tandem, Stewart 3-Spd, Stewart Track, Fuji Finest, Mongoose Tomac ATB, GT Bravado ATB, JCP Folder, Stewart 650B ATB
Mentioned: 0 Post(s)
Tagged: 0 Thread(s)
Quoted: 4197 Post(s)
Liked 3,849 Times
in
2,300 Posts
Finally the frame has no open loops. Still needs a lot of bits added and a few more final finishing touches but the basic structure is complete. Shot 1 is of the prebrazing set up for the seat stays. The more I use these machinist clamps the more I like them.
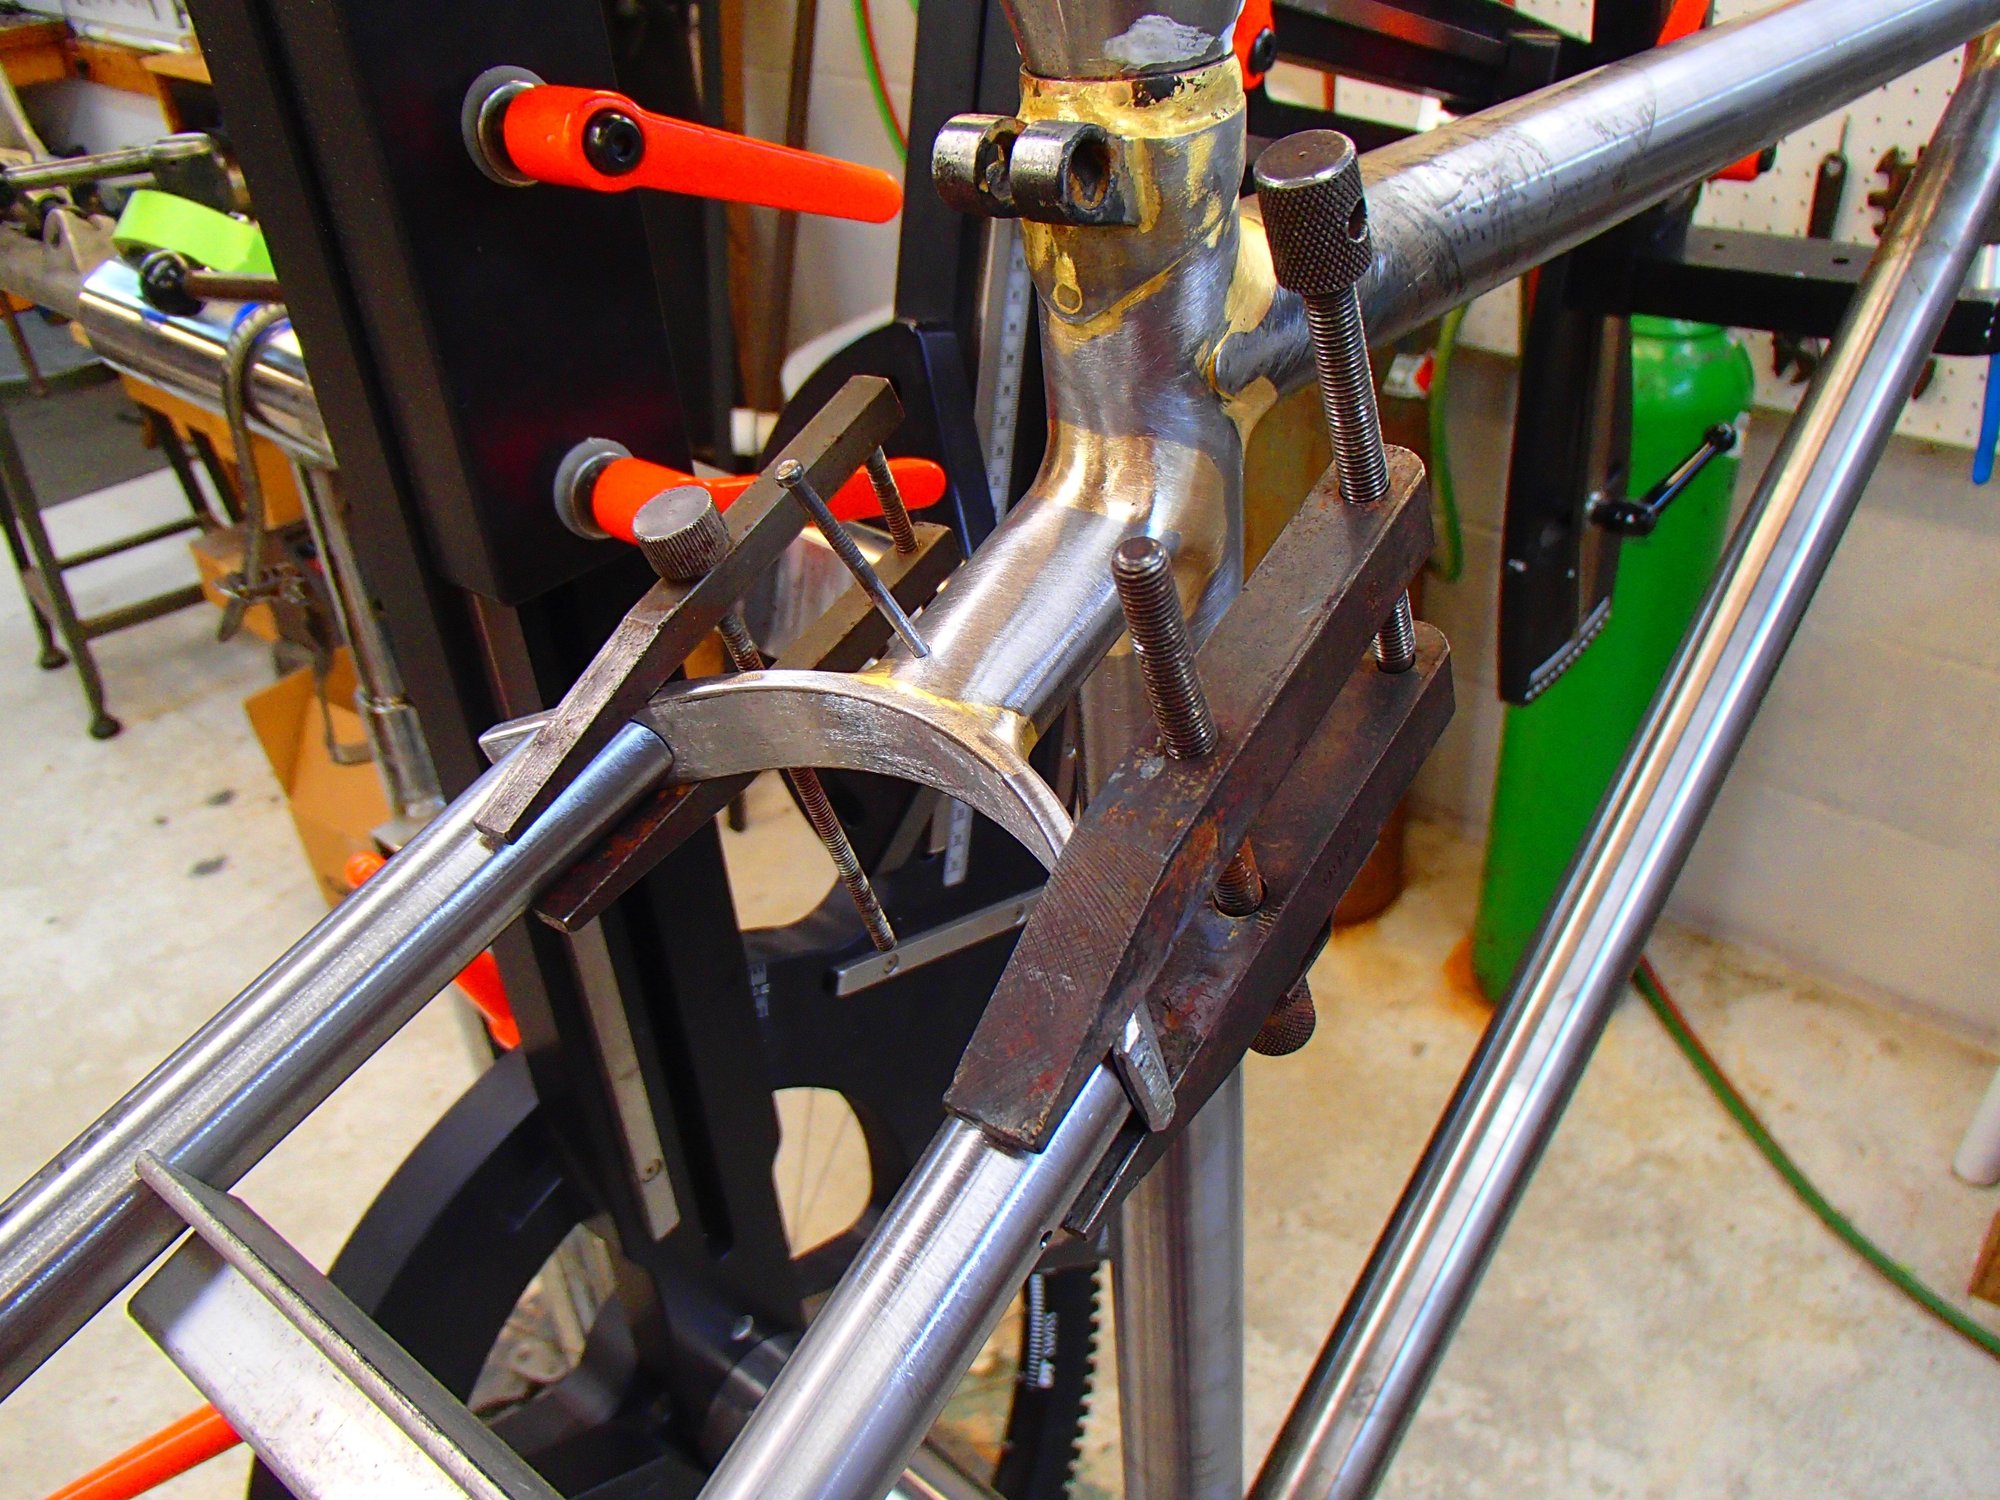
The after filing and sanding. The ST top and clamp is rather different then what I usually do. The ST ID did need some reaming before honing but not as much as I had thought. Andy

The after filing and sanding. The ST top and clamp is rather different then what I usually do. The ST ID did need some reaming before honing but not as much as I had thought. Andy
__________________
AndrewRStewart
AndrewRStewart
Likes For Andrew R Stewart:
02-24-21, 09:20 AM
#45
Senior Member
Thread Starter
Join Date: Feb 2012
Location: Rochester, NY
Posts: 18,063
Bikes: Stewart S&S coupled sport tourer, Stewart Sunday light, Stewart Commuting, Stewart Touring, Co Motion Tandem, Stewart 3-Spd, Stewart Track, Fuji Finest, Mongoose Tomac ATB, GT Bravado ATB, JCP Folder, Stewart 650B ATB
Mentioned: 0 Post(s)
Tagged: 0 Thread(s)
Quoted: 4197 Post(s)
Liked 3,849 Times
in
2,300 Posts
Of course. Reaming removes a lot of material compared to honing. Much like filing VS sanding. Reaming gets the size and roundness a post wants and honing removes any remaining burrs and results in a smooth ID surface. Andy
__________________
AndrewRStewart
AndrewRStewart
Likes For Andrew R Stewart:
02-24-21, 09:39 AM
#46
framebuilder
Andy, I've been enjoying watching the process of your MTB frame with some original ideas on the frame was well as how it is made. It is certainly nothing you could buy in a store. BTW, I encourage my frame building class students to put their frame together to ride it 1st before painting it for real just to make sure all the braze-on bits are in the right place and they haven't left one off they now wish they had. As you already stated, a clear coat over bare metal won't last long but I'm sure long enough to figure out if you need to make any changes. You might want to consider putting on just a primer instead. House of Kolor primers that come in red, blue, yellow as well as black and white are actually nice colors and might be another option for you. Because they are primary colors, they can be mixed to make almost any color.
02-24-21, 09:47 AM
#47
Senior Member
Join Date: Dec 2019
Posts: 954
Mentioned: 3 Post(s)
Tagged: 0 Thread(s)
Quoted: 321 Post(s)
Liked 263 Times
in
212 Posts
Nearly every commercially made bike I've owned had issues with the seatpost slipping down unless you did the clamp up so tight you nearly broke it, especially if you greased the seatpost, which of course you should, but I ended up having to clean it off and use linseed oil instead in an attempt to achieve additional stiction.
I'm not sure they even reamed them because all my own frames are far better. Grease and moderate torque on the bolt and zero slippage, exactly as it should be.
02-24-21, 10:28 AM
#48
Senior Member
Join Date: Aug 2012
Location: Seattle
Posts: 507
Mentioned: 0 Post(s)
Tagged: 0 Thread(s)
Quoted: 103 Post(s)
Liked 144 Times
in
88 Posts
What do you use for hone? I use a simple flex hone (for stem clamps as well). Looking great. I like the seat post clamp treatment.
__________________
https://www.flickr.com/photos/54319503@N05/
https://www.draper-cycles.com
https://www.flickr.com/photos/54319503@N05/
https://www.draper-cycles.com
02-24-21, 11:15 AM
#49


Randomhead
Join Date: Aug 2008
Location: Happy Valley, Pennsylvania
Posts: 24,392
Mentioned: 0 Post(s)
Tagged: 0 Thread(s)
Quoted: 4 Post(s)
Liked 3,690 Times
in
2,513 Posts
I use a Flex hone from Brush Research. Is there really another option?
02-24-21, 07:55 PM
#50
Senior Member
Join Date: Aug 2012
Location: Seattle
Posts: 507
Mentioned: 0 Post(s)
Tagged: 0 Thread(s)
Quoted: 103 Post(s)
Liked 144 Times
in
88 Posts
There are hone machines or those stone things they use for engine cylinder walls. There may be others that I'm not aware of - which is why I asked. I tried the stone hones but it chattered and there was very little pressure applied so the effect was minimal.
__________________
https://www.flickr.com/photos/54319503@N05/
https://www.draper-cycles.com
https://www.flickr.com/photos/54319503@N05/
https://www.draper-cycles.com
Last edited by duanedr; 02-24-21 at 07:58 PM.