


Getting Started in Framebuilding
 11-21-20, 08:12 PM
#1
Junior Member
Thread Starter
Join Date: Nov 2020
Posts: 17
Mentioned: 0 Post(s)
Tagged: 0 Thread(s)
Quoted: 7 Post(s)
Likes: 0
Liked 3 Times
in
3 Posts
Getting Started in Framebuilding
Hey folks,
I've been interested for some time in building a frames as a hobby. My goal would be a few frames a year. I have a few years of welding experience ranging from AWS structural to TIG welded stainless tubing.
What is actually needed to get started to build quality frames? I've got my welding equipment mostly covered, but I do not have machines such as lathes, mills, etc. I've got a small garage shop, DC tig welder, portaband, grinders, stuff like that. I would be starting out doing steel frames, and maybe get a new machine if I ever dabble into AL.
I do understand that the first frame isn't going to be the best, but figured I'd reach out to the experts to get some guidance of if its something realistic for my space and my financial situation. What do you guys recommend for someone starting out as a tool list, including basic fixturing, so that a new builder might be successful.
Cheers.
 11-21-20, 09:05 PM
#2

Senior Member
Join Date: Feb 2012
Location: Rochester, NY
Posts: 18,048
Bikes: Stewart S&S coupled sport tourer, Stewart Sunday light, Stewart Commuting, Stewart Touring, Co Motion Tandem, Stewart 3-Spd, Stewart Track, Fuji Finest, Mongoose Tomac ATB, GT Bravado ATB, JCP Folder, Stewart 650B ATB
Mentioned: 0 Post(s)
Tagged: 0 Thread(s)
Quoted: 4191 Post(s)
Liked 3,835 Times
in
2,293 Posts
Many frames have been built with very simple tools. No real need for powered mitering unless you're going SS or Ti. Besides the usual fabrication shop stuff tubing holding blocks/clamps are a nice thing that will be used a lot. If you're building infrequently and have a flat surface that you're good trusting I suggest a tube holding set up based on that surface. Alex Meade makes some. The only real reason to have a formal jig is to quicken the build time. Many people will wait till after a few frames before shelling out the $ for a quality and useable jig.
My I ask where you are located? Some aspiring builders will take a building class of find a mentor to help them. Andy
My I ask where you are located? Some aspiring builders will take a building class of find a mentor to help them. Andy
__________________
AndrewRStewart
AndrewRStewart
11-21-20, 09:15 PM
#3
Junior Member
Thread Starter
Join Date: Nov 2020
Posts: 17
Mentioned: 0 Post(s)
Tagged: 0 Thread(s)
Quoted: 7 Post(s)
Likes: 0
Liked 3 Times
in
3 Posts
Many frames have been built with very simple tools. No real need for powered mitering unless you're going SS or Ti. Besides the usual fabrication shop stuff tubing holding blocks/clamps are a nice thing that will be used a lot. If you're building infrequently and have a flat surface that you're good trusting I suggest a tube holding set up based on that surface. Alex Meade makes some. The only real reason to have a formal jig is to quicken the build time. Many people will wait till after a few frames before shelling out the $ for a quality and useable jig.
My I ask where you are located? Some aspiring builders will take a building class of find a mentor to help them. Andy
My I ask where you are located? Some aspiring builders will take a building class of find a mentor to help them. Andy
Thanks!
11-21-20, 09:22 PM
#4
Senior Member
Join Date: Feb 2012
Location: Rochester, NY
Posts: 18,048
Bikes: Stewart S&S coupled sport tourer, Stewart Sunday light, Stewart Commuting, Stewart Touring, Co Motion Tandem, Stewart 3-Spd, Stewart Track, Fuji Finest, Mongoose Tomac ATB, GT Bravado ATB, JCP Folder, Stewart 650B ATB
Mentioned: 0 Post(s)
Tagged: 0 Thread(s)
Quoted: 4191 Post(s)
Liked 3,835 Times
in
2,293 Posts
m_g- Here's my Flicker site link. I have many build albums and tooling shots for the browsing. Andrew Stewart’s albums | Flickr Andy
__________________
AndrewRStewart
AndrewRStewart
11-22-20, 04:29 AM
#5
Senior Member
Join Date: Dec 2019
Posts: 953
Mentioned: 3 Post(s)
Tagged: 0 Thread(s)
Quoted: 321 Post(s)
Liked 261 Times
in
212 Posts
I've made a few frames now with a TIG, a drill (for bottle cage and vent holes), an angle grinder and a digital angle box. From frame #00003 onwards I also had a laser level box which I highly recommend.
You will need some kind of basic fixturing but this can be homemade and does not have to be high precision if it's adjustable.
I do own a cheap tubing notcher but I actually prefer hand-mitring using templates. I just use a worn-out flap disk on the grinder.
You can use hand files (and saws) of course too. What I like about the grinder is you don't need to clamp the tube hardly at all. I ended up prepping so many practice joints with the grinder to save time that I got better at it so just use it for everything. I don't get absolutely perfect fit up and this is something I'm always trying to improve, but it's good enough.
11-22-20, 09:11 AM
#6


Randomhead
Join Date: Aug 2008
Location: Happy Valley, Pennsylvania
Posts: 24,383
Mentioned: 0 Post(s)
Tagged: 0 Thread(s)
Quoted: 4 Post(s)
Liked 3,684 Times
in
2,508 Posts
What do you use the laser level for?
11-23-20, 04:03 AM
#9
Senior Member
Join Date: Dec 2019
Posts: 953
Mentioned: 3 Post(s)
Tagged: 0 Thread(s)
Quoted: 321 Post(s)
Liked 261 Times
in
212 Posts
There are a couple of TIG accessories that I would recommend. It's well worth having a number 9 torch (the small ones) with one of those supersoft red CK hoses, and you will certainly need a foot pedal. I don't use auto-pulse although some people like it. I've experimented with huge cups and lots of stickout but it doesn't work for me but maybe just because I'm too mean to crank the gas up enough. I use a No 8 cup for everything with 1/16" electrode. For the tight spots I use a big stickout but wrap tinfoil around the place to trap Argon and sort of fill the area up for a few seconds before starting. Fiddly but works well. And you will want a thin filler rod. I use 1mm but some people use really thin MIG wire.
11-23-20, 07:03 AM
#10
Senior Member
Join Date: Dec 2019
Posts: 953
Mentioned: 3 Post(s)
Tagged: 0 Thread(s)
Quoted: 321 Post(s)
Liked 261 Times
in
212 Posts
The laser level in action:

The ST is vertical in the other plane as well (and will be tipped back to 73 degrees later). The vertical beam is lined up with the ST, the centre of the BB shell and the midpoint between the dropouts. The dummy axle is level. All good. So now I swing the ST down, leaving the laser where it is, and set up the HT:
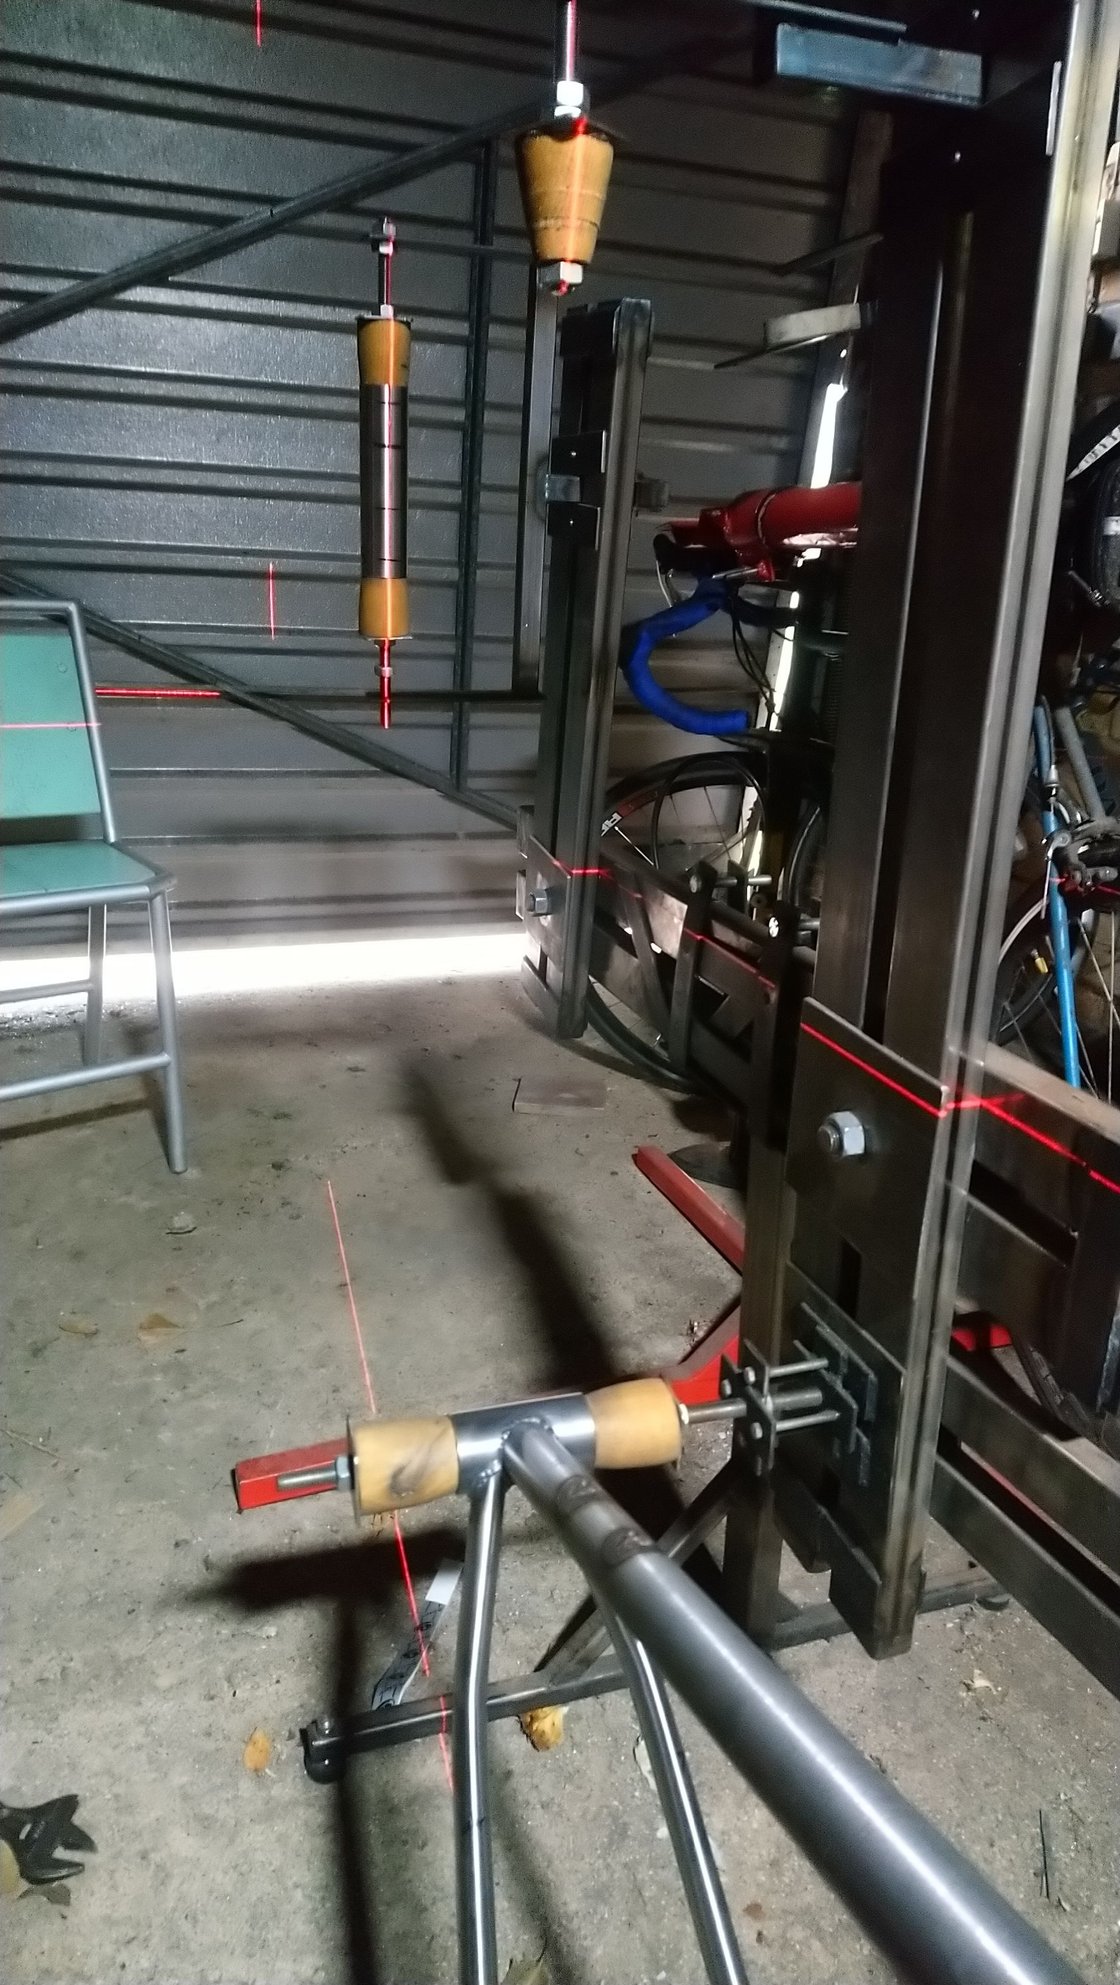
Then I will swing things back to the right angles, get them in the right places, and check again.
The ST is vertical in the other plane as well (and will be tipped back to 73 degrees later). The vertical beam is lined up with the ST, the centre of the BB shell and the midpoint between the dropouts. The dummy axle is level. All good. So now I swing the ST down, leaving the laser where it is, and set up the HT:
Then I will swing things back to the right angles, get them in the right places, and check again.
11-23-20, 12:03 PM
#11
Junior Member
Thread Starter
Join Date: Nov 2020
Posts: 17
Mentioned: 0 Post(s)
Tagged: 0 Thread(s)
Quoted: 7 Post(s)
Likes: 0
Liked 3 Times
in
3 Posts
There are a couple of TIG accessories that I would recommend. It's well worth having a number 9 torch (the small ones) with one of those supersoft red CK hoses, and you will certainly need a foot pedal. I don't use auto-pulse although some people like it. I've experimented with huge cups and lots of stickout but it doesn't work for me but maybe just because I'm too mean to crank the gas up enough. I use a No 8 cup for everything with 1/16" electrode. For the tight spots I use a big stickout but wrap tinfoil around the place to trap Argon and sort of fill the area up for a few seconds before starting. Fiddly but works well. And you will want a thin filler rod. I use 1mm but some people use really thin MIG wire.
I've got a CK 9 superflex, love the thing. My machine is a maxstar 150 STL so I'll be manually pulsing if needed.I've had good luck with Furick 12 cups myself, but on carbon steel a number 8 would be fine. I mostly only use the bigger cups are good for stainless where more gas is helpful. .045 wire is the smallest I have, but ill see if I can order smaller from my LWS if needed.
Likes For mind_guy:
11-23-20, 12:48 PM
#12
framebuilder
Thanks for posting your laser procedure! I've been curious for hobbyists if this was a possible option. The other possibility is to make a surface table with MDF board and pour an epoxy top. I know that will work and am hoping someone will work out the details. I have both cast iron and aluminum tables so don't need these things myself but like proved options for those on limited budgets.
Likes For Doug Fattic:
11-23-20, 01:16 PM
#13
Team Beer
Join Date: Apr 2004
Location: Sacramento CA
Posts: 6,339
Bikes: Too Many
Mentioned: 3 Post(s)
Tagged: 0 Thread(s)
Quoted: 114 Post(s)
Liked 159 Times
in
104 Posts
The laser level in action:
The ST is vertical in the other plane as well (and will be tipped back to 73 degrees later). The vertical beam is lined up with the ST, the centre of the BB shell and the midpoint between the dropouts. The dummy axle is level. All good. So now I swing the ST down, leaving the laser where it is, and set up the HT:
Then I will swing things back to the right angles, get them in the right places, and check again.
I've been curious about using a laser for alignment as well. Can you show a photo or a link to your laser?
__________________
I'm not one for fawning over bicycles, but I do believe that our bikes communicate with us, and what this bike is saying is, "You're an idiot." BikeSnobNYC
I'm not one for fawning over bicycles, but I do believe that our bikes communicate with us, and what this bike is saying is, "You're an idiot." BikeSnobNYC
11-23-20, 01:40 PM
#14
Senior Member
Join Date: Jan 2013
Location: South Jersey
Posts: 2,261
Mentioned: 18 Post(s)
Tagged: 0 Thread(s)
Quoted: 713 Post(s)
Liked 796 Times
in
473 Posts
Awesome! All of your tips are great to hear. I've actually incorporated a lot of the above in my toolbox.
I've got a CK 9 superflex, love the thing. My machine is a maxstar 150 STL so I'll be manually pulsing if needed.I've had good luck with Furick 12 cups myself, but on carbon steel a number 8 would be fine. I mostly only use the bigger cups are good for stainless where more gas is helpful. .045 wire is the smallest I have, but ill see if I can order smaller from my LWS if needed.
I've got a CK 9 superflex, love the thing. My machine is a maxstar 150 STL so I'll be manually pulsing if needed.I've had good luck with Furick 12 cups myself, but on carbon steel a number 8 would be fine. I mostly only use the bigger cups are good for stainless where more gas is helpful. .045 wire is the smallest I have, but ill see if I can order smaller from my LWS if needed.
11-23-20, 01:56 PM
#15
Senior Member
Join Date: Dec 2019
Posts: 953
Mentioned: 3 Post(s)
Tagged: 0 Thread(s)
Quoted: 321 Post(s)
Liked 261 Times
in
212 Posts
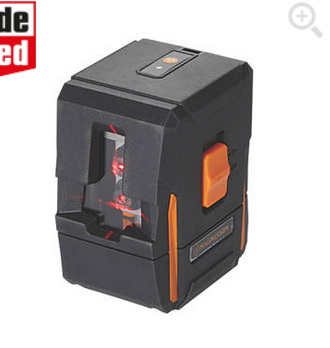
You can mount it on a camera tripod but I made my own adjustable height stand. Adjustable height is useful so you can get the horizontal line at the right height.
https://www.screwfix.com/p/magnusson...&gclsrc=aw.ds#
11-23-20, 02:06 PM
#17
Senior Member
Join Date: Jan 2013
Location: South Jersey
Posts: 2,261
Mentioned: 18 Post(s)
Tagged: 0 Thread(s)
Quoted: 713 Post(s)
Liked 796 Times
in
473 Posts
It seems to flow better than ER70S2 and I can use it for welding dissimilar metals like stainless dropouts to chromoly stays. Weldmold 880 is popular with framebuilders, but I believe that ER312 is the same stuff and costs less.
Likes For dsaul:
11-23-20, 05:26 PM
#18
Team Beer
Join Date: Apr 2004
Location: Sacramento CA
Posts: 6,339
Bikes: Too Many
Mentioned: 3 Post(s)
Tagged: 0 Thread(s)
Quoted: 114 Post(s)
Liked 159 Times
in
104 Posts
This is the one I use (which is probably only available in the UK but you can get similar things everywhere).
You can mount it on a camera tripod but I made my own adjustable height stand. Adjustable height is useful so you can get the horizontal line at the right height.
https://www.screwfix.com/p/magnusson...&gclsrc=aw.ds#
You can mount it on a camera tripod but I made my own adjustable height stand. Adjustable height is useful so you can get the horizontal line at the right height.
https://www.screwfix.com/p/magnusson...&gclsrc=aw.ds#
Thanks. Now that I see it, it makes sense. I'll look into one.
__________________
I'm not one for fawning over bicycles, but I do believe that our bikes communicate with us, and what this bike is saying is, "You're an idiot." BikeSnobNYC
I'm not one for fawning over bicycles, but I do believe that our bikes communicate with us, and what this bike is saying is, "You're an idiot." BikeSnobNYC
Last edited by Cynikal; 11-24-20 at 11:38 AM. Reason: fat fingers
 11-25-20, 07:16 AM
#20
Senior Member
Join Date: Dec 2019
Posts: 953
Mentioned: 3 Post(s)
Tagged: 0 Thread(s)
Quoted: 321 Post(s)
Liked 261 Times
in
212 Posts
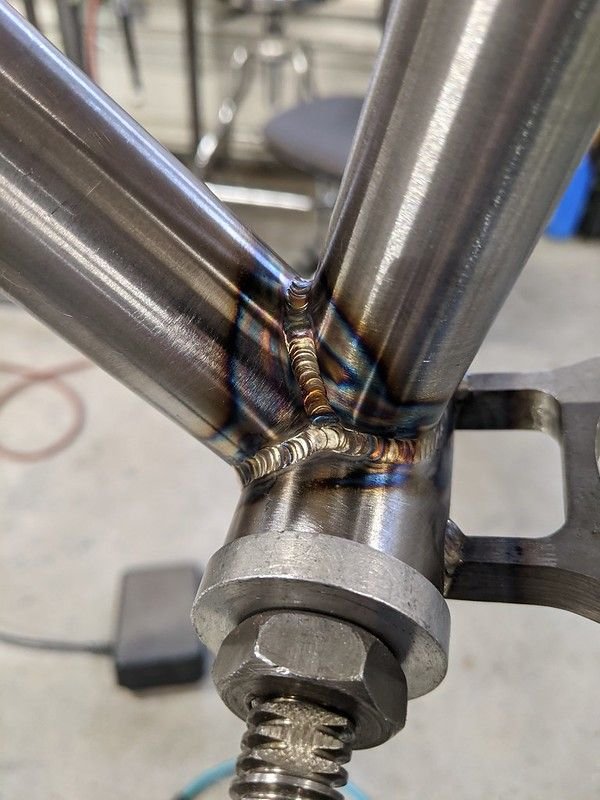
Trapping Argon around the bottom of the DT to HT junction. The angle here is tighter than it looks in the picture. With the foil there and a few seconds of "pre-flow" (actually achieved by arcing off the foil very briefly and waiting for the post-flow as my machine doesn't have a pre-flow) the region fills up with enough gas to mean you can take some big liberties with the amount of stickout. It also helps to put foil in the end of the HT because splitting the flow of Argon on an edge like that always seems to cause problems. This is probably the second hardest part of the frame to reach after the CS to BB junction which also always needs foil

11-26-20, 03:44 AM
#21
blahblahblah chrome moly

Join Date: Apr 2009
Location: Seattle
Posts: 1,984
Mentioned: 92 Post(s)
Tagged: 0 Thread(s)
Quoted: 1172 Post(s)
Liked 2,566 Times
in
1,072 Posts
Do you use a gas lens? If no, have you tried one and decided against it? I couldn't imagine going back after using one.
It's a must with Ti, but pretty useful for steel too. I welded more Ti than steel, and only really welded steel frames after I was already doing Ti, so I just used the same torch and the same gas lens for steel, and I liked it. I'd recommend the "large" lens and big cup to match, then you can get away with shocking amounts of stickout.
For those who don't know, a gas lens makes the argon flow laminar, which means no turbulence. The turbulence you get without a lens sucks in air from the surroundings. This video from Miller shows it pretty well:
Notice how the length of the laminar flow region gets shorter as the gas flow (cfh) goes up, which can be counter-intuitive. So if you're getting air coloring your weld, it can help to turn the argon flow down. Note also how the length of the laminar flow region goes up as the cup size (diameter and length) go up, so try the biggest cup you think you can fit in there..
Even with the lens, there were still places where I'd build a foil dam for Ti, but under the DT/HT joint wasn't one of them. The lens seemed adequate to me for that spot, even with Ti. I also welded with a plug ("heat sink") in the end of the HT, but that was more for back-purging, not really a heat-sink per se. Same as with the gas lens, I started doing that plug and back-purge thing for Ti, and just kept doing it the same way for steel because I liked the results.
Past-tense because I haven't welded a bike in over 20 years, so my advice is old and maybe obsolete.
Mark B in Seattle
It's a must with Ti, but pretty useful for steel too. I welded more Ti than steel, and only really welded steel frames after I was already doing Ti, so I just used the same torch and the same gas lens for steel, and I liked it. I'd recommend the "large" lens and big cup to match, then you can get away with shocking amounts of stickout.
For those who don't know, a gas lens makes the argon flow laminar, which means no turbulence. The turbulence you get without a lens sucks in air from the surroundings. This video from Miller shows it pretty well:
Even with the lens, there were still places where I'd build a foil dam for Ti, but under the DT/HT joint wasn't one of them. The lens seemed adequate to me for that spot, even with Ti. I also welded with a plug ("heat sink") in the end of the HT, but that was more for back-purging, not really a heat-sink per se. Same as with the gas lens, I started doing that plug and back-purge thing for Ti, and just kept doing it the same way for steel because I liked the results.
Past-tense because I haven't welded a bike in over 20 years, so my advice is old and maybe obsolete.
Mark B in Seattle
11-26-20, 04:15 AM
#22
Senior Member
Join Date: Dec 2019
Posts: 953
Mentioned: 3 Post(s)
Tagged: 0 Thread(s)
Quoted: 321 Post(s)
Liked 261 Times
in
212 Posts
Do you use a gas lens? If no, have you tried one and decided against it? I couldn't imagine going back after using one.
It's a must with Ti, but pretty useful for steel too. I welded more Ti than steel, and only really welded steel frames after I was already doing Ti, so I just used the same torch and the same gas lens for steel, and I liked it. I'd recommend the "large" lens and big cup to match, then you can get away with shocking amounts of stickout.
For those who don't know, a gas lens makes the argon flow laminar, which means no turbulence. The turbulence you get without a lens sucks in air from the surroundings. This video from Miller shows it pretty well: https://youtu.be/hGasy7wnALA Notice how the length of the laminar flow region gets shorter as the gas flow (cfh) goes up, which can be counter-intuitive. So if you're getting air coloring your weld, it can help to turn the argon flow down. Note also how the length of the laminar flow region goes up as the cup size (diameter and length) go up, so try the biggest cup you think you can fit in there..
Even with the lens, there were still places where I'd build a foil dam for Ti, but under the DT/HT joint wasn't one of them. The lens seemed adequate to me for that spot, even with Ti. I also welded with a plug ("heat sink") in the end of the HT, but that was more for back-purging, not really a heat-sink per se. Same as with the gas lens, I started doing that plug and back-purge thing for Ti, and just kept doing it the same way for steel because I liked the results.
Past-tense because I haven't welded a bike in over 20 years, so my advice is old and maybe obsolete.
Mark B in Seattle
I used the foil in three places: bottom of DT/HT, where the ST joins the DT, and CS to BB shell. ST/DT I probably could have got away without it and possibly DT/HT as well but I dunno... it was quite a lot of stickout. Never tried backpurging as not attempted stainless or Ti, but I know some people do use it for CrMo as well.
How did you manage the back of the SS to ST on a road-style frame with a horizontal TT and quite a long ST with is about 30mm diameter at the top? That's like a 57 degree angle and with the two stays very close together. I've found it's basically impossible to reach inside there, but I can TIG braze it. I make a bigger fillet that's sort of bridging across a bit (which means I can reach it) and then I can zap the fillet with the torch and it kind of falls in. Actually seems to work quite well.
11-27-20, 05:52 AM
#23
Senior Member
Join Date: Jan 2013
Location: South Jersey
Posts: 2,261
Mentioned: 18 Post(s)
Tagged: 0 Thread(s)
Quoted: 713 Post(s)
Liked 796 Times
in
473 Posts
I am using a gas lens with a No 8 cup, and about 10lpm which is about 20cfh, but I go to 12lpm if I'm in one of these tricky spots with extra stickout needed. I've tried a much bigger cup with more stickout but I found the big cup gets in the way and you need even more stickout... so kind of a vicious circle. Maybe my big cup is too big. You also always need some pre-flow with that setup because there's such a big space you're trying to fill up with gas.
I used the foil in three places: bottom of DT/HT, where the ST joins the DT, and CS to BB shell. ST/DT I probably could have got away without it and possibly DT/HT as well but I dunno... it was quite a lot of stickout. Never tried backpurging as not attempted stainless or Ti, but I know some people do use it for CrMo as well.
How did you manage the back of the SS to ST on a road-style frame with a horizontal TT and quite a long ST with is about 30mm diameter at the top? That's like a 57 degree angle and with the two stays very close together. I've found it's basically impossible to reach inside there, but I can TIG braze it. I make a bigger fillet that's sort of bridging across a bit (which means I can reach it) and then I can zap the fillet with the torch and it kind of falls in. Actually seems to work quite well.
Likes For dsaul:
11-27-20, 06:01 AM
#24
Senior Member
Join Date: Dec 2019
Posts: 953
Mentioned: 3 Post(s)
Tagged: 0 Thread(s)
Quoted: 321 Post(s)
Liked 261 Times
in
212 Posts
That's a very nice looking weld in one of the hardest spots. I have a bit of work before I reach your level but I'm still improving and I'm really pleased with how the frame I'm working on has turned out so far. I don't know if I'm really running exactly 20CFH because I use the regulator that comes on the Albee gas cylinders which is fairly approximate. Obviously any fireworks are considered harmful.
Getting a really nice consistent looking weld like that starts with good fit-up.
Getting a really nice consistent looking weld like that starts with good fit-up.
11-28-20, 11:42 AM
#25
Junior Member
Thread Starter
Join Date: Nov 2020
Posts: 17
Mentioned: 0 Post(s)
Tagged: 0 Thread(s)
Quoted: 7 Post(s)
Likes: 0
Liked 3 Times
in
3 Posts
I bigger cup allows for a longer stick out, which is awesome for getting into those acute angle joints. I've made a few rocket stoves recently out of stainless and a #12 furick was the only way to get in there without AL dams. I'll have to check out the jazzy 10 sometime.

