


Restoring an early 70s Raleigh Super Course
 09-09-19, 07:16 AM
#1
Member
Thread Starter
Join Date: Sep 2019
Posts: 48
Mentioned: 1 Post(s)
Tagged: 0 Thread(s)
Quoted: 31 Post(s)
Likes: 0
Liked 3 Times
in
3 Posts
Restoring an early 70s Raleigh Super Course
My father has a early 70s Super Course which has lots of sentimental value to him. He has mentioned several times that he would like to get the bike back in riding condition or even do a restoration. My mother and I have decided to surprise him by getting this done before Christmas this year. My biggest concern is with the condition of the paint, there is plenty of surface rust, so the finish will either have to be stabilized and left in it's current state or completely refinished. While my biggest concern is with the paint my biggest questions are about hardware.
The bike has Simplex shifters and derailleurs that are in terrible shape and will need to be replaced, I have read that these can be replaced with Raleigh branded Suntour units but I am not sure which ones are a direct fit.
The brakes are center pull Weinmann units and look to be in serviceable condition. The brake pads will obviously need to be replaced, is there a recommended brand pad that fits these better than others?
I removed the stem and fork over the weekend and in the process lost most of the bearing balls, can these be replaced with caged bearings or do the balls have to be loose in the race?
I have yet to remove any parts of the drive train and plan on getting some of that done this coming week, the chain rings look to be in good shape and will probably just need to be cleaned up, but the fasteners holding them together are rusted and one is missing. Does anyone know what size bolts are in the factory chain rings?
The rear gears are pretty rusty and I'm not sure if they can be saved. Are these a cassette or free wheel and is there a direct replacement for them? Also is a modern chain going to be compatible with the original drive train components or is it going to be better just to try and retrofit a full modern drive train to the bike?
Thanks in advance,
Ryan
 09-09-19, 07:44 AM
#2
Industry guy
Glenns Manual and Haynes Bicycle Mechanics books.
Use the correct tools, in correct sizes -1/4" will work, but 6mm is correct.
If you are riding it, the changes are warranted. If a show bike, you can accomplish that as well.
Careful working with Simplex (Delrin) plastic from this vintage - very brittle.
Lots of bicycle graveyards in metro areas to source parts.
Also, look up photos of your bicycle and use for guides.
09-09-19, 08:45 AM
#4

Senior Member
Join Date: May 2013
Location: Greenwood SC USA
Posts: 2,252
Bikes: 2002 Mercian Vincitore, 1982 Mercian Colorado, 1976 Puch Royal X, 1973 Raleigh Competition, 1971 Gitane Tour de France and others
Mentioned: 55 Post(s)
Tagged: 0 Thread(s)
Quoted: 823 Post(s)
Liked 1,395 Times
in
694 Posts
First, replacing the Simplex derailleurs with SunTour stuff was a routine repair/replacement/upgrade when the bike was new. The V-GT Luxe rear on a mounting claw and pretty much any SunTour front derailleur would be an improvement. If you can find some SunTour Power Ratchet downtube shifters, that would also be good. If you score a set of the same shifters in the handlebar end (barcon) variety, it's a major upgrade. And don't feel bad about the Simplex stuff breaking, it manages to do that all on its own.
100bikes mentioned Glenn's Complete Bicycle Manual, and that would be an excellent book for this. You might even get lucky and find a copy in your local library, you never can tell. If not, copies are cheap enough, and it's a very good and detailed book that would perfectly suit an early 70s Super Course.
Tires - Panaracer Pasela in 27 x 1 1/4 will work on the stock rims, but don't inflate to more than 70 psi. The tires are rated for more than that, but only on the later hooked-bead rims. On the other hand, those tires roll really, really smoothly at 70 psi or even less.
Cables - get some good stainless steel ones and use Teflon lined housings and you will be shocked by how well they work.
Brake Pads - Kool-Stop sells several different versions of salmon-colored replacement pads for Weinmann brake shoes. My personal preference would be the ones with the X cutouts rather than the dot type, but the dot type is more historically accurate.
The downside to refinishing is that even if repainted, the chrome will probably look tired. Search this forum for Evapo-Rust and Oxalic Acid methods and consider soaking and washing the frame to get rid of the rust. My preferred technique is to wrap the frame and fork in blue paper shop towels and tape them down, then liberally soak said towels with non-toxic Evapo-Rust, then wrap everything up tightly in plastic shrink wrap (either the funky mover's non-adhesive stuff or kitchen cling wrap) and let it sit overnight. It is amazing the difference it makes. I also use Evapo-Rust on chromed steel parts and it seems to work better than anything else.
Likes For rustystrings61:
09-09-19, 08:47 AM
#5
Half way there

Join Date: Sep 2015
Location: North Carolina
Posts: 2,955
Bikes: Many, and the list changes frequently
Mentioned: 5 Post(s)
Tagged: 0 Thread(s)
Quoted: 985 Post(s)
Liked 879 Times
in
526 Posts
I removed the stem and fork over the weekend and in the process lost most of the bearing balls, can these be replaced with caged bearings or do the balls have to be loose in the race?
The rear gears are pretty rusty and I'm not sure if they can be saved. Are these a cassette or free wheel and is there a direct replacement for them? Also is a modern chain going to be compatible with the original drive train components or is it going to be better just to try and retrofit a full modern drive train to the bike?
Good luck on the restoration
09-09-19, 09:57 AM
#6
Friendship is Magic

Join Date: Nov 2010
Location: Sacramento, CA
Posts: 22,984
Bikes: old ones
Mentioned: 304 Post(s)
Tagged: 0 Thread(s)
Quoted: 26389 Post(s)
Liked 10,365 Times
in
7,197 Posts
My father has a early 70s Super Course which has lots of sentimental value to him. He has mentioned several times that he would like to get the bike back in riding condition or even do a restoration. My mother and I have decided to surprise him by getting this done before Christmas this year. My biggest concern is with the condition of the paint, there is plenty of surface rust, so the finish will either have to be stabilized and left in it's current state or completely refinished. While my biggest concern is with the paint
I have yet to remove any parts of the drive train and plan on getting some of that done this coming week, the chain rings look to be in good shape and will probably just need to be cleaned up, but the fasteners holding them together are rusted and one is missing. Does anyone know what size bolts are in the factory chain rings?
The rear gears are pretty rusty and I'm not sure if they can be saved. Are these a cassette or free wheel and is there a direct replacement for them? Also is a modern chain going to be compatible with the original drive train components or is it going to be better just to try and retrofit a full modern drive train to the bike?
Once you have the whole thing apart, start putting photos in your thread. You'll get more accurate information, and it's easier to respond. The headset and fork threading are most probably Raleigh proprietary threading (most of these were.) As is most probably the BB and spindle cup threading. They did vary some (depending on where made), and many of them have been modified over the years. Without some pictures it's very hard to give specifics other than to try very hard not to **** up the headset and BB threading as you disassemble it.
 09-09-19, 10:06 AM
#7
Junior Member
You say "early 70s" Super Course (SC). The specs for these change toward the later 70s, so rehab/ replace/ upgrade has numerous options and quite a timeline. A good resource to correctly date and spec your Super Course would be the "Headbadge" website. I believe the site owner is a bike forums member. Based on your description, I think the Super Course is 1973. Photo and Specs are here and here.
An upgrade to SunTour derailleurs is a solid bet and what was spec'd on the later 70s Super Courses, but some of the early 70s SCs had Huret Challenger derailleurs which aged a bit better and were more robust than the delrin components in Simplex derailleurs. Just an option to consider.
If your Dad's Super Course is the one in the links above, then you may also have cottered steel cranks. Evapo-rust does wonderful things for old steel bike parts and may clean up those crank bolts quite well (and the chain rings and cranks too if you soak the whole thing). If you want to stay faithful to the original, you could give that a go. Instructions for making a cotter pin press to extract the cotter pins is available online. The necessary lighting hanger c-clamp that serves as the starting point for the press is about $7 and you can buy it online or from a local supplier. The grinder for modifying the clamp may be a barrier. I've made one and it did get the cotters out.
An upgrade to an alloy crankset and modern cartridge bottom bracket may shave a couple pounds off the bike (and Dad could go faster). Period "correct" cranksets are readily available via eBay.
09-09-19, 10:17 AM
#8
Friendship is Magic
Join Date: Nov 2010
Location: Sacramento, CA
Posts: 22,984
Bikes: old ones
Mentioned: 304 Post(s)
Tagged: 0 Thread(s)
Quoted: 26389 Post(s)
Liked 10,365 Times
in
7,197 Posts
....this is probably the most useful thing I can tell you:
When taking apart a bike this old and with rust issues, mix up 50/50 automatic trans fluid and acetone in a small squeeze bottle that is made from acetone proof plastic. Apply it liberally to all thread interfaces five or ten minutes before you try to take that section apart. You're welcome.
When taking apart a bike this old and with rust issues, mix up 50/50 automatic trans fluid and acetone in a small squeeze bottle that is made from acetone proof plastic. Apply it liberally to all thread interfaces five or ten minutes before you try to take that section apart. You're welcome.
09-09-19, 10:37 AM
#10
aka Tom Reingold

Join Date: Jan 2009
Location: New York, NY, and High Falls, NY, USA
Posts: 40,498
Bikes: 1962 Rudge Sports, 1971 Raleigh Super Course, 1971 Raleigh Pro Track, 1974 Raleigh International, 1975 Viscount Fixie, 1982 McLean, 1996 Lemond (Ti), 2002 Burley Zydeco tandem
Mentioned: 511 Post(s)
Tagged: 0 Thread(s)
Quoted: 7346 Post(s)
Liked 2,452 Times
in
1,430 Posts
See if you can feel him out about how he would feel about an update rather than a period-correct restoration. I have modern components on my 1973 Super Course, and I love it that way. It's a great bike to start from because the frame offers such a good ride, but it did not come with nice components. It's like a painter's canvass more than a masterpiece.
__________________
Tom Reingold, tom@noglider.com
New York City and High Falls, NY
Blogs: The Experienced Cyclist; noglider's ride blog
�When man invented the bicycle he reached the peak of his attainments.� � Elizabeth West, US author
Please email me rather than PM'ing me. Thanks.
Tom Reingold, tom@noglider.com
New York City and High Falls, NY
Blogs: The Experienced Cyclist; noglider's ride blog
�When man invented the bicycle he reached the peak of his attainments.� � Elizabeth West, US author
Please email me rather than PM'ing me. Thanks.
Likes For noglider:
09-10-19, 04:03 AM
#12
Member
Thread Starter
Join Date: Sep 2019
Posts: 48
Mentioned: 1 Post(s)
Tagged: 0 Thread(s)
Quoted: 31 Post(s)
Likes: 0
Liked 3 Times
in
3 Posts
Here's a quick update on the bike. The bike has Stronglight cranks with cotter pins, tried to get them out with a c-clamp and a socket, no luck will try a bigger c-clamp later this week. The serial number on the bike is 284676.
09-10-19, 04:18 AM
#13
Member
The serial number tags it as a 1972 model.
Raleigh Serial Numbers & Charts
Possibly useful information, if you need to track down original parts - and it's cool to know in any event.
Raleigh Serial Numbers & Charts
Possibly useful information, if you need to track down original parts - and it's cool to know in any event.
09-10-19, 06:20 AM
#14
Semper Fi
Join Date: Jan 2008
Posts: 12,942
Mentioned: 89 Post(s)
Tagged: 0 Thread(s)
Quoted: 1172 Post(s)
Liked 358 Times
in
241 Posts
If you haven't already visited this thread "Show Us Your Super Course", take a few minutes to scan through it, or take a while and enjoy all of the great member Super Course pictured in it. I enjoyed my 79 Super Course greatly, wish I had kept it, and its International stable mate, to this day.
Oh, welcome to the C&V forum also, welcome aboard @Carvingtr.
Bill
Oh, welcome to the C&V forum also, welcome aboard @Carvingtr.
Bill
__________________
Semper Fi, USMC, 1975-1977
I Can Do All Things Through Him, Who Gives Me Strength. Philippians 4:13
Semper Fi, USMC, 1975-1977
I Can Do All Things Through Him, Who Gives Me Strength. Philippians 4:13
09-10-19, 06:41 AM
#15
Senior Member
Join Date: Oct 2006
Location: Dallas / Ft Worth
Posts: 1,161
Mentioned: 19 Post(s)
Tagged: 0 Thread(s)
Quoted: 213 Post(s)
Liked 1,494 Times
in
408 Posts
You didn't mention your Dad's age group but I found in my 60's a taller stem really helped me achieve a more comfortable riding position.
Also I have become a fan of wide platform pedals since I'm not pedaling anywhere all that fast anymore.
I'm more about the comfort these days.
One final note: on some bikes for more moderate cruising I've found upright bars like a Nitto Albatross or similar have been just the ticket and I love the position of thumb shifters on such bars. Another comfort bonus in my view.
May your project be a great success.
Please post pics when you can.
09-10-19, 07:56 AM
#16
Member
Thread Starter
Join Date: Sep 2019
Posts: 48
Mentioned: 1 Post(s)
Tagged: 0 Thread(s)
Quoted: 31 Post(s)
Likes: 0
Liked 3 Times
in
3 Posts
You didn't mention your Dad's age group but I found in my 60's a taller stem really helped me achieve a more comfortable riding position.
Also I have become a fan of wide platform pedals since I'm not pedaling anywhere all that fast anymore.
I'm more about the comfort these days.
One final note: on some bikes for more moderate cruising I've found upright bars like a Nitto Albatross or similar have been just the ticket and I love the position of thumb shifters on such bars. Another comfort bonus in my view.
May your project be a great success.
Please post pics when you can.
Also I have become a fan of wide platform pedals since I'm not pedaling anywhere all that fast anymore.
I'm more about the comfort these days.
One final note: on some bikes for more moderate cruising I've found upright bars like a Nitto Albatross or similar have been just the ticket and I love the position of thumb shifters on such bars. Another comfort bonus in my view.
May your project be a great success.
Please post pics when you can.
09-10-19, 08:25 AM
#17
Friendship is Magic
Join Date: Nov 2010
Location: Sacramento, CA
Posts: 22,984
Bikes: old ones
Mentioned: 304 Post(s)
Tagged: 0 Thread(s)
Quoted: 26389 Post(s)
Liked 10,365 Times
in
7,197 Posts
...if you have the fork and everything else off the frame except the cranks, you can usually maneuver the frame around enough to use a vise instead of a C clamp. Use a socket for the negative space in the same way as with the clamp, and use plenty of penetrating oil on the cotters, top and bottom. Keep the nut on the cotter, loose, to help preserve the threads as you push with the vise jaws.
09-10-19, 08:44 AM
#18
Friendship is Magic
Join Date: Nov 2010
Location: Sacramento, CA
Posts: 22,984
Bikes: old ones
Mentioned: 304 Post(s)
Tagged: 0 Thread(s)
Quoted: 26389 Post(s)
Liked 10,365 Times
in
7,197 Posts
.
....here is a link to a guy's '72 Super Course restoration, but he had good paint and chrome on the frame. Some of his parts choices might help you.
....here is a link to a guy's '72 Super Course restoration, but he had good paint and chrome on the frame. Some of his parts choices might help you.
09-10-19, 01:15 PM
#19
Used to be Conspiratemus
Join Date: Jan 2009
Location: Hamilton ON Canada
Posts: 1,512
Mentioned: 4 Post(s)
Tagged: 0 Thread(s)
Quoted: 297 Post(s)
Liked 245 Times
in
163 Posts
See if you can feel him out about how he would feel about an update rather than a period-correct restoration. I have modern components on my 1973 Super Course, and I love it that way. It's a great bike to start from because the frame offers such a good ride, but it did not come with nice components. It's like a painter's canvass more than a masterpiece.
 , especially since I used mine for a still-remembered epic first bike tour, too.
The OP says that one of the chain-ring crank bolts is missing -- there were only 3 to start with so something needs to be done. It's possible (I last looked at one over 40 yr ago!) that the missing bolt could be just a standard hardware hex-head short machine screw -- M6 or 1/4 x 20 or maybe one size bigger? The male part just screwed into the crank spider -- there was no separate specially made nut to have to find. If the threads in the empty hole are destroyed, could just drill out the hole and put any old nut and bolt in for safety.
Sheldon Brown has info on getting cotter pins out. Often a tough job, especially if you were hoping to re-use the cotter pins. Cotter pin removal was by far the biggest barrier to doing routine bike maintenance in a university dorm room. If it's just for riding on rail trails for old-time's sake, consider leaving the cranks on and just trickle oil into the gaps between the spindle and the two cups. If it spins OK and doesn't rattle, it could suffice. It'll leak oil so make sure your mother approves whatever wall it might get hung on eventually.
When I had my replacement cotterless crank set installed, the shop had no trouble installing the new bottom bracket, so almost certainly the shell threads are standard English, not Raleigh proprietary.
09-10-19, 07:44 PM
#20
Senior Member
Join Date: Apr 2017
Location: Los Angeles, CA
Posts: 2,249
Bikes: 1964 Legnano Roma Olympiade, 1973 Raleigh Super Course, 1978 Raleigh Super Course, 1978 Peugeot PR10, 2002 Specialized Allez, 2007 Specialized Roubaix, 2013 Culprit Croz Blade
Mentioned: 68 Post(s)
Tagged: 0 Thread(s)
Quoted: 741 Post(s)
Liked 818 Times
in
421 Posts
I've built two Super Courses from pretty much bare frames a '73 and a '78. The dark green '73 was my first ever bike build, starting from a very rough frame. Lurking on BF was a great help in figuring out what components to use. A friend gave me a nice set of 700c wheels, and I decided, as stated in above posts, to go with Suntour drivetrain, a GT Luxe rear, and a Cyclone II front, Suntour bar end shifters, and a Sugino triple crank, because I already had the BB. The freewheel is a Shimano 6 speed 34t Megarange. It's a great combination. I overspent on the paint, but I'm thrilled by how it turned out. I ended up with more invested than the bike is worth, but it's worth every $$$ to me. To save money, I would go with powder coat next time, also it may be more durable. The gold '78 was in better shape paint wise (only slightly), and came with a few more components than the '73. I went with an identical drive train except the '78 has a SR Apex double crank. Both bikes have KMC 7 speed chains. I have stock type Weinmann pads on the '78, and Koolstop dual compound in modern Shimano type holders on the '73, since it was my Eroica ride last year. These are great riding bikes, good luck with yours!
 My green repainted '73 with Pasela 28s.
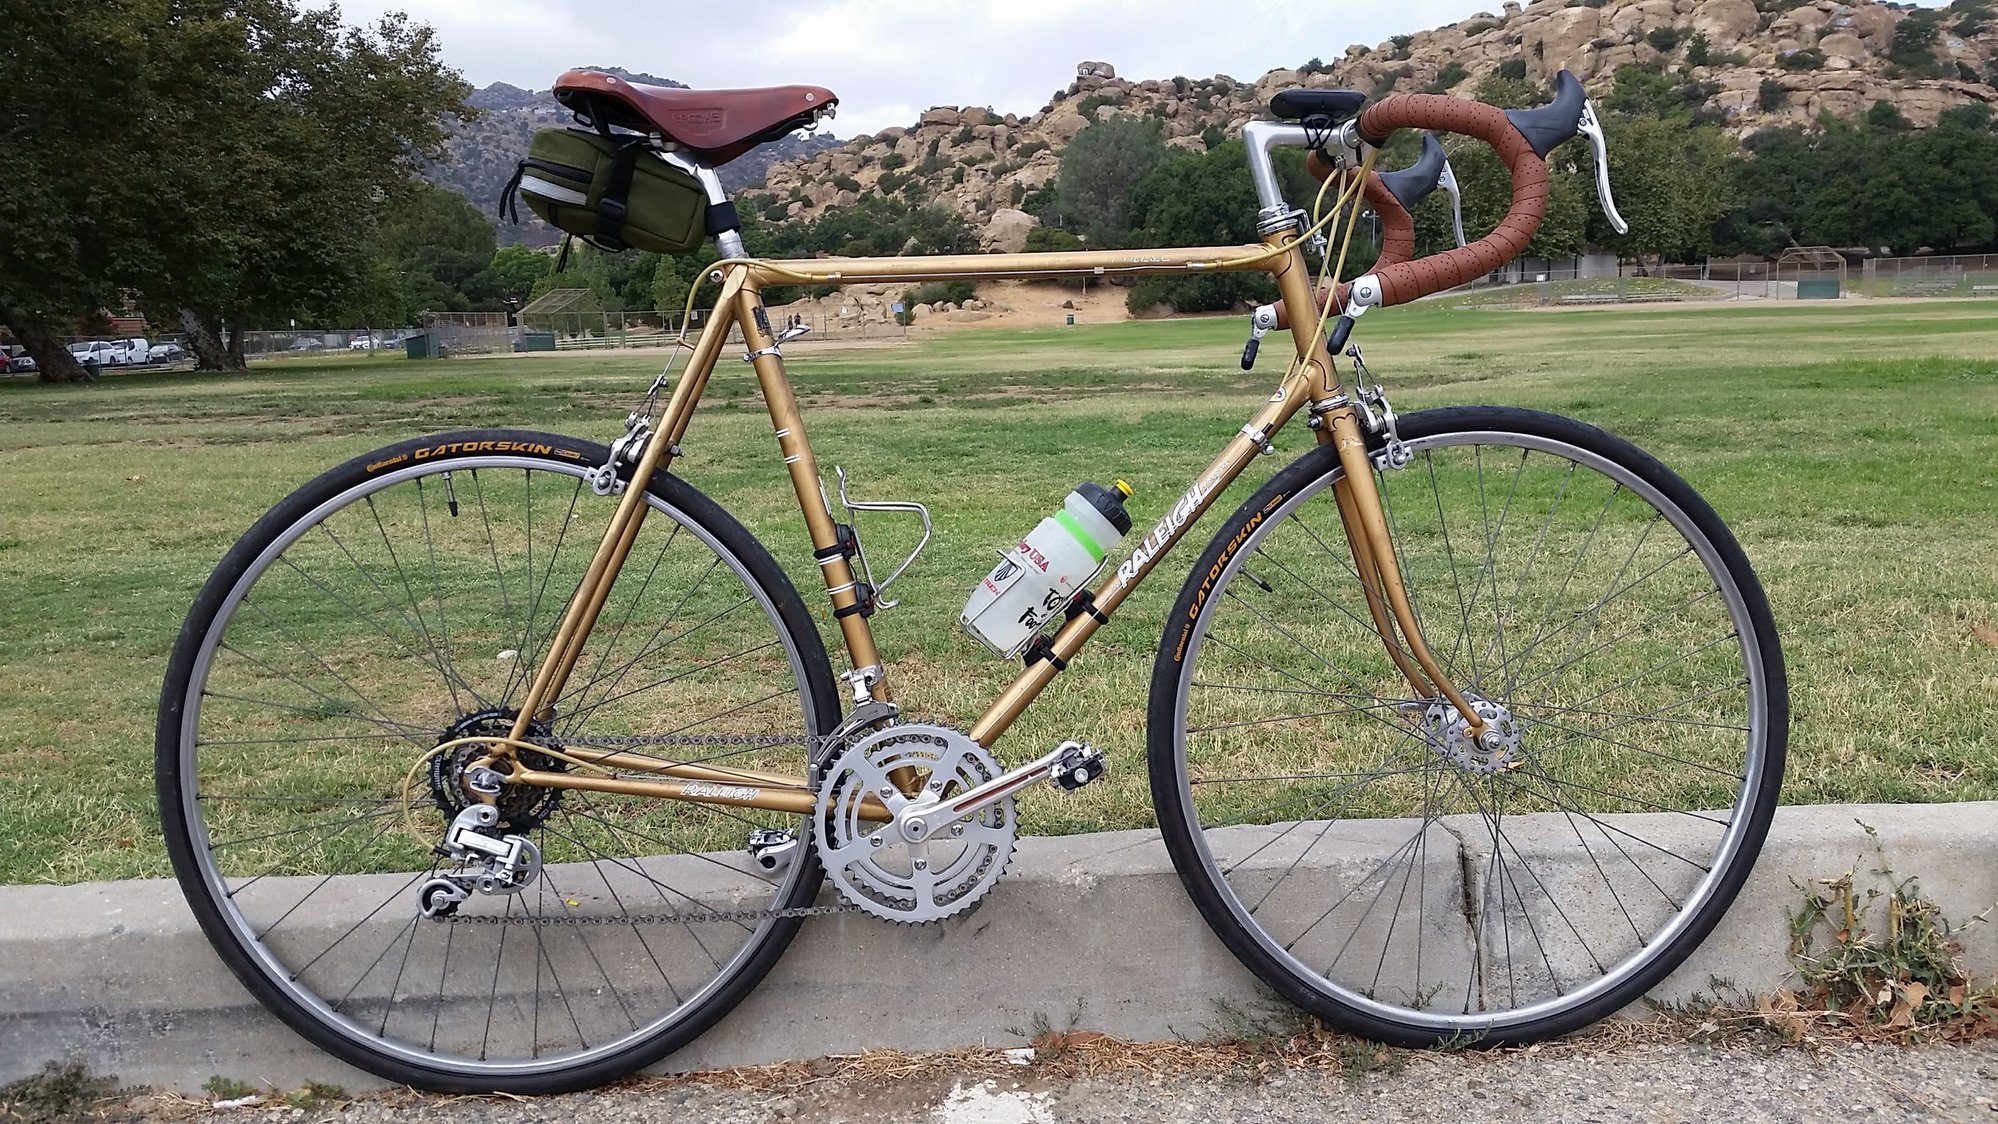
Original paint, decals and "patina" 'on the 78, with 700c x 28 Gatorskins. I may try to touch up the paint, and do new decals, or even try powercoat. Right now, I'm just enjoying the ride.
My green repainted '73 with Pasela 28s.Original paint, decals and "patina" 'on the 78, with 700c x 28 Gatorskins. I may try to touch up the paint, and do new decals, or even try powercoat. Right now, I'm just enjoying the ride.
Last edited by Slightspeed; 09-10-19 at 08:07 PM.
Likes For Slightspeed:
09-10-19, 10:06 PM
#21
Ride, Wrench, Swap, Race

Join Date: Jan 2010
Location: Northern California
Posts: 9,181
Bikes: Cheltenham-Pedersen racer, Boulder F/S Paris-Roubaix, Varsity racer, '52 Christophe, '62 Continental, '92 Merckx, '75 Limongi, '76 Presto, '72 Gitane SC, '71 Schwinn SS, etc.
Mentioned: 132 Post(s)
Tagged: 0 Thread(s)
Quoted: 1562 Post(s)
Liked 1,287 Times
in
858 Posts
Repeating what conspiratemus1 says, the bottom bracket should be normal English-threaded.
As for removing and installing the precious original hardened crank cotters!:
It will likely take heat to remove the precious cotters without smooshing or bending the threaded ends. Most home mechanics ruin them, beware!
I use a propane torch on the big knuckle of the arm, heated until some oil smoke issues from the assembly when you remove the torch.
Then either a press or a hammer, used judiciously, should allow the cotters to come out damage-free.
Do not damage these cotters, you can't buy decent new ones any more!!!
Upon re-installation, first get the cotters in their correct crankarm, i.e. make sure that both cotters slide freely through their mating arm. If one hangs up, try it in the other arm. Tolerances on these parts was I believe somewhat of a selection-fit process or so it seems.
Then be sure that the two cotters point in opposite directions before driving them in, otherwise the cranks won't be quite 180-degrees apart!
Alternate between hammer blows to the head of the cotter and wrench-tightening of the nut. Repeat until the nut no longer wants to turn.
Definitely use 11 good GR25 1/4" ball bearings per side and install the fixed cup with grease and prodigious torque around 30 Ft.-lbs.
All this because I do feel that the original crankset is worth saving.
Last edited by dddd; 09-10-19 at 10:12 PM.
09-11-19, 04:08 AM
#22
Member
Thread Starter
Join Date: Sep 2019
Posts: 48
Mentioned: 1 Post(s)
Tagged: 0 Thread(s)
Quoted: 31 Post(s)
Likes: 0
Liked 3 Times
in
3 Posts
I purchased a Suntour V Luxe derailleur set and a set of power ratchet shifters yesterday. Price was pretty low so if something doesn't work our it's not a huge loss.
09-11-19, 04:29 AM
#23
Member
Thread Starter
Join Date: Sep 2019
Posts: 48
Mentioned: 1 Post(s)
Tagged: 0 Thread(s)
Quoted: 31 Post(s)
Likes: 0
Liked 3 Times
in
3 Posts
Repeating what conspiratemus1 says, the bottom bracket should be normal English-threaded.
As for removing and installing the precious original hardened crank cotters!:
It will likely take heat to remove the precious cotters without smooshing or bending the threaded ends. Most home mechanics ruin them, beware!
I use a propane torch on the big knuckle of the arm, heated until some oil smoke issues from the assembly when you remove the torch.
Then either a press or a hammer, used judiciously, should allow the cotters to come out damage-free.
Do not damage these cotters, you can't buy decent new ones any more!!!
Upon re-installation, first get the cotters in their correct crankarm, i.e. make sure that both cotters slide freely through their mating arm. If one hangs up, try it in the other arm. Tolerances on these parts was I believe somewhat of a selection-fit process or so it seems.
Then be sure that the two cotters point in opposite directions before driving them in, otherwise the cranks won't be quite 180-degrees apart!
Alternate between hammer blows to the head of the cotter and wrench-tightening of the nut. Repeat until the nut no longer wants to turn.
Definitely use 11 good GR25 1/4" ball bearings per side and install the fixed cup with grease and prodigious torque around 30 Ft.-lbs.
All this because I do feel that the original crankset is worth saving.
As for removing and installing the precious original hardened crank cotters!:
It will likely take heat to remove the precious cotters without smooshing or bending the threaded ends. Most home mechanics ruin them, beware!
I use a propane torch on the big knuckle of the arm, heated until some oil smoke issues from the assembly when you remove the torch.
Then either a press or a hammer, used judiciously, should allow the cotters to come out damage-free.
Do not damage these cotters, you can't buy decent new ones any more!!!
Upon re-installation, first get the cotters in their correct crankarm, i.e. make sure that both cotters slide freely through their mating arm. If one hangs up, try it in the other arm. Tolerances on these parts was I believe somewhat of a selection-fit process or so it seems.
Then be sure that the two cotters point in opposite directions before driving them in, otherwise the cranks won't be quite 180-degrees apart!
Alternate between hammer blows to the head of the cotter and wrench-tightening of the nut. Repeat until the nut no longer wants to turn.
Definitely use 11 good GR25 1/4" ball bearings per side and install the fixed cup with grease and prodigious torque around 30 Ft.-lbs.
All this because I do feel that the original crankset is worth saving.
Unfortunately I have probably already ruined the cotters, I followed the advice on Sheldon Brown's website and have bent the threaded ends attempting to press them out. If what you say about good ones not being available anymore then I'll just buy a Stronglight cotterless crank and rock on.
09-11-19, 08:07 AM
#24
Member
Thread Starter
Join Date: Sep 2019
Posts: 48
Mentioned: 1 Post(s)
Tagged: 0 Thread(s)
Quoted: 31 Post(s)
Likes: 0
Liked 3 Times
in
3 Posts
I've built two Super Courses from pretty much bare frames a '73 and a '78. The dark green '73 was my first ever bike build, starting from a very rough frame. Lurking on BF was a great help in figuring out what components to use. A friend gave me a nice set of 700c wheels, and I decided, as stated in above posts, to go with Suntour drivetrain, a GT Luxe rear, and a Cyclone II front, Suntour bar end shifters, and a Sugino triple crank, because I already had the BB. The freewheel is a Shimano 6 speed 34t Megarange. It's a great combination. I overspent on the paint, but I'm thrilled by how it turned out. I ended up with more invested than the bike is worth, but it's worth every $$$ to me. To save money, I would go with powder coat next time, also it may be more durable. The gold '78 was in better shape paint wise (only slightly), and came with a few more components than the '73. I went with an identical drive train except the '78 has a SR Apex double crank. Both bikes have KMC 7 speed chains. I have stock type Weinmann pads on the '78, and Koolstop dual compound in modern Shimano type holders on the '73, since it was my Eroica ride last year. These are great riding bikes, good luck with yours!
09-11-19, 08:45 AM
#25
Friendship is Magic
Join Date: Nov 2010
Location: Sacramento, CA
Posts: 22,984
Bikes: old ones
Mentioned: 304 Post(s)
Tagged: 0 Thread(s)
Quoted: 26389 Post(s)
Liked 10,365 Times
in
7,197 Posts
Regardless, they do exist in both versions. Otherwise you wouldn't hear all the stories about searching out the special spindles that have enough reach between the shoulders to do the conversion to cotterless cranks using that and the Raleigh original cups. It would be a snap to just buy a standard square taper BB unit that is wide enough for a MTB shell in standard threading and go from there.
Cottered Cranks=Raleigh 26 TPI Threading
In later years, higher-end Raleigh models such as the International, Professional, Competition, Grand Sport and other models built at the separate Carlton workshop used B.S.C. threading, as did models made in Asia and the United States. These bicycles all used cotterless cranks.
Generally speaking, Raleighs that use cottered cranks have Raleigh 26 TPI threading for both the bottom bracket and the headset. These include all Nottingham-built bicycles sold with a coaster brake or internal-gear hub, as well as lower-priced derailer-equipped models up through the Super Course, which had a frame of plain-gauge Reynolds 531 tubing. Although the diameters are the same as B.S.C., the different thread pitch makes the parts incompatible. This article will provide strategies for getting around this problem.https://sheldonbrown.com/raleigh26.html
If you're set on going to a square taper crank, and it turns out this has Raleigh threading, Velo Orange sells a "threadless" BB unit in square taper which some people here have used and re happy with. I can't say how good it is, because I've never used one of them.
Last edited by 3alarmer; 09-11-19 at 08:50 AM.