


Circa 1955 Phillips Step Through SA Dyno-Three Hubs with Working Lights! PHOTOS HEAVY
 02-06-15, 06:59 AM
#276

aka Tom Reingold

Join Date: Jan 2009
Location: New York, NY, and High Falls, NY, USA
Posts: 40,503
Bikes: 1962 Rudge Sports, 1971 Raleigh Super Course, 1971 Raleigh Pro Track, 1974 Raleigh International, 1975 Viscount Fixie, 1982 McLean, 1996 Lemond (Ti), 2002 Burley Zydeco tandem
Mentioned: 511 Post(s)
Tagged: 0 Thread(s)
Quoted: 7348 Post(s)
Liked 2,465 Times
in
1,433 Posts
I was taught in the 70's to grease the leather gasket, but that doesn't mean it's the best thing to do. Maybe using both is best. 
Using felt is clever. I wouldn't have thought of that.
Using felt is clever. I wouldn't have thought of that.
__________________
Tom Reingold, tom@noglider.com
New York City and High Falls, NY
Blogs: The Experienced Cyclist; noglider's ride blog
�When man invented the bicycle he reached the peak of his attainments.� � Elizabeth West, US author
Please email me rather than PM'ing me. Thanks.
Tom Reingold, tom@noglider.com
New York City and High Falls, NY
Blogs: The Experienced Cyclist; noglider's ride blog
�When man invented the bicycle he reached the peak of his attainments.� � Elizabeth West, US author
Please email me rather than PM'ing me. Thanks.
 02-06-15, 07:01 AM
#277
Senior Member
For a good description read "No Hands: The Rise and Fall of the Schwinn Bicycle Company, an American Institution" by Judith Crown. It's been ten years or so since I read it. Your library probably has a copy.
02-06-15, 11:26 AM
#278
Senior Member
Thread Starter

Yes, I decided to soak the leather plunger cup in motor oil! It's very dehydrated and will require massaging. After some lengthy research, I see that vintage Coleman lantern pumps use the leather cups. Anyway I'll post the updates.
In reality I have CO2 cartridges & a Lezyne mini pump.
In reality I have CO2 cartridges & a Lezyne mini pump.
02-06-15, 11:50 AM
#279
Senior Member
Those leather cup plungers can work amazingly well. I have a Silca floor pump probably from about 1990. It pumps like mad; fast and high. About ten years ago, it stopped working. I went in there and the leather cup was torn. Looked to be greased rather than oiled. So, I called Daniel Boone Bicycle in Houston, "can you order the parts for a Silca pump?" Reply, "No need, we have it in stock."
I'm curious to see if you get your pump working well enough to get the necessary pressure in a 26 1 3/8 tire. Also curious about your methods as to getting the pump to pump.
Are you using those Panaracer tires? I think they are more like 1 1/2. That's a lot of air with a frame pump. The Raleigh Sports bikes I bought last month each came with a pump and both will pump but I haven't tested to see how well or how much. The Black Widow is a firm member of the Save the Presta club, anyway, so I'm afraid to introduce anything Shrader within bite distance.
02-06-15, 11:52 PM
#280
Senior Member
Thread Starter
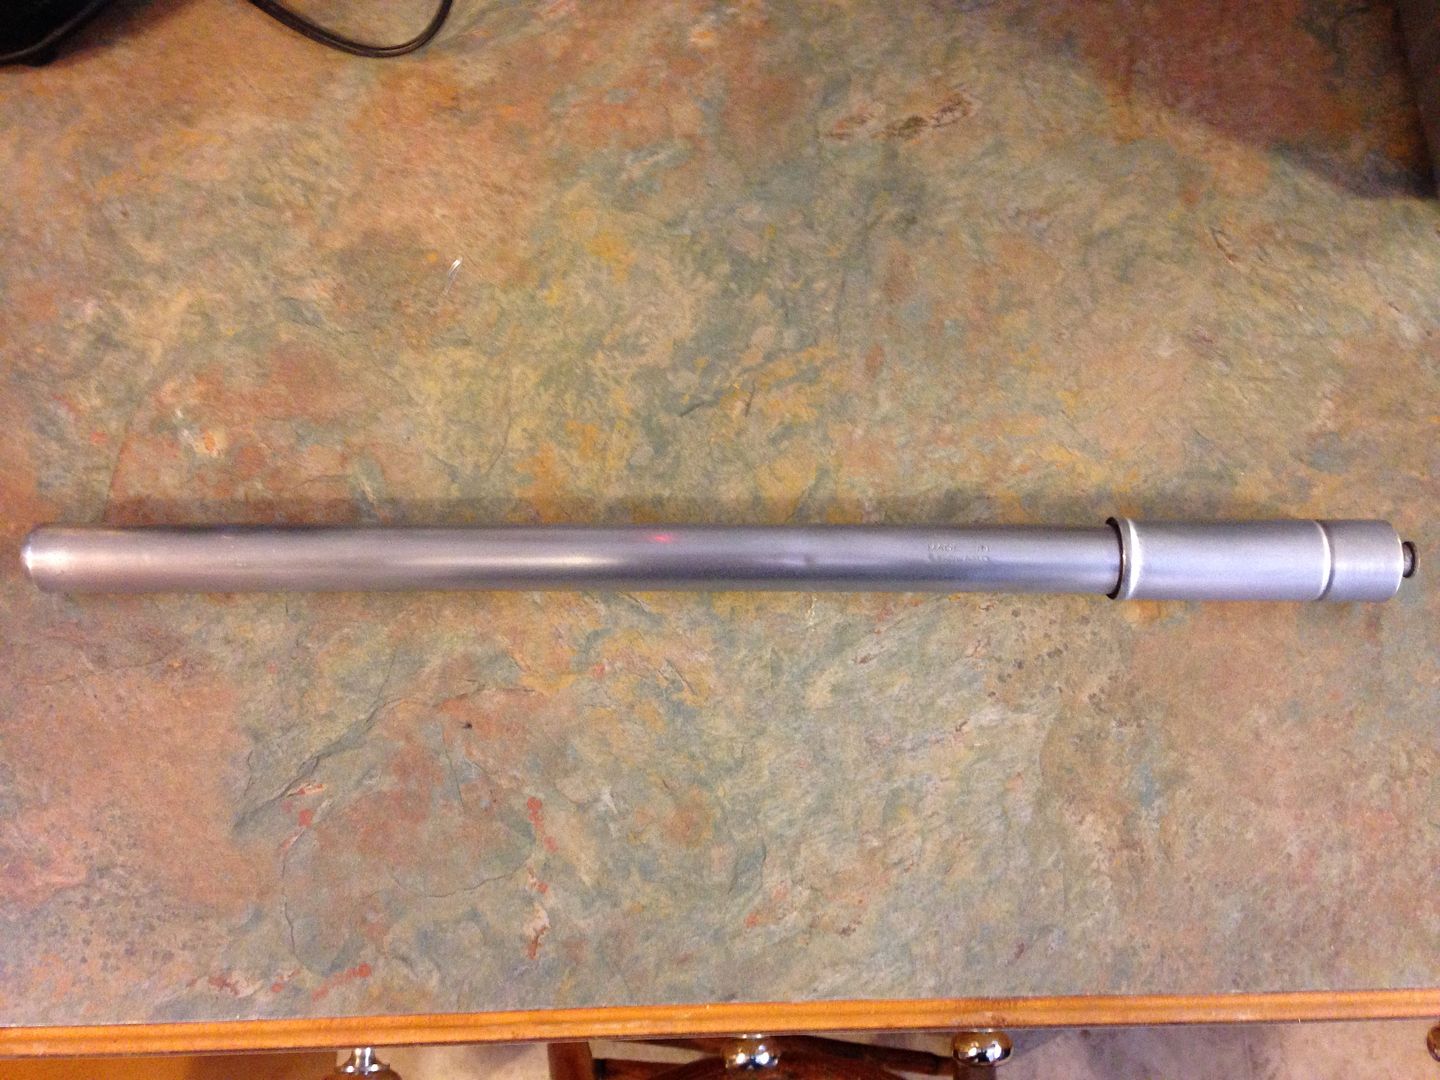
@desconhecido - I have a story to tell, but yes the pump is working. Haven't tried actually pumping up tires though. First I soaked current leather washer in motor oil for a few hours, massaged it. I installed and it worked. However....after going to a compressor store, a beer making supply place (they had larger leather cup washers), I ended up at Ollie & Damon's in Portland. They're a sporting goods repair place and happen to sell and repair Coleman lanterns. I know from my research that vintage Coleman lanterns use a leather cup washer for it's pump. Guess who sold me a coleman leather pump washer for $2.95? It's a 1" washer, but very pliable and it works like a CHARM! Here are a few photos (no, I still don't know how to imbed from flickr - so here's a link I guess:
https://www.flickr.com/photos/130319151@N06/.
Here are some photos not from flickr:


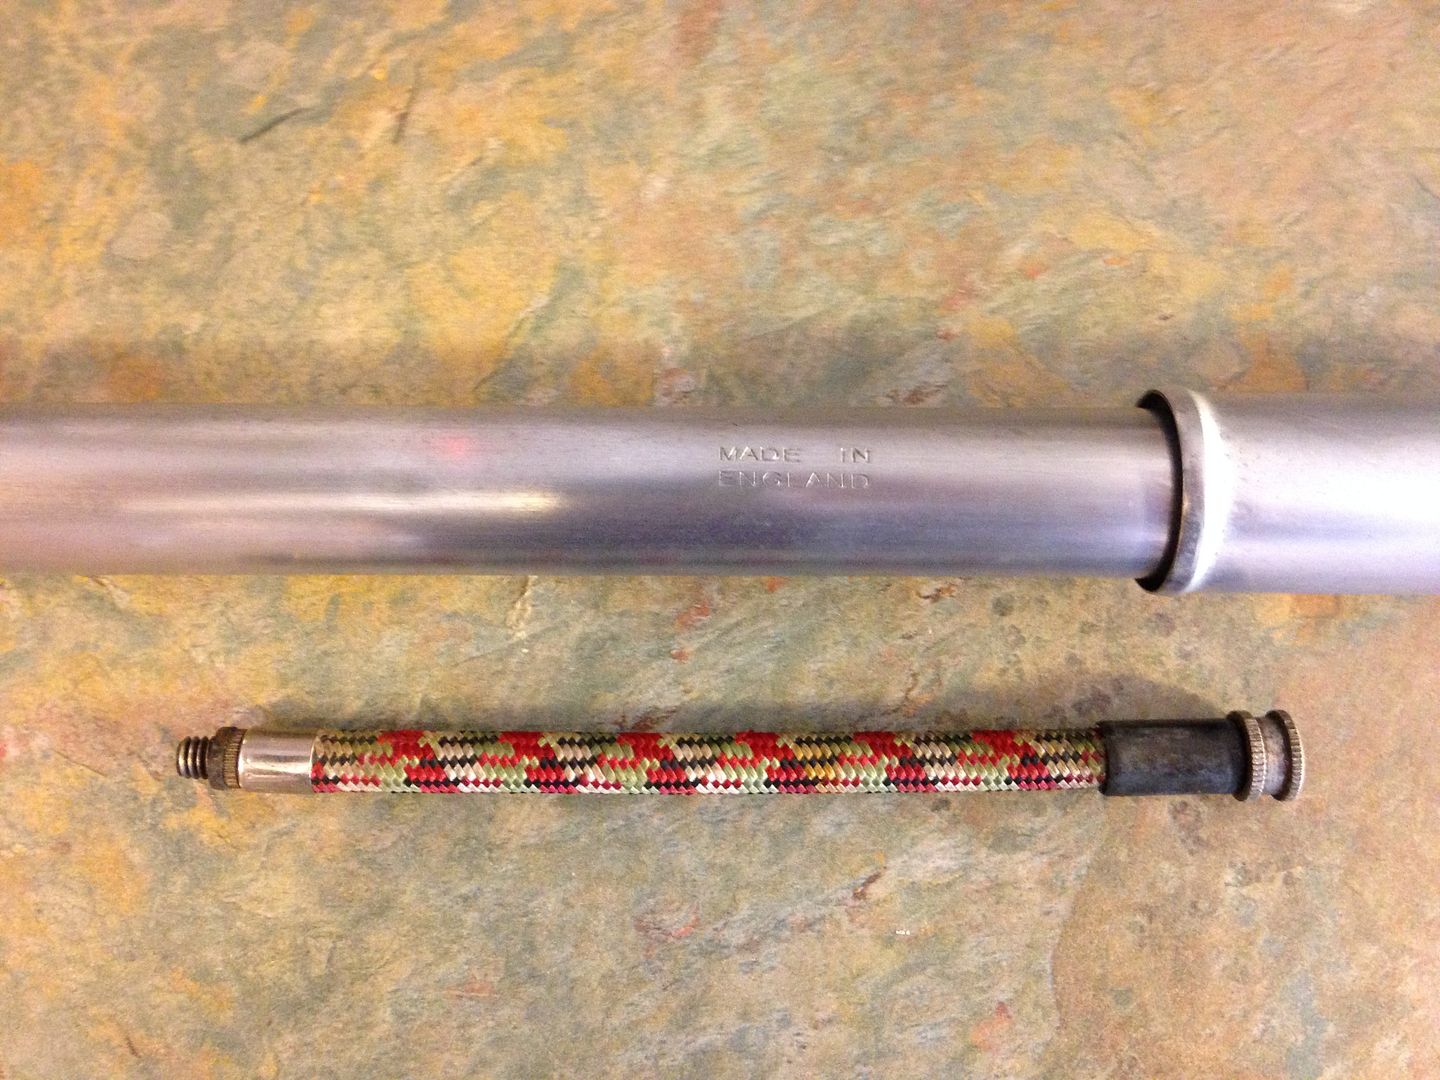
 Photo far left is dehydrated leather cup washer; new 1" Coleman lantern pump leather washer: side by side comparison after original soaked in oil.


 I scrubbed the pump with dawn & a scrubby sponge, then Mother's Mag, followed by a coat of wax. I could have gone all out with various grits of sandpaper, etc to make it look "new" but it's going on an old, faded bicycle, so I'm happy with it how it is.
 I don't have a "before" photo but the red/black threads were pulled away from the rubber hose and were frayed. I trimmed them, used a thin layer of rubber cement on the hose, then held it in place with painter's masking take (very little tackiness). Once dried I gently removed the tape and the threads are now securely stuck to the hose and the hose is still pliable/bendable.
I will likely do a thread on refurbishing old frame pumps. I've got some other resources I've found and someone else down the line might like the info. all in one place. I had to search all over the internet reading up on things.
I picked up my CR18 40 hole 26 x 1 3/8" rim, spokes & nipples. I've disassembled the rear wheel and cleaned the hub. Tomorrow I'll polish, wax then build the wheel. My first rear wheel but I'm fully confident that it will be fine.
Took my front wheel (my 1st wheel build) to the professional wheel builder who owns a shop here, and she said it was laced correctly, was true, but that the tensions were a tad low. She said that Park tensionometers are sometimes "off" even when new, and require recalibration. She told me what numbers to aim for knowing how far off mine was. I came home and spent the next couple of hours re-tensioning the front & truing. It looks great, it's true and numbers are good.
https://www.flickr.com/photos/130319151@N06/.
Here are some photos not from flickr:
I will likely do a thread on refurbishing old frame pumps. I've got some other resources I've found and someone else down the line might like the info. all in one place. I had to search all over the internet reading up on things.
I picked up my CR18 40 hole 26 x 1 3/8" rim, spokes & nipples. I've disassembled the rear wheel and cleaned the hub. Tomorrow I'll polish, wax then build the wheel. My first rear wheel but I'm fully confident that it will be fine.
Took my front wheel (my 1st wheel build) to the professional wheel builder who owns a shop here, and she said it was laced correctly, was true, but that the tensions were a tad low. She said that Park tensionometers are sometimes "off" even when new, and require recalibration. She told me what numbers to aim for knowing how far off mine was. I came home and spent the next couple of hours re-tensioning the front & truing. It looks great, it's true and numbers are good.
02-07-15, 12:24 PM
#281
Freewheel Medic

Join Date: Oct 2005
Location: An Island on the Coast of GA!
Posts: 12,882
Bikes: Snazzy* Schwinns, Classy Cannondales & a Super Pro Aero Lotus (* Ed.)
Mentioned: 140 Post(s)
Tagged: 0 Thread(s)
Quoted: 1452 Post(s)
Liked 2,195 Times
in
962 Posts
Very nice work on the pump!!! Well done!! I'm so happy I could pass it along to you and this worthy project! 
Did the folks at the Coleman repair center mention whether oil or grease was to be used on the leather washers. It would be good to clear up that mystery, especially since @noglider and I posted differing information.
Did the folks at the Coleman repair center mention whether oil or grease was to be used on the leather washers. It would be good to clear up that mystery, especially since @noglider and I posted differing information.
__________________
Bob
Enjoying the GA coast all year long!
Thanks for visiting my website: www.freewheelspa.com
Bob
Enjoying the GA coast all year long!
Thanks for visiting my website: www.freewheelspa.com
02-07-15, 01:12 PM
#282
Senior Member
Join Date: Jan 2007
Location: Ontario
Posts: 2,648
Mentioned: 16 Post(s)
Tagged: 0 Thread(s)
Quoted: 478 Post(s)
Liked 634 Times
in
336 Posts
@pastorbobnlnh: from the coleman website: Coleman - Care & Cleaning of Gear
"When it's time to take out your lantern, remember to oil the pump cup on the tank's pump plunger at least twice a year with a light machine oil. This allows the cup to seal against the inside of the pump barrel and insures the pump will work smoothly and push air into the tank properly."
Not sure if this applies to vintage ones but....
02-07-15, 02:56 PM
#283
Freewheel Medic
Join Date: Oct 2005
Location: An Island on the Coast of GA!
Posts: 12,882
Bikes: Snazzy* Schwinns, Classy Cannondales & a Super Pro Aero Lotus (* Ed.)
Mentioned: 140 Post(s)
Tagged: 0 Thread(s)
Quoted: 1452 Post(s)
Liked 2,195 Times
in
962 Posts
@pastorbobnlnh: from the coleman website: Coleman - Care & Cleaning of Gear
"When it's time to take out your lantern, remember to oil the pump cup on the tank's pump plunger at least twice a year with a light machine oil. This allows the cup to seal against the inside of the pump barrel and insures the pump will work smoothly and push air into the tank properly."
Not sure if this applies to vintage ones but....
"When it's time to take out your lantern, remember to oil the pump cup on the tank's pump plunger at least twice a year with a light machine oil. This allows the cup to seal against the inside of the pump barrel and insures the pump will work smoothly and push air into the tank properly."
Not sure if this applies to vintage ones but....
Inspired by @Velocivixen and her total restoration of this Phillips and the pump I sent her, I pulled out a pump I've been saving to mount on my '71 Paramount, and I went to work. I didn't bother to take any before pics. It has a rather bland inscription, but it does work after oiling.
Seems to retain the same sort of "freckles."

__________________
Bob
Enjoying the GA coast all year long!
Thanks for visiting my website: www.freewheelspa.com
Bob
Enjoying the GA coast all year long!
Thanks for visiting my website: www.freewheelspa.com
02-07-15, 06:26 PM
#284
Senior Member
Thread Starter
Very nice work on the pump!!! Well done!! I'm so happy I could pass it along to you and this worthy project!
Did the folks at the Coleman repair center mention whether oil or grease was to be used on the leather washers. It would be good to clear up that mystery, especially since @noglider and I posted differing information.
Did the folks at the Coleman repair center mention whether oil or grease was to be used on the leather washers. It would be good to clear up that mystery, especially since @noglider and I posted differing information.
02-08-15, 06:03 PM
#285
Senior Member
Thread Starter
Update: My new 26 x 1 3/8" wheel using CR18 rim is complete. I had a horrible time lacing because of the 3x on NDS & 4x on drive side. This is my second wheel build ever. The first one I followed Jobst Brandt's book's "recipe" and it was super easy. This wheel I got the first set of 4 in and I couldn't figure out where the first spoke of the second set went because 1. dynamo side is bigger-wider than smaller drive side, and 2. the cross being different on each side meant that when I did it his way it didn't work.
I decided to built the NDS with both sets of spokes so that would at least narrow down the number of holes I was dealing with on the drive side. I built up the drive side 3 different ways. On the 3rd try the spokes all fit well and I was so proud.....but then I noticed problems like every other rim hole did not have a spoke from alternating flanges. The crosses on both sides were correct though....so it HAD to be correct. Right? Wrong! I also had a narrow space around the valve hole.
Finally, my friend who is a bike mechanic & meticulous wheel builder came all the way over and figured out what went wrong. I won't bore you with details, but it all worked out & we fixed it. I'm fairly good at lateral/radial/dish/tension "dance" and that part went surprisingly easy. At 1:00 a.m. I had finished the wheel, reinstalled on the bike, put Kool Stop pads back on.
NOTE: for a newby's 2nd wheel build I do not recommend trying a wheel where the cross is different on both sides. Brandt's book did not have a section on this. The lacing on this took hours, and in the end, was still incorrect. Unless you have someone with you who is more experienced. New wheel builders, like myself, often just "follow the recipe" blindly. I did that on the front wheel and lacing it was a breeze. The classes at UBI & Sugar Wheel Works both teach students to insert all the spokes then lace as you go along vs Brand's way of 4 different "sets" of spokes.
Photos from Flickr:
 IMG_4887 by velocivixen, on Flickr
 IMG_4888 by velocivixen, on Flickr
 IMG_4884 by velocivixen, on Flickr
 IMG_4881 by velocivixen, on Flickr
I decided to built the NDS with both sets of spokes so that would at least narrow down the number of holes I was dealing with on the drive side. I built up the drive side 3 different ways. On the 3rd try the spokes all fit well and I was so proud.....but then I noticed problems like every other rim hole did not have a spoke from alternating flanges. The crosses on both sides were correct though....so it HAD to be correct. Right? Wrong! I also had a narrow space around the valve hole.
Finally, my friend who is a bike mechanic & meticulous wheel builder came all the way over and figured out what went wrong. I won't bore you with details, but it all worked out & we fixed it. I'm fairly good at lateral/radial/dish/tension "dance" and that part went surprisingly easy. At 1:00 a.m. I had finished the wheel, reinstalled on the bike, put Kool Stop pads back on.
NOTE: for a newby's 2nd wheel build I do not recommend trying a wheel where the cross is different on both sides. Brandt's book did not have a section on this. The lacing on this took hours, and in the end, was still incorrect. Unless you have someone with you who is more experienced. New wheel builders, like myself, often just "follow the recipe" blindly. I did that on the front wheel and lacing it was a breeze. The classes at UBI & Sugar Wheel Works both teach students to insert all the spokes then lace as you go along vs Brand's way of 4 different "sets" of spokes.
Photos from Flickr:
IMG_4887 by velocivixen, on FlickrIMG_4888 by velocivixen, on FlickrIMG_4884 by velocivixen, on FlickrIMG_4881 by velocivixen, on Flickr
Last edited by Velocivixen; 02-08-15 at 06:09 PM. Reason: photos
02-08-15, 06:37 PM
#286

Membership Not Required

Join Date: Jan 2005
Location: On the road-USA
Posts: 16,855
Bikes: Giant Excursion, Raleigh Sports, Raleigh R.S.W. Compact, Motobecane? and about 20 more! OMG
Mentioned: 5 Post(s)
Tagged: 0 Thread(s)
Quoted: 70 Post(s)
Likes: 0
Liked 15 Times
in
14 Posts
Very nice work on the pump!!! Well done!! I'm so happy I could pass it along to you and this worthy project!
Did the folks at the Coleman repair center mention whether oil or grease was to be used on the leather washers. It would be good to clear up that mystery, especially since @noglider and I posted differing information.
Did the folks at the Coleman repair center mention whether oil or grease was to be used on the leather washers. It would be good to clear up that mystery, especially since @noglider and I posted differing information.
@pastorbobnlnh: from the coleman website: Coleman - Care & Cleaning of Gear
"When it's time to take out your lantern, remember to oil the pump cup on the tank's pump plunger at least twice a year with a light machine oil. This allows the cup to seal against the inside of the pump barrel and insures the pump will work smoothly and push air into the tank properly."
Not sure if this applies to vintage ones but....
"When it's time to take out your lantern, remember to oil the pump cup on the tank's pump plunger at least twice a year with a light machine oil. This allows the cup to seal against the inside of the pump barrel and insures the pump will work smoothly and push air into the tank properly."
Not sure if this applies to vintage ones but....
Aaron
__________________
Webshots is bailing out, if you find any of my posts with corrupt picture files and want to see them corrected please let me know. :(
ISO: A late 1980's Giant Iguana MTB frameset (or complete bike) 23" Red with yellow graphics.
"Cycling should be a way of life, not a hobby.
RIDE, YOU FOOL, RIDE!"_Nicodemus
"Steel: nearly a thousand years of metallurgical development
Aluminum: barely a hundred
Which one would you rather have under your butt at 30mph?"_krazygluon
02-08-15, 08:22 PM
#287
Senior Member

Join Date: Dec 2012
Location: St. Paul, MN
Posts: 1,597
Bikes: Too many 3-speeds, Jones Plus LWB
Mentioned: 12 Post(s)
Tagged: 0 Thread(s)
Quoted: 359 Post(s)
Liked 265 Times
in
119 Posts
Update: My new 26 x 1 3/8" wheel using CR18 rim is complete. I had a horrible time lacing because of the 3x on NDS & 4x on drive side. This is my second wheel build ever. The first one I followed Jobst Brandt's book's "recipe" and it was super easy. This wheel I got the first set of 4 in and I couldn't figure out where the first spoke of the second set went because 1. dynamo side is bigger-wider than smaller drive side, and 2. the cross being different on each side meant that when I did it his way it didn't work.
I decided to built the NDS with both sets of spokes so that would at least narrow down the number of holes I was dealing with on the drive side. I built up the drive side 3 different ways. On the 3rd try the spokes all fit well and I was so proud.....but then I noticed problems like every other rim hole did not have a spoke from alternating flanges. The crosses on both sides were correct though....so it HAD to be correct. Right? Wrong! I also had a narrow space around the valve hole.
Finally, my friend who is a bike mechanic & meticulous wheel builder came all the way over and figured out what went wrong. I won't bore you with details, but it all worked out & we fixed it. I'm fairly good at lateral/radial/dish/tension "dance" and that part went surprisingly easy. At 1:00 a.m. I had finished the wheel, reinstalled on the bike, put Kool Stop pads back on.
02-08-15, 09:31 PM
#288
Senior Member
Thread Starter
@Salubrious - it rides smoothly. Seems a little more "light footed" and the rear brakes work much better. I messed around with getting the handlebars adjusted just right-tilted the ends down just a touch, as well as with the saddle. I've got the saddle clamp forward now and moved it a little closer to the front. Then noticed a new rhythmic sound/sensation which turned out to be both pedals bearings slightly loose. Not sure how that happened because I repacked them, got the adjustment just great so there was no play and locked them down. Somehow they got a touch loose, which I could feel with each pedal stroke. So took care of those. I think I have it adjusted how I want.
I always think of the wicked witch in the Wizard of Oz when I ride this bike. Of course I don't have a basket or a little dog....
On a different not I rode home in the dark through a park which has no lights. I decided to see just how bright my dyno headlight would be so I turned off my battery light and basically the dyno light did not cast a beam. Of course the lens is very yellowed and marred but I quickly turned my modern light back on. I think this light is more of a "to be seen" light vs to see.
02-09-15, 08:39 AM
#289
Senior Member
Join Date: Dec 2012
Location: St. Paul, MN
Posts: 1,597
Bikes: Too many 3-speeds, Jones Plus LWB
Mentioned: 12 Post(s)
Tagged: 0 Thread(s)
Quoted: 359 Post(s)
Liked 265 Times
in
119 Posts
I think I have seen treatments that deal with yellowing lenses on headlight fixtures; many cars have enclosed headlights that use plastic lenses. If that were somehow dealt with I think it would help, but I know what you mean- you want your eyes to be used to the dark when using the lighting You have an LED bulb right?
The incandescent would light up with each alternator pulse but LEDs won't do that. They only light up in one direction of current, not the other. So I think the solution is to build a little electronic circuit. Essentially it converts the AC of the Dynohub to DC, at which point the LED will be lit continuously as long as you are moving. It won't be a lot more light but it should help.
The input is from the Dynohub on the left and output to the LED on the right. The thing in the middle is the bridge rectifier- you want the smallest you can find at Radio Shack if they have not sold all their stock (they are closing a lot of their shops). An electrolytic capacitor of about 220uf, rated at 16 volts would help if it is also connected at the output side. Electrolytics have polarity, so the minus side goes to the minus side in the diagram, plus side to positive. The LED hooks up in the same place. If you wire the LED backwards, nothing will happen. The bridge rectifier should be no more than 1/2" in diameter- you want a small one. This circuit will cause the LED to operate a lot more like the incandescent.
You have an LED bulb right? The incandescent would light up with each alternator pulse but LEDs won't do that. They only light up in one direction of current, not the other. So I think the solution is to build a little electronic circuit. Essentially it converts the AC of the Dynohub to DC, at which point the LED will be lit continuously as long as you are moving. It won't be a lot more light but it should help.
The input is from the Dynohub on the left and output to the LED on the right. The thing in the middle is the bridge rectifier- you want the smallest you can find at Radio Shack if they have not sold all their stock (they are closing a lot of their shops). An electrolytic capacitor of about 220uf, rated at 16 volts would help if it is also connected at the output side. Electrolytics have polarity, so the minus side goes to the minus side in the diagram, plus side to positive. The LED hooks up in the same place. If you wire the LED backwards, nothing will happen. The bridge rectifier should be no more than 1/2" in diameter- you want a small one. This circuit will cause the LED to operate a lot more like the incandescent.

Thread
Thread Starter
Forum
Replies
Last Post
mht7159
Classic and Vintage Bicycles: Whats it Worth? Appraisals.
8
08-04-14 03:10 PM
