


Centering direct mount center pull brakes
 09-12-20, 12:35 PM
#1
Member
Thread Starter
Join Date: Mar 2017
Location: VA suburbs of DC
Posts: 39
Bikes: '76 Centurion Pro Tour, '78 Centurion Super LeMans custom, '10 Scott CR1 Comp/Pro, '11 KHS Tandemania Cross, '96 Kestrel 200 SCi, German Centurion Al Road Bike, Cannondale 500 (M&W), Museeuw/ZRace project
Mentioned: 0 Post(s)
Tagged: 0 Thread(s)
Quoted: 11 Post(s)
Liked 8 Times
in
7 Posts
Centering direct mount center pull brakes
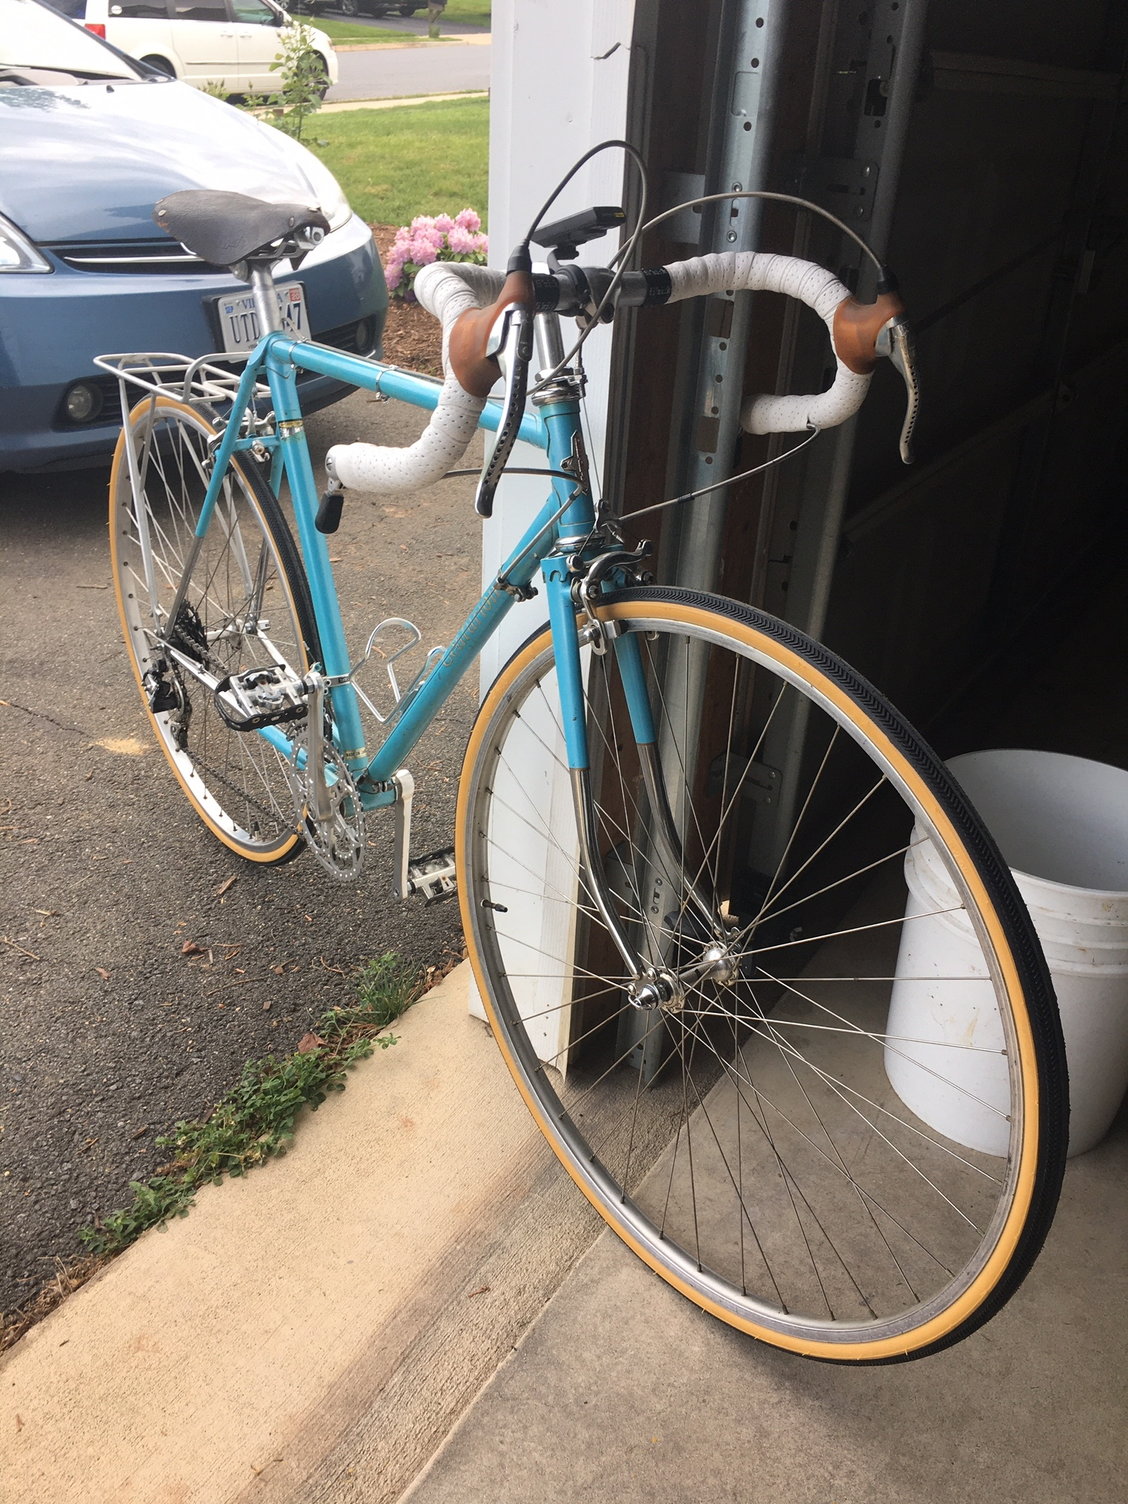
I bought a very sweet, all original Centurion Pro Tour and I am finally getting some time to spiff it up. It has Dia-Compe direct mount center pull brakes and they are not centered on the rims. I can't figure out what I need to do to center them. Anyone give me some pointers?

 09-12-20, 12:59 PM
#2


Senior Member
Join Date: Dec 2005
Posts: 17,153
Mentioned: 481 Post(s)
Tagged: 0 Thread(s)
Quoted: 3807 Post(s)
Liked 6,676 Times
in
2,607 Posts
I’d start with removing them from the mounts, thoroughly cleaning all of the contact points, and reinstalling with a dab of grease on the mounts. It’s possible you’re getting uneven spring tension, but I kinda doubt it.
 09-12-20, 01:27 PM
#3
Senior Member

Join Date: Feb 2008
Location: Peoria, IL
Posts: 4,475
Mentioned: 86 Post(s)
Tagged: 0 Thread(s)
Quoted: 1829 Post(s)
Liked 3,373 Times
in
1,579 Posts
and approaching the problem from another direction... have you verified that the rim is centered on the fork blades?
Steve in Peoria
Steve in Peoria
Likes For steelbikeguy:
09-12-20, 01:31 PM
#4
Senior Member
Join Date: Dec 2005
Posts: 17,153
Mentioned: 481 Post(s)
Tagged: 0 Thread(s)
Quoted: 3807 Post(s)
Liked 6,676 Times
in
2,607 Posts
09-12-20, 01:38 PM
#5
Banned
have you removed the brakes cleaned & re greased the pivots?
there are cable 'stirrups' that include setscrews to grip the transverse cable
to have it pull closer from one side than the other..
there are cable 'stirrups' that include setscrews to grip the transverse cable
to have it pull closer from one side than the other..
09-12-20, 03:00 PM
#7
Senior Member
Check wheel dish and measure the distance from the rim to the fork on both sides first. No point at all in adjusting the brake centering if the wheel or fork is off. More than likely, that is the problem. If the rim isn't centered, deal with that first.
If the rim is centered, first make sure the brake caliper is well lubed and not binding anywhere. Oil all pivots, the pin between the caliper, a the little pins where the springs contact the caliper arms. Actually take the brake of and apart, and grease the braze on pivots as well.
When you get to that point, it's basically like an old school cantilever brake. There's two things you can do, play with the straddle, and play with the springs. To play with the straddle hanger, try shifting it one way or another. This will change the centering point of the brake pads. You can encourage it to one side or the other by lightly bending down on the straddle wire. As mentioned, for extremes, use a modern Tektro straddle or equivalent that has set screws to hold position. To play with the spring, take the straddle wire and everything off. Pull out the brake pad that is in too far, twisting the caliper to overset the spring a bit. Be careful. You might have to loosen the pivot bolts. Try to avoid doing this if you can.
It's probably a combination of the wheel being off center, and pivots needing lube, maybe some straddle tweaking. Attend to that stuff first.
EDIT (again): looks like the spring plates are adjustable. But they are not.
Last edited by Salamandrine; 09-13-20 at 11:25 AM.
09-12-20, 03:14 PM
#8
Senior Member
Join Date: Jan 2004
Location: Madison, WI USA
Posts: 6,154
Mentioned: 50 Post(s)
Tagged: 0 Thread(s)
Quoted: 2363 Post(s)
Liked 1,749 Times
in
1,191 Posts
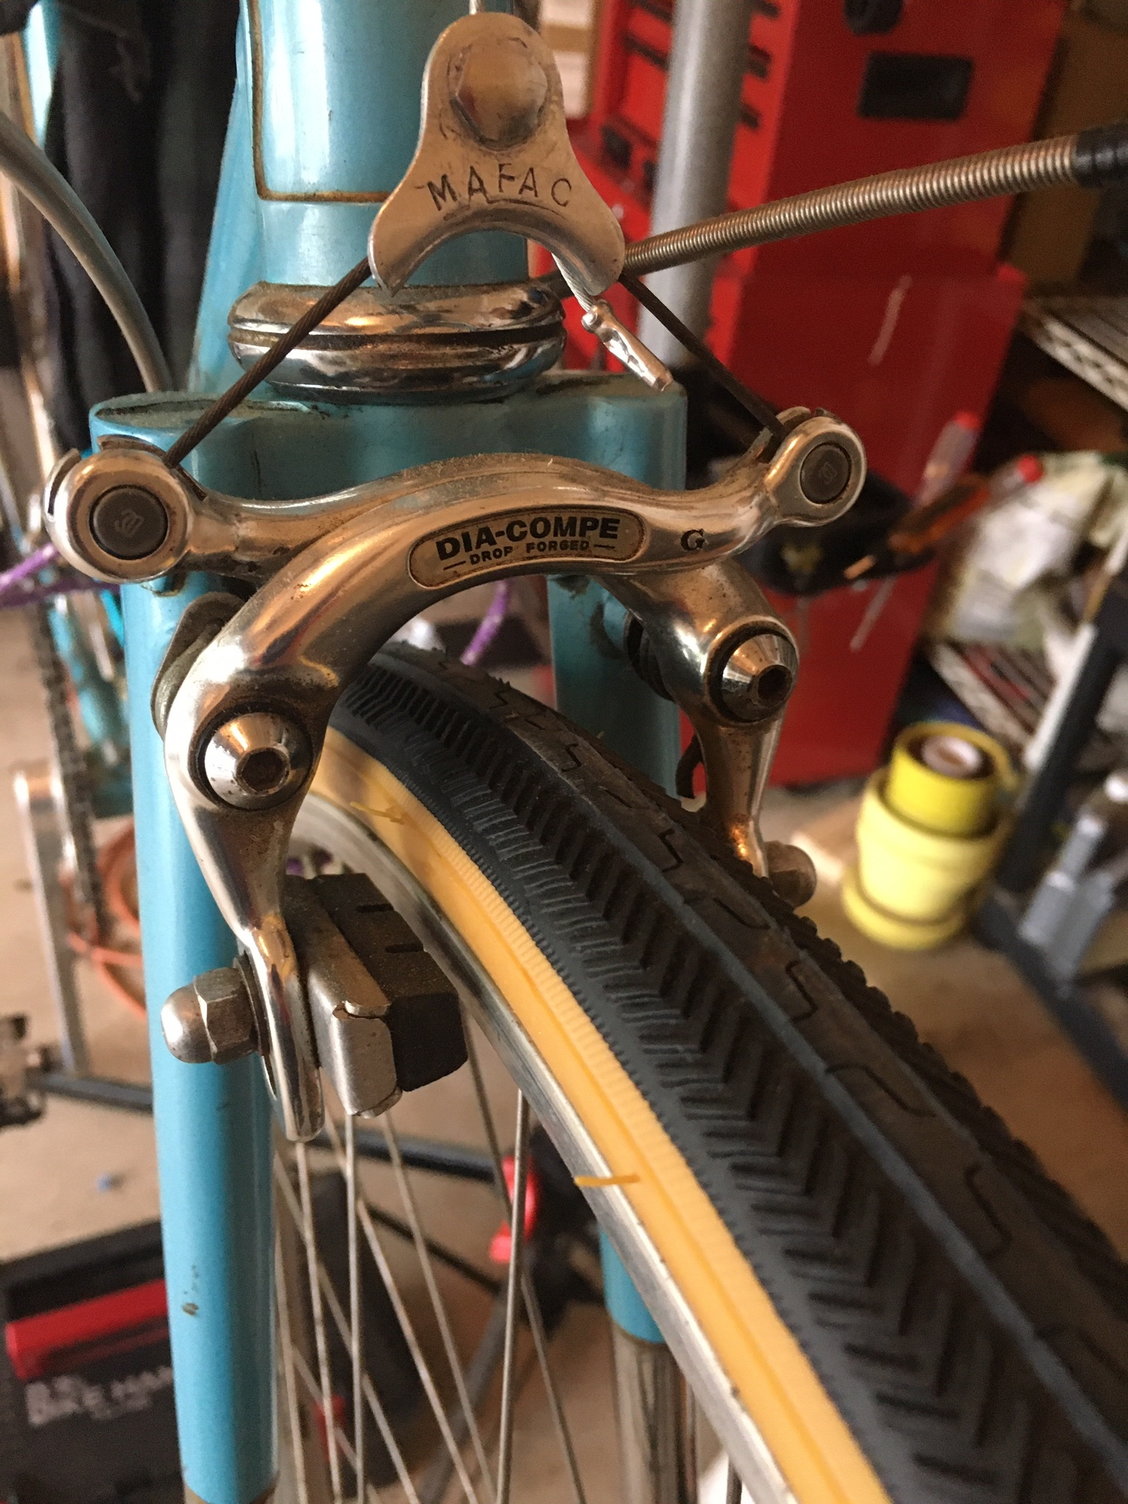
Hard to tell from the pics -- is there one spring spanning between the two side? Or does each side have its own spring?
09-12-20, 03:28 PM
#9
Senior Member
It should have individual springs. I'm pretty sure I see the end of an individual spring going into the braze on boss hole in the second picture.
09-12-20, 03:54 PM
#10
Senior Member

Join Date: Apr 2007
Location: Thunder Bay, Ontario, Canada - burrrrr!
Posts: 11,674
Bikes: 1958 Rabeneick 120D, 1968 Legnano Gran Premio, 196? Torpado Professional, 2000 Marinoni Piuma
Mentioned: 210 Post(s)
Tagged: 0 Thread(s)
Quoted: 1372 Post(s)
Likes: 0
Liked 1,751 Times
in
938 Posts
Let's assume the wheel is true and properly dished.
Center pull brakes work best when the cable frictions are minimal. Start with disassembly of the caliper. Clean it and lubricate each caliper. Grease pivots and also the area where the springs slide on the caliper arms.
Next, make sure that your yoke cables are clean and smooth. A piece of aluminum foil is the perfect tool for cleaning and polishing cables (old school). Ensure that there are no kinks in the yoke cable. Grease the yoke and cable contact area.
Install the brake and attempt to center it by pulling the lever tight. Snug up the mounting bolts on the calipers. If not centered, upon releasing the lever, you will have to loosen the mountain bolt and rotate the caliper in the appropriate direction. You might also have to smooth off the faces of the alloy mounting washers (they can become grooved making it difficult to realign the calipers)
Hope that is helpful.
__________________
"98% of the bikes I buy are projects".
"98% of the bikes I buy are projects".
09-12-20, 04:08 PM
#11
Senior Member
Join Date: Nov 2013
Location: Big Apple
Posts: 1,428
Bikes: yes
Mentioned: 17 Post(s)
Tagged: 0 Thread(s)
Quoted: 512 Post(s)
Likes: 0
Liked 409 Times
in
176 Posts
Each side has separate springs.
On my 1979 Pro Tour, the calipers were binding on the post/plastic bushing combination. I ended up taking them all off and sanded down the inside hole of the caliper that slides over the post/plastic bushing combination. Cleaned and greased. This corrected the condition completely. Also, inspect the plastic bushings themselves. Two of mine were a little cracked and frayed, which wasn't helping, so I cannibalized from the box of crap for replacements.

And the obligatory money shot.

On my 1979 Pro Tour, the calipers were binding on the post/plastic bushing combination. I ended up taking them all off and sanded down the inside hole of the caliper that slides over the post/plastic bushing combination. Cleaned and greased. This corrected the condition completely. Also, inspect the plastic bushings themselves. Two of mine were a little cracked and frayed, which wasn't helping, so I cannibalized from the box of crap for replacements.
And the obligatory money shot.
09-12-20, 04:13 PM
#12
Senior Member

Join Date: May 2013
Location: Pacific Northwest
Posts: 1,989
Bikes: �87 Marinoni SLX Sports Tourer, �79 Miyata 912 by Gugificazione
Mentioned: 166 Post(s)
Tagged: 0 Thread(s)
Quoted: 500 Post(s)
Liked 466 Times
in
256 Posts
Each side has separate springs.
On my 1979 Pro Tour, the calipers were binding on the post/plastic bushing combination. I ended up taking them all off and sanded down the inside hole of the caliper that slides over the post/plastic bushing combination. Cleaned and greased. This corrected the condition completely. Also, inspect the plastic themselves themselves. Two of mine were a little cracked and frayed, which wasn't helping, so I cannibalized from the box of crap for replacements.
On my 1979 Pro Tour, the calipers were binding on the post/plastic bushing combination. I ended up taking them all off and sanded down the inside hole of the caliper that slides over the post/plastic bushing combination. Cleaned and greased. This corrected the condition completely. Also, inspect the plastic themselves themselves. Two of mine were a little cracked and frayed, which wasn't helping, so I cannibalized from the box of crap for replacements.
09-12-20, 05:30 PM
#13
Senior Member
Join Date: Aug 2007
Location: Evanston, IL
Posts: 5,091
Bikes: many
Mentioned: 63 Post(s)
Tagged: 0 Thread(s)
Quoted: 1444 Post(s)
Liked 1,390 Times
in
759 Posts
While you have them apart, compare the two springs to make sure they match. You might need to bend one or the other to get them even.
09-12-20, 06:17 PM
#14
Senior Member
Install the brake and attempt to center it by pulling the lever tight. Snug up the mounting bolts on the calipers. If not centered, upon releasing the lever, you will have to loosen the mountain bolt and rotate the caliper in the appropriate direction. You might also have to smooth off the faces of the alloy mounting washers (they can become grooved making it difficult to realign the calipers)
Likes For Salamandrine:
09-12-20, 07:28 PM
#15
Senior Member
Join Date: Jan 2004
Location: Madison, WI USA
Posts: 6,154
Mentioned: 50 Post(s)
Tagged: 0 Thread(s)
Quoted: 2363 Post(s)
Liked 1,749 Times
in
1,191 Posts
+1; if those adjusters exist, that's the _right_ way to adjust any brake with two separate springs.
09-12-20, 10:27 PM
#16
Ride, Wrench, Swap, Race

Join Date: Jan 2010
Location: Northern California
Posts: 9,193
Bikes: Cheltenham-Pedersen racer, Boulder F/S Paris-Roubaix, Varsity racer, '52 Christophe, '62 Continental, '92 Merckx, '75 Limongi, '76 Presto, '72 Gitane SC, '71 Schwinn SS, etc.
Mentioned: 132 Post(s)
Tagged: 0 Thread(s)
Quoted: 1565 Post(s)
Liked 1,295 Times
in
865 Posts
The spring plates are brazed on these bikes.
09-12-20, 10:38 PM
#17
Senior Member
A little off the topic but if those same brakes are set up as centerpulls, what would it take to get them to be ready for canti mode?

09-12-20, 11:01 PM
#18
Senior Member
Join Date: Nov 2013
Location: Big Apple
Posts: 1,428
Bikes: yes
Mentioned: 17 Post(s)
Tagged: 0 Thread(s)
Quoted: 512 Post(s)
Likes: 0
Liked 409 Times
in
176 Posts
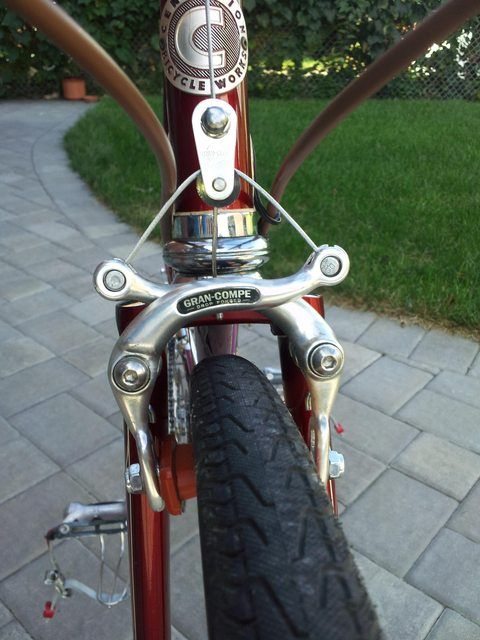
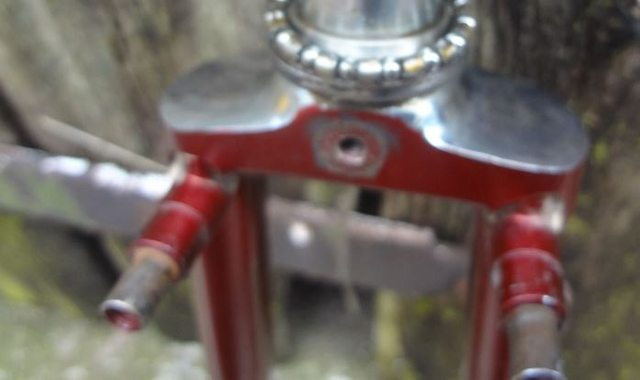
Not the Pro Tour. They plates slide onto the posts. One side of the post and corresponding plate is flat to keep them from turning. The front fork from my bike.
This is what the plates and springs look like.

As opposed to something like this:

This is what the plates and springs look like.
As opposed to something like this:
09-12-20, 11:04 PM
#19
Senior Member
Join Date: Jan 2004
Location: Madison, WI USA
Posts: 6,154
Mentioned: 50 Post(s)
Tagged: 0 Thread(s)
Quoted: 2363 Post(s)
Liked 1,749 Times
in
1,191 Posts
Are there adjusters for the ends of the springs that engage the brake arms?
09-13-20, 12:32 AM
#20
Not lost wanderer.

Join Date: Jan 2013
Location: Lititz, Pa
Posts: 3,325
Bikes: In USA; 73 Raleigh Super Course dingle speed, 72 Raleigh Gran Sport SS, 72 Geoffry Butler, 81 Centurion Pro-Tour, 74 Gugie Grandier Sportier
Mentioned: 72 Post(s)
Tagged: 0 Thread(s)
Quoted: 885 Post(s)
Liked 989 Times
in
521 Posts
09-13-20, 06:31 AM
#21
Senior Member
Probably still the wheel that's the issue.
09-13-20, 06:53 AM
#22

Senior Member

Join Date: Apr 2005
Location: Ann Arbor, MI
Posts: 16,874
Bikes: 1980 Masi, 1984 Mondonico, 1984 Trek 610, 1980 Woodrup Giro, 2005 Mondonico Futura Leggera ELOS, 1967 PX10E, 1971 Peugeot UO-8
Mentioned: 49 Post(s)
Tagged: 0 Thread(s)
Quoted: 1856 Post(s)
Liked 664 Times
in
506 Posts
The OP�s brakes look like conventional center pulls. What makes them �direct mount?� If they�re bolted to the frame and fork with a single center bolt you can loosen the nut and hold the entire caliper where you want it as you tighten it up.
The alignments, dish, true, lubrication, spring preload, straddle flexibility should be checked as well, bet depending on the immediate goal you can just turn them.
Or you could just buy a new frame ...
The alignments, dish, true, lubrication, spring preload, straddle flexibility should be checked as well, bet depending on the immediate goal you can just turn them.
Or you could just buy a new frame ...
Last edited by Road Fan; 09-13-20 at 06:57 AM.
09-13-20, 06:59 AM
#23
Senior Member

Join Date: Feb 2017
Location: Northern Shenandoah Valley
Posts: 4,140
Bikes: More bikes than riders
Mentioned: 36 Post(s)
Tagged: 0 Thread(s)
Quoted: 1444 Post(s)
Liked 761 Times
in
569 Posts
If you look closely, they're not bolted to the frame with a single center bolt. Each arm of the center pull caliper is mounted directly to fork studs without a center bolt, which is why the whole brake assembly can't simply be rotated.
09-13-20, 07:07 AM
#24
Senior Member
Join Date: Apr 2005
Location: Ann Arbor, MI
Posts: 16,874
Bikes: 1980 Masi, 1984 Mondonico, 1984 Trek 610, 1980 Woodrup Giro, 2005 Mondonico Futura Leggera ELOS, 1967 PX10E, 1971 Peugeot UO-8
Mentioned: 49 Post(s)
Tagged: 0 Thread(s)
Quoted: 1856 Post(s)
Liked 664 Times
in
506 Posts
Yeah, this adjustment could be complicated! I�d start with truing and dishing the wheel, then use the wheel to assess fork alignment, then mechanically overhaul the pivots and springs unless it�s actually new, then set the stationary shoe positions, then reattach the straddle and see if its bend is part of the problem.
09-13-20, 08:30 AM
#25

Randomhead
Join Date: Aug 2008
Location: Happy Valley, Pennsylvania
Posts: 24,394
Mentioned: 0 Post(s)
Tagged: 0 Thread(s)
Quoted: 4 Post(s)
Liked 3,693 Times
in
2,515 Posts
I had this problem with some Mafac racers and had to bend the spring