


Crushed seat tube repair?
 01-05-21, 04:57 AM
#1
Senior Member
Thread Starter
Crushed seat tube repair?
Maybe this should be in the mechanics forum but I thought it would be applicable here too.
Last summer I bought one of my 3 grail bikes, a Fishlips Toxic Tuna made locally, here in Salt Lake City. There’s an ongoing thread about it in the Classic & Vintage forum titled “Grail bike acquired “.
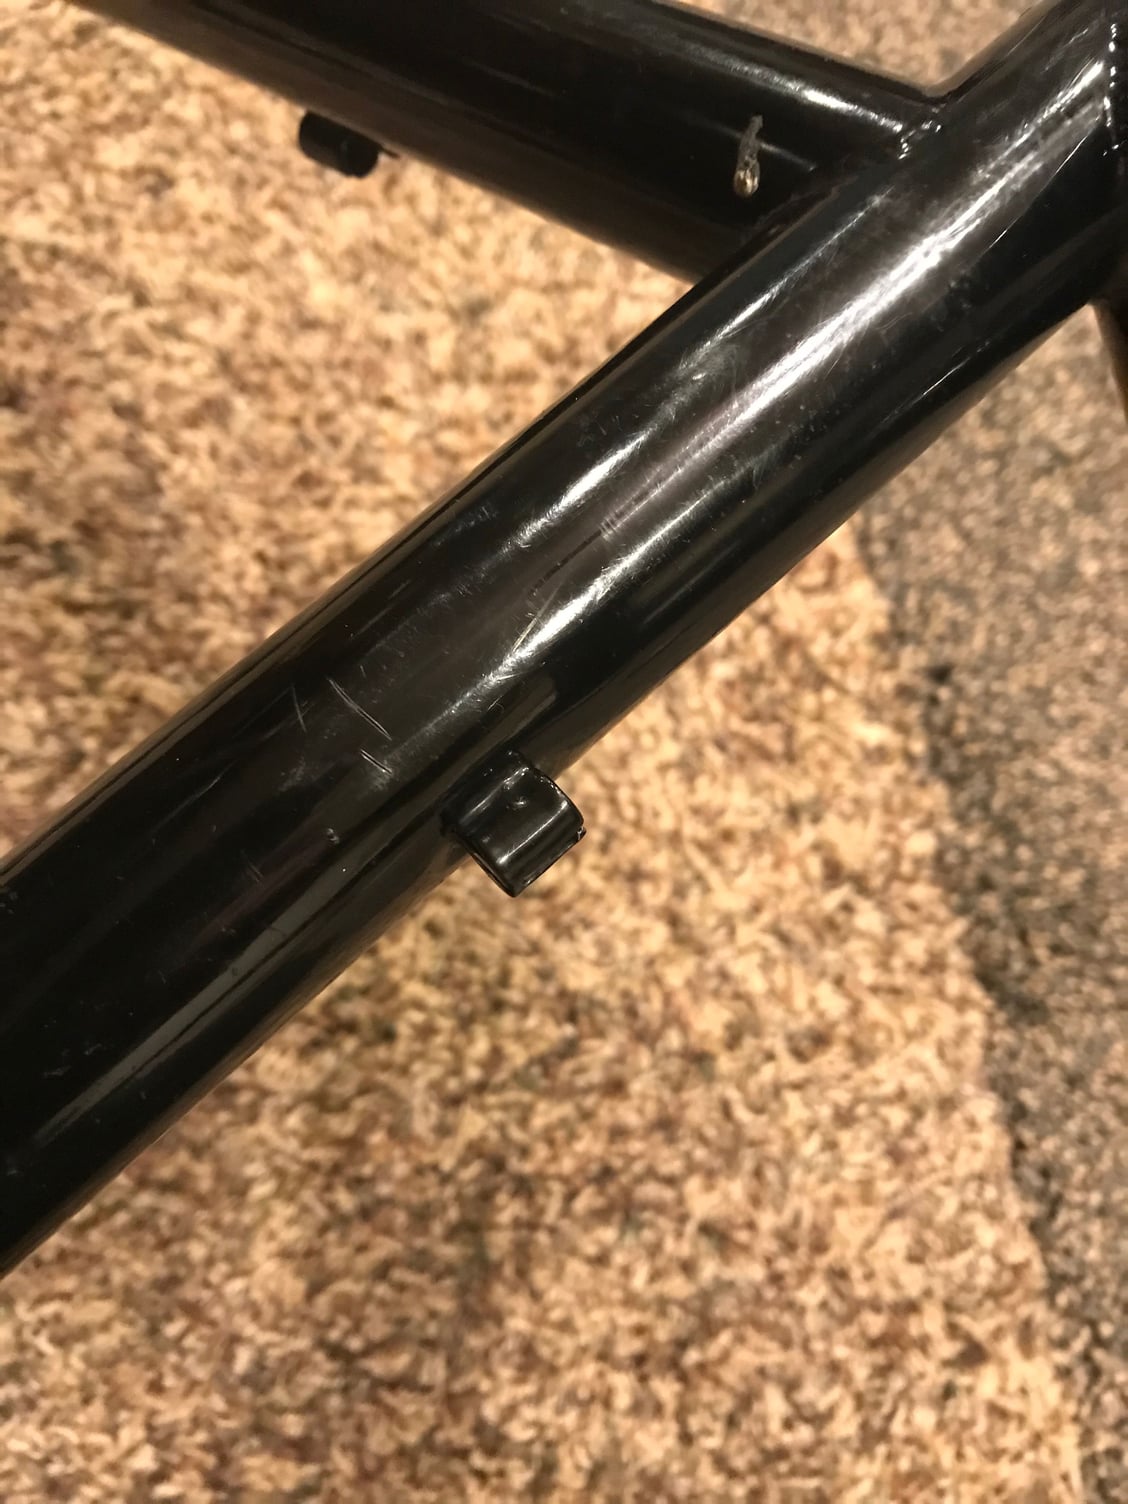
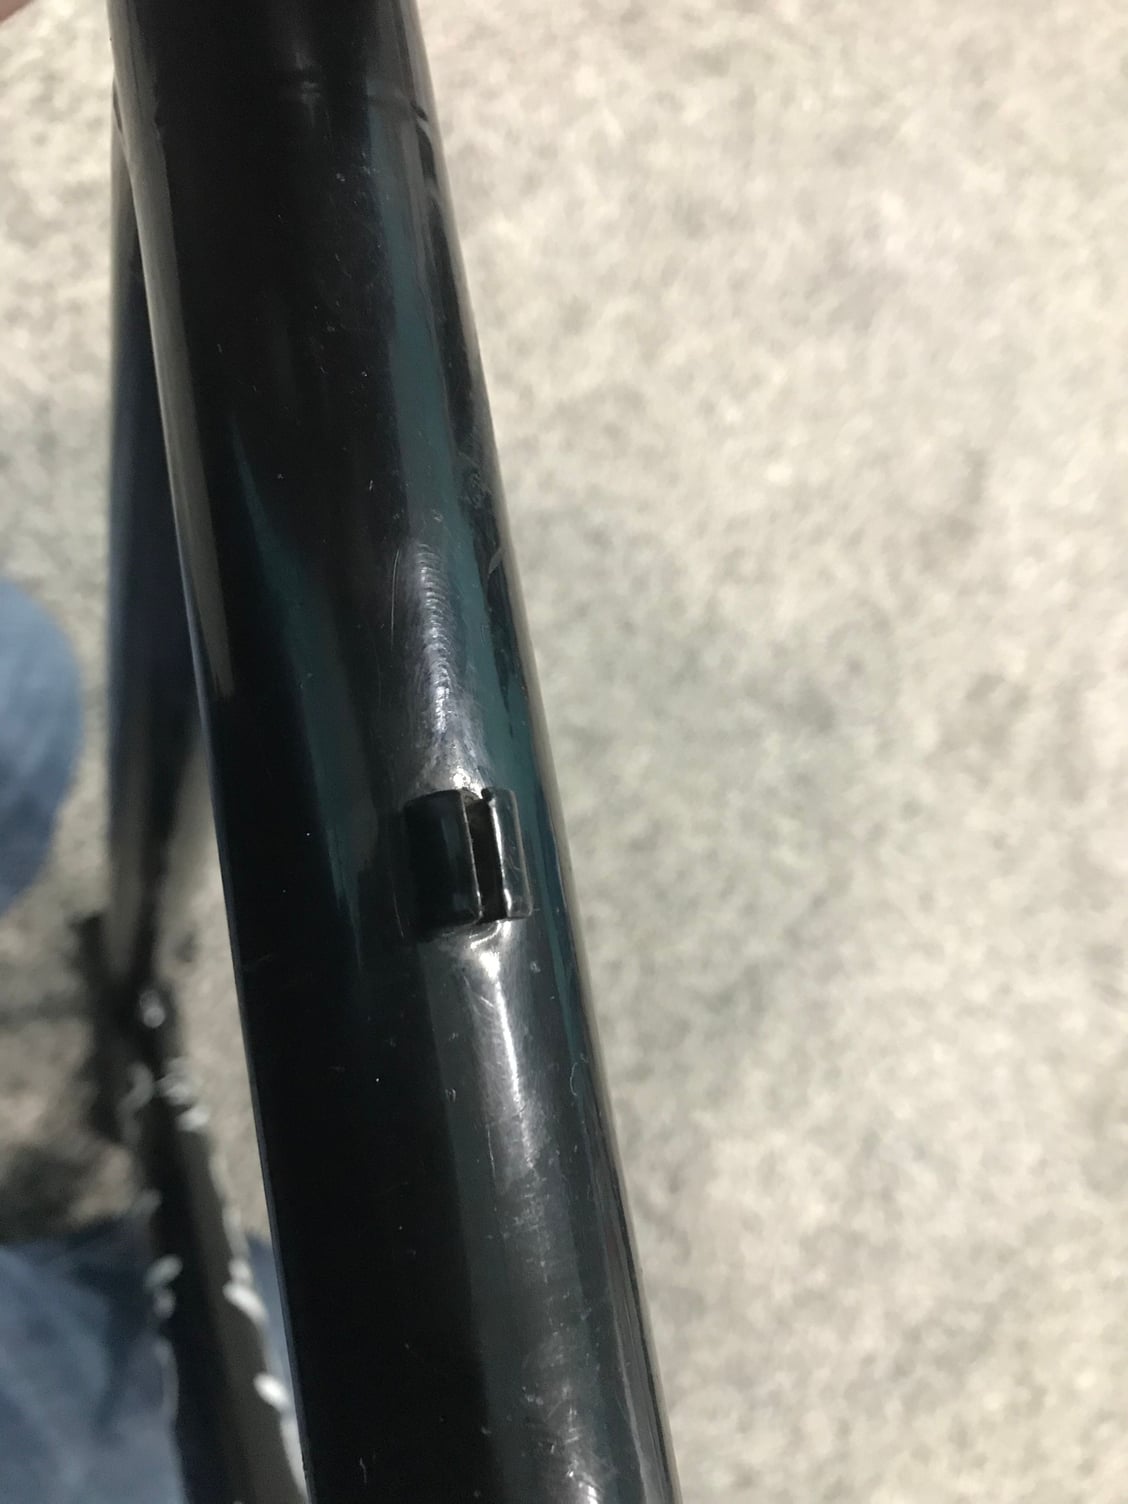
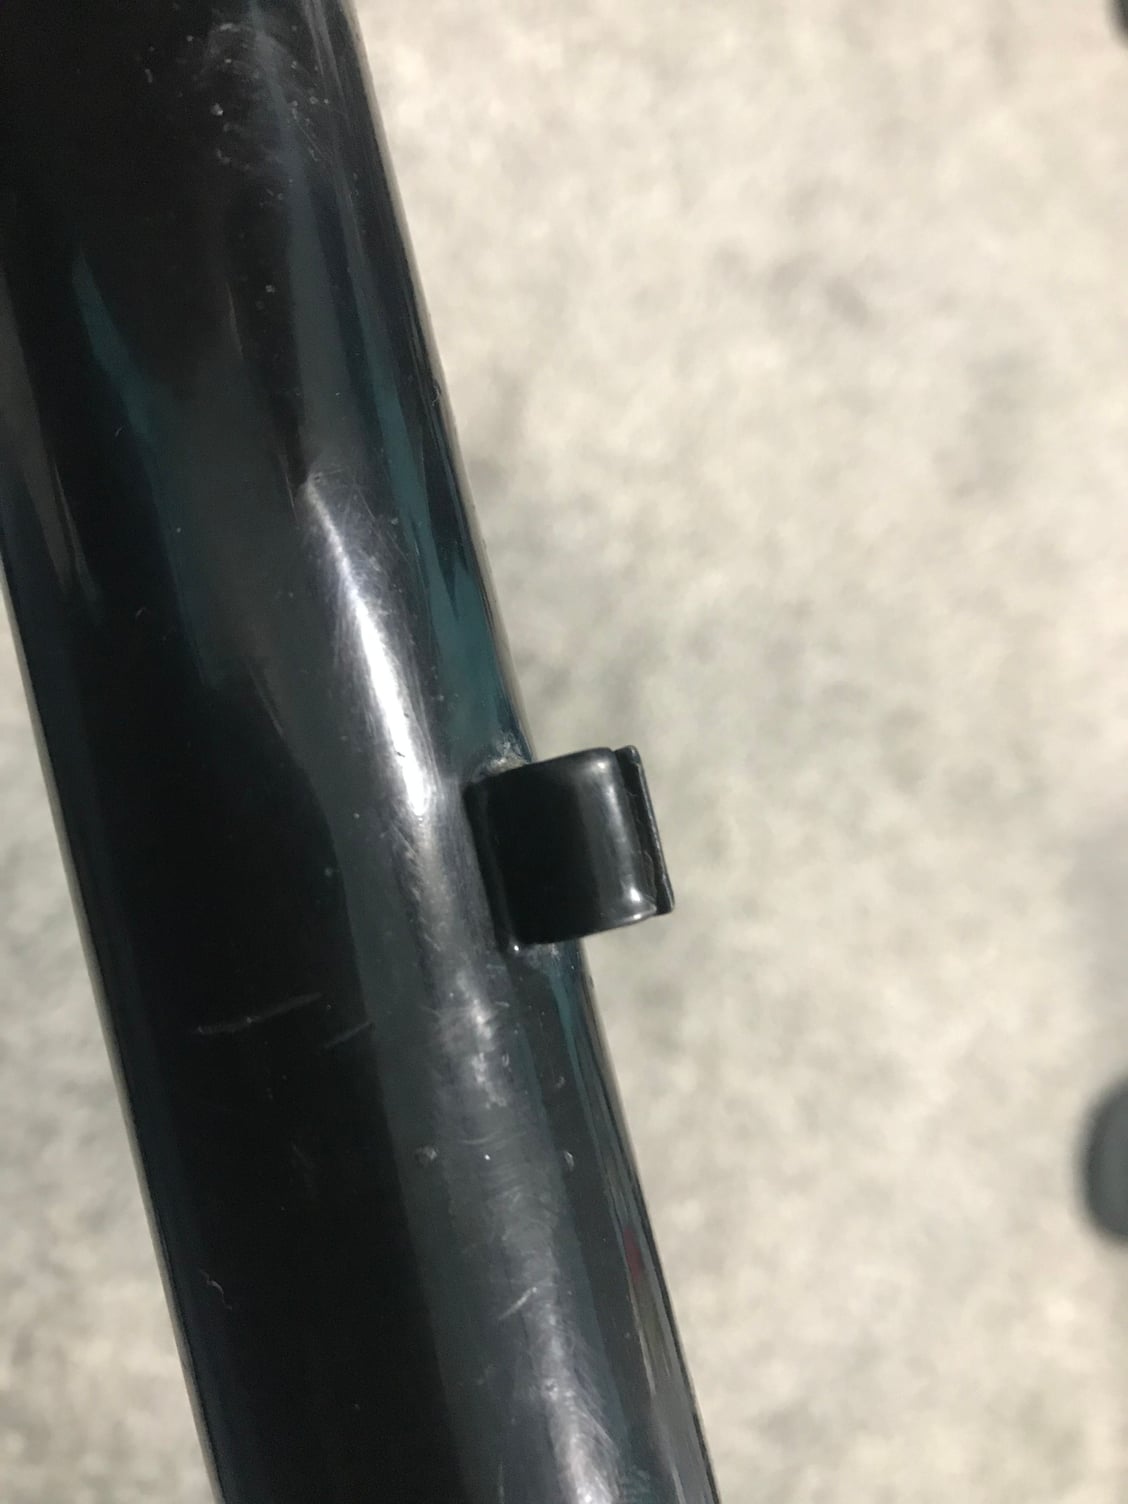
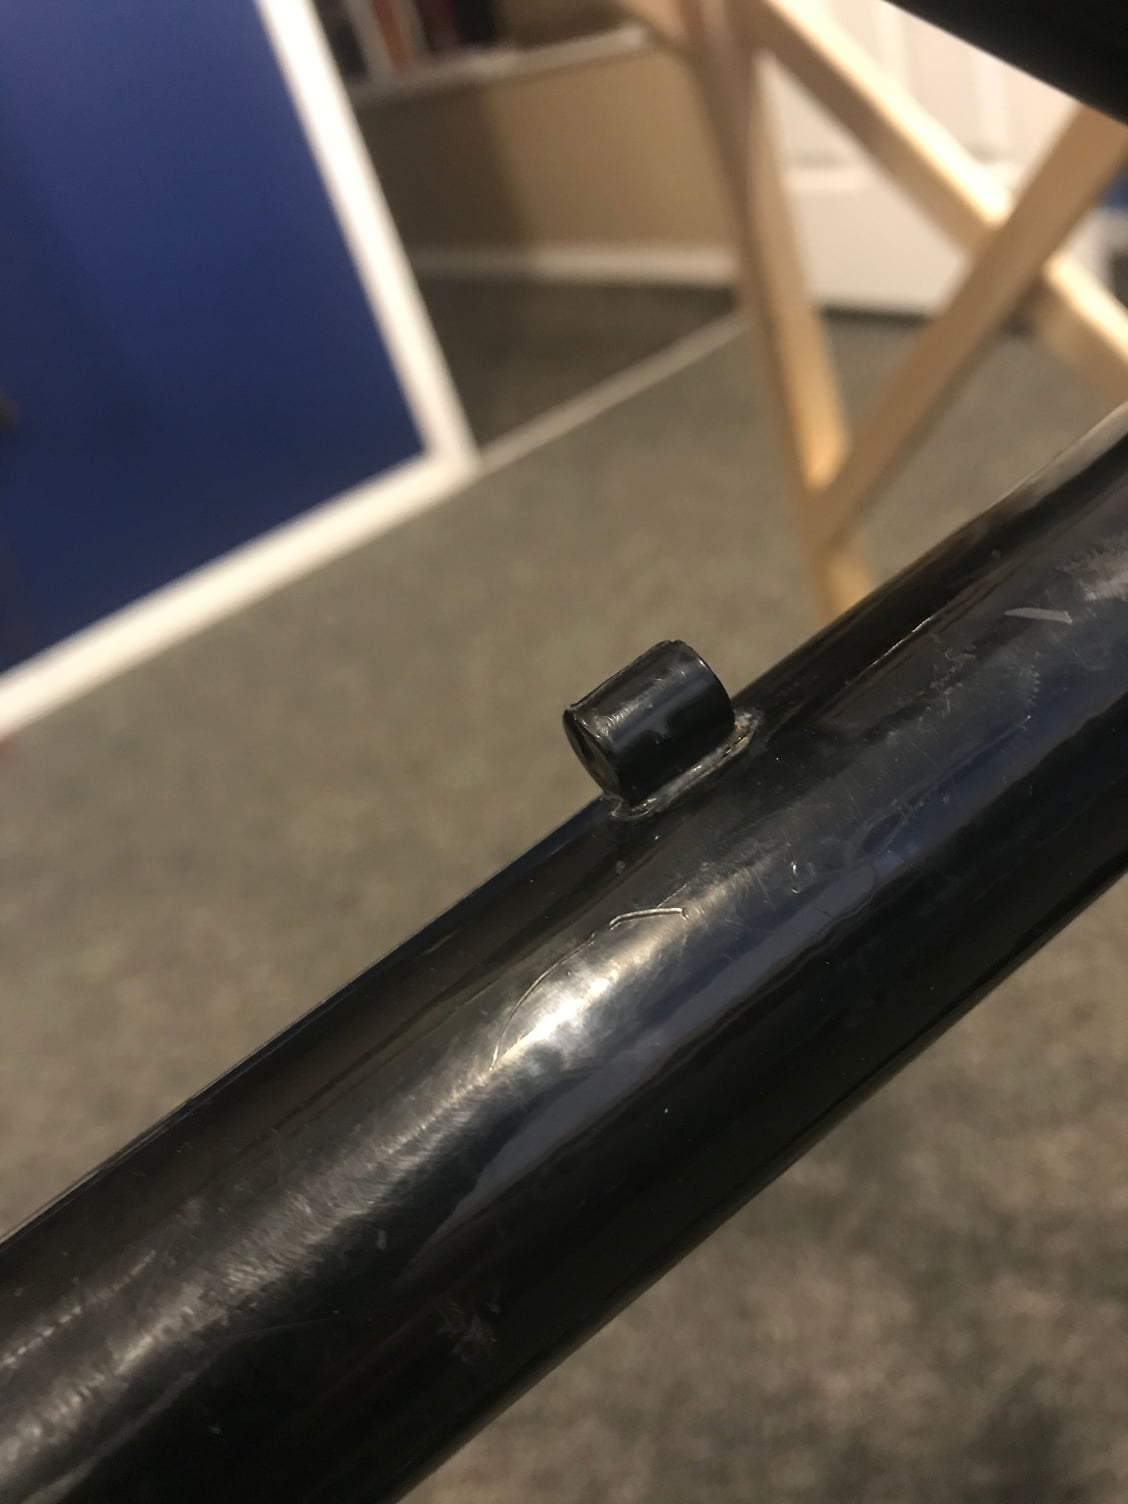
I was sniffing around the frame last night and noticed what appears to be a crushed seat tube where the FD cable housing stop is brazed on to the back of the seat tube:

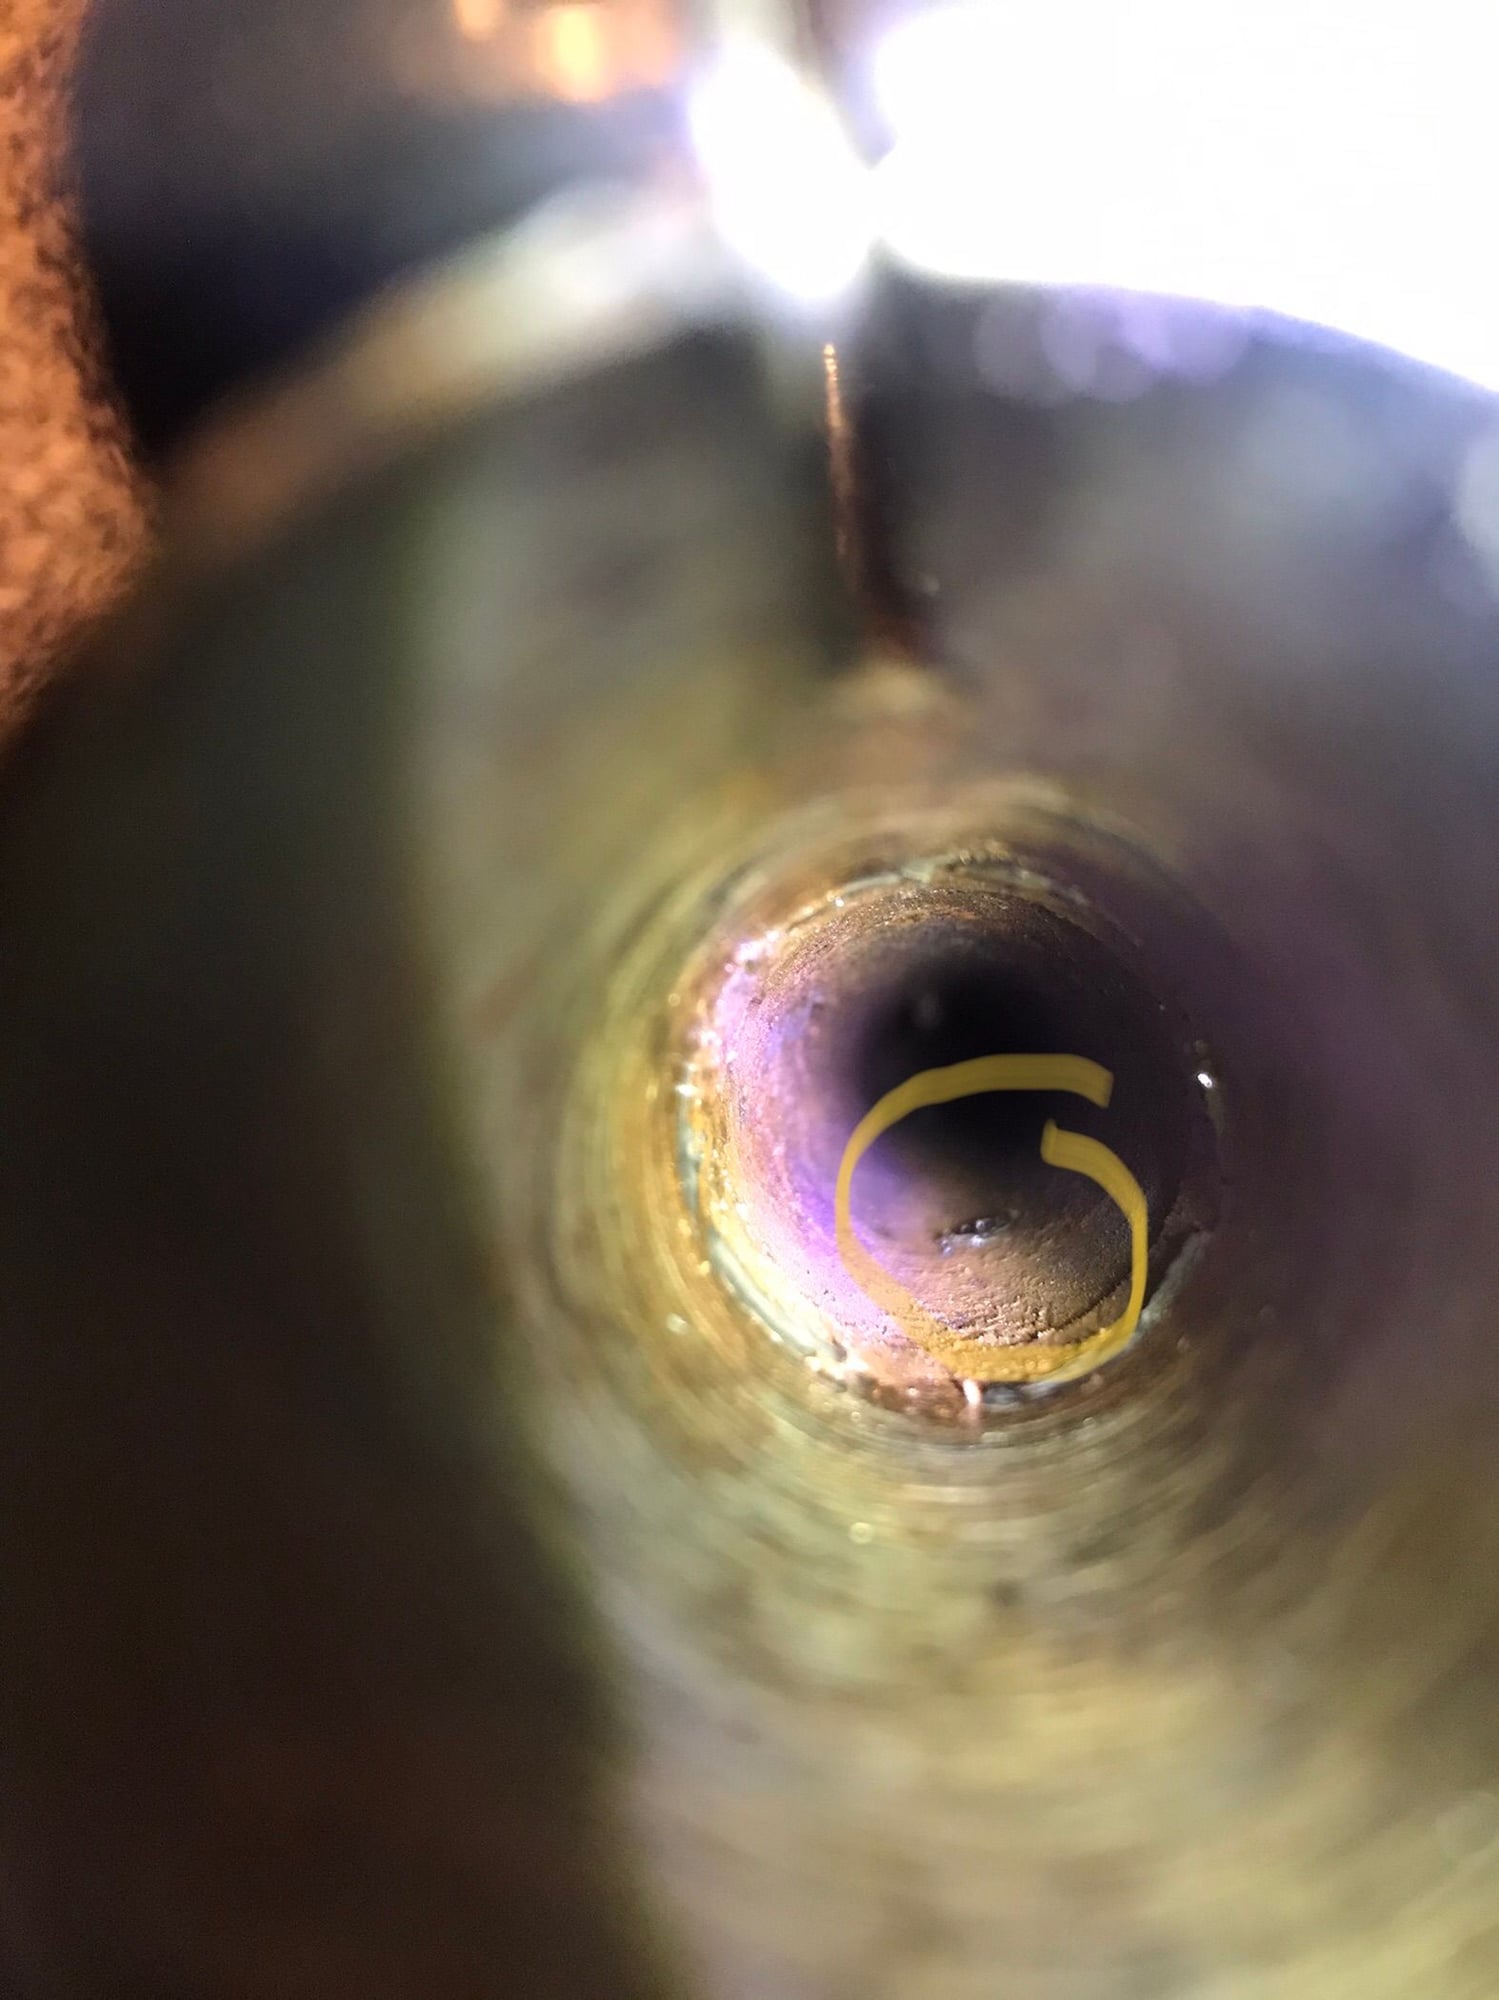
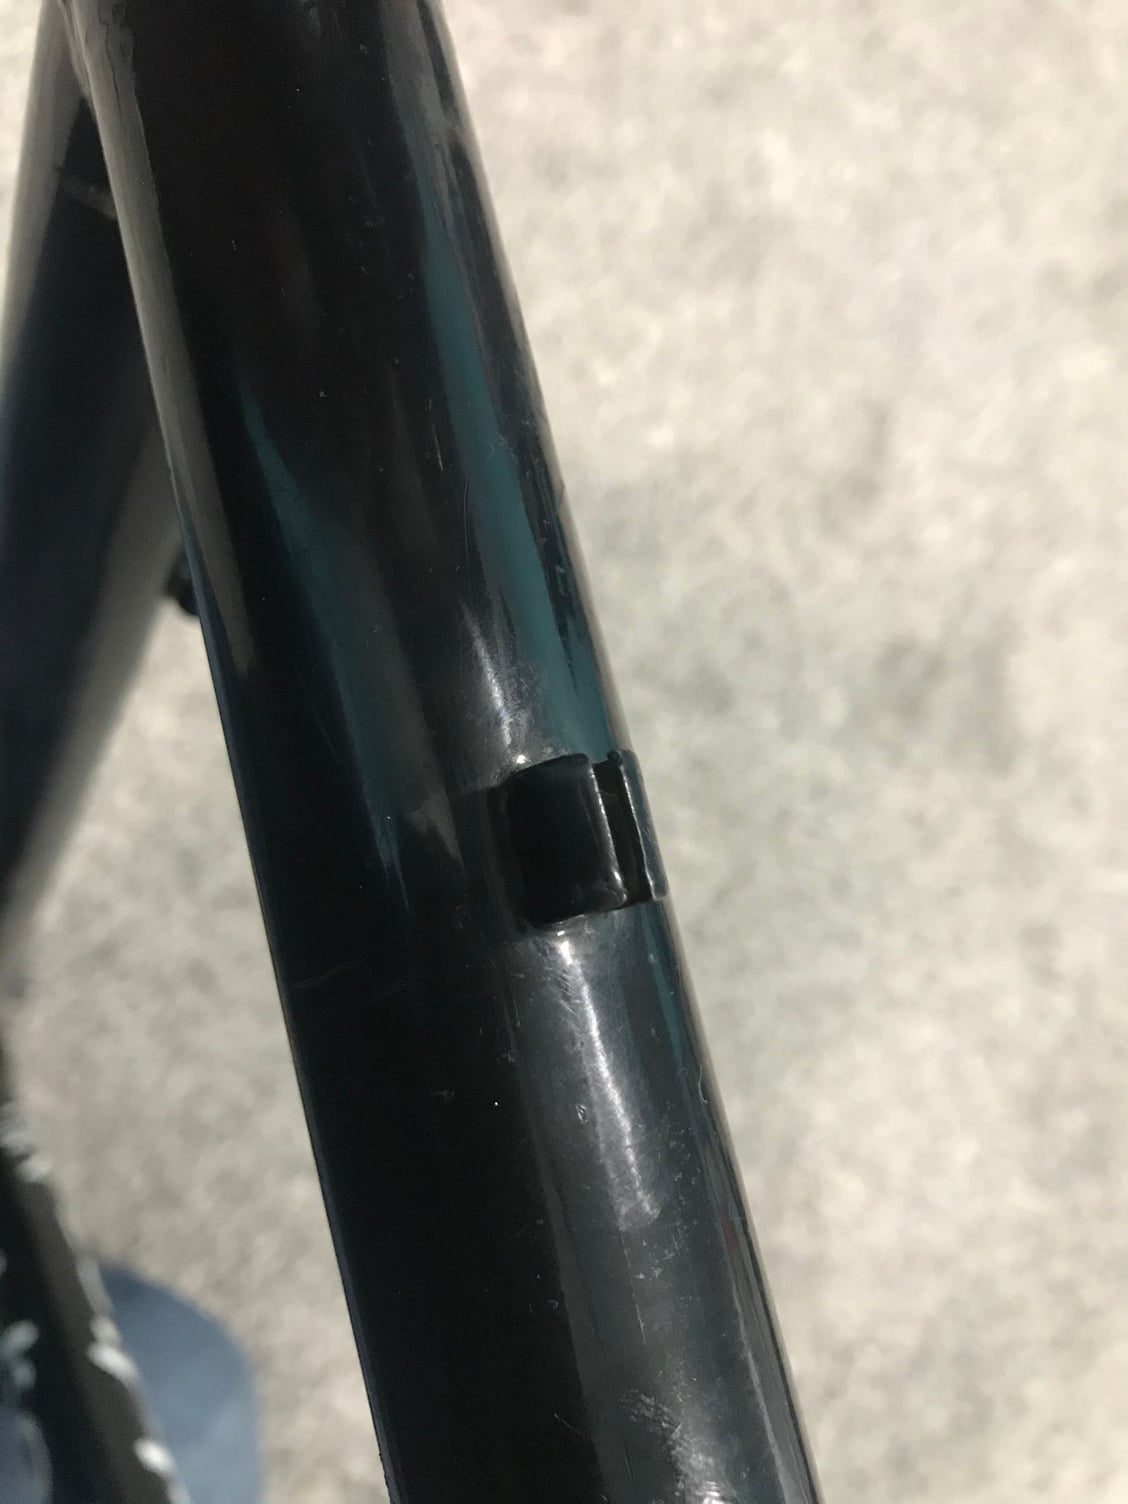
Here it is on the inside of the seat tube:
So I was thinking to push the tube back out using a custom made mandrel (I have a very accommodating machinist at work) similar to a quill stem. So the idea is that a well fitted wedge, when drawn up against the “quill”, will push the tube back round.
The seat tube measures out at 29.4mm ID, but the bike came with a shim and a 27.2 seat post. Perhaps this was to accommodate the damaged seat tube, perhaps the shim was OEM; I don’t know.
There is some speculation that this frame was made with Columbus SLX tubing but there is no decal so I can neither confirm nor deny. The seat tube is ovalized at the BB, and it is very light- 4.81 lbs with headset and XTR v brakes installed. I’m told SLX should have some spiral butting down near the BB, but there’s too much surface rust for me to see this.
So what are your thoughts? I appreciate any input you have as this is uncharted territory for me.
Last summer I bought one of my 3 grail bikes, a Fishlips Toxic Tuna made locally, here in Salt Lake City. There’s an ongoing thread about it in the Classic & Vintage forum titled “Grail bike acquired “.
I was sniffing around the frame last night and noticed what appears to be a crushed seat tube where the FD cable housing stop is brazed on to the back of the seat tube:
Here it is on the inside of the seat tube:
So I was thinking to push the tube back out using a custom made mandrel (I have a very accommodating machinist at work) similar to a quill stem. So the idea is that a well fitted wedge, when drawn up against the “quill”, will push the tube back round.
The seat tube measures out at 29.4mm ID, but the bike came with a shim and a 27.2 seat post. Perhaps this was to accommodate the damaged seat tube, perhaps the shim was OEM; I don’t know.
There is some speculation that this frame was made with Columbus SLX tubing but there is no decal so I can neither confirm nor deny. The seat tube is ovalized at the BB, and it is very light- 4.81 lbs with headset and XTR v brakes installed. I’m told SLX should have some spiral butting down near the BB, but there’s too much surface rust for me to see this.
So what are your thoughts? I appreciate any input you have as this is uncharted territory for me.
 01-05-21, 07:02 AM
#2

blahblahblah chrome moly

Join Date: Apr 2009
Location: Seattle
Posts: 1,993
Mentioned: 92 Post(s)
Tagged: 0 Thread(s)
Quoted: 1179 Post(s)
Liked 2,576 Times
in
1,076 Posts
Maybe this should be in the mechanics forum but I thought it would be applicable here too.
Last summer I bought one of my 3 grail bikes, a Fishlips Toxic Tuna made locally, here in Salt Lake City. There’s an ongoing thread about it in the Classic & Vintage forum titled “Grail bike acquired “.
I was sniffing around the frame last night and noticed what appears to be a crushed seat tube where the FD cable housing stop is brazed on to the back of the seat tube:
Here it is on the inside of the seat tube:
So I was thinking to push the tube back out using a custom made mandrel (I have a very accommodating machinist at work) similar to a quill stem. So the idea is that a well fitted wedge, when drawn up against the “quill”, will push the tube back round.
The seat tube measures out at 29.4mm ID, but the bike came with a shim and a 27.2 seat post. Perhaps this was to accommodate the damaged seat tube, perhaps the shim was OEM; I don’t know.
There is some speculation that this frame was made with Columbus SLX tubing but there is no decal so I can neither confirm nor deny. The seat tube is ovalized at the BB, and it is very light- 4.81 lbs with headset and XTR v brakes installed. I’m told SLX should have some spiral butting down near the BB, but there’s too much surface rust for me to see this.
So what are your thoughts? I appreciate any input you have as this is uncharted territory for me.
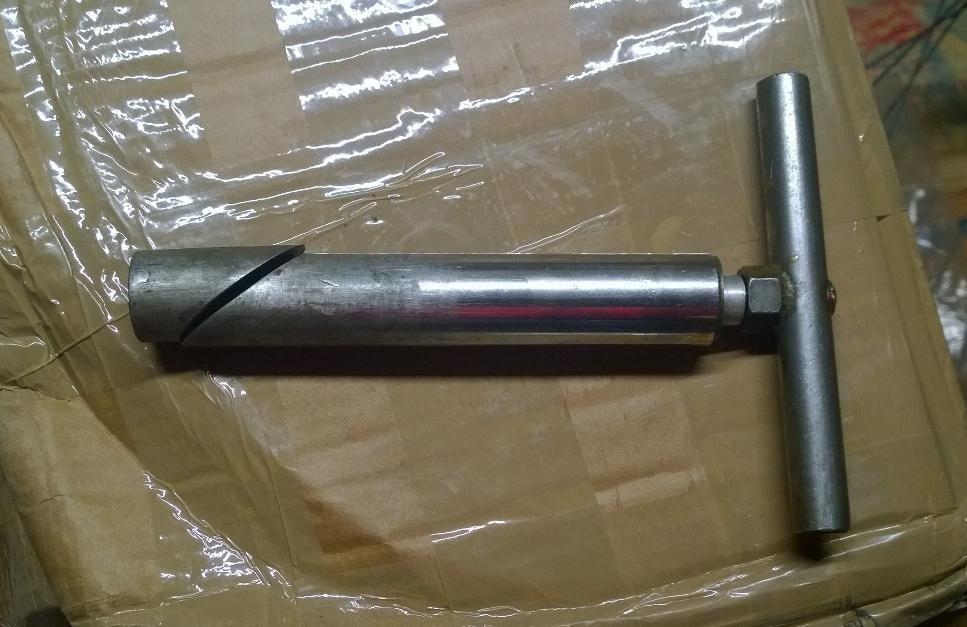
This is a pic of one of several we had when I worked at Davidson. It's now in the toolbox of Robert Freeman.
Make it as close as you can to the optimum seatpost diameter for that frame, though it has to be a little smaller to get down into the indented part. A bit of taper on the bottom edge of the wedge can help with that.
Mark B in Seattle
Likes For bulgie:
 01-05-21, 08:31 AM
#4


Randomhead
Join Date: Aug 2008
Location: Happy Valley, Pennsylvania
Posts: 24,399
Mentioned: 0 Post(s)
Tagged: 0 Thread(s)
Quoted: 4 Post(s)
Liked 3,699 Times
in
2,519 Posts
I have a tool like that. Done this many times. I made it out of a 1" iron pipe, which is bigger than 1". It has been pretty useful, I have thought about improving it because sometimes it takes a lot of force. I used the all-thread that was closest at hand and it's a little small
Likes For unterhausen:
01-05-21, 09:57 AM
#5
Senior Member
Thread Starter
Thank you so much! I was beginning to think it was a lost cause. I'll yap with my machinist about a tool.
01-05-21, 12:52 PM
#6
Senior Member
Thread Starter
So I showed my sympathetic machinist the picture of the tool you posted Bulgie, and he is on board. Of course, work duties are priority but he will get one built as time is available to him... The slow burn, as it were, is still smoldering on this project!
01-05-21, 04:32 PM
#7
blahblahblah chrome moly
Join Date: Apr 2009
Location: Seattle
Posts: 1,993
Mentioned: 92 Post(s)
Tagged: 0 Thread(s)
Quoted: 1179 Post(s)
Liked 2,576 Times
in
1,076 Posts
So, not quite smokin that pankake yet? Just smoldering?
unterhausen 's idea of plumbing pipe is a good one. You want thick wall, because the wedge bears against the tubular part only on it's edge, so you want that edge to be thick, basically as thick as possible. A solid bar drilled at a suitable size for the draw bolt might be even better but more expensive to make. The hole has to be a fair bit larger than the bolt since the wedge will need to go off-center as it moves through its travel.
At your seatpost size, starting with something about 1-1/8" OD would be fine I think. Starting with something larger and lathe-turning it to a custom diameter increases the cost of the tool drastically. A plain black iron pipe (or galvanized, whatever's handy), sliced at an angle, with a nut at the wedge end and a washer at the top end, could cost under $10 and work fine. You might need to weld the nut to the wedge to keep it from turning, or get creative to key them together by filing a matching shape into wedge and nut. You could even cut the angle with a hacksaw and dress the faces with a file, if you have no other way. 15 minutes, if you have a decently solid bench vise, hacksaw and a file.
Mark B
01-05-21, 04:47 PM
#8
Senior Member
Thread Starter
So how much force can I expect this to take to reshape the seat tube? This is pretty thin wall stuff, whatever it is....
Fortunately, this won't cost me a thing more than time waiting.
The drawing I gave him, along with your picture, calls out a 1.155" OD on the tool and .750" ID, leaving a .2025" wall thickness, using a 1/2"-13 UNC thread on the wedge. Thoughts?
Fortunately, this won't cost me a thing more than time waiting.
The drawing I gave him, along with your picture, calls out a 1.155" OD on the tool and .750" ID, leaving a .2025" wall thickness, using a 1/2"-13 UNC thread on the wedge. Thoughts?
Last edited by Smokinapankake; 01-05-21 at 04:51 PM.
01-05-21, 07:20 PM
#9
blahblahblah chrome moly
Join Date: Apr 2009
Location: Seattle
Posts: 1,993
Mentioned: 92 Post(s)
Tagged: 0 Thread(s)
Quoted: 1179 Post(s)
Liked 2,576 Times
in
1,076 Posts
So how much force can I expect this to take to reshape the seat tube? This is pretty thin wall stuff, whatever it is....
Fortunately, this won't cost me a thing more than time waiting.
The drawing I gave him, along with your picture, calls out a 1.155" OD on the tool and .750" ID, leaving a .2025" wall thickness, using a 1/2"-13 UNC thread on the wedge. Thoughts?
Fortunately, this won't cost me a thing more than time waiting.
The drawing I gave him, along with your picture, calls out a 1.155" OD on the tool and .750" ID, leaving a .2025" wall thickness, using a 1/2"-13 UNC thread on the wedge. Thoughts?
With the OD as large as you suggest, it still can work of you grind/file/machine a taper on the bottom of the wedge. A rounded transition at the bottom will be better than a sharp transition from tapered part to cylindrical part. Maybe smooth it by hand with a belt-sander or bench grinder.
With the full-diameter, and tapered bottom to the wedge, you'd have to insert it a little (until the dent stops you going further), expand, loosen and push it in a little deeper — repeat as many times as needed until the whole wedge (untapered part) has shown the indent who's boss.
Any wedge-expander like this wants to make a slightly oval hole, so you may have to rotate the tool clockwise & CCW a little to keep the tube round at that point. My idea of making it out of 1-1/8" stock would exaggerate that; your 1.155" post will have less tendency to make the hole oval. That's the advantage of being as close as possible to seatpost size. The advantage of the 1-1/8" tool is you may be able to insert it all the way into the dent on one go, rather than the incremental way I described. Maybe the ultimate would be to have both — start with the 1-1/8" to get the worst of the dent and finish with the 1.155". It's not practical (or necessary) to make the tool twice though.
Mark B
Likes For bulgie:
01-06-21, 07:47 AM
#10
Senior Member
Thread Starter
Thank you Mark for that well written procedure. I was having the same thoughts as to 1.155" being perhaps a bit large to fit on the initial go. The drawing I gave him called out a taper on the bottom edge of the wedge to help facilitate insertion, however I hadn't considered making a rounded transition. Makes sense. But I figure if necessary I can have my guy turn the tool down from that 1.155" to something a little smaller, like the 1.125 like you mentioned. Like I say, I've got all the time in the world to monkey around with this. I certainly don't want to rush it and screw it up worse.
The other thought I had was to make a tool that is just a solid mandrel with a bullet shaped nose that you pound down in there to re-form the tube, but getting it back out would be a problem. This method may require too much brute force for my comfort level. Maybe make the bullet nose tool out of 1.125" stock and then use the 1.155" wedge to finish er off?
The other thought I had was to make a tool that is just a solid mandrel with a bullet shaped nose that you pound down in there to re-form the tube, but getting it back out would be a problem. This method may require too much brute force for my comfort level. Maybe make the bullet nose tool out of 1.125" stock and then use the 1.155" wedge to finish er off?
01-06-21, 11:31 AM
#11
Senior Member
Join Date: Dec 2019
Posts: 956
Mentioned: 3 Post(s)
Tagged: 0 Thread(s)
Quoted: 321 Post(s)
Liked 263 Times
in
212 Posts
Thank you Mark for that well written procedure. I was having the same thoughts as to 1.155" being perhaps a bit large to fit on the initial go. The drawing I gave him called out a taper on the bottom edge of the wedge to help facilitate insertion, however I hadn't considered making a rounded transition. Makes sense. But I figure if necessary I can have my guy turn the tool down from that 1.155" to something a little smaller, like the 1.125 like you mentioned. Like I say, I've got all the time in the world to monkey around with this. I certainly don't want to rush it and screw it up worse.
The other thought I had was to make a tool that is just a solid mandrel with a bullet shaped nose that you pound down in there to re-form the tube, but getting it back out would be a problem. This method may require too much brute force for my comfort level. Maybe make the bullet nose tool out of 1.125" stock and then use the 1.155" wedge to finish er off?
The other thought I had was to make a tool that is just a solid mandrel with a bullet shaped nose that you pound down in there to re-form the tube, but getting it back out would be a problem. This method may require too much brute force for my comfort level. Maybe make the bullet nose tool out of 1.125" stock and then use the 1.155" wedge to finish er off?
01-06-21, 06:17 PM
#12
Randomhead
Join Date: Aug 2008
Location: Happy Valley, Pennsylvania
Posts: 24,399
Mentioned: 0 Post(s)
Tagged: 0 Thread(s)
Quoted: 4 Post(s)
Liked 3,699 Times
in
2,519 Posts
I think you need a wedge. A mandrel will not return the tube to its original shape. It needs to be over-stretched
Given how localized this is, a bar with a bit of a curve on the end might help get the wedge in there more easily
Given how localized this is, a bar with a bit of a curve on the end might help get the wedge in there more easily
01-06-21, 06:27 PM
#13
Senior Member
Thread Starter
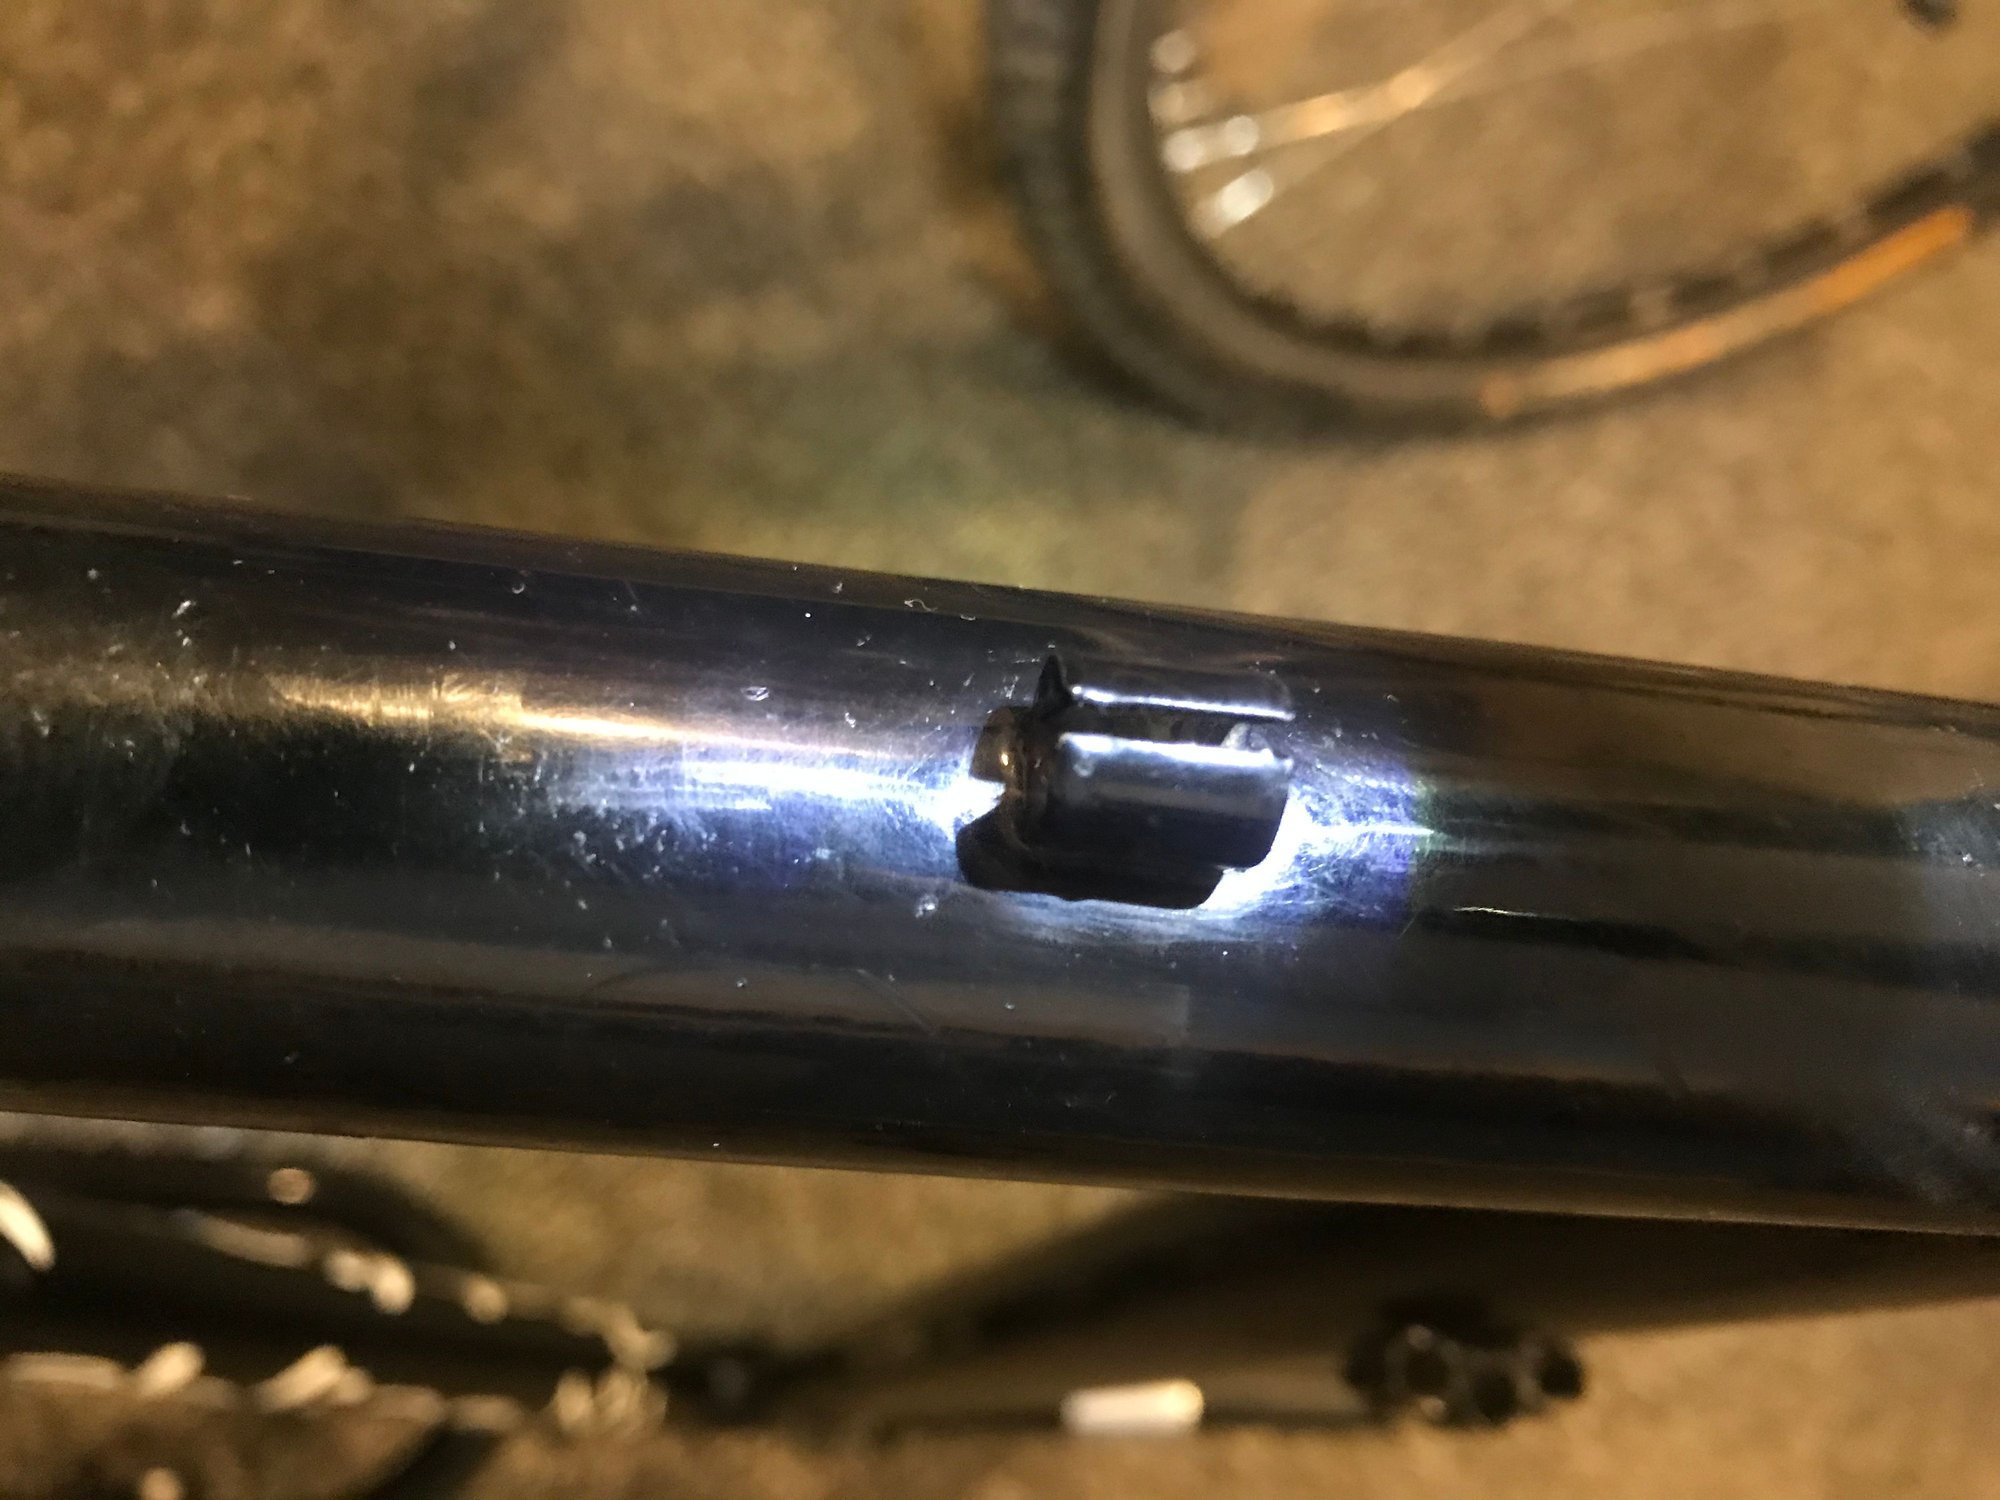
So my machinist pulled through. Behold the Re-bigulator:
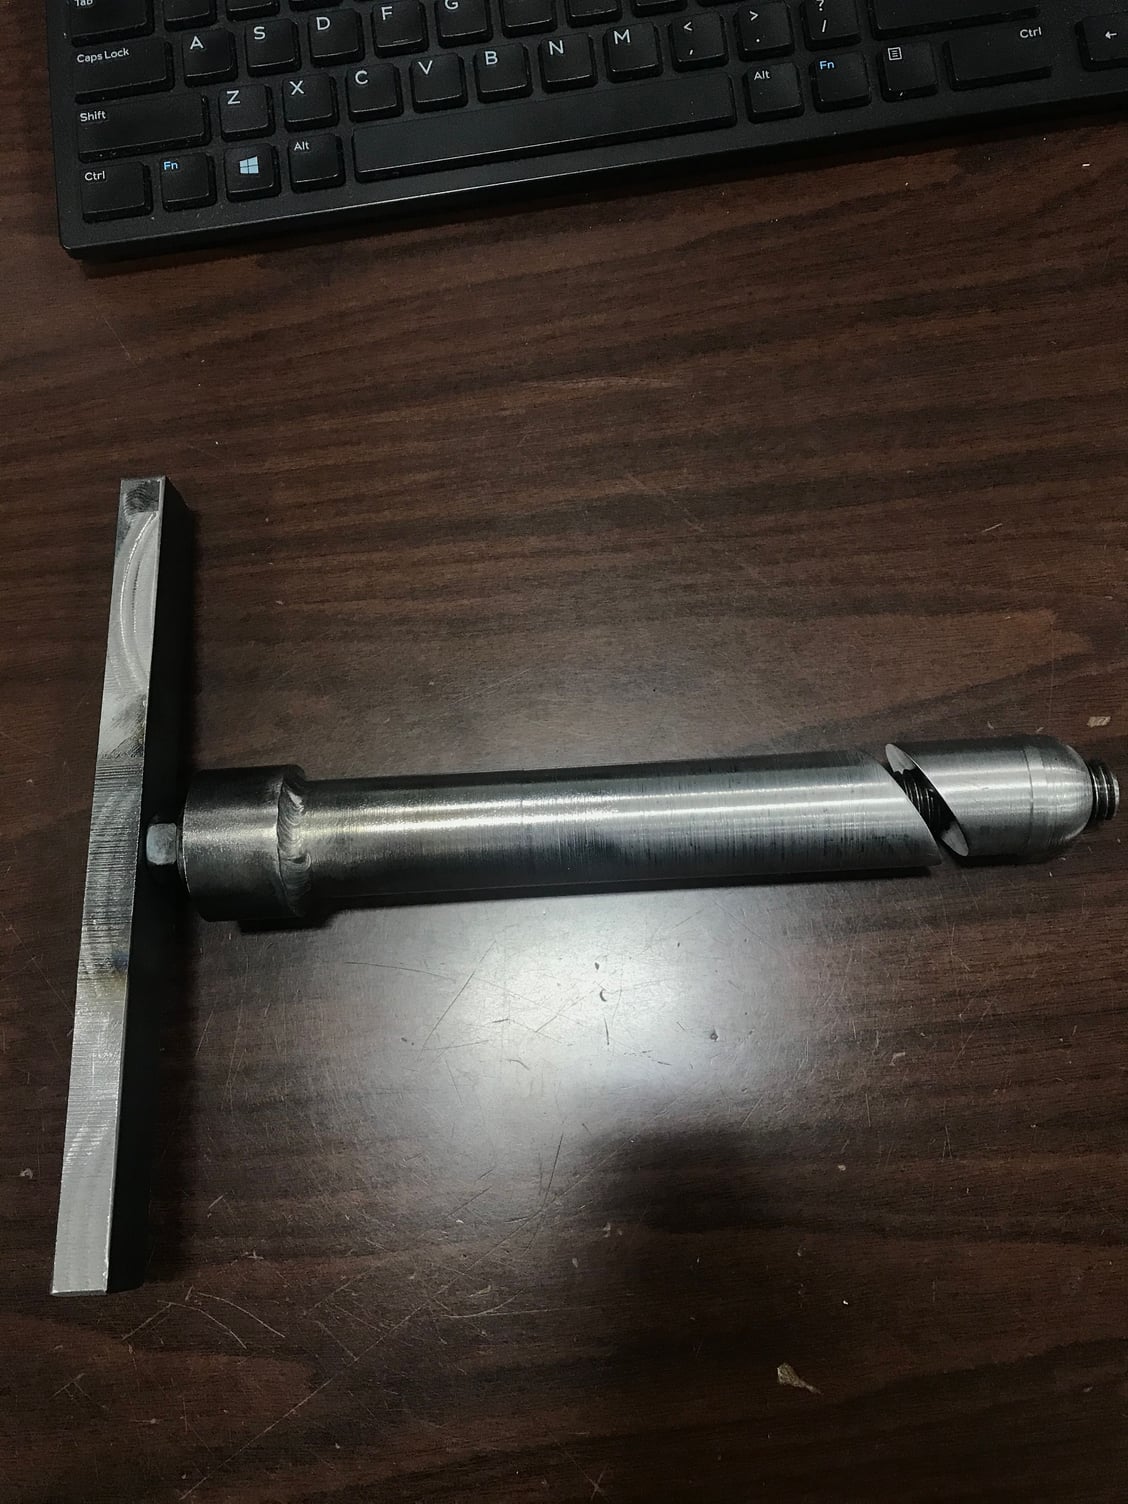
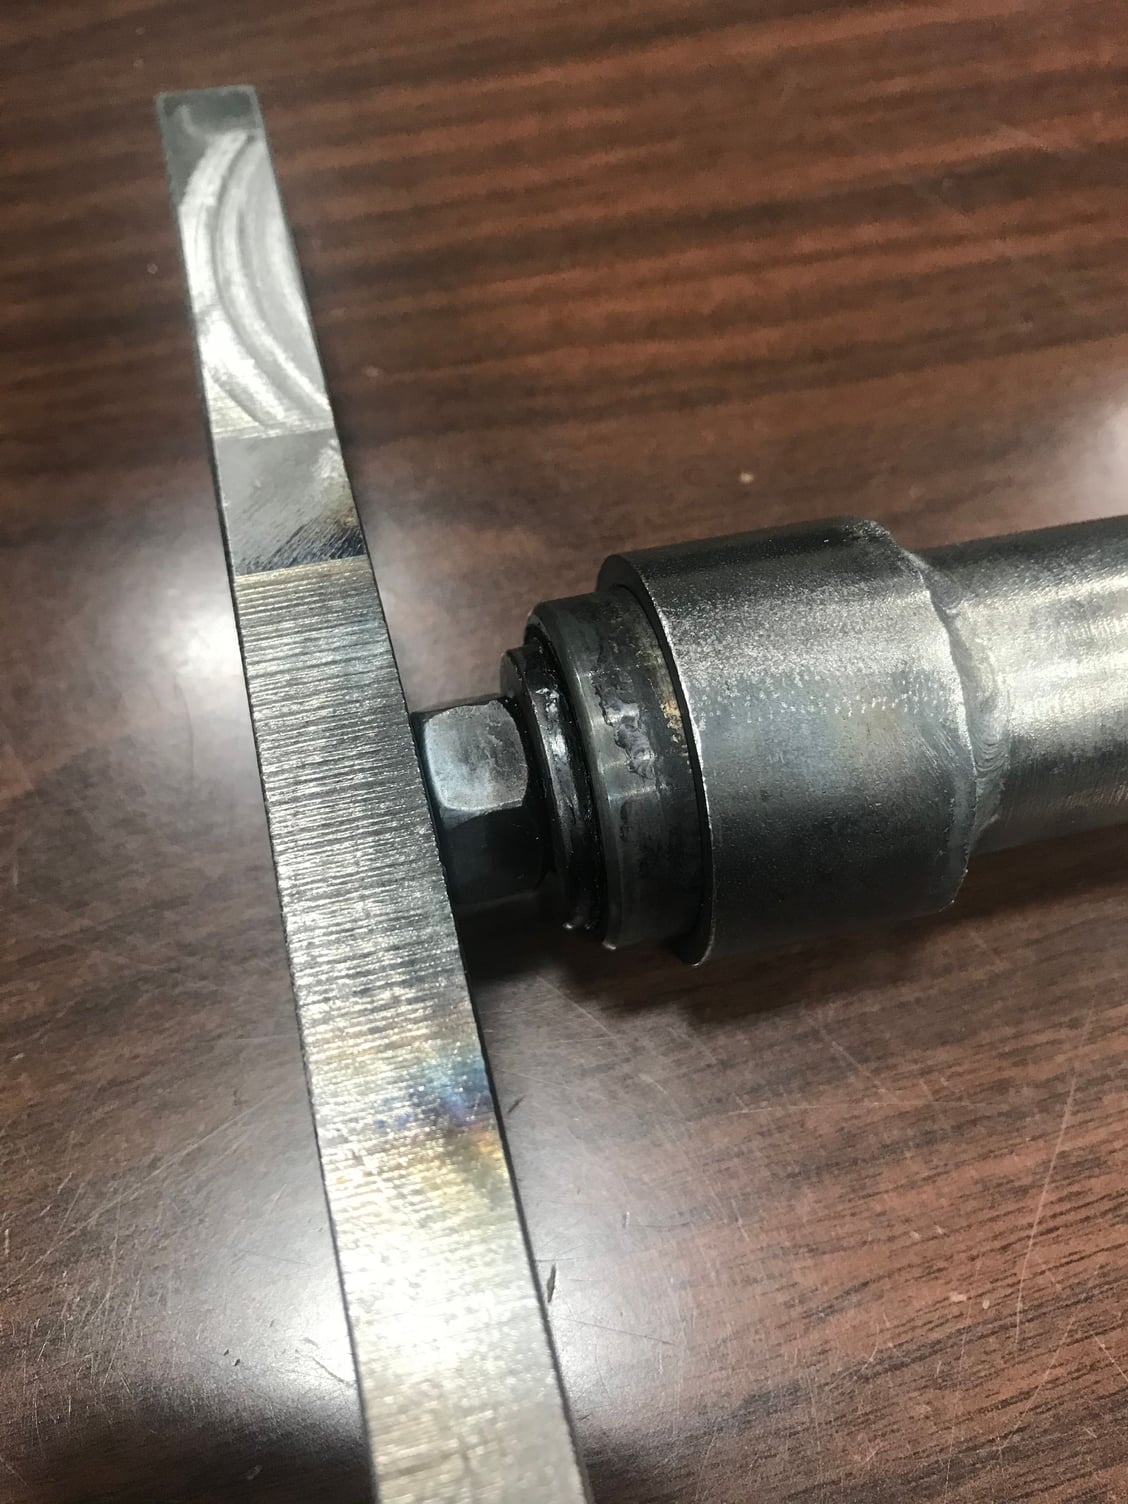
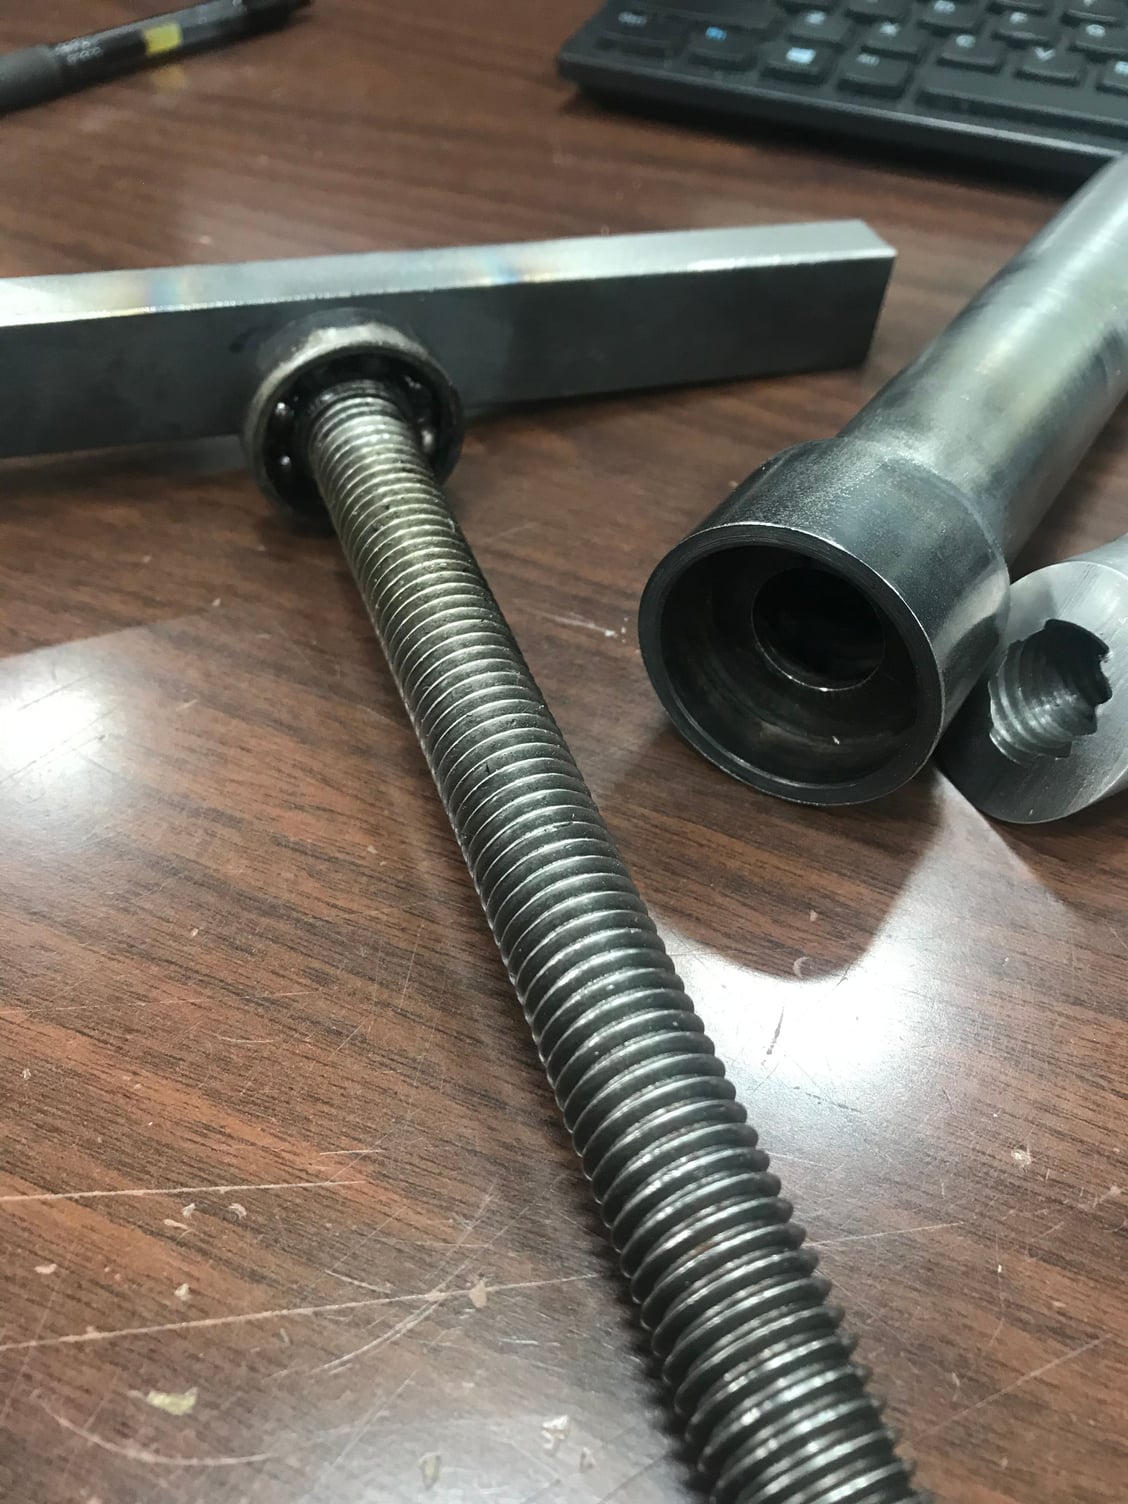
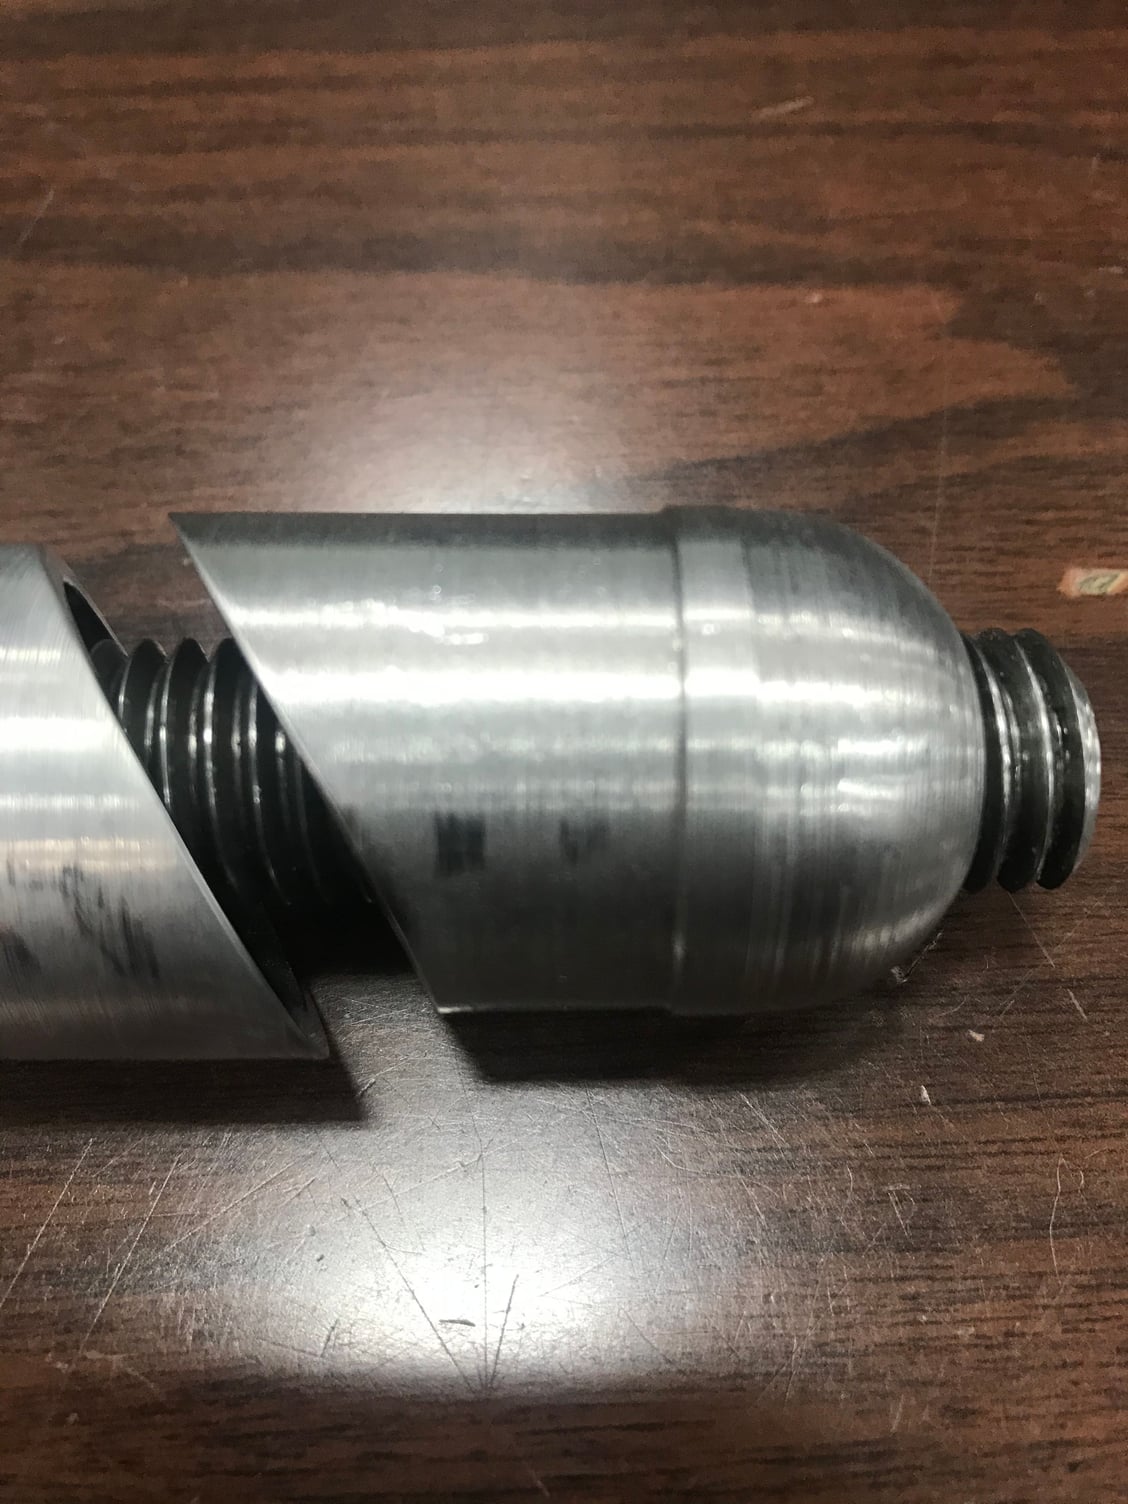
The bullnose on the wedge is intended to help it slide down into the dented area. The main body of the wedge is reduced in diameter; this was put on by him under his own initiative; not sure what his thinking was. That means that the short flat spot between the radiused end and the step will be where all the work will be done. Have to expand in small increments I guess. There is a bearing at the top to aid in turning the screw. The major diameter is 1.150, smaller than originally discussed. Preliminary testing is positive; I’m able to push the wedge all the way past the dent so should be able to expand without too much trouble.
The bullnose on the wedge is intended to help it slide down into the dented area. The main body of the wedge is reduced in diameter; this was put on by him under his own initiative; not sure what his thinking was. That means that the short flat spot between the radiused end and the step will be where all the work will be done. Have to expand in small increments I guess. There is a bearing at the top to aid in turning the screw. The major diameter is 1.150, smaller than originally discussed. Preliminary testing is positive; I’m able to push the wedge all the way past the dent so should be able to expand without too much trouble.
Likes For Smokinapankake:
01-06-21, 07:52 PM
#14
Senior Member
Thread Starter
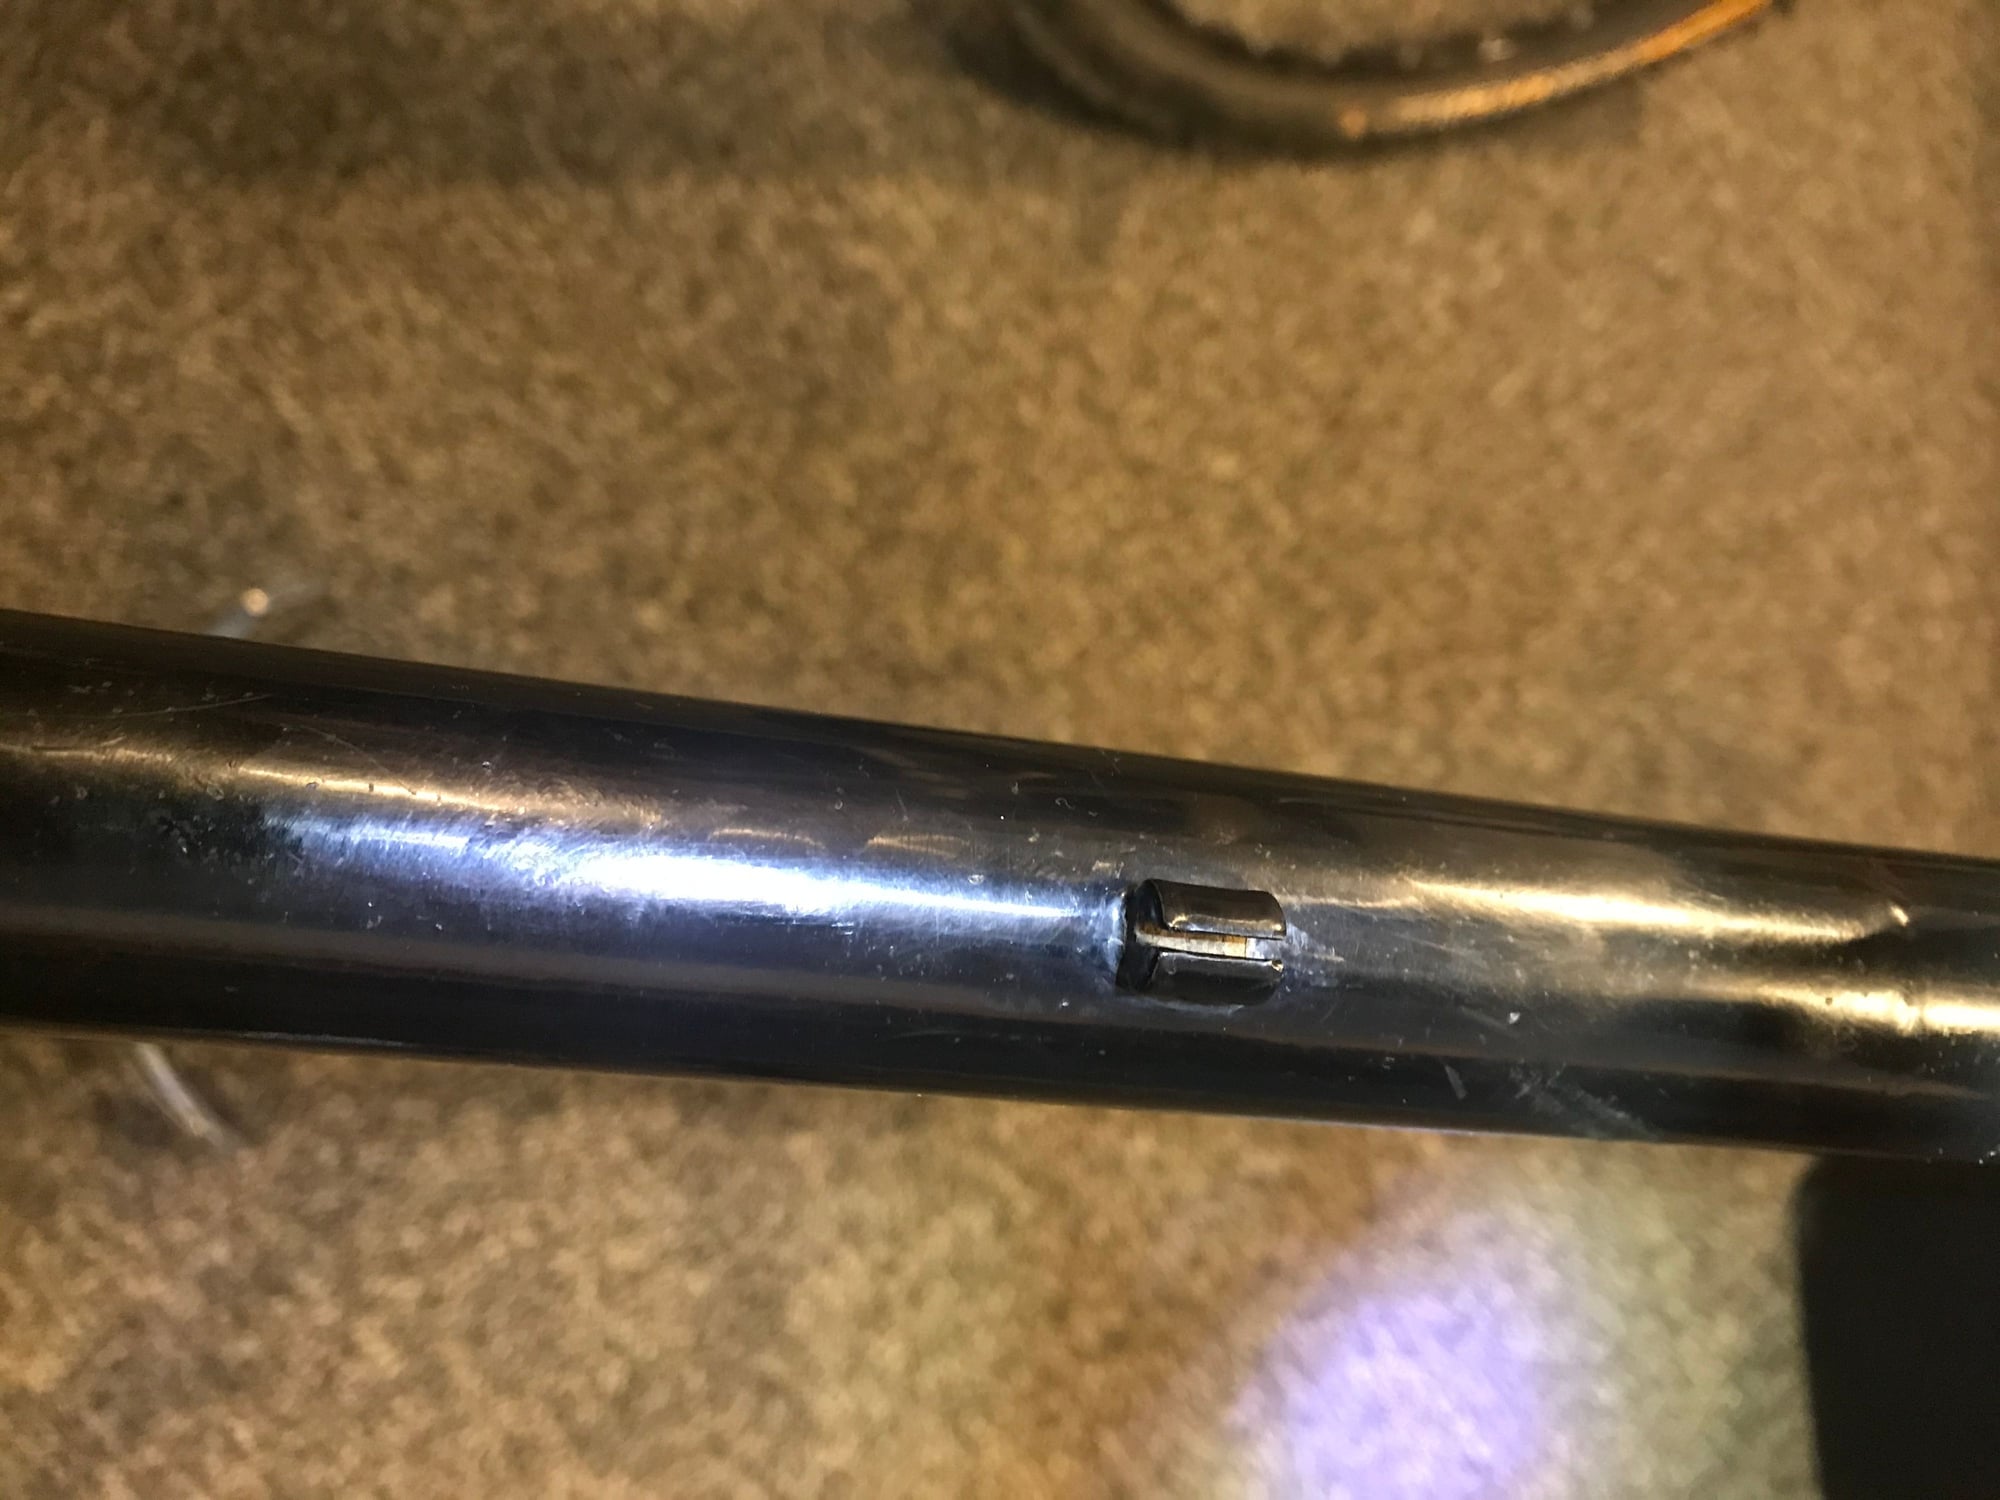
I think I’ve successfully effected a repair to the dented tube.
Before:

And after:
The true litmus test will be insertion of a correctly sized seatpost (29.2). If it slides all the way down to the bottle bosses I’m in fat city!
I think it’s still a little compressed but I don’t want to push too much yet without getting a feel for how a seatpost will fit.
Thoughts?
Before:
And after:
The true litmus test will be insertion of a correctly sized seatpost (29.2). If it slides all the way down to the bottle bosses I’m in fat city!
I think it’s still a little compressed but I don’t want to push too much yet without getting a feel for how a seatpost will fit.
Thoughts?
Likes For Smokinapankake:
01-06-21, 09:01 PM
#15
Senior Member
Thread Starter
The seat tube is internally butted for the top 3-1/2”. I think that’s kind of odd but it may not be. I’ve only ever seen externally butted seat tubes.
That said, I would think a proper sized seatpost should slide in without any problems. Also that said, why replace the perfectly good seatpost it came with (27.2, with a shim) for a correctly sized (29.2) post if only the top 3-1/2” of that 29.2 post will be supported in the frame?
And lastly, the shim it came with is just shy of 3” long. Should I be worried about it? Seems like a lot of very thin wall seat tube is not back supported by a seatpost. And my less than svelte 197 pounds ain’t gonna be kind to that frame... or am I overthinking this?
01-07-21, 03:28 AM
#16
Senior Member
Join Date: Dec 2019
Posts: 956
Mentioned: 3 Post(s)
Tagged: 0 Thread(s)
Quoted: 321 Post(s)
Liked 263 Times
in
212 Posts
That looks like a definite result, well done! Does the seatpost need to go that far down anyway? You could always consider reaming it if necessary. But this will remove a bit of metal. A 3" shim is probably long enough to support it well.
01-07-21, 10:06 AM
#17
Senior Member
Thread Starter
After a 2nd round of tube re-expansion, I think I’m done. Not going to touch it anymore.
Likes For Smokinapankake:
01-07-21, 07:56 PM
#18
Randomhead
Join Date: Aug 2008
Location: Happy Valley, Pennsylvania
Posts: 24,399
Mentioned: 0 Post(s)
Tagged: 0 Thread(s)
Quoted: 4 Post(s)
Liked 3,699 Times
in
2,519 Posts
That's a really nice implementation of that tool.
Columbus makes some butted seat tubes, e.g. Spirit
Columbus makes some butted seat tubes, e.g. Spirit
01-08-21, 02:42 AM
#19
Senior Member
Join Date: Dec 2019
Posts: 956
Mentioned: 3 Post(s)
Tagged: 0 Thread(s)
Quoted: 321 Post(s)
Liked 263 Times
in
212 Posts
The Reynolds ones are all butted too including the externally butted ones.
Basically butting is the main thing that Columbus and Reynolds actually do.
01-08-21, 08:10 AM
#20
Randomhead
Join Date: Aug 2008
Location: Happy Valley, Pennsylvania
Posts: 24,399
Mentioned: 0 Post(s)
Tagged: 0 Thread(s)
Quoted: 4 Post(s)
Liked 3,699 Times
in
2,519 Posts
Sorry, I should have been clear they are butted at the top, "triple butted" as some people like to call it. I call it double butted.
I stopped buying the double butted Spirit tubes after I got a defective one and I had a problem removing a stuck seatpost on another. The defective one has a 27.4 seatpost in it now, which is a pain.
There is a really tiny weight savings from .45 vs. .6 and it's not worth introducing any complications at all for that. Shave your arms and get the same weight savings (or don't).
