


Need help with Pinarello head badge
 12-16-19, 03:18 PM
#1
Junior Member
Thread Starter
Need help with Pinarello head badge
Hello everyone
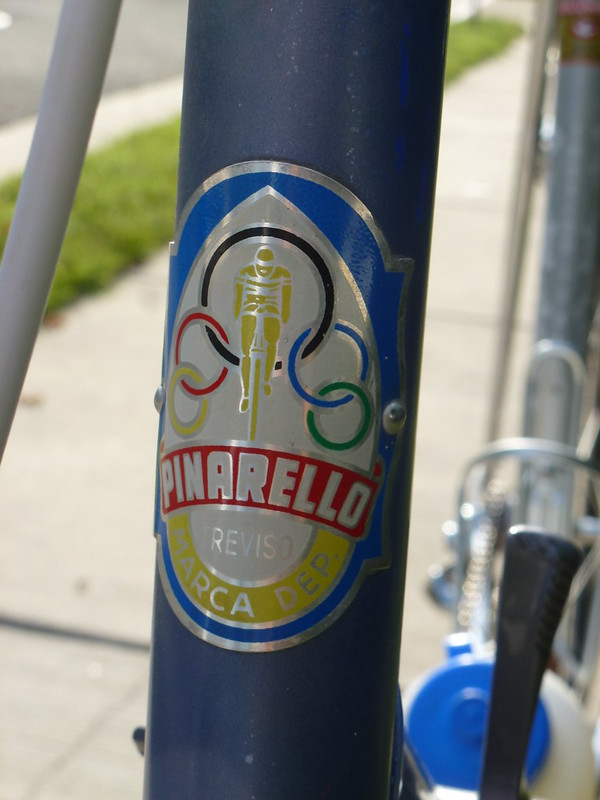
I have a 1983(ish) Treviso that is curently at the chrome and paint shop that I intend to fully restore, but it arrived in my possession without a head badge. Since these are extremely hard to find, I'm making a reproduction from steel and photoetching the areas to be painted. My problem is that when I dropped off the frame, I failed to measure the distance between the rivet holes. Since I won't have access to the frame for a few months I'm stuck with a problem.
I'm hoping one of my fellow vintage Pinarello owners can put a quick ruler to their head badge and give me this dimension! I'll say please please please and send flowers and chocolates and be eternally grateful!
Here's the artwork, I just need the rivet hole spacing
 12-16-19, 07:46 PM
#2
'84 and '09 Pinarellos

Join Date: Jul 2008
Location: Seattle, WA
Posts: 393
Bikes: '84 Pinarello Record Equipe rebuilt with Campy Chorus/ Record; 2009 Pinarello Paris/ Campy SR 11sp; Litespeed Tuscany w Campy SR 11 speed
Mentioned: 3 Post(s)
Tagged: 0 Thread(s)
Quoted: 12 Post(s)
Likes: 0
Liked 3 Times
in
1 Post
Mine is an 84 and has a decal, not a head badge.
12-16-19, 08:06 PM
#3

Forum Moderator
Join Date: Jul 2007
Location: Kalamazoo MI
Posts: 20,669
Bikes: Fuji SL2.1 Carbon Di2 Cannondale Synapse Alloy 4 Trek Checkpoint ALR-5 Viscount Aerospace Pro Colnago Classic Rabobank Raleigh C50 Cromoly Hybrid Legnano Tipo Roma Pista
Mentioned: 59 Post(s)
Tagged: 0 Thread(s)
Quoted: 3100 Post(s)
Liked 6,636 Times
in
3,800 Posts
My 97-ish Stelvio had a headbadge. I sold it this fall to forum member blart. He may be willing to measure it.
07-02-20, 08:11 PM
#4
Junior Member
Thread Starter
Hey folks
I'm continuing this thread to show Everyone what has conspire over the past 6 months. The artwork above was refined and badges have been fabricated, first in stainless steel, which turned out to be too difficult to work, then in brass.The brass badges look fantastic and I’m going to try a couple different finishes to see what works best. The steel is .010 with .03 etch and it just looks too flat. The bronze is .030 with .15 etch and looks much better and close to the stamped metal of the original badges.

I'm continuing this thread to show Everyone what has conspire over the past 6 months. The artwork above was refined and badges have been fabricated, first in stainless steel, which turned out to be too difficult to work, then in brass.The brass badges look fantastic and I’m going to try a couple different finishes to see what works best. The steel is .010 with .03 etch and it just looks too flat. The bronze is .030 with .15 etch and looks much better and close to the stamped metal of the original badges.
Last edited by Vince Hoffmann; 07-03-20 at 10:44 PM.
07-02-20, 08:29 PM
#5
Senior Member

Join Date: Aug 2010
Location: Wurundjeri Country
Posts: 2,475
Mentioned: 32 Post(s)
Tagged: 0 Thread(s)
Quoted: 1084 Post(s)
Liked 1,904 Times
in
934 Posts
Holy moly, they look AMAZING!
Agree the bronze has a bit more 'depth'. Is the intent to paint it? Just wondering how the paint goes on either material.
Agree the bronze has a bit more 'depth'. Is the intent to paint it? Just wondering how the paint goes on either material.
07-03-20, 01:17 AM
#6

Senior Member

Join Date: Apr 2007
Location: Thunder Bay, Ontario, Canada - burrrrr!
Posts: 11,677
Bikes: 1958 Rabeneick 120D, 1968 Legnano Gran Premio, 196? Torpado Professional, 2000 Marinoni Piuma
Mentioned: 210 Post(s)
Tagged: 0 Thread(s)
Quoted: 1372 Post(s)
Likes: 0
Liked 1,755 Times
in
941 Posts
I would be very interested in seeing details of the fabrication process. That said, very well done! I am impressed.
__________________
"98% of the bikes I buy are projects".
"98% of the bikes I buy are projects".
07-03-20, 06:26 AM
#7
Full Member
Join Date: Apr 2019
Location: Northern NJ
Posts: 419
Bikes: 1987 Pinarello Montello, 1996 Litespeed Classic, 1996 Colnago Master Light, 1997 Litespeed Ultimate, 2006 Opera Leonardo FP, 2006 Pinarello Paris FP, 1984 Pinarello Record, 89-ish Cornelo Profilo
Mentioned: 5 Post(s)
Tagged: 0 Thread(s)
Quoted: 148 Post(s)
Liked 119 Times
in
73 Posts
Actually, I like the stainless one. Might look really good as is, unpainted.
07-03-20, 08:23 AM
#8
Senior Member
Join Date: May 2008
Location: Fredericksburg, Va
Posts: 9,581
Bikes: '65 Frejus TDF, '73 Bottecchia Giro d'Italia, '83 Colnago Superissimo, '84 Trek 610, '84 Trek 760, '88 Pinarello Veneto, '88 De Rosa Pro, '89 Pinarello Montello, '94 Burley Duet, 97 Specialized RockHopper, 2010 Langster, Tern Link D8
Mentioned: 73 Post(s)
Tagged: 0 Thread(s)
Quoted: 1610 Post(s)
Liked 2,216 Times
in
1,103 Posts
Vince Hoffmann Just found this thread. Nice job! How many are you going to make?
I did hunt for one for my daughters Pin but gave up. The bike drastically needed repaint but he badge is in really bad condition. We agreed that the "Patina" should be retained to capture the original condition. Note the paint next to the badge on the bottom right. The whole frame was like this.
 P1000968, on Flickr
My Montello badge. No raised portions on the badge. Looks to be silk screened.
 P1020145, on Flickr
I did hunt for one for my daughters Pin but gave up. The bike drastically needed repaint but he badge is in really bad condition. We agreed that the "Patina" should be retained to capture the original condition. Note the paint next to the badge on the bottom right. The whole frame was like this.
P1000968, on FlickrMy Montello badge. No raised portions on the badge. Looks to be silk screened.
P1020145, on Flickr
__________________
Bikes don't stand alone. They are two tired.
Bikes don't stand alone. They are two tired.
Last edited by SJX426; 07-03-20 at 08:26 AM.
07-03-20, 11:15 AM
#9
Senior Member
Join Date: Apr 2007
Location: Thunder Bay, Ontario, Canada - burrrrr!
Posts: 11,677
Bikes: 1958 Rabeneick 120D, 1968 Legnano Gran Premio, 196? Torpado Professional, 2000 Marinoni Piuma
Mentioned: 210 Post(s)
Tagged: 0 Thread(s)
Quoted: 1372 Post(s)
Likes: 0
Liked 1,755 Times
in
941 Posts
Needless to say but I will say it anyway, I did not remove my headbadge to measure the rivet location holes. That said, fitted to the curve of the head tube, I get 32.5 mm or roughly 1.29 inches. Hope that that is a help and hope that my poor old eyes really saw what I think they saw. The badge, itself, is pretty much smooth with no embossing of any kind, although I can feel slight variations between colors.
__________________
"98% of the bikes I buy are projects".
"98% of the bikes I buy are projects".
07-03-20, 11:24 AM
#10
Senior Member

Join Date: Jun 2008
Location: Louisville, KY
Posts: 13,456
Mentioned: 33 Post(s)
Tagged: 0 Thread(s)
Quoted: 4247 Post(s)
Liked 2,958 Times
in
1,816 Posts
super cool. Is riveting the new ones in going to be a major pain?
07-03-20, 11:31 AM
#11
Senior Member

Join Date: Mar 2014
Location: City of Angels
Posts: 4,870
Bikes: A few too many
Mentioned: 42 Post(s)
Tagged: 1 Thread(s)
Quoted: 1364 Post(s)
Liked 2,182 Times
in
1,184 Posts
Great job, I hope that you will share the process, I believe there are a few members that could benefit from the process....I assume the measurement you used took the curve of the badge into account.
Please post the final results and installation etc.
Ben
Please post the final results and installation etc.
Ben
07-03-20, 01:53 PM
#12
Senior Member
Join Date: Apr 2007
Location: Thunder Bay, Ontario, Canada - burrrrr!
Posts: 11,677
Bikes: 1958 Rabeneick 120D, 1968 Legnano Gran Premio, 196? Torpado Professional, 2000 Marinoni Piuma
Mentioned: 210 Post(s)
Tagged: 0 Thread(s)
Quoted: 1372 Post(s)
Likes: 0
Liked 1,755 Times
in
941 Posts
I assume the measurement you used took the curve of the badge into account.
__________________
"98% of the bikes I buy are projects".
"98% of the bikes I buy are projects".
07-03-20, 02:54 PM
#13
Junior Member
Thread Starter
Thanks for the kudos folks! The badges are photo etched. I spent about 3 weeks making the artwork in AutoCAD then imported the artwork into Illustrator to make the masks which is basically a reverse image. My first attempt in steel look fantastic, but even as thin as it is, the metal won�t easily bend. I can�t photoetch aluminum, so I used brass instead.
I can make as many as I like but i don�t know if Pinarello would take issue with me making replicas of their badges... any lawyers out there who can give me advise? 😊
here�s a picture of the painted badge... I currently have 6 of each, steel and brass And it takes about 1 week to make a new batch of 6.
07-03-20, 03:43 PM
#14
Senior Member
Join Date: May 2008
Location: Fredericksburg, Va
Posts: 9,581
Bikes: '65 Frejus TDF, '73 Bottecchia Giro d'Italia, '83 Colnago Superissimo, '84 Trek 610, '84 Trek 760, '88 Pinarello Veneto, '88 De Rosa Pro, '89 Pinarello Montello, '94 Burley Duet, 97 Specialized RockHopper, 2010 Langster, Tern Link D8
Mentioned: 73 Post(s)
Tagged: 0 Thread(s)
Quoted: 1610 Post(s)
Liked 2,216 Times
in
1,103 Posts
Very cool! Better than the original! I like!
__________________
Bikes don't stand alone. They are two tired.
Bikes don't stand alone. They are two tired.
07-03-20, 03:58 PM
#15
Senior Member
Join Date: Mar 2014
Location: City of Angels
Posts: 4,870
Bikes: A few too many
Mentioned: 42 Post(s)
Tagged: 1 Thread(s)
Quoted: 1364 Post(s)
Liked 2,182 Times
in
1,184 Posts
Nice!
07-03-20, 05:19 PM
#16
Senior Member
Join Date: Aug 2010
Location: Wurundjeri Country
Posts: 2,475
Mentioned: 32 Post(s)
Tagged: 0 Thread(s)
Quoted: 1084 Post(s)
Liked 1,904 Times
in
934 Posts
This just keeps getting better. How do you bend them and do you do that before or after painting?
Man, I wish you did this before I restored my Montello!
It�s no different to reproduction decals which are legitimate businesses. I don�t think Pinarello is losing out on too much money because a handful of retrogrouches replace their head badges!
Man, I wish you did this before I restored my Montello!
It�s no different to reproduction decals which are legitimate businesses. I don�t think Pinarello is losing out on too much money because a handful of retrogrouches replace their head badges!
Likes For P!N20:
07-03-20, 05:43 PM
#17
Senior Member
Join Date: Mar 2014
Location: City of Angels
Posts: 4,870
Bikes: A few too many
Mentioned: 42 Post(s)
Tagged: 1 Thread(s)
Quoted: 1364 Post(s)
Liked 2,182 Times
in
1,184 Posts
I would bend and apply before the paint has a chance to really harden, lessening the chance of cracking.
Really looks good.
BTW I guess if the paint "cracks/peels" it will make them appear original...we all know how to tell if the bike we are looking at is a real PINA,
don't we?
Ben
Really looks good.
BTW I guess if the paint "cracks/peels" it will make them appear original...we all know how to tell if the bike we are looking at is a real PINA,
don't we?
Ben
Likes For xiaoman1:
07-04-20, 03:20 PM
#18
Junior Member
Thread Starter
 07-04-20, 04:29 PM
#19

Senior Member
Join Date: Jun 2006
Posts: 20,305
Mentioned: 130 Post(s)
Tagged: 0 Thread(s)
Quoted: 3464 Post(s)
Liked 2,834 Times
in
1,998 Posts
Those turned out very well.
back in school I used a photo-etched Process to create �molded in� identification for a few product design visual models.
that source vanished, they etched into a magnesium plate, that started about .060� thick. I set the plate into the model. Appeared very authentic.
art was done the old way, by hand, photo reduced and a reverse neg providing the basis for photo printing the resist on the plate.
I must laugh, my garage was broken into one night and tools were stolen, one was a model of a saber saw I did- thief must have been very bummed when he plugged in the model thinking it was going to work, I tried making it real in heft and the trigger control even had a spring return feel. The guy bypassed my Masi track bike frame hanging on the wall! Small favors.
good work.
07-04-20, 10:24 PM
#20
Junior Member
Thread Starter
Thank you! The fully painted badge in the pics has some issues because it is my experimental copy, but the others are turning out very nice. I admit it was (and still is) a lot of effort to produce these but I think its fun and a challenge!
Good to know your Masi remains in your possession, nobody ever accused a thief of being smart!
Good to know your Masi remains in your possession, nobody ever accused a thief of being smart!
02-18-21, 01:44 AM
#22
Senior Member
Join Date: Jun 2019
Posts: 641
Mentioned: 16 Post(s)
Tagged: 0 Thread(s)
Quoted: 346 Post(s)
Likes: 0
Liked 398 Times
in
260 Posts
E-bay seller ( farrak) makes badges.
See #233653589450
See#233581217709
See#233780688382
farrak's badges are a simple way to instantly upgrade those old SEARS free spirits........just repaint them, buy a replica decal set from another, different E-bayer who is in the U.K. who produces near perfect replica decal sets of all the treasured classic European marques. Then add farrak's eyecatching badge to finish the brilliant transformation!
02-18-21, 11:41 AM
#23
Full Member
Join Date: Apr 2019
Location: Northern NJ
Posts: 419
Bikes: 1987 Pinarello Montello, 1996 Litespeed Classic, 1996 Colnago Master Light, 1997 Litespeed Ultimate, 2006 Opera Leonardo FP, 2006 Pinarello Paris FP, 1984 Pinarello Record, 89-ish Cornelo Profilo
Mentioned: 5 Post(s)
Tagged: 0 Thread(s)
Quoted: 148 Post(s)
Liked 119 Times
in
73 Posts
E-bay seller ( farrak) makes badges.
See #233653589450
See#233581217709
See#233780688382
farrak's badges are a simple way to instantly upgrade those old SEARS free spirits........just repaint them, buy a replica decal set from another, different E-bayer who is in the U.K. who produces near perfect replica decal sets of all the treasured classic European marques. Then add farrak's eyecatching badge to finish the brilliant transformation!
See #233653589450
See#233581217709
See#233780688382
farrak's badges are a simple way to instantly upgrade those old SEARS free spirits........just repaint them, buy a replica decal set from another, different E-bayer who is in the U.K. who produces near perfect replica decal sets of all the treasured classic European marques. Then add farrak's eyecatching badge to finish the brilliant transformation!
I think I'll be putting one of these on the next time I need to replace a head tube badge (my Litepseed Ultimate's badge fell off): https://www.newbelgium.com/shop/30th...ry-bike-badge/
02-18-21, 01:10 PM
#25
Full Member
Join Date: Apr 2019
Location: Northern NJ
Posts: 419
Bikes: 1987 Pinarello Montello, 1996 Litespeed Classic, 1996 Colnago Master Light, 1997 Litespeed Ultimate, 2006 Opera Leonardo FP, 2006 Pinarello Paris FP, 1984 Pinarello Record, 89-ish Cornelo Profilo
Mentioned: 5 Post(s)
Tagged: 0 Thread(s)
Quoted: 148 Post(s)
Liked 119 Times
in
73 Posts
I meant the thickness of the material - is it tin foil or proper thick sheetmetal?