


Touching up a Trek
 02-04-20, 11:39 AM
#1

Senior Member
Thread Starter
Join Date: Apr 2014
Location: Back in Lincoln Sq, Chicago...🙄
Posts: 1,609
Bikes: '84 Miyata 610 �91 Cannondale ST600,'83 Trek 720 �84 Trek 520, 620, �91 Miyata 1000LT, '79 Trek 514, '78 Trek 706, '73 Raleigh Int. frame.
Mentioned: 13 Post(s)
Tagged: 0 Thread(s)
Quoted: 684 Post(s)
Liked 370 Times
in
219 Posts
Touching up a Trek
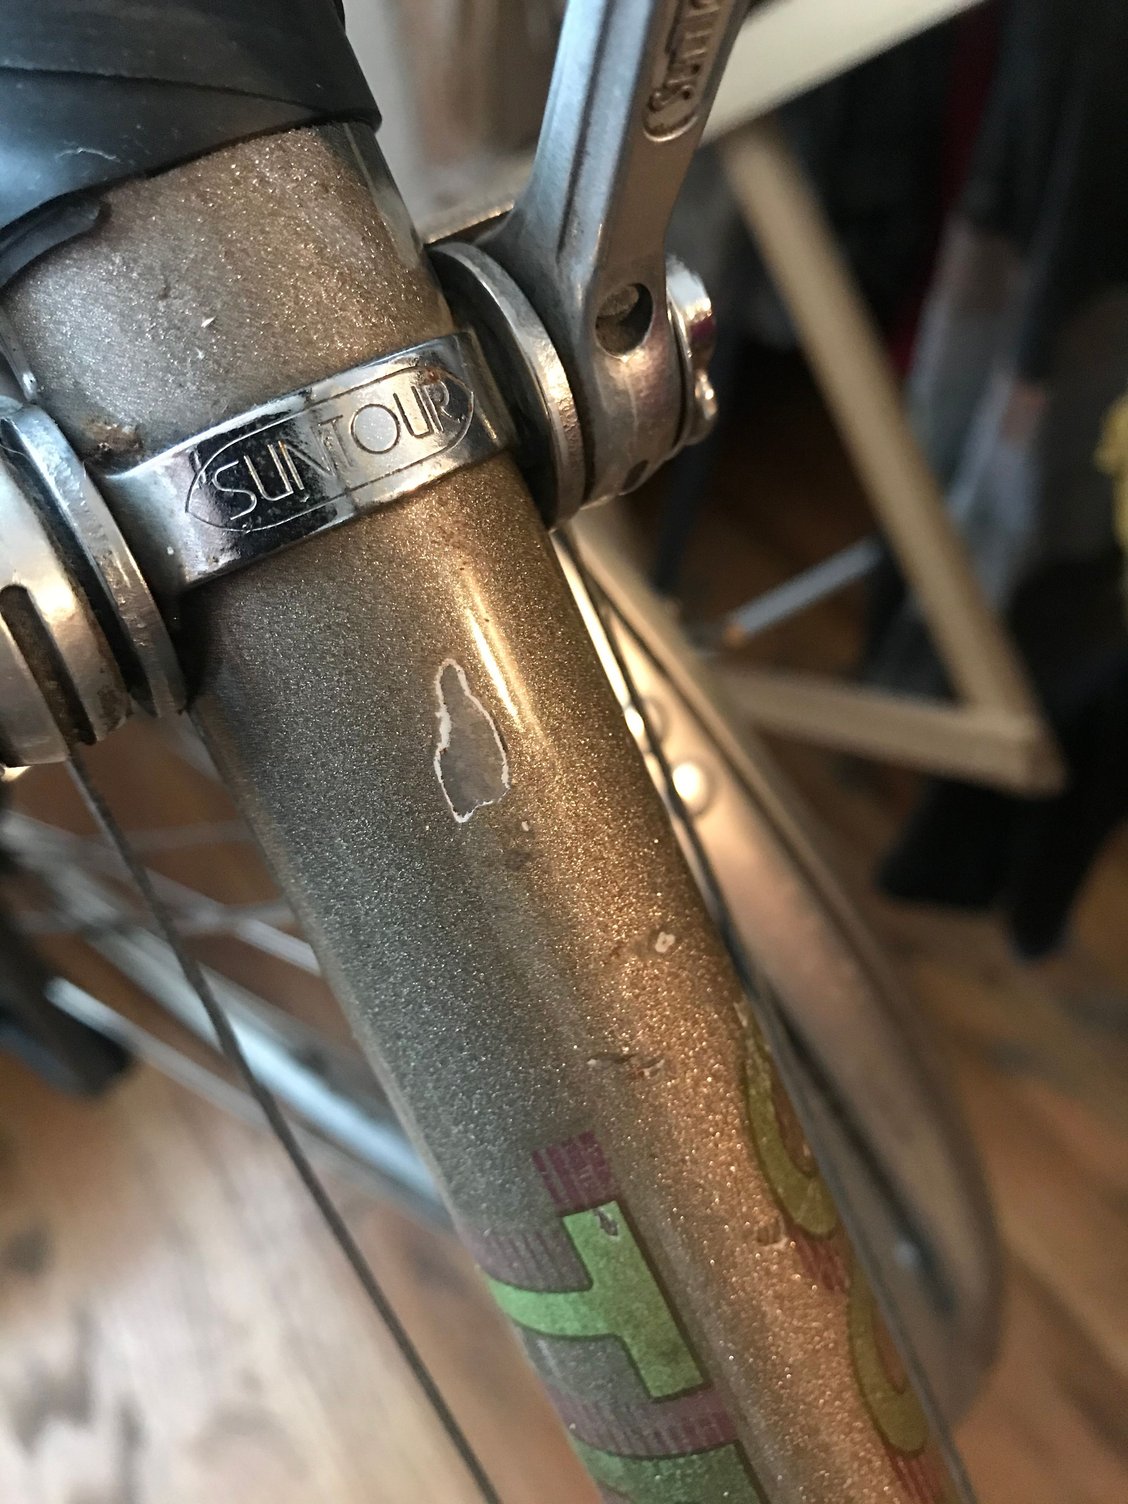
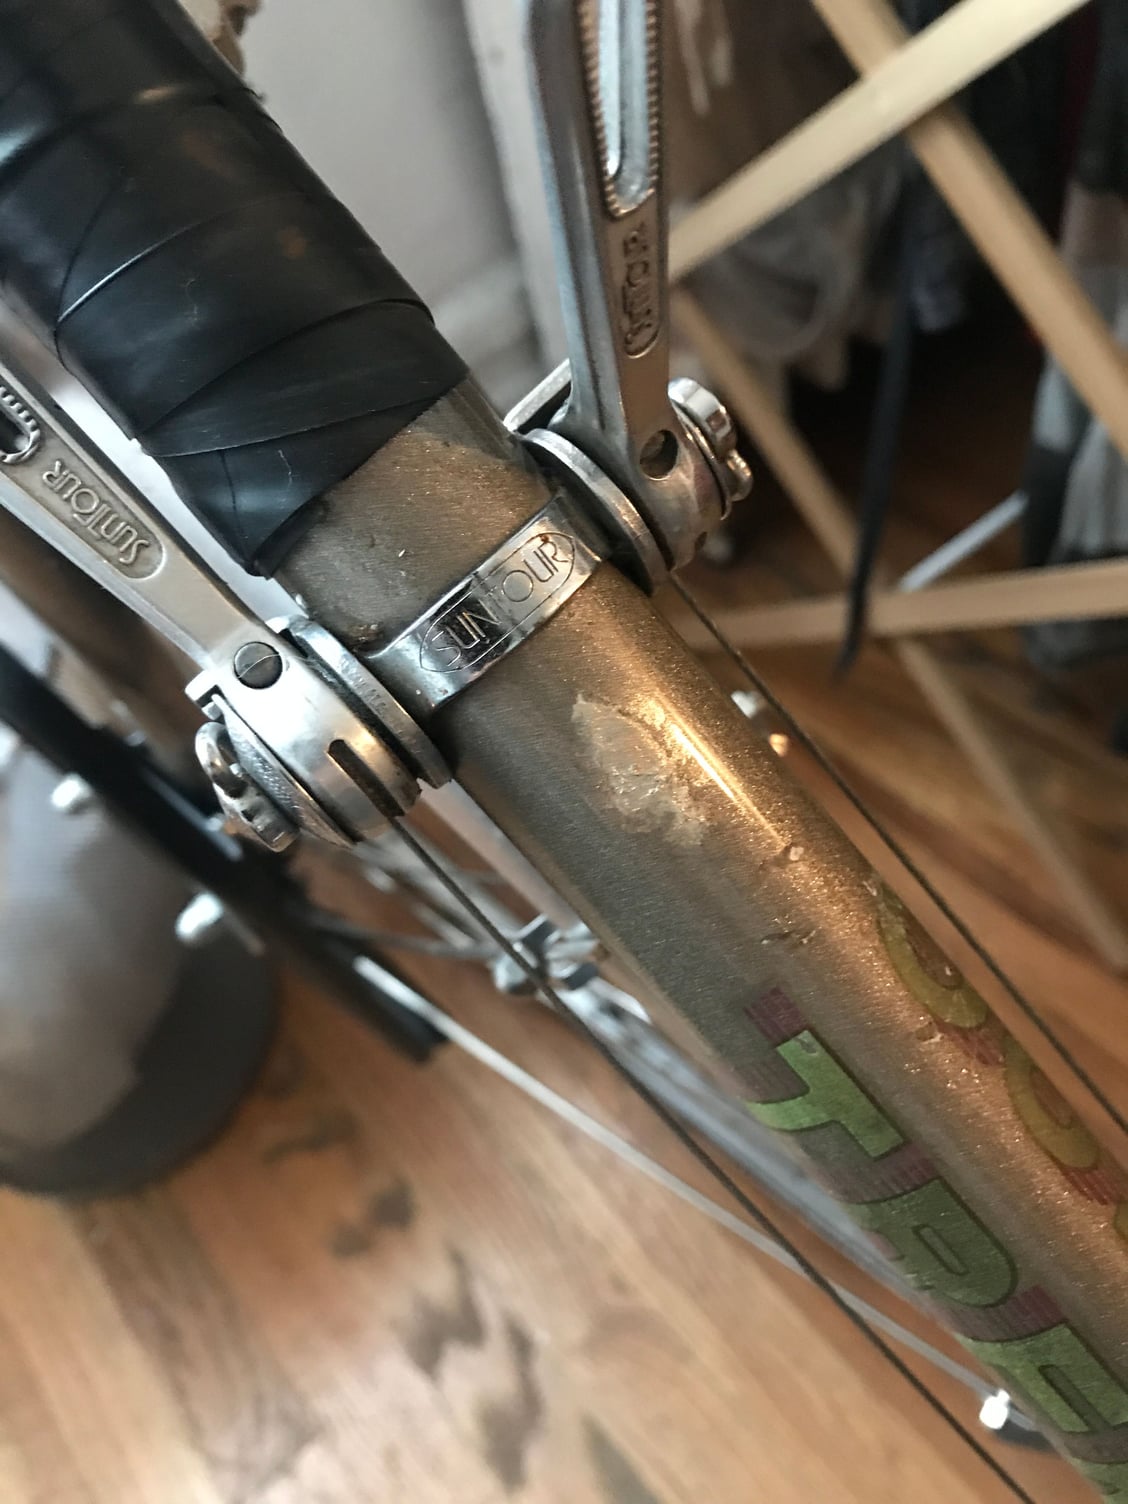
My daily use bike is an '84 Trek 520. It's in decent shape but does have rust beginning to form on the cable guides and the corner edges of some of the lugs.
My plan is to hit the rust with naval jelly, and touch up with some Rust-Oleum painted on with a tiny brush or q-tip.
The bike is a flaked antique gold color (if you're being generous, "metallic baby poo" if you're not).
Failing an "exact" exact match would it be better to be off slightly lighter or darker in color?
 02-04-20, 11:43 AM
#2
PM me your cotters

Join Date: Jun 2015
Location: ATL
Posts: 3,241
Mentioned: 80 Post(s)
Tagged: 0 Thread(s)
Quoted: 1137 Post(s)
Liked 588 Times
in
420 Posts
I prefer to be off a bit lighter. Think about it: How many bikes have you seen with freckles all over because the touch-up is darker? It's more difficult to see lighter color spots than darker color.
That said, paints always look darker and more saturated depending on the background and where you're viewing, so it may just be best to aim for something lighter and be done.
Someone gave me a great idea a while back. Ride your bike through a heavily populated parking lot on a sunny day. Try to find a car roughly the same color. Then get a batch of fresh touch-up paint from automotivetouchup.com and you're virtually guaranteed to get what you're looking for.
For cable guide rusty spots, I like to get oversized cotton swabs, soak them in Evap-o-rust, insert into the cable guide, then wrap the tube and cable guide in saran wrap for 24 hours to keep the cotton wet. Rinse liberally after, it will absolutely neutralize the rust. You can always follow-up with naval jelly in the same manner though.
Cotton make-up pads also work great with Evap-o-rust on tubes.
__________________
███████████████
███████████████
Likes For francophile:
02-04-20, 12:03 PM
#3
Senior Member
Join Date: May 2011
Location: Seattle WA
Posts: 2,841
Bikes: 2009 Handsome Devil, 1987 Trek 520 Cirrus, 1978 Motobecane Grand Touring, 1987 Nishiki Cresta GT, 1989 Specialized Allez Former bikes; 1986 Miyata Trail Runner, 1979 Miyata 912, 2011 VO Rando, 1999 Cannondale R800, 1986 Schwinn Passage
Mentioned: 72 Post(s)
Tagged: 0 Thread(s)
Quoted: 796 Post(s)
Liked 522 Times
in
367 Posts
I am intending to go to Lowes for a paint match for the 87 Trek 520 I am in the process of rebuilding, I have taken care of the rust and from another forum members account you can get a small batch of acrylic paint for about $5 at Lowes I believe they took in their fork to have it matched. YMMV
Last edited by ryansu; 02-04-20 at 02:39 PM.
02-04-20, 12:15 PM
#4
Senior Member
Join Date: Jan 2004
Location: Madison, WI USA
Posts: 6,141
Mentioned: 50 Post(s)
Tagged: 0 Thread(s)
Quoted: 2356 Post(s)
Liked 1,743 Times
in
1,187 Posts
The other advantage with erring on the light side is that, if you're custom mixing and going for "successive approximations", it's easier to darken from too light than it is to lighten from too dark.
Likes For madpogue:
02-04-20, 01:54 PM
#5
Senior Member
Thread Starter
Join Date: Apr 2014
Location: Back in Lincoln Sq, Chicago...🙄
Posts: 1,609
Bikes: '84 Miyata 610 �91 Cannondale ST600,'83 Trek 720 �84 Trek 520, 620, �91 Miyata 1000LT, '79 Trek 514, '78 Trek 706, '73 Raleigh Int. frame.
Mentioned: 13 Post(s)
Tagged: 0 Thread(s)
Quoted: 684 Post(s)
Liked 370 Times
in
219 Posts
I'm looking at this:

Looks good under a hot flash
Looks good under a hot flash
02-04-20, 01:57 PM
#6
PM me your cotters
Join Date: Jun 2015
Location: ATL
Posts: 3,241
Mentioned: 80 Post(s)
Tagged: 0 Thread(s)
Quoted: 1137 Post(s)
Liked 588 Times
in
420 Posts
I think that's too dark, personally. However the cap representation is rarely ever accurate. Note, you can mix whites and blacks into your paints (even for metallics) to slightly lighten or darken things. It doesn't always work flawlessly, but for tiny spots like what I see in this pic, it's negligible.
__________________
███████████████
███████████████
02-04-20, 02:14 PM
#7
Senior Member
Thread Starter
Join Date: Apr 2014
Location: Back in Lincoln Sq, Chicago...🙄
Posts: 1,609
Bikes: '84 Miyata 610 �91 Cannondale ST600,'83 Trek 720 �84 Trek 520, 620, �91 Miyata 1000LT, '79 Trek 514, '78 Trek 706, '73 Raleigh Int. frame.
Mentioned: 13 Post(s)
Tagged: 0 Thread(s)
Quoted: 684 Post(s)
Liked 370 Times
in
219 Posts
Thank you, that's the lightest metallic gold-ish color I seem to see on Amazon. I'll try mixing in some white.
Let me put up a couple shots of the rust I'm talking about, it's not bad at all, but I'd like to arrest any spreading sooner rather than later.
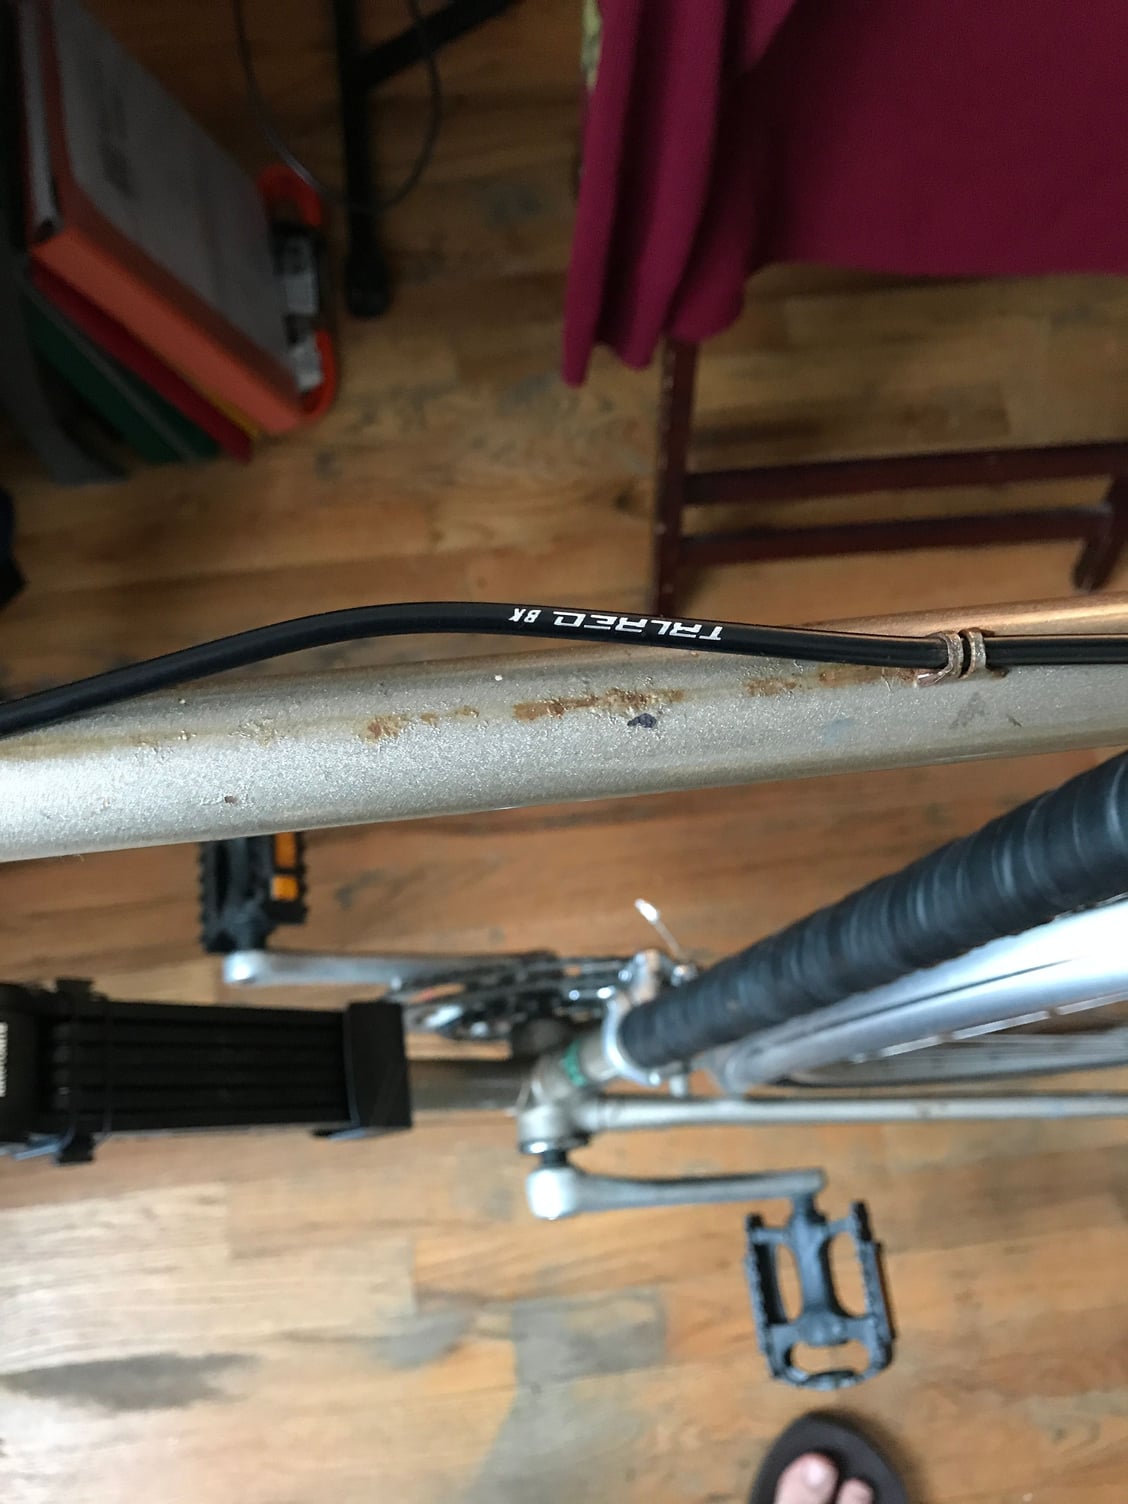


Minimal, but I want to catch it now.
Let me put up a couple shots of the rust I'm talking about, it's not bad at all, but I'd like to arrest any spreading sooner rather than later.
Minimal, but I want to catch it now.
02-04-20, 02:31 PM
#8
Senior Member

Join Date: Apr 2012
Location: Middle Earth (aka IA)
Posts: 20,431
Bikes: A bunch of old bikes and a few new ones
Mentioned: 178 Post(s)
Tagged: 0 Thread(s)
Quoted: 5885 Post(s)
Liked 3,468 Times
in
2,078 Posts
I like using a flat white rustoleum. Then I can add model paint colors and mix them if need be to get what i want. Sometimes I just stick with the flat white and call it a day.
02-04-20, 02:43 PM
#9
Senior Member
Thread Starter
Join Date: Apr 2014
Location: Back in Lincoln Sq, Chicago...🙄
Posts: 1,609
Bikes: '84 Miyata 610 �91 Cannondale ST600,'83 Trek 720 �84 Trek 520, 620, �91 Miyata 1000LT, '79 Trek 514, '78 Trek 706, '73 Raleigh Int. frame.
Mentioned: 13 Post(s)
Tagged: 0 Thread(s)
Quoted: 684 Post(s)
Liked 370 Times
in
219 Posts
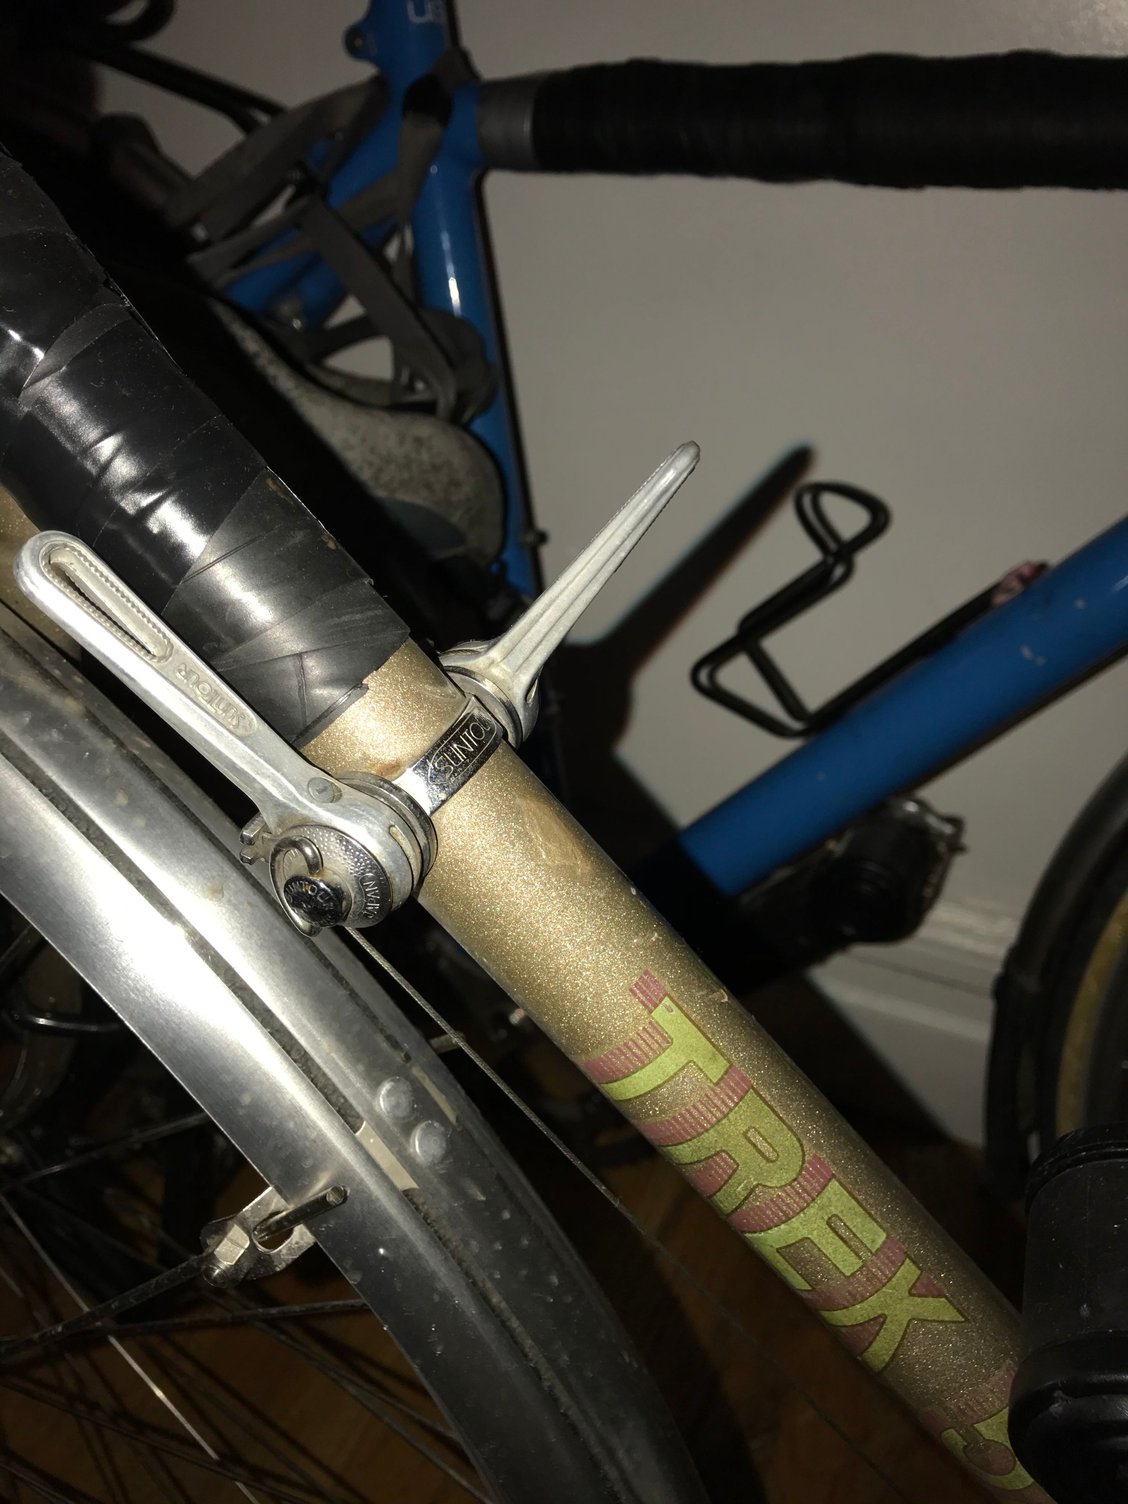
After about a half hour of navel jelly
 Dabbled on some paint.
Dabbled on some paint.
02-04-20, 02:48 PM
#10
Senior Member
Join Date: May 2011
Location: Seattle WA
Posts: 2,841
Bikes: 2009 Handsome Devil, 1987 Trek 520 Cirrus, 1978 Motobecane Grand Touring, 1987 Nishiki Cresta GT, 1989 Specialized Allez Former bikes; 1986 Miyata Trail Runner, 1979 Miyata 912, 2011 VO Rando, 1999 Cannondale R800, 1986 Schwinn Passage
Mentioned: 72 Post(s)
Tagged: 0 Thread(s)
Quoted: 796 Post(s)
Liked 522 Times
in
367 Posts
Naval Jelly is nasty.... but it does the job! I have found I suck at paint matching so I am going to try the cheap paint matching at Lowes to see if it works out better. In the past I have used nail polish of a close color or just clear to protect the cleaned up metal. Good luck with your 520.
02-04-20, 03:04 PM
#11
Senior Member
Thread Starter
Join Date: Apr 2014
Location: Back in Lincoln Sq, Chicago...🙄
Posts: 1,609
Bikes: '84 Miyata 610 �91 Cannondale ST600,'83 Trek 720 �84 Trek 520, 620, �91 Miyata 1000LT, '79 Trek 514, '78 Trek 706, '73 Raleigh Int. frame.
Mentioned: 13 Post(s)
Tagged: 0 Thread(s)
Quoted: 684 Post(s)
Liked 370 Times
in
219 Posts
I like the jelly because it doesn't run. Not the best for soaking a frame, but if you want to do some spot touch up, I like it.
Once I get a few layers of paint down, I'll give it a light sand. I think this'll work for what I'm after, which is mainly rust protection.
Does it match, not really, but with a tidy job I think it'll serve my purpose.
Once I get a few layers of paint down, I'll give it a light sand. I think this'll work for what I'm after, which is mainly rust protection.
Does it match, not really, but with a tidy job I think it'll serve my purpose.
02-04-20, 03:06 PM
#12
PM me your cotters
Join Date: Jun 2015
Location: ATL
Posts: 3,241
Mentioned: 80 Post(s)
Tagged: 0 Thread(s)
Quoted: 1137 Post(s)
Liked 588 Times
in
420 Posts
Paint looks good. It should harden to a slightly different hue after a little time. Will be curious to see in 72 hours.
I haven't had a ton of luck with naval jelly. Have you (or anyone) used it on single-stage non-clearcoated paint before? Just curious if it would destroy it like it does the rust. I have something specific in mind, a project where I can't use my preferred stuff.
I haven't had a ton of luck with naval jelly. Have you (or anyone) used it on single-stage non-clearcoated paint before? Just curious if it would destroy it like it does the rust. I have something specific in mind, a project where I can't use my preferred stuff.
__________________
███████████████
███████████████
02-04-20, 04:58 PM
#13
Senior Member
Join Date: Jan 2004
Location: Madison, WI USA
Posts: 6,141
Mentioned: 50 Post(s)
Tagged: 0 Thread(s)
Quoted: 2356 Post(s)
Liked 1,743 Times
in
1,187 Posts
Are you gonna peel of those innertube wraps, to see if there's any more yet-undiscovered rust? Or did those go on after inspection?
02-04-20, 05:12 PM
#14
Senior Member
Thread Starter
Join Date: Apr 2014
Location: Back in Lincoln Sq, Chicago...🙄
Posts: 1,609
Bikes: '84 Miyata 610 �91 Cannondale ST600,'83 Trek 720 �84 Trek 520, 620, �91 Miyata 1000LT, '79 Trek 514, '78 Trek 706, '73 Raleigh Int. frame.
Mentioned: 13 Post(s)
Tagged: 0 Thread(s)
Quoted: 684 Post(s)
Liked 370 Times
in
219 Posts
02-04-20, 06:50 PM
#15
Junior Member
Join Date: Sep 2016
Location: Gulf Coast
Posts: 183
Bikes: '93 Cannondale R500; '88 Centurion Ironman Expert, '97 Cannondale R900, '95 Serotta CSI, '83 Trek 700, '97 Lemond Zurich, '89 Bianchi Giro, '87 Schwinn Prologue, '83 Fuji TSIV + one perturbed wife
Mentioned: 1 Post(s)
Tagged: 0 Thread(s)
Quoted: 71 Post(s)
Liked 154 Times
in
58 Posts
You may want to look at the Testors metallic enamels. They do make a metallic gold but don�t know how close it would be to your frame. Testor�s makes a dark blue metallic that was practically a dead on for my metallic blue �83 Trek 700. Like others said, you can get white, black & ivory paints to mix up & better match the paint. I touched up an �88 Centurion Ironman�s white front fork with Testors. Testors white was too white for the fork paint but using an empty beer cap I would mix 9 drops of white paint from a toothpick with a drop of ivory & got a good match. The best part is that if you mess up the mixing, all you have to do is pop another beer to get a clean cap!
02-05-20, 09:38 AM
#17
Senior Member
Join Date: Feb 2015
Location: Chicago
Posts: 93
Bikes: 1973 Jack Taylor ToB, 1974 or '75 LeJeune Champ du Monde (possibly from the Carre Shop), 1971 Motobecane Le Champion, 1980s Rodriguez frame (future 650b conversion project)
Mentioned: 2 Post(s)
Tagged: 0 Thread(s)
Quoted: 38 Post(s)
Liked 7 Times
in
6 Posts
In you experience, does the testors enamel, spray or vial, hold up well? I�m interested in painting a head tube black metallic on an otherwise excellent condition 70s frame and wondering if testors would be a good choice for that application. I don�t imagine head tubes get roughed up much. I�m thinking the small brush application would be good for keeping lug shoreline clean.
Thanks.
Thanks.
02-05-20, 11:56 AM
#18
PM me your cotters
Join Date: Jun 2015
Location: ATL
Posts: 3,241
Mentioned: 80 Post(s)
Tagged: 0 Thread(s)
Quoted: 1137 Post(s)
Liked 588 Times
in
420 Posts
It'll never be as bulletproof as a 2-part paint using a catalyst, and if you come at it too soon (days, sometimes a week or more) after you apply, it will rub away. This is both an advantage (for mistakes) and a disadvantage (takes a while). It really needs to harden before you rub it out, if you plan to. And quality of adherence is highly dependent on your surface prep, whether you give it (or the basecoat/primer, if used) enough tooth to lay into.
There are plenty of products out there other than regular frog tape (or similar) you can use to paint the actual lug and valley, then spray your multiple fine enamel coats, and remove the product. If using tapes, I prefer to pull my mask immediately after the last shot. If using other products, I wait until 2-3 weeks has passed before trying to remove.
I think you can definitely get good results. Paint is ... ultimately you get out of it what you put into it, time included.
__________________
███████████████
███████████████
02-05-20, 01:19 PM
#19
Senior Member
Join Date: Mar 2013
Location: Maryland
Posts: 3,799
Bikes: Lots of English 3-speeds, a couple of old road bikes, 3 mountain bikes, 1 hybrid, and a couple of mash-ups
Mentioned: 53 Post(s)
Tagged: 0 Thread(s)
Quoted: 887 Post(s)
Liked 335 Times
in
225 Posts
I agree. You may find something that would work using Testors or their premium brand (can't recall the name).
02-05-20, 03:35 PM
#20
Senior Member
Personally I think it would less effort to find a GM (etc) auto color that's pretty close, and purchase a touch up pen.
02-05-20, 03:52 PM
#21
Senior Member

Join Date: Mar 2014
Location: City of Angels
Posts: 4,867
Bikes: A few too many
Mentioned: 42 Post(s)
Tagged: 1 Thread(s)
Quoted: 1360 Post(s)
Liked 2,175 Times
in
1,180 Posts
Metallic paint will almost never match whether using a brush, toothpick because the metallic will not flow well etc. Spraying will be similar because it will be difficult to blend or spot in, we've all seen panels where the blend is not seamless I'm afraid the same will hold true for bike frames.
Close is as close as you can get unless you are very lucky.
JMO, Ben
Close is as close as you can get unless you are very lucky.
JMO, Ben
02-06-20, 06:45 PM
#22
Senior Member
Join Date: Feb 2015
Location: Chicago
Posts: 93
Bikes: 1973 Jack Taylor ToB, 1974 or '75 LeJeune Champ du Monde (possibly from the Carre Shop), 1971 Motobecane Le Champion, 1980s Rodriguez frame (future 650b conversion project)
Mentioned: 2 Post(s)
Tagged: 0 Thread(s)
Quoted: 38 Post(s)
Liked 7 Times
in
6 Posts
Tganks, Francophile! I appreciate all these details.
best,
Leif
best,
Leif
Here's the deal: It's single-part enamel, which means it takes longer than you may expect to fully harden up, there's (at minimum) a multi-day cure/harden time involved and if you top it with clearcoat, you ideally need to wait days or weeks before doing so, unless you have specific info on that product's topcoat window.
It'll never be as bulletproof as a 2-part paint using a catalyst, and if you come at it too soon (days, sometimes a week or more) after you apply, it will rub away. This is both an advantage (for mistakes) and a disadvantage (takes a while). It really needs to harden before you rub it out, if you plan to. And quality of adherence is highly dependent on your surface prep, whether you give it (or the basecoat/primer, if used) enough tooth to lay into.
There are plenty of products out there other than regular frog tape (or similar) you can use to paint the actual lug and valley, then spray your multiple fine enamel coats, and remove the product. If using tapes, I prefer to pull my mask immediately after the last shot. If using other products, I wait until 2-3 weeks has passed before trying to remove.
I think you can definitely get good results. Paint is ... ultimately you get out of it what you put into it, time included.
02-06-20, 09:44 PM
#23
Senior Member
Thread Starter
Join Date: Apr 2014
Location: Back in Lincoln Sq, Chicago...🙄
Posts: 1,609
Bikes: '84 Miyata 610 �91 Cannondale ST600,'83 Trek 720 �84 Trek 520, 620, �91 Miyata 1000LT, '79 Trek 514, '78 Trek 706, '73 Raleigh Int. frame.
Mentioned: 13 Post(s)
Tagged: 0 Thread(s)
Quoted: 684 Post(s)
Liked 370 Times
in
219 Posts
Here's the spot touch up after a couple days. It looks a lot closer under the flash *Shrug*

I don't know...
My first thought was to order the other matalic gold-ish Rusto sprays from Amazon and try to blend something.
Then again it does look like it needs a little green...
Going to a GM and matching a paint pen might be best, I bet I'd have a shot at getting closer with the color, but also with the metal flake. It's only now, looking at the bike close up, and under bright lighting that I noticed how much flake is in that paint! It's like a bass boat!
02-07-20, 08:26 AM
#24
PM me your cotters
Join Date: Jun 2015
Location: ATL
Posts: 3,241
Mentioned: 80 Post(s)
Tagged: 0 Thread(s)
Quoted: 1137 Post(s)
Liked 588 Times
in
420 Posts
I think you could definitely get much closer with a hair of testor's black added. And when I say a hair, I mean a hair! The way I like to do it is like this:
Get a few stirrers (coffee sticks work great), and piece of something small that will fit in a zip top back, that's not-too-porous like a square of plastic, maybe a flash card wrapped in plastic wrap, 3x5 cardboard wrapped in alu foil, or similar.
Take your testors black, and using a somewhat-measured tactic, create a line of successively larger dots of black paint separated by 1" or so. Like, do 1 brush tip drop on the first one, 2 on the 2nd, 3 on 3rd, etc.
Spray your metallic paint separately, then apply roughly-equal measures of it to each black spot and mix it in. Once done, dab a little on your bike with each stirrer in a line, in order, so you remember which is which. Finally - and this is important - stick a toothpick through the cardboard pointing up on the paint sample side, and slide it into a zip-top back so the toothpick makes a tent, this will keep it fresh while your samples dry.
Give the samples time to dry on the bike - you should know where you stand within a couple hours. After the couple hours, take a little nail polish remover on a cotton ball and remove the paint, it'll rub right off. If one of the samples you painted on is "close enough" to being perfect, go ahead and remove your old touchup spot also (w/acetone). Then prep again for new paint, pull your samples out the zip-top bag, and get to work.
I've had to do this a few times on bikes with heavily faded paint. It works well. Just make sure you give the touch-up ample time to dry and cure before messing with it. Days or weeks, if possible. Afterwards, you have a few options to clean up the edges if you're not happy with how flat/level the touchup work is.
__________________
███████████████
███████████████
02-07-20, 10:41 AM
#25
Senior Member
Thread Starter
Join Date: Apr 2014
Location: Back in Lincoln Sq, Chicago...🙄
Posts: 1,609
Bikes: '84 Miyata 610 �91 Cannondale ST600,'83 Trek 720 �84 Trek 520, 620, �91 Miyata 1000LT, '79 Trek 514, '78 Trek 706, '73 Raleigh Int. frame.
Mentioned: 13 Post(s)
Tagged: 0 Thread(s)
Quoted: 684 Post(s)
Liked 370 Times
in
219 Posts
I think you could definitely get much closer with a hair of testor's black added. And when I say a hair, I mean a hair! The way I like to do it is like this:
Get a few stirrers (coffee sticks work great), and piece of something small that will fit in a zip top back, that's not-too-porous like a square of plastic, maybe a flash card wrapped in plastic wrap, 3x5 cardboard wrapped in alu foil, or similar.
Take your testors black, and using a somewhat-measured tactic, create a line of successively larger dots of black paint separated by 1" or so. Like, do 1 brush tip drop on the first one, 2 on the 2nd, 3 on 3rd, etc.
Spray your metallic paint separately, then apply roughly-equal measures of it to each black spot and mix it in. Once done, dab a little on your bike with each stirrer in a line, in order, so you remember which is which. Finally - and this is important - stick a toothpick through the cardboard pointing up on the paint sample side, and slide it into a zip-top back so the toothpick makes a tent, this will keep it fresh while your samples dry.
Give the samples time to dry on the bike - you should know where you stand within a couple hours. After the couple hours, take a little nail polish remover on a cotton ball and remove the paint, it'll rub right off. If one of the samples you painted on is "close enough" to being perfect, go ahead and remove your old touchup spot also (w/acetone). Then prep again for new paint, pull your samples out the zip-top bag, and get to work.
I've had to do this a few times on bikes with heavily faded paint. It works well. Just make sure you give the touch-up ample time to dry and cure before messing with it. Days or weeks, if possible. Afterwards, you have a few options to clean up the edges if you're not happy with how flat/level the touchup work is.
Get a few stirrers (coffee sticks work great), and piece of something small that will fit in a zip top back, that's not-too-porous like a square of plastic, maybe a flash card wrapped in plastic wrap, 3x5 cardboard wrapped in alu foil, or similar.
Take your testors black, and using a somewhat-measured tactic, create a line of successively larger dots of black paint separated by 1" or so. Like, do 1 brush tip drop on the first one, 2 on the 2nd, 3 on 3rd, etc.
Spray your metallic paint separately, then apply roughly-equal measures of it to each black spot and mix it in. Once done, dab a little on your bike with each stirrer in a line, in order, so you remember which is which. Finally - and this is important - stick a toothpick through the cardboard pointing up on the paint sample side, and slide it into a zip-top back so the toothpick makes a tent, this will keep it fresh while your samples dry.
Give the samples time to dry on the bike - you should know where you stand within a couple hours. After the couple hours, take a little nail polish remover on a cotton ball and remove the paint, it'll rub right off. If one of the samples you painted on is "close enough" to being perfect, go ahead and remove your old touchup spot also (w/acetone). Then prep again for new paint, pull your samples out the zip-top bag, and get to work.
I've had to do this a few times on bikes with heavily faded paint. It works well. Just make sure you give the touch-up ample time to dry and cure before messing with it. Days or weeks, if possible. Afterwards, you have a few options to clean up the edges if you're not happy with how flat/level the touchup work is.
But I'll try the dots of black, (you think that would be better than, say, and olive green?) and get it closer.
I had been thinking close enough just protect the frame, but it's the same amount of work to prep and paint, so may as well get a closer match.
After a few weeks I figured I could knock down the high spots with sand paper. Real fine grit, maybe wet sand, and finish with some cleaning polish.
When I do the cable guides, how long should I wait before re-cabling? Would 24 hours do it? 48?
Thanks for the advises!!


