


Adding cable stops to a frame without wrecking the paint.
 02-04-20, 09:09 PM
#1
Senior Member
Thread Starter
Join Date: Jun 2019
Location: Portland Oregon
Posts: 996
Mentioned: 7 Post(s)
Tagged: 0 Thread(s)
Quoted: 457 Post(s)
Liked 462 Times
in
270 Posts
Adding cable stops to a frame without wrecking the paint.
I know there are all sorts of cable stops that clamp onto the frame, but I really don't like that look, and if I'm working on a restomod I don't need to stay period correct with bolt on cable stops anyway.
I have a 1968 Raleigh Sprite that I'm slowly picking away at, it has an S5 Sturmey in the back, so it has 2 shift cables, this will be a full restomod build, but I want to leave the original paint.
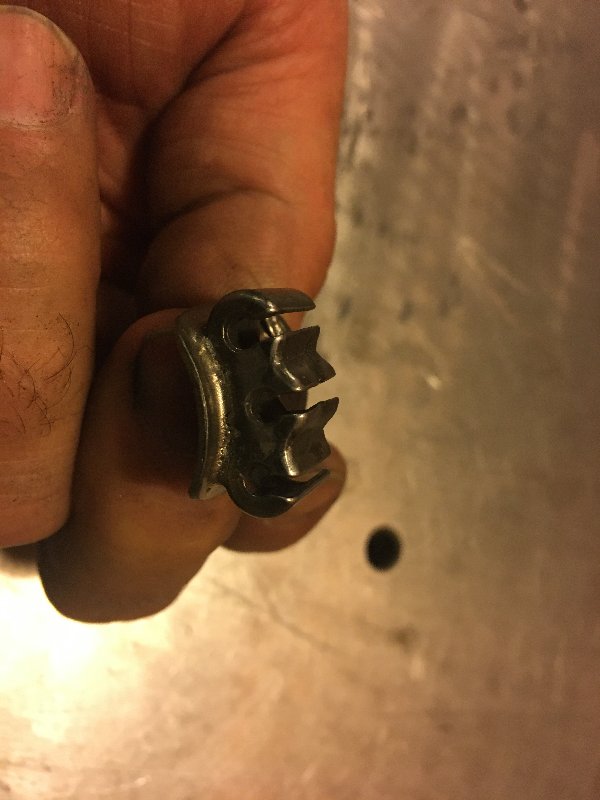
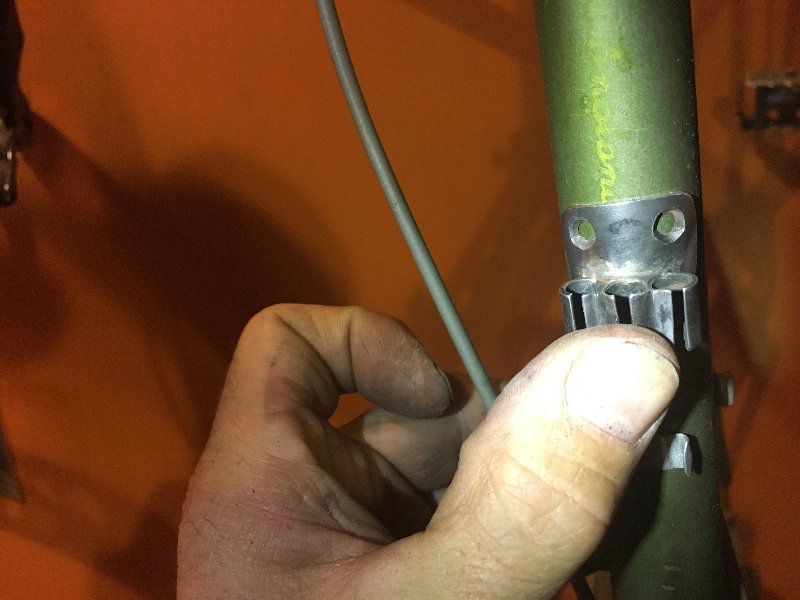
I will be attaching 2 3 gang cable stops on the underside of the top tube, here is what I made, those are 4-40 stainless screws, the frame will get drilled and tapped for the 2 screws, and I will JB weld this piece to the frame as well, which has, supposedly, 2,800 PSI of adhesion strength, and the force will be in shear, not tension. This fitting will be 2 shift cables with brake cable in the center so the greatest force will be applied totally symmetrically.
I will make some single cable stops to go on the underside of the seat stays as well that will get one screw and JB Weld to hold them on to run each cable for each side of the hub.
I will paint these black with some catalyzed automotive paint I have, I'll use more paint getting the spray gun wet that will end up on these pieces...
Here are some pics of the first piece, I do have the right diameter tubing to match the OD of the seat stays on the Sprite as well. I did just run out of oxygen though, so no more brazing tonight...


I have a 1968 Raleigh Sprite that I'm slowly picking away at, it has an S5 Sturmey in the back, so it has 2 shift cables, this will be a full restomod build, but I want to leave the original paint.
I will be attaching 2 3 gang cable stops on the underside of the top tube, here is what I made, those are 4-40 stainless screws, the frame will get drilled and tapped for the 2 screws, and I will JB weld this piece to the frame as well, which has, supposedly, 2,800 PSI of adhesion strength, and the force will be in shear, not tension. This fitting will be 2 shift cables with brake cable in the center so the greatest force will be applied totally symmetrically.
I will make some single cable stops to go on the underside of the seat stays as well that will get one screw and JB Weld to hold them on to run each cable for each side of the hub.
I will paint these black with some catalyzed automotive paint I have, I'll use more paint getting the spray gun wet that will end up on these pieces...
Here are some pics of the first piece, I do have the right diameter tubing to match the OD of the seat stays on the Sprite as well. I did just run out of oxygen though, so no more brazing tonight...

Likes For jackbombay:
 02-05-20, 10:43 AM
#3

Veteran, Pacifist

Join Date: Dec 2004
Location: Seattle area
Posts: 13,325
Bikes: Bikes??? Thought this was social media?!?
Mentioned: 284 Post(s)
Tagged: 0 Thread(s)
Quoted: 3897 Post(s)
Liked 4,823 Times
in
2,226 Posts
Not a criticism in any way, but I find it ironic you want original paint but are going to drill a frame to add avoid using a clamp. To each their own.
+1 the 'Carry On' comment.
+1 the 'Carry On' comment.
__________________
Vintage, modern, e-road. It is a big cycling universe.
Vintage, modern, e-road. It is a big cycling universe.
02-05-20, 10:54 AM
#4
Senior Member
Join Date: Jan 2020
Posts: 2,346
Mentioned: 2 Post(s)
Tagged: 0 Thread(s)
Quoted: 680 Post(s)
Liked 947 Times
in
554 Posts
use a silicone glue like e6000 it will hold it will put the glue on tape it in place wait overnight. and with a little work it will peel off with no damage. yo ucan get the glue about anywhere now including walmart in the crafts section.
02-05-20, 11:07 AM
#5
Senior Member
Join Date: Dec 2016
Location: Long Island, NY
Posts: 2,107
Bikes: Trek 800 x 2, Schwinn Heavy Duti, Schwinn Traveler, Schwinn Le Tour Luxe, Schwinn Continental, Cannondale M400 and Lambert, Schwinn Super Sport
Mentioned: 14 Post(s)
Tagged: 0 Thread(s)
Quoted: 809 Post(s)
Liked 1,018 Times
in
664 Posts
This is a clever work around. I can understand preserving the original paint and therefore creating these new cable stops. I don't see any reason why it would not work. Epoxy should hold and the screws will cinch it down until the epoxy cross links. You may want to use a clamp or near the cable stops too just to make sure that you have a uniform thickness of epoxy across the joint. You probably thought of that already though.
Keep the pictures coming.
Keep the pictures coming.
02-05-20, 11:15 AM
#6
Senior Member
Join Date: Oct 2010
Posts: 8,515
Mentioned: 69 Post(s)
Tagged: 0 Thread(s)
Quoted: 3241 Post(s)
Liked 2,512 Times
in
1,510 Posts
I don't know that it will look any better than clamp stops, but...................carry on.
02-05-20, 11:40 AM
#7
Half way there

Join Date: Sep 2015
Location: North Carolina
Posts: 2,955
Bikes: Many, and the list changes frequently
Mentioned: 5 Post(s)
Tagged: 0 Thread(s)
Quoted: 985 Post(s)
Liked 879 Times
in
526 Posts
I'd use clamp-on stops, but understand your preference. I would just use epoxy and skip the drilling and tapping. I don't think the tubing will be thick enough. My memory is that those old Raleigh frames had tubing thicknesses between 1.4 and 1.8 mm. If your machine screws are 32 tpi then all you would be able to tap is maybe 2-3 threads and only if your tapping was perfect. I'd guess that hand tapping would result in a very sloppy fit. You'd be better off using self-tapping sheet metal screws. In either case, the epoxy would hold the screws in.
Good luck
Good luck
02-05-20, 02:28 PM
#8
Senior Member

Join Date: Oct 2012
Location: Berkeley CA
Posts: 2,533
Bikes: 1981 Ron Cooper, 1974 Cinelli Speciale Corsa, 2000 Gary Fisher Sugar 1, 1986 Miyata 710, 1982 Raleigh "International"
Mentioned: 97 Post(s)
Tagged: 0 Thread(s)
Quoted: 929 Post(s)
Liked 1,289 Times
in
486 Posts
Personally, I'd use clamp ons. However, if you're going to go this way I don't think the tubing is thick enough. The obvious (to me) solution is using a threaded insert such as a nutsert or rivnut. This is what is commonly used on aluminum frames to provide threaded holes for attaching water bottle cages and other accessories, though they can be used for steel too.
02-05-20, 02:38 PM
#9

Senior Member

Join Date: Jul 2006
Location: San Jose (Willow Glen) Ca
Posts: 9,832
Bikes: Kirk Custom JK Special, '84 Team Miyata,(dura ace old school) 80?? SR Semi-Pro 600 Arabesque
Mentioned: 106 Post(s)
Tagged: 0 Thread(s)
Quoted: 2336 Post(s)
Liked 2,808 Times
in
1,534 Posts
I would not do that, too big of holes too close to each other. and if you are using for brake cables there is a fair of mount of force, so my conservative self would be skeptical of gluing also.
many frames with cable clamps had thin pieces of metal brazed to the frame as stopper to help with the prevent cable clamps from slipping
many frames with cable clamps had thin pieces of metal brazed to the frame as stopper to help with the prevent cable clamps from slipping
__________________
Life is too short not to ride the best bike you have, as much as you can
(looking for Torpado Super light frame/fork or for Raleigh International frame fork 58cm)
Life is too short not to ride the best bike you have, as much as you can
(looking for Torpado Super light frame/fork or for Raleigh International frame fork 58cm)
Last edited by squirtdad; 02-05-20 at 02:51 PM.
02-05-20, 02:41 PM
#10
Bike Butcher of Portland

Join Date: Jul 2014
Location: Portland, OR
Posts: 11,630
Bikes: It's complicated.
Mentioned: 1299 Post(s)
Tagged: 0 Thread(s)
Quoted: 4677 Post(s)
Liked 5,790 Times
in
2,279 Posts
I've been following and thinking about this, I'm not sure I'd trust epoxy to hold a cable stop that actuates my brake, especially if the epoxy is on top of some vintage paint of unknown adhesion to base metal.
__________________
If someone tells you that you have enough bicycles and you don't need any more, stop talking to them. You don't need that kind of negativity in your life.
If someone tells you that you have enough bicycles and you don't need any more, stop talking to them. You don't need that kind of negativity in your life.
Likes For gugie:
02-05-20, 02:46 PM
#11
se�or miembro

Join Date: Dec 2018
Location: Pac NW
Posts: 6,597
Bikes: '70s - '80s Campagnolo
Mentioned: 92 Post(s)
Tagged: 0 Thread(s)
Quoted: 3860 Post(s)
Liked 6,450 Times
in
3,190 Posts
If worried about cost of top tube clamps for the rear brake, there are chinese alternatives that look great on low- and mid-level bikes, and they come in different sizes.
https://www.ebay.com/itm/1pc-bicycle...S/293010473162
https://www.ebay.com/itm/1pc-bicycle...S/293010473162
02-05-20, 02:58 PM
#12
Senior Member
Thread Starter
Join Date: Jun 2019
Location: Portland Oregon
Posts: 996
Mentioned: 7 Post(s)
Tagged: 0 Thread(s)
Quoted: 457 Post(s)
Liked 462 Times
in
270 Posts
The force on the cable stops creates a shearing force on the screws, so even though there are only a few threads engaged the screws will add plenty of strength to the setup.
JB Weld states their product has tensile strength of 2800 PSI, the 3 gang cable stops have about an inch of surface area, plus the 2 screws, my right hand has a grip strength of 165 pounds, the mechanical advantage of the brake lever will increase this force by a factor of, 10? So tension on the brake cable could be up to 1650 pounds if I pull the lever with all the force I can muster in my right hand, but I will never do that as the rear tire will be skidding long before I get anywhere to exerting the full grip strength of my right hand. So, assuming the screws do nothing, the JB Weld still has plenty of over head to deal with the expected forces, the screws are "belt and suspenders". The screws are 4-40 size. I will remove the paint under the cable stops with a dremel before I JB Weld them on so the glue will be metal to metal.
There are currently 7 cable guides and clips on my Raleigh Sprite, they are dull kind of gross looking galvanized steel, they will be replaced with 4 satin black cable stops which will look much better IMO.
I also need to add some stops to my Hercules 3 speed as it now has a 5 speed hub in the back and I need cable stops for the new cable on it that shifts the NDS side of the hub, that bike is semigloss black, so these home made flameless cable stops will be right at home there.
02-05-20, 03:00 PM
#13
Senior Member
Thread Starter
Join Date: Jun 2019
Location: Portland Oregon
Posts: 996
Mentioned: 7 Post(s)
Tagged: 0 Thread(s)
Quoted: 457 Post(s)
Liked 462 Times
in
270 Posts
If worried about cost of top tube clamps for the rear brake, there are chinese alternatives that look great on low- and mid-level bikes, and they come in different sizes.
https://www.ebay.com/itm/1pc-bicycle...S/293010473162
https://www.ebay.com/itm/1pc-bicycle...S/293010473162
I have the rear brake cable and 2 shifter cables that all need to be routed on or under the top tube.
02-05-20, 03:02 PM
#15
I am potato.

Join Date: Jun 2015
Location: Pacific Northwest
Posts: 3,104
Bikes: Only precision built, custom high performance elitist machines of the highest caliber. 🍆
Mentioned: 28 Post(s)
Tagged: 0 Thread(s)
Quoted: 1782 Post(s)
Liked 1,620 Times
in
926 Posts
I second the hesitation to drilling holes in the frame.
For one the down tube is under tension just by sitting on the bike. Then it is further under cyclical torsion with every pedal stroke. Then following that, the tapped threads are sharp leading to stress concentration. Considering the actual hole size is the most extreme distance from edge to edge inside the bolt threads inside the bore. That makes the hole quite a bit bigger structurally than it appears by eye or the drill bit you used.
Red flags all over the place on this one.
Good cool wet rags, moderate heat, a bit of silver & a post in the frame builders forum for some advice ftom the real talented builders there are all things I suggest.
Fwiw: Why not a real spot weld instead of JB Weld?
Last edited by base2; 02-05-20 at 03:10 PM.
02-05-20, 03:03 PM
#16
Senior Member

Join Date: Sep 2005
Location: Oakland, CA
Posts: 3,265
Bikes: '82 Univega Competizione, '72 Motobecane Grand Record, '83 Mercian KOM Touring, '85 Univega Alpina Uno, '76 Eisentraut Limited
Mentioned: 57 Post(s)
Tagged: 0 Thread(s)
Quoted: 1088 Post(s)
Liked 1,205 Times
in
701 Posts
I don't know -- what makes me cringe a little bit is that this is an irreversible change to the frame. Also, you want to preserve original paint, but you need to remove paint under the proposed addition to aid adhesion. I dunno. It's your bike, but if it were me, I would want to experiment on something a little less pristine than a '68 Raleigh with original paint. But, it's your bike.
02-05-20, 03:21 PM
#17
se�or miembro
Join Date: Dec 2018
Location: Pac NW
Posts: 6,597
Bikes: '70s - '80s Campagnolo
Mentioned: 92 Post(s)
Tagged: 0 Thread(s)
Quoted: 3860 Post(s)
Liked 6,450 Times
in
3,190 Posts
02-05-20, 03:54 PM
#18
Senior Member
Join Date: Jan 2004
Location: Madison, WI USA
Posts: 6,149
Mentioned: 50 Post(s)
Tagged: 0 Thread(s)
Quoted: 2361 Post(s)
Liked 1,745 Times
in
1,189 Posts
If you re-invent them as guides instead of stops, you could glue / epoxy / JBWeld them on without worrying about the amount of force applied, esp. if you use good compressionless cable housing. I would still remove the paint in the contact areas.
Or perhaps a hybrid - if it's the force associated with the brake cables you're worried about, keep the ones associated with the shift cables as stops, but convert the brake cable ones to guides.
Or perhaps a hybrid - if it's the force associated with the brake cables you're worried about, keep the ones associated with the shift cables as stops, but convert the brake cable ones to guides.
Last edited by madpogue; 02-05-20 at 05:33 PM.
02-05-20, 04:02 PM
#19
Senior Member
Thread Starter
Join Date: Jun 2019
Location: Portland Oregon
Posts: 996
Mentioned: 7 Post(s)
Tagged: 0 Thread(s)
Quoted: 457 Post(s)
Liked 462 Times
in
270 Posts
It just so happens they recently released a new formula, 5,020 PSI now!!!
I don't know -- what makes me cringe a little bit is that this is an irreversible change to the frame. Also, you want to preserve original paint, but you need to remove paint under the proposed addition to aid adhesion. I dunno. It's your bike, but if it were me, I would want to experiment on something a little less pristine than a '68 Raleigh with original paint. But, it's your bike.
Is this irreversible? Hardly, it would be simple to zap the holes full with a MIG welder at a later date and refinish the frame.
Is the belief here that at a later date somebody will want to revert this bike back to a period correct stock build? I suppose that could happen, but this thing is going to be a super sweet gravel bike when I'm done with it, fenders/chainguard and all. How many bikes came with Sturmey S5 hubs? Not many, and most all of them that did have had the hubs removed and placed in other bikes. I am guilty of buying S5 hubs that somebody robbed from a working bike, and placing them in a different bike, so I'm stoked for this hub to have a very good chance of living out the rest of its years in the frame it was born in.
I'm sure there are plenty of people that are opposed to resto mod builds, but I'm not, I like modern wheels and tires! I even have a titanium BB for this bike, and some Campy cranks, and I'll be building some 650b wheels for it. Final build weight will be 25-26 pounds with the original rack on it, the bike will positively fly compared to how it left the factory.
At some point in the future will somebody undo all that I'll have done to this bike? They'll take a super sweet, efficient, all terrain gravel/asphalt smashing touring townie and turn it back into a 38 pound bike with super heavy wheels (no tire selection) and crap brakes? Maybe, but I won't be alive to witness it.
FWIW, I'll take this bike on gravel centuries and I'm sure I'll whip the ass of some "french geared bikes" in the process ;-) If I left the bike stock, I would not ride a dirt century on it.
Building this bike up "properly" will ensure that it lives a glorious life under my ass :-)
Last edited by jackbombay; 02-05-20 at 04:18 PM.
Likes For jackbombay:
02-05-20, 04:39 PM
#20
Bianchi Goddess

Join Date: Apr 2009
Location: Shady Pines Retirement Fort Wayne, In
Posts: 27,844
Bikes: Too many to list here check my signature.
Mentioned: 192 Post(s)
Tagged: 2 Thread(s)
Quoted: 2924 Post(s)
Liked 2,921 Times
in
1,489 Posts
I know there are all sorts of cable stops that clamp onto the frame, but I really don't like that look, and if I'm working on a restomod I don't need to stay period correct with bolt on cable stops anyway.
I have a 1968 Raleigh Sprite that I'm slowly picking away at, it has an S5 Sturmey in the back, so it has 2 shift cables, this will be a full restomod build, but I want to leave the original paint.
I will be attaching 2 3 gang cable stops on the underside of the top tube, here is what I made, those are 4-40 stainless screws, the frame will get drilled and tapped for the 2 screws, and I will JB weld this piece to the frame as well, which has, supposedly, 2,800 PSI of adhesion strength, and the force will be in shear, not tension. This fitting will be 2 shift cables with brake cable in the center so the greatest force will be applied totally symmetrically.
I will make some single cable stops to go on the underside of the seat stays as well that will get one screw and JB Weld to hold them on to run each cable for each side of the hub.
I will paint these black with some catalyzed automotive paint I have, I'll use more paint getting the spray gun wet that will end up on these pieces...
Here are some pics of the first piece, I do have the right diameter tubing to match the OD of the seat stays on the Sprite as well. I did just run out of oxygen though, so no more brazing tonight...
__________________
�One morning you wake up, the girl is gone, the bikes are gone, all that's left behind is a pair of old tires and a tube of tubular glue, all squeezed out"
Sugar "Kane" Kowalczyk
�One morning you wake up, the girl is gone, the bikes are gone, all that's left behind is a pair of old tires and a tube of tubular glue, all squeezed out"
Sugar "Kane" Kowalczyk
02-05-20, 04:56 PM
#21
Senior Member
Thread Starter
Join Date: Jun 2019
Location: Portland Oregon
Posts: 996
Mentioned: 7 Post(s)
Tagged: 0 Thread(s)
Quoted: 457 Post(s)
Liked 462 Times
in
270 Posts
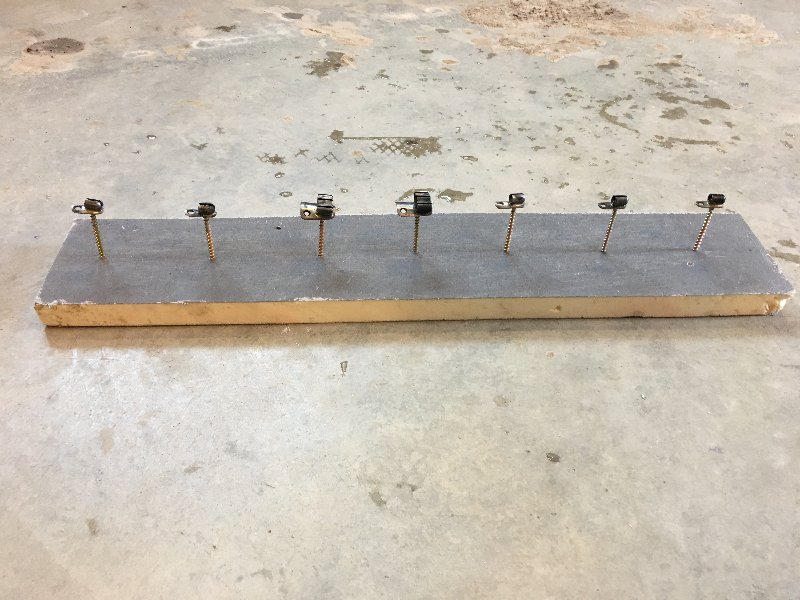
Painting tiny pieces with an HVLP gun! And not have them blow across the garage...
I put screws through foam board, cut the tips off the screws off and super glued the pieces to the top of the screws, I'll grind the super glue off the back once they are painted for proper jb weld adhesion.
 02-05-20, 05:04 PM
#22
www.theheadbadge.com

Join Date: Sep 2005
Location: Southern Florida
Posts: 28,508
Bikes: https://www.theheadbadge.com
Mentioned: 124 Post(s)
Tagged: 0 Thread(s)
Quoted: 2420 Post(s)
Liked 4,381 Times
in
2,090 Posts
It's a 1968 Raleigh Sprite with a characteristically dull Bronze Green paint job, like a gazillion others. Rip that paint right off and add those braze-ons.
Since you mentioned that you are working with 2K paint, treat the frame to a glorious coat of dignified black. It'll be an improvement and it won't result in holes in the frame. Plus, there are those gazillion others that can exist as representatives of original, unmodified Raleigh Sprites.
-Kurt
Since you mentioned that you are working with 2K paint, treat the frame to a glorious coat of dignified black. It'll be an improvement and it won't result in holes in the frame. Plus, there are those gazillion others that can exist as representatives of original, unmodified Raleigh Sprites.
-Kurt
__________________


02-05-20, 05:26 PM
#23
Senior Member
Thread Starter
Join Date: Jun 2019
Location: Portland Oregon
Posts: 996
Mentioned: 7 Post(s)
Tagged: 0 Thread(s)
Quoted: 457 Post(s)
Liked 462 Times
in
270 Posts
Paint gun is not out yet, no holes drilled yet, I'll think on it...
02-05-20, 05:37 PM
#24
Bianchi Goddess
Join Date: Apr 2009
Location: Shady Pines Retirement Fort Wayne, In
Posts: 27,844
Bikes: Too many to list here check my signature.
Mentioned: 192 Post(s)
Tagged: 2 Thread(s)
Quoted: 2924 Post(s)
Liked 2,921 Times
in
1,489 Posts
I am sure it has been mentioned but those housing stops are more for carbon and alloy frames but they usually have some sort of anchor for the screw
__________________
�One morning you wake up, the girl is gone, the bikes are gone, all that's left behind is a pair of old tires and a tube of tubular glue, all squeezed out"
Sugar "Kane" Kowalczyk
�One morning you wake up, the girl is gone, the bikes are gone, all that's left behind is a pair of old tires and a tube of tubular glue, all squeezed out"
Sugar "Kane" Kowalczyk
02-05-20, 05:45 PM
#25
Banned.

Join Date: Jul 2009
Location: PAZ
Posts: 12,294
Mentioned: 255 Post(s)
Tagged: 0 Thread(s)
Quoted: 2588 Post(s)
Liked 4,823 Times
in
1,709 Posts
DD

Last edited by Drillium Dude; 02-05-20 at 05:51 PM.

