


Raleigh Pro Build and Some Thoughts on Patina
 02-21-20, 10:17 PM
#1

Senior Member
Thread Starter

Join Date: May 2012
Location: Point Reyes Station, California
Posts: 4,526
Bikes: Indeed!
Mentioned: 92 Post(s)
Tagged: 0 Thread(s)
Quoted: 1506 Post(s)
Liked 3,464 Times
in
1,130 Posts
Raleigh Pro Build and Some Thoughts on Patina
Up until now I have always bought bikes with nice paint jobs or ones that were so badly rusted or rattlecanned that I had no qualms about repainting them... but I am finding my self drawn to bikes with patina, bikes that might tell a bit of a story, though not all stories are happy ones!
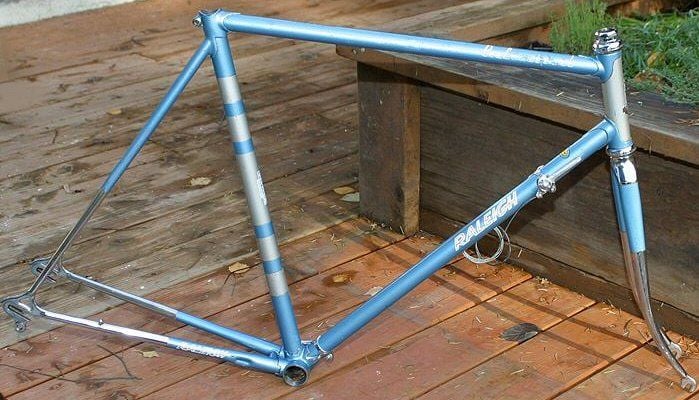
Looking for a bike to build on the cheap for this year's California Eroica, I came across this Raleigh Pro frameset at a reasonable price. I am not a Raleigh expert and the expert opinions I have seen leave me wondering whether it is a '72 or a '73. It seems to have some attributes of each, which I guess was pretty normal at Raleigh in the early seventies. Serial number is G4909. I welcome your suggestions.


A medium amount of patina I would say, but a nice project. Definitely some decisions to be made about what patina to keep and what to remove. If it were a valuable ancient artifact I suppose the archaeological curator might want to preserve every smear of old grease and every rust spot . I decided, however, that examples of rusty bicycles and old hardened grease are common enough that the world would be no worse off if I attempted to clean this bike up a little bit.
The most recent bit of patina was the bent dropout adjusters which were nice and straight in the ebay listing but fell victim to an exceptionally shoddy packing job. They are a surprisingly forgiving steel and I was able to straighten them. Once I got them straight and put a properly-dished rear wheel in the dropouts I discovered perhaps the oldest bit of patina on the bike. One dropout sits about 3mm farther from the bottom bracket than the other, causing the wheel to incline towards the drive-side chain stay if the two adjusters are both screwed in the same amount. Yes, I checked the frame alignment twice.

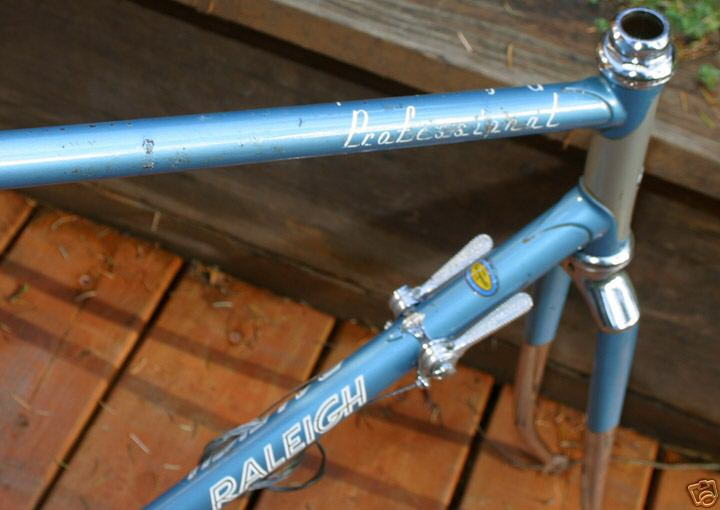
The seat binder bolt provides a bit of a story, perhaps even a mystery. The socket head was badly stripped, so much that it was impossible to tighten it sufficiently. Upon removal I was perplexed to discover that it is a 1/4" x 28tpi stainless bolt, the head of which has been ground down so that it will fit in the recess on the drive-side of the seat lug. I assume that part of the story is that an unsuspecting owner or mechanic tried to tighten it with a metric Allen key causing the stripped head. The grinding on the head of the bolt certainly indicates that it was a replacement, but was the original a 1/4" bolt or were the original threads in the lug 5mm that someone drilled and tapped?


In an effort to remove the rust without mixing up gallons of oxalic acid I hit upon the idea of wrapping the frame with rags, drenching the rags with a mild oxalic acid solution, wrapping the whole thing in plastic, and letting it sit for a day or two. It worked pretty well for the fork.


Next step was to do the same with the entire frame. Unfortunately the results were not what I anticipated. You can see in the photo below the spiral light and dark marks left on the down tube by the spiral wrapped rags when I removed them.

...And there was still some rust on the frame. Next step was to build what gaucho777 brilliantly labeled the "bike coffin" from some scrap plywood and a plastic tarp. I soaked the frame the conventional way in the coffin and was successful at removing the remaining rust but not in removing the spiral paint marks. I said I wanted patina and now I have inadvertently created my very own. I guess I'm part of this bikes history for some future owner to wonder about!

To be continued...
Brent
Looking for a bike to build on the cheap for this year's California Eroica, I came across this Raleigh Pro frameset at a reasonable price. I am not a Raleigh expert and the expert opinions I have seen leave me wondering whether it is a '72 or a '73. It seems to have some attributes of each, which I guess was pretty normal at Raleigh in the early seventies. Serial number is G4909. I welcome your suggestions.
A medium amount of patina I would say, but a nice project. Definitely some decisions to be made about what patina to keep and what to remove. If it were a valuable ancient artifact I suppose the archaeological curator might want to preserve every smear of old grease and every rust spot . I decided, however, that examples of rusty bicycles and old hardened grease are common enough that the world would be no worse off if I attempted to clean this bike up a little bit.
The most recent bit of patina was the bent dropout adjusters which were nice and straight in the ebay listing but fell victim to an exceptionally shoddy packing job. They are a surprisingly forgiving steel and I was able to straighten them. Once I got them straight and put a properly-dished rear wheel in the dropouts I discovered perhaps the oldest bit of patina on the bike. One dropout sits about 3mm farther from the bottom bracket than the other, causing the wheel to incline towards the drive-side chain stay if the two adjusters are both screwed in the same amount. Yes, I checked the frame alignment twice.
The seat binder bolt provides a bit of a story, perhaps even a mystery. The socket head was badly stripped, so much that it was impossible to tighten it sufficiently. Upon removal I was perplexed to discover that it is a 1/4" x 28tpi stainless bolt, the head of which has been ground down so that it will fit in the recess on the drive-side of the seat lug. I assume that part of the story is that an unsuspecting owner or mechanic tried to tighten it with a metric Allen key causing the stripped head. The grinding on the head of the bolt certainly indicates that it was a replacement, but was the original a 1/4" bolt or were the original threads in the lug 5mm that someone drilled and tapped?
In an effort to remove the rust without mixing up gallons of oxalic acid I hit upon the idea of wrapping the frame with rags, drenching the rags with a mild oxalic acid solution, wrapping the whole thing in plastic, and letting it sit for a day or two. It worked pretty well for the fork.
Next step was to do the same with the entire frame. Unfortunately the results were not what I anticipated. You can see in the photo below the spiral light and dark marks left on the down tube by the spiral wrapped rags when I removed them.
...And there was still some rust on the frame. Next step was to build what gaucho777 brilliantly labeled the "bike coffin" from some scrap plywood and a plastic tarp. I soaked the frame the conventional way in the coffin and was successful at removing the remaining rust but not in removing the spiral paint marks. I said I wanted patina and now I have inadvertently created my very own. I guess I'm part of this bikes history for some future owner to wonder about!
To be continued...
Brent
 02-21-20, 10:54 PM
#2
Bike Butcher of Portland

Join Date: Jul 2014
Location: Portland, OR
Posts: 11,630
Bikes: It's complicated.
Mentioned: 1299 Post(s)
Tagged: 0 Thread(s)
Quoted: 4677 Post(s)
Liked 5,790 Times
in
2,279 Posts
Don't worry about the difference in the horizontal dropouts. You'll be the only one that knows.
As for the spiral marks, I'd bet some light rubbing compound and wax will take that out.
As for the spiral marks, I'd bet some light rubbing compound and wax will take that out.
__________________
If someone tells you that you have enough bicycles and you don't need any more, stop talking to them. You don't need that kind of negativity in your life.
If someone tells you that you have enough bicycles and you don't need any more, stop talking to them. You don't need that kind of negativity in your life.
02-21-20, 11:19 PM
#3
Senior Member
Join Date: Aug 2017
Location: Minneapolis
Posts: 934
Bikes: 1968 Raleigh Super Course, 1972 Raleigh Professional, 1975 Raleigh International, 1978 Raleigh Professional, 1985 Raleigh Prestige, 1972 Schwinn Paramount, 1980 Schwinn Voyageur 11.8, 1960 Carlton Franco Suisse Peugeot PX10, 1972 Motobecane Le Champ
Mentioned: 9 Post(s)
Tagged: 0 Thread(s)
Quoted: 321 Post(s)
Liked 688 Times
in
351 Posts
Great frame! It�s definitely 72 and not a 73. This serial number system began in 1966 with the letter A, then 67 was B, and so on, then continued until the letter G in 72. In 73 the system changed briefly back to A, then a new W system began that lasted through the Eighties. The Lugs on your frame are called Haden Birdsmouth and the 72 model is the only year that Raleigh used them on the Pro. The original seat post bolt is Campagnolo and is a �Shot in� style. I suspect the original threading on your frame became stripped and the threads where chased to accommodate a larger bolt. I have a 72 as well (#G989) and my my seat binder received the same treatment at some point in the past. Enjoy the frame, I�m looking forward to seeing the build.
Last edited by Pcampeau; 03-19-20 at 12:28 AM.
02-21-20, 11:51 PM
#4

Se�or Member

Join Date: Oct 2004
Location: Hardy, VA
Posts: 17,922
Bikes: Mostly English - predominantly Raleighs
Mentioned: 70 Post(s)
Tagged: 0 Thread(s)
Quoted: 1491 Post(s)
Liked 1,090 Times
in
638 Posts
Great frame! It�s definitely 72 and not a 73. This serial number system began in 1966 with the letter A, then 67 was B, and so on, then continued until the letter G in 72. In 73 the system changed briefly back to A, then a new W system began that lasted through the Eighties. The Lugs on your frame are called Hayden Birdsmouth and the 72 model is the only year that Raleigh used them on the Pro. The original seat post bolt is Campagnolo and is a �Shot in� style. I suspect the original threading on your frame became stripped and the threads where chased to accommodate a larger bolt. I have a 72 as well (#G989) and my my seat binder received the same treatment at some point in the past. Enjoy the frame, I�m looking forward to seeing the build.
Speculation on esoterica aside, this is a lovely original survivor. I've seen other of Brent's builds, and knowing he intends to ride it in a premiere event, I expect the end result will be phenomenal
02-22-20, 01:02 AM
#5
verktyg

Join Date: Jul 2006
Location: SF Bay Area
Posts: 4,030
Bikes: Current favorites: 1988 Peugeot Birraritz, 1984 Gitane Super Corsa, 1980s DeRosa, 1981 Bianchi Campione Del Mondo, 1992 Paramount OS, 1988 Colnago Technos, 1985 RalieghUSA SBDU Team Pro
Mentioned: 207 Post(s)
Tagged: 0 Thread(s)
Quoted: 1036 Post(s)
Liked 1,237 Times
in
653 Posts
Patina'd bikes for enjoyment
My really nice bikes rarely get ridden. Ones with a few scratches and a little patina, I have no worries about them getting more scratched or dirty!
Also, once you get some bling on the bike, little cosmetic defects become less noticeable.
On that note, this time last year I bought "Barney", a lilac 1971 Raleigh Competition to ride in CA L'eroica. Didn't make the ride but I ended up with my only rust bucket beater for gravel grinding.
This sleek beauty was listed on eBay as having been completely overhauled and ready to ride. I figured a few component changes and tweaks it would be ready to go!
I'll spare you the details but I had to redo, rebuild or overhaul everything on the bike. The seller did issue me a substantial refund!
eBay picture as purchased

After Picture... The last change was a set of Stronglight 93 cranks, not shown. Note the rust under the top tube. But it rides GREAT!

Getting back to Raleigh Pros, I bought this 1975 frame in 2007. It passes the 10 foot test but has a top tube ding and lots of scratches.

It arrived on a Saturday. I was in a hurry to get it out for a ride on Sunday but I didn't have a British Campy BB handy so I threw in a Stronglight 93 crank. I guess I should change it to Campy now that 13 years have gone by.

obrentharris I really like the Haden or Agrati "Birds Mouth" lugs used for one year on the 1972 Raleigh Pros.

verktyg
Also, once you get some bling on the bike, little cosmetic defects become less noticeable.
On that note, this time last year I bought "Barney", a lilac 1971 Raleigh Competition to ride in CA L'eroica. Didn't make the ride but I ended up with my only rust bucket beater for gravel grinding.
This sleek beauty was listed on eBay as having been completely overhauled and ready to ride. I figured a few component changes and tweaks it would be ready to go!
I'll spare you the details but I had to redo, rebuild or overhaul everything on the bike. The seller did issue me a substantial refund!
eBay picture as purchased
After Picture... The last change was a set of Stronglight 93 cranks, not shown. Note the rust under the top tube. But it rides GREAT!
Getting back to Raleigh Pros, I bought this 1975 frame in 2007. It passes the 10 foot test but has a top tube ding and lots of scratches.
It arrived on a Saturday. I was in a hurry to get it out for a ride on Sunday but I didn't have a British Campy BB handy so I threw in a Stronglight 93 crank. I guess I should change it to Campy now that 13 years have gone by.
obrentharris I really like the Haden or Agrati "Birds Mouth" lugs used for one year on the 1972 Raleigh Pros.
verktyg
__________________
Don't believe everything you think! History is written by those who weren't there....
Chas. ;-)
Don't believe everything you think! History is written by those who weren't there....
Chas. ;-)
Last edited by verktyg; 02-22-20 at 01:08 AM.
02-22-20, 06:38 AM
#6
Senior Member
Join Date: Dec 2005
Posts: 17,146
Mentioned: 481 Post(s)
Tagged: 0 Thread(s)
Quoted: 3804 Post(s)
Liked 6,643 Times
in
2,602 Posts
Brent, the bend on those fork blades in the first pic sure looks funky. Camera angle issue?
02-22-20, 08:17 AM
#7

Senior Member
Join Date: Jun 2006
Posts: 20,305
Mentioned: 130 Post(s)
Tagged: 0 Thread(s)
Quoted: 3464 Post(s)
Liked 2,827 Times
in
1,995 Posts
these Raleigh pros had British bolts... not SAE, not Metric. Thread the bolt you have in from the other side to verify class of fit. Chances of easily finding a Whitworth socket head cap screw for a reasonable price is small. As I recall the originals were black oxide in finish.
turning down a head to fit is a necessary and clever fix- just not sure about the threading condition.
buy a correct bolt and Allen key or two to fit and mark them with paint to keep track.
02-22-20, 08:22 AM
#8
Senior Member

Join Date: Jan 2015
Location: Los Angeles
Posts: 4,697
Bikes: 82 Medici, 2011 Richard Sachs, 2011 Milwaukee Road
Mentioned: 55 Post(s)
Tagged: 0 Thread(s)
Quoted: 1946 Post(s)
Liked 2,004 Times
in
1,105 Posts
That paint looks great and adjusters are for adjusting. That you are planning on putting this together in time for EroicaCA makes me contemplate preparing a recently adopted and super patinafied Grand Jubile. I'm going to accept some rust inside the fixed bottom bracket cup but you could probably get away with replacing that seat binder bolt.
__________________
I don't do: disks, tubeless, e-shifting, or bead head nymphs.
I don't do: disks, tubeless, e-shifting, or bead head nymphs.
02-22-20, 04:33 PM
#9
Senior Member
Join Date: Oct 2015
Location: PDX
Posts: 13,033
Bikes: Merz x 5 + Specialized Merz Allez x 2, Strawberry/Newlands/DiNucci/Ti x3, Gordon, Fuso/Moulton x2, Bornstein, Paisley,1958-74 Paramounts x3, 3rensho, 74 Moto TC, 73-78 Raleigh Pro's x5, Marinoni x2, 1960 Cinelli SC, 1980 Bianchi SC, PX-10 X 2
Mentioned: 267 Post(s)
Tagged: 0 Thread(s)
Quoted: 4510 Post(s)
Liked 6,374 Times
in
3,666 Posts
In an effort to remove the rust without mixing up gallons of oxalic acid I hit upon the idea of wrapping the frame with rags, drenching the rags with a mild oxalic acid solution, wrapping the whole thing in plastic, and letting it sit for a day or two. It worked pretty well for the fork.
Next step was to do the same with the entire frame. Unfortunately the results were not what I anticipated. You can see in the photo below the spiral light and dark marks left on the down tube by the spiral wrapped rags when I removed them.
...And there was still some rust on the frame. Next step was to build what gaucho777 brilliantly labeled the "bike coffin" from some scrap plywood and a plastic tarp. I soaked the frame the conventional way in the coffin and was successful at removing the remaining rust but not in removing the spiral paint marks. I said I wanted patina and now I have inadvertently created my very own. I guess I'm part of this bikes history for some future owner to wonder about!
To be continued...
Brent[/QUOTE]
On the 58 Paramount, all of the lugs and fittings were covered with greasy residue and petrified underneath, dishsoap and simple green removed all the grease and softened the hard stuff a bit.
All that left the paint splotchy and I was mortified, by the time I chiseled the petrified stuff off carefully using wood and plastic scrapers and washing again with plain water, the splotches had faded away, I did carefully wax most of it afterwards and it turned out just fine almost seemed like the paint was "rehydrated" in the end. I was very relieved.
02-22-20, 04:42 PM
#10
Senior Member
Join Date: Oct 2015
Location: PDX
Posts: 13,033
Bikes: Merz x 5 + Specialized Merz Allez x 2, Strawberry/Newlands/DiNucci/Ti x3, Gordon, Fuso/Moulton x2, Bornstein, Paisley,1958-74 Paramounts x3, 3rensho, 74 Moto TC, 73-78 Raleigh Pro's x5, Marinoni x2, 1960 Cinelli SC, 1980 Bianchi SC, PX-10 X 2
Mentioned: 267 Post(s)
Tagged: 0 Thread(s)
Quoted: 4510 Post(s)
Liked 6,374 Times
in
3,666 Posts
Oh, and fabulous choice for a reboot, love the Pro's all day long, always have, always will.
Someday the Moto TC, 74 Paramount, PX-10 and Raleigh Pro will sit side by side as a tribute to the bike boom titans that they were.
Someday the Moto TC, 74 Paramount, PX-10 and Raleigh Pro will sit side by side as a tribute to the bike boom titans that they were.
02-22-20, 06:41 PM
#11
aka Tom Reingold

Join Date: Jan 2009
Location: New York, NY, and High Falls, NY, USA
Posts: 40,498
Bikes: 1962 Rudge Sports, 1971 Raleigh Super Course, 1971 Raleigh Pro Track, 1974 Raleigh International, 1975 Viscount Fixie, 1982 McLean, 1996 Lemond (Ti), 2002 Burley Zydeco tandem
Mentioned: 511 Post(s)
Tagged: 0 Thread(s)
Quoted: 7346 Post(s)
Liked 2,453 Times
in
1,430 Posts
Those dropout adjuster screws are there to compensate for defects such as the one you have.
__________________
Tom Reingold, tom@noglider.com
New York City and High Falls, NY
Blogs: The Experienced Cyclist; noglider's ride blog
�When man invented the bicycle he reached the peak of his attainments.� � Elizabeth West, US author
Please email me rather than PM'ing me. Thanks.
Tom Reingold, tom@noglider.com
New York City and High Falls, NY
Blogs: The Experienced Cyclist; noglider's ride blog
�When man invented the bicycle he reached the peak of his attainments.� � Elizabeth West, US author
Please email me rather than PM'ing me. Thanks.
02-22-20, 08:43 PM
#12
Senior Member
Thread Starter
Join Date: May 2012
Location: Point Reyes Station, California
Posts: 4,526
Bikes: Indeed!
Mentioned: 92 Post(s)
Tagged: 0 Thread(s)
Quoted: 1506 Post(s)
Liked 3,464 Times
in
1,130 Posts
On the 58 Paramount, all of the lugs and fittings were covered with greasy residue and petrified underneath, dishsoap and simple green removed all the grease and softened the hard stuff a bit.
All that left the paint splotchy and I was mortified, by the time I chiseled the petrified stuff off carefully using wood and plastic scrapers and washing again with plain water, the splotches had faded away, I did carefully wax most of it afterwards and it turned out just fine almost seemed like the paint was "rehydrated" in the end. I was very relieved.
I too am a believer in the restorative properties of rubbing compound and a good wax. My first attempt was with a scratch and swirl removing compound but with no success. Next I went to a heavier compound that I use after the 1500 paper when painting a frame: Still no success. However I did discover that, on this old bike, I liked the reduced sheen of the heavier compound than the shinier finish of the lighter compound! It seems to me to give this particular paint more depth, more a feeling of solidity rather than sparkle if that makes any sense. A little "Klasse" wax provided a good finishing touch. I have at this point taken the expedient of convincing myself that I like the spiral mottling in the paint job, a bit of "character" perhaps!
Brent
02-22-20, 08:47 PM
#13
Senior Member
Thread Starter
Join Date: May 2012
Location: Point Reyes Station, California
Posts: 4,526
Bikes: Indeed!
Mentioned: 92 Post(s)
Tagged: 0 Thread(s)
Quoted: 1506 Post(s)
Liked 3,464 Times
in
1,130 Posts
Getting back to Raleigh Pros, I bought this 1975 frame in 2007. It passes the 10 foot test but has a top tube ding and lots of scratches.
obrentharris I really like the Haden or Agrati "Birds Mouth" lugs used for one year on the 1972 Raleigh Pros.
verktyg
obrentharris I really like the Haden or Agrati "Birds Mouth" lugs used for one year on the 1972 Raleigh Pros.
verktyg
Brent
02-22-20, 08:51 PM
#14
Senior Member
Thread Starter
Join Date: May 2012
Location: Point Reyes Station, California
Posts: 4,526
Bikes: Indeed!
Mentioned: 92 Post(s)
Tagged: 0 Thread(s)
Quoted: 1506 Post(s)
Liked 3,464 Times
in
1,130 Posts
this is a case where I think the parallax and the slightly turned to the left fork conspire.
these Raleigh pros had British bolts... not SAE, not Metric. Thread the bolt you have in from the other side to verify class of fit. Chances of easily finding a Whitworth socket head cap screw for a reasonable price is small. As I recall the originals were black oxide in finish.
turning down a head to fit is a necessary and clever fix- just not sure about the threading condition.
buy a correct bolt and Allen key or two to fit and mark them with paint to keep track.
I think repechage is correct. The fork was turned slightly towards the camera in that photo. I don't have a fork alignment tool but, using the crude tools at my disposal, (string, carpenter's square, measuring tape, and calipers) I'm fairly confident the fork is straight.
Brent
02-22-20, 08:54 PM
#15
Senior Member
Thread Starter
Join Date: May 2012
Location: Point Reyes Station, California
Posts: 4,526
Bikes: Indeed!
Mentioned: 92 Post(s)
Tagged: 0 Thread(s)
Quoted: 1506 Post(s)
Liked 3,464 Times
in
1,130 Posts
02-22-20, 09:43 PM
#16
Senior Member
Thread Starter
Join Date: May 2012
Location: Point Reyes Station, California
Posts: 4,526
Bikes: Indeed!
Mentioned: 92 Post(s)
Tagged: 0 Thread(s)
Quoted: 1506 Post(s)
Liked 3,464 Times
in
1,130 Posts
Thank you all for the kind words and advice.
The rust was nicely removed by the repeated oxalic acid treatments but the fork decals suffered as you can see here. I've been tempted to replace with new decals but have decided that, for now, this is just a bit more patina.

Another victim of the oxalic acid was the paint on the headbadge. I'm kind of partial to the shiny brass though, so it also will stay as it is.
Before

After

Then there was the question of touch up paint. How much to hide, how much to keep? I'm usually fairly successful with blending colors except when it comes to metallics other than silver. This one is no exception. I spent hours mixing metallic silver, metallic blue, red, and yellow but never got it just right. Compounding the problem is that the paint has aged and shifted color unevenly. In the end I used my poor color match on a few glaring spots and left the rest alone.

The rusty seat lug tip was one of those glaring spots. I also chose to re-fill the lug cutouts with gold paint but have left the rest of the lug lining alone.
Before

After

Components. I mentioned earlier that I'm trying to restore this bike on the cheap. Fortunately for me I have an entire Nuovo Record group sitting around that I could put on the bike. But I am no longer able to push Nuovo Record gears up the steeper portions of gravel on the Coastal route at the Eroica, so some changes were in order. Inspired by a recent Suntour thread by Drillium Dude I decided to go with a set of black first generation Suntour Cyclone derailleurs that have been gathering dust in my shop. I documented the process of switching a long cage onto the rear derailleur in this thread.
I like the look of the Mighty Tour crankset and was fortunate to get one from a forum member to make my own compact double 44/34. A Dura Ace 12-28 7-speed freewheel built from parts will give me a nice range of gears.
Many thanks to jeirvine USAZorro unworthy1 and L134 for their help sourcing parts!

The red toe straps will have to go and I'm still trying to decide between water bottle on the downtube or on the handlebars. I know the purple tape is a bit unorthodox but I like the effect. Even a patina bike deserves a little bling.
I had a good supply of left over touch up paint so I again followed Drillium Dude's lead and did a little color fill on some of the components.


Shakedown ride is immanent.
Brent
The rust was nicely removed by the repeated oxalic acid treatments but the fork decals suffered as you can see here. I've been tempted to replace with new decals but have decided that, for now, this is just a bit more patina.
Another victim of the oxalic acid was the paint on the headbadge. I'm kind of partial to the shiny brass though, so it also will stay as it is.
Before
After
Then there was the question of touch up paint. How much to hide, how much to keep? I'm usually fairly successful with blending colors except when it comes to metallics other than silver. This one is no exception. I spent hours mixing metallic silver, metallic blue, red, and yellow but never got it just right. Compounding the problem is that the paint has aged and shifted color unevenly. In the end I used my poor color match on a few glaring spots and left the rest alone.
The rusty seat lug tip was one of those glaring spots. I also chose to re-fill the lug cutouts with gold paint but have left the rest of the lug lining alone.
Before
After
Components. I mentioned earlier that I'm trying to restore this bike on the cheap. Fortunately for me I have an entire Nuovo Record group sitting around that I could put on the bike. But I am no longer able to push Nuovo Record gears up the steeper portions of gravel on the Coastal route at the Eroica, so some changes were in order. Inspired by a recent Suntour thread by Drillium Dude I decided to go with a set of black first generation Suntour Cyclone derailleurs that have been gathering dust in my shop. I documented the process of switching a long cage onto the rear derailleur in this thread.
I like the look of the Mighty Tour crankset and was fortunate to get one from a forum member to make my own compact double 44/34. A Dura Ace 12-28 7-speed freewheel built from parts will give me a nice range of gears.
Many thanks to jeirvine USAZorro unworthy1 and L134 for their help sourcing parts!
The red toe straps will have to go and I'm still trying to decide between water bottle on the downtube or on the handlebars. I know the purple tape is a bit unorthodox but I like the effect. Even a patina bike deserves a little bling.
I had a good supply of left over touch up paint so I again followed Drillium Dude's lead and did a little color fill on some of the components.
Shakedown ride is immanent.
Brent
02-22-20, 10:14 PM
#17
Senior Member
Join Date: May 2019
Location: Burien WA
Posts: 510
Bikes: Cannondale Synapse, LeMond Victoire, Bianchi Campione d'Italia, Kona Hei Hei, Ritchey Ultra, Schwinn "Paramount" PDG, '83 Trek 640
Mentioned: 7 Post(s)
Tagged: 0 Thread(s)
Quoted: 267 Post(s)
Liked 324 Times
in
210 Posts
Beautiful.
And yes, it can be nice to have gear that isn't overly precious.
High-five for the brass head badge, too.
And yes, it can be nice to have gear that isn't overly precious.
High-five for the brass head badge, too.
02-23-20, 12:23 AM
#18
Senior Member
Nuovo Record - get some! With patina, so the cost is not too high. It will properly fit the bike.
02-23-20, 01:57 AM
#19
Senior Member
Join Date: Oct 2015
Location: PDX
Posts: 13,033
Bikes: Merz x 5 + Specialized Merz Allez x 2, Strawberry/Newlands/DiNucci/Ti x3, Gordon, Fuso/Moulton x2, Bornstein, Paisley,1958-74 Paramounts x3, 3rensho, 74 Moto TC, 73-78 Raleigh Pro's x5, Marinoni x2, 1960 Cinelli SC, 1980 Bianchi SC, PX-10 X 2
Mentioned: 267 Post(s)
Tagged: 0 Thread(s)
Quoted: 4510 Post(s)
Liked 6,374 Times
in
3,666 Posts
obrentharris
 Looks great Brent, well done, a Pro workhorse, not that they were ever not that, but this will serve you and the purpose very well I think.
Looks great Brent, well done, a Pro workhorse, not that they were ever not that, but this will serve you and the purpose very well I think.
02-23-20, 03:17 PM
#20
Senior Member

Join Date: Jul 2007
Location: Manhattan & Woodstock NY
Posts: 2,745
Bikes: 1987 Mercian Pro, 1985 Shogun 500, early '70s Falcon San Remo, 1972 Peugeot PX-10, 1972 Schwinn Paramount P13-9, 1971 Raleigh International, 1971 Peugeot PX-10, 1970 Raleigh Professional Mk1
Mentioned: 109 Post(s)
Tagged: 0 Thread(s)
Quoted: 938 Post(s)
Liked 2,924 Times
in
978 Posts
Great work. That bike�s gonna make you smile!
__________________
1987 Mercian Pro, 1985 Shogun 500, 197? Falcon San Remo, 1972 Peugeot PX-10, 1972 Schwinn Paramount P13-9, 1971 Peugeot PX-10, 1971 Raleigh International, 1970 Raleigh Professional Mark I
Curator/Team Mechanic: 2016 Dawes Streetfighter, 1984 Lotus Eclair, 1975 Motobecane Jubile Mixte, 1974 Raleigh Sports, 1973 Free Spirit Ted Williams, 1972 Raleigh Super Course, 1971 Philips Sport
02-23-20, 03:32 PM
#21
Senior Member
Join Date: Jan 2016
Posts: 3,442
Mentioned: 33 Post(s)
Tagged: 0 Thread(s)
Quoted: 872 Post(s)
Liked 2,272 Times
in
1,274 Posts
I love bikes with patina , and that one is a beauty! I love riding my ItalVega for the ride and the patina is a bit more severe than your Pro. I rode the ItalVega last year at Eroica and it fit in with all the other bikes quite well. I look forward to seeing yours.

03-18-20, 03:36 PM
#22
Junior Member
Join Date: Mar 2020
Posts: 14
Mentioned: 0 Post(s)
Tagged: 0 Thread(s)
Quoted: 2 Post(s)
Likes: 0
Liked 11 Times
in
3 Posts
Nice looking bike , I restored a 1951 Holdsworth Cyclone deluxe and it had been painted over with red lead so I had no option but to do an "as new" restoration . The only thing with it is it now looks like a old designed, new bike , not a bike with 70 years of history. Better to have the marks of history IMO.
Likes For Andy@64:
