


Mid-'40s René Herse tandem
 11-07-19, 06:11 PM
#76
Senior Member
Join Date: Nov 2018
Location: East Tennessee
Posts: 251
Bikes: 2002 Trek 800 Singletrack, 1982 Bridgestone Spica
Mentioned: 2 Post(s)
Tagged: 0 Thread(s)
Quoted: 57 Post(s)
Liked 41 Times
in
32 Posts
The creme de la creme of French constructeur classics. French arte de velo at it's finest. And unmatched in pure Gallicness. To bikes what classic Citroens are to automobiles. Thanks for sharing this find. Post of the year.

Likes For Kent T:
11-07-19, 06:50 PM
#77

Senior Member
Thread Starter

Join Date: Jun 2010
Location: Medford MA
Posts: 2,089
Bikes: Ron Cooper touring, 1959 Jack Taylor 650b ladyback touring tandem, Vitus 979, Joe Bell painted Claud Butler Dalesman, Colin Laing curved tube tandem, heavily-Dilberted 1982 Trek 6xx, René Herse tandem
Mentioned: 80 Post(s)
Tagged: 0 Thread(s)
Quoted: 964 Post(s)
Liked 1,451 Times
in
723 Posts
Old Lyotard pedals are WEIRD
So I have bad luck with pedal dust caps. I'm always missing one. I never lose them, but bikes find their way to me, invariably, with at least one pedal dust cap gone. My Jack Taylor, for example, came with exactly two out of four Brampton pedals missing dust caps. I painstakingly turned three of them on a manual lathe (fifteen steps I think, and as many tool changes), broke one, and now everything is fine (other than one original dust cap trying to escape in Medford traffic last weekend!!  )
)
I thought, therefore, that the Herse was an improvement. Three out of four dust caps were present for roll call. According to some information floating out on the internet, the dust cap I wanted was the Lyotard 669 (see bottom of catalog page below). And when I went on the internet, the notorious Ebay seller of odd French parts, Fabuluzvintage, had two for sale.

So I bought them, and they came last week. But I wouldn't be posting this if all went smoothly. Here is a photo of the Ebay dust caps next to a correct one off the 460D pedals from the Herse. It looks like they got wet so someone put them in the dryer and they shrunk!

So those wouldn't do. I'd had it. I grabbed a scrap piece of Inconel (science trash is the best trash) and turned one. It took three hours, but now I don't have to dink around with Ebay for this particular part. Yeah it's not nickel plated stamped steel like the original, but at least it exists, and anything the bike falls over on will be instantly destroyed, because Inconel. I've never seen another Lyotard 669 dust cap. Hell, the ones Fabuluzvintage was selling could have been the actual No. 669, there's no way to know, although a French forum seems to say the 669 cap fits on the 460D, but they're probably going off the same catalog page that I am, which has nothing for scale, nor fitment information.
Here are the glamor shots.


The thing I need now is an oiler hole cover. Like the photo below. I think I could make it out of an old clock spring, if I annealed it, ground the shape, peened the dimple in it, and then re-heat-treated it (or not!!) but I threw my last old clock spring away. I am sure I can find another in the next few months. Or maybe someone on these forums knows a cheap hub with a similar oiler hole cover that I could scavenge from.

The final question is, do I bug Fabuluzvintage about getting a refund for these dust caps? It seems like he or she was selling something completely unknowable, and I was buying the same, and we both kinda knew that, so ethically it seems like a neutral exchange. But it ended up being the wrong thing, and now I wonder what in the heck these pygmy shrunken dust caps actually are!
)I thought, therefore, that the Herse was an improvement. Three out of four dust caps were present for roll call. According to some information floating out on the internet, the dust cap I wanted was the Lyotard 669 (see bottom of catalog page below). And when I went on the internet, the notorious Ebay seller of odd French parts, Fabuluzvintage, had two for sale.
So I bought them, and they came last week. But I wouldn't be posting this if all went smoothly. Here is a photo of the Ebay dust caps next to a correct one off the 460D pedals from the Herse. It looks like they got wet so someone put them in the dryer and they shrunk!
So those wouldn't do. I'd had it. I grabbed a scrap piece of Inconel (science trash is the best trash) and turned one. It took three hours, but now I don't have to dink around with Ebay for this particular part. Yeah it's not nickel plated stamped steel like the original, but at least it exists, and anything the bike falls over on will be instantly destroyed, because Inconel. I've never seen another Lyotard 669 dust cap. Hell, the ones Fabuluzvintage was selling could have been the actual No. 669, there's no way to know, although a French forum seems to say the 669 cap fits on the 460D, but they're probably going off the same catalog page that I am, which has nothing for scale, nor fitment information.
Here are the glamor shots.
The thing I need now is an oiler hole cover. Like the photo below. I think I could make it out of an old clock spring, if I annealed it, ground the shape, peened the dimple in it, and then re-heat-treated it (or not!!) but I threw my last old clock spring away. I am sure I can find another in the next few months. Or maybe someone on these forums knows a cheap hub with a similar oiler hole cover that I could scavenge from.
The final question is, do I bug Fabuluzvintage about getting a refund for these dust caps? It seems like he or she was selling something completely unknowable, and I was buying the same, and we both kinda knew that, so ethically it seems like a neutral exchange. But it ended up being the wrong thing, and now I wonder what in the heck these pygmy shrunken dust caps actually are!
__________________
Owner & co-founder, Cycles René Hubris. Unfortunately attaching questionable braze-ons to perfectly good frames since about 2015. With style.
Owner & co-founder, Cycles René Hubris. Unfortunately attaching questionable braze-ons to perfectly good frames since about 2015. With style.
Likes For scarlson:
11-07-19, 07:43 PM
#78
working on my sandal tan

Join Date: Aug 2011
Location: CID
Posts: 22,627
Bikes: 1991 Bianchi Eros, 1964 Armstrong, 1988 Diamondback Ascent, 1988 Bianchi Premio, 1987 Bianchi Sport SX, 1980s Raleigh mixte (hers), All-City Space Horse (hers)
Mentioned: 98 Post(s)
Tagged: 0 Thread(s)
Quoted: 3870 Post(s)
Liked 2,563 Times
in
1,577 Posts
Just think, @scarlson: once you've nailed machining dustcaps for French pedals, that could be yet another lucrative side-business for you! 
Likes For ThermionicScott:
11-07-19, 09:59 PM
#79
Senior Member
Thread Starter
Join Date: Jun 2010
Location: Medford MA
Posts: 2,089
Bikes: Ron Cooper touring, 1959 Jack Taylor 650b ladyback touring tandem, Vitus 979, Joe Bell painted Claud Butler Dalesman, Colin Laing curved tube tandem, heavily-Dilberted 1982 Trek 6xx, René Herse tandem
Mentioned: 80 Post(s)
Tagged: 0 Thread(s)
Quoted: 964 Post(s)
Liked 1,451 Times
in
723 Posts
Just think, @scarlson: once you've nailed machining dustcaps for French pedals, that could be yet another lucrative side-business for you!

I think, manual turning stuff on the Hardinge lathe, I'm probably worth $50 an hour. That means these dust caps are $150 a piece! Even Jan Heine couldn't afford it (although I'd gladly take an even trade, one dust cap for a set of Honjo fenders, two dust caps for a SON SL, three dust caps for a bike's worth of centerpull brakes... I'm sure we could work something out.
Without question CNCing them is the way to go, but I'll be fighting with Autodesk Fusion 360 for 3 hours just to get the design nailed down, and then another 4 hours for the CAM toolpaths and then another hour of alternately debugging gcode and sweating with my hand over the "stop" button of the CNC lathe while it does the first one. Then I could make a hundred as easy as one, just push the go button, but you see why I do them manually for making one or two!
Actually there's more to it. Turning things is so soothing and therapeutic. There are only two dimensions, radius and length, so your world is so simple you can be master of it without much effort or thought. It makes me happy to do little stuff like this.
__________________
Owner & co-founder, Cycles René Hubris. Unfortunately attaching questionable braze-ons to perfectly good frames since about 2015. With style.
Owner & co-founder, Cycles René Hubris. Unfortunately attaching questionable braze-ons to perfectly good frames since about 2015. With style.
11-07-19, 10:11 PM
#80
Senior Member
Wow! Thank you so much for sharing this here. I'm amazed! Good job so far. Very impressive how much you've accomplished. It's fitting such a nice tandem would go to someone who is able and willing to put so much work into it.
Are you going to rebuild the tandem hubs? Are they significantly different to later Maxi-Car hubs as far as you can tell?
Are you going to rebuild the tandem hubs? Are they significantly different to later Maxi-Car hubs as far as you can tell?
11-07-19, 10:44 PM
#81
Senior Member
Thread Starter
Join Date: Jun 2010
Location: Medford MA
Posts: 2,089
Bikes: Ron Cooper touring, 1959 Jack Taylor 650b ladyback touring tandem, Vitus 979, Joe Bell painted Claud Butler Dalesman, Colin Laing curved tube tandem, heavily-Dilberted 1982 Trek 6xx, René Herse tandem
Mentioned: 80 Post(s)
Tagged: 0 Thread(s)
Quoted: 964 Post(s)
Liked 1,451 Times
in
723 Posts

Are you going to rebuild the tandem hubs? Are they significantly different to later Maxi-Car hubs as far as you can tell?
The drum linings will probably also have to be redone, but this is fairly straightforward and well-documented on vintage motorcycle sites. Since these wheels are tied and soldered, I won't be taking them apart to clean the hubs up and polish on the lathe, but maybe I will skim the drum on a larger lathe that can fit the whole wheel, if it looks bad.
__________________
Owner & co-founder, Cycles René Hubris. Unfortunately attaching questionable braze-ons to perfectly good frames since about 2015. With style.
Owner & co-founder, Cycles René Hubris. Unfortunately attaching questionable braze-ons to perfectly good frames since about 2015. With style.
11-25-19, 08:28 PM
#82
Senior Member
Thread Starter
Join Date: Jun 2010
Location: Medford MA
Posts: 2,089
Bikes: Ron Cooper touring, 1959 Jack Taylor 650b ladyback touring tandem, Vitus 979, Joe Bell painted Claud Butler Dalesman, Colin Laing curved tube tandem, heavily-Dilberted 1982 Trek 6xx, René Herse tandem
Mentioned: 80 Post(s)
Tagged: 0 Thread(s)
Quoted: 964 Post(s)
Liked 1,451 Times
in
723 Posts
Another update comes forth!
Not chainrings, sorry. But perhaps another unique thing on the internet, here we have a teardown of an E.D. Dechelette speedometer.
A bit of background: Herse has been known to stick these on his bikes. They are belt-driven, like the Huret Multito but on a larger scale.

You can't see in this photo, but the belt is actually a very long, circular, coiled tension spring.
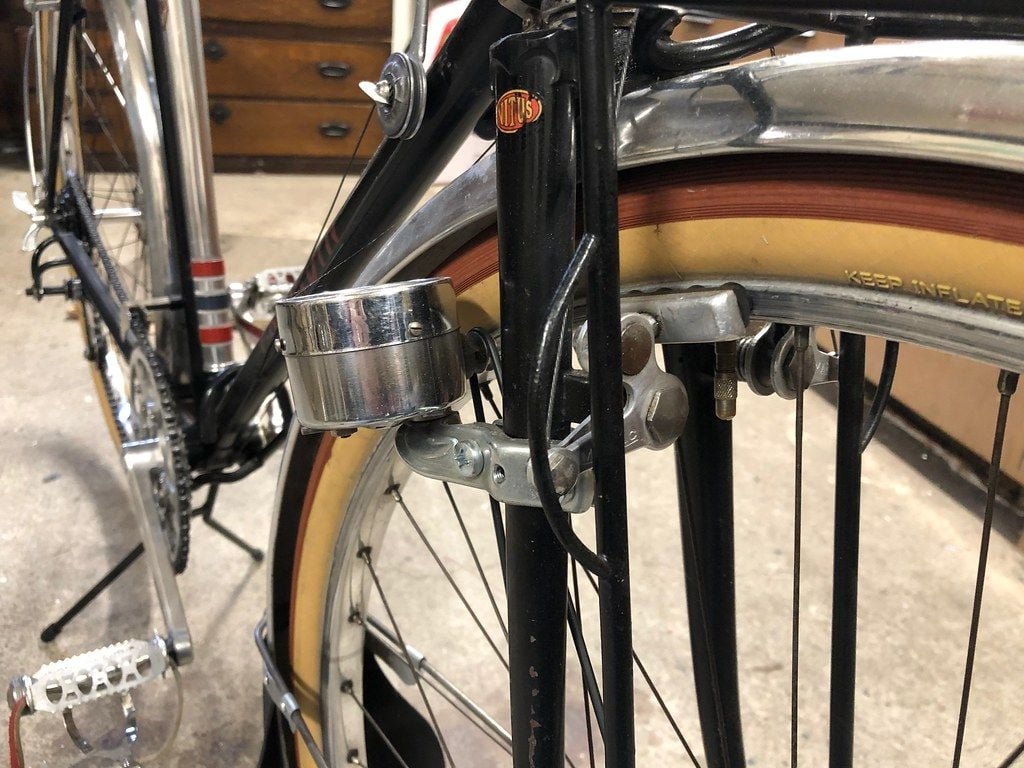
Mine has the belt pulley on the front wheel, and a peculiar braze-on on the right fork blade, which a friend in-the-know told me probably was for mounting such a speedometer. Both features are visible in this photo.

So I bought one on Ebay and it came from France just recently. Not bad looking eh?

But it's a little dirty and the needle a little jumpy, there's some play in the drive-shaft, and the set screw to the pulley is missing, so I figured it could use a good servicing, or at least a cleaning inside. So off come the three screws that hold the bezel on.

With the bezel off, I can remove the glass to give it a good wipe down with alcohol and polish the bezel separately.

The needle is looking a little rusty. Bet that's radium paint? It seems to yellow like that in older clock displays, so maybe!! The way to remove it is to grip firmly and confidently with needlenose pliers and pull straight up. Off it pops, held only by friction to the post!

Then I took the can off the bottom. The chassis was only just sitting in there, and came out with a little wiggling. Here's the naked chassis of the thing. Time to look at the insides and do some servicing!
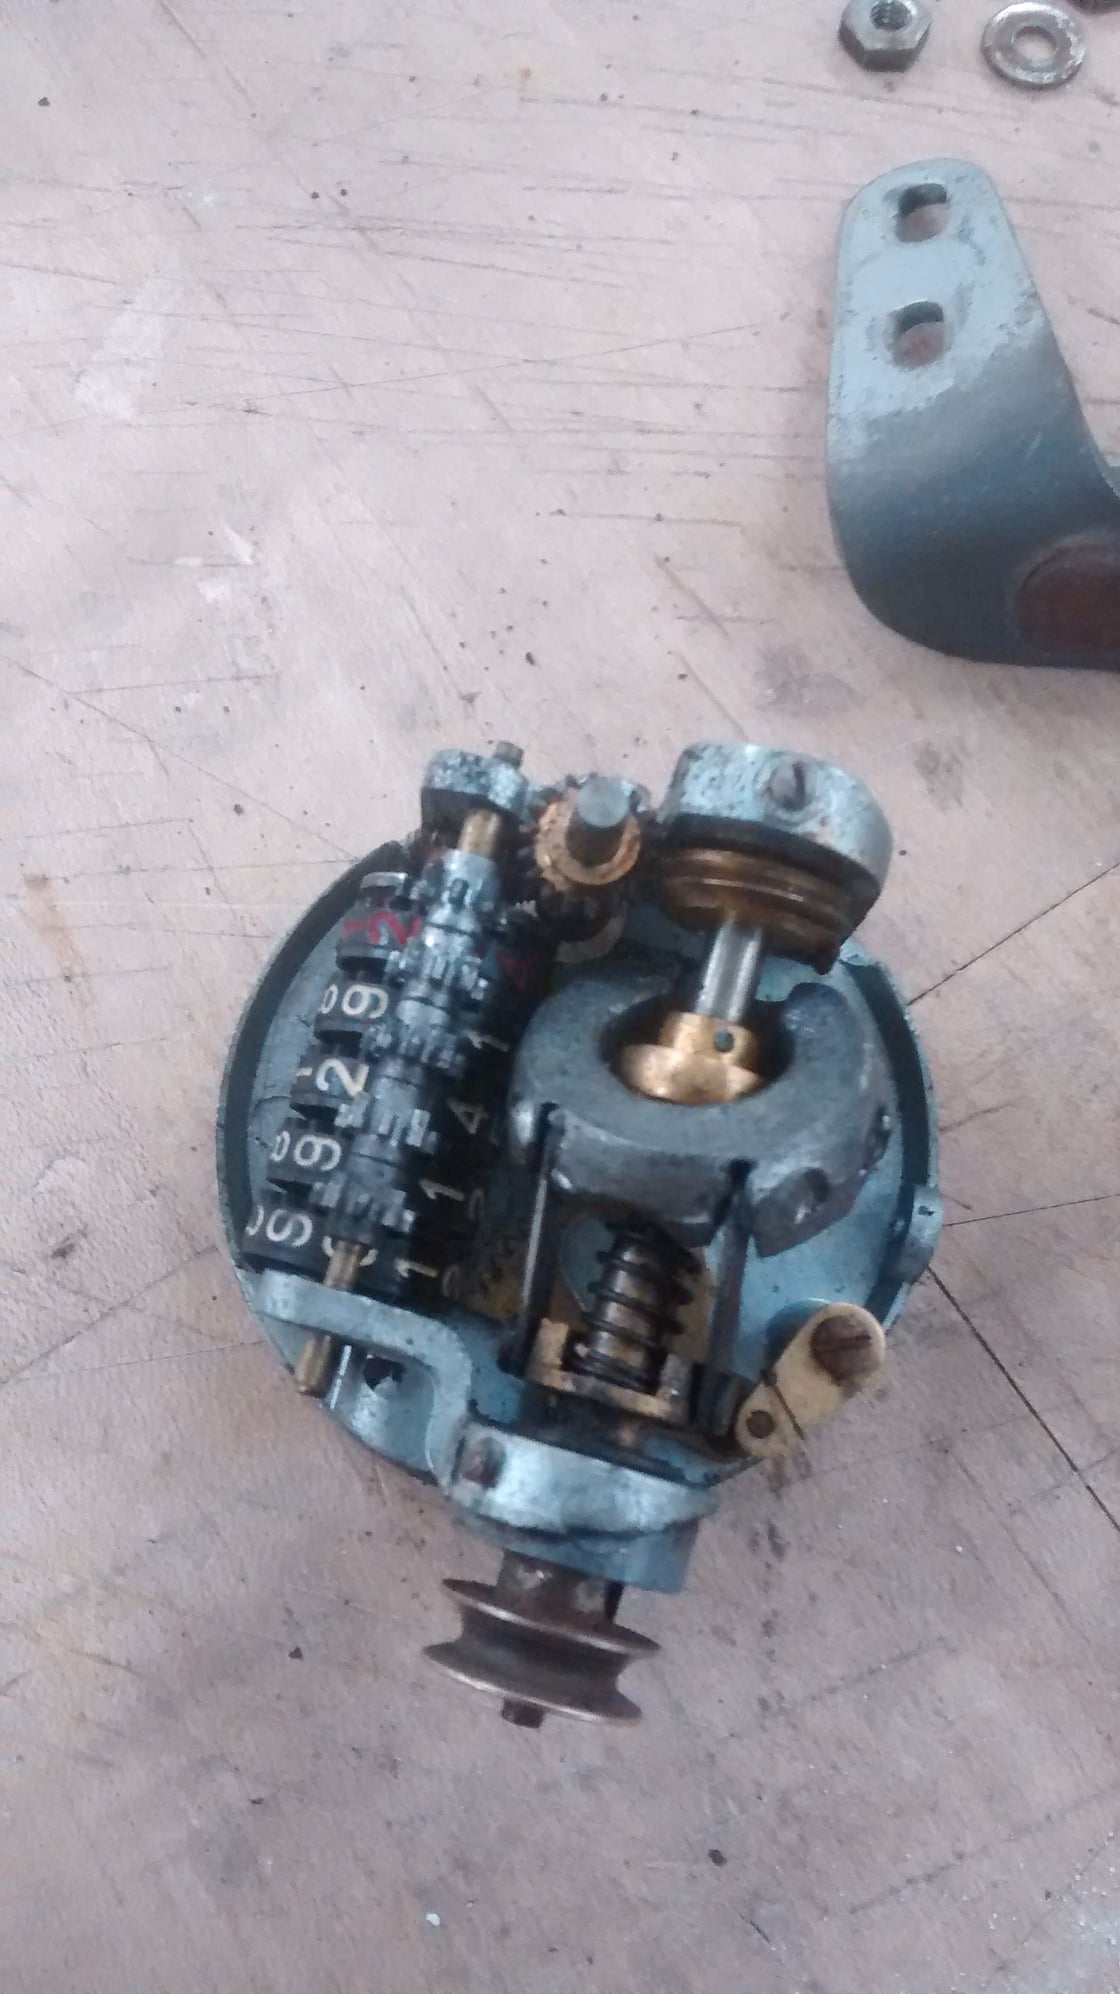
Look at that! Isn't it a beauty inside? And the pulley came right off with a gear puller (comically huge next to the speedometer) so then I could adjust the tiny ball bearings.

The ball bearing cups have slots in them, and are threaded in the chassis. They are retained by setscrews. So you loosen those, then you insert something and twist to adjust the bearings. By playing with this adjustment, I can fix the play in the drive shaft!
I will finish the bearing adjustment, flush out the old lubricant and add new, maybe play with the calibration a little, and clean everything and paint the needle and put it back together!
But before I do, I need to decide something. Do I roll the odometer back to zero? Or do I leave it as-is? My Honda CB350 I rolled back (legally) after the restoration. Should I do it here to mark a new life for the thing?
Also, if anyone has any input on how exactly the speedometer attaches to the fork blade braze-on, which you can see in my first post of this thread, I'd appreciate it. It is probably not a stock bracket. The bottom of the speedometer has two screws going horizontally, and the stock bracket extends behind the speedometer like so:

It almost seems like I need to reverse the stock bracket to hold the speedometer behind the fork blade, because if it were in front of the fork blade it would run into the cantilever brake arm. But I think it maybe can't be reversed because there's a lump in the back of the speedometer housing for the fly-weight. It's weird. In any case, I have to fabricate the bracket so I can make whatever rinky dink thing I want to make it work now that I have the speedometer and the bike. It only occurs to me after writing this post that it would be bad to have the speedometer anywhere in front of the fork blade because the view of the gauge would be occluded by the handlebar bag and the speedometer would probably hit the front panniers if the tandem were thusly loaded up. So I bet it goes behind the fork blade. Thoughts?
Not chainrings, sorry. But perhaps another unique thing on the internet, here we have a teardown of an E.D. Dechelette speedometer.
A bit of background: Herse has been known to stick these on his bikes. They are belt-driven, like the Huret Multito but on a larger scale.
You can't see in this photo, but the belt is actually a very long, circular, coiled tension spring.
Mine has the belt pulley on the front wheel, and a peculiar braze-on on the right fork blade, which a friend in-the-know told me probably was for mounting such a speedometer. Both features are visible in this photo.
So I bought one on Ebay and it came from France just recently. Not bad looking eh?
But it's a little dirty and the needle a little jumpy, there's some play in the drive-shaft, and the set screw to the pulley is missing, so I figured it could use a good servicing, or at least a cleaning inside. So off come the three screws that hold the bezel on.
With the bezel off, I can remove the glass to give it a good wipe down with alcohol and polish the bezel separately.
The needle is looking a little rusty. Bet that's radium paint? It seems to yellow like that in older clock displays, so maybe!! The way to remove it is to grip firmly and confidently with needlenose pliers and pull straight up. Off it pops, held only by friction to the post!
Then I took the can off the bottom. The chassis was only just sitting in there, and came out with a little wiggling. Here's the naked chassis of the thing. Time to look at the insides and do some servicing!
Look at that! Isn't it a beauty inside? And the pulley came right off with a gear puller (comically huge next to the speedometer) so then I could adjust the tiny ball bearings.
The ball bearing cups have slots in them, and are threaded in the chassis. They are retained by setscrews. So you loosen those, then you insert something and twist to adjust the bearings. By playing with this adjustment, I can fix the play in the drive shaft!
I will finish the bearing adjustment, flush out the old lubricant and add new, maybe play with the calibration a little, and clean everything and paint the needle and put it back together!
But before I do, I need to decide something. Do I roll the odometer back to zero? Or do I leave it as-is? My Honda CB350 I rolled back (legally) after the restoration. Should I do it here to mark a new life for the thing?
Also, if anyone has any input on how exactly the speedometer attaches to the fork blade braze-on, which you can see in my first post of this thread, I'd appreciate it. It is probably not a stock bracket. The bottom of the speedometer has two screws going horizontally, and the stock bracket extends behind the speedometer like so:
It almost seems like I need to reverse the stock bracket to hold the speedometer behind the fork blade, because if it were in front of the fork blade it would run into the cantilever brake arm. But I think it maybe can't be reversed because there's a lump in the back of the speedometer housing for the fly-weight. It's weird. In any case, I have to fabricate the bracket so I can make whatever rinky dink thing I want to make it work now that I have the speedometer and the bike. It only occurs to me after writing this post that it would be bad to have the speedometer anywhere in front of the fork blade because the view of the gauge would be occluded by the handlebar bag and the speedometer would probably hit the front panniers if the tandem were thusly loaded up. So I bet it goes behind the fork blade. Thoughts?
__________________
Owner & co-founder, Cycles René Hubris. Unfortunately attaching questionable braze-ons to perfectly good frames since about 2015. With style.
Owner & co-founder, Cycles René Hubris. Unfortunately attaching questionable braze-ons to perfectly good frames since about 2015. With style.
11-25-19, 08:55 PM
#83
Bike Butcher of Portland

Join Date: Jul 2014
Location: Portland, OR
Posts: 11,630
Bikes: It's complicated.
Mentioned: 1299 Post(s)
Tagged: 0 Thread(s)
Quoted: 4677 Post(s)
Liked 5,790 Times
in
2,279 Posts
I made a replica decaleur for fellow Portlander Karl Edwards's Blondin recently. I took a lot of pictures of this beauty, and the speedo is definitely behind the fork blade.

__________________
If someone tells you that you have enough bicycles and you don't need any more, stop talking to them. You don't need that kind of negativity in your life.
If someone tells you that you have enough bicycles and you don't need any more, stop talking to them. You don't need that kind of negativity in your life.
11-25-19, 09:01 PM
#84
Senior Member
Thread Starter
Join Date: Jun 2010
Location: Medford MA
Posts: 2,089
Bikes: Ron Cooper touring, 1959 Jack Taylor 650b ladyback touring tandem, Vitus 979, Joe Bell painted Claud Butler Dalesman, Colin Laing curved tube tandem, heavily-Dilberted 1982 Trek 6xx, René Herse tandem
Mentioned: 80 Post(s)
Tagged: 0 Thread(s)
Quoted: 964 Post(s)
Liked 1,451 Times
in
723 Posts
gugie Good info, thank you!
What is with that bracket in that picture there? It looks, er, creatively modified.
AND, to everyone else, I would love opinions on whether to roll it back to zero or not!
What is with that bracket in that picture there? It looks, er, creatively modified.
AND, to everyone else, I would love opinions on whether to roll it back to zero or not!
__________________
Owner & co-founder, Cycles René Hubris. Unfortunately attaching questionable braze-ons to perfectly good frames since about 2015. With style.
Owner & co-founder, Cycles René Hubris. Unfortunately attaching questionable braze-ons to perfectly good frames since about 2015. With style.
Last edited by scarlson; 11-25-19 at 09:13 PM.
11-25-19, 09:15 PM
#85
Senior Member
Join Date: Jun 2019
Location: Portland Oregon
Posts: 996
Mentioned: 7 Post(s)
Tagged: 0 Thread(s)
Quoted: 457 Post(s)
Liked 462 Times
in
270 Posts
If the speedo was original to the bike I would possibly not roll it back to zero, but as it isn't original to the bike I would certainly roll it back to zero.
I love the Inconel dust cap!
I love the Inconel dust cap!
Likes For jackbombay:
11-25-19, 09:35 PM
#86

multimodal commuter

Join Date: Nov 2006
Location: NJ, NYC, LI
Posts: 19,808
Bikes: 1940s Fothergill, 1959 Allegro Special, 1963? Claud Butler Olympic Sprint, Lambert 'Clubman', 1974 Fuji "the Ace", 1976 Holdsworth 650b conversion rando bike, 1983 Trek 720 tourer, 1984 Counterpoint Opus II, 1993 Basso Gap, 2010 Downtube 8h, and...
Mentioned: 584 Post(s)
Tagged: 0 Thread(s)
Quoted: 1908 Post(s)
Liked 574 Times
in
339 Posts
I suppose the speedometer you bought was intended (or modified) for a location other than behind the fork of a tandem? I'm not sure what that might be.
I would continue to look at these on eBay, including finished sales, and search Google images. You'll find more photos of correct installation.
I would continue to look at these on eBay, including finished sales, and search Google images. You'll find more photos of correct installation.
__________________
www.rhmsaddles.com.
www.rhmsaddles.com.
11-25-19, 09:40 PM
#87
working on my sandal tan
Join Date: Aug 2011
Location: CID
Posts: 22,627
Bikes: 1991 Bianchi Eros, 1964 Armstrong, 1988 Diamondback Ascent, 1988 Bianchi Premio, 1987 Bianchi Sport SX, 1980s Raleigh mixte (hers), All-City Space Horse (hers)
Mentioned: 98 Post(s)
Tagged: 0 Thread(s)
Quoted: 3870 Post(s)
Liked 2,563 Times
in
1,577 Posts
BTW @scarlson, did you take any detailed pictures of the old tires or inside the rims? Minutiae like that would be cool for VeloBase, IMO.
11-26-19, 12:10 AM
#88
Junior Member

Still reading through this most inspiring thread, thanks for sharing this restoration with us. Not sure if you already have it all in hand but I wanted to offer my Adobe Illustrator services if it would help you, I should be able to render you files that would match your chainring(s) exactly.
I have about a billion hours on the software
I have about a billion hours on the software
11-26-19, 01:56 AM
#89
Senior Member
Join Date: Oct 2015
Location: PDX
Posts: 13,031
Bikes: Merz x 5 + Specialized Merz Allez x 2, Strawberry/Newlands/DiNucci/Ti x3, Gordon, Fuso/Moulton x2, Bornstein, Paisley,1958-74 Paramounts x3, 3rensho, 74 Moto TC, 73-78 Raleigh Pro's x5, Marinoni x2, 1960 Cinelli SC, 1980 Bianchi SC, PX-10 X 2
Mentioned: 267 Post(s)
Tagged: 0 Thread(s)
Quoted: 4509 Post(s)
Liked 6,374 Times
in
3,666 Posts
gugie Good info, thank you!
What is with that bracket in that picture there? It looks, er, creatively modified.
AND, to everyone else, I would love opinions on whether to roll it back to zero or not!
What is with that bracket in that picture there? It looks, er, creatively modified.
AND, to everyone else, I would love opinions on whether to roll it back to zero or not!
11-26-19, 05:06 PM
#90
Full Member
I agree. The mileage on the used part is meaningless. Original miles on the bike are meaningful; your miles on the bike are meaningful.
11-26-19, 11:39 PM
#91
Bike Butcher of Portland
Join Date: Jul 2014
Location: Portland, OR
Posts: 11,630
Bikes: It's complicated.
Mentioned: 1299 Post(s)
Tagged: 0 Thread(s)
Quoted: 4677 Post(s)
Liked 5,790 Times
in
2,279 Posts
gugie Good info, thank you!
What is with that bracket in that picture there? It looks, er, creatively modified.
AND, to everyone else, I would love opinions on whether to roll it back to zero or not!
What is with that bracket in that picture there? It looks, er, creatively modified.
AND, to everyone else, I would love opinions on whether to roll it back to zero or not!
I vote for keeping the miles/kilometers as is. If you want it to be useful, all you care about is stop - start, that is, the trip mileage.
__________________
If someone tells you that you have enough bicycles and you don't need any more, stop talking to them. You don't need that kind of negativity in your life.
If someone tells you that you have enough bicycles and you don't need any more, stop talking to them. You don't need that kind of negativity in your life.
11-27-19, 12:53 AM
#92
Full Member

The only one of these speedometers I've seen mounted on a Herse is this bike pictured in Jan Heine's Herse book.
1945 Herse
The picture shows the lump underneath, and a bracket for mounting to a fender rather tha a fork. However, if you flipped that kind oi mount 180 degree under the speedometer, the bend in the bracket might clear the bump, and provibe a two-bolt mating surface that could match the kind of holes in-your fork mount instead of the front fender.
Incidentally, the speedometer on this 1945 bike apparently never left zero. There were problems with the Cyclo chain stay mount, the bike is virtually unridden, and the speedometer was never even hooked up to record mileage.
In your case, I would treat your heroic rehab of both the Herse tandem and someone else's speedometer as a new beginning. Reset the unit to zero so it can record all the new miles and adventures you will have with that fabulous bike project!
11-27-19, 09:48 AM
#93
Senior Member

Join Date: Sep 2011
Location: Baltimore MD
Posts: 3,331
Bikes: '72 Motobecane Grand Record, '72 Gitane tandem, '72 Raleigh Super Course, '73 Raleigh Gran Sport, '73 Colnago Super, '76 Fiorelli Coppi, '78 Raleigh SBDU Team Pro, '78 Trek 930, '81 Holdsworth Special 650B, '86 Masi GC, ’94 Bridgestone RB-T
Mentioned: 67 Post(s)
Tagged: 0 Thread(s)
Quoted: 786 Post(s)
Liked 517 Times
in
280 Posts
Not sure how much resto work you want to do on the speedo, but this guy's work is pretty inspiring:
__________________
The man who dies with the most toys…is dead. - Rootboy
The man who dies with the most toys…is dead. - Rootboy
11-27-19, 11:09 AM
#94
Senior Member
Thread Starter
Join Date: Jun 2010
Location: Medford MA
Posts: 2,089
Bikes: Ron Cooper touring, 1959 Jack Taylor 650b ladyback touring tandem, Vitus 979, Joe Bell painted Claud Butler Dalesman, Colin Laing curved tube tandem, heavily-Dilberted 1982 Trek 6xx, René Herse tandem
Mentioned: 80 Post(s)
Tagged: 0 Thread(s)
Quoted: 964 Post(s)
Liked 1,451 Times
in
723 Posts
He has an interesting way of piloting dies with the face of a retracted Jacobs chuck on the tailstock, which I copied. Luckily the face of mine looks pretty good so I only have to decide whether to get the can zinc plated or chromed or just paint it. Zinc plating at home is pretty trivial so I might do that, but I know they did come chromed as I've seen photos of such things, and if I'm sending stuff to the platers anyway there's no harm in sending one more thing.A friend lent me some glow in the dark paint, so that's going on the needle, which will be cool.
__________________
Owner & co-founder, Cycles René Hubris. Unfortunately attaching questionable braze-ons to perfectly good frames since about 2015. With style.
Owner & co-founder, Cycles René Hubris. Unfortunately attaching questionable braze-ons to perfectly good frames since about 2015. With style.
Likes For scarlson:
11-27-19, 12:12 PM
#95
Senior Member
Thread Starter
Join Date: Jun 2010
Location: Medford MA
Posts: 2,089
Bikes: Ron Cooper touring, 1959 Jack Taylor 650b ladyback touring tandem, Vitus 979, Joe Bell painted Claud Butler Dalesman, Colin Laing curved tube tandem, heavily-Dilberted 1982 Trek 6xx, René Herse tandem
Mentioned: 80 Post(s)
Tagged: 0 Thread(s)
Quoted: 964 Post(s)
Liked 1,451 Times
in
723 Posts
The only one of these speedometers I've seen mounted on a Herse is this bike pictured in Jan Heine's Herse book.
1945 Herse
The picture shows the lump underneath, and a bracket for mounting to a fender rather tha a fork. However, if you flipped that kind oi mount 180 degree under the speedometer, the bend in the bracket might clear the bump, and provibe a two-bolt mating surface that could match the kind of holes in-your fork mount instead of the front fender.
Incidentally, the speedometer on this 1945 bike apparently never left zero. There were problems with the Cyclo chain stay mount, the bike is virtually unridden, and the speedometer was never even hooked up to record mileage.
__________________
Owner & co-founder, Cycles René Hubris. Unfortunately attaching questionable braze-ons to perfectly good frames since about 2015. With style.
Owner & co-founder, Cycles René Hubris. Unfortunately attaching questionable braze-ons to perfectly good frames since about 2015. With style.
11-27-19, 09:44 PM
#96
Senior Member
Thread Starter
Join Date: Jun 2010
Location: Medford MA
Posts: 2,089
Bikes: Ron Cooper touring, 1959 Jack Taylor 650b ladyback touring tandem, Vitus 979, Joe Bell painted Claud Butler Dalesman, Colin Laing curved tube tandem, heavily-Dilberted 1982 Trek 6xx, René Herse tandem
Mentioned: 80 Post(s)
Tagged: 0 Thread(s)
Quoted: 964 Post(s)
Liked 1,451 Times
in
723 Posts
The stem, part 1
I lost that Ebay auction for the stoker stem, even though I sniped the hell out of it. Serves me right I guess. 
So how hard can it be to make one? Jan Heine says apprentices did it, so it is certainly something that's within my purview. Here goes.
First I took my existing stem off my existing bars. I felt kinda bad taking off 70-year-old shellac (sure looked like 70 years old anyway). It was kind of haphazardly tied on with some twine near the end on the side I unwrapped, which made me think that it was probably field-repaired anyway. Whatever, you can imagine me crying undoing all this history. Then I measured some parts of the original stem and original frame, as well as some frames I like my position on. I found I need a stem that is 125mm long to obtain the same position. The original stem is a 73 degree stem, as measured using a digital protractor. The steerer hole is about 7/8" Actually a little over that, it varies between 7/8 and 0.885".

I started out with a piece of aluminum scrap (science junk, probably used by a neurobiology lab), which measures 1.28" thick. No idea why, but it's pretty close to the thickness of these stems. I bandsawed it out to approximately a stem looking shape, using faintly-drawn Sharpie lines using a ruler and calipers and the original stem as a guide. Fine.

Then I got the stem in the vise of the mill at a 17 degree angle. The slot in the stem measures about 5/8" so I put a 5/8" end mill in the collet and went to town. Hot chips! But any machinist can make chips...

I drilled to 1/64 under 7/8" and then reamed to 7/8". Perfect! Here are some glamor shots of the mill after I reamed the hole for the steerer.
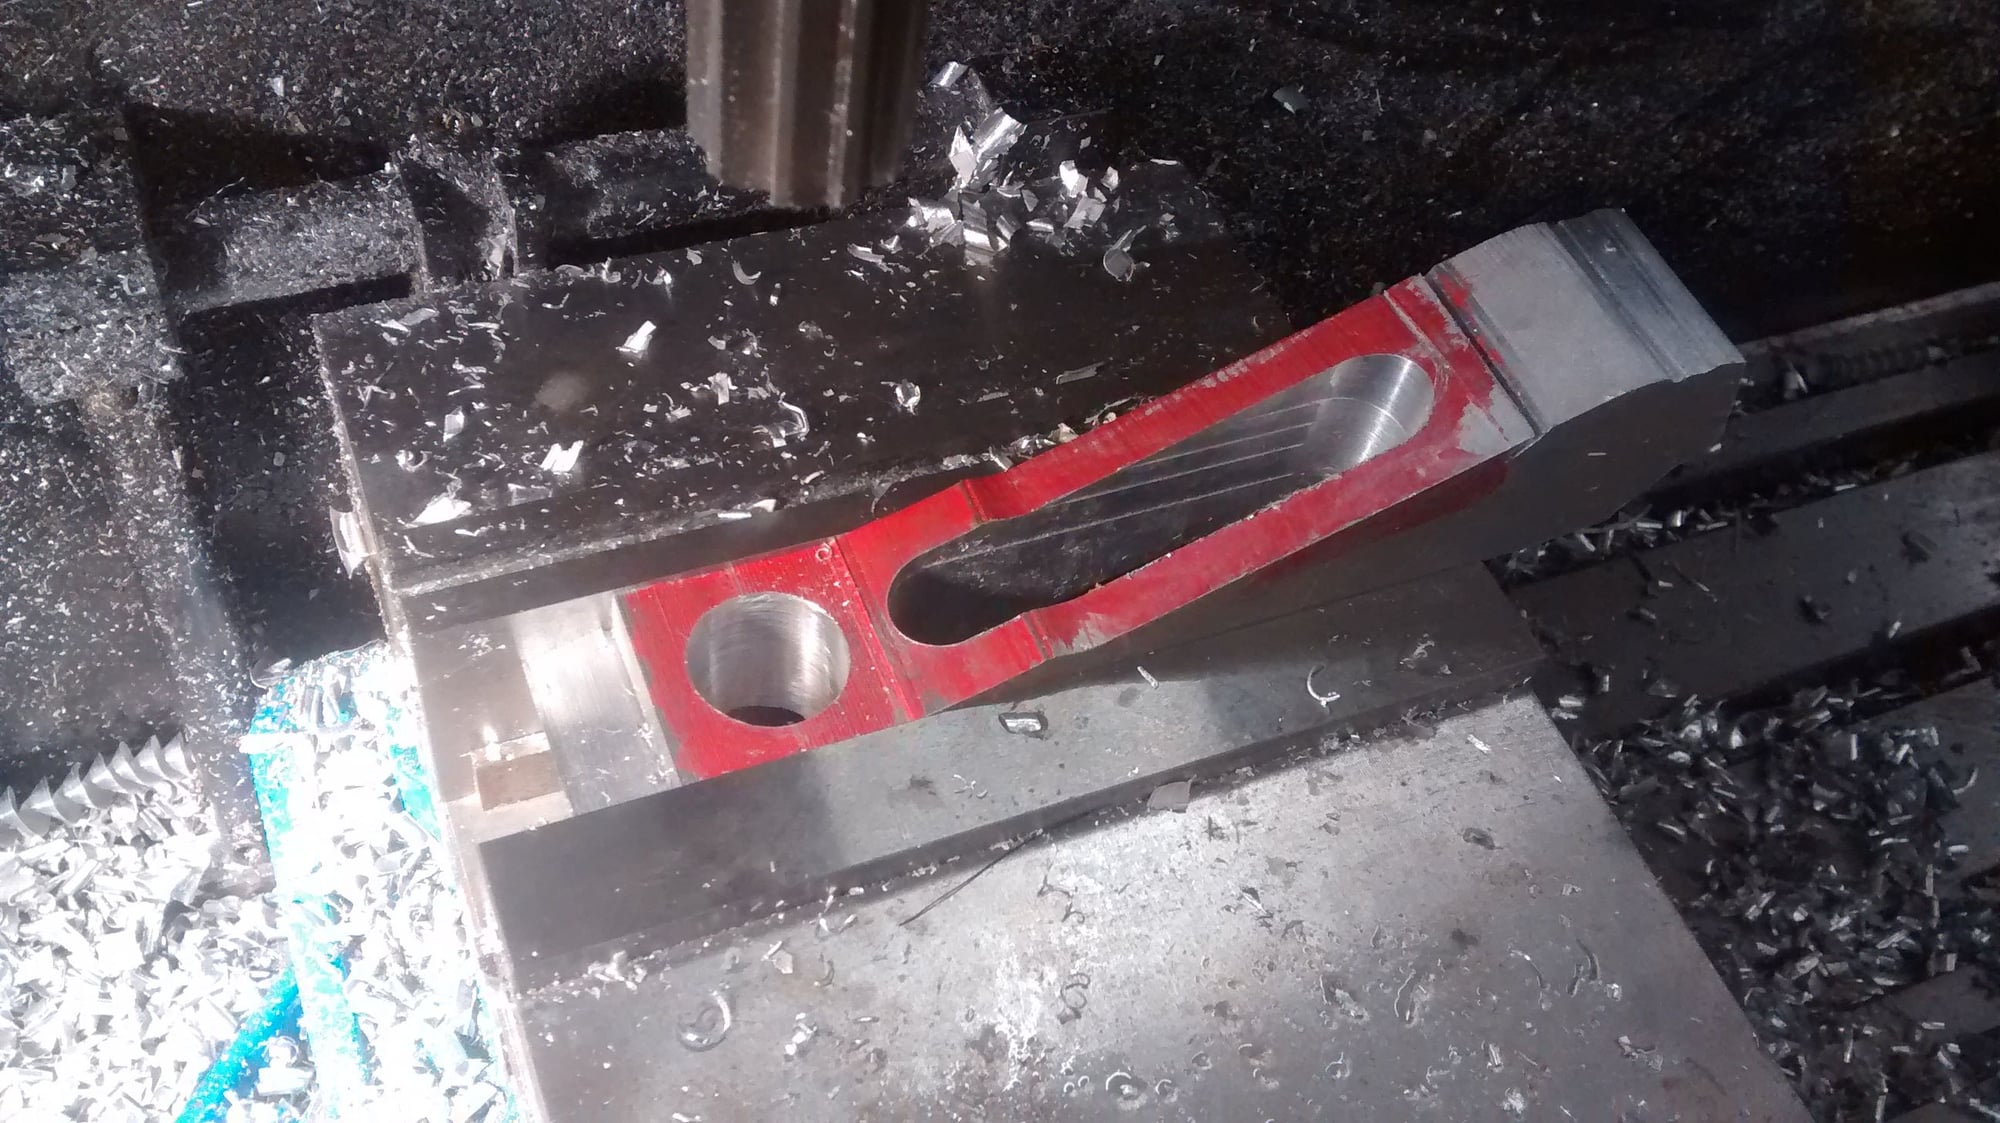

Here's the result.

More to come as I have time for it!!
So how hard can it be to make one? Jan Heine says apprentices did it, so it is certainly something that's within my purview. Here goes.
First I took my existing stem off my existing bars. I felt kinda bad taking off 70-year-old shellac (sure looked like 70 years old anyway). It was kind of haphazardly tied on with some twine near the end on the side I unwrapped, which made me think that it was probably field-repaired anyway. Whatever, you can imagine me crying undoing all this history. Then I measured some parts of the original stem and original frame, as well as some frames I like my position on. I found I need a stem that is 125mm long to obtain the same position. The original stem is a 73 degree stem, as measured using a digital protractor. The steerer hole is about 7/8" Actually a little over that, it varies between 7/8 and 0.885".
I started out with a piece of aluminum scrap (science junk, probably used by a neurobiology lab), which measures 1.28" thick. No idea why, but it's pretty close to the thickness of these stems. I bandsawed it out to approximately a stem looking shape, using faintly-drawn Sharpie lines using a ruler and calipers and the original stem as a guide. Fine.
Then I got the stem in the vise of the mill at a 17 degree angle. The slot in the stem measures about 5/8" so I put a 5/8" end mill in the collet and went to town. Hot chips! But any machinist can make chips...
I drilled to 1/64 under 7/8" and then reamed to 7/8". Perfect! Here are some glamor shots of the mill after I reamed the hole for the steerer.
Here's the result.
More to come as I have time for it!!
__________________
Owner & co-founder, Cycles René Hubris. Unfortunately attaching questionable braze-ons to perfectly good frames since about 2015. With style.
Owner & co-founder, Cycles René Hubris. Unfortunately attaching questionable braze-ons to perfectly good frames since about 2015. With style.
Likes For scarlson:
11-27-19, 10:12 PM
#97
Senior Member
Join Date: Jan 2019
Posts: 528
Mentioned: 8 Post(s)
Tagged: 0 Thread(s)
Quoted: 237 Post(s)
Likes: 0
Liked 83 Times
in
64 Posts
Is that a front or a stoker stem? I suspect you know this, but the reason for 7/8" is because the ID of the steerer is 7/8" to fit quill stems, and for these threadless-style stems a smooth piece of 7/8 OD tube was brazed into the steerer for it to camp onto, instead of clamping directly onto the steerer like a modern aheadset front end. If it is a front stem, then also note that the bottom edge of the steerer side clamp tends to follow the line of the stem body instead of being perpendicular to the brazed in tube, since unlike an aheadset, there are no spacers to preload. It's one of those small details that lends to the elegance of the components and prevents from looking kinked or bent, unless that's just a reference plane to bore the steerer clamp hole.
Last edited by Kuromori; 11-27-19 at 10:16 PM.
11-27-19, 10:18 PM
#98
tantum vehi

Join Date: Jul 2008
Location: Flathead Valley, MT
Posts: 4,440
Bikes: More than I care to admit
Mentioned: 153 Post(s)
Tagged: 0 Thread(s)
Quoted: 1167 Post(s)
Liked 992 Times
in
491 Posts

__________________
1970 Gitane TdF; 1973 Gitane TdF
1979 Trek 710; 1981 Trek 412; 1981 Trek 710
1984 Specialized Stumpjumper Sport; 1985 Specialized Allez SE; 1988 Specialized Sirrus; 1989 Specialized Rock Combo
1984 Ross Mt. Hood
1988 Centurion Ironman Expert
1991 Bridgestone RB-1
1992 Serotta Colorado TG
2015 Elephant NFE
1979 Trek 710; 1981 Trek 412; 1981 Trek 710
1984 Specialized Stumpjumper Sport; 1985 Specialized Allez SE; 1988 Specialized Sirrus; 1989 Specialized Rock Combo
1984 Ross Mt. Hood
1988 Centurion Ironman Expert
1991 Bridgestone RB-1
1992 Serotta Colorado TG
2015 Elephant NFE
Likes For mountaindave:
11-27-19, 10:23 PM
#99
working on my sandal tan
Join Date: Aug 2011
Location: CID
Posts: 22,627
Bikes: 1991 Bianchi Eros, 1964 Armstrong, 1988 Diamondback Ascent, 1988 Bianchi Premio, 1987 Bianchi Sport SX, 1980s Raleigh mixte (hers), All-City Space Horse (hers)
Mentioned: 98 Post(s)
Tagged: 0 Thread(s)
Quoted: 3870 Post(s)
Liked 2,563 Times
in
1,577 Posts
Good stuff, @scarlson. If you're interested, there's an article on making RH stems in BQ#17 (the tire issue). But since your stoker stem will clamp on both ends, I have no doubt you'll be able to figure it all out yourself.
11-27-19, 10:52 PM
#100
Senior Member
Thread Starter
Join Date: Jun 2010
Location: Medford MA
Posts: 2,089
Bikes: Ron Cooper touring, 1959 Jack Taylor 650b ladyback touring tandem, Vitus 979, Joe Bell painted Claud Butler Dalesman, Colin Laing curved tube tandem, heavily-Dilberted 1982 Trek 6xx, René Herse tandem
Mentioned: 80 Post(s)
Tagged: 0 Thread(s)
Quoted: 964 Post(s)
Liked 1,451 Times
in
723 Posts
Is that a front or a stoker stem? I suspect you know this, but the reason for 7/8" is because the ID of the steerer is 7/8" to fit quill stems, and for these threadless-style stems a smooth piece of 7/8 OD tube was brazed into the steerer for it to camp onto, instead of clamping directly onto the steerer like a modern aheadset front end.
Oh and in case anyone is wondering, the bars are 25.4 or 1". Standard French fare and a fairly available size in general, which is nice. The bars I have are probably pretty rare though. I haven't looked for a logo yet.
If it is a front stem, then also note that the bottom edge of the steerer side clamp tends to follow the line of the stem body instead of being perpendicular to the brazed in tube, since unlike an aheadset, there are no spacers to preload. It's one of those small details that lends to the elegance of the components and prevents from looking kinked or bent, unless that's just a reference plane to bore the steerer clamp hole.

Good stuff, @scarlson. If you're interested, there's an article on making RH stems in BQ#17 (the tire issue). But since your stoker stem will clamp on both ends, I have no doubt you'll be able to figure it all out yourself.
I have a hunch it's a taper, that's what my machinist friends tell me, to lock the quill to the horizontal portion.
__________________
Owner & co-founder, Cycles René Hubris. Unfortunately attaching questionable braze-ons to perfectly good frames since about 2015. With style.
Owner & co-founder, Cycles René Hubris. Unfortunately attaching questionable braze-ons to perfectly good frames since about 2015. With style.
Last edited by scarlson; 11-27-19 at 10:56 PM.
Likes For scarlson: