


Don't you hate when things are designed not to be rebuilt?
 03-29-20, 03:31 PM
#1
Senior Member
Thread Starter
Don't you hate when things are designed not to be rebuilt?
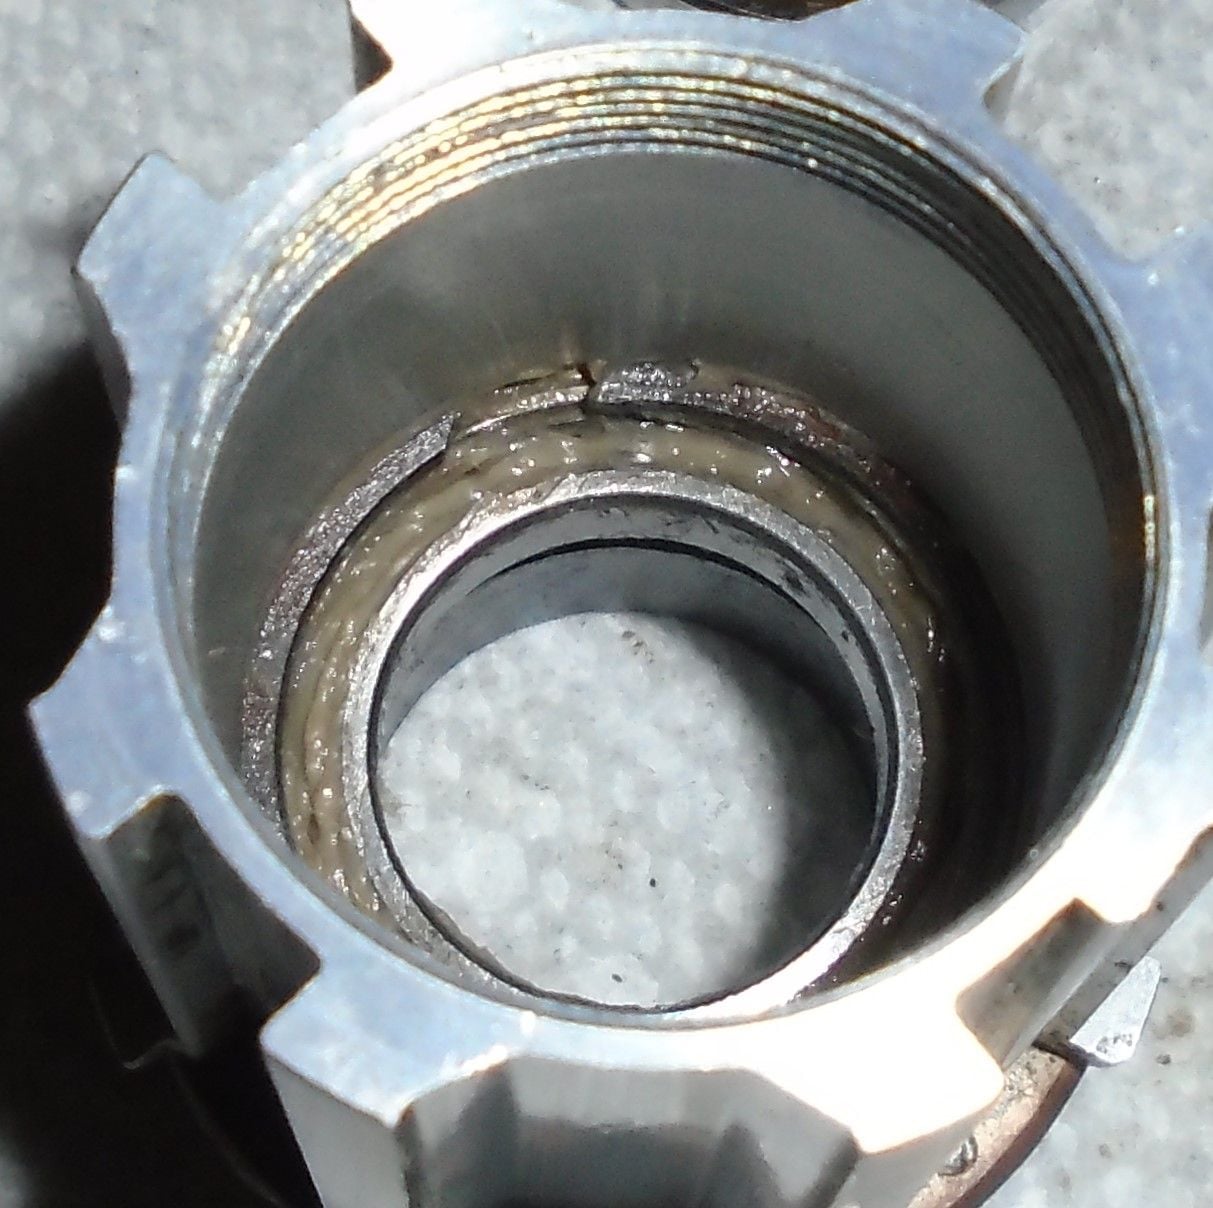
A friend gave me two Campy 10s rear hubs. He cracked a flange on both of them, and knowing I like to rebuild things, he gave them to me for parts. I stripped them down and one freehub body had a bad outer bearing. They are 6803 bearings (cheap and readily available). So, I decided to try to remove both bearings. After a lot of frustration, I got the outer one out. Trying to remove the inner one was becoming a PITA. After trying every method, I decided to clean it out better and get more light on the subject. Low and behold, the bearing is held in by a clip. I cannot figure out a way to remove it. Any Suggestions will be highly appreciated. Please see photo, Thanks.
 03-29-20, 03:45 PM
#2

Senior Member
Join Date: Feb 2020
Posts: 2,819
Mentioned: 49 Post(s)
Tagged: 0 Thread(s)
Quoted: 1106 Post(s)
Likes: 0
Liked 1,326 Times
in
782 Posts
A friend gave me two Campy 10s rear hubs. He cracked a flange on both of them, and knowing I like to rebuild things, he gave them to me for parts. I stripped them down and one freehub body had a bad outer bearing. They are 6803 bearings (cheap and readily available). So, I decided to try to remove both bearings. After a lot of frustration, I got the outer one out. Trying to remove the inner one was becoming a PITA. After trying every method, I decided to clean it out better and get more light on the subject. Low and behold, the bearing is held in by a clip. I cannot figure out a way to remove it. Any Suggestions will be highly appreciated. Please see photo, Thanks.
Make friends with a Dentist, mine gave me a box full.
03-29-20, 03:48 PM
#3
Senior Member
Thread Starter
I have dental picks, but I'm thinking they aren't strong enough. I'll give it a shot. No guts...no glory.
03-29-20, 04:03 PM
#4
Senior Member
Join Date: Mar 2017
Location: San Clemente
Posts: 664
Bikes: 87 Bianchi X4, 95 Bianchi Ti Mega Tube, 06 Alan Carbon Cross X33, Gold plated Columbus AIR Guerciotti, 74 Galmozzi Super Competizione, 52 Bianchi Paris Roubaix.
Mentioned: 6 Post(s)
Tagged: 0 Thread(s)
Quoted: 259 Post(s)
Liked 539 Times
in
166 Posts
Have you tried looking at the manual?
03-29-20, 04:09 PM
#5
SE Wis
Join Date: Apr 2005
Location: Milwaukee, WI
Posts: 10,509
Bikes: '68 Raleigh Sprite, '02 Raleigh C500, '84 Raleigh Gran Prix, '91 Trek 400, 2013 Novara Randonee, 1990 Trek 970
Mentioned: 40 Post(s)
Tagged: 0 Thread(s)
Quoted: 2746 Post(s)
Liked 3,390 Times
in
2,053 Posts
Dental pick and small regular screwdriver
03-29-20, 04:16 PM
#6
Senior Member
Join Date: Oct 2015
Location: PDX
Posts: 13,038
Bikes: Merz x 5 + Specialized Merz Allez x 2, Strawberry/Newlands/DiNucci/Ti x3, Gordon, Fuso/Moulton x2, Bornstein, Paisley,1958-74 Paramounts x3, 3rensho, 74 Moto TC, 73-78 Raleigh Pro's x5, Marinoni x2, 1960 Cinelli SC, 1980 Bianchi SC, PX-10 X 2
Mentioned: 267 Post(s)
Tagged: 0 Thread(s)
Quoted: 4510 Post(s)
Liked 6,377 Times
in
3,667 Posts
A friend gave me two Campy 10s rear hubs. He cracked a flange on both of them, and knowing I like to rebuild things, he gave them to me for parts. I stripped them down and one freehub body had a bad outer bearing. They are 6803 bearings (cheap and readily available). So, I decided to try to remove both bearings. After a lot of frustration, I got the outer one out. Trying to remove the inner one was becoming a PITA. After trying every method, I decided to clean it out better and get more light on the subject. Low and behold, the bearing is held in by a clip. I cannot figure out a way to remove it. Any Suggestions will be highly appreciated. Please see photo, Thanks.

 03-29-20, 05:27 PM
#7
Senior Member
Thread Starter
Ok, I tried 2 screwdrivers, 2 dental picks, 1 screwdriver 1 dental pick. I can get it to flex out, but I can't get anything behind it or under it. The space I'm working in is only 27 mm wide and the clip is about 35 mm down from the opening. I'll give it one more shot tomorrow, then I'll see how far I can throw it.
03-29-20, 05:51 PM
#8
SE Wis
Join Date: Apr 2005
Location: Milwaukee, WI
Posts: 10,509
Bikes: '68 Raleigh Sprite, '02 Raleigh C500, '84 Raleigh Gran Prix, '91 Trek 400, 2013 Novara Randonee, 1990 Trek 970
Mentioned: 40 Post(s)
Tagged: 0 Thread(s)
Quoted: 2746 Post(s)
Liked 3,390 Times
in
2,053 Posts
Ok, I tried 2 screwdrivers, 2 dental picks, 1 screwdriver 1 dental pick. I can get it to flex out, but I can't get anything behind it or under it. The space I'm working in is only 27 mm wide and the clip is about 35 mm down from the opening. I'll give it one more shot tomorrow, then I'll see how far I can throw it.
03-29-20, 06:02 PM
#9
Senior Member
Join Date: Oct 2015
Location: PDX
Posts: 13,038
Bikes: Merz x 5 + Specialized Merz Allez x 2, Strawberry/Newlands/DiNucci/Ti x3, Gordon, Fuso/Moulton x2, Bornstein, Paisley,1958-74 Paramounts x3, 3rensho, 74 Moto TC, 73-78 Raleigh Pro's x5, Marinoni x2, 1960 Cinelli SC, 1980 Bianchi SC, PX-10 X 2
Mentioned: 267 Post(s)
Tagged: 0 Thread(s)
Quoted: 4510 Post(s)
Liked 6,377 Times
in
3,667 Posts
Ok, I tried 2 screwdrivers, 2 dental picks, 1 screwdriver 1 dental pick. I can get it to flex out, but I can't get anything behind it or under it. The space I'm working in is only 27 mm wide and the clip is about 35 mm down from the opening. I'll give it one more shot tomorrow, then I'll see how far I can throw it.
03-30-20, 05:15 AM
#10
Senior Member
Join Date: Feb 2020
Posts: 2,819
Mentioned: 49 Post(s)
Tagged: 0 Thread(s)
Quoted: 1106 Post(s)
Likes: 0
Liked 1,326 Times
in
782 Posts
Dentist picks are great for this because (some of them) have a sharp edge ground just where you can slip it under the clip and winkle it out.
03-30-20, 05:20 AM
#11
Senior Member

Join Date: May 2008
Location: Fredericksburg, Va
Posts: 9,579
Bikes: '65 Frejus TDF, '73 Bottecchia Giro d'Italia, '83 Colnago Superissimo, '84 Trek 610, '84 Trek 760, '88 Pinarello Veneto, '88 De Rosa Pro, '89 Pinarello Montello, '94 Burley Duet, 97 Specialized RockHopper, 2010 Langster, Tern Link D8
Mentioned: 73 Post(s)
Tagged: 0 Thread(s)
Quoted: 1607 Post(s)
Liked 2,216 Times
in
1,103 Posts
I believe there is a tool that has replaceable tips that include a paddle like tip at a right angle that can be used for this purpose. HB might have it. I don't recall where I purchased it. This is a very frustrating activity if you don't have the right tool. Almost binary, either you can or can't.
The one I am thinking of is in the middle. I believe it is used to remove rings from pistons so you could find it in an autoparts store. The others are very useful for clips with the holes in the ends. Some times they are just useful for what they were not designed to do!
The title of this thread does not apply to this challenge. Lots of parts on cars from the east of the pacific pond do make non-replaceable assemblies and charge accordingly.
 P1030125, on Flickr
The one I am thinking of is in the middle. I believe it is used to remove rings from pistons so you could find it in an autoparts store. The others are very useful for clips with the holes in the ends. Some times they are just useful for what they were not designed to do!
The title of this thread does not apply to this challenge. Lots of parts on cars from the east of the pacific pond do make non-replaceable assemblies and charge accordingly.
P1030125, on Flickr
__________________
Bikes don't stand alone. They are two tired.
Bikes don't stand alone. They are two tired.
Last edited by SJX426; 03-30-20 at 05:35 AM.
03-30-20, 06:40 AM
#12
Senior Member
Thread Starter
Well, if you look at Campy's parts diagrams this (like their sealed bearing BBs) is sold as an assembly. No internal parts are available through Campy. Hence, I call it designed to be tossed out and not rebuilt. BTW: I have rebuilt their BBs with no problem at all.
03-30-20, 07:01 AM
#13
Senior Member
Join Date: May 2008
Location: Fredericksburg, Va
Posts: 9,579
Bikes: '65 Frejus TDF, '73 Bottecchia Giro d'Italia, '83 Colnago Superissimo, '84 Trek 610, '84 Trek 760, '88 Pinarello Veneto, '88 De Rosa Pro, '89 Pinarello Montello, '94 Burley Duet, 97 Specialized RockHopper, 2010 Langster, Tern Link D8
Mentioned: 73 Post(s)
Tagged: 0 Thread(s)
Quoted: 1607 Post(s)
Liked 2,216 Times
in
1,103 Posts
Well there is a difference between designs which cannot be disassembled/rebuildable (crimped parts) and those that are marketing/service FRU's (field replaceable units) that are sold as assemblies. If a unit can be disassembled, standard parts replaced or salvaged from other parts, I would not consider that a non-repairable design or one that could not be rebuilt. It is not a design engineering decision, but rather a business one. The marketing side of it wants to price the assembly high enough to make a profit and low enough that buying the sub parts (profit margin included) does not have the ROI for the consumer. Not to mention that they may buy the sub-assembly as a unit from a supplier or third party, driving the decision.
I can understand that the issue is cost of time. If you want to disassemble a NR RD down to removing the rivets, that is the option of the "mechanic," but was not designed for the average mechanic to disassemble to that extent, hence a part (assembly) that is not repairable.
In this case, removing a retaining clip is not qualify as a non rebuildable part.
I do agree with the title in general. I have often been frustrated that a design was not rebuildable due to a manufacturing process that prevents disassembly doe to unalterably damaging one of the key parts when an alternative design would have made the assembly rebuildable. I enjoy taking things apart and reassembling as it is therapeutic for me and gives me insight to the design approach which feeds my very limited creativity.
__________________
Bikes don't stand alone. They are two tired.
Bikes don't stand alone. They are two tired.
03-30-20, 07:07 AM
#14
Full Member
Can you drill a small hole thru the outer body aligned with one end, then use a pin to push the end inward?
03-30-20, 07:23 AM
#15
Pining for the fjords

Join Date: Feb 2011
Location: Brussels
Posts: 709
Mentioned: 14 Post(s)
Tagged: 0 Thread(s)
Quoted: 130 Post(s)
Liked 444 Times
in
150 Posts
You have to drill a small hole through the body at the exact spot where the clip sits and then push it inward. Found this tip somewhere in a forum discussion (weight weenies?) and tried it, it was fairly easy (and I'm far from a gifted mechanic). Saved a Proton wheel that way.
edit: like this
drill a very small hole in the freehub body and poke something through it to stop the circlip spinning round?
About 1/16th" or 1.5mm is plenty large enough.
Measure the depth of the circlip with a rule or even something as simple as a spoke?
Mark it up on the outside with a pen and you should get a small hole right on the circlip groove?
I drill it on the thinner part between the splines.
I use a dentists tooth pick to get them out, but a slightly bent watchmakers screwdriver will work fine as well?
I've been told a spoke with a point on the end works well too?
Last edited by CMAW; 03-30-20 at 07:37 AM.
03-30-20, 08:05 AM
#16

Senior Member
Join Date: Jun 2006
Posts: 20,305
Mentioned: 130 Post(s)
Tagged: 0 Thread(s)
Quoted: 3464 Post(s)
Liked 2,829 Times
in
1,995 Posts
i would also hold it lightly but firmly in a vise. Stability is needed.
i cannot tell the gap, but I would look or make a this wide �minus� screwdriver to fill the gap, with an angled edge to help tease the one end in and out.
at some point you may have to use a medium sized hook to enter from the other side to push it out.
will likely need lubrication too . I don�t think the finish is that critical on the inside, save ease of insertion of the new bearing.
BTW- literal translation of the Japanese for screwdriver types is Plus and minus.
03-30-20, 09:59 AM
#17
Senior Member
Thread Starter
Success!!! Did the drill method. I started out with the smallest bit I had and ended up just on the north edge of groove. So, I went a little wider. The hole ended up just large enough to get a 2.5 mm Allen in. I'd say it is half above and half in the groove. I pushed in with the Allen, hooked the bottom of the clip with a dental pick and it came right out.
The bearings on these are only sealed on one side. The early Campy 10s freehub bodies had a hole in them with a set screw. I would remove the set screw and pump grease in the hole to lube the bearings. The later campy bodies don't have this feature. I was going to use double sealed bearings. But, now that I have a hole, maybe I will use it as a grease port using bearings sealed only on one side. A dropout adjuster tap fits nicely. I wonder if I can get a small set screw with the same threads.
Edit, Yes set screws are available in that size.
Last edited by gearbasher; 03-30-20 at 10:33 AM.
03-30-20, 10:15 AM
#18
SE Wis
Join Date: Apr 2005
Location: Milwaukee, WI
Posts: 10,509
Bikes: '68 Raleigh Sprite, '02 Raleigh C500, '84 Raleigh Gran Prix, '91 Trek 400, 2013 Novara Randonee, 1990 Trek 970
Mentioned: 40 Post(s)
Tagged: 0 Thread(s)
Quoted: 2746 Post(s)
Liked 3,390 Times
in
2,053 Posts
I always love it when something that has been frustrating me for a couple days finally succumbs to my efforts.
