


First Frame (and finished shots)
 05-18-13, 08:54 PM
#1
Member
Thread Starter
Join Date: Jan 2009
Posts: 33
Mentioned: 0 Post(s)
Tagged: 0 Thread(s)
Quoted: 1 Post(s)
Likes: 0
Liked 0 Times
in
0 Posts
First Frame (and finished shots)
Hi All,
I recently attended a frame building workshop with Tim Sanner in Palo Alto CA. Overall had a GREAT time, learned a lot, and built a nice bike!
Here are some shots of the process and finished product:
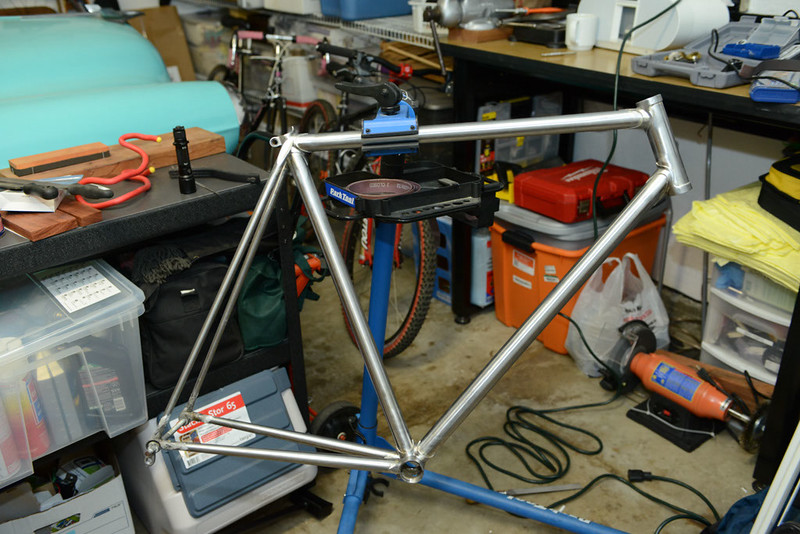
The Jig we used:
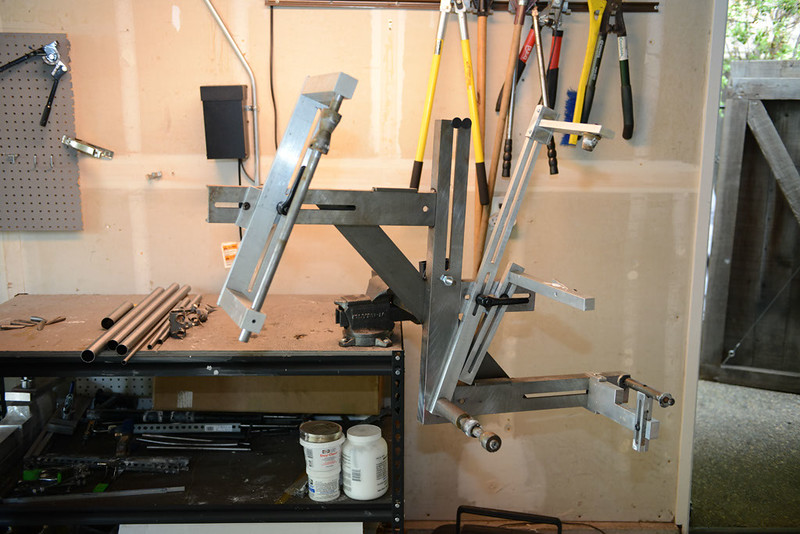
DSC_8042 by neil.sasaki, on Flickr
Parts:
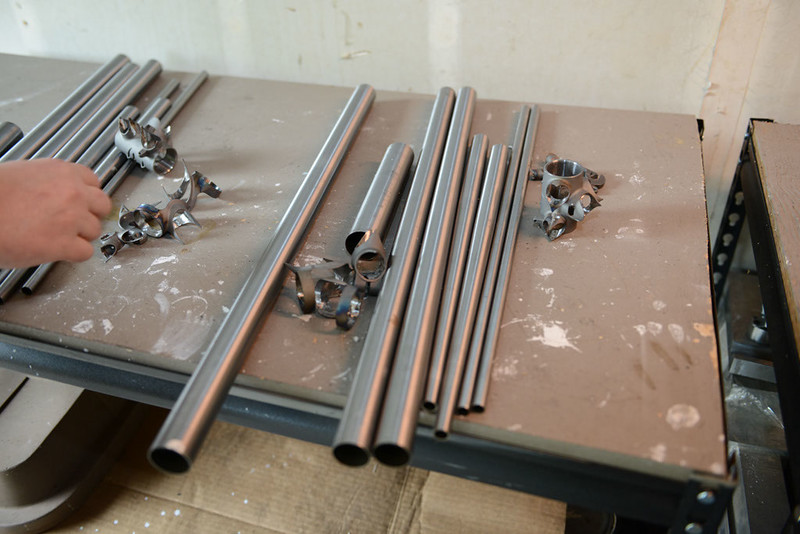
DSC_8043 by neil.sasaki, on Flickr
Jigged Up:
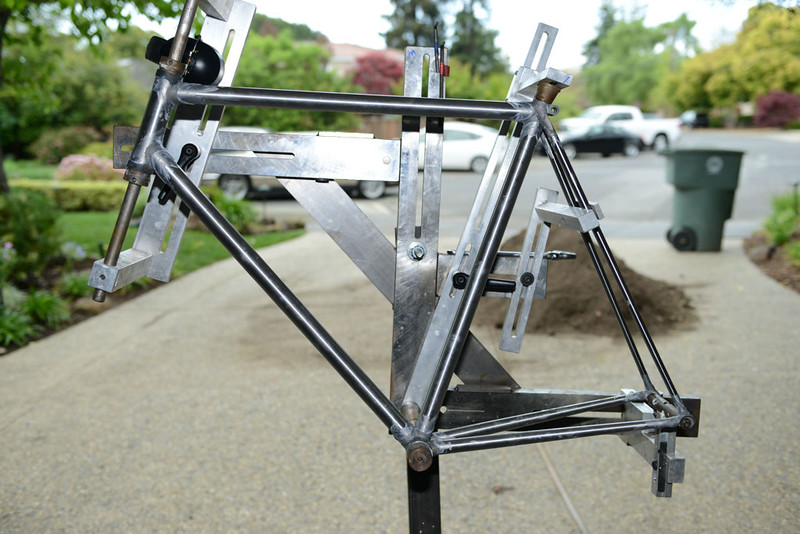
DSC_8087 by neil.sasaki, on Flickr
Brazing:
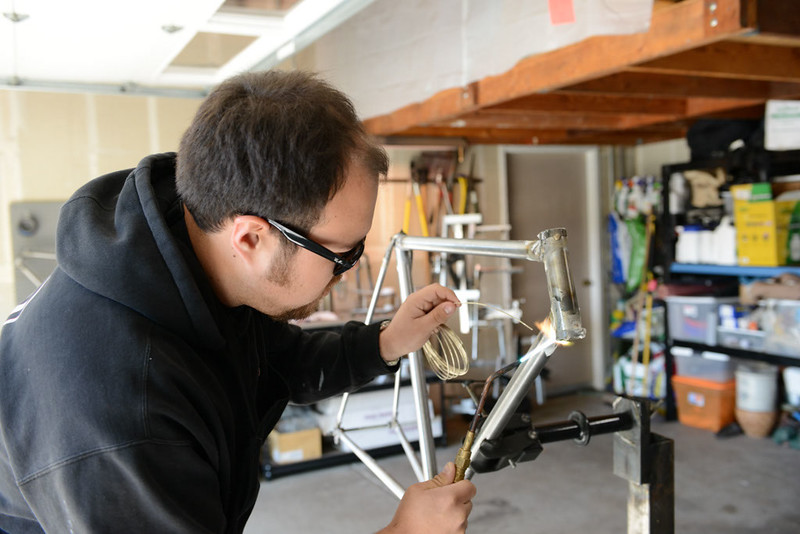
DSC_8120 by neil.sasaki, on Flickr
Ready for powdercoat:
DSC_8155 by neil.sasaki, on Flickr
Built up:
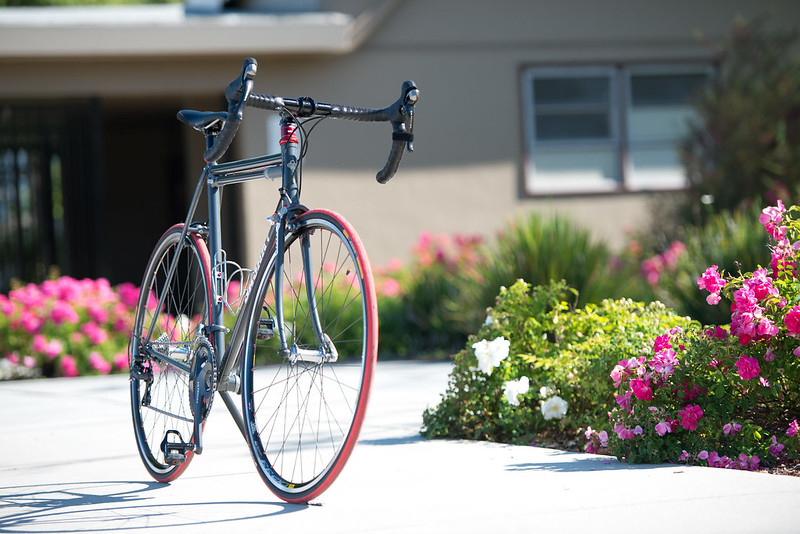
DSC_9495 by neil.sasaki, on Flickr
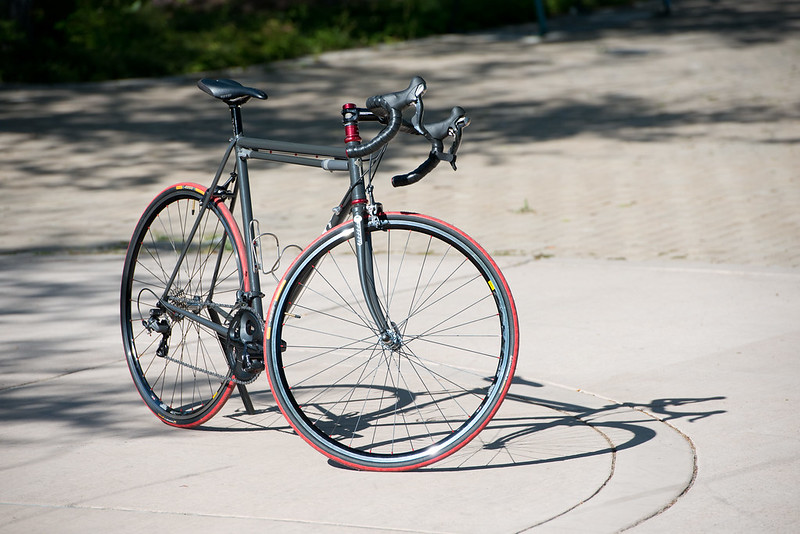
DSC_9517 by neil.sasaki, on Flickr
DSC_9527 by neil.sasaki, on Flickr
More shots here:
https://www.flickr.com/photos/neilsas...7633202933638/
Let me know what you think!
I recently attended a frame building workshop with Tim Sanner in Palo Alto CA. Overall had a GREAT time, learned a lot, and built a nice bike!
Here are some shots of the process and finished product:
The Jig we used:
DSC_8042 by neil.sasaki, on Flickr
Parts:
DSC_8043 by neil.sasaki, on Flickr
Jigged Up:
DSC_8087 by neil.sasaki, on Flickr
Brazing:
DSC_8120 by neil.sasaki, on Flickr
Ready for powdercoat:
DSC_8155 by neil.sasaki, on Flickr
Built up:
DSC_9495 by neil.sasaki, on Flickr
DSC_9517 by neil.sasaki, on Flickr
DSC_9527 by neil.sasaki, on Flickr
More shots here:
https://www.flickr.com/photos/neilsas...7633202933638/
Let me know what you think!
 05-18-13, 09:35 PM
#2

Senior Member

Join Date: Mar 2012
Location: santa barbara CA
Posts: 1,087
Mentioned: 1 Post(s)
Tagged: 0 Thread(s)
Quoted: 96 Post(s)
Liked 30 Times
in
21 Posts
I think its a great looking frame/bike. Nice pics on your flicker too. Whats the geometry and type of lugs/crown/bb/drops?
Brian
Brian
__________________
Brian
Brian
05-18-13, 10:00 PM
#3
Member
Thread Starter
Join Date: Jan 2009
Posts: 33
Mentioned: 0 Post(s)
Tagged: 0 Thread(s)
Quoted: 1 Post(s)
Likes: 0
Liked 0 Times
in
0 Posts
Thanks for the compliments- the lugs are all Long Shen with true temper tubes. The geometry is standard road with a 56cm seat tube and a 56cm tt; I'm not sure the exact angles as Tim set that up for us.
 05-20-13, 08:37 AM
#5
Senior Member
Neil; Awesome build. Much appreciate the start to finish photos. Are you planning a tandem next?
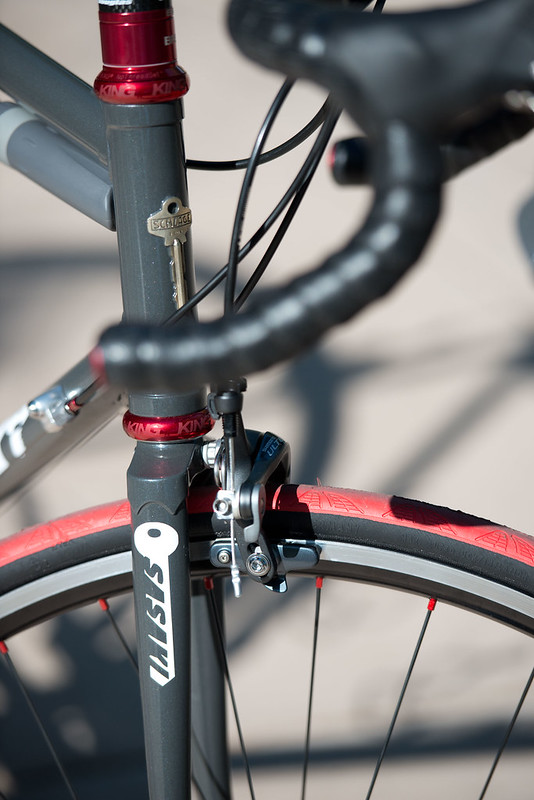
On the side; Noted that your torching access around the seat lug seems a bit constrainted by the JIG in use. Suggest it might be a good process add to leave the seat tube a few inches longer, moving the JIG bracket further up and out of the way and thus ease the torch. I tend to just leave it full length...others just leave it an inch above the top of the lug. I find the extra bit of seattube as a nice place to slide the brass down into the lug. FWIW!
/K
05-20-13, 11:31 AM
#6
Member
Thread Starter
Join Date: Jan 2009
Posts: 33
Mentioned: 0 Post(s)
Tagged: 0 Thread(s)
Quoted: 1 Post(s)
Likes: 0
Liked 0 Times
in
0 Posts
On the side; Noted that your torching access around the seat lug seems a bit constrained by the JIG in use.
Next bike is probably going to be a city bike; a grocery getter type bike with custom racks & possibly a basket.
Thanks!
05-20-13, 11:59 AM
#7
Team Beer
Join Date: Apr 2004
Location: Sacramento CA
Posts: 6,339
Bikes: Too Many
Mentioned: 3 Post(s)
Tagged: 0 Thread(s)
Quoted: 114 Post(s)
Liked 159 Times
in
104 Posts
Hey, that looks familiar! It turned out great Neil! This is Chris from Tim's class.
I'm still doing some finish work on mine. Need to fill a couple of spots that got missed in the rush of the final day. Should get the tanks filled this week and then back at it.
Ksisler, we only tacked in the jig and used bike stands for everything else. The lugs we used wouldn't allow use to leave the tube at full length. There was a shoulder inside the lug that stopped the tube.
__________________
I'm not one for fawning over bicycles, but I do believe that our bikes communicate with us, and what this bike is saying is, "You're an idiot." BikeSnobNYC
I'm not one for fawning over bicycles, but I do believe that our bikes communicate with us, and what this bike is saying is, "You're an idiot." BikeSnobNYC
05-20-13, 01:40 PM
#8
Senior Member
Join Date: Mar 2012
Location: santa barbara CA
Posts: 1,087
Mentioned: 1 Post(s)
Tagged: 0 Thread(s)
Quoted: 96 Post(s)
Liked 30 Times
in
21 Posts
thanks, Brian
__________________
Brian
Brian
05-20-13, 01:45 PM
#9
Team Beer
Join Date: Apr 2004
Location: Sacramento CA
Posts: 6,339
Bikes: Too Many
Mentioned: 3 Post(s)
Tagged: 0 Thread(s)
Quoted: 114 Post(s)
Liked 159 Times
in
104 Posts
Maybe shoulder isn't the correct term. There is a ridge on the inside of the lug for the tube to butt up against.
__________________
I'm not one for fawning over bicycles, but I do believe that our bikes communicate with us, and what this bike is saying is, "You're an idiot." BikeSnobNYC
I'm not one for fawning over bicycles, but I do believe that our bikes communicate with us, and what this bike is saying is, "You're an idiot." BikeSnobNYC
05-20-13, 02:32 PM
#10

Decrepit Member

This is a seat lug like the one Cynikal is describing. The ridge is 0.8mm thick on this one, and the seat tube butts up against it.
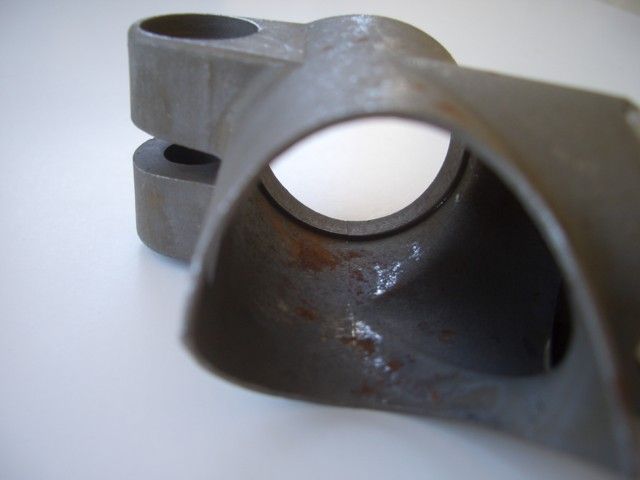
Here is the view from the top of the lug with a tube inserted and butted against the ridge.
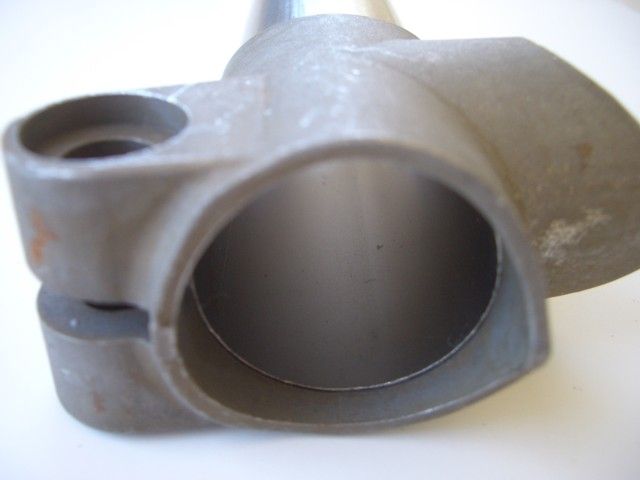
Here is the view from the top of the lug with a tube inserted and butted against the ridge.
 05-20-13, 02:36 PM
#11
Senior Member

Join Date: Jun 2008
Location: Louisville, KY
Posts: 13,447
Mentioned: 33 Post(s)
Tagged: 0 Thread(s)
Quoted: 4236 Post(s)
Liked 2,949 Times
in
1,808 Posts
That's a beauty. Good job.
__________________
Bikes: 1996 Eddy Merckx Titanium EX, 1989/90 Colnago Super(issimo?) Piu(?),1990 Concorde Aquila(hit by car while riding), others in build queue "when I get the time"
Bikes: 1996 Eddy Merckx Titanium EX, 1989/90 Colnago Super(issimo?) Piu(?),
 05-20-13, 03:12 PM
#12
Team Beer
Join Date: Apr 2004
Location: Sacramento CA
Posts: 6,339
Bikes: Too Many
Mentioned: 3 Post(s)
Tagged: 0 Thread(s)
Quoted: 114 Post(s)
Liked 159 Times
in
104 Posts
Yup. that's it. Clearly a picture is worth a 1000 poorly chosen words.
__________________
I'm not one for fawning over bicycles, but I do believe that our bikes communicate with us, and what this bike is saying is, "You're an idiot." BikeSnobNYC
I'm not one for fawning over bicycles, but I do believe that our bikes communicate with us, and what this bike is saying is, "You're an idiot." BikeSnobNYC
05-21-13, 07:50 AM
#13
Senior Member

Join Date: Sep 2008
Location: Collegeville, PA
Posts: 1,350
Bikes: Ruckelshaus Randonneur, Specialized Allez (early 90's, steel), Ruckelshaus Path Bomber currently being built
Mentioned: 1 Post(s)
Tagged: 0 Thread(s)
Quoted: 4 Post(s)
Likes: 0
Liked 1 Time
in
1 Post
05-21-13, 08:46 AM
#14
framebuilder
Every beginner should file the shoulder out of seat lugs so the seat tube can extend above the lug. There shouldn't be an exception to this. The reason it is important to extend the tube is allow any extra silver to be flowed out to somewhere it can later be cut off. This allows one to get super crisp shorelines so there will be no silver peeking out beyond the lug that needs to try and be removed later. No starting builder has the skill to get exactly the right amount in without it being too little or too much. What they can do is learn how to make sure silver is everywhere between the lug and tube and then flow the extra (including what is on the shorelines) to where it doesn't matter. For this same reason some extra head tube should extend above the top tube lug and below the down tube lug. This extra tubing can also come in handy when checking frame alignment on a flat table. And if for some reason a person screws up and they need to touch up the lug again with a torch – which shouldn't be necessary with sufficient training – this extra extended tubing makes rebrazing easier.
These lugs with shoulders were originally designed to cut down on costs when making production frames. They aren't friendly to custom builders.
These lugs with shoulders were originally designed to cut down on costs when making production frames. They aren't friendly to custom builders.
05-21-13, 09:18 AM
#15
Team Beer
Join Date: Apr 2004
Location: Sacramento CA
Posts: 6,339
Bikes: Too Many
Mentioned: 3 Post(s)
Tagged: 0 Thread(s)
Quoted: 114 Post(s)
Liked 159 Times
in
104 Posts
It's the nuggets like this that really make this forum great. Thanks Doug.
__________________
I'm not one for fawning over bicycles, but I do believe that our bikes communicate with us, and what this bike is saying is, "You're an idiot." BikeSnobNYC
I'm not one for fawning over bicycles, but I do believe that our bikes communicate with us, and what this bike is saying is, "You're an idiot." BikeSnobNYC
05-27-13, 12:13 PM
#16
Senior Member
Join Date: Apr 2011
Location: Lancaster,CA the desert north of Los Angeles
Posts: 701
Bikes: 84' Ciocc, 79' Shogun 1000, 76' KHS Gran Sport, 96' Schwinn Super Sport,
Mentioned: 0 Post(s)
Tagged: 0 Thread(s)
Quoted: 2 Post(s)
Likes: 0
Liked 0 Times
in
0 Posts
Congratulations on the first frame, hope to do one myself in about two years.
 08-09-13, 11:12 AM
#19
Theflatbarguy!

Join Date: Jun 2013
Location: Massachusetts
Posts: 475
Bikes: Custom Giant Anyroad Flatbar, Custom Raw Steel Raleigh XXIX SS
Mentioned: 1 Post(s)
Tagged: 0 Thread(s)
Quoted: 40 Post(s)
Likes: 0
Liked 0 Times
in
0 Posts
Hi All,
I recently attended a frame building workshop with Tim Sanner in Palo Alto CA. Overall had a GREAT time, learned a lot, and built a nice bike!
Here are some shots of the process and finished product:
The Jig we used:
DSC_8042 by neil.sasaki, on Flickr
Parts:
DSC_8043 by neil.sasaki, on Flickr
Jigged Up:
DSC_8087 by neil.sasaki, on Flickr
Brazing:
DSC_8120 by neil.sasaki, on Flickr
Ready for powdercoat:
DSC_8155 by neil.sasaki, on Flickr
Built up:
DSC_9495 by neil.sasaki, on Flickr
DSC_9517 by neil.sasaki, on Flickr
DSC_9527 by neil.sasaki, on Flickr
More shots here:
https://www.flickr.com/photos/neilsas...7633202933638/
Let me know what you think!
Your bike looks fantastic!
08-12-13, 09:42 PM
#22
Senior Member
First Frame (and finished shots)
Hey, that looks familiar! It turned out great Neil! This is Chris from Tim's class.
I'm still doing some finish work on mine. Need to fill a couple of spots that got missed in the rush of the final day. Should get the tanks filled this week and then back at it.
Ksisler, we only tacked in the jig and used bike stands for everything else. The lugs we used wouldn't allow use to leave the tube at full length. There was a shoulder inside the lug that stopped the tube.
I'm still doing some finish work on mine. Need to fill a couple of spots that got missed in the rush of the final day. Should get the tanks filled this week and then back at it.
Ksisler, we only tacked in the jig and used bike stands for everything else. The lugs we used wouldn't allow use to leave the tube at full length. There was a shoulder inside the lug that stopped the tube.
Re my original post regarding more cramped jig space for the tubes. I have always left the seat tube full length, valuing the extra tube as a way to gain more accuracy during the build and when checking the frame for alignment afterward. Also tend to longer head tube stock for the same reason. As I most often build on a flat table, the extra tube lengths at those two locations give me spots further away to put my v-blocks (spacer for the tubes away from the table top) and thus providing better alignment.
/K
08-13-13, 02:12 PM
#23
Team Beer
Join Date: Apr 2004
Location: Sacramento CA
Posts: 6,339
Bikes: Too Many
Mentioned: 3 Post(s)
Tagged: 0 Thread(s)
Quoted: 114 Post(s)
Liked 159 Times
in
104 Posts
Good points. If I use this lug set again I'll remove that section.
__________________
I'm not one for fawning over bicycles, but I do believe that our bikes communicate with us, and what this bike is saying is, "You're an idiot." BikeSnobNYC
I'm not one for fawning over bicycles, but I do believe that our bikes communicate with us, and what this bike is saying is, "You're an idiot." BikeSnobNYC

