


Rear Rack Boss Location??
 03-03-20, 07:27 AM
#1
Senior Member
Thread Starter
Join Date: Dec 2011
Location: NE Ohio
Posts: 2,595
Bikes: 1992 Serotta Colorado II,Co-Motion Speedster, Giant Escape Hybrid, 1977 Schwinn Super Le Tour
Mentioned: 4 Post(s)
Tagged: 0 Thread(s)
Quoted: 455 Post(s)
Likes: 0
Liked 112 Times
in
85 Posts
Rear Rack Boss Location??
As I get down to final braze-ons here is my quandary. I want to install threaded boss in the seatstay for a rear rack. But not sure what rack I will eventually use. I might even like to try making my own.
So a suggestion on how to locate the bosses would be appreciated.
Thanks!
So a suggestion on how to locate the bosses would be appreciated.
Thanks!
 03-03-20, 07:28 AM
#2


Randomhead
Join Date: Aug 2008
Location: Happy Valley, Pennsylvania
Posts: 24,398
Mentioned: 0 Post(s)
Tagged: 0 Thread(s)
Quoted: 4 Post(s)
Liked 3,698 Times
in
2,518 Posts
There is no standard. Most racks adjust as a result of that. I think somewhere around the same height as the top of the tire makes sense. Or you could just make yourself a constructeur style rack that mounts to the brake bosses
03-03-20, 01:16 PM
#3

Senior Member
Join Date: Feb 2012
Location: Rochester, NY
Posts: 18,092
Bikes: Stewart S&S coupled sport tourer, Stewart Sunday light, Stewart Commuting, Stewart Touring, Co Motion Tandem, Stewart 3-Spd, Stewart Track, Fuji Finest, Mongoose Tomac ATB, GT Bravado ATB, JCP Folder, Stewart 650B ATB
Mentioned: 0 Post(s)
Tagged: 0 Thread(s)
Quoted: 4208 Post(s)
Liked 3,874 Times
in
2,314 Posts
Tom- I like to have the rack stay struts attach to a boss that stands off the stay a tad. Quite different then the common "hour glass" braze on bits. The reason is to not have the paint get scratched from a wrench slipping, to have a through hole (not a blind one) and since I make fairly small bikes to make leveling off the rack need slightly less strut length. I strongly suggest having the rack in hand during this Andy
Andy
Andy
__________________
AndrewRStewart
AndrewRStewart
Likes For Andrew R Stewart:
03-03-20, 02:11 PM
#4
Old fart

Join Date: Nov 2004
Location: Appleton WI
Posts: 24,786
Bikes: Several, mostly not name brands.
Mentioned: 153 Post(s)
Tagged: 0 Thread(s)
Quoted: 3588 Post(s)
Liked 3,400 Times
in
1,934 Posts
I agree with Andrew; it's best to have the rack in hand so you can be sure you're putting the mount points where they need to be.
03-03-20, 05:53 PM
#5
framebuilder
Tom, lets' review. Like others have said you want to have not only the fender in place but also the brakes attached and possibly any cables to make sure nothing gets in the way of the rack's arms. Now you have to pick a rack so you can locate your bosses. Some racks have adjustability up and down and, if so, you want to place the rack as low as possible and still miss the top of the fender. This is for center of gravity control. If you have some choices like at a bike shop, you will choose one that can meet your objective of the bottom of the rack being just above the fender. And have adjustable arms that will miss stuff and look normal when attached. If you will eventually be making your own rack you want the bottom of the rack to have a boss as an additional attachment point for the fender. The top of the rack of course should be level. There is no rule of thumb rack boss distance that I know about because any custom geometry variable can change a rack's attachment position. As can what brakes are chosen.
Actually before you put the rack on you want to scribe a line along the side of seat stays to make it easier to place your drill mark. This is done with a machinist square touching the tops of both stays and the angle piece dragging along the side leaving a mark right on the side center.
I like the arms to be parallel to the top of the rack but sometimes that isn't possible. If they angle down you still want them to look normal. Awkward arm placement distracts from the aesthetics of a custom frame. After positioning the arm so it misses everything and isn't at a stupid angle, make a mark on the centerline of the seat stay where the center of the water bottle boss should be located at the hole in the end of the arm. Do the same on the other side and measure both to see if they are exactly the same distance from the dropout eyelet. If not figure out how to make the distance the same.
Andy's idea of how to do rack mount braze-ons is a solid one but I prefer the looks of a water bottle boss on the side of the seat stay. This is especially true if the rack is sometimes removed when not needed.
03-03-20, 06:56 PM
#6
Senior Member
Thread Starter
Join Date: Dec 2011
Location: NE Ohio
Posts: 2,595
Bikes: 1992 Serotta Colorado II,Co-Motion Speedster, Giant Escape Hybrid, 1977 Schwinn Super Le Tour
Mentioned: 4 Post(s)
Tagged: 0 Thread(s)
Quoted: 455 Post(s)
Likes: 0
Liked 112 Times
in
85 Posts
Thanks Doug! I found a rack in the corner of my shop this afternoon to use as a "sample". I will mount the fenders and brakes tomorrow and play around with it.
Picked up a short 1/4" but at McMaster Carr so I can get the bottle bosses installed. Cable stops are on.
Picked up a short 1/4" but at McMaster Carr so I can get the bottle bosses installed. Cable stops are on.
03-03-20, 07:16 PM
#7
blahblahblah chrome moly

Join Date: Apr 2009
Location: Seattle
Posts: 1,990
Mentioned: 92 Post(s)
Tagged: 0 Thread(s)
Quoted: 1177 Post(s)
Liked 2,572 Times
in
1,074 Posts
With many sidepull or dual-pivot brakes, the best location is blocked on one side, especially if the seatstays are narrow, like with a fastback seat cluster. So I made this lightweight rack for my wife's '79 Erickson with a strut on one side only.

Only pic I have of it on the bike is from before it was plated. We tried it for a while before committing to chrome.

Weighs about 6 ounces, and strong enough for me to sit on it, so it holds well over 200 lb static loads. Maybe not recommended for riding with that much, but probably still OK! Not that I'm against redundancy, but two struts to the seatstays is not necessary.
Flickr album with more beauty shots and in-progress shots here.
Mark B in Seattle
Only pic I have of it on the bike is from before it was plated. We tried it for a while before committing to chrome.
Weighs about 6 ounces, and strong enough for me to sit on it, so it holds well over 200 lb static loads. Maybe not recommended for riding with that much, but probably still OK! Not that I'm against redundancy, but two struts to the seatstays is not necessary.
Flickr album with more beauty shots and in-progress shots here.
Mark B in Seattle
 03-03-20, 07:24 PM
#8
blahblahblah chrome moly
Join Date: Apr 2009
Location: Seattle
Posts: 1,990
Mentioned: 92 Post(s)
Tagged: 0 Thread(s)
Quoted: 1177 Post(s)
Liked 2,572 Times
in
1,074 Posts
Just asking in case your bosses are really 6 mm. That's what they were back in my day.
Are H2O "top hats" 1/4" nowadays? If so I'm mildly disappointed. No measurements on a bike should be based on the length of three barleycorns. I thought we'd evolved past that.
Mark B in Seattle
03-03-20, 07:32 PM
#9
Senior Member
Thread Starter
Join Date: Dec 2011
Location: NE Ohio
Posts: 2,595
Bikes: 1992 Serotta Colorado II,Co-Motion Speedster, Giant Escape Hybrid, 1977 Schwinn Super Le Tour
Mentioned: 4 Post(s)
Tagged: 0 Thread(s)
Quoted: 455 Post(s)
Likes: 0
Liked 112 Times
in
85 Posts
Yep should have been bit! Yes 1/4" as I did a few practice ones on an old frame.
I like the rack! Tell me about the chrome process and $.
Thanks!
I like the rack! Tell me about the chrome process and $.
Thanks!
03-03-20, 07:56 PM
#10
Randomhead
Join Date: Aug 2008
Location: Happy Valley, Pennsylvania
Posts: 24,398
Mentioned: 0 Post(s)
Tagged: 0 Thread(s)
Quoted: 4 Post(s)
Liked 3,698 Times
in
2,518 Posts
just about every steel tube made is in inches, it's just that they hide it by translating it to metric.
03-03-20, 08:13 PM
#11
blahblahblah chrome moly
Join Date: Apr 2009
Location: Seattle
Posts: 1,990
Mentioned: 92 Post(s)
Tagged: 0 Thread(s)
Quoted: 1177 Post(s)
Liked 2,572 Times
in
1,074 Posts
-mb
03-03-20, 09:40 PM
#12
framebuilder
Tom, just a couple suggestions since you aren't using a #3 center drill to drill your water bottle holes. Steel drill bits come in 118� angle and 135� angle. For thin tubing, 135� is best. A 135� bit will still drift off center (and not drill a perfectly round hole) but will do better than a 118� bit. Because of a drill bit's tendency to wander, it is better to use several drill bit sizes to get up to �. Watch carefully with each increase in size. As you get off center (a very likely possibility), use a small round file to round the hole and keep it between your long and cross marks.
Whatever you do, DO NOT just center punch your mark and then drill a hole with a 1/4" bit and then look and see what happened. I can tell you now what will happen. The hole will not be round and not be on center and by the time you correct with a file your hole will be bigger than you want. Of course a bigger lip on the boss can allow the boss to be centered in a too big hole. You have to be extra extra careful with drilling holes in your 14mm seat stays. They are easier to get off center and more difficult to correct.
Whatever you do, DO NOT just center punch your mark and then drill a hole with a 1/4" bit and then look and see what happened. I can tell you now what will happen. The hole will not be round and not be on center and by the time you correct with a file your hole will be bigger than you want. Of course a bigger lip on the boss can allow the boss to be centered in a too big hole. You have to be extra extra careful with drilling holes in your 14mm seat stays. They are easier to get off center and more difficult to correct.
Likes For Doug Fattic:
03-04-20, 06:22 AM
#13
Senior Member
Thread Starter
Join Date: Dec 2011
Location: NE Ohio
Posts: 2,595
Bikes: 1992 Serotta Colorado II,Co-Motion Speedster, Giant Escape Hybrid, 1977 Schwinn Super Le Tour
Mentioned: 4 Post(s)
Tagged: 0 Thread(s)
Quoted: 455 Post(s)
Likes: 0
Liked 112 Times
in
85 Posts
Yep, gradually working my way up in size. That my plan. Thanks!
03-04-20, 07:16 AM
#14
Randomhead
Join Date: Aug 2008
Location: Happy Valley, Pennsylvania
Posts: 24,398
Mentioned: 0 Post(s)
Tagged: 0 Thread(s)
Quoted: 4 Post(s)
Liked 3,698 Times
in
2,518 Posts
Consider using a spotting drill. Sometimes McMaster calls them "short length drill" It's tough to drill a hole on center on an already-built frame, so I have a spotting drill that is about 4.5mm.
03-04-20, 08:46 AM
#15
framebuilder
Actually I know you know about using increasing diameter drill bits to stay on center but Andy and I like to use a specific illustration to explain to anybody else that might want to learn more about that subject. So my post included your name but it was really written to a general audience.
03-04-20, 05:08 PM
#16
blahblahblah chrome moly
Join Date: Apr 2009
Location: Seattle
Posts: 1,990
Mentioned: 92 Post(s)
Tagged: 0 Thread(s)
Quoted: 1177 Post(s)
Liked 2,572 Times
in
1,074 Posts

Here's a cheap electric (under $40!), probably not very good, just one of the first hits I got. I have used the Milwaukee that this is a clone of, probably worth the extra $$
 03-04-20, 09:35 PM
#17
Senior Member
Join Date: Feb 2012
Location: Rochester, NY
Posts: 18,092
Bikes: Stewart S&S coupled sport tourer, Stewart Sunday light, Stewart Commuting, Stewart Touring, Co Motion Tandem, Stewart 3-Spd, Stewart Track, Fuji Finest, Mongoose Tomac ATB, GT Bravado ATB, JCP Folder, Stewart 650B ATB
Mentioned: 0 Post(s)
Tagged: 0 Thread(s)
Quoted: 4208 Post(s)
Liked 3,874 Times
in
2,314 Posts
I acquired a right angle drill a few years ago. Like any tool is exactly what you need till then next stumble...
I like to drill my bottle bosses a tad undersize and increase to size with a file. Using a center drill and stopping at the piloting drilled hole then moving onto increasing larger hand drills Many of the commercially available bosses are not quite .025" in fit. Not that it really maters. Andy
I like to drill my bottle bosses a tad undersize and increase to size with a file. Using a center drill and stopping at the piloting drilled hole then moving onto increasing larger hand drills Many of the commercially available bosses are not quite .025" in fit. Not that it really maters. Andy
__________________
AndrewRStewart
AndrewRStewart
03-05-20, 06:41 AM
#18
Senior Member
Thread Starter
Join Date: Dec 2011
Location: NE Ohio
Posts: 2,595
Bikes: 1992 Serotta Colorado II,Co-Motion Speedster, Giant Escape Hybrid, 1977 Schwinn Super Le Tour
Mentioned: 4 Post(s)
Tagged: 0 Thread(s)
Quoted: 455 Post(s)
Likes: 0
Liked 112 Times
in
85 Posts
The 1/4" short drill bit I picked up at McMaster Carr the other day still required a few file strokes to allow the boss to fit.
03-05-20, 04:09 PM
#19
Old fart
Join Date: Nov 2004
Location: Appleton WI
Posts: 24,786
Bikes: Several, mostly not name brands.
Mentioned: 153 Post(s)
Tagged: 0 Thread(s)
Quoted: 3588 Post(s)
Liked 3,400 Times
in
1,934 Posts
I use a 1/4" piloted bit for bottle mount fittings. I marked the spot with a punch, and the pilot doesn't wander as readily as a larger bit:

03-05-20, 04:11 PM
#20
blahblahblah chrome moly
Join Date: Apr 2009
Location: Seattle
Posts: 1,990
Mentioned: 92 Post(s)
Tagged: 0 Thread(s)
Quoted: 1177 Post(s)
Liked 2,572 Times
in
1,074 Posts
The ones I use taper from about 3/8" down to about 1/4", so a brand-new one will barely start in a 1/4" hole, but they get smaller as you use them and you'll always have a used one lying around. Enlarging a hole for a H2O boss takes like one second.
Here's a pic:
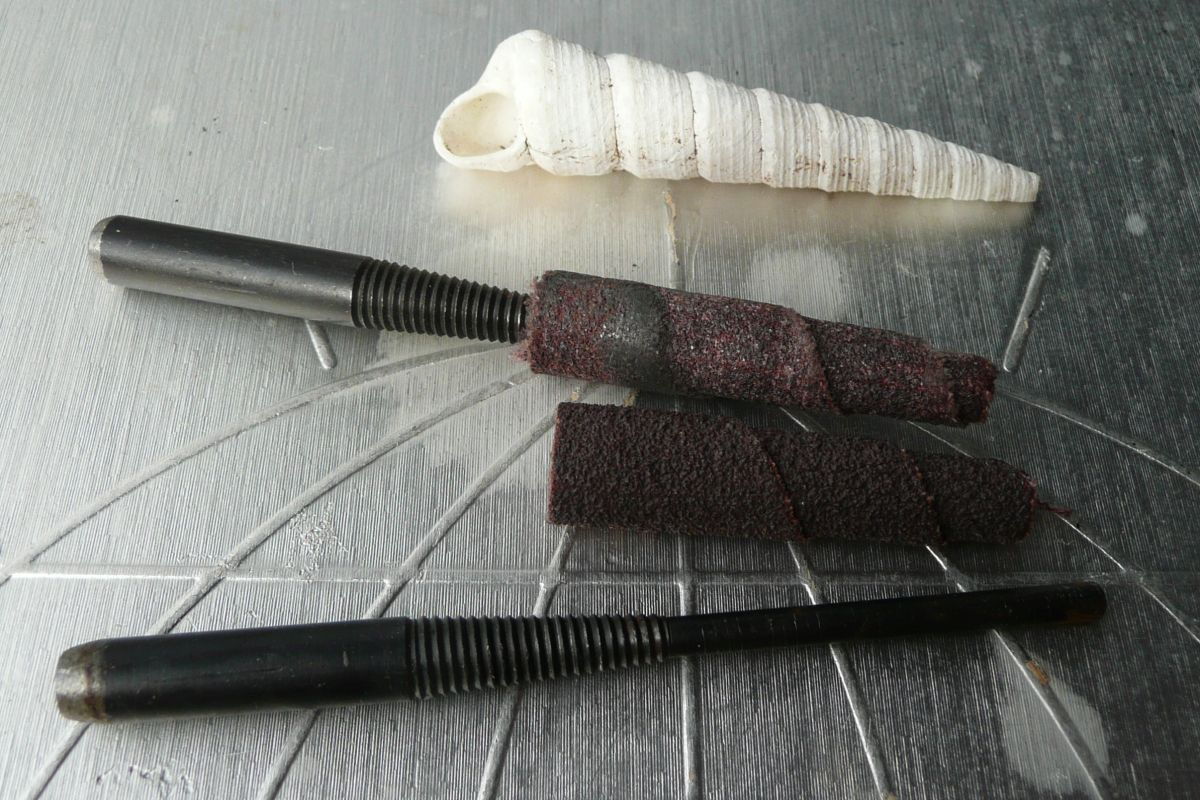
Don't use sea-shells though, they're too brittle and not abrasive enough.

The mandrel has a 1/4" shank, but the part that goes through the cartridge roll is 1/8"
Though the cartridge is not accurately round, when they spin they tend to make round holes. Being tapered, you just shove it in until it's grinding equally all the way around.
These little suckers are so handy that I like to keep one mounted in a die-grinder full time. Works fine in a small hand drill too though. The cartridges take about a second to swap by hand. Note you can also mount the cartridge backwards, handy sometimes when you want the big end to go into some tight space.
They come in different grits, lengths and sizes, tapered or not, so pay attention when ordering. If you like big fillets then you may want to go for the one with a faster taper, 1/2" at the big end, but I like small fillets so I mostly use the 3/8". They're cheap enough you might want a couple boxes of different sizes. Get yourself a couple arbors too, because you will drop it on the floor, and Murphy's Law says it'll bend the skinny part of the mandrel. You can straighten them, but eventually the 1/8" part will break off.
Mark B in Seattle
03-05-20, 07:04 PM
#21
Senior Member
Thread Starter
Join Date: Dec 2011
Location: NE Ohio
Posts: 2,595
Bikes: 1992 Serotta Colorado II,Co-Motion Speedster, Giant Escape Hybrid, 1977 Schwinn Super Le Tour
Mentioned: 4 Post(s)
Tagged: 0 Thread(s)
Quoted: 455 Post(s)
Likes: 0
Liked 112 Times
in
85 Posts
Another neat tool I have not heard of! That's what happens when you do woodworking most of your life!
03-08-20, 11:09 PM
#22
Senior Member
Join Date: Aug 2012
Location: Seattle
Posts: 507
Mentioned: 0 Post(s)
Tagged: 0 Thread(s)
Quoted: 103 Post(s)
Liked 144 Times
in
88 Posts
I found a tapered hand reamer that works really well for enlarging boss holes, cleaning up ends of fork blades other similar jobs.
__________________
https://www.flickr.com/photos/54319503@N05/
https://www.draper-cycles.com
https://www.flickr.com/photos/54319503@N05/
https://www.draper-cycles.com
03-09-20, 07:59 AM
#23
Newbie
Filing is OK, but I prefer to use tapered abrasives called cartridge rolls or spiral rolls. Here's a pic:
They come in different grits, lengths and sizes, tapered or not, so pay attention when ordering. If you like big fillets then you may want to go for the one with a faster taper, 1/2" at the big end, but I like small fillets so I mostly use the 3/8". They're cheap enough you might want a couple boxes of different sizes. Get yourself a couple arbors too, because you will drop it on the floor, and Murphy's Law says it'll bend the skinny part of the mandrel. You can straighten them, but eventually the 1/8" part will break off.
Mark B in Seattle
What is the overall length of your preferred spiral roll? I am going to order a bunch of 3/8� 80 grit spiral rolls. Also what is the size of the mandrel?
03-09-20, 08:09 AM
#24
Randomhead
Join Date: Aug 2008
Location: Happy Valley, Pennsylvania
Posts: 24,398
Mentioned: 0 Post(s)
Tagged: 0 Thread(s)
Quoted: 4 Post(s)
Liked 3,698 Times
in
2,518 Posts
He said 1/8" arbor hole. Mcmaster has some that size, I didn't keep looking after that. Amazon doesn't seem to have the 1/8" arbor hole variety, but search there can be hit or miss
03-09-20, 05:29 PM
#25
blahblahblah chrome moly
Join Date: Apr 2009
Location: Seattle
Posts: 1,990
Mentioned: 92 Post(s)
Tagged: 0 Thread(s)
Quoted: 1177 Post(s)
Liked 2,572 Times
in
1,074 Posts
https://www.mscdirect.com/browse/tn/...navid=12100146
1-1/2" long, 3/8" diameter, "full" taper, 1/8" arbor hole.
I find as I use one up, the small end kinda goes away to nothing, then the 1/8" arbor is exposed. But you can continue using that cartridge if the arbor is shortened. For that reason I have an arbor that I've shortened a bit, maybe 1/4" shorter. You can use the shorter arbor with a full-length cartridge too, the little bit at the end that's unsupported still works pretty much normally.
I also made a mandrel with an adjustable, replaceable 1/8" part. Left that at a previous employer, so I can't show a picture, but easy to make:
- Cut the 1/8" part off completely
- Drill what's left, the 1/4" part and the spiral part, all the way down the center at 1/8" (must be done on a lathe, with decent precision)
- Slit the back end of the 1/4" part with a hacksaw, where it gets clamped in the collet or chuck in use
- Put a piece of 1/8" drill rod or piano wire down the middle.
- Adjust the 1/8" part to length as you're tightening the collet or chuck, which will squeeze the part with the slit, clamping the 1/8" part in place.
Not filing/polishing the fillets also lets you use thinner tubes to some extent, because with the thin stuff, any filing/sanding at the edge of the fillet risks thinning the steel. Or put another way -- you will thin the steel tube a little when you clean up fillets, no matter how skilled you are -- it's just a question of how much. With very thin tubes, keep the cleanup to a minimum.
Getting your fillets to where they need zero cleanup is a good goal, but unless you make a lot of lugless bikes, it's hard to get that many hours 'in the saddle' so to speak. So zero cleanup might be an elusive goal, but any improvement you can make towards smoother, less lumpy fillets is worthwhile. Hint: this does not mean going back over and re-melting the fillet -- that's causing more heat damage to the tubes, and likely boiling the filler, causing porosity. Just lay 'em down as fast and smoothly as you can without looking back. Ironically, at some point in the learning curve, going faster makes them smoother. You'll find you like a bigger flame too -- but don't push it until you're ready. Beginners and intermediates should use a smallish flame.
But I am getting way off topic.
Mark B
