


Handlebar tape finishing
 07-31-14, 01:38 PM
#1
Senior Member
Thread Starter
Handlebar tape finishing
Does anybody have a technique that is easy and neat for marking and cutting the end if handle bar tape? Starting at the end, and finishing near the stem.
Any by the way, don't tape bars when you are tired, and have had enough of bikes for the day, even though your wife want's it done.
Any by the way, don't tape bars when you are tired, and have had enough of bikes for the day, even though your wife want's it done.
 07-31-14, 02:06 PM
#2
Senior Member
Join Date: Mar 2014
Location: Northwest Ohio
Posts: 176
Bikes: Schwinns and Miyatas
Mentioned: 0 Post(s)
Tagged: 0 Thread(s)
Quoted: 6 Post(s)
Likes: 0
Liked 0 Times
in
0 Posts
There is usually finishing tape included with the handlebar tape kit, but sometimes this tape isn't the best and doesn't stick very well. One tip for finishing the handlebar tape job, is to never wrap the finishing tape onto the handlebar itself. Keep the finished end on the handlebar tape. This prevents the finishing tape wrap that has to go from the handlebar tape down to the lower surface of the handlebar. This bit of an offset is where the finishing tape unravels. If the finishing tape that included in the handlebar tape kit is the quality you want, electrical tape of a contrasting color or matching color can usually be found at a "big box" store or local hardware store.
07-31-14, 02:11 PM
#3
Custom User Title
Join Date: May 2013
Location: SE MN
Posts: 11,239
Bikes: Fuji Roubaix Pro & Quintana Roo Kilo
Mentioned: 40 Post(s)
Tagged: 1 Thread(s)
Quoted: 2863 Post(s)
Likes: 0
Liked 31 Times
in
14 Posts
I just cut it at an angle so it thins out to the tip and have it end on the bottom of the bar. Then I finish it off with 3M electrical tape. The first wrap of tape I do tight so it is secure, which is cut off. Then I do a second cosmetic layer of electrical tape that I do not stretch at all. Make sure to end the tape at the bottom of the bar.
07-31-14, 02:15 PM
#4
Senior Member

Join Date: Dec 2010
Posts: 8,951
Mentioned: 0 Post(s)
Tagged: 0 Thread(s)
Quoted: 14 Post(s)
Likes: 0
Liked 13 Times
in
12 Posts
Yes. I have a method of finishing off bar tape that is easy and neat. One important trick is to use only 3M 33 or 88 electrical tape for the finishing wrap.
07-31-14, 02:17 PM
#5
Banned
I try to overlap the top portions more to be a bit fatter and so I don't have to cut off excess.
Then use 3M tape to hold it down.
Then use 3M tape to hold it down.
07-31-14, 02:34 PM
#6

Mad bike riding scientist

Join Date: Nov 2004
Location: Denver, CO
Posts: 27,368
Bikes: Some silver ones, a red one, a black and orange one, and a few titanium ones
Mentioned: 152 Post(s)
Tagged: 1 Thread(s)
Quoted: 6221 Post(s)
Liked 4,221 Times
in
2,367 Posts
Does anybody have a technique that is easy and neat for marking and cutting the end if handle bar tape? Starting at the end, and finishing near the stem.
Any by the way, don't tape bars when you are tired, and have had enough of bikes for the day, even though your wife want's it done.
Any by the way, don't tape bars when you are tired, and have had enough of bikes for the day, even though your wife want's it done.
__________________
Stuart Black
Plan Epsilon Around Lake Michigan in the era of Covid
Old School�When It Wasn�t Ancient bikepacking
Gold Fever Three days of dirt in Colorado
Pokin' around the Poconos A cold ride around Lake Erie
Dinosaurs in Colorado A mountain bike guide to the Purgatory Canyon dinosaur trackway
Solo Without Pie. The search for pie in the Midwest.
Picking the Scablands. Washington and Oregon, 2005. Pie and spiders on the Columbia River!
07-31-14, 03:01 PM
#7
Senior Member
Thread Starter
I find that a hawkbill knife (this is only an example there are many others) works best to make a straight cut around a tube. Run the tape up to where you want to end it, then cut the tape. For finishing, I much prefer self fusing silicone tape like Rescue Tape or Tommy Tape to electrician's tape. It fuses smoothly, makes a permanent bond and doesn't get sticky like adhesive tape can. It comes in several different colors as well
07-31-14, 06:29 PM
#8
Senior Member

Join Date: Sep 2010
Location: Roswell, GA
Posts: 8,319
Bikes: '93 Trek 750, '92 Schwinn Crisscross, '93 Mongoose Alta
Mentioned: 30 Post(s)
Tagged: 0 Thread(s)
Quoted: 1438 Post(s)
Liked 1,092 Times
in
723 Posts
+100 on self-fusing silicone tape. It comes in lots of colors, including clear, to match or contrast with your frame/tape. Great for 1000 other uses.
07-31-14, 06:55 PM
#9
Mad bike riding scientist
Join Date: Nov 2004
Location: Denver, CO
Posts: 27,368
Bikes: Some silver ones, a red one, a black and orange one, and a few titanium ones
Mentioned: 152 Post(s)
Tagged: 1 Thread(s)
Quoted: 6221 Post(s)
Liked 4,221 Times
in
2,367 Posts
I cut the tape first. However, if the tape doesn't stick, you can use a small amount of electrical tape or a bit of the silicone tape to hold it while you cut it. Then you finish it with a couple of wraps of the silicone tape.
__________________
Stuart Black
Plan Epsilon Around Lake Michigan in the era of Covid
Old School�When It Wasn�t Ancient bikepacking
Gold Fever Three days of dirt in Colorado
Pokin' around the Poconos A cold ride around Lake Erie
Dinosaurs in Colorado A mountain bike guide to the Purgatory Canyon dinosaur trackway
Solo Without Pie. The search for pie in the Midwest.
Picking the Scablands. Washington and Oregon, 2005. Pie and spiders on the Columbia River!
Stuart Black
Plan Epsilon Around Lake Michigan in the era of Covid
Old School�When It Wasn�t Ancient bikepacking
Gold Fever Three days of dirt in Colorado
Pokin' around the Poconos A cold ride around Lake Erie
Dinosaurs in Colorado A mountain bike guide to the Purgatory Canyon dinosaur trackway
Solo Without Pie. The search for pie in the Midwest.
Picking the Scablands. Washington and Oregon, 2005. Pie and spiders on the Columbia River!
08-01-14, 06:26 PM
#10
Senior Member
Join Date: Apr 2005
Location: Wherever
Posts: 16,748
Mentioned: 92 Post(s)
Tagged: 0 Thread(s)
Quoted: 556 Post(s)
Likes: 0
Liked 132 Times
in
78 Posts
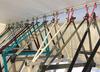
Plastic tape is easy, which is what you asked for. Personally I've never liked the look of plastic tape on bicycles, but it goes better on more "modern" bikes than it does on older classics. This aint easy, but I like the looks. Especially on older bikes. Crochet thread, sealed with a couple of costs of clear shellac.

This is thin braided black nylon


This is thin braided black nylon
 08-01-14, 07:43 PM
#11
Junior Member
08-02-14, 03:25 AM
#12
Senior Member
Join Date: Oct 2011
Location: Fairplay Co
Posts: 9,530
Bikes: Current 79 Nishiki Custum Sport, Jeunet 620, notable previous bikes P.K. Ripper loop tail, Kawahara Laser Lite, Paramount Track full chrome, Raliegh Internatioanl, Motobecan Super Mirage. 59 Crown royak 3 speed
Mentioned: 26 Post(s)
Tagged: 1 Thread(s)
Quoted: 792 Post(s)
Liked 1,783 Times
in
638 Posts
Norm you well come up short just vuy another rolll and go.
08-02-14, 09:24 PM
#14

Thrifty Bill
Join Date: Jan 2008
Location: Mountains of Western NC
Posts: 23,526
Bikes: 86 Katakura Silk, 87 Prologue X2, 88 Cimarron LE, 1975 Sekai 4000 Professional, 73 Paramount, plus more
Mentioned: 96 Post(s)
Tagged: 0 Thread(s)
Quoted: 1236 Post(s)
Liked 964 Times
in
628 Posts
+100 Self fusing tape, its all I use, lots of colors. No adhesive, sticks to itself, no gooey mess.
08-02-14, 11:08 PM
#15
Senior Member
Join Date: Oct 2004
Posts: 700
Bikes: Cannondale CAAD10 Team, Giant TCR
Mentioned: 0 Post(s)
Tagged: 0 Thread(s)
Quoted: 0 Post(s)
Likes: 0
Liked 0 Times
in
0 Posts
i double over the last bit so I don't have to cut it, does make it a bit thicker at the end though. Then I use two passes of electrical tape - the first is stretched taut to hold the tape in place, and the second is mostly for a cosmetic finish. Sometimes I use the supplied finishing tape over the electrical tape. It's important to finish the wrap and cut the tape at the bottom of the bar for a clean look.
08-03-14, 01:24 AM
#16
Senior Member
I use electricians tape then use twine (see Rivendell video for "how to") at the ends to cover the tape. If the tape is dark, I use black waxed twine, otherwise hemp twine & shellac.
08-03-14, 07:34 AM
#17
Senior Member
Join Date: Feb 2014
Location: Southern Ontario
Posts: 1,883
Mentioned: 5 Post(s)
Tagged: 0 Thread(s)
Quoted: 263 Post(s)
Likes: 0
Liked 9 Times
in
8 Posts
That's a great idea using two separate layers of electrical tape to finish off. Never thought of that. Really hard to match the width of the stretched tape.
Thanks.
Thanks.
08-03-14, 11:29 AM
#18
Let your bike be the tool

Join Date: Jun 2006
Location: NC/SC border
Posts: 939
Bikes: '66 Raleigh Carlton, '70 Ron Cooper, '95 Bianchi CD'I, Zonal Frame with Xenon gruppo, Carbon Frame with Record Gruppo, Columbia Twosome, Terry Classic, Bianchi SX, Gravity SS/FG
Mentioned: 2 Post(s)
Tagged: 0 Thread(s)
Quoted: 338 Post(s)
Liked 314 Times
in
194 Posts
I put a pass of electrical tape with the sticky side out halfway under where the tapered bar tape will end. The electrical tape will stretch enough to fold over the bar tape edge. Then I wrap the Cinelli finishing tape around it even with the electrical tape's edge.

__________________
Never try to teach a pig to sing...
Never try to teach a pig to sing...
Last edited by cranky old road; 08-04-14 at 05:15 AM. Reason: Added photo
08-03-14, 03:01 PM
#19
Senior Member
Join Date: Dec 2010
Posts: 8,951
Mentioned: 0 Post(s)
Tagged: 0 Thread(s)
Quoted: 14 Post(s)
Likes: 0
Liked 13 Times
in
12 Posts
No sticky mess with 3M 33 or 88 electrical tape. It sticks well, is very stretchy conforming to the step between the tape and the bar, doesn't shrink or creep after installation, and the adhesive never gets gooey or bleeds. Removing the tape leaves no adhesive behind. Not saying it's necessarily superior to silicone tape but it is an alternative and way better than lesser electrical tapes.
08-03-14, 05:42 PM
#20
Mad bike riding scientist
Join Date: Nov 2004
Location: Denver, CO
Posts: 27,368
Bikes: Some silver ones, a red one, a black and orange one, and a few titanium ones
Mentioned: 152 Post(s)
Tagged: 1 Thread(s)
Quoted: 6221 Post(s)
Liked 4,221 Times
in
2,367 Posts
No sticky mess with 3M 33 or 88 electrical tape. It sticks well, is very stretchy conforming to the step between the tape and the bar, doesn't shrink or creep after installation, and the adhesive never gets gooey or bleeds. Removing the tape leaves no adhesive behind. Not saying it's necessarily superior to silicone tape but it is an alternative and way better than lesser electrical tapes.
__________________
Stuart Black
Plan Epsilon Around Lake Michigan in the era of Covid
Old School�When It Wasn�t Ancient bikepacking
Gold Fever Three days of dirt in Colorado
Pokin' around the Poconos A cold ride around Lake Erie
Dinosaurs in Colorado A mountain bike guide to the Purgatory Canyon dinosaur trackway
Solo Without Pie. The search for pie in the Midwest.
Picking the Scablands. Washington and Oregon, 2005. Pie and spiders on the Columbia River!
08-03-14, 10:43 PM
#21
Member

Join Date: Jul 2014
Location: CDMX
Posts: 41
Bikes: Cerv�lo T1 (n+1 in bio ;)
Mentioned: 0 Post(s)
Tagged: 0 Thread(s)
Quoted: 6 Post(s)
Likes: 0
Liked 2 Times
in
1 Post
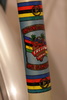
I just finished a experiment using no adhesive tape, and starting from the stem.
1- I cut a piece of the additional padding layer where I was going to overlap the tape to avoid having a bump there.
2- Placement of the tape
3- The first turn I did it stretching the tape to hold the end in place
4- I kept rolling the tape all the way to the bottom.
5- The upper end looks very clean
6- This was the tricky part, but if you have enough tape left it is easier. Just drop it in there
7- I'm very pleased with the result, aesthetically at least, I'll keep you updated of how it performs. I think it depends a lot on the start being really tight, I left very little material under the first turn because the tape was just long enough for my handlebar, but I am sure that with more length the start of the tape will be even more secure.
Last edited by Cen; 08-03-14 at 11:16 PM. Reason: Images wouldn't load
08-04-14, 10:19 AM
#22
Senior Member
Join Date: Jan 2010
Posts: 181
Mentioned: 0 Post(s)
Tagged: 0 Thread(s)
Quoted: 4 Post(s)
Likes: 0
Liked 0 Times
in
0 Posts
I just finished a experiment using no adhesive tape, and starting from the stem.
1- I cut a piece of the additional padding layer where I was going to overlap the tape to avoid having a bump there.
2- Placement of the tape
3- The first turn I did it stretching the tape to hold the end in place
4- I kept rolling the tape all the way to the bottom.
5- The upper end looks very clean
6- This was the tricky part, but if you have enough tape left it is easier. Just drop it in there
7- I'm very pleased with the result, aesthetically at least, I'll keep you updated of how it performs. I think it depends a lot on the start being really tight, I left very little material under the first turn because the tape was just long enough for my handlebar, but I am sure that with more length the start of the tape will be even more secure.
08-04-14, 10:57 AM
#23
Senior Member
Thread Starter
I just finished a experiment using no adhesive tape, and starting from the stem.
1- I cut a piece of the additional padding layer where I was going to overlap the tape to avoid having a bump there.
2- Placement of the tape
3- The first turn I did it stretching the tape to hold the end in place
4- I kept rolling the tape all the way to the bottom.
5- The upper end looks very clean
6- This was the tricky part, but if you have enough tape left it is easier. Just drop it in there
7- I'm very pleased with the result, aesthetically at least, I'll keep you updated of how it performs. I think it depends a lot on the start being really tight, I left very little material under the first turn because the tape was just long enough for my handlebar, but I am sure that with more length the start of the tape will be even more secure.
1- I cut a piece of the additional padding layer where I was going to overlap the tape to avoid having a bump there.
2- Placement of the tape
3- The first turn I did it stretching the tape to hold the end in place
4- I kept rolling the tape all the way to the bottom.
5- The upper end looks very clean
6- This was the tricky part, but if you have enough tape left it is easier. Just drop it in there
7- I'm very pleased with the result, aesthetically at least, I'll keep you updated of how it performs. I think it depends a lot on the start being really tight, I left very little material under the first turn because the tape was just long enough for my handlebar, but I am sure that with more length the start of the tape will be even more secure.
Brakes?
08-04-14, 04:30 PM
#25
aka Tom Reingold

Join Date: Jan 2009
Location: New York, NY, and High Falls, NY, USA
Posts: 40,506
Bikes: 1962 Rudge Sports, 1971 Raleigh Super Course, 1971 Raleigh Pro Track, 1974 Raleigh International, 1975 Viscount Fixie, 1982 McLean, 1996 Lemond (Ti), 2002 Burley Zydeco tandem
Mentioned: 511 Post(s)
Tagged: 0 Thread(s)
Quoted: 7351 Post(s)
Liked 2,479 Times
in
1,439 Posts
We switched from taping top-down to bottom-up because the edges are not exposed this way. As a result, bottom-up jobs last longer.
I glue the ends with contact cement or similar.
I glue the ends with contact cement or similar.
__________________
Tom Reingold, tom@noglider.com
New York City and High Falls, NY
Blogs: The Experienced Cyclist; noglider's ride blog
�When man invented the bicycle he reached the peak of his attainments.� � Elizabeth West, US author
Please email me rather than PM'ing me. Thanks.
Tom Reingold, tom@noglider.com
New York City and High Falls, NY
Blogs: The Experienced Cyclist; noglider's ride blog
�When man invented the bicycle he reached the peak of his attainments.� � Elizabeth West, US author
Please email me rather than PM'ing me. Thanks.