


1985 League Fuji Sorta Build Thread
 08-08-20, 02:49 AM
#1
Senior Member
Thread Starter
Join Date: Jul 2020
Location: Humboldt County, CA
Posts: 832
Mentioned: 7 Post(s)
Tagged: 0 Thread(s)
Quoted: 405 Post(s)
Likes: 0
Liked 430 Times
in
286 Posts
1985 League Fuji Sorta Build Thread
I live in Humboldt County, CA, and I don't drive, so I needed a bike. Also, I'm pretty broke. So, it took a long while of checking Craigslist every day, but I finally found a good road bike, in my size, that I could afford.
Last Sunday, I picked this up in Arcata for $200:

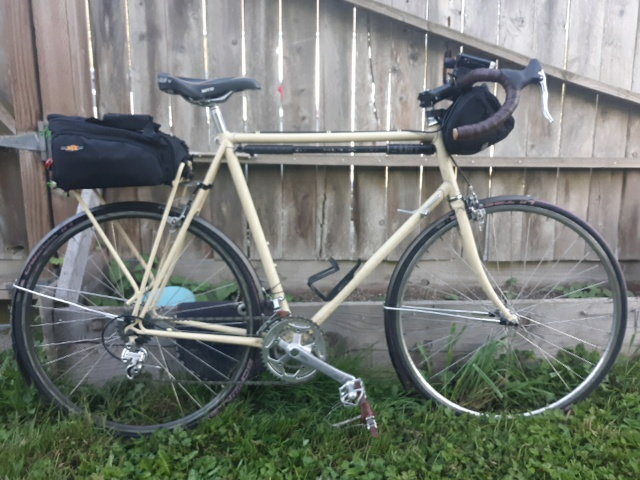
Side view
1985 League Fuji, 58 cm.
Powder coat and single-speed conversion were done by the previous owner, who had the rack done at the same time. The powder coat is a nice flat beige that goes really well with the brown pleather bar tape and WTB Rocket V saddle.
She also added:
Big honkin' Kona 31.8 bars and stem, on a threaded-to-threadless converter. I think they're the 48s, but nobody in the world seems to know how they're measured.
TRP RRL-SR levers... not sure why she didn't go with the brown hoods. Comfortable, good looking levers. The weird shape of the lever blades feels really good in the hand, and the drilling breaks up the shape a bit. The smooth ones look weirder to me.
Portland Design Works 700x30 fenders. These are really nice-looking aluminum fenders. They are also proving to be a titanic pain in the posterior, which will be extensively detailed, and thoroughly complained about, as this thread develops.
WTB Rocket V saddle. Nice-looking seat. 130 mm width, which is narrower than I was used to. I've spent the most time on a Rolls (148 mm) and a Concor (140 mm).I've also got time on a Brooks Team Pro and a Champion Flyer, and liked them both. But(t), since I haven't ridden in 5 or 6 years, and I'm broke, it's gonna stay for a while. I'm probably going to end up on a brown Brooks, B-17 or Pro.
Original parts are the Sugino RT crankset and 110 x 42T chainring, Dia-Compe 400 calipers, Sugino SP-KC seatpost, and Suntour LaPree shifters. (I think the shifters were not group-specific, they look like most PowerRatchet shifters I've seen, except the Superbe Pros.) I also got the original bar and stem, both Nittos. The B114 bars measure 40 cm outside at the ends... so likely 39s... on a 58 cm frame! What were they thinking??
--Shannon
Last Sunday, I picked this up in Arcata for $200:
Side view
1985 League Fuji, 58 cm.
Powder coat and single-speed conversion were done by the previous owner, who had the rack done at the same time. The powder coat is a nice flat beige that goes really well with the brown pleather bar tape and WTB Rocket V saddle.
She also added:
Big honkin' Kona 31.8 bars and stem, on a threaded-to-threadless converter. I think they're the 48s, but nobody in the world seems to know how they're measured.
TRP RRL-SR levers... not sure why she didn't go with the brown hoods. Comfortable, good looking levers. The weird shape of the lever blades feels really good in the hand, and the drilling breaks up the shape a bit. The smooth ones look weirder to me.
Portland Design Works 700x30 fenders. These are really nice-looking aluminum fenders. They are also proving to be a titanic pain in the posterior, which will be extensively detailed, and thoroughly complained about, as this thread develops.
WTB Rocket V saddle. Nice-looking seat. 130 mm width, which is narrower than I was used to. I've spent the most time on a Rolls (148 mm) and a Concor (140 mm).I've also got time on a Brooks Team Pro and a Champion Flyer, and liked them both. But(t), since I haven't ridden in 5 or 6 years, and I'm broke, it's gonna stay for a while. I'm probably going to end up on a brown Brooks, B-17 or Pro.
Original parts are the Sugino RT crankset and 110 x 42T chainring, Dia-Compe 400 calipers, Sugino SP-KC seatpost, and Suntour LaPree shifters. (I think the shifters were not group-specific, they look like most PowerRatchet shifters I've seen, except the Superbe Pros.) I also got the original bar and stem, both Nittos. The B114 bars measure 40 cm outside at the ends... so likely 39s... on a 58 cm frame! What were they thinking??
--Shannon

Likes For ShannonM:
08-08-20, 02:53 AM
#2
Senior Member
Thread Starter
Join Date: Jul 2020
Location: Humboldt County, CA
Posts: 832
Mentioned: 7 Post(s)
Tagged: 0 Thread(s)
Quoted: 405 Post(s)
Likes: 0
Liked 430 Times
in
286 Posts
More Pix

As purchased

Front view
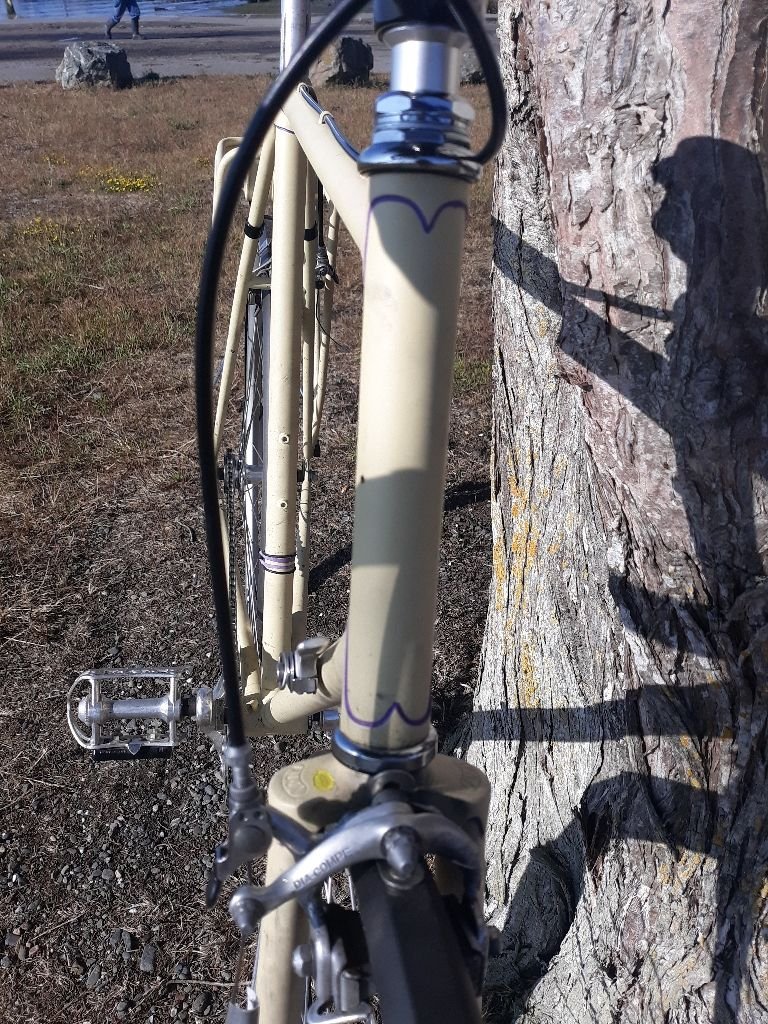
Head tube detail

Fatback seatstay detail
The purple lug lining will be replaced with a forest green.
--Shannon
08-08-20, 03:00 AM
#3
Senior Member
Thread Starter
Join Date: Jul 2020
Location: Humboldt County, CA
Posts: 832
Mentioned: 7 Post(s)
Tagged: 0 Thread(s)
Quoted: 405 Post(s)
Likes: 0
Liked 430 Times
in
286 Posts
The Drivetrain Saga (So Far)
So, as I said, the bike came to me as a singlespeed, with a flip-flop hub and 16T free / 15t fixed gearing. Since this is of no use or interest to me, conversion to geared drive is a must.
At least the original owner made it easy for me. Here's where I'm starting from:

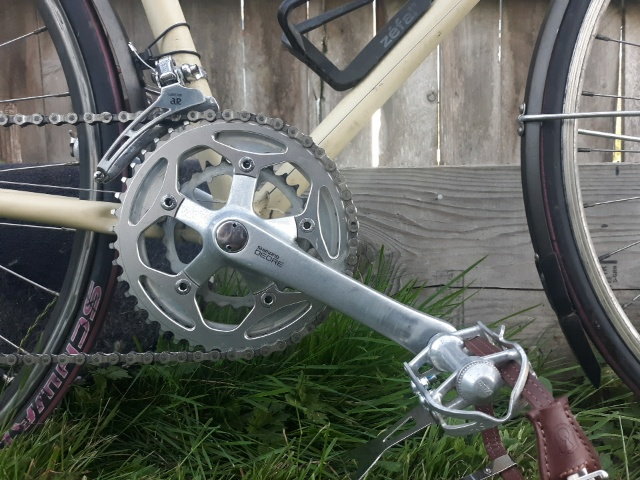
Sugino RT crankset

Suntour PowerRatchet shifters
Next up, The Plan...
--Shannon
At least the original owner made it easy for me. Here's where I'm starting from:
Sugino RT crankset
Suntour PowerRatchet shifters
Next up, The Plan...
--Shannon
08-08-20, 03:12 AM
#4
Senior Member
Thread Starter
Join Date: Jul 2020
Location: Humboldt County, CA
Posts: 832
Mentioned: 7 Post(s)
Tagged: 0 Thread(s)
Quoted: 405 Post(s)
Likes: 0
Liked 430 Times
in
286 Posts
The Drivetrain Saga (The Plan)
The Plan:
The plan is to use parts I already have, since I'm broke. Fortunately, one of the things that has followed me around ever since my divorce in 2014 has been my box o' bike parts. Most of the stuff in it I've had since I worked at Performance in La Mesa, CA when I was in college in the early 2000s.
Crankset: Sugino RT 110mm BCD double. 170 mm crankarms. Came with the bike. I really like the looks of this crank. Nice and shiny, cuz it's a Sugino. I dig the "twisted" profile of the spider arms. Right now, it's only got the 42t inner ring on it.
Freewheel: NIB 6-speed Suntour Pro Compe, 14-16-18-20-23-26. The catalog shows a Suntour Mighty-6 13-15-17-19-22-26 as stock.
Rear Derailleur: NIB 1980 Suntour Superbe.
Shift Levers: Suntour LaPree that came on the bike.
I'll run it as a 1x6 now, because I'm broke, but the longer-range plan is to add a 45T outer ring and a Suntour road front derailleur for a 45/42 half-step. Should be good to go for around here. Bonus is that if I need gears for a hilly ride, I can swap the 42T for a 33, and have a wide-range 1.5-step at the cost of less-convenient shifting.
--Shannon
Likes For ShannonM:
08-08-20, 07:45 AM
#5

Photographer

Join Date: May 2006
Location: The other Cape, Cape Ann
Posts: 3,116
Mentioned: 27 Post(s)
Tagged: 0 Thread(s)
Quoted: 105 Post(s)
Liked 98 Times
in
53 Posts
Looks like a great project! Hope you can find a nice Fuji badge for the head tube.
Cheers,
Scott
Cheers,
Scott
__________________
ClassicFuji.posthaven.com.archive
IG @scottryder.surf.cycle
IG @scottryder.fine.art
ClassicFuji.posthaven.com.archive
IG @scottryder.surf.cycle
IG @scottryder.fine.art
08-08-20, 01:15 PM
#6
Senior Member
Thread Starter
Join Date: Jul 2020
Location: Humboldt County, CA
Posts: 832
Mentioned: 7 Post(s)
Tagged: 0 Thread(s)
Quoted: 405 Post(s)
Likes: 0
Liked 430 Times
in
286 Posts
Since it's never going to be original-looking, I might just use my favorite so far, the "feather" badge.
Is there a collection of Fuji head badges somewhere on the web?
Also, thanks for sharing all of your Fuji-fu with us. Your site and the threads here have been invaluable to me.
--Shannon
Likes For ShannonM:
08-08-20, 08:51 PM
#7
Senior Member
Thread Starter
Join Date: Jul 2020
Location: Humboldt County, CA
Posts: 832
Mentioned: 7 Post(s)
Tagged: 0 Thread(s)
Quoted: 405 Post(s)
Likes: 0
Liked 430 Times
in
286 Posts
The Drivetrain Saga (Chapter 1)
I got the drivetrain installed, and man, it was painful.
Attempt the first:
Went to the Bike Kitchen on Wednesday night. My usual volunteer shift, but I got permission to work on my own bike.
First thing first, find a 700c freewheel rear wheel. This should be easy, right? Wrong. None to be seen. But there was a lower-end Mavic rim on an Acera cassette hub that I figured I could make work. Start looking for cassettes. The 7-speed 12-27 cassette turned out to be an 8 speed missing a cog. The only other ones that would work are all 9 speed with 32T. I guess I can't use the Superbe. Bummer. Finally get a working cassette put together, grab the last 9 speed chain on the shelf, start putting the chain on the bike. It's too long. Need the chain tool. Walking back from the pegboard to the repair stand, I happen to glance under one of the workbenches, where lurks a previously unseen box of wheels. Hello, what's that?
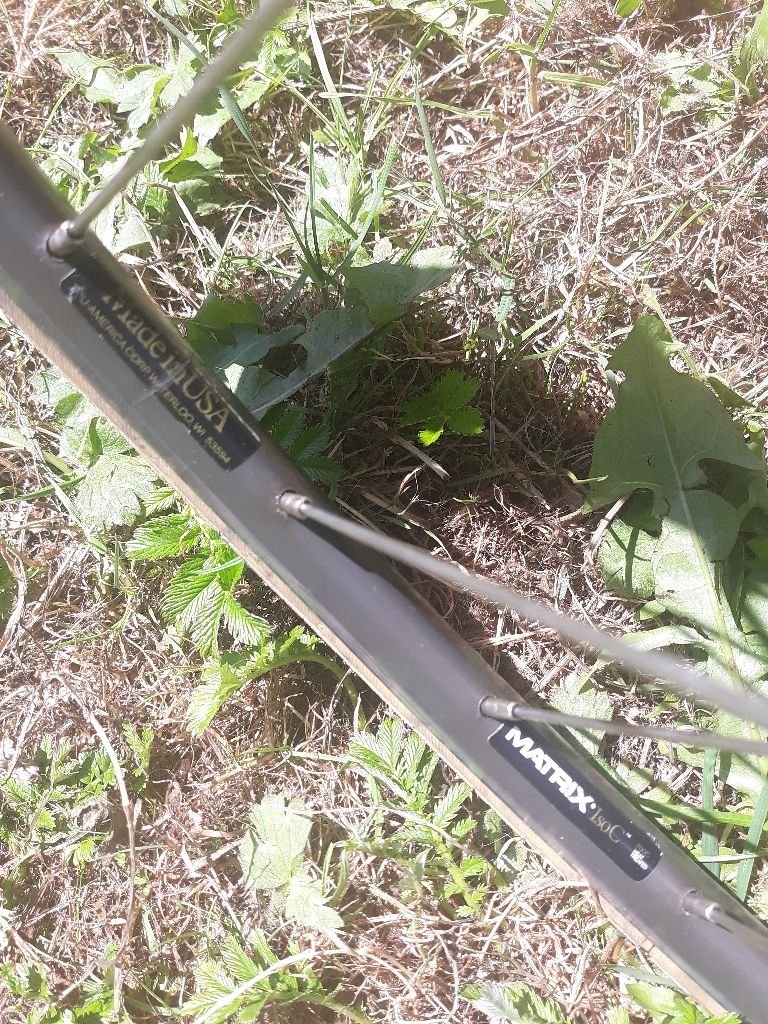
Rim
Why, it's a Matrix IsoC rim on a 600EX freewheel hub!
Needs some love, which I don't have time to give it, as it's closing time. But at least I have a chance to return to The Plan.
I spend several hours later Wednesday night researching the wheel. Eventually, I learn, from this forum and from vintage-treks.com, that my wheel most likely came from a 1987 Trek 560EX or 1200.
Attempt the second:
Returning to the Kitchen on Friday evening, I start by overhauling the wheel I found at closing time on Wednesday. It's been years since I trued a wheel, so it takes a while. I think that it's had a spoke replaced at some point, because every nipple I turn takes the green Park wrench, except one, which wants the red one. Weird. Then to repack the 600EX hub, which is in excellent shape. You can even still tell that it had red grease.
On goes the freewheel.
Into the frame goes the wheel.
All the way to the bar goes the brake lever.
Gotta adjust the brake.
"No problem," sez I.
"Oh, yeah?" sez the fender.
Much wailing and gnashing of teeth ensue as I try to adjust the cable, recenter the caliper, and not have the fender rub the tire.
Fortunately, the derailleur mounts right up. Once I adjust the limit screws, put chain and cable on, and set initial cable tension, it looks like that Superbe might even clear a 28T cog, even though it's supposed to be a 23T max:
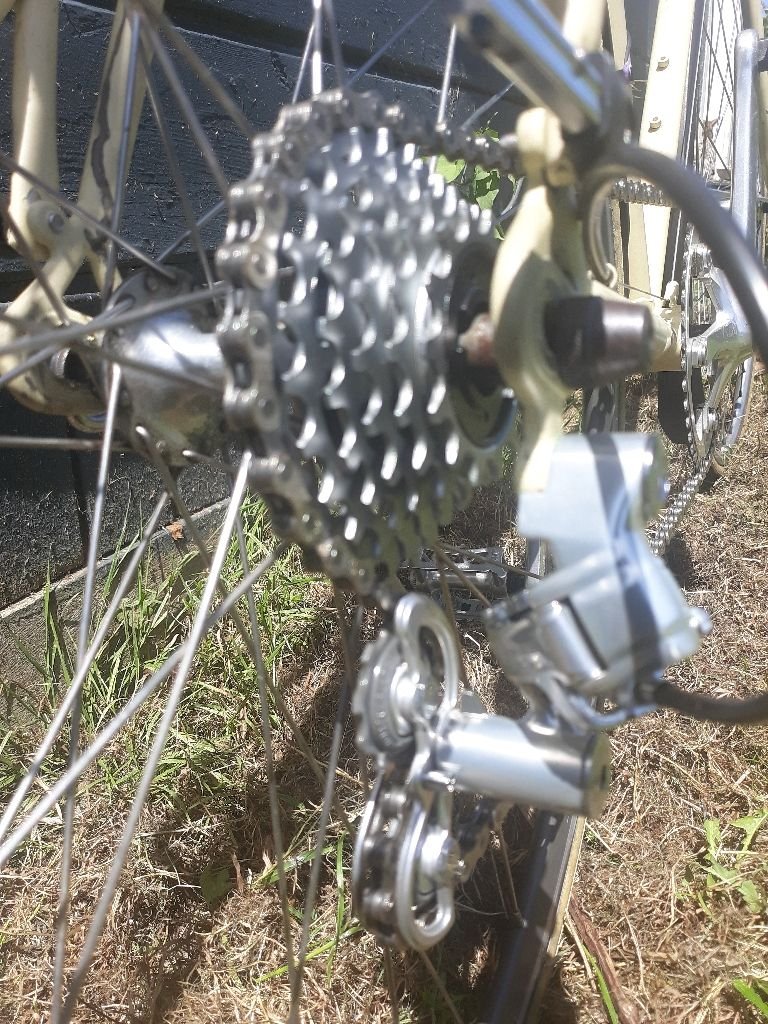
Freewheel
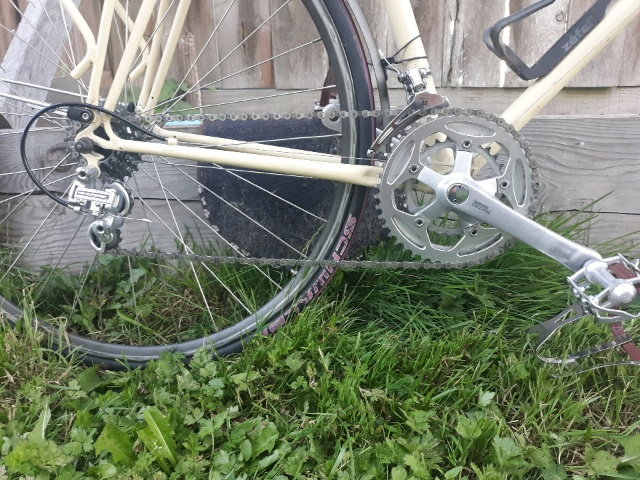
So here's how it ended up, after all was said and done.
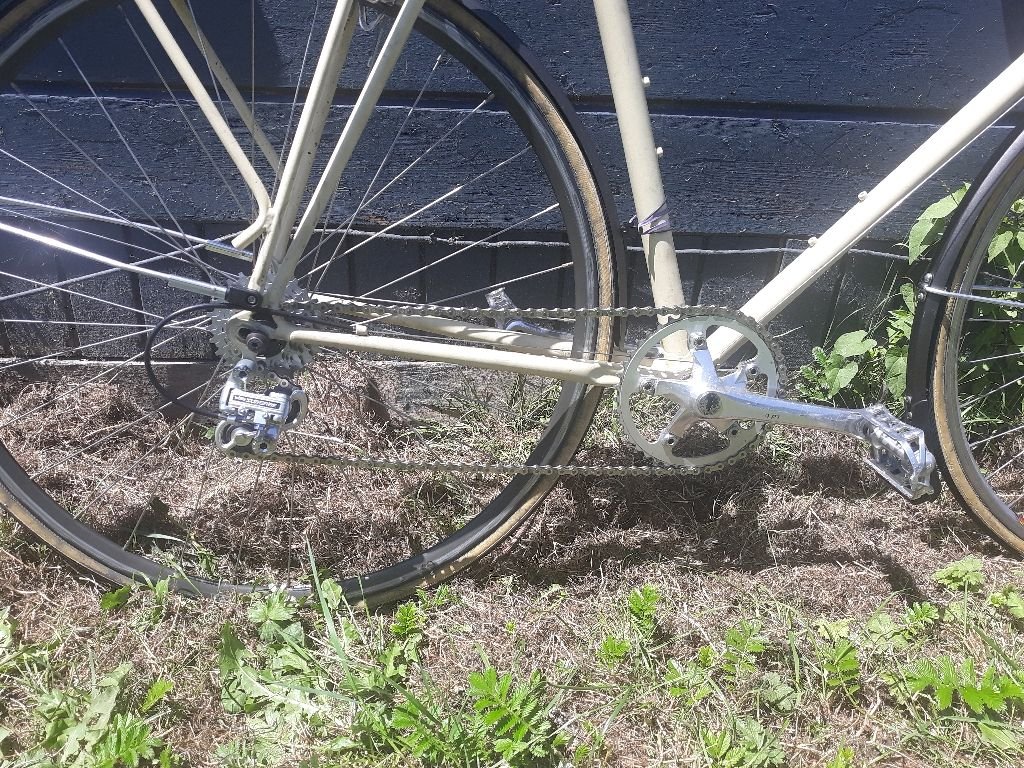
Drivetrain

--Shannon
Attempt the first:
Went to the Bike Kitchen on Wednesday night. My usual volunteer shift, but I got permission to work on my own bike.
First thing first, find a 700c freewheel rear wheel. This should be easy, right? Wrong. None to be seen. But there was a lower-end Mavic rim on an Acera cassette hub that I figured I could make work. Start looking for cassettes. The 7-speed 12-27 cassette turned out to be an 8 speed missing a cog. The only other ones that would work are all 9 speed with 32T. I guess I can't use the Superbe. Bummer. Finally get a working cassette put together, grab the last 9 speed chain on the shelf, start putting the chain on the bike. It's too long. Need the chain tool. Walking back from the pegboard to the repair stand, I happen to glance under one of the workbenches, where lurks a previously unseen box of wheels. Hello, what's that?
Rim
Why, it's a Matrix IsoC rim on a 600EX freewheel hub!
Needs some love, which I don't have time to give it, as it's closing time. But at least I have a chance to return to The Plan.
I spend several hours later Wednesday night researching the wheel. Eventually, I learn, from this forum and from vintage-treks.com, that my wheel most likely came from a 1987 Trek 560EX or 1200.
Attempt the second:
Returning to the Kitchen on Friday evening, I start by overhauling the wheel I found at closing time on Wednesday. It's been years since I trued a wheel, so it takes a while. I think that it's had a spoke replaced at some point, because every nipple I turn takes the green Park wrench, except one, which wants the red one. Weird. Then to repack the 600EX hub, which is in excellent shape. You can even still tell that it had red grease.
On goes the freewheel.
Into the frame goes the wheel.
All the way to the bar goes the brake lever.
Gotta adjust the brake.
"No problem," sez I.
"Oh, yeah?" sez the fender.
Much wailing and gnashing of teeth ensue as I try to adjust the cable, recenter the caliper, and not have the fender rub the tire.
Fortunately, the derailleur mounts right up. Once I adjust the limit screws, put chain and cable on, and set initial cable tension, it looks like that Superbe might even clear a 28T cog, even though it's supposed to be a 23T max:
Freewheel
So here's how it ended up, after all was said and done.
Drivetrain
--Shannon
Last edited by ShannonM; 08-08-20 at 09:29 PM.
08-08-20, 09:12 PM
#8
Senior Member
Thread Starter
Join Date: Jul 2020
Location: Humboldt County, CA
Posts: 832
Mentioned: 7 Post(s)
Tagged: 0 Thread(s)
Quoted: 405 Post(s)
Likes: 0
Liked 430 Times
in
286 Posts
The Test Ride
We have gears, so it's time for a shakedown ride!
Just a 5 mile run from the house to King Salmon and back, to see how it's all working.
The very first pedal stroke pulls the rear wheel out of the dropout. Skewer wasn't quite tight enough.
The rear fender rubs the tire. Again.
Bend the caliper mount a bit, fender stops rubbing.
Take off again. check brakes. Helacious clatter. This baffles me for a bit, until I realize that it's not the fender, it's one of the wheel guides hitting the spokes when the caliper closes. Bend wheel guide out a bit, all is well. The front fender still makes a bit of noise, it just kisses the tire at one spot every rotation.
After two blocks of ride-fiddle-ride-repeat, I can now actually ride my bike. I proceed to do so, and, a couple of miles later, I end up here:

Looking south down Humboldt Bay.
The verdict so far:
The Superbe derailleur and PowerRatchet shifters shift amazingly well. The derailleur is one of the prettiest bike parts I've ever seen. I really like the 14-16-18-20-23-26 freewheel. The 16-18-20 right in the middle is just perfect for flatland riding with my haven't-done-any-riding-in-six-years legs. I can already kinda tell how the 45/42 half-step I've got planned for Phase 2 is going to feel. I was cruising in the 42x18, wanted a bit more gear, the 16 was a bit much. Splitting the difference would have been perfect.
--Shannon
Just a 5 mile run from the house to King Salmon and back, to see how it's all working.
The very first pedal stroke pulls the rear wheel out of the dropout. Skewer wasn't quite tight enough.
The rear fender rubs the tire. Again.
Bend the caliper mount a bit, fender stops rubbing.
Take off again. check brakes. Helacious clatter. This baffles me for a bit, until I realize that it's not the fender, it's one of the wheel guides hitting the spokes when the caliper closes. Bend wheel guide out a bit, all is well. The front fender still makes a bit of noise, it just kisses the tire at one spot every rotation.
After two blocks of ride-fiddle-ride-repeat, I can now actually ride my bike. I proceed to do so, and, a couple of miles later, I end up here:
Looking south down Humboldt Bay.
The verdict so far:
The Superbe derailleur and PowerRatchet shifters shift amazingly well. The derailleur is one of the prettiest bike parts I've ever seen. I really like the 14-16-18-20-23-26 freewheel. The 16-18-20 right in the middle is just perfect for flatland riding with my haven't-done-any-riding-in-six-years legs. I can already kinda tell how the 45/42 half-step I've got planned for Phase 2 is going to feel. I was cruising in the 42x18, wanted a bit more gear, the 16 was a bit much. Splitting the difference would have been perfect.
--Shannon
Likes For ShannonM:
08-08-20, 11:49 PM
#9
Master Parts Rearranger

Join Date: Mar 2015
Location: Portlandia's Kuiper Belt, OR
Posts: 4,402
Bikes: 1982 Trek 720 - 1985 Trek 620 - 1984 Trek 620 - 1980 Trek 510 - Other luminaries past and present
Mentioned: 221 Post(s)
Tagged: 0 Thread(s)
Quoted: 1556 Post(s)
Liked 2,023 Times
in
989 Posts
I appreciate your candor in this "sorta build" thread.  Very relatable!
The PDW fenders are nice, but the fender dance with short reach brake caliper setups (and ones where the pads are only mid-slot and not all the way down, which would allow for maximum room to work with), not to mention what looks like a 25mm tire instead of a 23mm tire, is nothing less than a battle.
In addition to the nice-bit-of-kit PDWs, it must warm your heart to have one of Suntour's gems as your rear derailleur in the midst of very limited funds. Always nice to have a little jewelry (its condition is excellent) to make a bike a bit more special. I've run a 28T large cog on it, but I had to be gentler and slower to go from the second largest cog to the 28T. Not that I'm a brute or ham-fisted, but in the words of Robin Longstride when addressing Marion, the Superbe derailleur requested, "Ask me nicely."
A 26T is a lot easier ask of that derailleur, so gearing down the front chainrings is a good idea. If a 26T low gear in back was good enough for Campagnolo well into the 2000's 10-speed era (at least), then it's good enough for any of us I suppose. I still like lower gears when needed though, so maybe not...
Very relatable! The PDW fenders are nice, but the fender dance with short reach brake caliper setups (and ones where the pads are only mid-slot and not all the way down, which would allow for maximum room to work with), not to mention what looks like a 25mm tire instead of a 23mm tire, is nothing less than a battle.
In addition to the nice-bit-of-kit PDWs, it must warm your heart to have one of Suntour's gems as your rear derailleur in the midst of very limited funds. Always nice to have a little jewelry (its condition is excellent) to make a bike a bit more special. I've run a 28T large cog on it, but I had to be gentler and slower to go from the second largest cog to the 28T. Not that I'm a brute or ham-fisted, but in the words of Robin Longstride when addressing Marion, the Superbe derailleur requested, "Ask me nicely."
A 26T is a lot easier ask of that derailleur, so gearing down the front chainrings is a good idea. If a 26T low gear in back was good enough for Campagnolo well into the 2000's 10-speed era (at least), then it's good enough for any of us I suppose. I still like lower gears when needed though, so maybe not...
08-13-20, 03:44 AM
#10
Senior Member
Thread Starter
Join Date: Jul 2020
Location: Humboldt County, CA
Posts: 832
Mentioned: 7 Post(s)
Tagged: 0 Thread(s)
Quoted: 405 Post(s)
Likes: 0
Liked 430 Times
in
286 Posts
Added a DIY saddlebag
So, last night I was going through some stuff in my room, and I pulled out my camera bag and then thought, "Hmmmm... I wonder if I can turn this into a handlebar bag?"
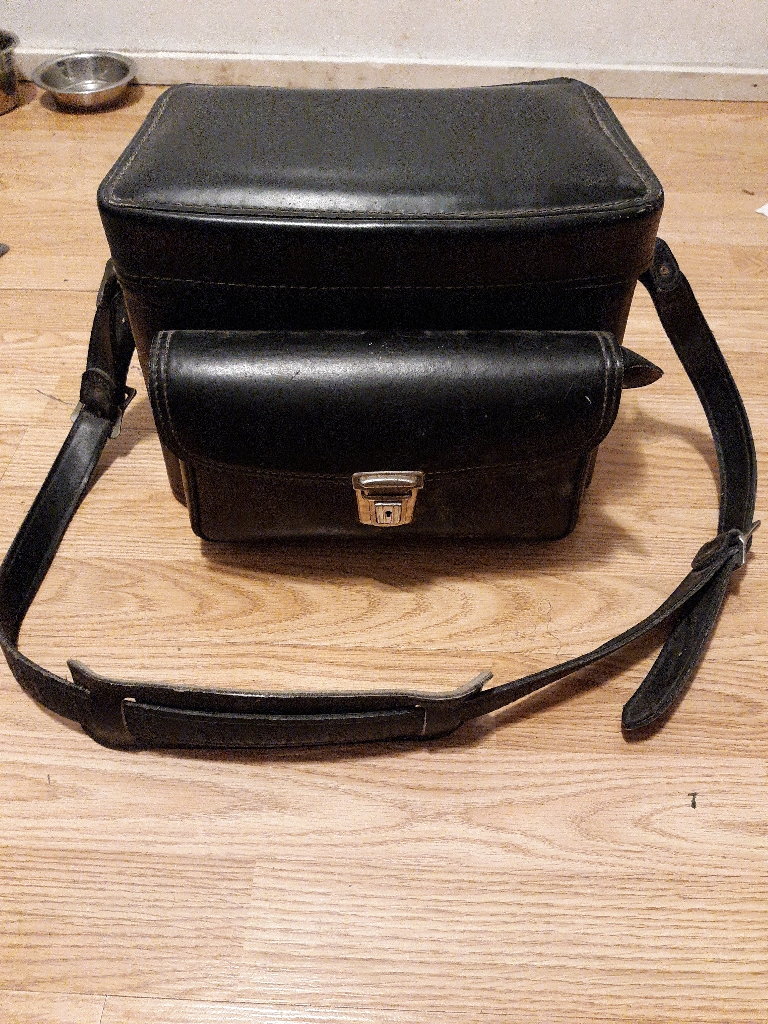
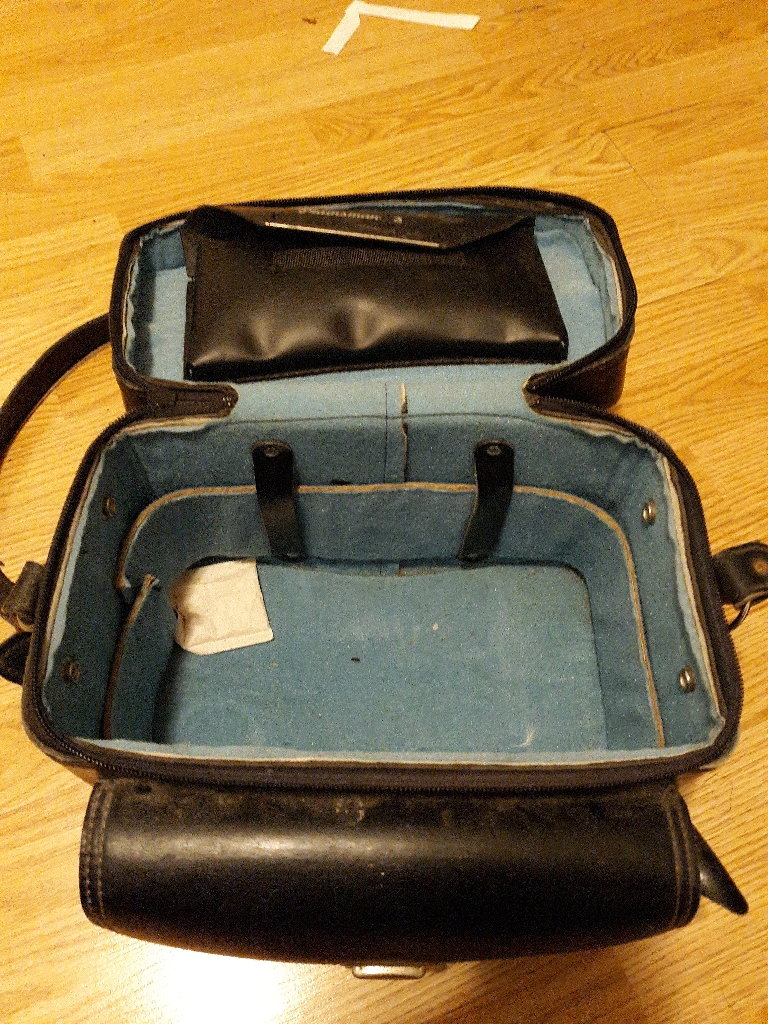
An old, made in 'Murica by 'Muricans, thick leather camera bag. Very stiff leather, would fit very well and look sweet!
A couple of hours of internetting and a post to the BF Touring forum later, and I figure out that
1) Yes, I can totally convert this to a quick-release handlebar bar bag.
2) It will cost 60 bucks that I don't have right now.
I then go grab some much-needed shut-eye.
This afternoon, it occurs to me that maybe I can mount the bag to the saddle and the rear rack. Then it occurs to me that the shoulder strap is a three-piece affair, with two permanently attached side straps and a longer center section. If I remove the center piece, the two side straps might go around the seatpost and buckle together. This turns out to be true. So, 20 minutes, two nylon MTB toe straps, and some fiddling later, I rig this up:
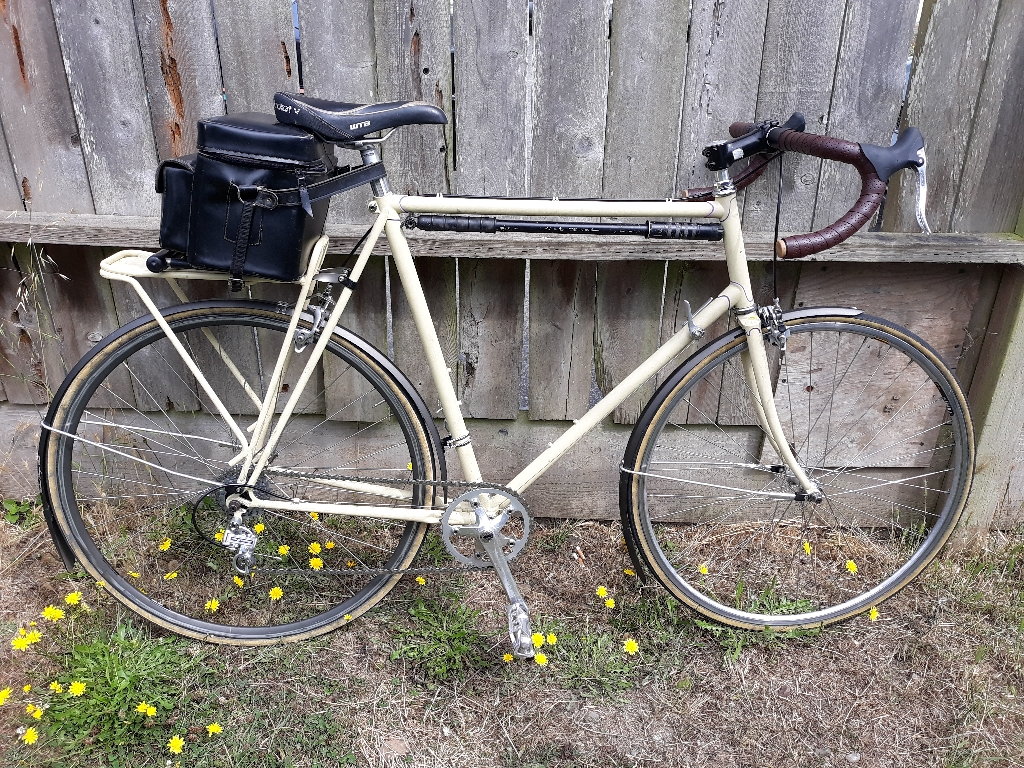
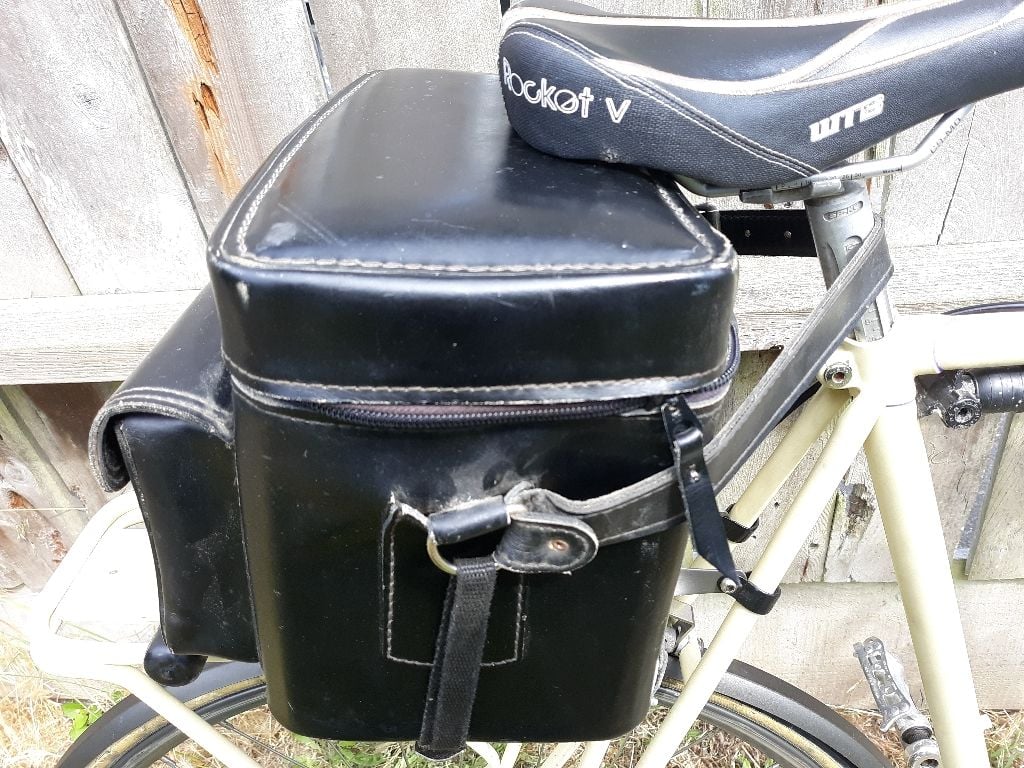
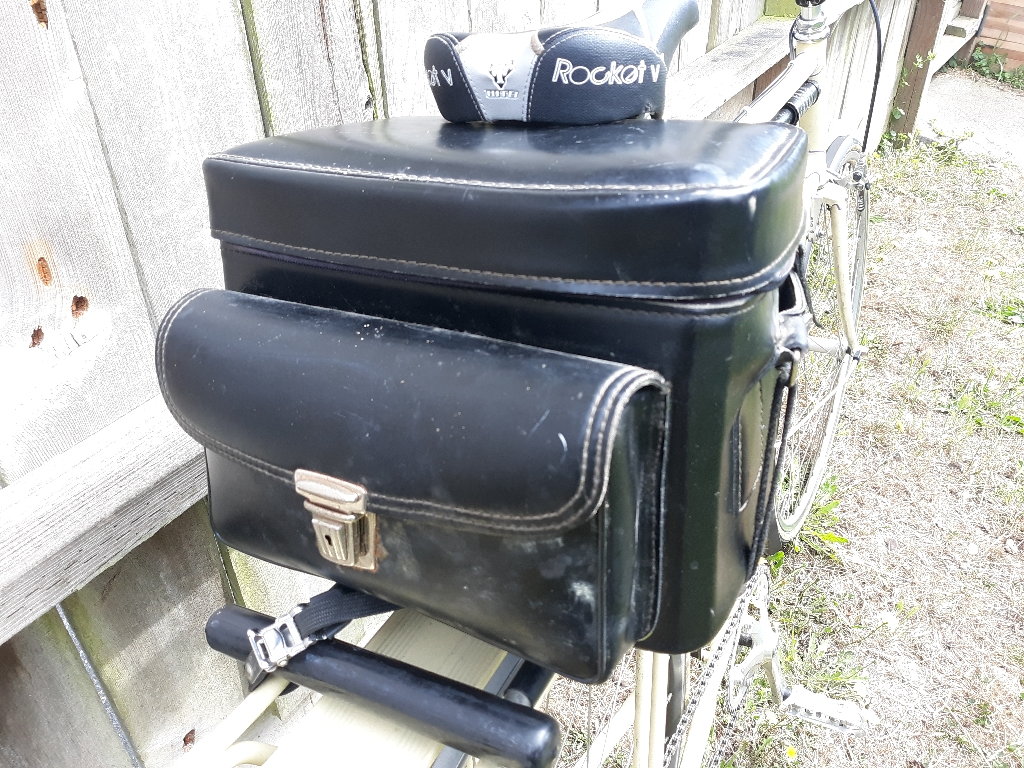
A quick ride around the neighborhood validates the concept. The 7-mile ride to the Eureka Bike Kitchen for my volunteer wrenching shift reveals zero shifts, wobbles, or shakes. The backs of my legs do brush the bag, but so lightly that, unless I'm consciously paying attention to it, I don't notice it. And when I do notice it, I don't care. The only downside is that, because the bag is right up under the saddle, the lid doesn't open all the way. This is more noticeable while sitting on the bike. I was able to extract a bottle of water from it while waiting for a long red light, and get it back in before the light changed, but it was a bit of an effort. That said, it's a minor complaint that can be solved with a bit of fiddling.
Overall, I'm pretty stoked.
--Shannon
An old, made in 'Murica by 'Muricans, thick leather camera bag. Very stiff leather, would fit very well and look sweet!
A couple of hours of internetting and a post to the BF Touring forum later, and I figure out that
1) Yes, I can totally convert this to a quick-release handlebar bar bag.
2) It will cost 60 bucks that I don't have right now.
I then go grab some much-needed shut-eye.
This afternoon, it occurs to me that maybe I can mount the bag to the saddle and the rear rack. Then it occurs to me that the shoulder strap is a three-piece affair, with two permanently attached side straps and a longer center section. If I remove the center piece, the two side straps might go around the seatpost and buckle together. This turns out to be true. So, 20 minutes, two nylon MTB toe straps, and some fiddling later, I rig this up:
A quick ride around the neighborhood validates the concept. The 7-mile ride to the Eureka Bike Kitchen for my volunteer wrenching shift reveals zero shifts, wobbles, or shakes. The backs of my legs do brush the bag, but so lightly that, unless I'm consciously paying attention to it, I don't notice it. And when I do notice it, I don't care. The only downside is that, because the bag is right up under the saddle, the lid doesn't open all the way. This is more noticeable while sitting on the bike. I was able to extract a bottle of water from it while waiting for a long red light, and get it back in before the light changed, but it was a bit of an effort. That said, it's a minor complaint that can be solved with a bit of fiddling.
Overall, I'm pretty stoked.
--Shannon
08-14-20, 05:58 PM
#11
Senior Member
Thread Starter
Join Date: Jul 2020
Location: Humboldt County, CA
Posts: 832
Mentioned: 7 Post(s)
Tagged: 0 Thread(s)
Quoted: 405 Post(s)
Likes: 0
Liked 430 Times
in
286 Posts
New bag
So, yesterday was my birthday, and we celebrated it at my Mom's house in Eureka. Self, daughter, Mom, stepdad. Carnitas tacos and tres leches cake. Also margaritas. Was talking with stepdad about bikes. He just got a Trek e-bike, to replace the full-suspension rig he'd had for several years and never off-roaded. I showed him the pix of the camera-bag-as-saddlebag rig, and it turned out that he had a Topeak rack trunk with zip-out mini panniers from his old bike. He asked me if I wanted it. I, of course, said yes.
Here it is:
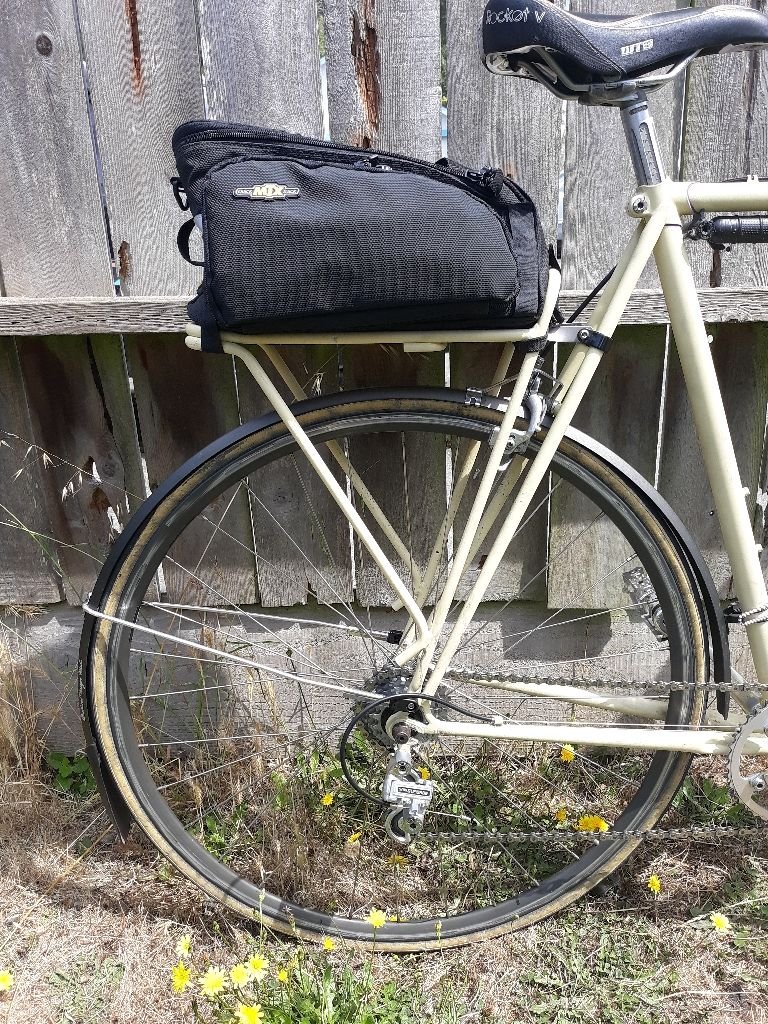

It's the velcro mount, so doesn't require the Topeak rack. I added a toe strap around the front to reduce wiggles. Looks to be a good setup for commuting and trips to the store. (Big shopping happens in Daughter's car.)
Oh, and the pump and bottle cage came from the Eureka Bike Kitchen where I volunteer. Ugly, I know... but free! (Also, the Zefal HpX , aka The Houndpounder Xtreme, is the only pump that doesn't suck. The spring lockout is one of those things that, once you use it, anything that lacks it is fundamentally broken.)
--Shannon
Here it is:
It's the velcro mount, so doesn't require the Topeak rack. I added a toe strap around the front to reduce wiggles. Looks to be a good setup for commuting and trips to the store. (Big shopping happens in Daughter's car.)
Oh, and the pump and bottle cage came from the Eureka Bike Kitchen where I volunteer. Ugly, I know... but free! (Also, the Zefal HpX , aka The Houndpounder Xtreme, is the only pump that doesn't suck. The spring lockout is one of those things that, once you use it, anything that lacks it is fundamentally broken.)
--Shannon
08-15-20, 07:06 AM
#12
Senior Member
Join Date: Nov 2005
Location: NW Ohio
Posts: 3,408
Bikes: 1984 Miyata 310, 1986 Schwinn Sierra, 2011 Jamis Quest, 1980 Peugeot TH8 Tandem, 1992 Performance Parabola, 1987 Ross Mt. Hood, 1988 Schwinn LeTour, 1988 Trek 400T, 1981 Fuji S12-S LTD, 197? FW Evans
Mentioned: 24 Post(s)
Tagged: 0 Thread(s)
Quoted: 523 Post(s)
Liked 968 Times
in
507 Posts
Oh, and the pump and bottle cage came from the Eureka Bike Kitchen where I volunteer. Ugly, I know... but free! (Also, the Zefal HpX , aka The Houndpounder Xtreme, is the only pump that doesn't suck. The spring lockout is one of those things that, once you use it, anything that lacks it is fundamentally broken.)
--Shannon
--Shannon
08-16-20, 07:42 AM
#13
Photographer
Join Date: May 2006
Location: The other Cape, Cape Ann
Posts: 3,116
Mentioned: 27 Post(s)
Tagged: 0 Thread(s)
Quoted: 105 Post(s)
Liked 98 Times
in
53 Posts
Scott, do you happen to know which head badge would be correct? There were a bunch of 'em over the years.
Since it's never going to be original-looking, I might just use my favorite so far, the "feather" badge.
Is there a collection of Fuji head badges somewhere on the web?
Also, thanks for sharing all of your Fuji-fu with us. Your site and the threads here have been invaluable to me.
--Shannon
Since it's never going to be original-looking, I might just use my favorite so far, the "feather" badge.
Is there a collection of Fuji head badges somewhere on the web?
Also, thanks for sharing all of your Fuji-fu with us. Your site and the threads here have been invaluable to me.
--Shannon
"Fuji-fu". hahaha that cracks me up. Glad my blogs help.
Scott
__________________
ClassicFuji.posthaven.com.archive
IG @scottryder.surf.cycle
IG @scottryder.fine.art
ClassicFuji.posthaven.com.archive
IG @scottryder.surf.cycle
IG @scottryder.fine.art
08-08-21, 11:15 PM
#14
Senior Member
Thread Starter
Join Date: Jul 2020
Location: Humboldt County, CA
Posts: 832
Mentioned: 7 Post(s)
Tagged: 0 Thread(s)
Quoted: 405 Post(s)
Likes: 0
Liked 430 Times
in
286 Posts
Firing The Build Back Up, A Year Later
I started this thread, exactly one year ago, to track the build of my 1985 League Fuji.
I would not have thought back then that it would be a year later that the drivetrain would finally be complete, but, as the Greeks knew all too well, if you want to make the Gods laugh, tell Them your plans.
The first thing that happened to my plans was that the Bike Kitchen closed down due to COVID in October of last year, and didn't open back up until the end of June. So I had no source of parts, and nowhere to work on the bike.
The second thing that happened to my plans was that I didn't go back to work until this past June, having been laid off in March of 2020 when the first shutdown happened. No work equals no money equals no bike parts.
Then, in June, everything changed. I got a new job as the maintenance man at a nursing home two miles from my house. And a week after I started, the Bike Kitchen re-opened and I started wrenching again. With disposable income and a place to work on the bike and access to parts bins, it was time to start building again. And since I've started building again, it's time to reanimate the Sorta Build Thread.
--Shannon
08-08-21, 11:41 PM
#15
Senior Member
Thread Starter
Join Date: Jul 2020
Location: Humboldt County, CA
Posts: 832
Mentioned: 7 Post(s)
Tagged: 0 Thread(s)
Quoted: 405 Post(s)
Likes: 0
Liked 430 Times
in
286 Posts
Phase 2: The Rest of the Drivetrain
Phase 1 of the sorta-build was the conversion from singlespeed to multi. As described in excessive, and excessively self-revalatory, detail in the beginning of the thread, this involved a Matrix Iso-C / 600EX rear wheel, chain, and shift cable from the Bike Kitchen; a Suntour Pro-Compe 14-26 freewheel and Superbe rear derailleur form my parts box; and the Suntour LaPree shift levers that the previous owner had thoughtfully left on the bike when she singlespeeded it.
The bike then stayed in that configuration for a year.
Once I went back to work and the Kitchen re-opened, I finally started working on it again. And as I did so, The Plan began to change. The Plan had been to do a 45/42 half-step on the 110 BCD Sugino RT double crank, with an option to go to a 45/33 1.5-step for hilly rides. Then I thought, "why not all three?", and played around with the idea of using long chainring bolts to make an all-110 45/42/33 triple. Then I came to my senses and thought, "if you're gonna do a triple, do a triple."
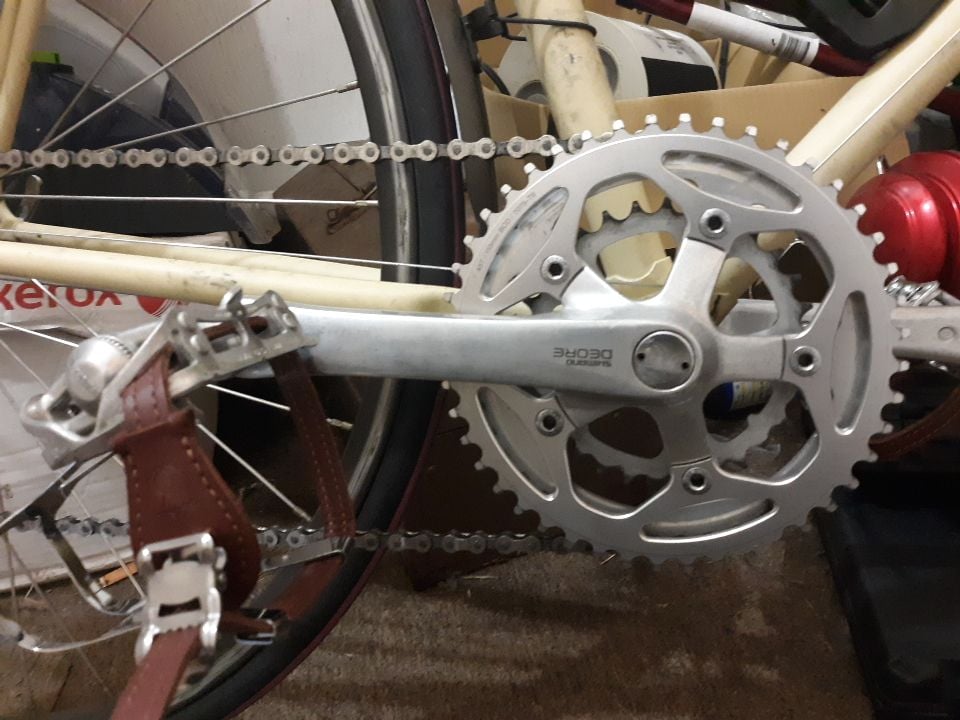
So, three weeks ago, I embarked upon Phase 2 of the sorta-build. The Internet, combined with my new paychecks, yielded a 110 BCD x 45T Dimension chainring, Soma Double-Gate toe clips, and Velo Orange toe straps. The box-o'-cranksets at the Kitchen yielded a 170 mm Deore MT-60 in nice shape. With the chainring I'd just bought, the 42T that I already had, and a 30T from the box-o'-chainrings, I had myself a crankset:
What followed the very easy crank and bottom bracket swap was a two-hour cage match between me and every road double front derailleur in the shop.
I lost.
--Shannon
The bike then stayed in that configuration for a year.
Once I went back to work and the Kitchen re-opened, I finally started working on it again. And as I did so, The Plan began to change. The Plan had been to do a 45/42 half-step on the 110 BCD Sugino RT double crank, with an option to go to a 45/33 1.5-step for hilly rides. Then I thought, "why not all three?", and played around with the idea of using long chainring bolts to make an all-110 45/42/33 triple. Then I came to my senses and thought, "if you're gonna do a triple, do a triple."
So, three weeks ago, I embarked upon Phase 2 of the sorta-build. The Internet, combined with my new paychecks, yielded a 110 BCD x 45T Dimension chainring, Soma Double-Gate toe clips, and Velo Orange toe straps. The box-o'-cranksets at the Kitchen yielded a 170 mm Deore MT-60 in nice shape. With the chainring I'd just bought, the 42T that I already had, and a 30T from the box-o'-chainrings, I had myself a crankset:
What followed the very easy crank and bottom bracket swap was a two-hour cage match between me and every road double front derailleur in the shop.
I lost.
--Shannon
Last edited by ShannonM; 08-09-21 at 12:02 AM.
08-09-21, 12:01 AM
#16
Senior Member
Thread Starter
Join Date: Jul 2020
Location: Humboldt County, CA
Posts: 832
Mentioned: 7 Post(s)
Tagged: 0 Thread(s)
Quoted: 405 Post(s)
Likes: 0
Liked 430 Times
in
286 Posts
Phase 2, Round 2
When we went to commercial, I had just lost a bare-knuckled brawl with a box full of front derailleurs. Most of them knocked me flat with the first punch... wrong clamp size, missing adjustment screws, etc. One of them was a top-pull 105 double, which I didn't figure out until I tried to route the cable. The closest I came to victory was with the first one I tried, a Suntour AR. That one almost worked. It just wouldn't swing out quite far enough to make the shift to the 45. I admitted defeat, and rode off into the sunset on the same gearing I'd started with, 42 x 14-26. Only now I had two extra chainrings.
I rode it that way for a week. On the plus side of the ledger, the Soma toe clips and Velo Orange straps were a huge win, even though the MKS Urban Platform pedals I ordered on the Kitchen's JBI account haven't come in yet, so I'm still on the Sylvan quills.
The wonderful people here on the C&V came up with a solution to my front derailleur quandry: use a 118 mm bottom bracket instead of the 122.5 that Shimano spec'd for the MT-60 crank. So, today, I went back into the Kitchen, fired up the stove, and tried the new recipe.
118 mm UN-55? Check.
30T ring clears the chainstay? Check.
Suntour AR front derailleur? Check.
Put derailleur on bike. Set height and angle of derailleur. Install and tension cable. Adjust limit screws. Run though the gears. They all work!
We've got ourselves a drivetrain, folks. 45/42/30 x 14-16-18-20-23-26:
--Shannon
Likes For ShannonM:
08-10-21, 11:52 PM
#17
Senior Member
Thread Starter
Join Date: Jul 2020
Location: Humboldt County, CA
Posts: 832
Mentioned: 7 Post(s)
Tagged: 0 Thread(s)
Quoted: 405 Post(s)
Likes: 0
Liked 430 Times
in
286 Posts
I've now got a couple of commute days on the new drivetrain.
I like-a da gearing.
The 45x14 top is high enough that I still have resistance at the pedal when descending the 1/2 mile 8% hill from work. If I hammer the top, I almost spin out by the bottom, but I can still pedal across the 1/4 mile flat to the stop sign. Fun times.
I had no trouble climbing the hill to work in the 42x26 low gear before. But it was better to stand for the steepest pitch, which is right before the turn into the parking lot. Always made the sweat flow hardest right before I got to work. (Where I have to take my temperature, as I work in a nursing home.) Now, with the 30, I can do the whole thing sitting in the 30x20 and still have two gears in reserve.
There's a 1-1/2 mile stretch of Highway 101 between my house and the road to work. Since it's right next to Humboldt Bay, the wind is always dead off the ocean, so there's always a quartering headwind no matter which direction you're going. This is where the half-step pays the bills. Before, it was often the case that the 42x18 wasn't enough gear and the 42x16 was a bit too high. (Or the 20 and the 18... depends on the wind, and on whether I stopped at the store on the way home, and on what kind of day I had.) Now, a quick front upshift usually lands me right where I want to be.
Early days yet, but I'm liking it a lot so far. Some tweaking is still to be done.
I think I want to shorten the front shift cable a bit. I set it up with the lever fully forward when the front derailleur is on the low limit. This makes for a long throw to the 45, which is interesting, since the problem I had before was that it would barely reach it at all. I think that if I set the tension so that the lever sits just a bit above the downtube on the granny, I'll get a quicker shift to the big ring.
I may try taking a link out of the chain. I just reused the chain from when it was a 1x6, which I'd left a bit long because I knew it wasn't going to stay a 1x but I wasn't sure what I'd end up doing. As it sits, the derailleur cage is just short of perpendicular in the 45x14 top gear, and it feels like there's more than enough play in the 45x26. Which I'm probably more likely to shift into on this bike than any other road bike I've had because of the small big ring. (And even if I "knew" I'd never do it, I'd still leave enough chain to let everything turn in that gear, because a locked drivetrain at speed really, really sucks.) Still, if I'm right and the chain's a link too long, shorter chains shift better and faster than longer ones.
--Shannon
08-14-22, 06:28 PM
#18
Senior Member
Thread Starter
Join Date: Jul 2020
Location: Humboldt County, CA
Posts: 832
Mentioned: 7 Post(s)
Tagged: 0 Thread(s)
Quoted: 405 Post(s)
Likes: 0
Liked 430 Times
in
286 Posts
Another year, another birthday, another post
So, a year has gone under the wheels, and another birthday has arrived, and with birthdays come presents.
In this case, an Antique Brown B.17. (Thanks, mom!)
Off comes the 130mm WTB Rocket V.
On goes the Brooks.

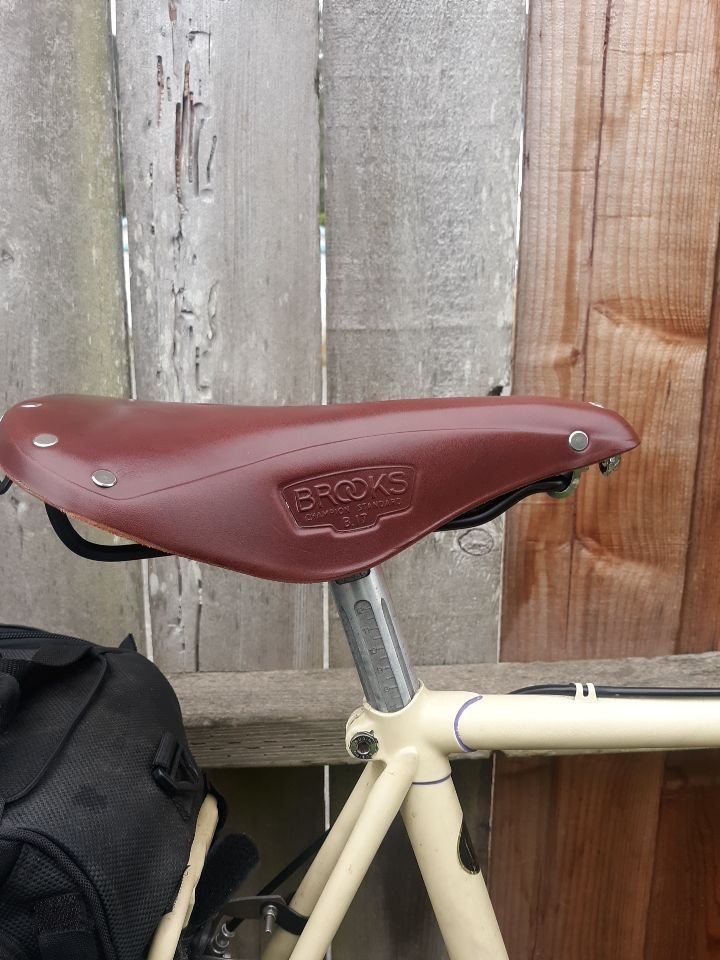
Off I go for a ~1-hour test ride. A couple of position tweaks at the side of the road, and Bob's yer uncle. Even brandy-new outta-da-box, the Brooks, the bike, and the butt are gettin' along just fine.
--Shannon
In this case, an Antique Brown B.17. (Thanks, mom!)
Off comes the 130mm WTB Rocket V.
On goes the Brooks.
Off I go for a ~1-hour test ride. A couple of position tweaks at the side of the road, and Bob's yer uncle. Even brandy-new outta-da-box, the Brooks, the bike, and the butt are gettin' along just fine.
--Shannon
12-26-22, 05:06 PM
#19
Senior Member
Thread Starter
Join Date: Jul 2020
Location: Humboldt County, CA
Posts: 832
Mentioned: 7 Post(s)
Tagged: 0 Thread(s)
Quoted: 405 Post(s)
Likes: 0
Liked 430 Times
in
286 Posts
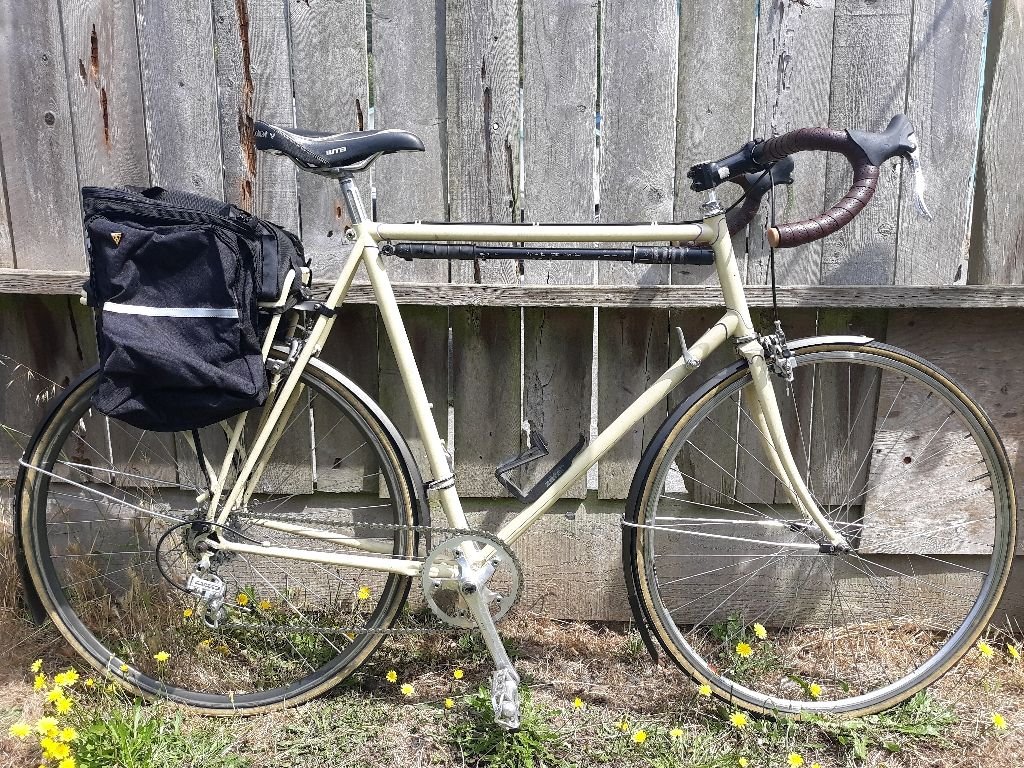
New Bag Day! (AKA "Christmas")
Comes Christmas, comes Carradice! (Thanks, Mom!)
A Lowsaddle Longflap. Green. Made by Jolita.
Somebody, either at Carradice or Perennial Cycles, forgot to put the straps in the bag, so I dug in the parts box and found a couple of old nylon toe straps. Combined with the cut-down one I'd been using to stabilize the Topeak rack trunk, I had three, so I went ahead and mounted it up.


Correct straps will be forthcoming.
It looks the business, and the bike feels noticeably lighter without the Blackburn rack. Time will tell if I'll need to add support, but it fits pretty tight, even with the wrong straps, so I'm hopeful.
--Shannon
A Lowsaddle Longflap. Green. Made by Jolita.
Somebody, either at Carradice or Perennial Cycles, forgot to put the straps in the bag, so I dug in the parts box and found a couple of old nylon toe straps. Combined with the cut-down one I'd been using to stabilize the Topeak rack trunk, I had three, so I went ahead and mounted it up.
Correct straps will be forthcoming.
It looks the business, and the bike feels noticeably lighter without the Blackburn rack. Time will tell if I'll need to add support, but it fits pretty tight, even with the wrong straps, so I'm hopeful.
--Shannon
Last edited by ShannonM; 12-26-22 at 05:38 PM.


