


How to save this Raleigh A4 frame?
 07-11-23, 03:12 PM
#26
Newbie
Thread Starter

I hope this time everything will be safe, now it's about my son't life.
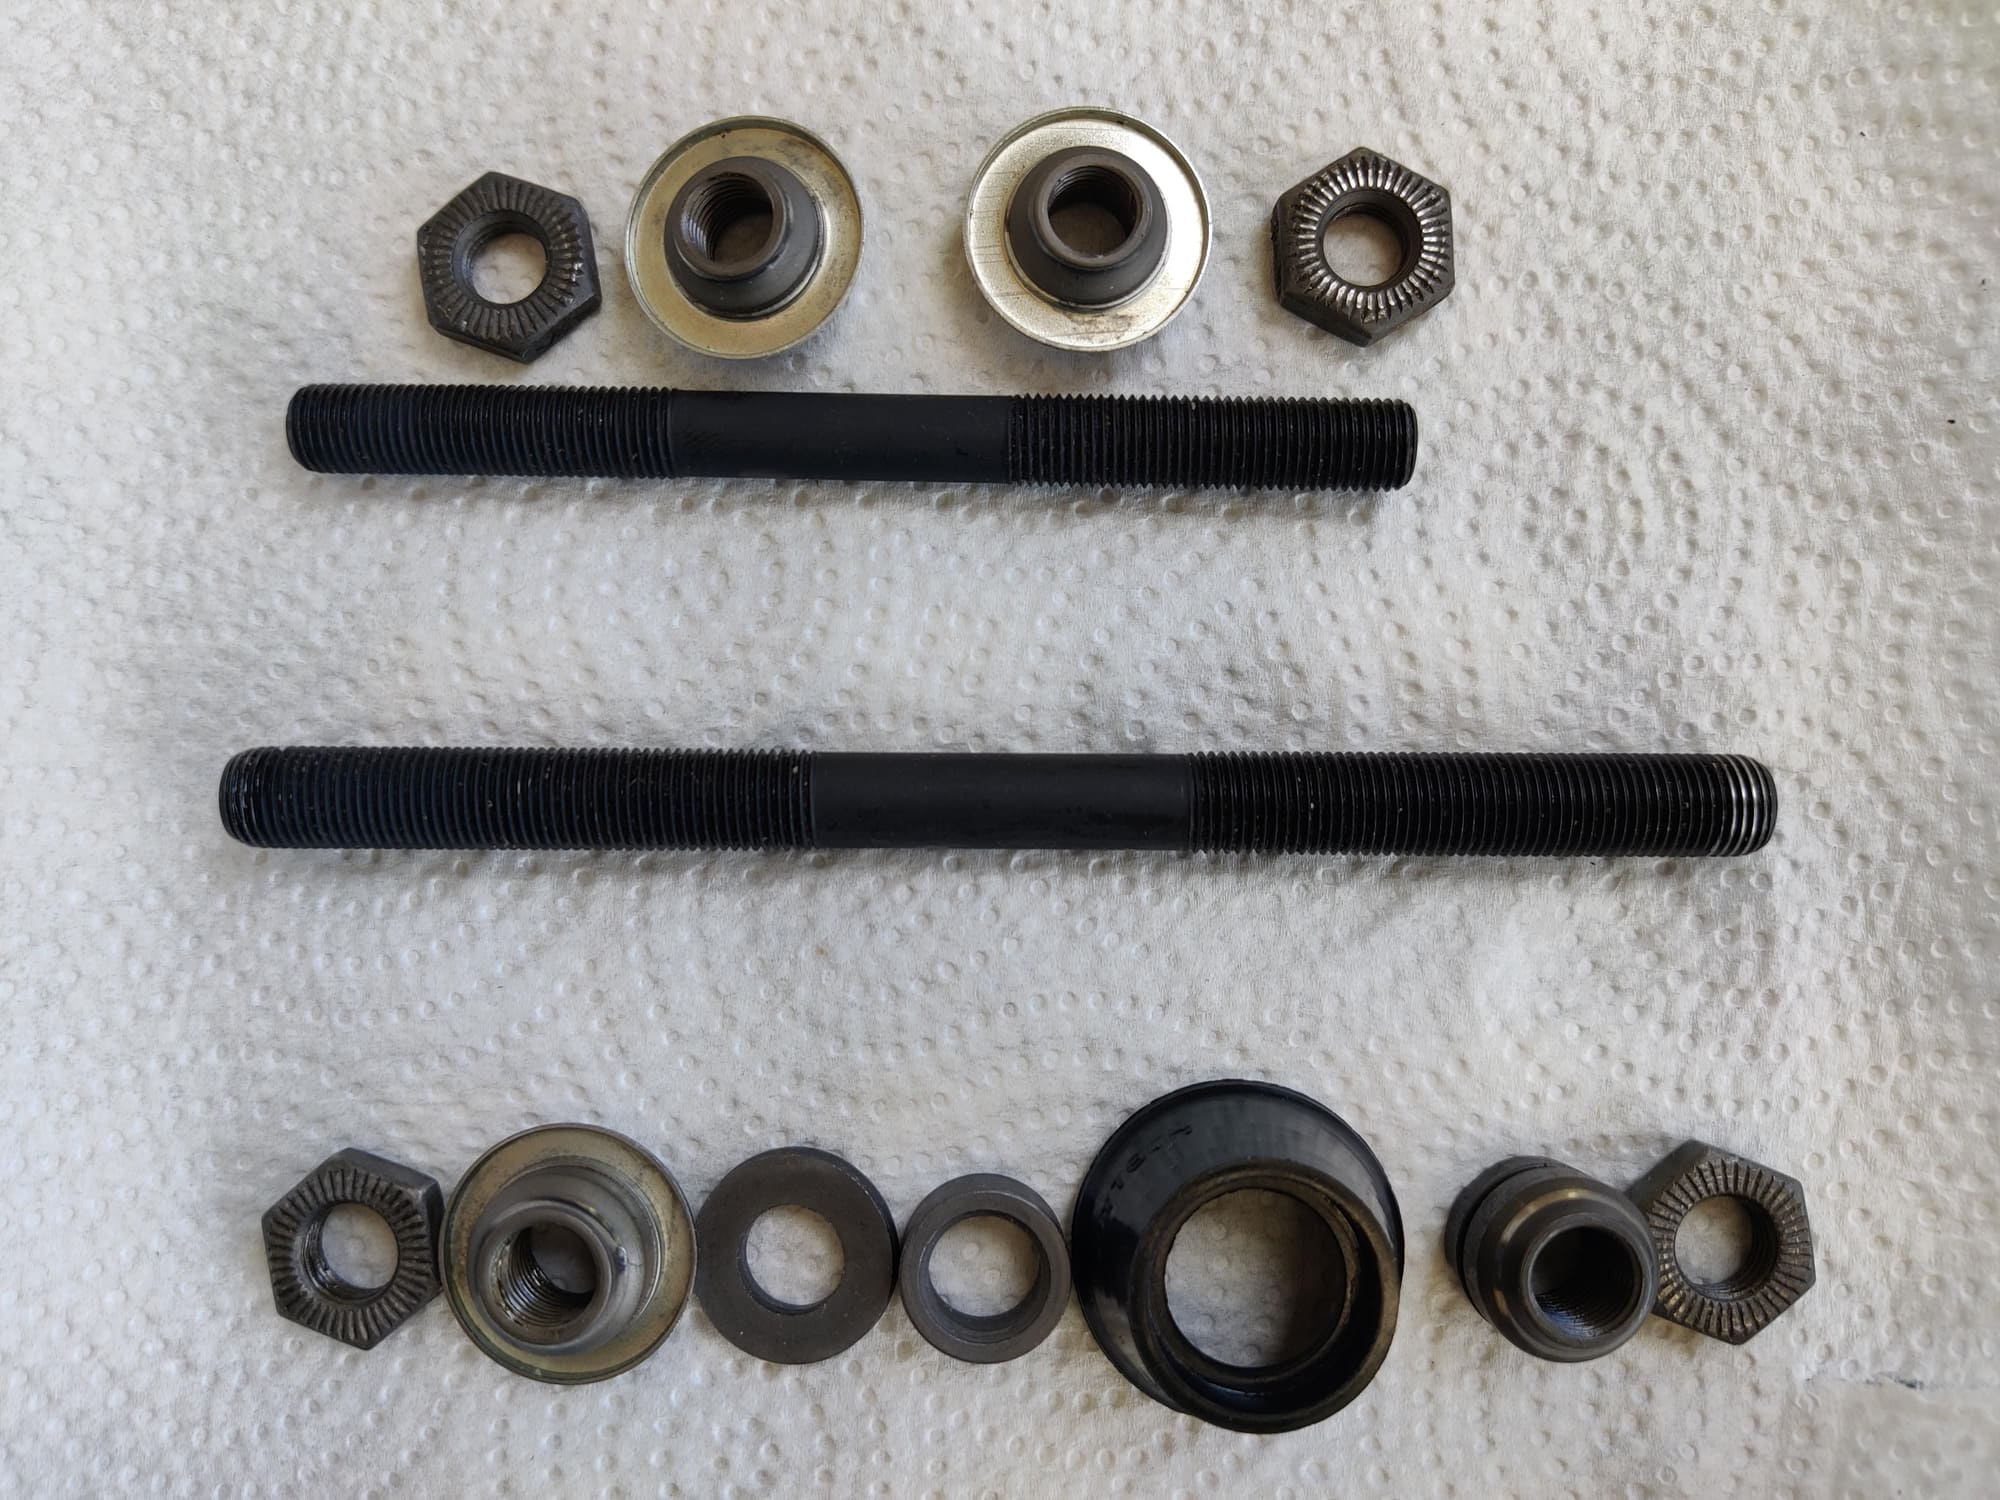
Though I have to admit that today I sweat a bit when I was putting everything together (hubs, and the headset/fork) because I didn't take pictures when I disassembled them to know exactly what goes where and which direction. But I'm pretty confident I assembled it as it was, 'cause there's almost no other way. (I hope this is not a famous last sentence


Likes For flocsy:
07-11-23, 03:37 PM
#27
Senior Member

Join Date: Jul 2015
Location: NW Oregon
Posts: 2,975
Bikes: !982 Trek 930R Custom, Diamondback ascent with SERIOUS updates, Fuji Team Pro CF and a '09 Comencal Meta 5.5
Mentioned: 15 Post(s)
Tagged: 1 Thread(s)
Quoted: 1299 Post(s)
Liked 739 Times
in
534 Posts
I remembered from youtube videos how to play with the tightening, then trying it again and again. Today I assembled both hubs (used the same parts). I'll make sure tomorrow to loosen them ever so slightly before I give it to my son to test ride.
Replacement? What makes you think that? I didn't even think that's a possibility. I got the bike form a colleague who used it when he was a teenager, and the last years it spent stored at his parent's place. I thought everything was original. Not that it matters for me. I don't think the threads are loose, but I'm not 100% sure which threads you mean When I put the cones on the axle and turn it until it gets to it's place (touches the bearings)? After the cleaning I could do that with bare hands, but I thought that's the normal case, I wouldn't say it's loose.
Replacement? What makes you think that? I didn't even think that's a possibility. I got the bike form a colleague who used it when he was a teenager, and the last years it spent stored at his parent's place. I thought everything was original. Not that it matters for me. I don't think the threads are loose, but I'm not 100% sure which threads you mean
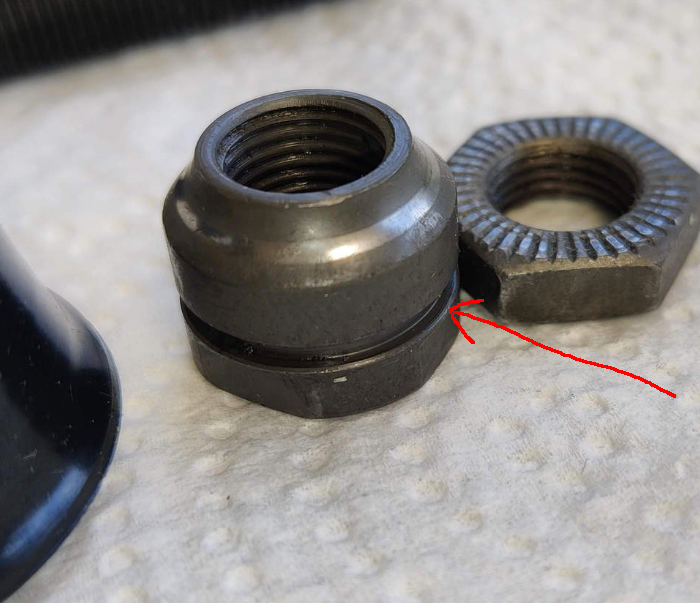
When I put the cones on the axle and turn it until it gets to it's place (touches the bearings)? After the cleaning I could do that with bare hands, but I thought that's the normal case, I wouldn't say it's loose.Notice that the rear cones are gray finish? and the front ones are Black Oxide finish? also, the Dust covers("seals") on the front cones are shiny silver....this leads me to conclude that they have been replaced at some point in the bike's life... at least they aren't rusty and ugly.. most of the old bikes i work on are rusty and old looking.. i live in a Rain Forest.
earlier, someone said that the rear hub is almost sure to be a Shimano hub.. the Cone with the groove is a Shimano cone.. A plastic ring used to be in that groove.. they get broke when people try to remove them, or they just break on their own.. They get Brittle from age and sunlight. At one point i had a bunch of o-rings that fit in the groove and didn't cause drag on the hub... visit an auto parts store or well stocked hardware store to see if they might have an o-ring that will fit....it needs to be small enough, WHEN INSTALLED ON THE CONE, in Outside diameter, to not drag on the dust cover in the freehub....
07-11-23, 04:27 PM
#28
Newbie
Thread Starter
I already assembled the bike so I can't take a picture now, but on this picture that was taken before I cleaned everything you can see a plastic "ring" but it's more like the rings of Saturn: it's flat. Like a plate with a huge hole in the middle. It is attached (or so it seems) to the freehub and it is positioned exactly outside of the cone and above the groove:
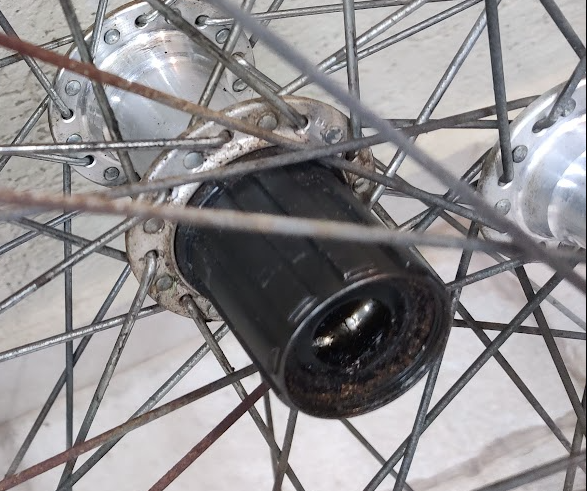
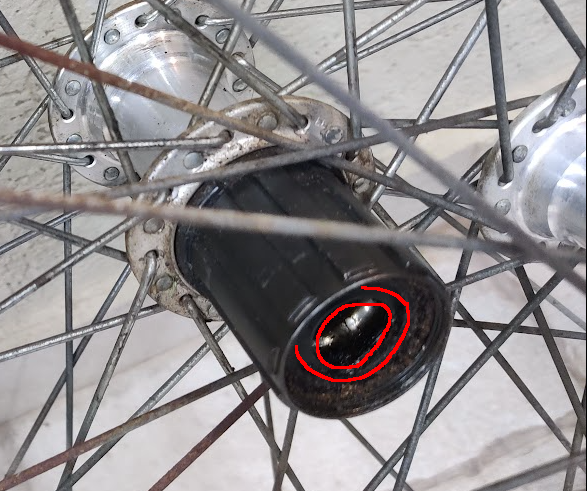
And this is the groove that I think is positioned exactly where the "ring" is:
And this is the groove that I think is positioned exactly where the "ring" is:
07-11-23, 06:42 PM
#29
Senior Member
Join Date: Jul 2015
Location: NW Oregon
Posts: 2,975
Bikes: !982 Trek 930R Custom, Diamondback ascent with SERIOUS updates, Fuji Team Pro CF and a '09 Comencal Meta 5.5
Mentioned: 15 Post(s)
Tagged: 1 Thread(s)
Quoted: 1299 Post(s)
Liked 739 Times
in
534 Posts
that's a pressed in Dust Cover.. Leave it in place.. they love to get bent up when you remove them and are not fun to straighten or re-install.
as long as you don't shoot water at your bikes, or leave them out in the weather, you should be fine without an o-ring or the stock seal in the groove of the axle cone.
maybe someone here knows of a source for those seal rings.
as long as you don't shoot water at your bikes, or leave them out in the weather, you should be fine without an o-ring or the stock seal in the groove of the axle cone.
maybe someone here knows of a source for those seal rings.
07-11-23, 07:02 PM
#30
Senior Member
Join Date: Sep 2004
Location: Chicago area
Posts: 2,556
Bikes: Airborne "Carpe Diem", Motobecane "Mirage", Trek 6000, Strida 2, Dahon "Helios XL", Dahon "Mu XL", Tern "Verge S11i"
Mentioned: 23 Post(s)
Tagged: 0 Thread(s)
Quoted: 981 Post(s)
Liked 584 Times
in
401 Posts

 08-07-23, 12:57 AM
#32
Newbie
Thread Starter
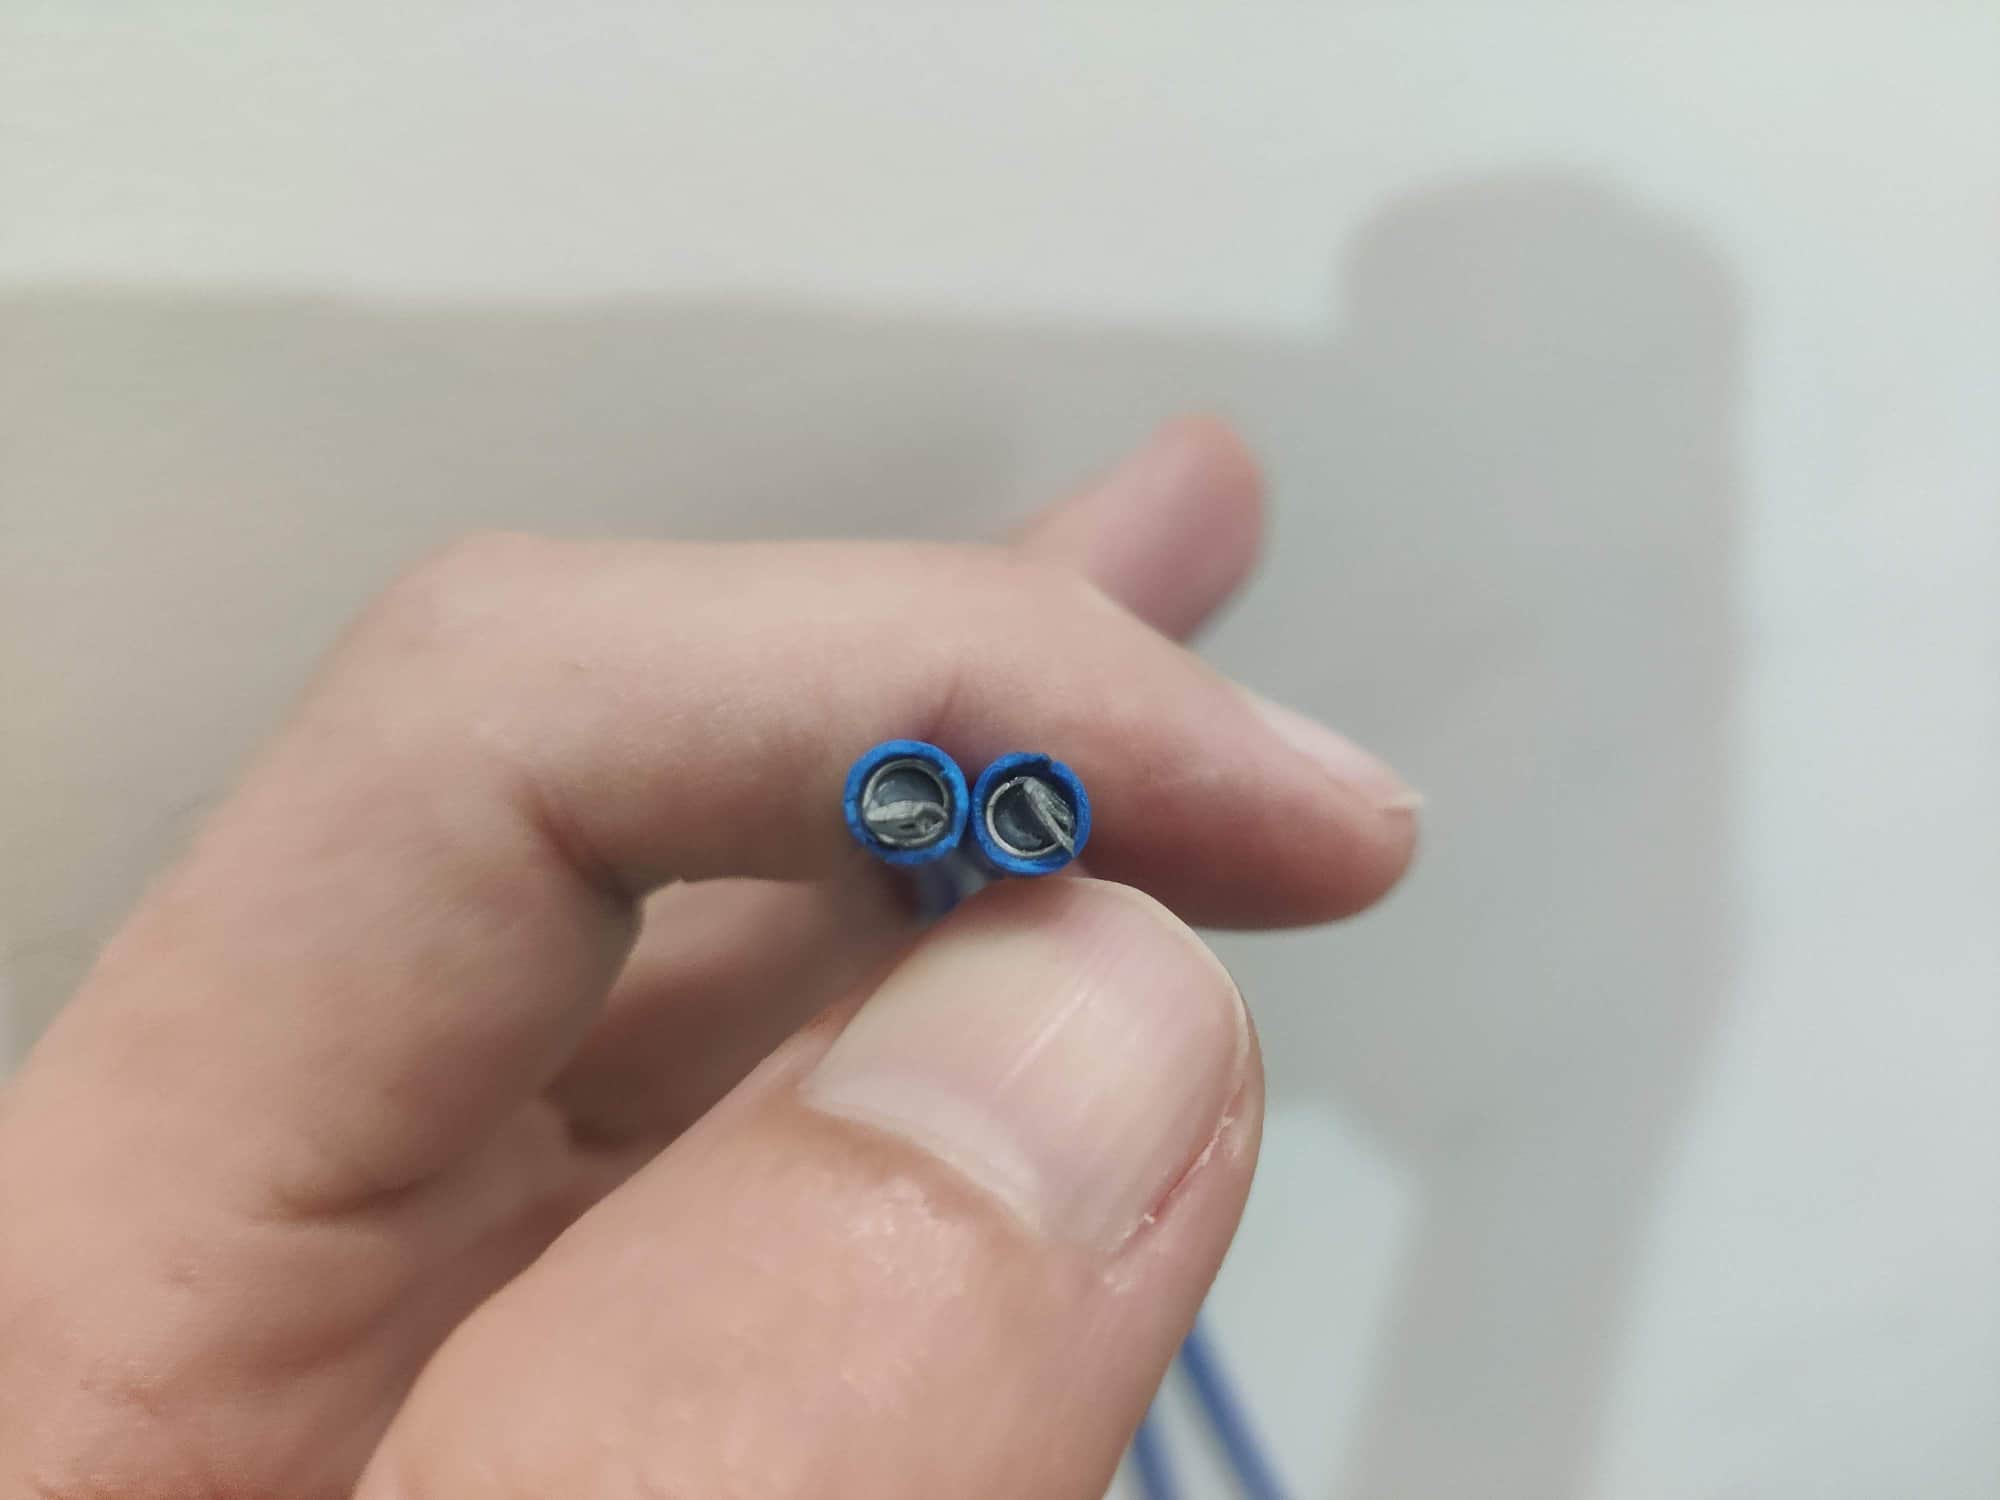
How can I open these cut brake cable housing? I used the same cutter (that came with the cable set) that worked perfectly for the shifter cables, but the brake cable housing seems to have some additional layer that looks like an thick aluminium layer. I had no problems with the shifter cable, where I think there was only the spring that goes around the perimeter of the housing. I tried to push a small nail in (that I also used for the shifter cable to clean up around the cut and make it perfectly round) but it doesn't go in. Tried to open it with a utility knife, but couldn't even push it in a bit (didn't try harder 'cause I didn't want to cut myself to pieces). Tried to cut it again 1/4 inch shorter, rotated 90 degrees but the exact same results.
08-07-23, 02:37 AM
#33
Droid on a mission

Join Date: May 2018
Location: Palm Coast, FL
Posts: 1,005
Bikes: Diamondback Wildwood Classic
Mentioned: 4 Post(s)
Tagged: 0 Thread(s)
Quoted: 317 Post(s)
Liked 280 Times
in
195 Posts
I find running the end faces against a grinding wheel or a Dremel stone helps get rid of the metal burrs and then while it is still warm, stick a sharpened spoke end or any thin pick to round out the liner.
__________________
JoeTBM (The Bike Man) - I'm a black & white type of guy, the only gray in my life is the hair on my head
 www.TheBikeMenOfFlaglerCounty.com
JoeTBM (The Bike Man) - I'm a black & white type of guy, the only gray in my life is the hair on my head
www.TheBikeMenOfFlaglerCounty.com Last edited by JoeTBM; 08-14-23 at 03:36 AM.
08-18-23, 06:57 AM
#34
Newbie
Doesn’t Raleigh use bottom bracket with non-standard threads? Might need to replace bearings in the original BB. I’ve seen it done on You Tube.
08-18-23, 10:54 AM
#35
Senior Member
Honestly if you're interested in learning about bike restoration or simply would be entertained to do so, you certainly could oxalic bath it, but honestly mechanically it'll be just fine if you do nothing to treat the rust. It would need to be way, way worse than that to have any structural consequences. If you wanted it to be pretty, you could strip it down to the frame, sand the finish flat, and paint it. I wouldn't worry about preserving the decals--that bike isn't really collectable in any conventional sense.
08-20-23, 08:31 AM
#36
se�or miembro

Join Date: Dec 2018
Location: Pac NW
Posts: 6,629
Bikes: '70s - '80s Campagnolo
Mentioned: 92 Post(s)
Tagged: 0 Thread(s)
Quoted: 3891 Post(s)
Liked 6,491 Times
in
3,213 Posts
Likes For SurferRosa:
09-13-23, 02:06 PM
#37
Newbie
Thread Starter
I could finally buy the Shimano BB-UN300-E (which is not imported to Israel, so I had to find it abroad, and because I already wasted my money on one that almost fit (except the "E") I didn't want to waste more money, so I took the old one with me to Hungary and compared it there with the new (which is 1/2 mm longer, but other that that seems OK)) and today I built the bike.
The 2 remaining issues are:
1. Is it possible that the steerer should be hold in place only by the stem? It was that way when I bought it, but looking inside it now it seems that there might have been some screw (like in the new bikes) that goes into the steerer from above. See pics:
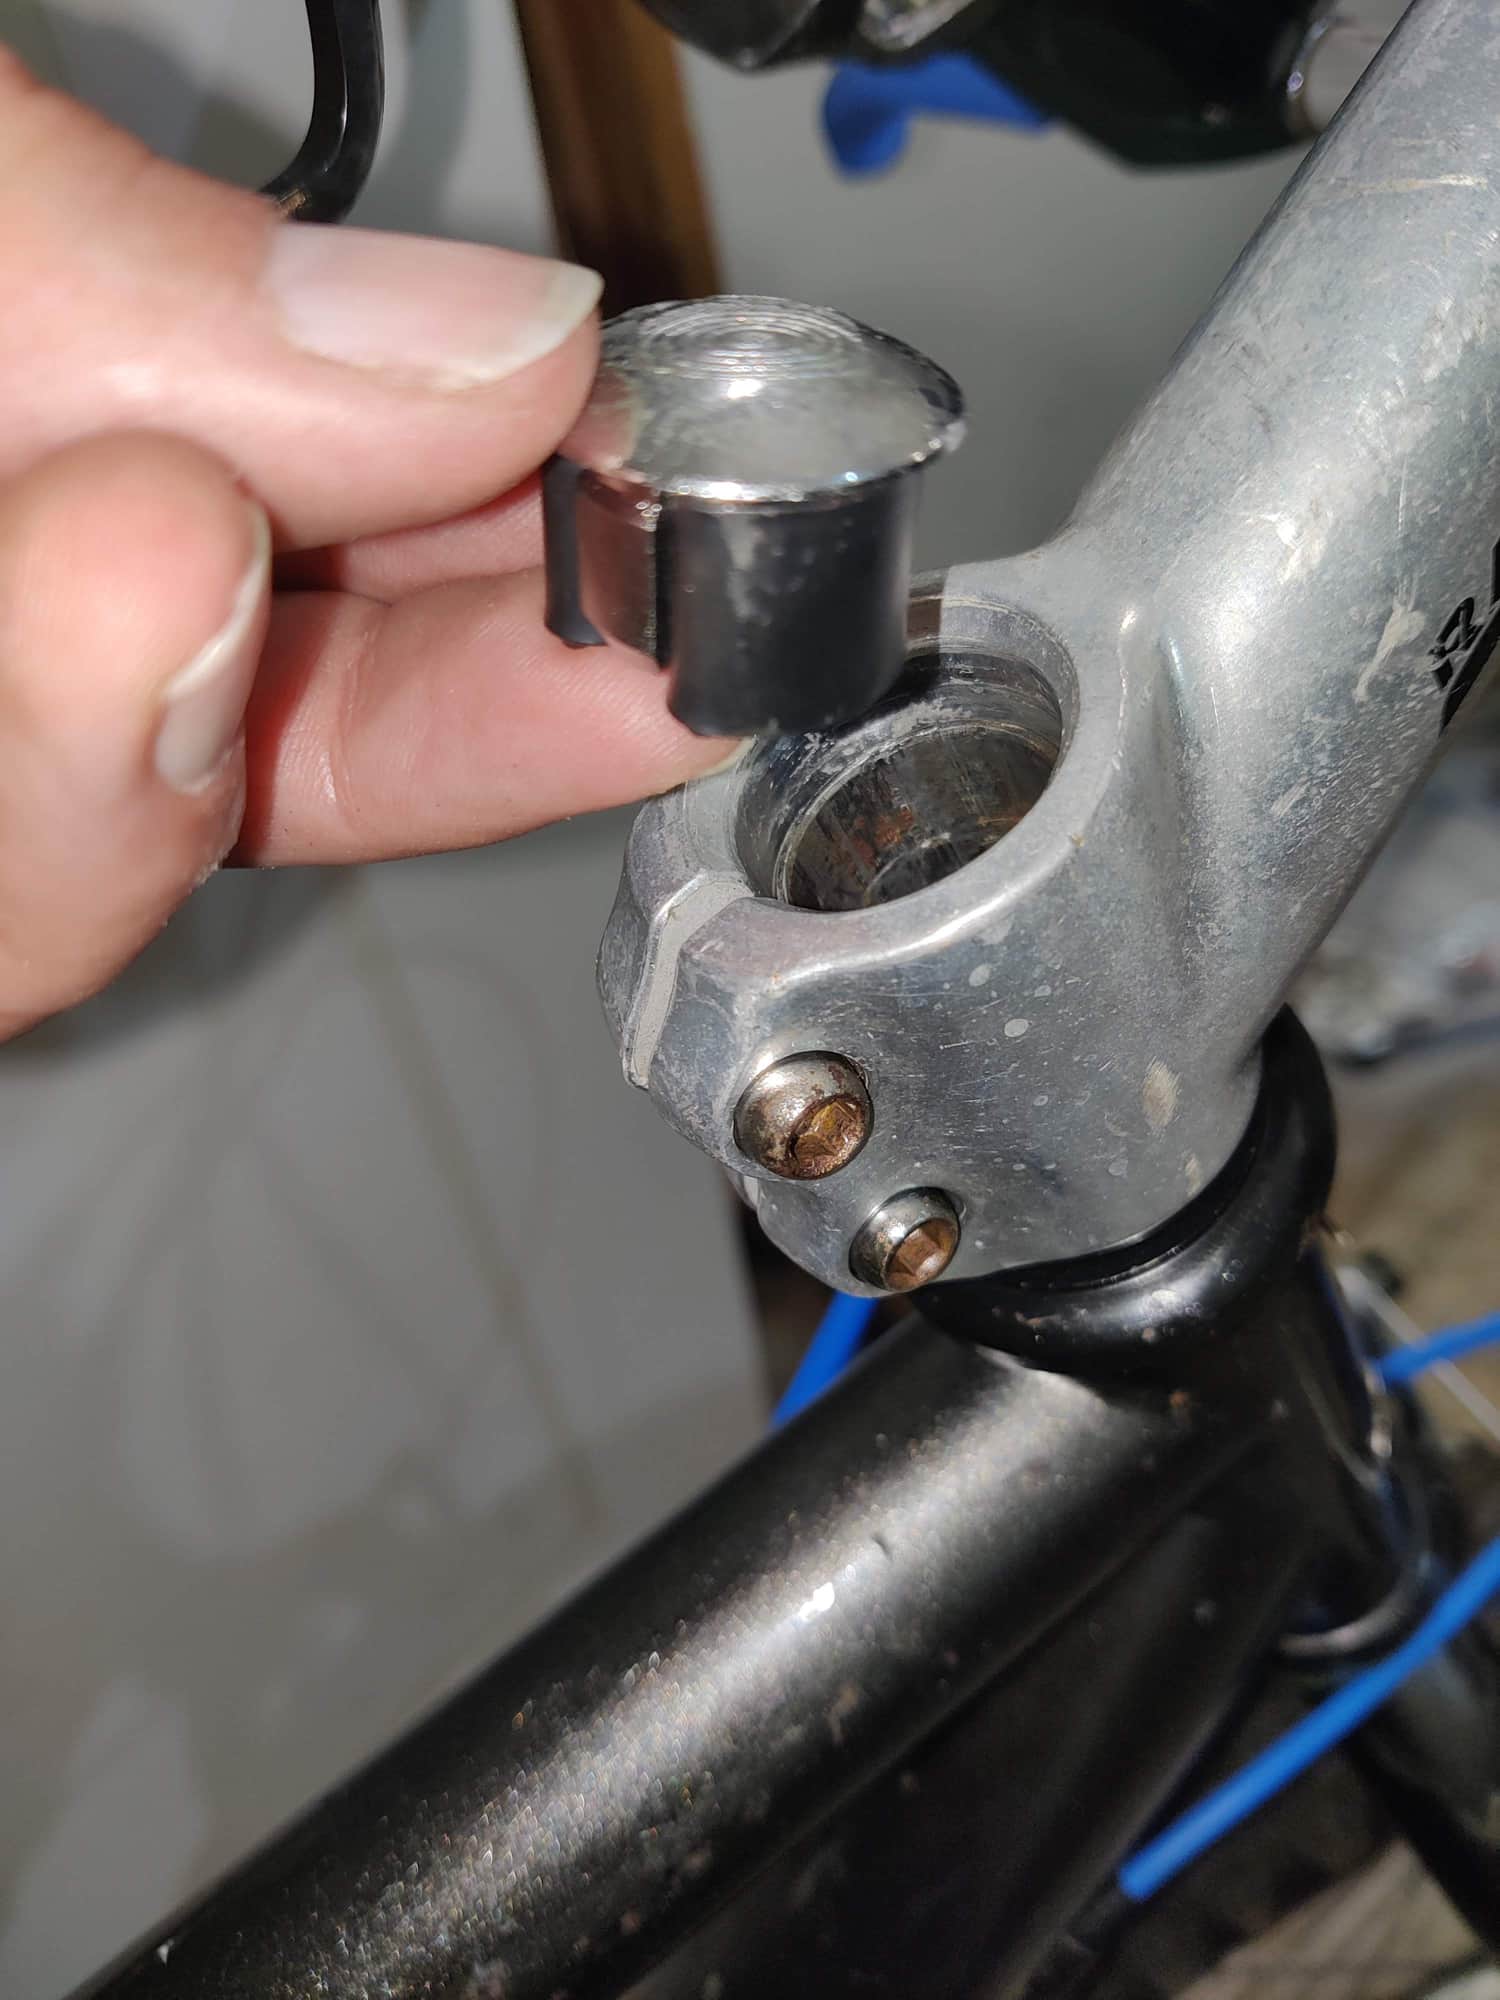
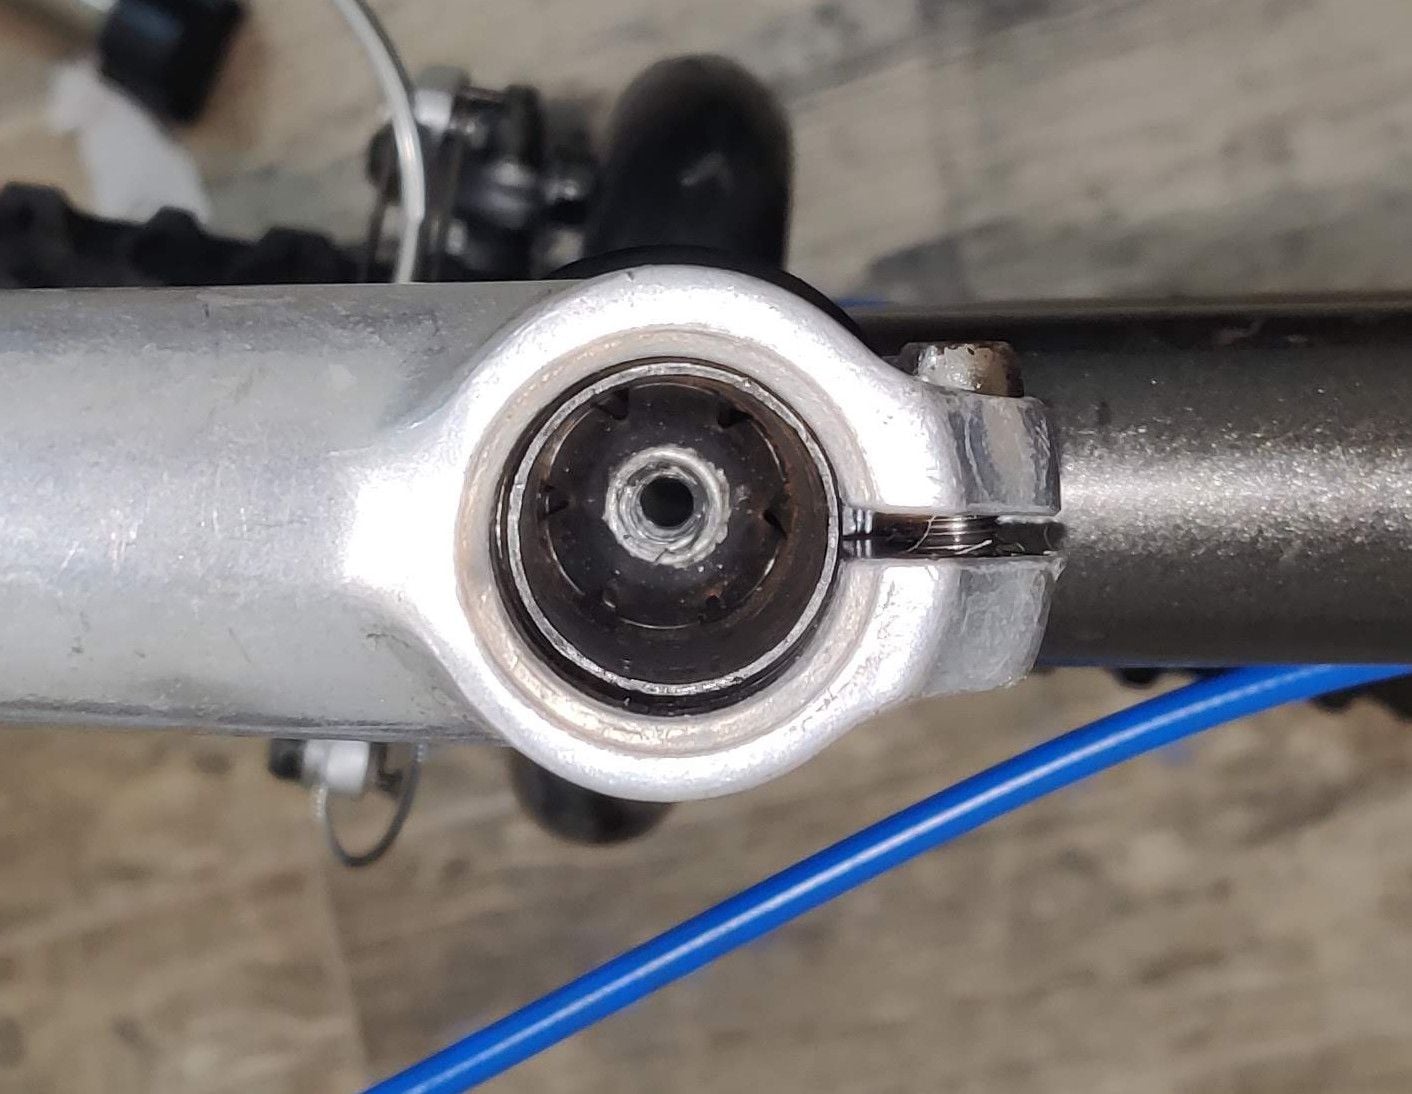
If it should be this way then what trick you recommend to be able to hold the stem as strong as possible while strengthening the 2 screws, so that when I finish and block the front wheel by the brake and "move" the bike forward/backwards the steerer/fork don't have a play?
If it shouldn't be this way, then how can I buy the missing part(s) that should go into the hole inside the steerer? (And what should be there? A screw and... some kind of a nut?)
In either case there are 2 thin spacers below the stem (as they were when purchased) on one hand but there's also a 1/2-1cm overhang of the stem above the end of the steerer on the other hand. Should I keep it this way or should I remove the spacers (or one of them) in order to push the stem down more and decrease the overhang?
2. The wheels aren't true so when braking the brake pads touch it in some places on one side before the brake is pulled hard enough and then they contact both sides anywhere on the wheel. What would you do? Should I keep it as is? Should I watch some tutorials on truing the wheel (without any special tool other then a spoke wrench)? Should I take it to someone to true the wheels (what I guess would cost more than the bike with all the rest I spent on it)?
The 2 remaining issues are:
1. Is it possible that the steerer should be hold in place only by the stem? It was that way when I bought it, but looking inside it now it seems that there might have been some screw (like in the new bikes) that goes into the steerer from above. See pics:
If it should be this way then what trick you recommend to be able to hold the stem as strong as possible while strengthening the 2 screws, so that when I finish and block the front wheel by the brake and "move" the bike forward/backwards the steerer/fork don't have a play?
If it shouldn't be this way, then how can I buy the missing part(s) that should go into the hole inside the steerer? (And what should be there? A screw and... some kind of a nut?)
In either case there are 2 thin spacers below the stem (as they were when purchased) on one hand but there's also a 1/2-1cm overhang of the stem above the end of the steerer on the other hand. Should I keep it this way or should I remove the spacers (or one of them) in order to push the stem down more and decrease the overhang?
2. The wheels aren't true so when braking the brake pads touch it in some places on one side before the brake is pulled hard enough and then they contact both sides anywhere on the wheel. What would you do? Should I keep it as is? Should I watch some tutorials on truing the wheel (without any special tool other then a spoke wrench)? Should I take it to someone to true the wheels (what I guess would cost more than the bike with all the rest I spent on it)?
09-13-23, 02:46 PM
#38
Senior Member
Join Date: Jul 2015
Location: NW Oregon
Posts: 2,975
Bikes: !982 Trek 930R Custom, Diamondback ascent with SERIOUS updates, Fuji Team Pro CF and a '09 Comencal Meta 5.5
Mentioned: 15 Post(s)
Tagged: 1 Thread(s)
Quoted: 1299 Post(s)
Liked 739 Times
in
534 Posts
the stem is all that REALLY holds the fork in place on a threadless fork.. the cap and hex socket screw only sets the correct tension, then covers the hole.. and makes people feel safer (  shhh, don't tell anyone!)
that star nut looks messed up and possibly stripped out... that would explain why someone just stuffed a plug into the stem top, eh?
you need something like this.. https://www.ebay.com/itm/36356007326...Bk9SR7iArITSYg
and i use the hex end of a midsize spark plug socket to install the star nuts...a fancy installer is on my wish list, but that socket works great, so far! the socket end of a close fitting socket causes the tips of the star nut to dig into the inner wall of the fork.. it's an 18mm spark plug socket with hex and 3/8" drive, IIRC..
the Thread in the star nuts is M6x1mm, in case you want to see if the thread is still good, or re-tap it.
shhh, don't tell anyone!)that star nut looks messed up and possibly stripped out... that would explain why someone just stuffed a plug into the stem top, eh?
you need something like this.. https://www.ebay.com/itm/36356007326...Bk9SR7iArITSYg
and i use the hex end of a midsize spark plug socket to install the star nuts...a fancy installer is on my wish list, but that socket works great, so far! the socket end of a close fitting socket causes the tips of the star nut to dig into the inner wall of the fork.. it's an 18mm spark plug socket with hex and 3/8" drive, IIRC..
the Thread in the star nuts is M6x1mm, in case you want to see if the thread is still good, or re-tap it.
09-13-23, 03:00 PM
#39
Newbie
Thread Starter
09-13-23, 06:02 PM
#40
Senior Member
Join Date: Apr 2016
Posts: 1,244
Mentioned: 3 Post(s)
Tagged: 0 Thread(s)
Quoted: 504 Post(s)
Liked 437 Times
in
336 Posts
The top cap only applies preload to the headset bearings while the stem is loose - after you tighten the stem onto the steerer, the stem is what holds the bearings in adjustment; the top cap is then just a cover until the next time you adjust the bearings.
Likes For grumpus:
09-13-23, 08:25 PM
#41
Senior Member
Join Date: Jul 2015
Location: NW Oregon
Posts: 2,975
Bikes: !982 Trek 930R Custom, Diamondback ascent with SERIOUS updates, Fuji Team Pro CF and a '09 Comencal Meta 5.5
Mentioned: 15 Post(s)
Tagged: 1 Thread(s)
Quoted: 1299 Post(s)
Liked 739 Times
in
534 Posts
THE STEM CARRIES THE LOAD WHEN TIGHTENED, Not the Cap. there is only minimal force trying to lift the stem in relation to the bike, IF ADJUSTED CORRECTLY. the stem clamp is well able to handle that tiny force.... and that lifting force is near zero if a headset is of the "Cartridge Bearing' design.
09-14-23, 12:41 AM
#42
Newbie
Thread Starter
Ok, so from both comments it sounds like my boy can safely ride without the proper (bolted) cap as long as the stem is strongly holding the steerer (which it does) but there's still this tiny forward/backward play (mostly noticable when checking by braking only the front wheel and moving the bike forward/backward)
What trick can be applied to make that play disappear? (If possible without the cap of course)
What trick can be applied to make that play disappear? (If possible without the cap of course)
09-14-23, 01:33 AM
#43
Senior Member
Join Date: Jul 2015
Location: NW Oregon
Posts: 2,975
Bikes: !982 Trek 930R Custom, Diamondback ascent with SERIOUS updates, Fuji Team Pro CF and a '09 Comencal Meta 5.5
Mentioned: 15 Post(s)
Tagged: 1 Thread(s)
Quoted: 1299 Post(s)
Liked 739 Times
in
534 Posts
Ok, so from both comments it sounds like my boy can safely ride without the proper (bolted) cap as long as the stem is strongly holding the steerer (which it does) but there's still this tiny forward/backward play (mostly noticable when checking by braking only the front wheel and moving the bike forward/backward)
What trick can be applied to make that play disappear? (If possible without the cap of course)
What trick can be applied to make that play disappear? (If possible without the cap of course)
i can quickly think of three ways to do what you need to do.
1: fake a cap after retapping the star nut.
or
2: get a new star nut and cap, then install them. (preferred method!) Tap the old one about 1" lower than it is now to clear the way for the new part. the new one will need to be be about 1/2" below the top of the fork steerer tube's top.
SOME forks will allow the complete removal of the old star nut by driving it all the way thru and out....
or
3: hope you achieve a proper preload by barely tightening the clamp then bumping the stem downward with a soft impact method that won't screw up cast aluminum.
good luck

hint: 2x4 boards make great cushions
another hint: make sure that you didn't install one of the headset bearings upside down....
yet another hint: tighten the clamp bolts in several stages, alternating between upper and lower bolts... but don't OVER-Tighten them! Cast aluminum likes to Crack.
Last edited by maddog34; 09-14-23 at 01:49 AM.
09-14-23, 01:59 PM
#44
Senior Member
Join Date: Apr 2016
Posts: 1,244
Mentioned: 3 Post(s)
Tagged: 0 Thread(s)
Quoted: 504 Post(s)
Liked 437 Times
in
336 Posts
Loosen the stem, but not so much that it rotates on the steerer. Knock on the top of the stem with a nylon hammer or similar implement. Tighten the stem a little, tap it again. Check for bearing play. You'll likely have to vary the loosening/tightening and how hard you hit, at the sweet spot you'll be removing all slack from the headset. Tighten to recommended torque.
