


White Peugeot Paint touchup
 10-29-19, 07:51 PM
#1

Senior Member
Thread Starter
Join Date: Oct 2017
Posts: 2,040
Mentioned: 26 Post(s)
Tagged: 0 Thread(s)
Quoted: 837 Post(s)
Liked 1,080 Times
in
521 Posts
White Peugeot Paint touchup
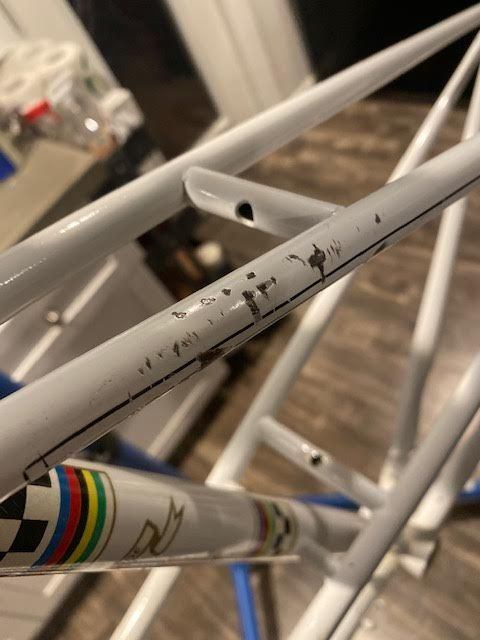
I'm looking to touchup the paint on this white Peugeot. Any tips for a good match but especially for technique? The areas are numerous but small. I've never been handy with a paint brush. Which kind should I use? Start thin, let dry and layer again if needed?
Also, I'm particularly concerned about the area pictured on the drive side of the down tube. Any saving that?
Theres nothing wrong with a little patina, and I worry that I may make this worse by trying to fix it, but figure it's also a good candidate for the learning experience.


Also, I'm particularly concerned about the area pictured on the drive side of the down tube. Any saving that?
Theres nothing wrong with a little patina, and I worry that I may make this worse by trying to fix it, but figure it's also a good candidate for the learning experience.
 10-29-19, 09:42 PM
#2
Bikes are okay, I guess.

Join Date: Jan 2015
Location: Richmond, Virginia
Posts: 6,938
Bikes: Waterford Paramount Touring, Giant CFM-2, Raleigh Sports 3-speeds in M23 & L23, Schwinn Cimarron oddball build, Marin Palisades Trail dropbar conversion, Nishiki Cresta GT
Mentioned: 69 Post(s)
Tagged: 0 Thread(s)
Quoted: 2647 Post(s)
Liked 2,446 Times
in
1,557 Posts
Check an auto parts store or hobby shop for just plain white, refrigerator white. Try it on a hidden spot and if it looks too thick you can thin the paint so it flows better. Hobby shop should also have a selection of brushes. I'd try a couple of different ones, very fine and medium.
10-29-19, 09:50 PM
#3
Senior Member

Join Date: Apr 2012
Location: Middle Earth (aka IA)
Posts: 20,433
Bikes: A bunch of old bikes and a few new ones
Mentioned: 178 Post(s)
Tagged: 0 Thread(s)
Quoted: 5887 Post(s)
Liked 3,469 Times
in
2,079 Posts
I used flat white rustoleum on a Peugeot of that vintage. It was a good match.
10-29-19, 11:19 PM
#4
Ride, Wrench, Swap, Race

Join Date: Jan 2010
Location: Northern California
Posts: 9,181
Bikes: Cheltenham-Pedersen racer, Boulder F/S Paris-Roubaix, Varsity racer, '52 Christophe, '62 Continental, '92 Merckx, '75 Limongi, '76 Presto, '72 Gitane SC, '71 Schwinn SS, etc.
Mentioned: 132 Post(s)
Tagged: 0 Thread(s)
Quoted: 1562 Post(s)
Liked 1,285 Times
in
856 Posts
The best tip that I can offer is to keep the area of touch-up as small as possible, meaning that you would only fill in the scratched-off paint but would not overlap the edges of the scratches at all.
For this sort of work I use a toothpick, not a brush.
The touched-up areas can be color-adjusted as needed with a second coat, perhaps also adding a bit of silver metallic to the white paint if that is what the original paint looks like, i.e. if it is a pearl white.
You'll be mixing by number of drops for little repairs like this, so all in keeping with the small-scale approach that keeps defects from growing and thus becoming more visible. The toothpicks are also very good for touching up pin-stripe and lettering.
Trust me, you can't go wrong with the small-scale approach.
Let us know how this goes.
10-30-19, 02:03 PM
#5
Senior Member
Thread Starter
Join Date: Oct 2017
Posts: 2,040
Mentioned: 26 Post(s)
Tagged: 0 Thread(s)
Quoted: 837 Post(s)
Liked 1,080 Times
in
521 Posts
The best tip that I can offer is to keep the area of touch-up as small as possible, meaning that you would only fill in the scratched-off paint but would not overlap the edges of the scratches at all.
For this sort of work I use a toothpick, not a brush.
The touched-up areas can be color-adjusted as needed with a second coat, perhaps also adding a bit of silver metallic to the white paint if that is what the original paint looks like, i.e. if it is a pearl white.
You'll be mixing by number of drops for little repairs like this, so all in keeping with the small-scale approach that keeps defects from growing and thus becoming more visible. The toothpicks are also very good for touching up pin-stripe and lettering.
Trust me, you can't go wrong with the small-scale approach.
Let us know how this goes.
For this sort of work I use a toothpick, not a brush.
The touched-up areas can be color-adjusted as needed with a second coat, perhaps also adding a bit of silver metallic to the white paint if that is what the original paint looks like, i.e. if it is a pearl white.
You'll be mixing by number of drops for little repairs like this, so all in keeping with the small-scale approach that keeps defects from growing and thus becoming more visible. The toothpicks are also very good for touching up pin-stripe and lettering.
Trust me, you can't go wrong with the small-scale approach.
Let us know how this goes.
10-30-19, 02:58 PM
#6
Senior Member

Join Date: Nov 2005
Location: Washington, DC
Posts: 108
Bikes: https://www.ipernity.com/doc/286349/album/550107
Mentioned: 7 Post(s)
Tagged: 0 Thread(s)
Quoted: 45 Post(s)
Likes: 0
Liked 40 Times
in
22 Posts
Yes, I would suggest finding one of little bottles of "appliance paint" in old fashioned refrigerator white. It's a close match unless the white on the machine is very yellowed or degraded (frankly not likely as Peugeot used a super quality heavy enamel) and unlike Testors or other modelling enamels, its very very hard and durable when dried.
White (and black) are notoriously hard to match but classic Peugeot white is as close to fridge white as you can get. As for matching the later pearl whites, don't get me started.....
Peter Kohler
Washington, DC USA
White (and black) are notoriously hard to match but classic Peugeot white is as close to fridge white as you can get. As for matching the later pearl whites, don't get me started.....
Peter Kohler
Washington, DC USA
10-30-19, 07:33 PM
#7
Rouleur

This is a cut & paste from Condorcycles.com - check out their web page "Journal" section for some nice reading!
Small chips won’t ruin aluminium or steel frames. They’re unlikely to compromise carbon either. Before starting squeeze the carbon, if it feels squishy contact your bike retailer.
Tip: If you are unable to find an enamel paint to match your frame, we recommend Humbrol model paints.
If you are repairing a carbon frame you must use Isopropyl Alcohol (available from Maplin) this alcohol won’t degrade plastics like carbon.


Tip: If you have a large chip, apply Humbrol Clear after applying and sanding back new paint. It will help improve the appearance of the paint is the damage is large.
1. CHECK THE MATERIAL
Small chips won’t ruin aluminium or steel frames. They’re unlikely to compromise carbon either. Before starting squeeze the carbon, if it feels squishy contact your bike retailer.2. FIND THE RIGHT COLOUR
Get a RAL colour chart and try to closely match your frame colour with the chart. You can take this RAL number to a model shop or online store and purchase the paint that will suit. If you require touch up paint for a Condor frameset please refer to your bicycle spec sheet if you are unsure of the colour you require.3. CHOOSE A PAINT
We recommend using an enamel paint rather than acrylic. Enamel paint takes longer to dry but is hard wearing and does not require a base primer.Tip: If you are unable to find an enamel paint to match your frame, we recommend Humbrol model paints.
4. CLEAN THE AREA
On metal frames an alcohol such as nail varnish remover will clean away the grease and paint flakes.If you are repairing a carbon frame you must use Isopropyl Alcohol (available from Maplin) this alcohol won’t degrade plastics like carbon.
5. BE PATIENT. BUILD UP THE PAINT LAYERS GRADUALLY
Get a small paint brush and paint a thin layer on to the chip. Condor Touch Up paints are supplied with an integrated brush. Allow it to dry and build up the layers gradually. It must dry between applications. You will need to apply up to five layers.6. SAND BACK THE PAINT
Once the paint sits slightly proud of the surrounding area you are now finished with painting. Cut a piece of fine-grade sandpaper (1500 grit / 2000 grit) into a small square. Wet the paper and work slowly in small circular movements on the paint you have applied. Checking the area to ensure you are not sanding the surrounding area.7. POLISH
When you feel the new paint is flat or flush against the frame, apply a wax polish to the area to bring up the shine.Tip: If you have a large chip, apply Humbrol Clear after applying and sanding back new paint. It will help improve the appearance of the paint is the damage is large.
10-30-19, 08:09 PM
#8
Useless Member
Join Date: Jun 2015
Location: Louisville, KY
Posts: 745
Mentioned: 5 Post(s)
Tagged: 0 Thread(s)
Quoted: 380 Post(s)
Liked 181 Times
in
113 Posts
Many automotive stores carry a fiberglass stick that is used as a sanding tool. It mimics a pencil eraser and allows you to carefully sand into those nicked areas without affecting the surrounding paint. Without removing that rust, your work will be useless. I use one exclusively before primer/paint touch-ups.
See this link as an example:
https://www.ebay.com/itm/Gold-Label-...AAAOSwsqdcTOKm
See this link as an example:
https://www.ebay.com/itm/Gold-Label-...AAAOSwsqdcTOKm
Last edited by UKFan4Sure; 10-30-19 at 08:17 PM.
10-30-19, 08:14 PM
#9
Full Member

I also used flat white rustoleum and it matches well on my '68 Peugeot. A small can is very cheap too.
10-30-19, 09:11 PM
#10
Senior Member
Join Date: Nov 2014
Location: Saratoga calif.
Posts: 1,049
Bikes: Miyata 610(66cm), GT Vantara Hybrid (64cm), Nishiki International (64cm), Peugeot rat rod (62 cm), Trek 800 Burning Man helicopter bike, Bob Jackson frame (to be restored?) plus a never ending stream of neglected waifs from the Bike exchange.
Mentioned: 28 Post(s)
Tagged: 0 Thread(s)
Quoted: 339 Post(s)
Likes: 0
Liked 631 Times
in
229 Posts
Here are a few things I do when touching up frame paint.
I start out by stripping the frame completely, then cleaning it thouroughly. I often start with paint thinner then wipe down with alcohol, then
using white polishing compound, rub down the entire frame . This will remove ALL the ground in dirt and other marks on the paint and leave it the original color.
If there is rust I will treat the rusted spots with naval jelly. If there is thick rust you can take an exacto knife and carefully scrape off the scale before you do the naval jelly. let sit 30 minutes, and rinse with clean water and wipe down. This does not seem to harm the paint , just dissolves the rust.
Next take your spray can of rustoleum and spray a small amount on a flat piece of tin foil . Take a small brush and dab the spots you want to paint. I bought some small brushes at home depot then with a pair of scissors, trimmed the brush to a point. Fill in the paint til it is slightly higher than the surface and let dry thoroughly then usinga block and 1000 grit wet sandpaper sand down smooth.
finally, rub out with white polishing compound then wax or, in my case, spray a coat of rustoleum automotive clear enamel over the whole freme ant the frame will look like new.
10-30-19, 09:35 PM
#11
Useless Member
Join Date: Jun 2015
Location: Louisville, KY
Posts: 745
Mentioned: 5 Post(s)
Tagged: 0 Thread(s)
Quoted: 380 Post(s)
Liked 181 Times
in
113 Posts
Here are a few things I do when touching up frame paint.
I start out by stripping the frame completely, then cleaning it thouroughly. I often start with paint thinner then wipe down with alcohol, then
using white polishing compound, rub down the entire frame . This will remove ALL the ground in dirt and other marks on the paint and leave it the original color.
If there is rust I will treat the rusted spots with naval jelly. If there is thick rust you can take an exacto knife and carefully scrape off the scale before you do the naval jelly. let sit 30 minutes, and rinse with clean water and wipe down. This does not seem to harm the paint , just dissolves the rust.
Next take your spray can of rustoleum and spray a small amount on a flat piece of tin foil . Take a small brush and dab the spots you want to paint. I bought some small brushes at home depot then with a pair of scissors, trimmed the brush to a point. Fill in the paint til it is slightly higher than the surface and let dry thoroughly then usinga block and 1000 grit wet sandpaper sand down smooth.
finally, rub out with white polishing compound then wax or, in my case, spray a coat of rustoleum automotive clear enamel over the whole freme ant the frame will look like new.
I start out by stripping the frame completely, then cleaning it thouroughly. I often start with paint thinner then wipe down with alcohol, then
using white polishing compound, rub down the entire frame . This will remove ALL the ground in dirt and other marks on the paint and leave it the original color.
If there is rust I will treat the rusted spots with naval jelly. If there is thick rust you can take an exacto knife and carefully scrape off the scale before you do the naval jelly. let sit 30 minutes, and rinse with clean water and wipe down. This does not seem to harm the paint , just dissolves the rust.
Next take your spray can of rustoleum and spray a small amount on a flat piece of tin foil . Take a small brush and dab the spots you want to paint. I bought some small brushes at home depot then with a pair of scissors, trimmed the brush to a point. Fill in the paint til it is slightly higher than the surface and let dry thoroughly then usinga block and 1000 grit wet sandpaper sand down smooth.
finally, rub out with white polishing compound then wax or, in my case, spray a coat of rustoleum automotive clear enamel over the whole freme ant the frame will look like new.
10-30-19, 09:40 PM
#12
se�or miembro

Join Date: Dec 2018
Location: Pac NW
Posts: 6,598
Bikes: '70s - '80s Campagnolo
Mentioned: 92 Post(s)
Tagged: 0 Thread(s)
Quoted: 3860 Post(s)
Liked 6,450 Times
in
3,190 Posts
10-31-19, 12:32 AM
#13
Ride, Wrench, Swap, Race
Join Date: Jan 2010
Location: Northern California
Posts: 9,181
Bikes: Cheltenham-Pedersen racer, Boulder F/S Paris-Roubaix, Varsity racer, '52 Christophe, '62 Continental, '92 Merckx, '75 Limongi, '76 Presto, '72 Gitane SC, '71 Schwinn SS, etc.
Mentioned: 132 Post(s)
Tagged: 0 Thread(s)
Quoted: 1562 Post(s)
Liked 1,285 Times
in
856 Posts
I keep a rag handy with a bit of solvent on it, which allows me to erase any sloppy work on the smallest scale and do it over. This is most important when you're just starting to get the hang of it, when re-doing a scratch helps one develop ever-better skills.
The nice thing about the toothpick method is that the paint tends to flow right to the edges of a scratch and stops there, by itself, making for a very neat touch-up.
Allowing each paint layer (if more than one is needed) to dry fully before applying a second layer is very important, it prevents a dreaded slow-drying condition where days or weeks are required for the paint surface to finally harden.
Last edited by dddd; 10-31-19 at 12:37 AM.
10-31-19, 08:07 AM
#14
Barred @ Velocipedesalon
Nail polish; easy to match given all the various shades available. Black really easy, white and red next easiest. Very inexpensive! Thrift shops usually have loads of the stuff for under a dollar (I pay $.10-$.50/bottle). Also, Dollar General/Dollar Tree type stores usually have it at $1-$3/bottle. Rubbing Alcohol cleanup. Brushes come with the bottle (trim if required).
10-31-19, 08:36 AM
#15
With a mighty wind
Join Date: May 2015
Posts: 2,575
Mentioned: 13 Post(s)
Tagged: 0 Thread(s)
Quoted: 1084 Post(s)
Liked 854 Times
in
483 Posts
I've got a big scrape on the chain stay of the bike I'm fixing.
It's black paint, so that should be ok. The scrape is about 7" long and 1/2" tall.
I've definitely wrapped entire chainstays with black fabric tape to protect the paint before. If I did this, it would totally hide the blemish. I kind of want to fix it though.
I want to do a good job, this is a Tom Kellogg Spectrum that other than this is almost perfect.


