


Unable to open Campy crank locking ring
 08-23-23, 03:50 PM
#26

aged to perfection

Join Date: Jun 2009
Location: PacNW
Posts: 1,817
Bikes: Dinucci Allez 2.0, Richard Sachs, Alex Singer, Serotta, Masi GC, Raleigh Pro Mk.1, Hetchins, etc
Mentioned: 24 Post(s)
Tagged: 0 Thread(s)
Quoted: 839 Post(s)
Liked 1,258 Times
in
663 Posts
yes Iride01 it looks like it says "Left" on there
so the OP has been "un-loosening" it. I think it's blowtorch time !
golly
/markp
so the OP has been "un-loosening" it. I think it's blowtorch time !
golly
/markp
 08-23-23, 04:49 PM
#27
Friendship is Magic

Join Date: Nov 2010
Location: Sacramento, CA
Posts: 22,984
Bikes: old ones
Mentioned: 304 Post(s)
Tagged: 0 Thread(s)
Quoted: 26425 Post(s)
Liked 10,381 Times
in
7,209 Posts
....at this point. I think I'd try cleaning up two opposite notches with a file, so they would fit a lock ring plier like the VAR.Then dose the thread interface with the BB shell liberally with ATF/acetone 50/50 mix. Then heat with a Mapp gas torch to break some of the corrosive bonding, apply the ATF/ acetone again, grab it with the pliers and hope for the best,
It looks beat up enough to be a total loss/throwaway at this point. So I guess you could also just try grabbing it with a pipe wrench going in the right direction, clamp that down on the ring surfaces as tight as you can, and using a pipe cheater on the handle of the wrench.
I hope you already removed the positioning cup from the other side. Sometimes that makes it easier to turn out the rest of the sealed unit.
This is how they go together. Often they were wrongly installed without any sort of anti-seize compound on the threads. The cups are aluminum alloy, so this is not an unusual problem.
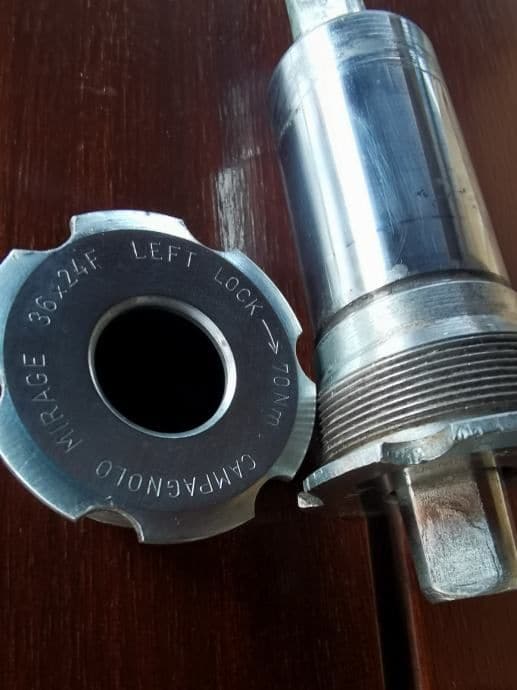
I think your photo is the drive side, which is more or less integral with the shell of the sealed unit. The whole think turns for installation and removal. With the threading marked on yours, the drive side (the whole unit) is LH threaded. The non drive side is regular RH threading.
It looks beat up enough to be a total loss/throwaway at this point. So I guess you could also just try grabbing it with a pipe wrench going in the right direction, clamp that down on the ring surfaces as tight as you can, and using a pipe cheater on the handle of the wrench.
I hope you already removed the positioning cup from the other side. Sometimes that makes it easier to turn out the rest of the sealed unit.
This is how they go together. Often they were wrongly installed without any sort of anti-seize compound on the threads. The cups are aluminum alloy, so this is not an unusual problem.
I think your photo is the drive side, which is more or less integral with the shell of the sealed unit. The whole think turns for installation and removal. With the threading marked on yours, the drive side (the whole unit) is LH threaded. The non drive side is regular RH threading.
__________________
08-23-23, 04:57 PM
#28
aged to perfection
Join Date: Jun 2009
Location: PacNW
Posts: 1,817
Bikes: Dinucci Allez 2.0, Richard Sachs, Alex Singer, Serotta, Masi GC, Raleigh Pro Mk.1, Hetchins, etc
Mentioned: 24 Post(s)
Tagged: 0 Thread(s)
Quoted: 839 Post(s)
Liked 1,258 Times
in
663 Posts
that's going to be tough to get out
/markp
/markp
08-23-23, 07:44 PM
#29
Senior Member
Join Date: Apr 2011
Posts: 7,067
Mentioned: 41 Post(s)
Tagged: 0 Thread(s)
Quoted: 4409 Post(s)
Liked 1,565 Times
in
1,027 Posts
Since the cups are now trashed, the two best tools are either a pipe wrench or locking the cup in a bench vice and turning the frame.
Left side is right hand threaded (normal righty-tighty), the right side opposite thread.
Or you chop them out of the frame with an ax.
Left side is right hand threaded (normal righty-tighty), the right side opposite thread.
Or you chop them out of the frame with an ax.
Last edited by Kontact; 08-24-23 at 06:34 AM.
08-23-23, 08:10 PM
#30
Senior Member

Join Date: Jul 2015
Location: NW Oregon
Posts: 2,975
Bikes: !982 Trek 930R Custom, Diamondback ascent with SERIOUS updates, Fuji Team Pro CF and a '09 Comencal Meta 5.5
Mentioned: 15 Post(s)
Tagged: 1 Thread(s)
Quoted: 1299 Post(s)
Liked 739 Times
in
534 Posts
Left.. the side that cup is made to fit... Arrow denotes Tightening Direction... lefty loosey
turn left bearing cup counter-clockwise to remove..
Exfi was punching in the correct direction.
that sucker's STUCK.
"heat is your friend"... a fellow mechanic that also owned the largest Dead blow hammer sold by Snap-On... we called that hammer "Patience"
i have Cuta similarly stuck cup out once.. with my high speed bosch grinder anda sacrificial 1/4" carbide burr... be careful t NOT cut into the threads of the frame.
08-25-23, 02:17 PM
#31
Senior Member
Join Date: Apr 2016
Posts: 1,236
Mentioned: 3 Post(s)
Tagged: 0 Thread(s)
Quoted: 501 Post(s)
Liked 435 Times
in
334 Posts
Are you going the wrong way? I didn't zoom in on your pic's when I posted that. But the one cb400bill posted looks like it says left threaded on the face and what I guess is the current hammer and punch marks or destruction looks like you are thinking it's right threaded.
08-25-23, 08:10 PM
#32
aged to perfection
Join Date: Jun 2009
Location: PacNW
Posts: 1,817
Bikes: Dinucci Allez 2.0, Richard Sachs, Alex Singer, Serotta, Masi GC, Raleigh Pro Mk.1, Hetchins, etc
Mentioned: 24 Post(s)
Tagged: 0 Thread(s)
Quoted: 839 Post(s)
Liked 1,258 Times
in
663 Posts
what you might do is file 2 flats on opposite sides of the cup and use those to get a good grip with a really solid vise.
of course a couple of heat cycles and some penetratic oil, PB Blaster or Kroil beforehand
gonna be fun
/markp
of course a couple of heat cycles and some penetratic oil, PB Blaster or Kroil beforehand
gonna be fun
/markp

 08-27-23, 03:22 PM
#34
Senior Member
Join Date: Apr 2011
Posts: 7,067
Mentioned: 41 Post(s)
Tagged: 0 Thread(s)
Quoted: 4409 Post(s)
Liked 1,565 Times
in
1,027 Posts
Large channel locks would have probably gotten it off by now in the hands of someone knowledgeable.
08-27-23, 10:32 PM
#35
Used to be Conspiratemus
Join Date: Jan 2009
Location: Hamilton ON Canada
Posts: 1,512
Mentioned: 4 Post(s)
Tagged: 0 Thread(s)
Quoted: 297 Post(s)
Liked 245 Times
in
163 Posts
I think that's why the indents are semi-circular, to discourage attempts with hammer + screwdriver that got inflicted on lock rings in the classic era.
