


Fitting a crown race on carbon fork
 01-15-19, 08:59 AM
#1
Senior Member
Thread Starter
Join Date: May 2016
Posts: 181
Mentioned: 0 Post(s)
Tagged: 0 Thread(s)
Quoted: 78 Post(s)
Likes: 0
Liked 1 Time
in
1 Post
Fitting a crown race on carbon fork

Hii ,
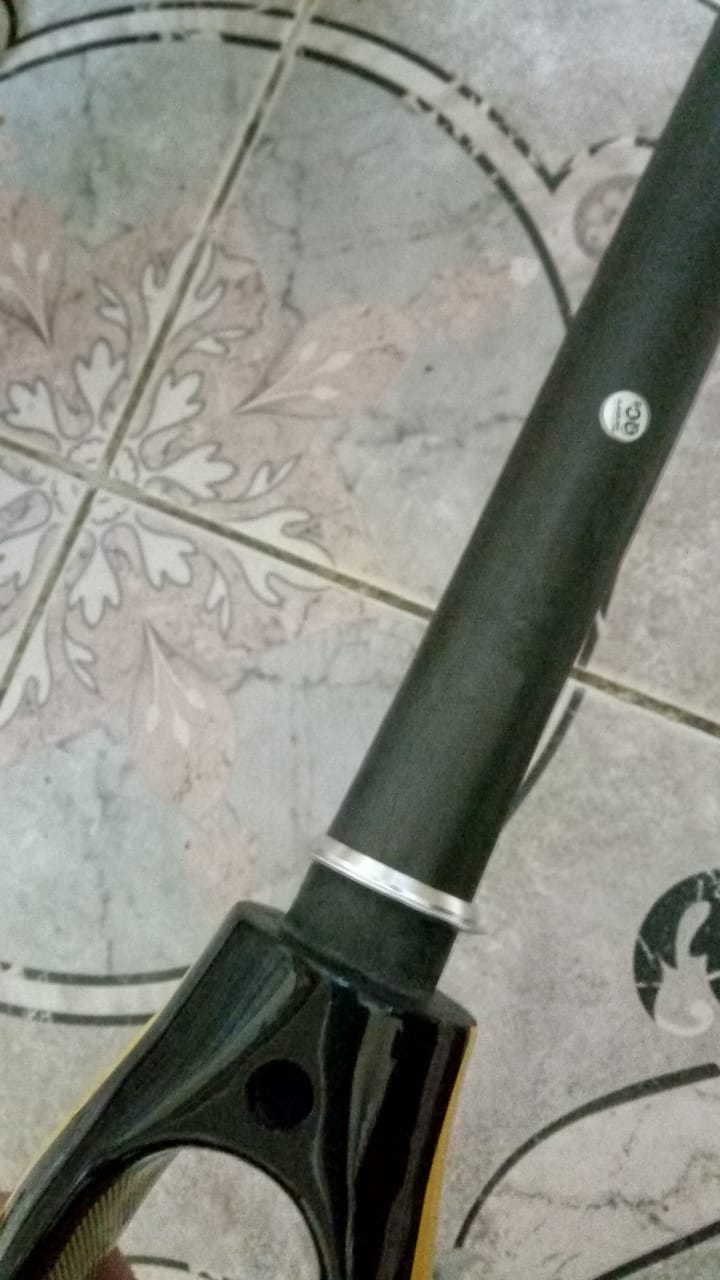
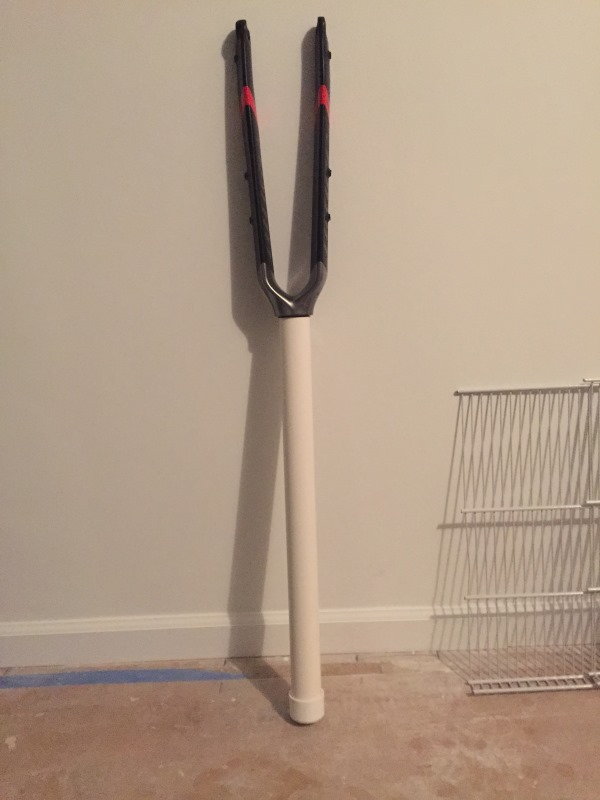
please refer to pics above, i'm building my new carbon bike, when i insert crown race on the fork , it looks it need decent amount of force to push it into place , i'm just afraid this can cause any marks on the fork fibers or affect its integrity .
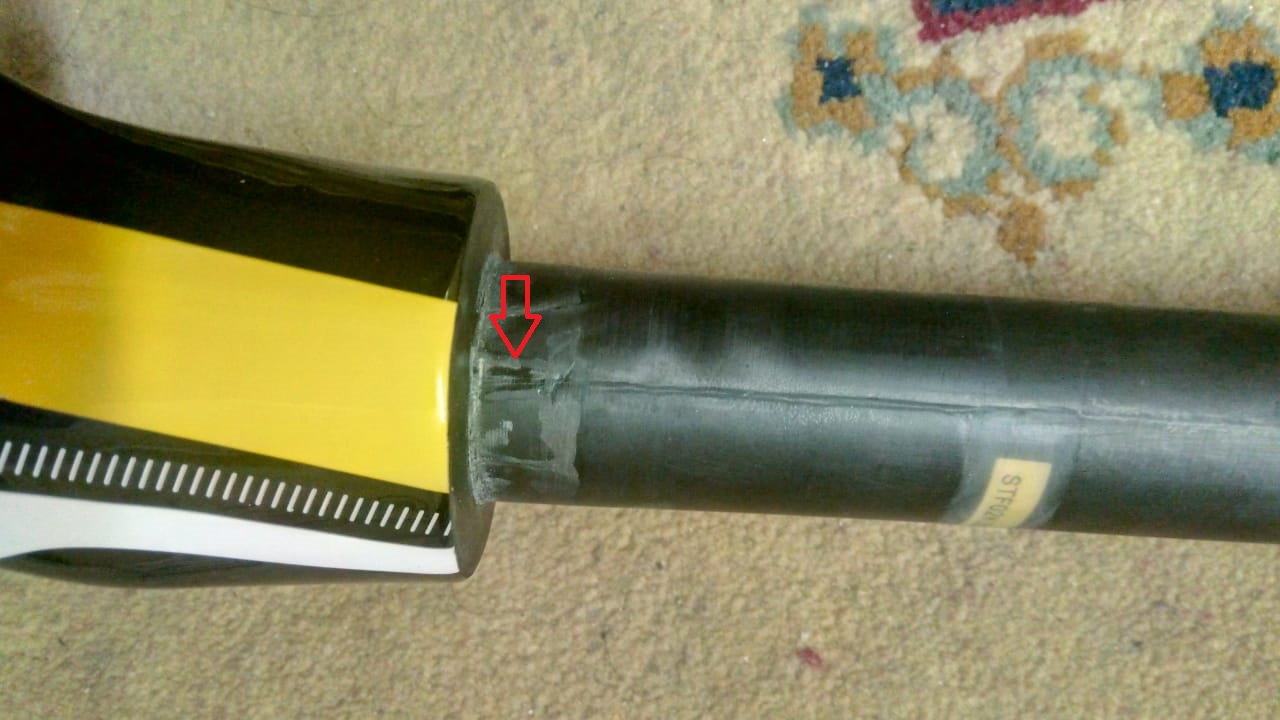
i assume this is because on the base of the steerer tube , there's like extras from manufacturing process or something "see first pic"
please advise
Last edited by hythamfekry; 01-15-19 at 09:03 AM.
 01-15-19, 09:55 AM
#2
Senior Member
Join Date: Oct 2017
Location: Chapel Hill NC
Posts: 1,683
Bikes: 2000 Litespeed Vortex Chorus 10, 1995 DeBernardi Cromor S/S
Mentioned: 4 Post(s)
Tagged: 0 Thread(s)
Quoted: 645 Post(s)
Liked 797 Times
in
446 Posts
If the crown race is a really tight fit, you can do a few things:
Use heat/cold - chill the fork (if you can fit it into a freezer) and heat the race - 200F won't damage anything, and see if the hot race will go easier onto the cold fork. Be quick - the race won't stay hot for long.
Use some emery cloth or a rolled up sheet of sandpaper to increase the interior diameter of the race (I personally wouldn't attempt to sand the fork, but others may differ here). This will likely be a slow process.
If the "race" is merely the support for the actual bearing (i.e., the bearing is a self-contained unit - the actual terminology escapes me), then use a Dremel or saw to cut a slot in the race. It's go right on and still do its job of supporting the bearing.
However, you go about it, I wouldn't be too concerned about scuffing up the surface of the carbon, as long as you're not digging into fibers themselves
When I installed a King race on a carbon fork recently, I used a metal tube of suitable width (the handle extension of a floor jack, IIRC) which fit over the steerer, and a white PVC pipe slip coupler, which slid over the pipe, but which contained an inner lip to prevent the pipe from pushing all the way through. The coupler was the right diameter to sit on the race, and the plastic was less likely to mar the race during installation. I rounded off the edge of a short piece of 2x6, so that the rounded edge conformed well with the "crotch" of the fork, placed the 2x6 between two trestles and sat the fork down onto the 2x6. Dropped the race on, slid the pipe/coupler over the steerer and a few robust "taps" with a lump hammer later, the race was firmly set.
The coupler is now irreversibly jammed onto the end of the jack handle, but I how have a "go-to" crown race installer
Last edited by Litespud; 01-15-19 at 10:04 AM.
01-15-19, 12:38 PM
#5
Banned
measure
So, what is the different diameters of that CF steering tube? obviously larger at the bottom than the upper, but by how much?
Perhaps you need a cartridge bearing headset crown race that is split.. being a cartridge bearing the real bearing race is within the lower bearing cartridge
the conic ring on the fork, engages the inner ring of the bottom bearing (integrated headset frame?)
.....
Perhaps you need a cartridge bearing headset crown race that is split.. being a cartridge bearing the real bearing race is within the lower bearing cartridge
the conic ring on the fork, engages the inner ring of the bottom bearing (integrated headset frame?)
.....
Last edited by fietsbob; 01-15-19 at 12:42 PM.
01-15-19, 12:39 PM
#6

Senior Member
I would use emery cloth or a narrow strip of sandpaper and the shoe shine stroke to remove excess material from the crown race area of the steering tube. The manufacturer did a lousy job in that area. The top of the fork crown also needs to be flat. Might need a few care strokes with a file to do that.
A hack saw cut would create a split crown race. Just be sure to scrape off the burrs left by the saw cut.
A hack saw cut would create a split crown race. Just be sure to scrape off the burrs left by the saw cut.
Last edited by DaveSSS; 01-15-19 at 12:42 PM.
01-15-19, 05:53 PM
#10
Senior Member
Thread Starter
Join Date: May 2016
Posts: 181
Mentioned: 0 Post(s)
Tagged: 0 Thread(s)
Quoted: 78 Post(s)
Likes: 0
Liked 1 Time
in
1 Post
So, what is the different diameters of that CF steering tube? obviously larger at the bottom than the upper, but by how much?
Perhaps you need a cartridge bearing headset crown race that is split.. being a cartridge bearing the real bearing race is within the lower bearing cartridge
the conic ring on the fork, engages the inner ring of the bottom bearing (integrated headset frame?)
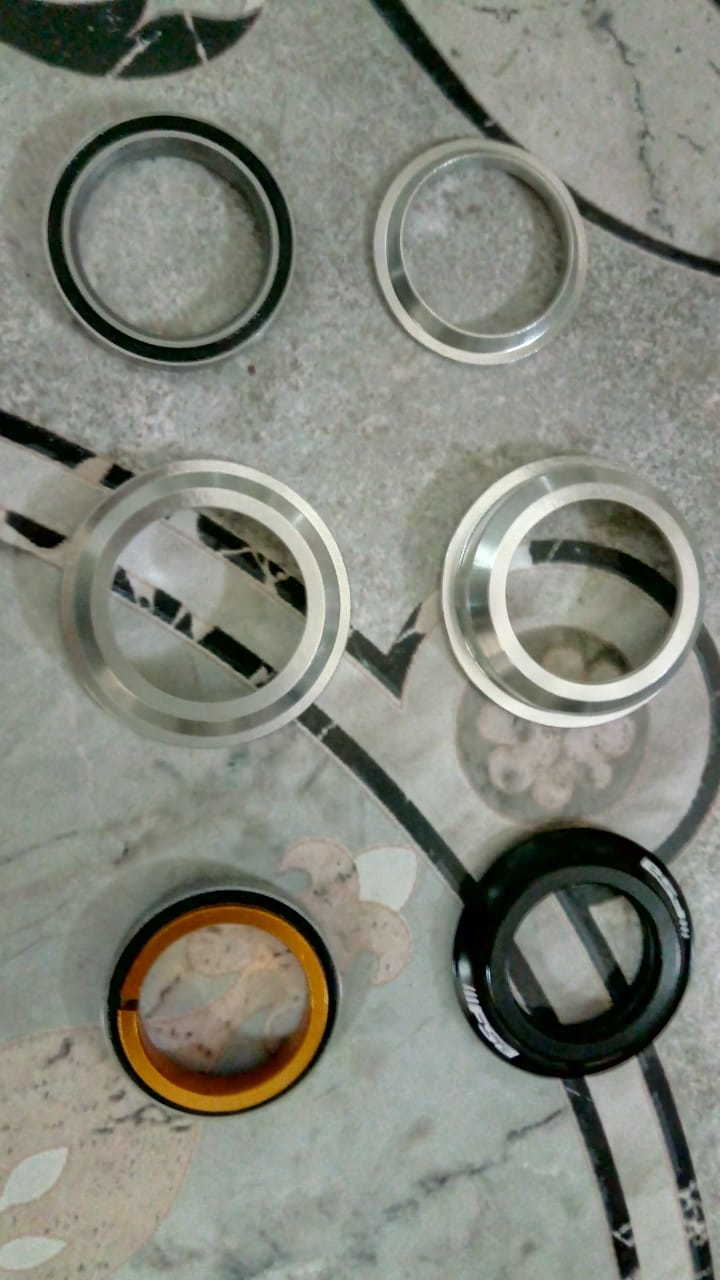
Headset is FSA TH 9/M-Cup , semi integrated , PN : 228882-222 .. guess it's the orbit z model , it should be compatible with my fork "scott addict rc 2011"
https://www.bikesdirect.com/products/...sa_headset.pdf "page 4"
crown race and bearing and bearing cup should be from the downside of the head tube , on top side of head tube is one bearing cup and bearing a and an open bearing compression ring and top cap
.....
Perhaps you need a cartridge bearing headset crown race that is split.. being a cartridge bearing the real bearing race is within the lower bearing cartridge
the conic ring on the fork, engages the inner ring of the bottom bearing (integrated headset frame?)
Headset is FSA TH 9/M-Cup , semi integrated , PN : 228882-222 .. guess it's the orbit z model , it should be compatible with my fork "scott addict rc 2011"
https://www.bikesdirect.com/products/...sa_headset.pdf "page 4"
crown race and bearing and bearing cup should be from the downside of the head tube , on top side of head tube is one bearing cup and bearing a and an open bearing compression ring and top cap
.....
 01-15-19, 06:05 PM
#11
Senior Member
Thread Starter
Join Date: May 2016
Posts: 181
Mentioned: 0 Post(s)
Tagged: 0 Thread(s)
Quoted: 78 Post(s)
Likes: 0
Liked 1 Time
in
1 Post
OK , so the options that may work in this case is to use sand paper on the fork or the crown race or cut the crown race and final option is to push the crown race little bit harder so it's snug in place ..
appreciate if you have further comments on which solution is best here ..
appreciate if you have further comments on which solution is best here ..
01-15-19, 06:08 PM
#12
- Soli Deo Gloria -
Join Date: Aug 2015
Location: Northwest Georgia
Posts: 14,779
Bikes: 2018 Rodriguez Custom Fixed Gear, 2017 Niner RLT 9 RDO, 2015 Bianchi Pista, 2002 Fuji Robaix
Mentioned: 235 Post(s)
Tagged: 0 Thread(s)
Quoted: 6844 Post(s)
Liked 736 Times
in
469 Posts
It isn't correct to file, sand or cut the steerer or crown race. That is not the way it should be done.
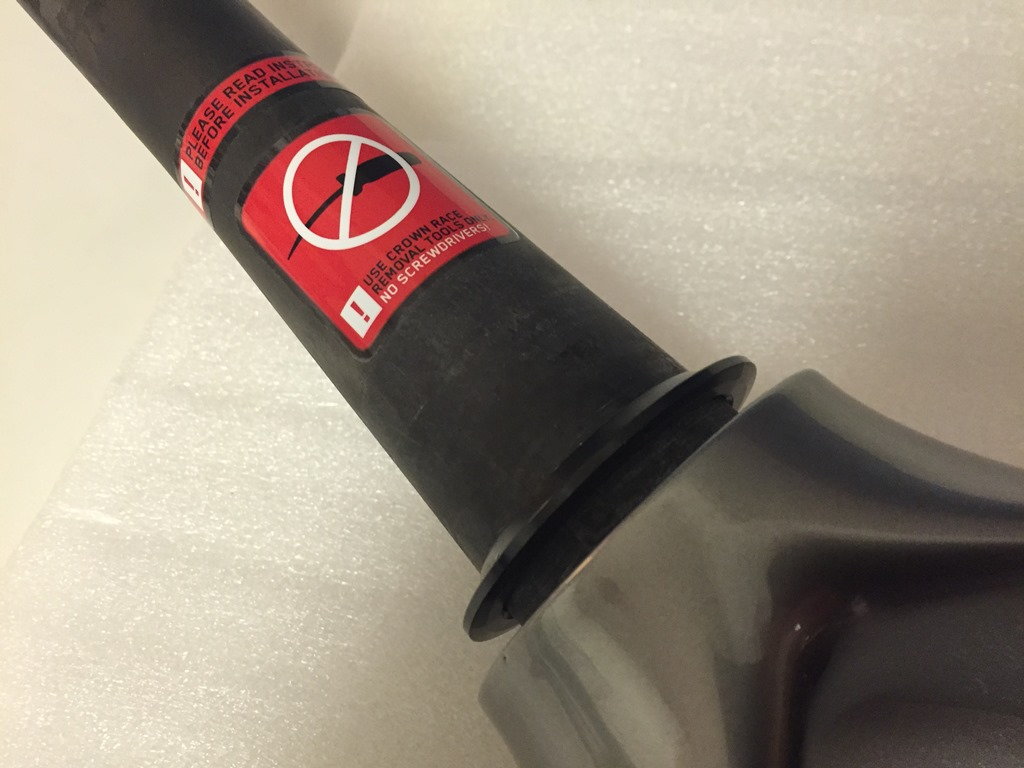
The crown race is an interference fit (press fit, friction fit). The outside diameter of the steerer is supposed to be slightly larger than the inside diameter of the crown race and is not supposed to slip on easily. It is supposed to be pressed on to the steerer. As a matter of practicality, most home mechanics pound it on rather than press it.
I made a tool out of PVC pipe as shown below. A few hits on the the ground and it went right on. All this assumes that it is the right size. If the crown race doesn't install with a few hits on the tool then it is likely the wrong size.
This photo shows that the steerer is larger than the crown race. It won't slip on...
This is the tool. A dremels was used to approximate the shape of the crown race.
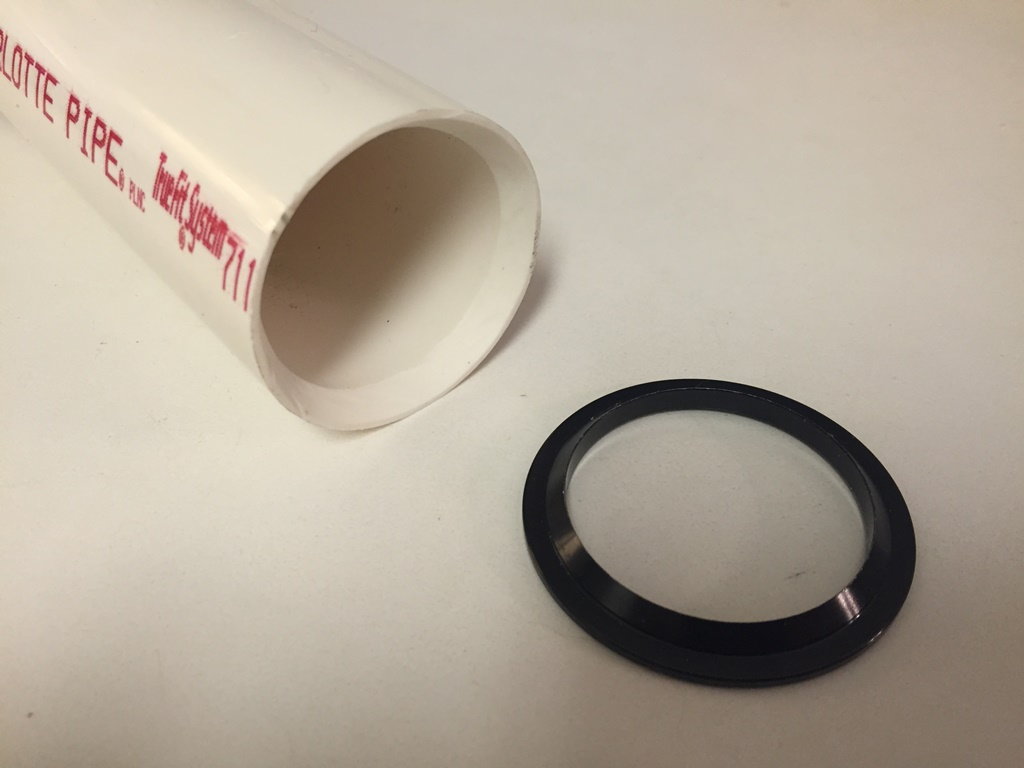
Tap the bottom of the tool and the crown race goes on. A few raps and done. If it doesn't go on then measure and confirm the correct parts.
-Tim-
The crown race is an interference fit (press fit, friction fit). The outside diameter of the steerer is supposed to be slightly larger than the inside diameter of the crown race and is not supposed to slip on easily. It is supposed to be pressed on to the steerer. As a matter of practicality, most home mechanics pound it on rather than press it.
I made a tool out of PVC pipe as shown below. A few hits on the the ground and it went right on. All this assumes that it is the right size. If the crown race doesn't install with a few hits on the tool then it is likely the wrong size.
This photo shows that the steerer is larger than the crown race. It won't slip on...
This is the tool. A dremels was used to approximate the shape of the crown race.
Tap the bottom of the tool and the crown race goes on. A few raps and done. If it doesn't go on then measure and confirm the correct parts.
-Tim-
01-15-19, 06:24 PM
#13
Senior Member
Thread Starter
Join Date: May 2016
Posts: 181
Mentioned: 0 Post(s)
Tagged: 0 Thread(s)
Quoted: 78 Post(s)
Likes: 0
Liked 1 Time
in
1 Post
It isn't correct to file, sand or cut the steerer or crown race. That is not the way it should be done.
The crown race is an interference fit (press fit, friction fit). The outside diameter of the steerer is supposed to be slightly larger than the inside diameter of the crown race and is not supposed to slip on easily. It is supposed to be pressed on to the steerer. As a matter of practicality, most home mechanics pound it on rather than press it.
I made a tool out of PVC pipe as shown below. A few hits on the the ground and it went right on. All this assumes that it is the right size. If the crown race doesn't install with a few hits on the tool then it is likely the wrong size.
This photo shows that the steerer is larger than the crown race. It won't slip on...
This is the tool. A dremels was used to approximate the shape of the crown race.
Tap the bottom of the tool and the crown race goes on. A few raps and done. If it doesn't go on then measure and confirm the correct parts.
-Tim-
01-15-19, 07:19 PM
#14
- Soli Deo Gloria -
Join Date: Aug 2015
Location: Northwest Georgia
Posts: 14,779
Bikes: 2018 Rodriguez Custom Fixed Gear, 2017 Niner RLT 9 RDO, 2015 Bianchi Pista, 2002 Fuji Robaix
Mentioned: 235 Post(s)
Tagged: 0 Thread(s)
Quoted: 6844 Post(s)
Liked 736 Times
in
469 Posts
I think the PVC cost like $5. I was standing in the plumbing aisle in Home Depot slipping pieces of PVC pipe onto a Niner carbon fork and guys were looking at me like WTF?

Let me know if you are in or near Atlanta.
-Tim-
01-15-19, 09:29 PM
#15
Senior Member

Join Date: Dec 2009
Location: Melbourne, Oz
Posts: 9,547
Bikes: https://weightweenies.starbike.com/forum/viewtopic.php?f=10&t=152015&p=1404231
Mentioned: 15 Post(s)
Tagged: 0 Thread(s)
Quoted: 1529 Post(s)
Liked 718 Times
in
510 Posts
Wrap a finger around the base of the steerer and turn the fork. Despite the messy appearance, it should feel smooth and uniform.
I hope you're way off when you say the steerer is a whole mm bigger than the crown race; that would indicate you have the wrong headset. 0.1mm is a very tight interference fit; it's usually less than half that.
If you don't have a vernier caliper, spend the ten bucks.
I hope you're way off when you say the steerer is a whole mm bigger than the crown race; that would indicate you have the wrong headset. 0.1mm is a very tight interference fit; it's usually less than half that.
If you don't have a vernier caliper, spend the ten bucks.
01-16-19, 05:35 AM
#16
Senior Member
Thread Starter
Join Date: May 2016
Posts: 181
Mentioned: 0 Post(s)
Tagged: 0 Thread(s)
Quoted: 78 Post(s)
Likes: 0
Liked 1 Time
in
1 Post
Yeah, a few good raps on the ground and it will eventually seat itself.
I think the PVC cost like $5. I was standing in the plumbing aisle in Home Depot slipping pieces of PVC pipe onto a Niner carbon fork and guys were looking at me like WTF?
Let me know if you are in or near Atlanta.
-Tim-
I think the PVC cost like $5. I was standing in the plumbing aisle in Home Depot slipping pieces of PVC pipe onto a Niner carbon fork and guys were looking at me like WTF?
Let me know if you are in or near Atlanta.
-Tim-
 01-16-19, 05:41 AM
#17
Senior Member
Thread Starter
Join Date: May 2016
Posts: 181
Mentioned: 0 Post(s)
Tagged: 0 Thread(s)
Quoted: 78 Post(s)
Likes: 0
Liked 1 Time
in
1 Post
Wrap a finger around the base of the steerer and turn the fork. Despite the messy appearance, it should feel smooth and uniform.
I hope you're way off when you say the steerer is a whole mm bigger than the crown race; that would indicate you have the wrong headset. 0.1mm is a very tight interference fit; it's usually less than half that.
If you don't have a vernier caliper, spend the ten bucks.
I hope you're way off when you say the steerer is a whole mm bigger than the crown race; that would indicate you have the wrong headset. 0.1mm is a very tight interference fit; it's usually less than half that.
If you don't have a vernier caliper, spend the ten bucks.
01-16-19, 06:58 AM
#18
Banned.

Join Date: Jun 2004
Location: Torrance, CA
Posts: 3,061
Bikes: Homebuilt steel
Mentioned: 18 Post(s)
Tagged: 0 Thread(s)
Quoted: 2193 Post(s)
Liked 425 Times
in
337 Posts
It might be a good idea to find a shop or framebuilder with a fork crown cutting tool to clean up and/or verify the fork has the proper dimensions.
01-16-19, 12:39 PM
#21
- Soli Deo Gloria -
Join Date: Aug 2015
Location: Northwest Georgia
Posts: 14,779
Bikes: 2018 Rodriguez Custom Fixed Gear, 2017 Niner RLT 9 RDO, 2015 Bianchi Pista, 2002 Fuji Robaix
Mentioned: 235 Post(s)
Tagged: 0 Thread(s)
Quoted: 6844 Post(s)
Liked 736 Times
in
469 Posts
Are we talking about cutting crown race seats on carbon forks with a crown race seat mill to reduce the diameter of the seat? Or removing excess epoxy, what would be called "casting slag" on a cast product?
I guess the very idea of excess epoxy doesn't sit well with me, let alone having to remove it. The forks I have used have been very clean at the crown race seat. There was no excess epoxy.
My point is that cutting the crown race seat on a carbon fork to reduce the diameter isn't something that is normally done and I doubt any manufacturer would recommend it or warranty the product after.
-Tim-
01-16-19, 12:48 PM
#22
Banned
It's Your face , You go down on, if the fork fails ,
if you consult a Pro Bike shop, before, they will cost less than the Emergency room MD , you may need after..
if you consult a Pro Bike shop, before, they will cost less than the Emergency room MD , you may need after..
01-16-19, 01:24 PM
#23
Banned.
Join Date: Jun 2004
Location: Torrance, CA
Posts: 3,061
Bikes: Homebuilt steel
Mentioned: 18 Post(s)
Tagged: 0 Thread(s)
Quoted: 2193 Post(s)
Liked 425 Times
in
337 Posts
BTW, I clean up the crown race on a NOS Reynolds Ouzo Pro last weeking using a lathe. All that was needed was a very light cut.
Last edited by Nessism; 01-16-19 at 02:40 PM.
01-16-19, 02:07 PM
#24
- Soli Deo Gloria -
Join Date: Aug 2015
Location: Northwest Georgia
Posts: 14,779
Bikes: 2018 Rodriguez Custom Fixed Gear, 2017 Niner RLT 9 RDO, 2015 Bianchi Pista, 2002 Fuji Robaix
Mentioned: 235 Post(s)
Tagged: 0 Thread(s)
Quoted: 6844 Post(s)
Liked 736 Times
in
469 Posts
Okay Tim, so let me ask then what you would do with the OP's fork? Pound on the race over the steerer tube inconsistencies shown in the photo? Personally, I'd use a fork crown cutting tool to check the diameter and to dress it up, assuming it's not cutting too deep. It the cutter was showing more than just a light skimming over some of the lumps is needed, I'd stop.
BTW, I clean up the crown race on a NOS Reynolds Ouzo Pro last weeking using a lathe. All that was needed was a very light cut.
BTW, I clean up the crown race on a NOS Reynolds Ouzo Pro last weeking using a lathe. All that was needed was a very light cut.
I wasn't trying to challenge, just understand, that's all.
-Tim-
01-16-19, 09:38 PM
#25
Senior Member
Join Date: Jul 2009
Posts: 70
Mentioned: 0 Post(s)
Tagged: 0 Thread(s)
Quoted: 18 Post(s)
Likes: 0
Liked 1 Time
in
1 Post
No cutting needed there. Take a full sheet of wet dry sand paper cut a 3/4 inch strip across the top of the whole sheet and use the shoe shine movement to sand the casting flaws. Then after you have it close take thin super glue and seal up the sanded area. Use a small flat thin paint brush from a hobby store. Put it on thin. After it dries use 600 grit or 800 grit wet dry sand paper to smooth and shine. Clean and smooth as a babies buttox.