


Beefy, alternative front rack for Bike Friday NWT
 08-03-15, 03:52 PM
#1

Bike Butcher of Portland
Thread Starter

Join Date: Jul 2014
Location: Portland, OR
Posts: 11,639
Bikes: It's complicated.
Mentioned: 1299 Post(s)
Tagged: 0 Thread(s)
Quoted: 4682 Post(s)
Liked 5,802 Times
in
2,286 Posts
Beefy, alternative front rack for Bike Friday NWT
Edit: Previously posted on Crazyguyonabike forum
The problem: I've always liked the idea of front-rear weight balance for my gear, however I've never accomplished it, especially on my New World Tourist. The front racks that Bike Friday sells are the only racks that fit properly on their bikes. The short fork doesn't allow a good fit for standard racks.
Alright, that's not the problem. The problem is I'm cheap, and the BF front racks start at around $100. For "standard" wheeled bikes there are several small front racks on the market. On the high end, the Nitto models are examples of well made, beefy racks. Again, over $100. I found some cheap Chinese models for under $20, but I found several reviews complaining about cracked welds.
Solution: Rack-time Top-it, modified
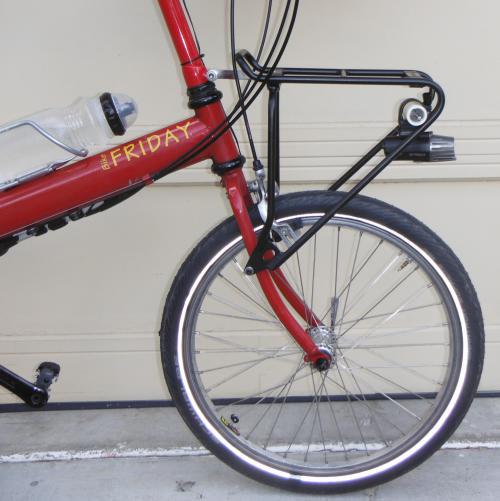
Beefy, German design that won't crack under pressure.
The front fork braze-ons are too narrow for the rack. Unlike bikes with threads that go into the sides of the fork, BF puts theirs behind the blades, so I used spacers. I recommend using grade 8 bolts at this point-stronger than your typical stainless steel bolt. I always use Locktite 242 on my rack attachments. You don't want these loosening up when you're bombing down a hill.

Here's the tricky bit.
The rack comes with an attachment that connects the rack to the fork fender or brake bolt-that is, if you have a "standard" sized wheel, anywhere from 650B to 27". There's no way you can bend the stock attachment piece to fit a 20" wheel front fork.
Solution? Make your own, and attach to the front stem binder bolt. (Note: I use the binder bolt option instead of the quick release type on my bike. If you have a q.r. on yours, it might work, no guarantees).
Material? I used 1/8" stainless steel flat bar stock in 5/8" width. I would not recommend using aluminum stock, this is a single point of failure on a small, loaded joint.
5/8 is slightly wider than the 15mm in the rack that it needs to go through, I used a grinder to narrow it down a bit to fit the rack.
All you need is a way to cut the bar stock, a grinder, vice, adjustable wrench, drill with 2 bits, one just slightly larger than 8mm, the other just slightly bigger than 5mm.
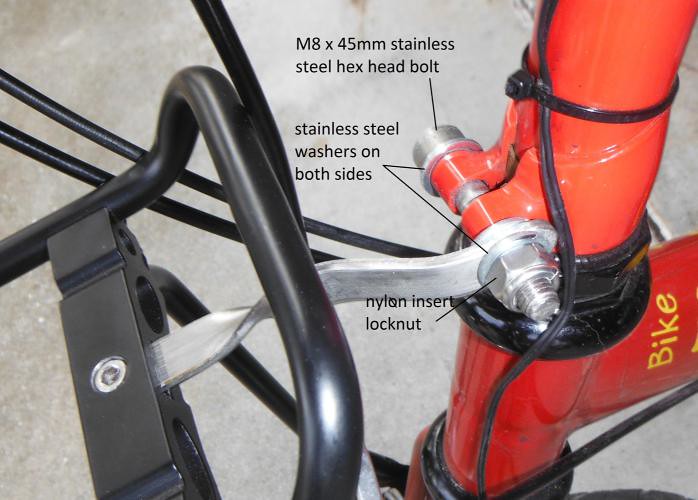
I had a choice to make when designing this. I could have just attached it to the head side of the screw. This worried me-the force from a wiggling, loaded rack, translated to the screw over hundreds and hundreds of miles might loosen it. Another option was to center it between the stem binder slot. This would men having to remove the stem binder bolt to remove the rack. I settled on sandwiching it between the stem binder flat and a lock nut.
Mount the rack on the fork, then swing it up so that it's level to the ground. You can figure out the length you'll need, cut it at least an inch longer than the straight line distance since you'll be bending and twisting the stock.
Replace the stem binder bolt with a M8 x 45mm screw. You'll have about 20mm of thread sticking when you tighten itup. Drill a hole on one end of the bar stock to fit over the bolt threads. Center the hole and leave at least 4mm of material between the hole edge and the bar stock end. You'll need to bend and twist the part to match the slot in the rack. Do this off of the bike in a vise, using an adjustable wrench to grip and twist. Iterate your bends and twists until you slide it into the rack slot easily.
Adjust the rack until it is level, mark the spot on the rack to drill the rack attachment bolt, remove, drill it out slightly larger than 5mm, replace and attach using the Racktime hardware (M5 bolt, flat washer, and nylon insert nut).
Remove the part and grind down sharp edges, round the ends a bit, and reinstall.
I had a friend with a machine shop make a few of these out of stainless steel (the one I show is a prototype). If interested, I have a few, PM me.
The problem: I've always liked the idea of front-rear weight balance for my gear, however I've never accomplished it, especially on my New World Tourist. The front racks that Bike Friday sells are the only racks that fit properly on their bikes. The short fork doesn't allow a good fit for standard racks.
Alright, that's not the problem. The problem is I'm cheap, and the BF front racks start at around $100. For "standard" wheeled bikes there are several small front racks on the market. On the high end, the Nitto models are examples of well made, beefy racks. Again, over $100. I found some cheap Chinese models for under $20, but I found several reviews complaining about cracked welds.
Solution: Rack-time Top-it, modified
Beefy, German design that won't crack under pressure.
The front fork braze-ons are too narrow for the rack. Unlike bikes with threads that go into the sides of the fork, BF puts theirs behind the blades, so I used spacers. I recommend using grade 8 bolts at this point-stronger than your typical stainless steel bolt. I always use Locktite 242 on my rack attachments. You don't want these loosening up when you're bombing down a hill.
Here's the tricky bit.
The rack comes with an attachment that connects the rack to the fork fender or brake bolt-that is, if you have a "standard" sized wheel, anywhere from 650B to 27". There's no way you can bend the stock attachment piece to fit a 20" wheel front fork.
Solution? Make your own, and attach to the front stem binder bolt. (Note: I use the binder bolt option instead of the quick release type on my bike. If you have a q.r. on yours, it might work, no guarantees).
Material? I used 1/8" stainless steel flat bar stock in 5/8" width. I would not recommend using aluminum stock, this is a single point of failure on a small, loaded joint.
5/8 is slightly wider than the 15mm in the rack that it needs to go through, I used a grinder to narrow it down a bit to fit the rack.
All you need is a way to cut the bar stock, a grinder, vice, adjustable wrench, drill with 2 bits, one just slightly larger than 8mm, the other just slightly bigger than 5mm.
I had a choice to make when designing this. I could have just attached it to the head side of the screw. This worried me-the force from a wiggling, loaded rack, translated to the screw over hundreds and hundreds of miles might loosen it. Another option was to center it between the stem binder slot. This would men having to remove the stem binder bolt to remove the rack. I settled on sandwiching it between the stem binder flat and a lock nut.
Mount the rack on the fork, then swing it up so that it's level to the ground. You can figure out the length you'll need, cut it at least an inch longer than the straight line distance since you'll be bending and twisting the stock.
Replace the stem binder bolt with a M8 x 45mm screw. You'll have about 20mm of thread sticking when you tighten itup. Drill a hole on one end of the bar stock to fit over the bolt threads. Center the hole and leave at least 4mm of material between the hole edge and the bar stock end. You'll need to bend and twist the part to match the slot in the rack. Do this off of the bike in a vise, using an adjustable wrench to grip and twist. Iterate your bends and twists until you slide it into the rack slot easily.
Adjust the rack until it is level, mark the spot on the rack to drill the rack attachment bolt, remove, drill it out slightly larger than 5mm, replace and attach using the Racktime hardware (M5 bolt, flat washer, and nylon insert nut).
Remove the part and grind down sharp edges, round the ends a bit, and reinstall.
I had a friend with a machine shop make a few of these out of stainless steel (the one I show is a prototype). If interested, I have a few, PM me.
__________________
If someone tells you that you have enough bicycles and you don't need any more, stop talking to them. You don't need that kind of negativity in your life.
If someone tells you that you have enough bicycles and you don't need any more, stop talking to them. You don't need that kind of negativity in your life.
Last edited by gugie; 08-03-15 at 03:56 PM. Reason: added info
 08-03-15, 04:17 PM
#2
Full Member
When I first got my BF NWT I fitted a Blackburn MTN bike front rack straight onto the front forks..It had 4 attaching points that fit fairly easily to the BF front forks..I remember I had to bend the bottom struts ever so slightly to fit..You could even attach it with a fifth strut to underneath the V brakes..
Later I simply cut off the bottom part of the rack and it fitted straight onto my BF Tikit..with the middle struts and the top one..
You could even fit a front rack from a tern or dahon quite easily and they are fairly cheap..but the Blackburn one was incredibly strong even though it was aluminium..

Thread
Thread Starter
Forum
Replies
Last Post
jmeb
Touring
14
08-01-13 11:41 AM
KtownScott
General Cycling Discussion
1
06-11-12 05:32 AM
shurly
Touring
5
02-04-10 10:02 PM
