


disassembling late 70s suntour Vx gt rear derailleur
 09-15-20, 03:38 PM
#1
Newbie
Thread Starter

disassembling late 70s suntour Vx gt rear derailleur
hi all:
i bought a 1978 (if my serial number sleuthing is correct) centurion lemans 10 speed off craiglist the other day. it seems to have all original components and the guy said that it was garagebound for most of it's life, which means the parts are generally in good condition but they are GRIMY. i'm gonna get the frame refinished and then do more work from there, but for now i'm working on cleaning ALL of it.
it has a gorgeous suntour vx rear mech, which I have mostly disassembled except for the jockey wheels and their little housing (that is, the part I am left with is JUST the wheels and the spring is already out of the picture.) on this specific part, there is an odd nut behind the spring which must be removed before the wheels can be pulled apart. i would attach pictures but as this is my first post the site is not allowing me to. EDIT: images are in a gallery, still can't link but should be on recent under galleries if you check
i went to ace today and picked up some liquid wrench after wd40 proved to be too weak, only to find that after letting it sit for ~30 min BOTH parts are still Very Stuck. wondering if anyone has experience servicing these parts and if there's anything else i could try? i've already messed up both nuts quite a bit trying to get them loose and I don't want to cause any more harm to it also, putting it back together from here and forgetting about cleaning this part is not an option because the jockey wheel with the odd nut is stuck and i imagine i would have to get inside to fix it proper. i took it to a bike shop and asked for their advice and after trying several tools unsuccessfully they recommended that I forget about it, which isn't super helpful. hoping i don't have to buy a replacement because other than this, mine is in much better condition that anything i'm seeing on ebay!
i bought a 1978 (if my serial number sleuthing is correct) centurion lemans 10 speed off craiglist the other day. it seems to have all original components and the guy said that it was garagebound for most of it's life, which means the parts are generally in good condition but they are GRIMY. i'm gonna get the frame refinished and then do more work from there, but for now i'm working on cleaning ALL of it.
it has a gorgeous suntour vx rear mech, which I have mostly disassembled except for the jockey wheels and their little housing (that is, the part I am left with is JUST the wheels and the spring is already out of the picture.) on this specific part, there is an odd nut behind the spring which must be removed before the wheels can be pulled apart. i would attach pictures but as this is my first post the site is not allowing me to. EDIT: images are in a gallery, still can't link but should be on recent under galleries if you check
i went to ace today and picked up some liquid wrench after wd40 proved to be too weak, only to find that after letting it sit for ~30 min BOTH parts are still Very Stuck. wondering if anyone has experience servicing these parts and if there's anything else i could try? i've already messed up both nuts quite a bit trying to get them loose and I don't want to cause any more harm to it
also, putting it back together from here and forgetting about cleaning this part is not an option because the jockey wheel with the odd nut is stuck and i imagine i would have to get inside to fix it proper. i took it to a bike shop and asked for their advice and after trying several tools unsuccessfully they recommended that I forget about it, which isn't super helpful. hoping i don't have to buy a replacement because other than this, mine is in much better condition that anything i'm seeing on ebay!
Last edited by queenmildew; 09-15-20 at 04:11 PM.
 09-15-20, 03:57 PM
#2

Senior Member

Join Date: Sep 2005
Location: Oakland, CA
Posts: 3,265
Bikes: '82 Univega Competizione, '72 Motobecane Grand Record, '83 Mercian KOM Touring, '85 Univega Alpina Uno, '76 Eisentraut Limited
Mentioned: 57 Post(s)
Tagged: 0 Thread(s)
Quoted: 1088 Post(s)
Liked 1,205 Times
in
701 Posts
You’re in luck! Here is a video tutorial on that very derailleur. They’re pretty simple to work on thanks to this video — I’ve done several.
Likes For noobinsf:
09-15-20, 04:00 PM
#3
The dropped

Join Date: Oct 2018
Location: Columbus, OH
Posts: 2,144
Bikes: Pake C'Mute Touring/Commuter Build, 1989 Kona Cinder Cone, 1995 Trek 5200, 1973 Raleigh Super Course FG, 1960/61 Montgomery Ward Hawthorne "thrift" 3 speed, by Hercules (sold) : 1966 Schwinn Deluxe Racer (sold)
Mentioned: 10 Post(s)
Tagged: 0 Thread(s)
Quoted: 1739 Post(s)
Liked 1,014 Times
in
696 Posts
I just did this.
You have the mounting bolt at the left, and on the right you have a knuckle with another 5mm hex.
You have the mounting bolt at the left, and on the right you have a knuckle with another 5mm hex.
- undo that hex bolt
- You'll see a spring wound around a pivot.
- Using a flathead screwdriver, unscrew the cage stop pin(the cage holds the pulleys)
- You'll now be able to unscrew the cage from the parallelogram, and get that bolt out so you can clean and service the pulley.
09-15-20, 04:05 PM
#4
Ride, Wrench, Swap, Race

Join Date: Jan 2010
Location: Northern California
Posts: 9,181
Bikes: Cheltenham-Pedersen racer, Boulder F/S Paris-Roubaix, Varsity racer, '52 Christophe, '62 Continental, '92 Merckx, '75 Limongi, '76 Presto, '72 Gitane SC, '71 Schwinn SS, etc.
Mentioned: 132 Post(s)
Tagged: 0 Thread(s)
Quoted: 1562 Post(s)
Liked 1,285 Times
in
856 Posts
I never bother taking these apart, the key is just to get a thin-bodied (i.e. solvent-diluted) lubricant into the pulley bushings and into the cage pivot.
The pullies will move if you flood the space under the dust shields with a light-bodied lube, then tilt the pulleys on their axis as there is just a bit of free-play to allow this even on brand new pullies.
From there you are good to go.
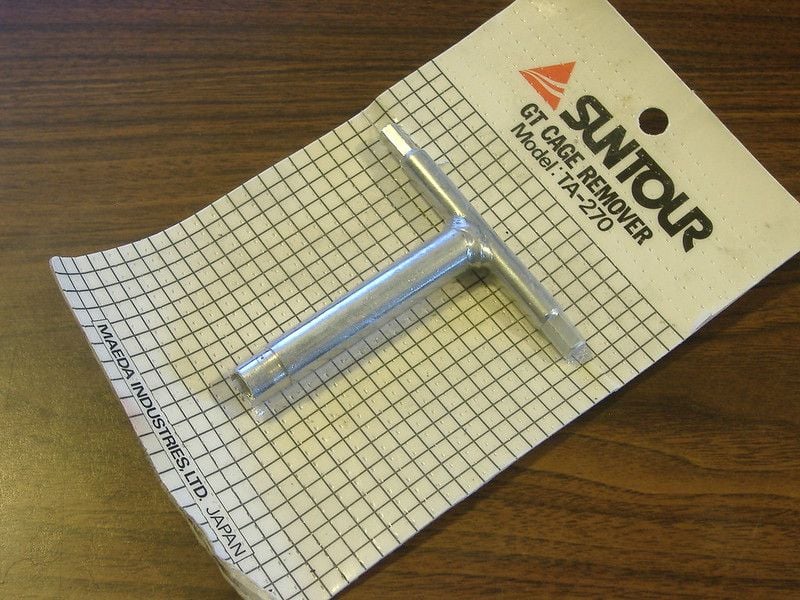
The tool can be found occasionally on Ebay, looks like this:
The pullies will move if you flood the space under the dust shields with a light-bodied lube, then tilt the pulleys on their axis as there is just a bit of free-play to allow this even on brand new pullies.
From there you are good to go.
The tool can be found occasionally on Ebay, looks like this:
09-15-20, 04:06 PM
#5
Newbie
Thread Starter
was following this earlier, my stuck parts are at 0.48 and 3.30 ! the wheel at 3.30 is stuck as well. i have already taken the spring part etc. apart and just left with the pulleys.
09-15-20, 04:38 PM
#6
se�or miembro

Join Date: Dec 2018
Location: Pac NW
Posts: 6,601
Bikes: '70s - '80s Campagnolo
Mentioned: 92 Post(s)
Tagged: 0 Thread(s)
Quoted: 3869 Post(s)
Liked 6,454 Times
in
3,192 Posts
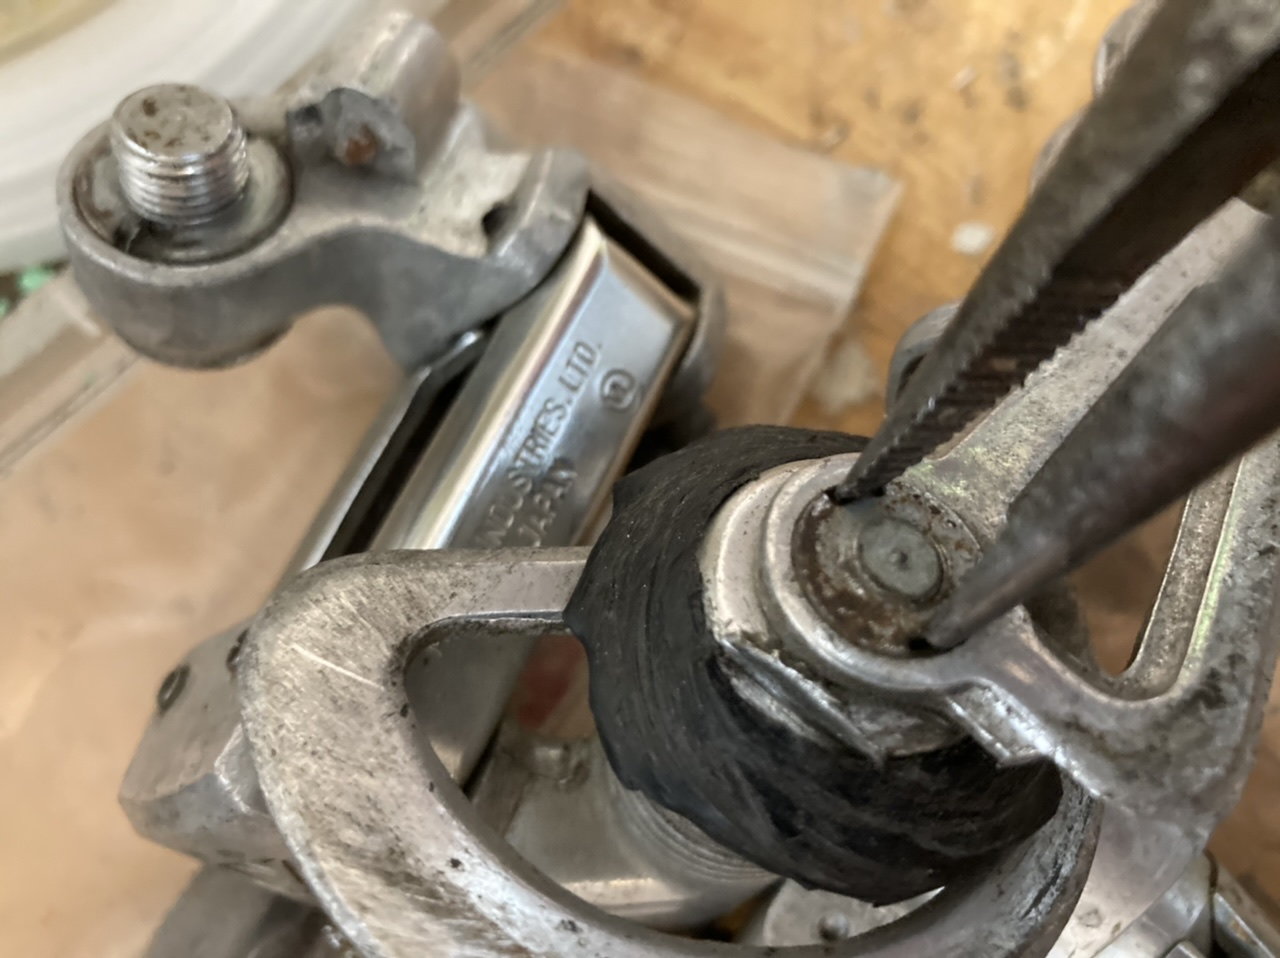
I've always used needle-nose pliers for that two-prong nut behind the jockey wheel. I suppose a hammer and punch (screwdriver) could work if it's stuck.
09-15-20, 05:38 PM
#7
Newbie
Thread Starter
suppose i will try some pliers tomorrow .. .. . i have whacked at it with a hammer and a screwdriver many times now and nothing at all! i suspected i may have warped the piece and pinched the wheel . . . perhaps i should have left it alone but i dont imagine several decades without being cleaned would have been good for it anyways.
Likes For queenmildew:
09-15-20, 06:00 PM
#8
Senior Member
Join Date: Sep 2005
Location: Oakland, CA
Posts: 3,265
Bikes: '82 Univega Competizione, '72 Motobecane Grand Record, '83 Mercian KOM Touring, '85 Univega Alpina Uno, '76 Eisentraut Limited
Mentioned: 57 Post(s)
Tagged: 0 Thread(s)
Quoted: 1088 Post(s)
Liked 1,205 Times
in
701 Posts
I think for the bolt at 0:48, you'll need to continue to try and soak with penetrating oil, and Liquid Wrench is a good one.
For that bolt at 3:30, I agree with SurferRosa about the needle nose pliers -- not pinching so much as treating it like a two-prong screwdriver and rotating it to loosen the bolt (and to tighten when reassembling).
For that bolt at 3:30, I agree with SurferRosa about the needle nose pliers -- not pinching so much as treating it like a two-prong screwdriver and rotating it to loosen the bolt (and to tighten when reassembling).
09-15-20, 06:22 PM
#9
Senior Member
Join Date: Sep 2005
Location: Oakland, CA
Posts: 3,265
Bikes: '82 Univega Competizione, '72 Motobecane Grand Record, '83 Mercian KOM Touring, '85 Univega Alpina Uno, '76 Eisentraut Limited
Mentioned: 57 Post(s)
Tagged: 0 Thread(s)
Quoted: 1088 Post(s)
Liked 1,205 Times
in
701 Posts
Like so...
Likes For noobinsf:
09-16-20, 11:27 AM
#10
Newbie
Thread Starter
I think for the bolt at 0:48, you'll need to continue to try and soak with penetrating oil, and Liquid Wrench is a good one.
For that bolt at 3:30, I agree with SurferRosa about the needle nose pliers -- not pinching so much as treating it like a two-prong screwdriver and rotating it to loosen the bolt (and to tighten when reassembling).
For that bolt at 3:30, I agree with SurferRosa about the needle nose pliers -- not pinching so much as treating it like a two-prong screwdriver and rotating it to loosen the bolt (and to tighten when reassembling).
09-16-20, 11:35 AM
#11
Senior Member
Join Date: Nov 2013
Location: Big Apple
Posts: 1,428
Bikes: yes
Mentioned: 17 Post(s)
Tagged: 0 Thread(s)
Quoted: 512 Post(s)
Likes: 0
Liked 409 Times
in
176 Posts
Needle nosed pliers work fine for that nut.
I have several of those Suntour GT RDs, so I finally sprung for one of the Suntour tools.
This guy apparently has a stock of NOS Suntour stuff and has been selling them for years.
https://www.ebay.com/itm/NOS-SUNTOUR...gAAOSwtpBeXwxq

I have several of those Suntour GT RDs, so I finally sprung for one of the Suntour tools.
This guy apparently has a stock of NOS Suntour stuff and has been selling them for years.
https://www.ebay.com/itm/NOS-SUNTOUR...gAAOSwtpBeXwxq
09-16-20, 11:55 AM
#12
se�or miembro
Join Date: Dec 2018
Location: Pac NW
Posts: 6,601
Bikes: '70s - '80s Campagnolo
Mentioned: 92 Post(s)
Tagged: 0 Thread(s)
Quoted: 3869 Post(s)
Liked 6,454 Times
in
3,192 Posts
 09-17-20, 03:07 PM
#13
Newbie
Thread Starter
i was not able to get the normal nut off BUT i was able to get the odd one off after fiddling around with the little cylinder which the spring wraps around! the wheel is no longer stuck so i will give up on cleaning the lower one and trust that it will work fine in actual use  thank you all!
thank you all!
09-17-20, 03:38 PM
#14
The dropped
Join Date: Oct 2018
Location: Columbus, OH
Posts: 2,144
Bikes: Pake C'Mute Touring/Commuter Build, 1989 Kona Cinder Cone, 1995 Trek 5200, 1973 Raleigh Super Course FG, 1960/61 Montgomery Ward Hawthorne "thrift" 3 speed, by Hercules (sold) : 1966 Schwinn Deluxe Racer (sold)
Mentioned: 10 Post(s)
Tagged: 0 Thread(s)
Quoted: 1739 Post(s)
Liked 1,014 Times
in
696 Posts
i was not able to get the normal nut off BUT i was able to get the odd one off after fiddling around with the little cylinder which the spring wraps around! the wheel is no longer stuck so i will give up on cleaning the lower one and trust that it will work fine in actual use thank you all!
thank you all!
09-17-20, 04:29 PM
#15
Ride, Wrench, Swap, Race
Join Date: Jan 2010
Location: Northern California
Posts: 9,181
Bikes: Cheltenham-Pedersen racer, Boulder F/S Paris-Roubaix, Varsity racer, '52 Christophe, '62 Continental, '92 Merckx, '75 Limongi, '76 Presto, '72 Gitane SC, '71 Schwinn SS, etc.
Mentioned: 132 Post(s)
Tagged: 0 Thread(s)
Quoted: 1562 Post(s)
Liked 1,285 Times
in
856 Posts
One trick I figgered out when using a needle-nose plier for such twisting duties is to first position the plier tips, and then use an adjustable wrench to apply the torque right next to the nut, so that the tips don't tend to lean over and slip out of the slots. You can apply a lot more torque this way.
The Suntour pulleys are made of good plastic, why they make such excellent replacements for Simplex derailers to be put into hard service!
As such, one can apply a bit of sideways prying force against these pulleys after flooding the dust shield spaces with light lube. This should break the "glued" bond of the old grease on the large-diameter Suntour pulley bushing.
09-17-20, 04:39 PM
#16
The dropped
Join Date: Oct 2018
Location: Columbus, OH
Posts: 2,144
Bikes: Pake C'Mute Touring/Commuter Build, 1989 Kona Cinder Cone, 1995 Trek 5200, 1973 Raleigh Super Course FG, 1960/61 Montgomery Ward Hawthorne "thrift" 3 speed, by Hercules (sold) : 1966 Schwinn Deluxe Racer (sold)
Mentioned: 10 Post(s)
Tagged: 0 Thread(s)
Quoted: 1739 Post(s)
Liked 1,014 Times
in
696 Posts
Do you mean that you carved up a cone wrench to fit the slotted nut?
One trick I figgered out when using a needle-nose plier for such twisting duties is to first position the plier tips, and then use an adjustable wrench to apply the torque right next to the nut, so that the tips don't tend to lean over and slip out of the slots. You can apply a lot more torque this way.
The Suntour pulleys are made of good plastic, why they make such excellent replacements for Simplex derailers to be put into hard service!
As such, one can apply a bit of sideways prying force against these pulleys after flooding the dust shield spaces with light lube. This should break the "glued" bond of the old grease on the large-diameter Suntour pulley bushing.
I used this thing to unscrew the spring torsion bar that also acts as the pulley axle.

It's leftover from some flat pack furniture kit.
09-18-20, 06:22 AM
#17
Senior Member
Join Date: Nov 2013
Location: Near Pottstown, PA: 30 miles NW of Philadelphia
Posts: 2,185
Bikes: 2 Trek Mtn, Cannondale R600 road, 6 vintage road bikes
Mentioned: 83 Post(s)
Tagged: 0 Thread(s)
Quoted: 472 Post(s)
Liked 1,028 Times
in
404 Posts
I made a tool for this. I plucked an old tool box out of the tip at the recycle center. I tossed the tools in my recycle bin and kept the tool box. But several day later I got to thinking about this nut driver. I got out the Dremel tool and modified the end of the "socket" to fit those Suntour weird nuts. The OD of the socket is 11mm. It fits those nuts quite well. If needed, I can use a small wrench on the plastic handle for more torque while pushing down to hold it in place. Note how thin the two teeth need to be to fit that nut. Now that I have the tool I can loosen and retighten those nuts each spring to prevent them corroding in place. I have three Cyclone RDs now so this is nice to have.
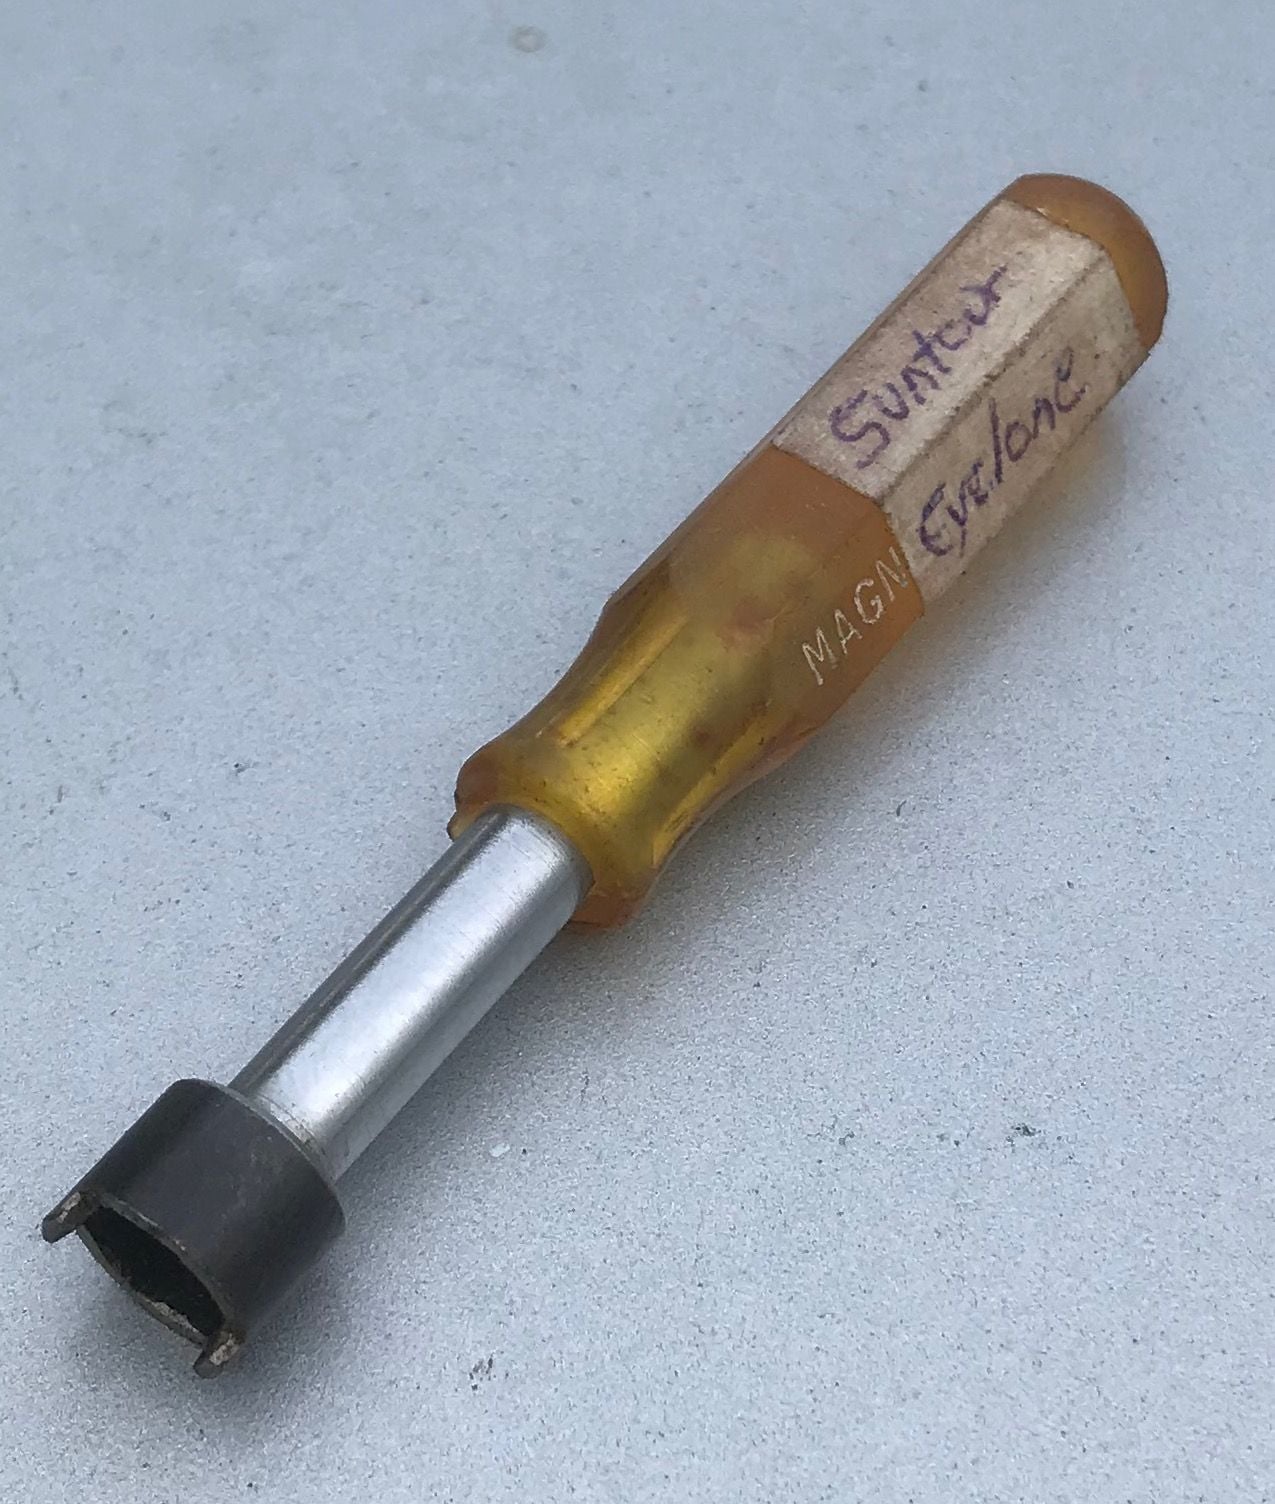
Likes For Prowler:
