


Hack for removing a Hollow tech crank cap?
 03-23-24, 08:58 AM
#1
Senior Member
Thread Starter
Join Date: May 2008
Location: Toronto, Canada
Posts: 895
Bikes: (shortlist) Cyclops, Marinoni, Mariposa, Air Firday, Pocket Rocket Pro, NWT, SLX Fuso, Claude Pottie (France) x3, Masi Team 3v, Lemond Zurich, Bianchi OS
Mentioned: 2 Post(s)
Tagged: 0 Thread(s)
Quoted: 168 Post(s)
Liked 34 Times
in
27 Posts
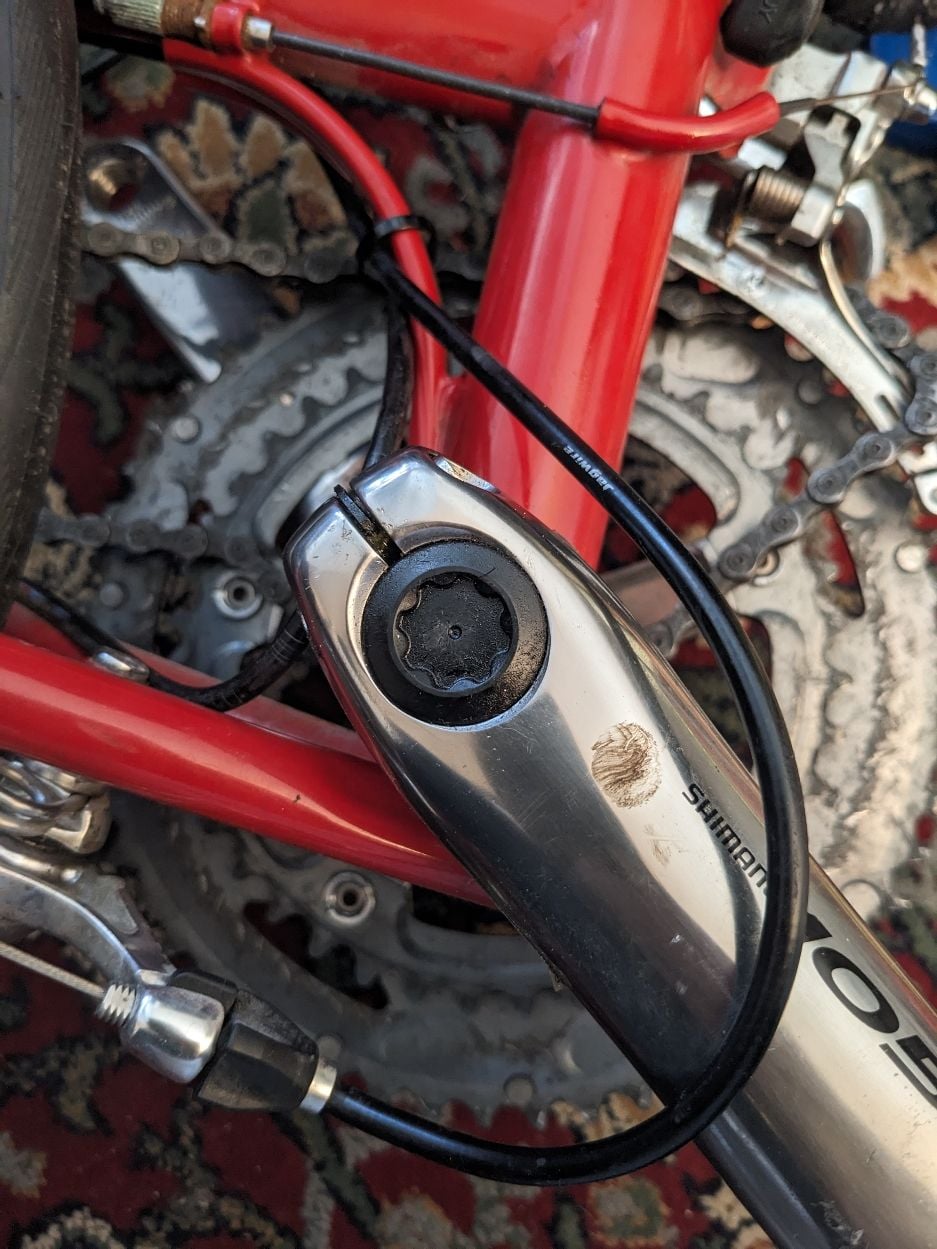
Hack for removing a Hollow tech crank cap?
I don't have the tool handy to remove this crank arm cap.
there must be a hack to get it off without the correct key.
anyone?
there must be a hack to get it off without the correct key.
anyone?

Likes For streetsurfer:
03-23-24, 09:10 AM
#3

I'm good to go!
Join Date: Jul 2017
Location: Mississippi
Posts: 14,992
Bikes: Tarmac Disc Comp Di2 - 2020
Mentioned: 51 Post(s)
Tagged: 0 Thread(s)
Quoted: 6196 Post(s)
Liked 4,810 Times
in
3,318 Posts
Push some modeling clay in there and shape the end into a cylinder so your can twist with your fingers. Let it harden. Though the last time I looked for modeling clay that would harden, I couldn't find any anywhere local.
Or get some epoxy wood filler from the big box building supply store and do the same. Might put a piece of the plastic bag that the store clerk put it in when you checked out between the epoxy and the cap.
Or go to the local bike shop and pay for the Park Tool that removes them. Unless you just want to take the whole bike and see if they'll loosen it for free with theirs.
I'm assuming you already tried to see if you could rotate it with just a punch or screwdriver hooked in one of the flutes.
03-23-24, 09:11 AM
#4
...
Join Date: Oct 2021
Location: Whitestone and Rensselaerville, New York
Posts: 1,518
Bikes: Bicycles? Yup.
Mentioned: 8 Post(s)
Tagged: 0 Thread(s)
Quoted: 482 Post(s)
Liked 1,593 Times
in
739 Posts
You want the tool. It's used to pre-load the crankset to hand-tight when reassembling.
That being said, you have to loosen the crankarm bolts before loosening the cap. It may come out by hand.
And the oppo when reassembling.
That being said, you have to loosen the crankarm bolts before loosening the cap. It may come out by hand.
And the oppo when reassembling.
Likes For BTinNYC:

Likes For choddo:
03-23-24, 09:52 AM
#6
LR�P=HR
Join Date: Sep 2019
Location: SF Bay Area
Posts: 2,180
Bikes: 1981 Holdsworth Special, 1993 C-dale MT3000 & 1996 F700CAD3, 2018 Cervelo R3 & 2022 R5, JustGo Runt, Ridley Oval, Kickr Bike 8-)
Mentioned: 2 Post(s)
Tagged: 0 Thread(s)
Quoted: 867 Post(s)
Liked 1,205 Times
in
694 Posts
That cap must not be tight. Tightening it with a tool will cause BB bearings wear!
That weak plastic cap does not retain the crank arm, it is there to preload the bearings before you tighten the two retaining bolts on the crank arm.
It is tightening the crank arm bolts that causes the cap to stick in its threads.
Loosen the crank arm bolts and the cap should come out with not much more than your thumb.
Barry
03-23-24, 10:37 AM
#7
Senior Member

Join Date: May 2010
Location: Bastrop Texas
Posts: 4,481
Bikes: Univega, Peu P6, Peu PR-10, Ted Williams, Peu UO-8, Peu UO-18 Mixte, Peu Dolomites
Mentioned: 13 Post(s)
Tagged: 0 Thread(s)
Quoted: 967 Post(s)
Liked 1,631 Times
in
1,047 Posts
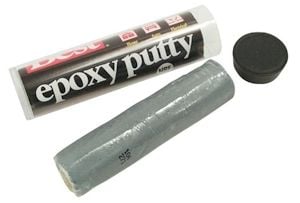
Grease up the cap. Forcefully press in 5 min epoxy putty into the hole and leave enough pancaked out the top to give you a good grip to turn it out once it hardens.
Come on man... You know this...
Come on man... You know this...
...That cap must not be tight. Tightening it with a tool will cause BB bearings wear! That weak plastic cap does not retain the crank arm, it is there to preload the bearings before you tighten the two retaining bolts on the crank arm. It is tightening the crank arm bolts that causes the cap to stick in its threads. Loosen the crank arm bolts and the cap should come out with not much more than your thumb...
__________________
 No matter where you're at... There you are... Δf:=f(1/2)-f(-1/2)
No matter where you're at... There you are... Δf:=f(1/2)-f(-1/2)Last edited by zandoval; 03-23-24 at 10:41 AM.
03-23-24, 10:49 AM
#8
Senior Member
Join Date: Apr 2016
Posts: 1,236
Mentioned: 3 Post(s)
Tagged: 0 Thread(s)
Quoted: 501 Post(s)
Liked 435 Times
in
334 Posts
I find Amazon, free next day delivery or sometimes even same day, is a great hack. But otherwise can you find something square that fits well enough?
03-23-24, 11:35 AM
#9
Senior Member
Thread Starter
Join Date: May 2008
Location: Toronto, Canada
Posts: 895
Bikes: (shortlist) Cyclops, Marinoni, Mariposa, Air Firday, Pocket Rocket Pro, NWT, SLX Fuso, Claude Pottie (France) x3, Masi Team 3v, Lemond Zurich, Bianchi OS
Mentioned: 2 Post(s)
Tagged: 0 Thread(s)
Quoted: 168 Post(s)
Liked 34 Times
in
27 Posts
Just to add a little to the above….
That cap must not be tight. Tightening it with a tool will cause BB bearings wear!
That weak plastic cap does not retain the crank arm, it is there to preload the bearings before you tighten the two retaining bolts on the crank arm.
It is tightening the crank arm bolts that causes the cap to stick in its threads.
Loosen the crank arm bolts and the cap should come out with not much more than your thumb.
Barry
my Today project was not a permanent installation of the cranks but rather just to temporarily remove the LH arm so I could access something near the bottom bracket.
Understanding how it all works (i.e. that the cap doesn't actually hold anything in place) was the key.
Loosening the two bolts relieved the pressure on the cap and allowed me with piece of correctly sized metal (to span the cap) to remove the cap.
I have the correct tool in my shop, though it is 2 hours from here.
mission accomplished
Likes For pstock:
03-23-24, 11:54 AM
#10
Sr Member on Sr bikes

That splined interface is not unlike the splined interface of Shimano freewheels. I have all the correct freewheel tools, but have discovered (and actually used) a hex 13/16th nut will fit snugly, and work to remove the freewheel. So�look for a bolt with a hex head that fits in that splined interface. If you use two nuts on the bolt, that will give you something to put a wrench on. Otherwise, you�d just have to use visegrips or channel locks on the threads of the bolt. � Dan
03-23-24, 12:29 PM
#12
Senior Member
Join Date: Oct 2013
Location: Mich
Posts: 7,395
Bikes: RSO E-tire dropper fixie brifter
Mentioned: 0 Post(s)
Tagged: 0 Thread(s)
Quoted: 6 Post(s)
Liked 2,979 Times
in
1,920 Posts
Could try a NPT pipe cap... pvc might lessen the chances of deforming stuff.
__________________
-Oh Hey!
-Oh Hey!
03-23-24, 01:07 PM
#13
SE Wis
Join Date: Apr 2005
Location: Milwaukee, WI
Posts: 10,516
Bikes: '68 Raleigh Sprite, '02 Raleigh C500, '84 Raleigh Gran Prix, '91 Trek 400, 2013 Novara Randonee, 1990 Trek 970
Mentioned: 40 Post(s)
Tagged: 0 Thread(s)
Quoted: 2747 Post(s)
Liked 3,401 Times
in
2,058 Posts
03-23-24, 02:35 PM
#14
Junior Member
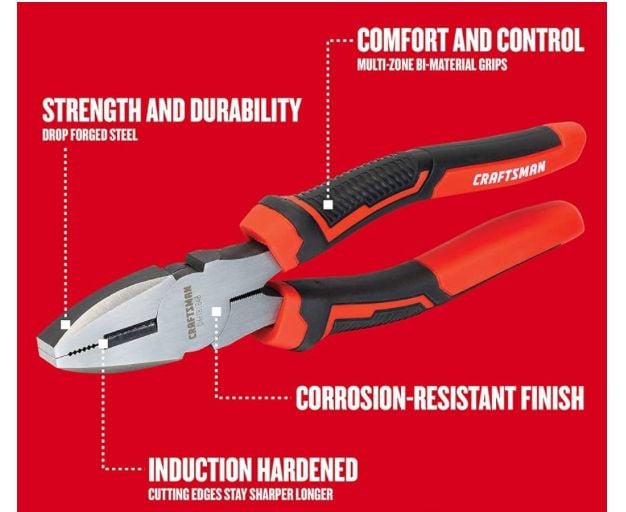
I�ve used a pliers similar to this one, with pliers closed the nose fits nicely into the cap. I now do have the proper tool, though.
03-23-24, 04:13 PM
#15
Sr Member on Sr bikes
03-23-24, 08:55 PM
#17
Senior Member
Join Date: Apr 2011
Posts: 7,067
Mentioned: 41 Post(s)
Tagged: 0 Thread(s)
Quoted: 4409 Post(s)
Liked 1,566 Times
in
1,028 Posts
He got it out already.
Likes For Kontact:
