


Building A Trailer Hitch
 02-19-11, 03:38 AM
#26
Senior Member
Thread Starter
Join Date: Sep 2010
Posts: 100
Mentioned: 0 Post(s)
Tagged: 0 Thread(s)
Quoted: 0 Post(s)
Likes: 0
Liked 0 Times
in
0 Posts
.........
Here is the Mixer 8 and the trailer.....
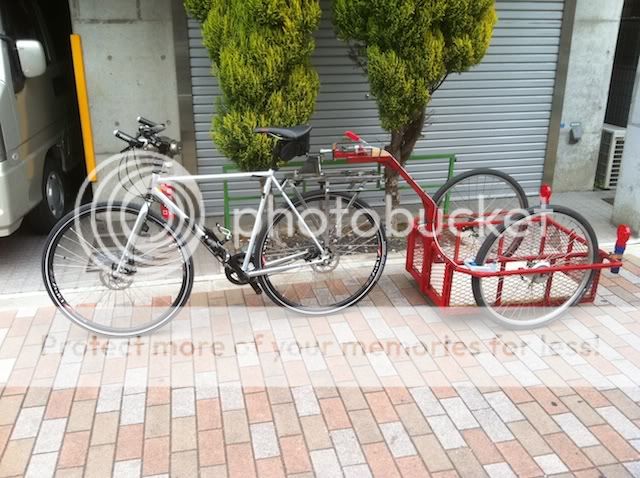
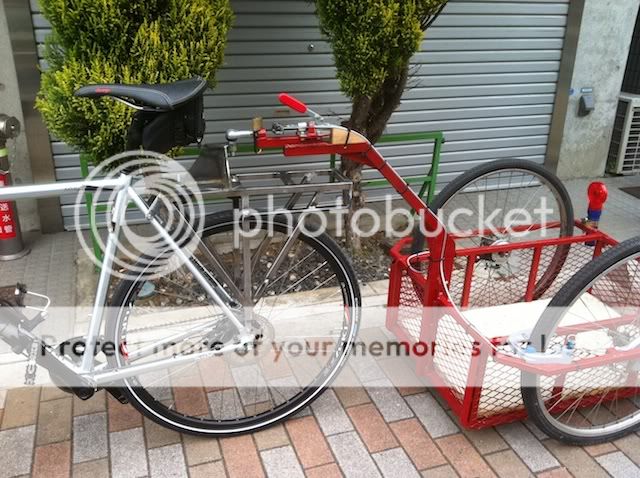
and soon after that, I took the new set up on it's maiden delivery.....

That is about 60Kg/130lbs of weight on there, a medium load. Things were great, it handles like a dream, the new bike is very responsive!
I now need to get some clip-less pedals, and a kick stand.
The kick stand may be a bit of a problem, I want the bi-pod stand like I have on the Cannondale, but the area just behind the BB on this bike is quite small, so I don't know if it will fit, might have to get out the grinder and make it fit, as I really want that bi-pod stand.
Next up will be some paint, but I'm thinking of trying to find some company to galvanize it, I think that would be very cool, it would really complete the whole thing, it should look good and it should also not rust as soon as a chipped paint version would.
I said I know this is not lightweight, and it isn't but I think it should last, the weak point now is going to be the frame, but it is bolted securely to four points on mounts that the maker intended to carry weight, so......?
I guess time will tell
Cheers!
Here is the Mixer 8 and the trailer.....
and soon after that, I took the new set up on it's maiden delivery.....
That is about 60Kg/130lbs of weight on there, a medium load. Things were great, it handles like a dream, the new bike is very responsive!
I now need to get some clip-less pedals, and a kick stand.
The kick stand may be a bit of a problem, I want the bi-pod stand like I have on the Cannondale, but the area just behind the BB on this bike is quite small, so I don't know if it will fit, might have to get out the grinder and make it fit, as I really want that bi-pod stand.
Next up will be some paint, but I'm thinking of trying to find some company to galvanize it, I think that would be very cool, it would really complete the whole thing, it should look good and it should also not rust as soon as a chipped paint version would.
I said I know this is not lightweight, and it isn't but I think it should last, the weak point now is going to be the frame, but it is bolted securely to four points on mounts that the maker intended to carry weight, so......?
I guess time will tell
Cheers!
 02-19-11, 04:14 AM
#27
Full Member
Join Date: Jun 2009
Location: Norwich, Norfolk. UK
Posts: 316
Bikes: 2006 Falcon Explorer Hybrid, 2008 Landrover Visalia Crossover, 2010 Cargo Cycles Senton, 2010 Cargo Cycles Capability, and a 2001 AVD quad pedi-van, 1980 Peugeot Carbolite 10sp racer
Mentioned: 2 Post(s)
Tagged: 0 Thread(s)
Quoted: 21 Post(s)
Liked 24 Times
in
7 Posts
Wow! that looks great (but it does seem like an awful lot of steel to be lugging around).
Hot dip galvanize would possibly be out of the question, because you will need to drill expansion/drain holes in the box section for the process to work without the heat warping the frame. But hot sprayed galvanizing would work: and you'll have a few different colours to choose from. Spray it with a good clear Polyurethane varnish when it's done and the finish will look great for years (Galvanizing does dull over time as the surface Oxidises).
Hot dip galvanize would possibly be out of the question, because you will need to drill expansion/drain holes in the box section for the process to work without the heat warping the frame. But hot sprayed galvanizing would work: and you'll have a few different colours to choose from. Spray it with a good clear Polyurethane varnish when it's done and the finish will look great for years (Galvanizing does dull over time as the surface Oxidises).
02-19-11, 05:04 AM
#28
Senior Member
Thread Starter
Join Date: Sep 2010
Posts: 100
Mentioned: 0 Post(s)
Tagged: 0 Thread(s)
Quoted: 0 Post(s)
Likes: 0
Liked 0 Times
in
0 Posts
Wow! that looks great (but it does seem like an awful lot of steel to be lugging around).
Hot dip galvanize would possibly be out of the question, because you will need to drill expansion/drain holes in the box section for the process to work without the heat warping the frame. But hot sprayed galvanizing would work: and you'll have a few different colours to choose from. Spray it with a good clear Polyurethane varnish when it's done and the finish will look great for years (Galvanizing does dull over time as the surface Oxidises).
Hot dip galvanize would possibly be out of the question, because you will need to drill expansion/drain holes in the box section for the process to work without the heat warping the frame. But hot sprayed galvanizing would work: and you'll have a few different colours to choose from. Spray it with a good clear Polyurethane varnish when it's done and the finish will look great for years (Galvanizing does dull over time as the surface Oxidises).

Yeah, the hot dip would be nice but I agree I'll have to get it sprayed, maybe. I'm looking now, but we are not having much success finding anything, I think I'll just paint it and not worry about it too much.
I know it is a lot of steel to lug around, but I just cannot stress how heavy a load I will be carrying every single day. The new customer that prompted this new bike will require a minimum of one 20L keg of beer and one large case of beer bottles, those two items alone will be 120lbs, and with all the other items, I expect to be hauling nearly 200lbs each day. I do not want constant failures in my trailer or hitch. My biggest fear is that the rear triangle of the bike will fail, but I hope not
 02-19-11, 01:09 PM
#29
Senior Member
Thread Starter
Join Date: Sep 2010
Posts: 100
Mentioned: 0 Post(s)
Tagged: 0 Thread(s)
Quoted: 0 Post(s)
Likes: 0
Liked 0 Times
in
0 Posts
So tonight I decided to try and lighten the hitch a bit..... ")
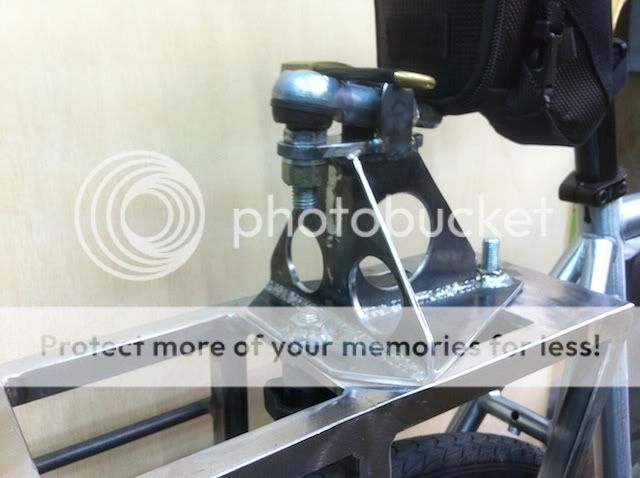
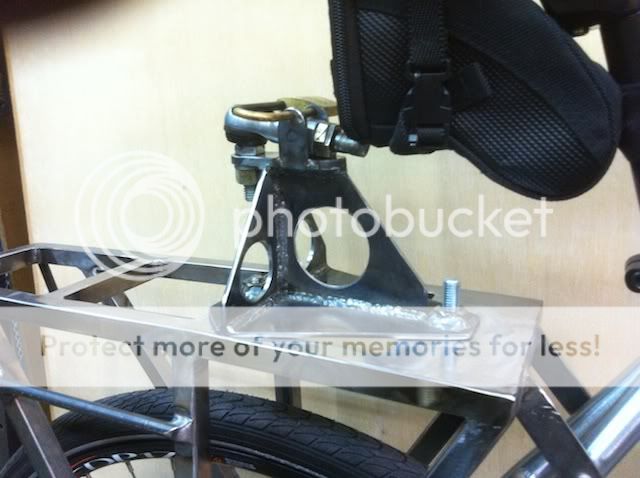
I know it does not REALLY lighten it much, but it does make it LOOK lighter :cool:
I also worked on the bottom contact point of the rack, down near the rear axle, I was not satisfied with the way it was.....
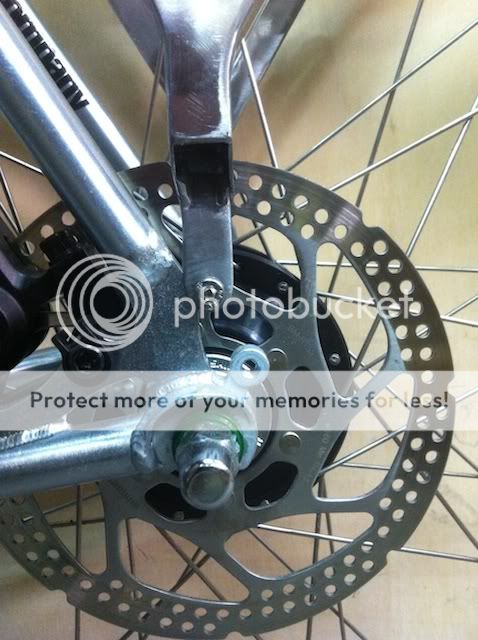
Not much beef there, and I thought it should be a bit stouter.
Taking it right off the axle was not really an option, because of this flange that the frame has....
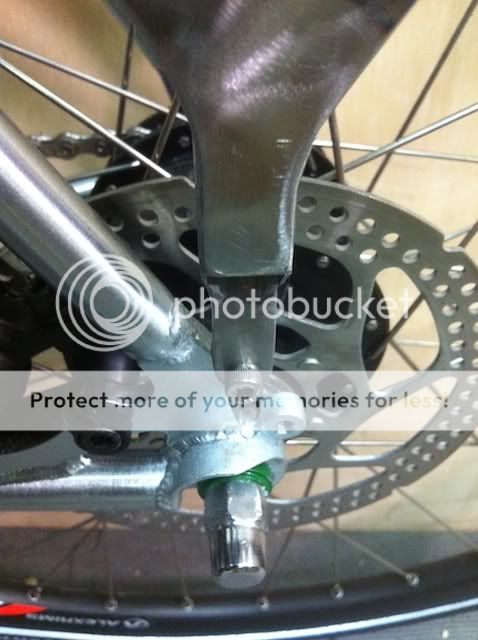
Kind of hard to work around that
This is what I came up with (on the other side, I still have the left side to build).......
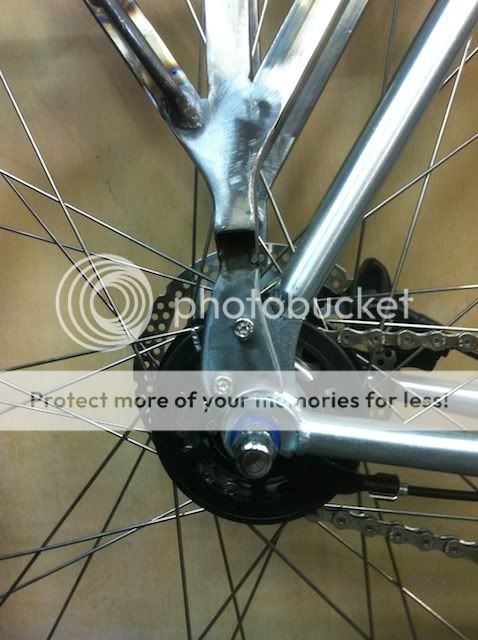
I missed ever so slightly on the arc of the bottom piece, I wish it would have matched perfectly, I might just pull it off and weld some on the edge and then grind/file it back some This way I'm using the fender mount as well as the rack mount, more beef too, so I think it should be able to handle more stress.
Again I'll say I know it is a lot of steel to be hauling around, but the trailer weighs 23Kg alone and the beer often weighs well over 60Kg so another 3 or 4 Kg really is not going to make a difference, I'm not trying to win races, or go touring with this set up, this bike is a work bike, it is for hauling a trailer full of beer around
Cheers!
I know it does not REALLY lighten it much, but it does make it LOOK lighter :cool:
I also worked on the bottom contact point of the rack, down near the rear axle, I was not satisfied with the way it was.....
Not much beef there, and I thought it should be a bit stouter.
Taking it right off the axle was not really an option, because of this flange that the frame has....
Kind of hard to work around that
This is what I came up with (on the other side, I still have the left side to build).......
I missed ever so slightly on the arc of the bottom piece, I wish it would have matched perfectly, I might just pull it off and weld some on the edge and then grind/file it back some
This way I'm using the fender mount as well as the rack mount, more beef too, so I think it should be able to handle more stress.Again I'll say I know it is a lot of steel to be hauling around, but the trailer weighs 23Kg alone and the beer often weighs well over 60Kg so another 3 or 4 Kg really is not going to make a difference, I'm not trying to win races, or go touring with this set up, this bike is a work bike, it is for hauling a trailer full of beer around
Cheers!
02-19-11, 02:16 PM
#30

Humvee of bikes =Worksman

Join Date: May 2004
Posts: 5,362
Mentioned: 0 Post(s)
Tagged: 0 Thread(s)
Quoted: 10 Post(s)
Likes: 0
Liked 6 Times
in
6 Posts
As an engineer I noted right away the one weak spot in your design. I'm glad to see that you finally noted that same weak spot and fixed it!

__________________
My preferred bicycle brand is.......WORKSMAN CYCLES
I dislike clipless pedals on any city bike since I feel they are unsafe.
Originally Posted by krazygluon
Steel: nearly a thousand years of metallurgical development
Aluminum: barely a hundred, which one would you rather have under your butt at 30mph?
03-09-11, 03:45 AM
#31
Full Member
Join Date: Jun 2009
Location: Norwich, Norfolk. UK
Posts: 316
Bikes: 2006 Falcon Explorer Hybrid, 2008 Landrover Visalia Crossover, 2010 Cargo Cycles Senton, 2010 Cargo Cycles Capability, and a 2001 AVD quad pedi-van, 1980 Peugeot Carbolite 10sp racer
Mentioned: 2 Post(s)
Tagged: 0 Thread(s)
Quoted: 21 Post(s)
Liked 24 Times
in
7 Posts
Hey Stu,
I would like to ask a question about your trailer.
I see that it has brakes ....
Are these just parking brakes? ...... ..... ...... or do you have them connected to the drawbar with a spring release telescoping over run type system similar to those found on light to medium car trailers? ..... if so how do balance each side?
I have been working on an over run trailer braking system, and I'm finding it almost impossible to achieve a correct balance under braking, with the trailer slowing and pulling up straight ..... I am experiencing slew and snaking braking to one side or the other.
I have to get this one perfectly right, as the trailer will be carrying up to 4 bike polo hacks, mallets balls and cones for my local Bike polo club for practice session here in Norwich.
03-09-11, 04:36 AM
#32
Senior Member
Thread Starter
Join Date: Sep 2010
Posts: 100
Mentioned: 0 Post(s)
Tagged: 0 Thread(s)
Quoted: 0 Post(s)
Likes: 0
Liked 0 Times
in
0 Posts
Hey Stu,
I would like to ask a question about your trailer.
I see that it has brakes ....
Are these just parking brakes? ...... ..... ...... or do you have them connected to the drawbar with a spring release telescoping over run type system similar to those found on light to medium car trailers? ..... if so how do balance each side?
I have been working on an over run trailer braking system, and I'm finding it almost impossible to achieve a correct balance under braking, with the trailer slowing and pulling up straight ..... I am experiencing slew and snaking braking to one side or the other.
I have to get this one perfectly right, as the trailer will be carrying up to 4 bike polo hacks, mallets balls and cones for my local Bike polo club for practice session here in Norwich.
I would like to ask a question about your trailer.
I see that it has brakes ....
Are these just parking brakes? ...... ..... ...... or do you have them connected to the drawbar with a spring release telescoping over run type system similar to those found on light to medium car trailers? ..... if so how do balance each side?
I have been working on an over run trailer braking system, and I'm finding it almost impossible to achieve a correct balance under braking, with the trailer slowing and pulling up straight ..... I am experiencing slew and snaking braking to one side or the other.
I have to get this one perfectly right, as the trailer will be carrying up to 4 bike polo hacks, mallets balls and cones for my local Bike polo club for practice session here in Norwich.
I would love to have the brakes on the trailer linked to the rear brake on the bike, that would be so very cool!
One idea I got from some kind soul was to use an old friction thumb shifter to make a drag brake, so if you have a long hill to go down, you would just apply a bit of brake for the trailer.
I think to make a set up that would work with the back brakes of the bike, you would need to go disc brakes and hydraulics where you could have the line spit to three, two for the trailer and one for the rear brake. The other idea I have is to build a solid axle trailer, and put a disc brake in the center of the axle, this way the braking force on both trailer wheels should be equal.
Cheers!
03-10-11, 04:33 PM
#33
Full Member
Join Date: Jun 2009
Location: Norwich, Norfolk. UK
Posts: 316
Bikes: 2006 Falcon Explorer Hybrid, 2008 Landrover Visalia Crossover, 2010 Cargo Cycles Senton, 2010 Cargo Cycles Capability, and a 2001 AVD quad pedi-van, 1980 Peugeot Carbolite 10sp racer
Mentioned: 2 Post(s)
Tagged: 0 Thread(s)
Quoted: 21 Post(s)
Liked 24 Times
in
7 Posts
I think that I am now on the right road with this project.
Instead of two cables: one to each side coming off the sping loaded return telescoping drawbar, I will have only one going down to a two way cable splitter as found on BMX and trick bikes. With the individual cables then running to each wheel and the disc brake assemblies.

I have to shelve trhis project for the next week or so, because of incoming order for more camel saddles, even more Pallet reclamation bars and a quad for a magic show.
Camel saddles:
Instead of two cables: one to each side coming off the sping loaded return telescoping drawbar, I will have only one going down to a two way cable splitter as found on BMX and trick bikes. With the individual cables then running to each wheel and the disc brake assemblies.
I have to shelve trhis project for the next week or so, because of incoming order for more camel saddles, even more Pallet reclamation bars and a quad for a magic show.
Camel saddles:
04-26-11, 07:54 AM
#34
Senior Member
Thread Starter
Join Date: Sep 2010
Posts: 100
Mentioned: 0 Post(s)
Tagged: 0 Thread(s)
Quoted: 0 Post(s)
Likes: 0
Liked 0 Times
in
0 Posts
A Minor Hitch......
..... or at least a lighter hitch
The very strong, and very heavy rack I build for the back of my Mixer 8 to tow my trailer has worked well, really, it has been a good performer, but, man it makes the bike heavy I could live with that, but I'm finding that having the hitching point over the center of the back wheel is not so good.
If I turn and the trailer is loaded, it kind of makes the bike want to stand up, instead of lean into a corner, if I hit the brakes in a corner, it is even worse. Before with the Cannondale I had the hitch point much closer to the seat post, and I did not feel this "Push" like I do now.
I'll ditch the rear rack and shave off a bunch of weight.
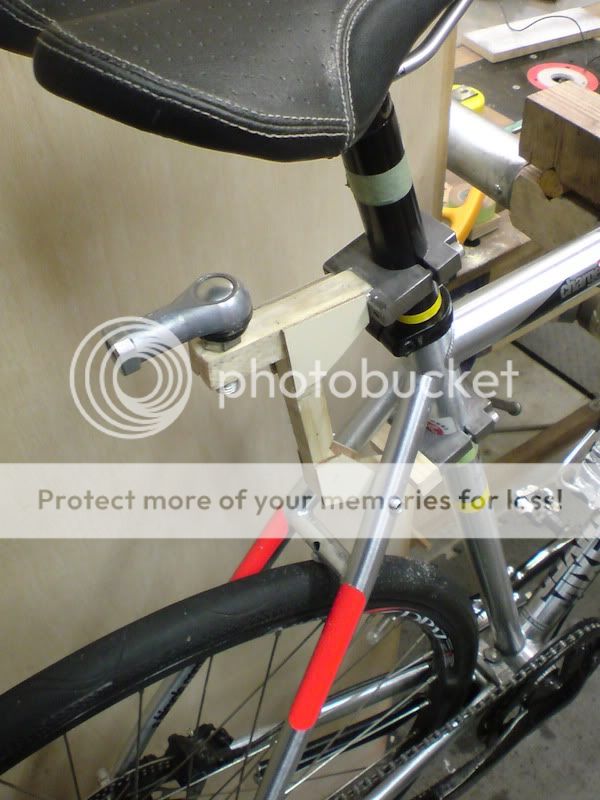
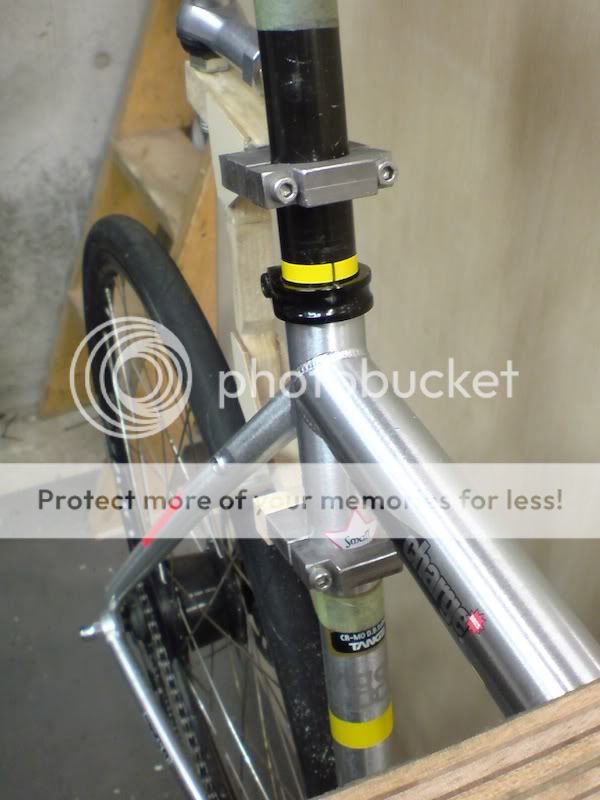
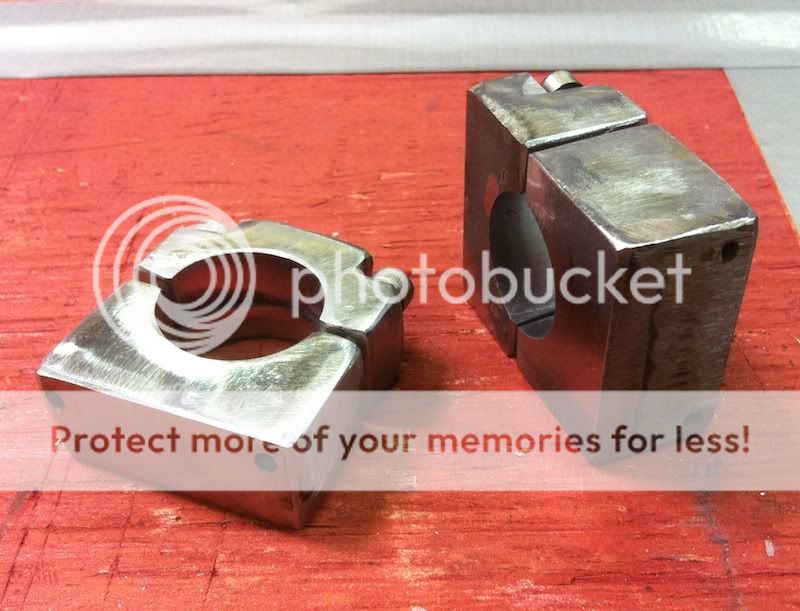
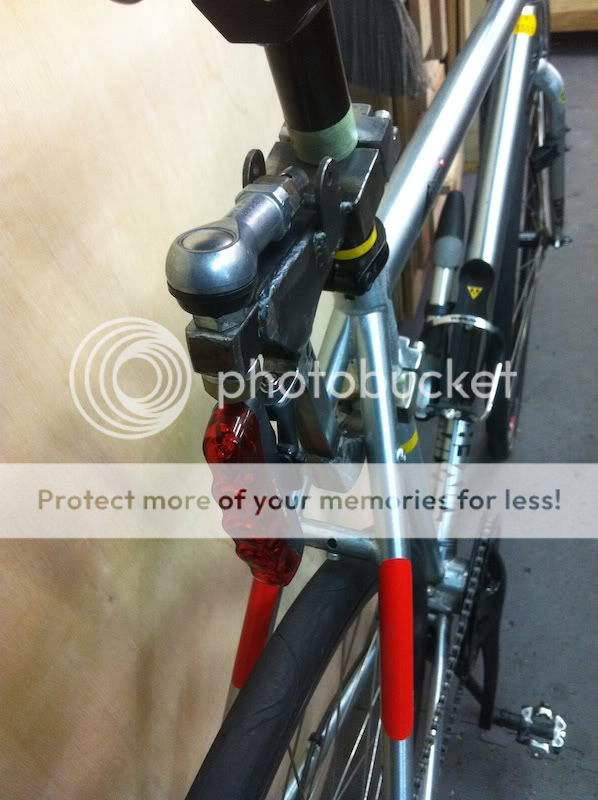
My plan is to make a hitch that clamps onto the seatpost and the seat tube.
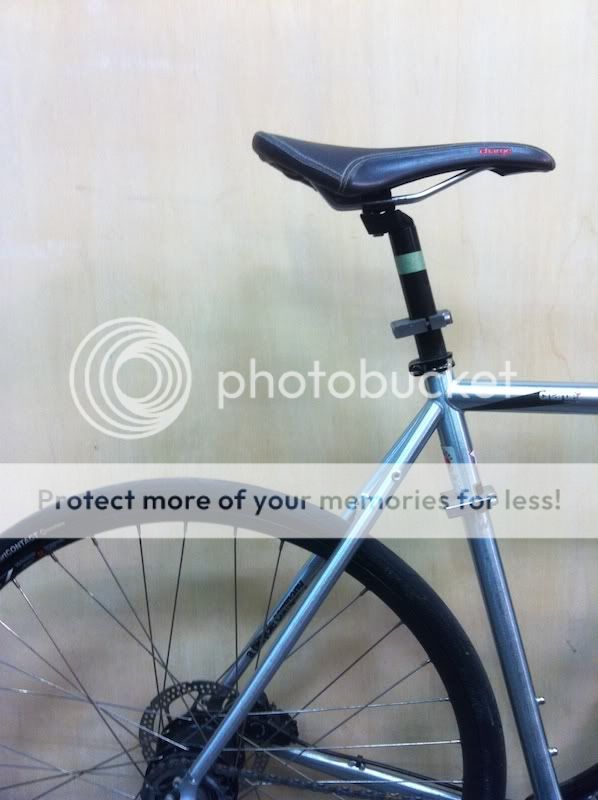
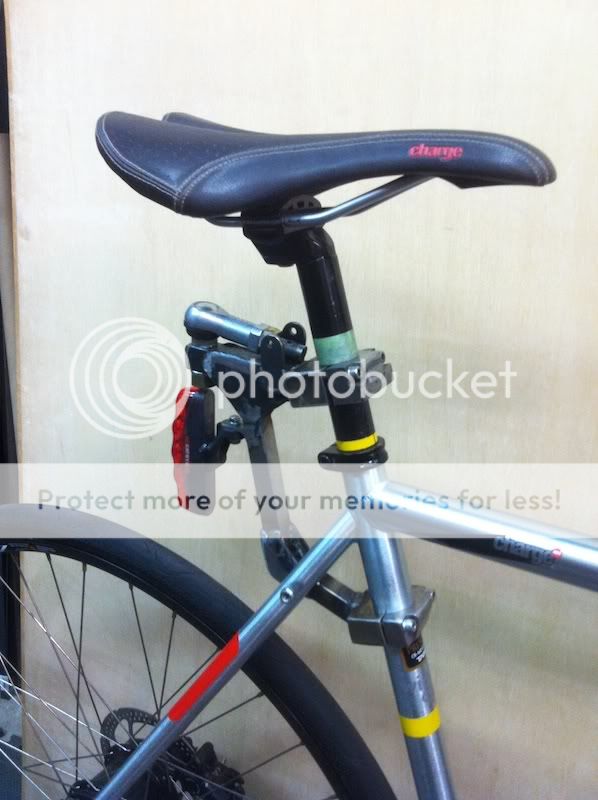
Here you can see the two clamps that I made, they fit rather well, the clamps sill need a bit of cleaning up, but there is welding etc to do yet, so I'll not bother until later.
That is the basic mock-up I have rattling around inside my brain right now
I'll gusset the joints so that they are stronger and make very sure that the pieces fit together well before I weld them, I want to make sure that this is light, but strong.
So, what do you guys think?
The top piece, the horizontal one will be made from 21mm square tubing the piece that goes from the lower clamp will be made from 16mm square tubing.
The inside of the clamps have been sanded smooth, so they fit very well, I don't plan on putting anything between the clamps and the seat tube or seat post, except a thin coat of paint to stop rust.
The way I see it,force is applied to the hitch and through it the bicycle in three directions;
1) front to back
2) up and down
3) side to side
I think with the two clamps spaced as they are the up and down and the back to back forces should not be a worry, the only thing I see that could be a potential problem is the side to side, specifically a push to the side. Pulling should not present much side to side stress, as it should straighten out as it pulls, but stopping might present some side to side moment. I think the clamps on the tubes should resist that side to side moment, but I guess I'll find out Maybe I could put spacer on the side of the lower tube of the hitch where it passes through the seat stays, so it could not twist the hitch...?
I always get great feedback and ideas here I really do want your thoughts and suggestions.
Cheers!
The very strong, and very heavy rack I build for the back of my Mixer 8 to tow my trailer has worked well, really, it has been a good performer, but, man it makes the bike heavy
I could live with that, but I'm finding that having the hitching point over the center of the back wheel is not so good.If I turn and the trailer is loaded, it kind of makes the bike want to stand up, instead of lean into a corner, if I hit the brakes in a corner, it is even worse. Before with the Cannondale I had the hitch point much closer to the seat post, and I did not feel this "Push" like I do now.
I'll ditch the rear rack and shave off a bunch of weight.
My plan is to make a hitch that clamps onto the seatpost and the seat tube.
Here you can see the two clamps that I made, they fit rather well, the clamps sill need a bit of cleaning up, but there is welding etc to do yet, so I'll not bother until later.
That is the basic mock-up I have rattling around inside my brain right now
I'll gusset the joints so that they are stronger and make very sure that the pieces fit together well before I weld them, I want to make sure that this is light, but strong.
So, what do you guys think?
The top piece, the horizontal one will be made from 21mm square tubing the piece that goes from the lower clamp will be made from 16mm square tubing.
The inside of the clamps have been sanded smooth, so they fit very well, I don't plan on putting anything between the clamps and the seat tube or seat post, except a thin coat of paint to stop rust.
The way I see it,force is applied to the hitch and through it the bicycle in three directions;
1) front to back
2) up and down
3) side to side
I think with the two clamps spaced as they are the up and down and the back to back forces should not be a worry, the only thing I see that could be a potential problem is the side to side, specifically a push to the side. Pulling should not present much side to side stress, as it should straighten out as it pulls, but stopping might present some side to side moment. I think the clamps on the tubes should resist that side to side moment, but I guess I'll find out
Maybe I could put spacer on the side of the lower tube of the hitch where it passes through the seat stays, so it could not twist the hitch...?I always get great feedback and ideas here I really do want your thoughts and suggestions.
Cheers!
04-27-11, 03:48 PM
#35
Full Member
Join Date: Jun 2009
Location: Norwich, Norfolk. UK
Posts: 316
Bikes: 2006 Falcon Explorer Hybrid, 2008 Landrover Visalia Crossover, 2010 Cargo Cycles Senton, 2010 Cargo Cycles Capability, and a 2001 AVD quad pedi-van, 1980 Peugeot Carbolite 10sp racer
Mentioned: 2 Post(s)
Tagged: 0 Thread(s)
Quoted: 21 Post(s)
Liked 24 Times
in
7 Posts
Hi Stu,
I haven't experienced any swing or whiplash problems with the hitch and drawbar for my trailer: and the hitch is forward of the wheel centre as you can see in the photos.
I don't like the idea of the clamps on the seat tube, as the clamping forces could cause a future issue when wanting to adjust or remove the the seat post.
My stay mounted hitch seems to be perfect for me. It's a 6601 Aluminum frame on my hybrid, and although I have hauled 100kg (and over a couple of times) and more usually 30kg I have not experienced one problem.
On another tack: Trailer braking, I haven't progressed any further with my project due to tons of incoming orders. Mainly Pallet reclamation Bars, Camel saddles frames, Mule Pack frames and Elephant Howdahs, (and very little to do with bicycles). I mentioned balanced cable operated disc brakes utilising a spring return over-run type system. Similar in design and operation to car and van type trailers. Have you given it any thought?
Here is a link to a basic schematic of a cable and rod controlled system: https://www.kfz-tech.de/Engl/AuflBremse.htm
04-27-11, 09:22 PM
#36
Senior Member
Thread Starter
Join Date: Sep 2010
Posts: 100
Mentioned: 0 Post(s)
Tagged: 0 Thread(s)
Quoted: 0 Post(s)
Likes: 0
Liked 0 Times
in
0 Posts
Thanks for the response Gareth, I always look forward to your input!
I'm not worried about the seat post, I will make the clamp wider, I'm just working on ideas right now, if the clamp was say 1 1/2" wide, instead of the 1/2" it is now, it would put the force over a much larger area and be better.
I am concerned about putting the clamp on the seat tube, those are Tange Prestige Double Butted tubes, which mean they are thinner in the middle, so I'm going to work on making that clamp a LOT wider, with more surface area, and move it up closer to the top tube where the tube itself is thicker steel, and I'll make sure the seat post extends down past the point where it is clamped just as a back up for the seat tube.
I do understand the whole idea of balanced braking, my 50cc Honda Gyro scooter (three wheeler) has that kind of system for the rear brakes, and yeah, the idea of a new trailer with suspension and brakes is on my mind, back burner right now, my plate too is rather full, still working on stuff from the earthquake, not so much damage, but making things better in our bottle shop and rebuilding some shelves that were not great, too much wiggle in them steel shelves.
My ideal trailer would be made from chromoly tubing, with 26" wider MTB front wheels with cable operated disc brakes, I'd have a linkage to use an old friction shifter as a drag brake on hills up on the bars, and this would also work as a parking brake. I would be able to put some nice fat slick tires on the MTB wheels to get some suspension but I'm also noodling an idea for using some of those squishy donut things for a bit of suspension for the trailer.
Now my trailer is heavy, it is 30Kg all in, I think I could make it half that weight and it would be better and stronger too, now it has been rebuilt so many times it is way over weight. Still, it gives me a good workout each time I use it, even empty!
Cheers!
04-28-11, 07:00 AM
#37
Senior Member
Thread Starter
Join Date: Sep 2010
Posts: 100
Mentioned: 0 Post(s)
Tagged: 0 Thread(s)
Quoted: 0 Post(s)
Likes: 0
Liked 0 Times
in
0 Posts
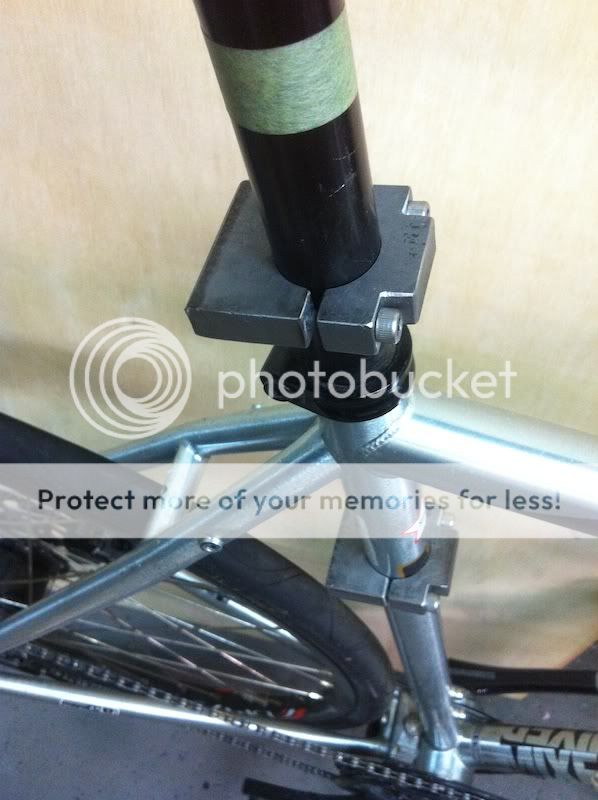
OK, I had some time this morning, and I did some more mocking up.
Some pics....
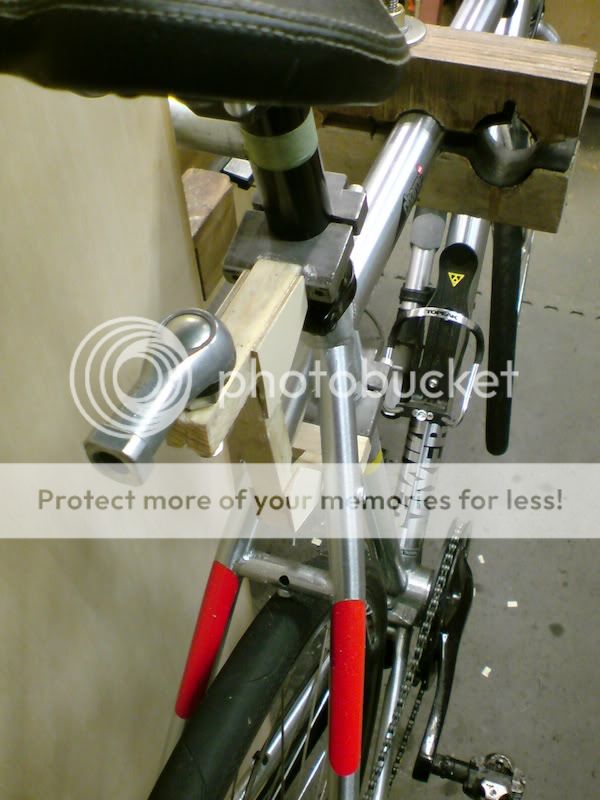
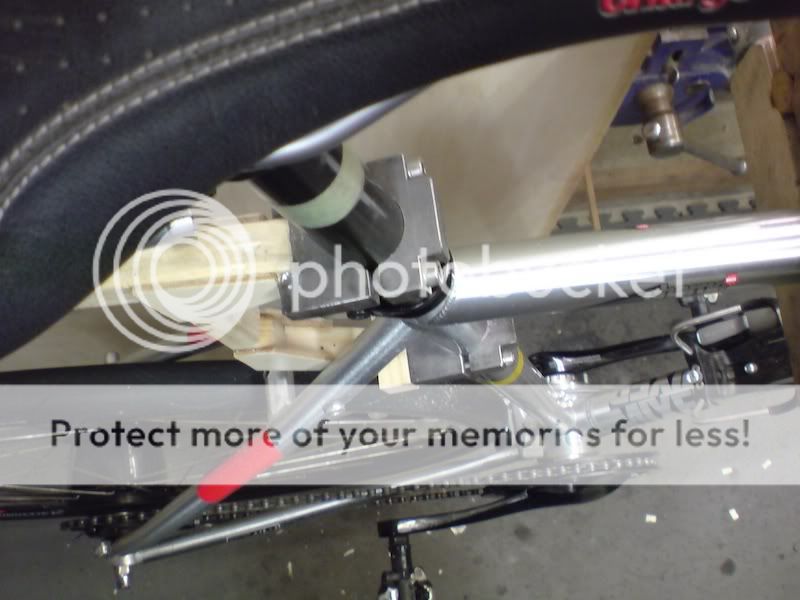
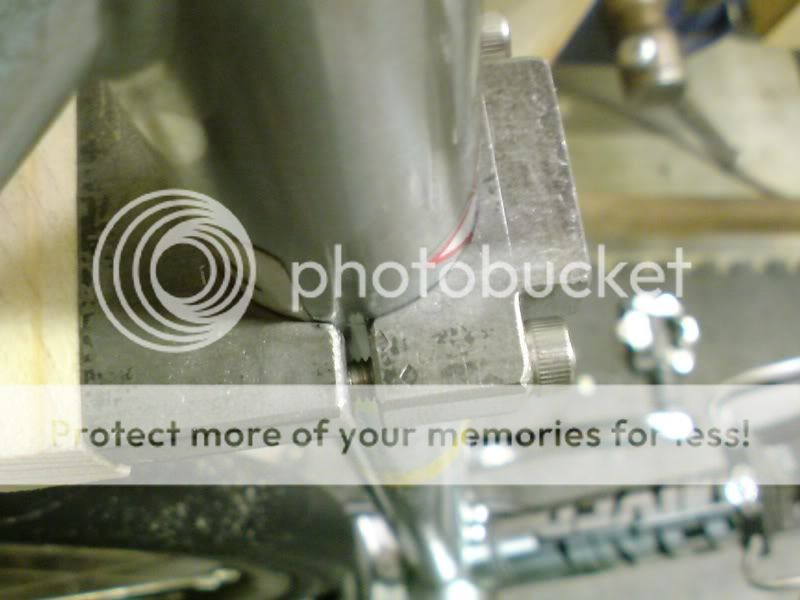
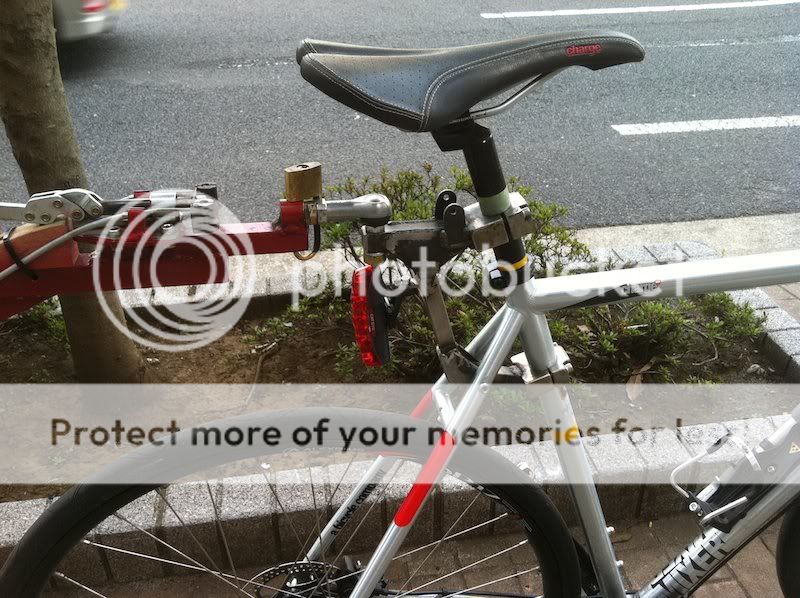
Just to show that the clamps fit very well on the tubes
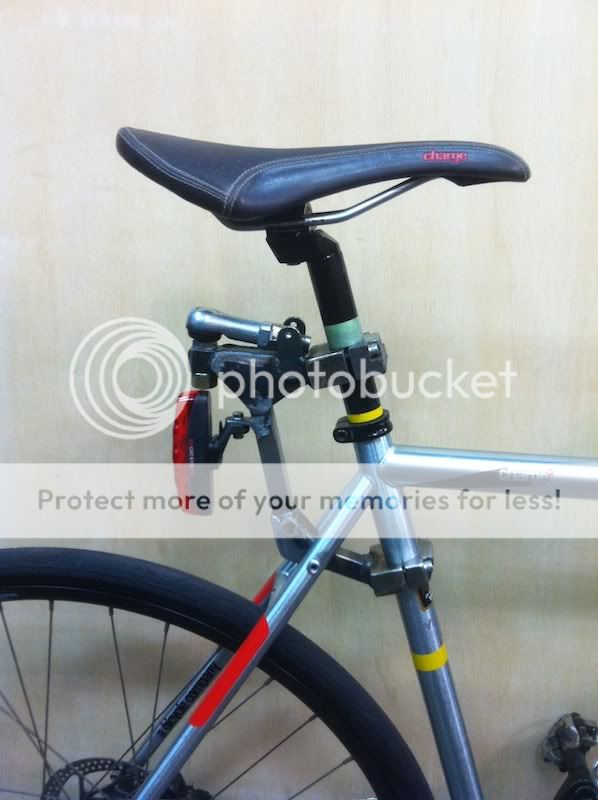
Compared to the first mock up, in this one I moved the bottom clamp up the seat post a lot higher. I did this to get the clamp on the part of the tubing that is not butted, as in the thicker part of the tubing. With the seatpost out I could look down into the tube and you can see where the grease from the seatpost is not smooth, this is the area, I assume that the butting starts as the tube inside diameter increases and the seat post no longer touches the inside of the tube.
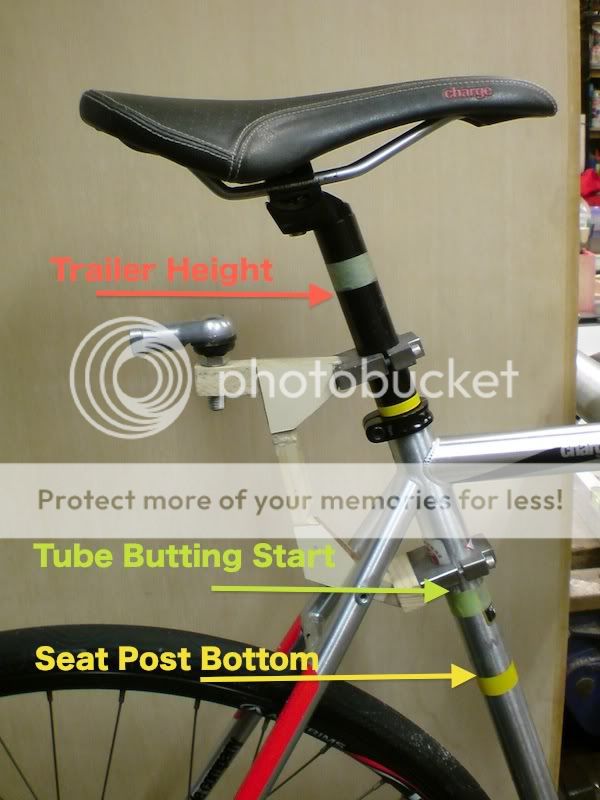
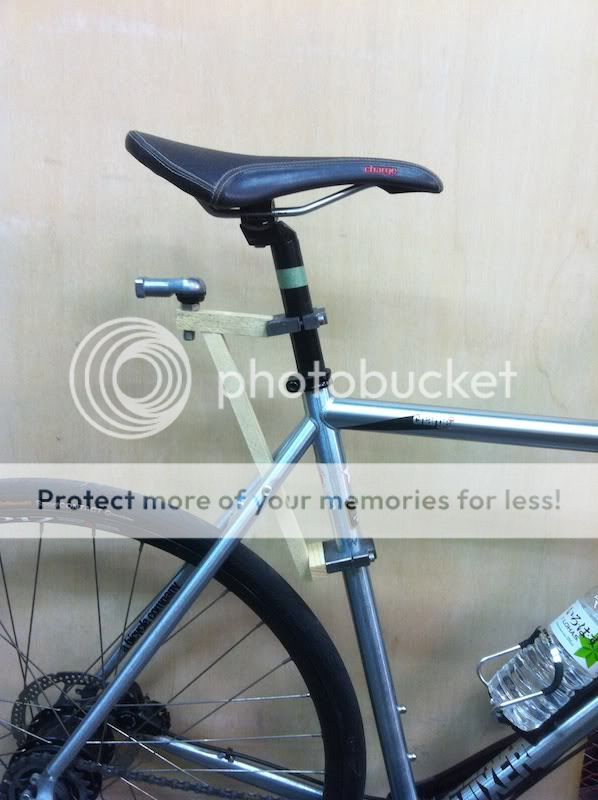
If you look at the above pic, I've marked a few things out.
In red is the height of the trailer's tongue, I want the hitch slightly below this height so I can adjust it upwards to get the trailer level with washers. In the picture it looks well below that level, but is is not, that is just the camera angle.
In green is where the internal tube butting starts. I put the clamp above this level by a bit, just to be safe.
In Yellow is where the seat post ends. I was surprised at how long the seat post is, but there you go.
I think that by doubling the thickness of the clamps, and by using this design, it should work very well, be compact and out of the way and a LOT lighter than what I have on there now.
Comments, suggestions, questions etc all welcome!
Cheers!
Some pics....
Just to show that the clamps fit very well on the tubes
Compared to the first mock up, in this one I moved the bottom clamp up the seat post a lot higher. I did this to get the clamp on the part of the tubing that is not butted, as in the thicker part of the tubing. With the seatpost out I could look down into the tube and you can see where the grease from the seatpost is not smooth, this is the area, I assume that the butting starts as the tube inside diameter increases and the seat post no longer touches the inside of the tube.
If you look at the above pic, I've marked a few things out.
In red is the height of the trailer's tongue, I want the hitch slightly below this height so I can adjust it upwards to get the trailer level with washers. In the picture it looks well below that level, but is is not, that is just the camera angle.
In green is where the internal tube butting starts. I put the clamp above this level by a bit, just to be safe.
In Yellow is where the seat post ends. I was surprised at how long the seat post is, but there you go.
I think that by doubling the thickness of the clamps, and by using this design, it should work very well, be compact and out of the way and a LOT lighter than what I have on there now.
Comments, suggestions, questions etc all welcome!
Cheers!
04-30-11, 07:40 AM
#38
Senior Member
Thread Starter
Join Date: Sep 2010
Posts: 100
Mentioned: 0 Post(s)
Tagged: 0 Thread(s)
Quoted: 0 Post(s)
Likes: 0
Liked 0 Times
in
0 Posts
I doubled up the size of the clamps......
They are quite a bit thicker now and heavier But they should do the job.
Tomorrow Sunday I have some stuff on the "Honey to do" list that I have to get round to, but I hope to get most of my afternoon in working on the hitch, I think I can get it done, as there is not that much to do really, this is a very simple hitch compared to the rack I built before.
Wish me luck!
They are quite a bit thicker now and heavier
But they should do the job.Tomorrow Sunday I have some stuff on the "Honey to do" list that I have to get round to, but I hope to get most of my afternoon in working on the hitch, I think I can get it done, as there is not that much to do really, this is a very simple hitch compared to the rack I built before.
Wish me luck!
05-01-11, 08:13 AM
#39
Senior Member
Thread Starter
Join Date: Sep 2010
Posts: 100
Mentioned: 0 Post(s)
Tagged: 0 Thread(s)
Quoted: 0 Post(s)
Likes: 0
Liked 0 Times
in
0 Posts
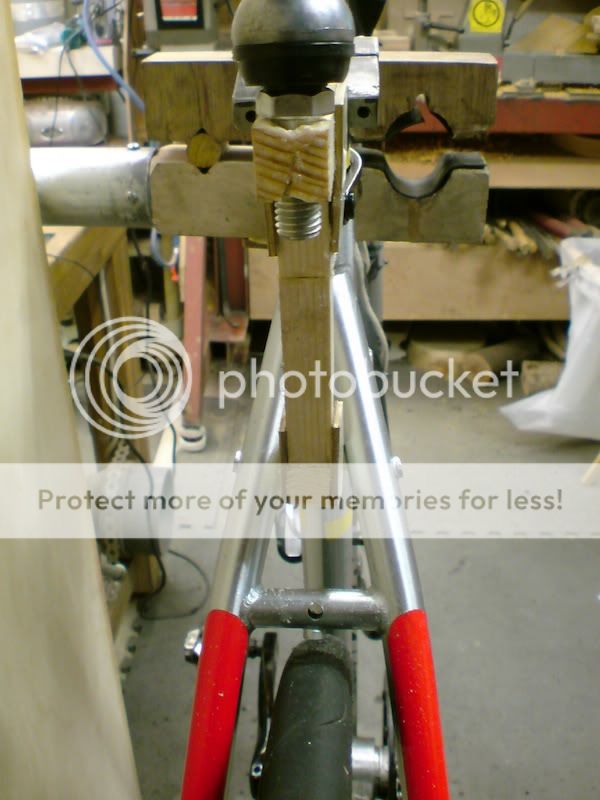
I got it done today!
Still needs some touching up and some paint, but it is good and solid, I'll know better how it works on the next heavy load.
For riding around the trailer feels much better, seems to feel like it follows the bike better and does not have the tenancy to push the bike sideways when I turn, even very sharply.
The old massive rack/hitch weighed almost exactly 4 kg, the new set up is 1.25 Kg.
Time will tell I guess!
05-02-11, 02:08 AM
#40
Senior Member
Thread Starter
Join Date: Sep 2010
Posts: 100
Mentioned: 0 Post(s)
Tagged: 0 Thread(s)
Quoted: 0 Post(s)
Likes: 0
Liked 0 Times
in
0 Posts
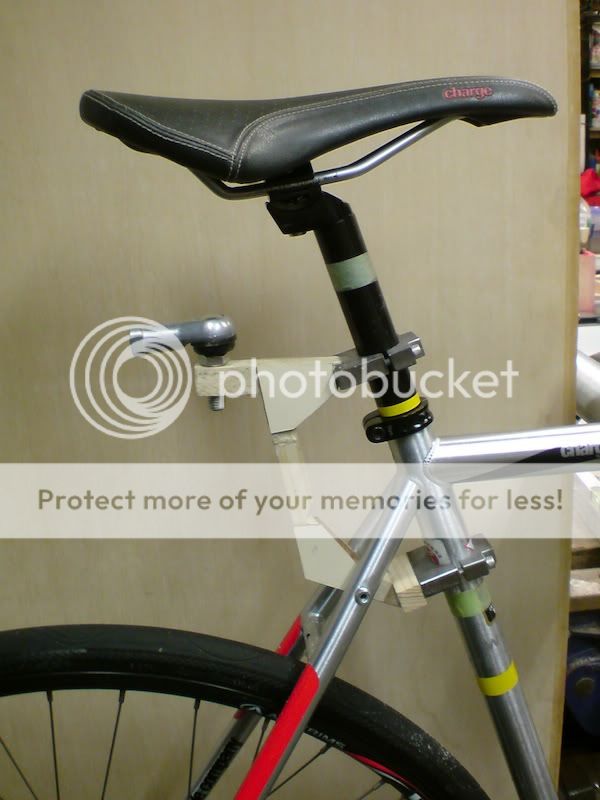
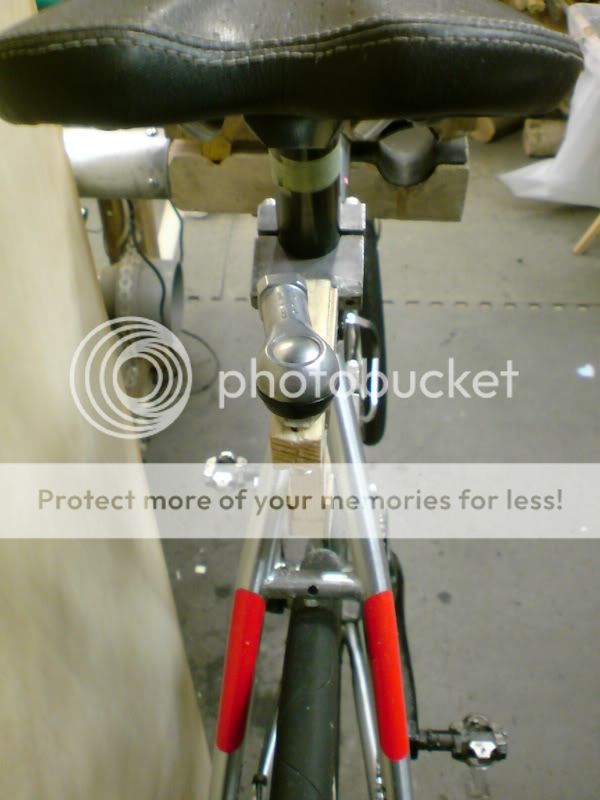
I know you are all out there enjoying the fine weather and getting in epic rides, but I'm still working away delivering beer

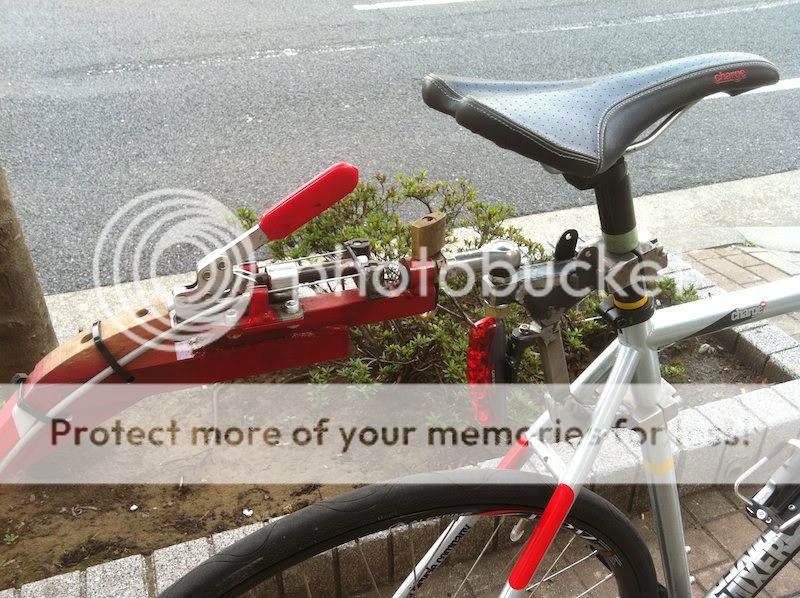
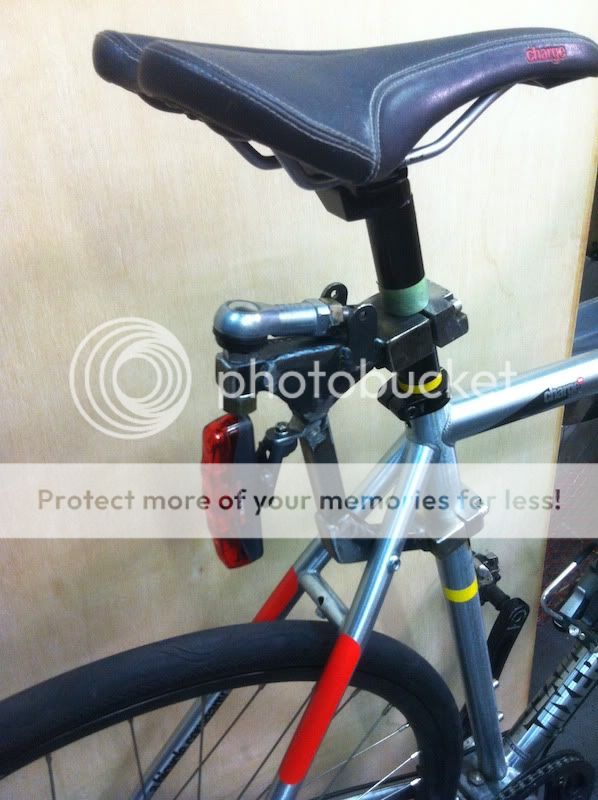
That is how it all looks in use, I know it still needs sanding and some painting, but I'm going to try it out like this for a while. I might buy a light weight aluminum rack for it, or I might not, haven't decided yet.
Today I had a medium heavy load of about 70Kg including the trailer and I have to say the new hitch preformed very well indeed! When I turn, I do not feel that the trailer is pushing the bike over sideways. The biggest difference is when I get out of the saddle and kick, before the bike would want to stay leaned over, it was hard to kick moving the bike side to side, using your upper body, not very good at all, and felt very unstable. Now I can get up and kick, moving the bike side to side with little problem at all. When I turn in a tight circle it feels much better, the trailer is not trying to push the bike over all the time.
I guess time will tell it this works or not, I'm optimistic that this will work out. The only fear I have is that the bottom clamp will somehow comprimise the seat tube, but, the clamping surface is large, and the seat post goes well past the point where the clamp is attached, so the seat post is acting as kind of a back up for the seat tube....... I hope......
I guess we shall see, but so far, so good!
 05-06-11, 12:18 PM
#42
Trailer Nut

Join Date: Oct 2008
Location: Central Scotland
Posts: 152
Bikes: Viking Urban Trail. Schwinn Spoiler
Mentioned: 0 Post(s)
Tagged: 0 Thread(s)
Quoted: 0 Post(s)
Likes: 0
Liked 1 Time
in
1 Post
Hi Stu,
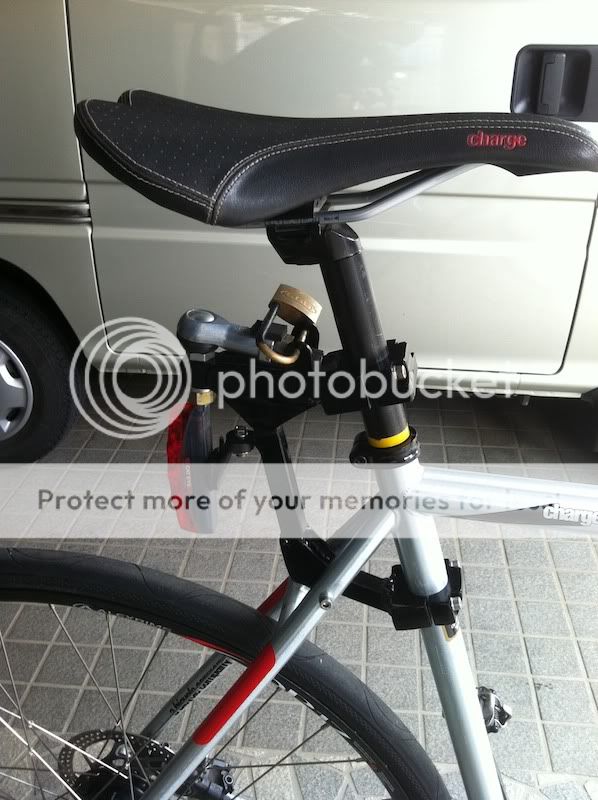
Looking at your last pic, Im wondering if you could have put your top fixing just under the seatpost clamp and connect the down-section (with light on it) to the mudguard/brake hole. You wouldn't have to use the seatpost downtube to attach to. This would trim a bit more metal/weight off.
Regards
Tom
Pity that nice rack you made up is now scrap.
Last edited by BossCat; 05-06-11 at 12:27 PM.
05-06-11, 06:40 PM
#43
Senior Member
Thread Starter
Join Date: Sep 2010
Posts: 100
Mentioned: 0 Post(s)
Tagged: 0 Thread(s)
Quoted: 0 Post(s)
Likes: 0
Liked 0 Times
in
0 Posts
Hi Stu,
Looking at your last pic, Im wondering if you could have put your top fixing just under the seatpost clamp and connect the down-section (with light on it) to the mudguard/brake hole. You wouldn't have to use the seatpost downtube to attach to. This would trim a bit more metal/weight off.
Regards
Tom
Pity that nice rack you made up is now scrap.
I was told by Charge, the bike maker, that the mudguard cross tube should NOT be used for this purpose, they said it was NOT designed to carry any load and would most likely not hold up to the abuse.
Yeah, the rack is just scrap metal now, boat anchor material, but at least I enjoyed making it and it really only cost me time, there might be $10 worth of steel in it.
This design is sure better, the bike handles the trailer much better and when I leave the trailer behind, the bike is so wonderfully quick and nippy it is pure fun to ride!
Cheers!
05-09-11, 09:31 AM
#44
I'm Rad.

Join Date: Apr 2008
Location: Florida
Posts: 366
Bikes: 2008 Allez (Sold), 2009 Surly LHT (Sold), 2014 Motobecane Fantom Cross Pro
Mentioned: 0 Post(s)
Tagged: 0 Thread(s)
Quoted: 0 Post(s)
Likes: 0
Liked 0 Times
in
0 Posts
Yeah, I was wondering the same thing about mounting that top bracket in place of the seat post clamp. This way it would be a dual purpose attachment for the seat and then the trailer. Then mount the lower bracket a few CM lower than what you have now. I don't have experience with hitches though, so I don't know if mounting it lower would be better or not. Still looks nice though, good metal work .
Slightly off topic, but I'm not exactly sure why the seat post clamp is better than a clamp near the chain stay (as with a kiddo trailer). I just got a trail-a-bike set up for my son and figured that the seat post mounted attachment would suck! Man was I wrong! I love the attachment in that area as it make the bike so much more stable vs. the chain stay mount near the rear hub.
. Slightly off topic, but I'm not exactly sure why the seat post clamp is better than a clamp near the chain stay (as with a kiddo trailer). I just got a trail-a-bike set up for my son and figured that the seat post mounted attachment would suck! Man was I wrong! I love the attachment in that area as it make the bike so much more stable vs. the chain stay mount near the rear hub.
05-10-11, 10:34 AM
#45
Senior Member
Thread Starter
Join Date: Sep 2010
Posts: 100
Mentioned: 0 Post(s)
Tagged: 0 Thread(s)
Quoted: 0 Post(s)
Likes: 0
Liked 0 Times
in
0 Posts
Yeah, I was wondering the same thing about mounting that top bracket in place of the seat post clamp. This way it would be a dual purpose attachment for the seat and then the trailer. Then mount the lower bracket a few CM lower than what you have now. I don't have experience with hitches though, so I don't know if mounting it lower would be better or not. Still looks nice though, good metal work .
.
Originally Posted by vXhanz
Slightly off topic, but I'm not exactly sure why the seat post clamp is better than a clamp near the chain stay (as with a kiddo trailer). I just got a trail-a-bike set up for my son and figured that the seat post mounted attachment would suck! Man was I wrong! I love the attachment in that area as it make the bike so much more stable vs. the chain stay mount near the rear hub.
05-10-11, 12:09 PM
#46
I'm Rad.
Join Date: Apr 2008
Location: Florida
Posts: 366
Bikes: 2008 Allez (Sold), 2009 Surly LHT (Sold), 2014 Motobecane Fantom Cross Pro
Mentioned: 0 Post(s)
Tagged: 0 Thread(s)
Quoted: 0 Post(s)
Likes: 0
Liked 0 Times
in
0 Posts
Stu,
Thanks for the link! VERY informative and helpful!
Thanks again!
V
Thanks for the link! VERY informative and helpful!
Thanks again!
V
10-25-11, 10:39 AM
#47
Full Member
Join Date: Jun 2009
Location: Norwich, Norfolk. UK
Posts: 316
Bikes: 2006 Falcon Explorer Hybrid, 2008 Landrover Visalia Crossover, 2010 Cargo Cycles Senton, 2010 Cargo Cycles Capability, and a 2001 AVD quad pedi-van, 1980 Peugeot Carbolite 10sp racer
Mentioned: 2 Post(s)
Tagged: 0 Thread(s)
Quoted: 21 Post(s)
Liked 24 Times
in
7 Posts
Hey Stu,
I was just wondering how you were getting on with the new trailer hitch now that it has been fitted to your bike for 5 almost 6 months.
I was just wondering how you were getting on with the new trailer hitch now that it has been fitted to your bike for 5 almost 6 months.
10-26-11, 12:27 AM
#48
Senior Member
Thread Starter
Join Date: Sep 2010
Posts: 100
Mentioned: 0 Post(s)
Tagged: 0 Thread(s)
Quoted: 0 Post(s)
Likes: 0
Liked 0 Times
in
0 Posts
Not a single problem
Kind of has me worried to be honest
but it is working very well. I use the trailer almost every day, sometimes up to 25 Km of deliveries and some very heavy loads. The heaviest load yet was just about 165Kg, including the trailer, which is about 30Kg. Let me tell you that was heavy, and I did not go fast, and boy did I appreciate the disk brakes on that run. I'm toying with the idea of building a new trailer, out of straight bicycle tubes, I'd have to buy a pipe bender as I'd use some bends in the pipe instead of so many joints in the tubing. I think I could make the trailer as strong but maybe only 1/3 the weight. I'd also use MTB front wheels with cable operated disk brakes.Dunno if or when it will happen, but if it does, you can bet I'll post it here.
Cheers!

