


My Trip (restoration) with a Viner
 02-11-21, 05:05 PM
#1
Junior Member
Thread Starter
My Trip (restoration) with a Viner
Here is where I start my journey. I have included some pictures for help. Where should I start to disassemble etc.? I have not washed it yet. We had lots of rain today and the next few days don't look good either. Post number 1
This is the beginning of my tear down and refurbishment of this Viner. As I discover more information about it I will post that. I have included some more pictures suggested by francophile, whom I would like to send a shout out to for helping this newbie. I could have easily gone down the wrong path and been discouraged, but with his input as well as others, I think I might just tackle this. Wife isn't too happy, so I get to do this in my man shed! Anyway check the picks and I'll take any advice that is available. I will also go to YouTube to watch RJ The Bike Guy videos before I tackle the hard (mostly all of) stuff. The mechanics forum will be my next stop.
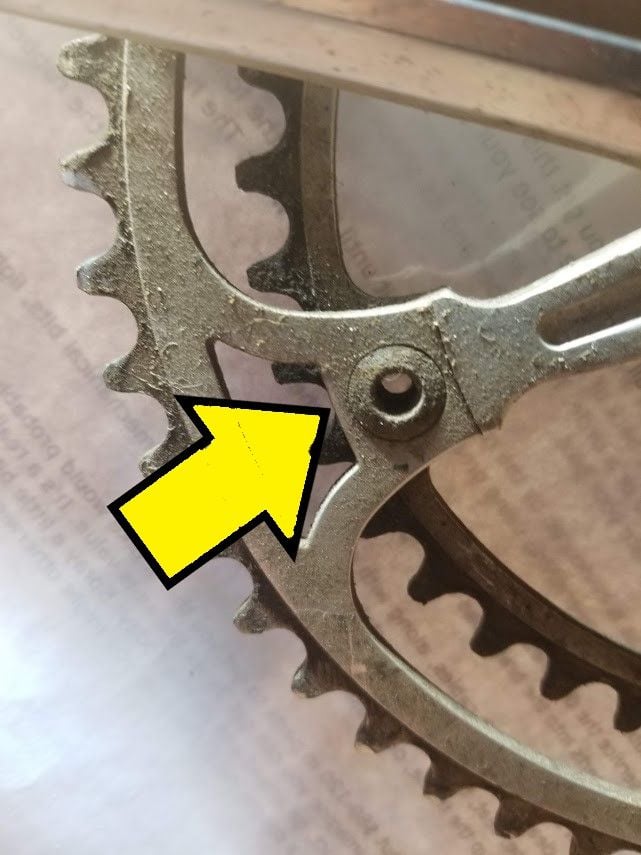
3 holes are empty, 2 are not. Is this an issue?


When I moved cable saw this too!
This is the beginning of my tear down and refurbishment of this Viner. As I discover more information about it I will post that. I have included some more pictures suggested by francophile, whom I would like to send a shout out to for helping this newbie. I could have easily gone down the wrong path and been discouraged, but with his input as well as others, I think I might just tackle this. Wife isn't too happy, so I get to do this in my man shed! Anyway check the picks and I'll take any advice that is available. I will also go to YouTube to watch RJ The Bike Guy videos before I tackle the hard (mostly all of) stuff. The mechanics forum will be my next stop.
3 holes are empty, 2 are not. Is this an issue?
When I moved cable saw this too!
 02-12-21, 09:14 AM
#2
Senior Member

Join Date: Aug 2015
Posts: 3,283
Mentioned: 39 Post(s)
Tagged: 0 Thread(s)
Quoted: 1135 Post(s)
Liked 1,727 Times
in
951 Posts
I think a little penetrant on all the fittings, and a frame wipe with oil and/or Windex on a rag is where I start. Then after its mostly clean I'll tear into the guts.
Likes For Mr. 66:
02-12-21, 09:35 AM
#3

Senior Member

Join Date: Apr 2012
Location: Middle Earth (aka IA)
Posts: 20,433
Bikes: A bunch of old bikes and a few new ones
Mentioned: 178 Post(s)
Tagged: 0 Thread(s)
Quoted: 5888 Post(s)
Liked 3,471 Times
in
2,079 Posts
If you are doing this to ride the bike, this is a great project and Viners have a fine pedigree. If you are thinking of flipping this, I'd just clean it and let it go as is.
Likes For bikemig:
02-12-21, 10:36 AM
#4
PM me your cotters

Join Date: Jun 2015
Location: ATL
Posts: 3,241
Mentioned: 80 Post(s)
Tagged: 0 Thread(s)
Quoted: 1137 Post(s)
Liked 588 Times
in
420 Posts
Also, important to stress another point: You won't be able to comfortably ride this bike unless you're in the 5'0" - 5"5 height range, so if you're thinking about riding it, just know this. Finally, the minute you remove two or three parts from this bike, you just cut the value in half. You do not want to give up halfway through a restoration/refurb on a bike.
All that out of the way, if you're still dead-set on restoration/refurbishment....
I can't recommend enough to wash everything thoroughly first. Two reasons: First, you can actually see what you're doing and not turn the bike, yourself, and all of your tools into one big greasy, nasty mess. Second, as Mr. 66 mentioned, you'll want to hit all of the bolts you need to remove with penetrating oil (PB Blaster, Kroil, ATF-petrol mix, or whatever your preference) at least once or twice before you start trying to turn bolts. If the bike is covered with filth, that's exactly where your penetrant is going to hang out, instead of going where it needs to be: Into the threads.
When washing a bike covered in this much grime, it makes a huge difference in the value and appearance, and this is why a simple wash of a bike like your Viner could easily double in value withe a thorough cleaning. Nobody wants to buy your dirt, they want what's underneath it.
All I use to get there is: A water hose, a bucket with dish soap mixture, a good alloy-safe degreaser, a couple of old brushes - two or three toothbrushes and a paint-safe scrub brush I use for my car tires.
I always air up my tires first so water doesn't get inside the rim, potentially rusting the spokes from the inside out. My preferred degreaser is the purple-colored Simple Green HD (Important: green Simple Green product isn't alloy-safe per the label and shouldn't be used on vintage bikes). I get the concentrate from home depot and mix it per the instructions. I take the bike out, drench every nook and cranny it with the purple HD, and let it sit for a few minutes. I'll then drench it another time, wait a minute, then take my large brush, dip in the soapy water bucket and scrub all the big stuff, and the toothbrushes to get the nooks and crannies. I keep my bottle of degreaser handy to squirt the extra-greasy parts and to clean out my brushes.
Once finished, I rinse off and assess where I'm at. I usually need to repeat the process again because on super dirty bikes, you always miss some spots.
After the bike is really clean, let it dry fully. When you get to that point, you can start using your penetrant. I'll post again later to point to some key areas.
BTW: You're going to need a good set of metric allen wrenches (ideally T-handles) to disassemble the bike. Nearly everything on this bike is going to be metric sized.
__________________
███████████████
███████████████
Last edited by francophile; 09-11-21 at 03:23 PM.
02-12-21, 10:56 AM
#5
bOsscO
Join Date: May 2006
Location: Vancouver
Posts: 746
Bikes: 2024 Spec Crux, 2015 Norco Search S1, 93 Mongoose IBOC COMP
Mentioned: 0 Post(s)
Tagged: 0 Thread(s)
Quoted: 296 Post(s)
Liked 355 Times
in
212 Posts
I'll leave the bike restoration comments to others but one recommendation for using the BF Lost Sailor17 is if you want to tag someone in your comments, and you want them to see it;
- Before typing the persons handle/name start with the @ symbol
- When you start typing their name after the @ symbol a drop down menu will show up with BF members with similar names
- When you find the person you want to tag, click on their name in the drop down menu and their name will show in your post as blue text with a blue bubble around it (see pic below)
Last edited by bOsscO; 02-12-21 at 11:18 AM.
Likes For bOsscO:
02-12-21, 11:13 AM
#6
Car free since 2018
Join Date: Aug 2017
Location: Vancouver, BC
Posts: 684
Bikes: Mostly japanese ones
Mentioned: 13 Post(s)
Tagged: 0 Thread(s)
Quoted: 257 Post(s)
Liked 269 Times
in
134 Posts
I'm not sure what you mean by holes. Do you mean 3 of the 5 chainring bolts are missing? If not, what do the non empty holes look like? If there are 3 missing chainring bolts then that is an issue but you should be able to replace them.
02-12-21, 11:22 AM
#7
PM me your cotters
Join Date: Jun 2015
Location: ATL
Posts: 3,241
Mentioned: 80 Post(s)
Tagged: 0 Thread(s)
Quoted: 1137 Post(s)
Liked 588 Times
in
420 Posts
I'd also add to this: You don't need to remove that bolt. the chainrings don't need to be removed to take off (or) clean the crankset. Best to leave the chainrings on for a newbie, I think.
__________________
███████████████
███████████████
