


Swift folders
 01-12-13, 11:11 AM
#3251
Newbie
Join Date: Sep 2012
Posts: 63
Mentioned: 0 Post(s)
Tagged: 0 Thread(s)
Quoted: 1 Post(s)
Likes: 0
Liked 1 Time
in
1 Post
Ok, I went out again and it went much better this time, though that coaster brake is making me look a bit silly at times.
I put a bit more air in those tyres, no idea how much because I haven’t got a pressure gauge. I’ve only ever ridden 700c tyres where the rule I’ve always followed has been to pump them up as hard as you can get them.
I love the small drop bars, which help to give me a great position. The distance from tops to drop is less than normal.
The problem is the SRAM automatix 2-speed rear hub and coaster brake of which I know nothing. It doesn’t seem to want to fit properly. The wheel is over to one side. The unit is as far forward as it will go in the horizontal dropouts and there is very little slack in the chain so not even sure how to get it off.
Can I put a longer chain on and move it back in the slots a bit or will it then tend to move to one side under load?
 01-12-13, 12:12 PM
#3252
Senior Member
Join Date: Jan 2010
Posts: 433
Mentioned: 0 Post(s)
Tagged: 0 Thread(s)
Quoted: 0 Post(s)
Likes: 0
Liked 2 Times
in
1 Post
Michael,
I have SRAM A2s on both my Brompton (no coaster brake) and TSR2 (with coaster brake). They are probably better suited to flat terrain and I found I had to adjust them to change at a higher speed (around 11mph). The coaster brake takes a little getting use to but on the whole works well. Saves on rim wear
On the Brompton

TSR2 with A2/Coaster Brake
I am a big hub gear fan but I really like the way the Swift rides with its fitted derailleur system.
The spacing on the hub is quite narrow so that is why is may be offset slightly. There is some wiggle room by adding spacers but you may need to get the wheel re built to center the hub between the dropouts/get the chain line right.
PS I don't think your problem is down to BAs. I have them fitted to my stock derailleur system fitted Swift, run them at 50psi and they are both fast and VERY comfortable.
Regards
Jerry
I have SRAM A2s on both my Brompton (no coaster brake) and TSR2 (with coaster brake). They are probably better suited to flat terrain and I found I had to adjust them to change at a higher speed (around 11mph). The coaster brake takes a little getting use to but on the whole works well. Saves on rim wear
On the Brompton
TSR2 with A2/Coaster Brake
I am a big hub gear fan but I really like the way the Swift rides with its fitted derailleur system.
The spacing on the hub is quite narrow so that is why is may be offset slightly. There is some wiggle room by adding spacers but you may need to get the wheel re built to center the hub between the dropouts/get the chain line right.
PS I don't think your problem is down to BAs. I have them fitted to my stock derailleur system fitted Swift, run them at 50psi and they are both fast and VERY comfortable.
Regards
Jerry
Last edited by jerrysimon; 01-13-13 at 04:24 AM.
01-12-13, 08:19 PM
#3253

Drops small screws

Man, these are some nice, clean Swifts. I'm ashamed to post pics of mine.
(And hi, all. Haven't been around in a while!)
(And hi, all. Haven't been around in a while!)
01-13-13, 04:22 AM
#3254
Senior Member
Join Date: Jan 2010
Posts: 433
Mentioned: 0 Post(s)
Tagged: 0 Thread(s)
Quoted: 0 Post(s)
Likes: 0
Liked 2 Times
in
1 Post
Post the pic anyway.
Mine is new and I am working on roughing/dirtying it up a little so I can lock it up and reduce fear of it be stolen. Yesterday I covered the marking/labels with silver gaffer tape lol
Jerry
Mine is new and I am working on roughing/dirtying it up a little so I can lock it up and reduce fear of it be stolen. Yesterday I covered the marking/labels with silver gaffer tape lol
Jerry
01-13-13, 10:16 AM
#3255
Newbie
Join Date: Sep 2012
Posts: 63
Mentioned: 0 Post(s)
Tagged: 0 Thread(s)
Quoted: 1 Post(s)
Likes: 0
Liked 1 Time
in
1 Post
Hi Jerry!
Thank you for your reply and for your excellent contributions to the thread,
Good news, I have my Swift up and running, just in time for the poor weather conditions that have been forecast.
Borrowed my neighbours pressure gauge, I only had the BA’s pumped up to 20psi, now got them at 70psi, I love a firm ride.
The hub is centered correctly between the dropouts but the wheel itself appears to be built over to one side by several millimetres and this has been confusing me. I have no wheel building experience or apparatus and arrived at this conclusion after endless measurements with steel rulers from wheel to frame and dropouts. Maybe I can slacken off all the spokes half a turn at a time on one side of the wheel and then tighten the other side the same.
I added a couple of links to the chain so I can get the hub off. The hub needs some attention, it’s not turning too smoothly and the sprocket is loose but I have nothing to tighten it up with at the moment.
Not great but it still goes quite nicely and this set up will be good enough to get me through the winter months.
*
The wheel reminds me of one of the trips I made on my racing bike with no luggage except for a little musette bag slung over one shoulder.
I had ridden across Venezuela from the airport and had just gone over the border into Colombia on my way to Bogot�, a wonderful ride that I’ve done several times. I went into Cucuta looking to change some money and was stationary on a corner when a bus knocked me off and it ran over back wheel just nipping the edge of the rim enough to break it.
I thought that that was the end of my trip and didn’t think the bus driver would have even noticed let alone stop.
But within seconds I was surrounded by dozens of people including a policeman. My immediate concern was that somebody might try to take advantage of the situation before I could regain my composure, steal my bag or something off the bike.
But to my amazement the policeman ordered all the people off the busy bus and put my bicycle inside. I was told to get inside too and the driver was instructed to get my bicycle sorted out at his own expense and to take as long as was needed until I was satisfied.
We found a shop and arranged to have a wheel built around my Mavic hub and I went back the next morning to collect it. The wheel was a bit heavy but I was grateful that I would be able to carry on with my trip.
Problem was that when I got back to where I was staying and tried to put it on the bike it wouldn’t fit through the brake blocks. It took me a few seconds to realise that the wheel had been built up alarmingly off centre. I was advised to go back into Venezuela and get it redone, which I did and had nothing but trouble with it the rest of the trip. But I was just grateful that I was able to ride out the whole route.
*
Hi noteon, please post some pics!
01-13-13, 03:24 PM
#3256
Drops small screws
Oh, there's not much chance of this one being stolen...


Last edited by noteon; 01-13-13 at 03:30 PM. Reason: Higher-res picture. Clearly I don't know how to do this.
01-13-13, 05:03 PM
#3257
Senior Member
Join Date: Jan 2010
Posts: 433
Mentioned: 0 Post(s)
Tagged: 0 Thread(s)
Quoted: 0 Post(s)
Likes: 0
Liked 2 Times
in
1 Post
In Cambridge bikes go quickly even if they are tatty more so any bike not locked up, which are then just used to the destination and dumped. There are in fact many bikes in the city that are left and then used from one person to the next as and when . That saddle, if it is a Brooks, would go quickly too as would any QR wheels if not cable locked.
PS thanks for the pics. It does not look bad to me and in fact appears very functional and well laid out.
Jerry
PS thanks for the pics. It does not look bad to me and in fact appears very functional and well laid out.
Jerry
Last edited by jerrysimon; 01-13-13 at 05:08 PM.
01-13-13, 06:36 PM
#3258
Senior Member
Join Date: Aug 2006
Location: Carlisle, in England's Lake District, just a few miles south of the border with Scotland.
Posts: 323
Bikes: A Bianchi C2C road bike, a steel framed touring bike and a Xootr Swift folder which has made the rest redundant!
Mentioned: 0 Post(s)
Tagged: 0 Thread(s)
Quoted: 23 Post(s)
Likes: 0
Liked 1 Time
in
1 Post
Managed to get out this week for my first ride since last August! Been working six days a week, took delivery of new grandson and nearly drowned by a year of rain. I hope 2013 gives me more time to ride.
01-13-13, 06:57 PM
#3259
Drops small screws
Yes, it's a Brooks B17. On the rare occasions when I have to lock the bike where I can't see it, I take the whole seat mast out and lock the bike in half-folded configuration so your less savvy bike thief can't tell what exactly is going on with it.
These pics you guys are posting are really nice. I think I have shiny frame envy.
These pics you guys are posting are really nice. I think I have shiny frame envy.
01-14-13, 08:22 AM
#3260

Part-time epistemologist

Do you still pull kids in the trailer with the Swift?
FWIW, the trailer is more level with a 20" rear wheel if you flip the trailer mount over. See the last picture here ...
FWIW, the trailer is more level with a 20" rear wheel if you flip the trailer mount over. See the last picture here ...
__________________
A narrative on bicycle driving.
A narrative on bicycle driving.
01-14-13, 12:09 PM
#3261
Drops small screws
Hey! No, they have their own 20" bikes now. The only thing I use the trailer for anymore is hauling their bikes home after we all ride to school.
I tried flipping the trailer mount up, and it did level the arm, but I didn't feel secure with a hundred-whatever-pound trailer hooked to it that way. (Don't remember why, exactly.) I wasn't having any problems with it down, so I just put it back. No issues...
I tried flipping the trailer mount up, and it did level the arm, but I didn't feel secure with a hundred-whatever-pound trailer hooked to it that way. (Don't remember why, exactly.) I wasn't having any problems with it down, so I just put it back. No issues...
01-18-13, 04:09 AM
#3262
Newbie
Join Date: Sep 2012
Posts: 63
Mentioned: 0 Post(s)
Tagged: 0 Thread(s)
Quoted: 1 Post(s)
Likes: 0
Liked 1 Time
in
1 Post
Hi everyone.
Love this bike now. Been using it for my daily commute.
First time I’ve ever used mudguards. Been riding on wet roads with the odd light snow flurry and some freezing fog and the thing is still spotlessly clean.
Looking for some light fast 406 wheels and have posted on the ‘Making a Swift lighter’ thread if anyone wishes to share their experiences.
Thank you.
01-26-13, 08:22 PM
#3263
Senior Member
Join Date: Dec 2009
Location: Westwood MA (just south of Boston)
Posts: 2,215
Bikes: 2009 Trek Soho
Mentioned: 1 Post(s)
Tagged: 0 Thread(s)
Quoted: 4 Post(s)
Likes: 0
Liked 0 Times
in
0 Posts
55mm Big Bens
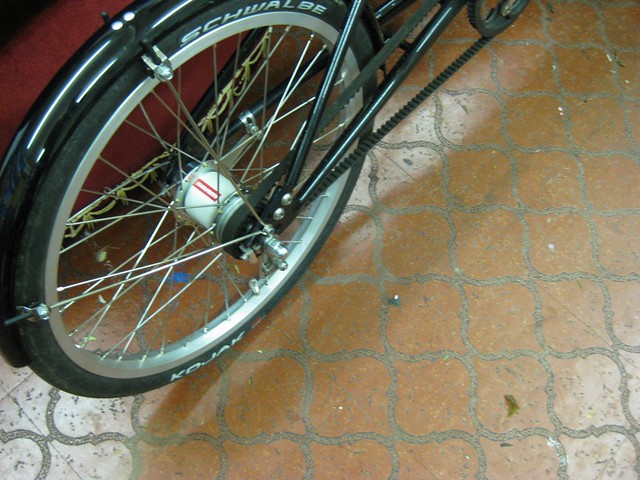
I am not sure whether the new "Big Ben" tires from Schwalbe will fit the Swift. these are the wide(r) version of the big Apple tires with a bit more tread for offroading.
I have two Swifts and wanted to mount it alternately on the one for light mountain biking and the other for commuting.
now here's the interesting thing: it clears the fork on the older (2006) Swift just fine but scrapes a bit against the newer (2011) frame. not sure what is going on.
anyone else have experience trying to "fit the fatties"? again, these are not the 50mm/2" tires but the 55mm/2.15s.
01-27-13, 03:10 AM
#3264
Senior Member
Join Date: Jan 2010
Posts: 433
Mentioned: 0 Post(s)
Tagged: 0 Thread(s)
Quoted: 0 Post(s)
Likes: 0
Liked 2 Times
in
1 Post
Interesting tyre and first time I have come across them. Did not make the initial London connection. As you say they are 55/2.15. I have Big Apples 50/2.0 on my swift (2011) and even those only "just" fit. I think they are one of the best upgrades you can make to the Swift in terms of improving comfort whilst maintaining its nippy ride.
Jerry
Jerry
02-14-13, 05:29 AM
#3265
Newbie
Join Date: Sep 2012
Posts: 63
Mentioned: 0 Post(s)
Tagged: 0 Thread(s)
Quoted: 1 Post(s)
Likes: 0
Liked 1 Time
in
1 Post
Hi everyone.
I got my rear mech hanger from the US and am now ready to ditch the rear hub gear and change to a 9-speed cassette/derailleur system (not Capreo).
Any hints, dos and don’ts, things to watch out for? Hubs, rear derailleur, 130mm or 135mm spacing etc.
Any experiences good and bad appreciated
Thank you.
02-18-13, 02:20 PM
#3266
Senior Member
Join Date: Aug 2006
Location: Carlisle, in England's Lake District, just a few miles south of the border with Scotland.
Posts: 323
Bikes: A Bianchi C2C road bike, a steel framed touring bike and a Xootr Swift folder which has made the rest redundant!
Mentioned: 0 Post(s)
Tagged: 0 Thread(s)
Quoted: 23 Post(s)
Likes: 0
Liked 1 Time
in
1 Post
I managed to get out on my Swift again today - that's only twice this year! A clear, sunny if cold day gave me the chance to try out new shoes and pedals. I also added a Deuter frame bag which fits nicely below the main frame spar. This bag contains; mini-pump, inner tubes, puncture repair kit, tyre levers and multi-tool. It helps to keep the weight down low (not that its that heavy) and frees up the Carradice seat pack for waterproof jacket, camera and food.
I also found a bracket to hold a rear light - using one of the seat post quick releases and that works well. Pedals are Shimano single sided SPD models which come fitted with reflectors and enable the rider to use either SPD or "normal" shoes. Being winter with a lot of debris on the roads, I'm sticking with the original wheels fitted with heavy Marathon tyres to prevent punctures. I'll switch to lighter wheels and tyres if summer ever arrives!
I also found a bracket to hold a rear light - using one of the seat post quick releases and that works well. Pedals are Shimano single sided SPD models which come fitted with reflectors and enable the rider to use either SPD or "normal" shoes. Being winter with a lot of debris on the roads, I'm sticking with the original wheels fitted with heavy Marathon tyres to prevent punctures. I'll switch to lighter wheels and tyres if summer ever arrives!
02-18-13, 03:03 PM
#3267
55+ Club,...

Join Date: Aug 2012
Location: Somewhere in New York, NY
Posts: 4,318
Bikes: 9+,...
Mentioned: 11 Post(s)
Tagged: 0 Thread(s)
Quoted: 1111 Post(s)
Liked 843 Times
in
587 Posts
Beautiful ride my friend,...treat her well. 
__________________
If it wasn't for you meddling kids,...
02-19-13, 01:12 PM
#3268
Senior Member
Join Date: Jun 2010
Posts: 105
Mentioned: 0 Post(s)
Tagged: 0 Thread(s)
Quoted: 6 Post(s)
Likes: 0
Liked 0 Times
in
0 Posts
Has anyone here had trouble with the lower clamp on the seattube? I find it takes a terrific amount of force to close it tightly enough that it actually holds the seatpost.
02-19-13, 01:58 PM
#3269
Drops small screws
I have a vague memory of hearing, a few years ago, that a redesign was in consideration, but I don't know any more than that.
02-20-13, 04:06 AM
#3270
Senior Member
Join Date: Jun 2006
Location: Lewes, UK
Posts: 116
Bikes: Brompton, Xootr Swift, Scott Spark, Giant Anthem, Yeti AS-R, Dahon Helios
Mentioned: 0 Post(s)
Tagged: 0 Thread(s)
Quoted: 5 Post(s)
Likes: 0
Liked 0 Times
in
0 Posts
Then you need a good quality seat clamp and you need to keep that lubricated at the point where the friction is on the cam.
But ignore what I just said about post thickness for now and start with the simplest thing: Loosen off your current clamp, lube it, tighten it up again. By lubricating it you should be able to achieve a much higher clamping force. If that's not enough, consider a new seatpost skewer. I recently got a new one - real cheap one, but made a big difference compared to the old one that was worn out. Expect to have to replace the skewer after a few years - you need that cam to be nice and smooth.
You should not be able to twist the saddle when just the bottom clamp is done up.
Good luck.
02-24-13, 03:50 PM
#3271
Senior Member
Join Date: May 2005
Location: Albany, WA
Posts: 7,393
Mentioned: 16 Post(s)
Tagged: 0 Thread(s)
Quoted: 321 Post(s)
Likes: 0
Liked 7 Times
in
6 Posts
Word of caution - too much force at the seat clamp can damage the frame. So stop at the point where the lower clamp holds it just snug.
02-27-13, 01:56 AM
#3272
Senior Member
Join Date: Jun 2006
Location: Lewes, UK
Posts: 116
Bikes: Brompton, Xootr Swift, Scott Spark, Giant Anthem, Yeti AS-R, Dahon Helios
Mentioned: 0 Post(s)
Tagged: 0 Thread(s)
Quoted: 5 Post(s)
Likes: 0
Liked 0 Times
in
0 Posts
Another update on the seatpost slipping issue - bumped into a friend last night who also has a swift. He has solved his seatpost slipping problem by getting his seatpost knurled. This makes the seatpost thicker as well as giving a more grippy surface. You don't have a lot of control over the thickness you add when knurling so you'd need to be careful the fit is loose enough before you knurl otherwise you it'll be too thick. Anyway it works for him.
02-27-13, 01:04 PM
#3275
Senior Member

Join Date: Nov 2007
Posts: 3,720
Mentioned: 3 Post(s)
Tagged: 0 Thread(s)
Quoted: 317 Post(s)
Likes: 0
Liked 1 Time
in
1 Post
@ BNB: Ok, thank you. I have a tool that is treated like that on the handle. Looks like quite rough treatment on a seatpost but if done carefully with a light hand I guess it`ll work.