


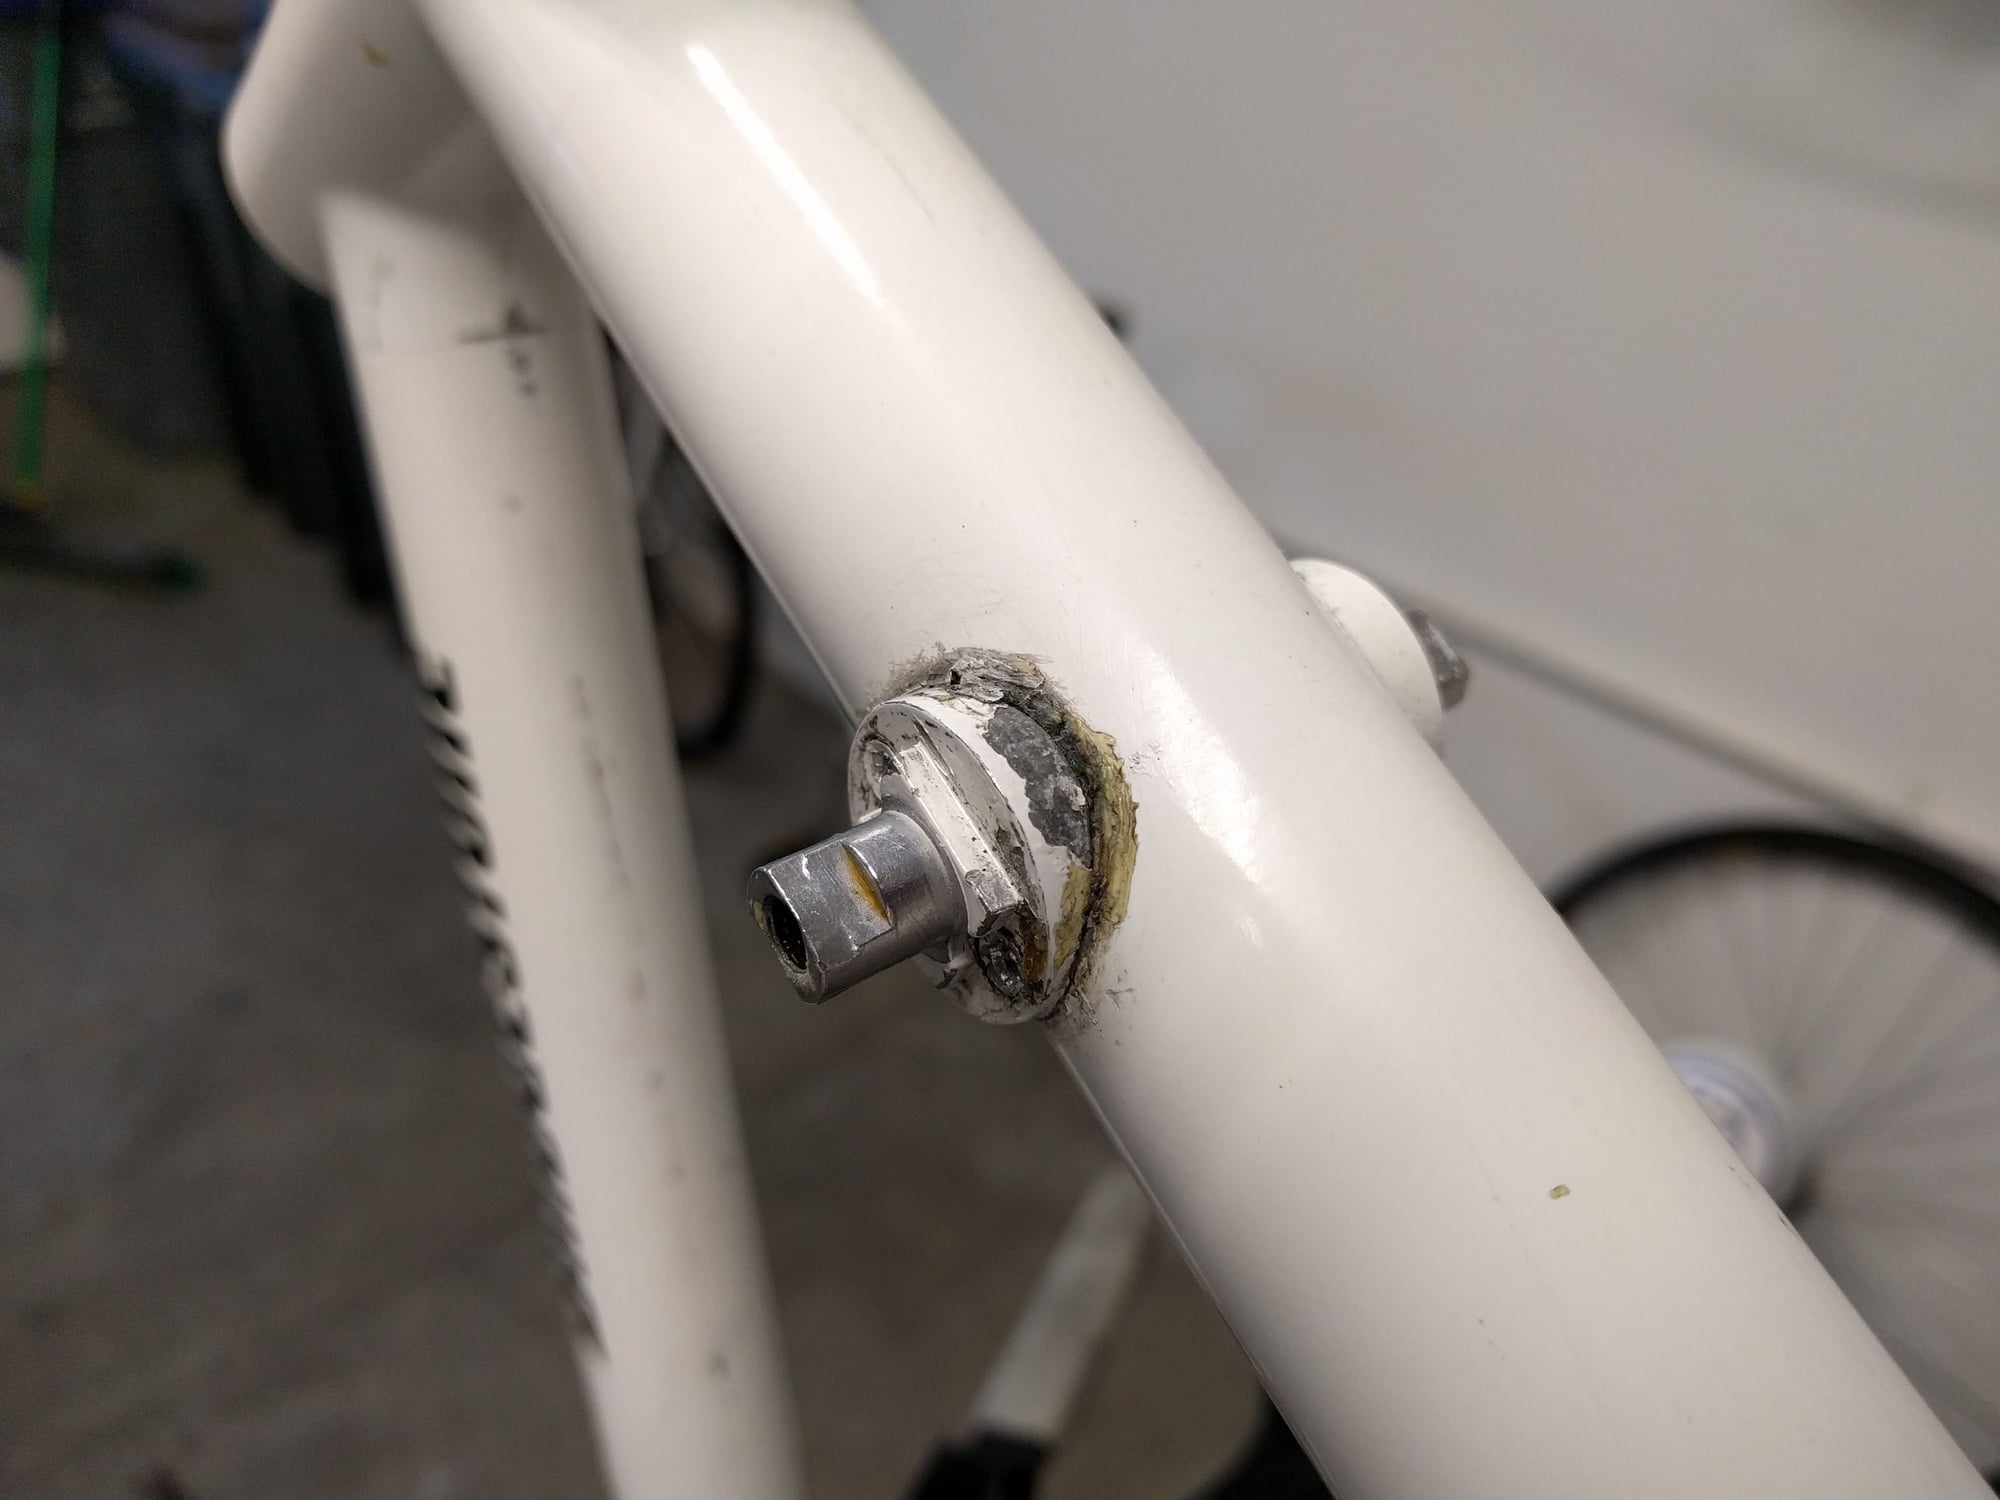
Headset install: Fork crown race - damaged crown shoulder
 07-14-19, 11:19 PM
#26

Friendship is Magic

Join Date: Nov 2010
Location: Sacramento, CA
Posts: 22,984
Bikes: old ones
Mentioned: 304 Post(s)
Tagged: 0 Thread(s)
Quoted: 26411 Post(s)
Liked 10,378 Times
in
7,206 Posts
...here is what I speculate. Please label it as speculation.
Your fork is composed of a steel steerer and an aluminum fork crown. The steel steerer does appear to penetrate the entire length of the crown, which is based on some design improvements after earlier failures of bonded aluminum forks and aluminum forks with aluminum steerers.
These two parts are dissimilar metals, in close proximity, with some difference in electrical potential that makes the surface where they meet subject to some electrolytic corrosion. There is a bonding agent between them, but it appears to be very thin, and to my knowledge lacks any sacrificial metals that might prevent electrolytic corrosion for a longer period of time.
I think, but certainly cannot prove without destructive analysis of your fork, that over time, and with some moisture present (which is always the case in that location on an older bicycle like yours), that this corrosion has damaged the bond between crown and steerer tube, I'm not certain why your crown race seat (also aluminum) has disappeared in such large chunks. But I think it possible that it, too is a victim of this same phenomenon. parts of it might be bonded to the old steel headset race you removed by that same electrolytic corrosion.
Regardless, if I am correct in this, your fork bond between tube and crown will continue to degrade.
I don't wish to preach any further on this. I could be completely mistaken. There's no way to tell for certain without viewing those surfaces, but the stuff in your first photos, before you cleaned off the brown rust that was sitting under the old race seat ought to give you some pause.
I do wish you the best with your project. I've already told you a couple of times what I would do as an alternative, and I hate it when people here go on and on about something as tenuous as this.
 07-15-19, 06:57 AM
#27
Generally bewildered

Join Date: Aug 2015
Location: Eastern PA, USA
Posts: 3,037
Bikes: 2014 Trek Domane 6.9, 1999 LeMond Zurich, 1978 Schwinn Superior
Mentioned: 20 Post(s)
Tagged: 0 Thread(s)
Quoted: 1152 Post(s)
Liked 341 Times
in
251 Posts
As others have pointed out, a bond like this (Al to Steel) would be discouraged because of the galvanic corrosion
1) Put the fork in a fixture and adjust (using a dial gauge fastened to, for example, a milling machine chuck).
2) Precisely align the fixture so that the steer tube in the chuck is parallel to and aligned with the milling machine spindle. This is a manual operation (don't turn on the milling machine with a dial gauge in the chuck!
3) Once the chuck is set, remove the fork and hacksaw off as much of the steerer as you can. Replace the fork in the chuck.
4) Drill and bore out the remainder of the steerer tube from the fork.
5) Bore out the fork so the the hole is just slightly larger than the original hole (this smooths out the hole and gets ride of any surface corrrosion.) Inspect the fork crown. If there is any deep corrosion, the fork is toast. Stop here. But if you can get a clean surface, this might work.
6) Get a piece of chrome-moly steel tubing that's slightly larger in diameter than what you've got. Turn a sufficient length of that tube down to the original OD.
7) Turn a the other end of the tube to mimic the original fork profile. That is, turn the very end to fit (interference fit) into the fork crown. Then have larger diameter to act as a stop for the bearing. Then turn a section for the bearing itself.
8) Press or thermal fit the tube into the fork. Thermal measures involve putting the tube in the freezer or in a cooler with dry ice, and the fork crown in an oven at say 300�F. Then press them together (quickly!) . Given the small support surface between the tube and fork crown, I'd suspect that any adhesive would not hold up.
9) Make sure you paint the joint on the bottom with a very good paint, to exclude moisture.
Again, the cheapest path for vintage would be to find a Radac that was only ridden in dry weather so that it has a good fork. A solution that might end up riding much easier would to just put a carbon fiber fork into the bike.
If there's corrosion between the tube and fork crown (or if you can't tell by inspection that there's no corrosion), I agree with others: don't ride this fork.
07-15-19, 08:46 AM
#28
Senior Member
Join Date: Feb 2012
Location: Rochester, NY
Posts: 18,073
Bikes: Stewart S&S coupled sport tourer, Stewart Sunday light, Stewart Commuting, Stewart Touring, Co Motion Tandem, Stewart 3-Spd, Stewart Track, Fuji Finest, Mongoose Tomac ATB, GT Bravado ATB, JCP Folder, Stewart 650B ATB
Mentioned: 0 Post(s)
Tagged: 0 Thread(s)
Quoted: 4201 Post(s)
Liked 3,857 Times
in
2,305 Posts
In photo 1 is the shinny surface of the steerer, just behind where the broken off shoulder would have been, a worn spot? The reflections that this worn area seems to show are curved, suggesting that either the surface it is reflecting is curved or that the steerer is curved.
I ask because I have seen more then a few forks with a groove or valley worn into the steerer, usually from the headset cup's skirt end (we see this in rear hub axles more frequently too). Placing a straight edge along the steerer's surface and seeing if there's any gaps between them is a quick and easy test.
If the steerer has been worn to the amount of a reduction of wall thickness/diameter right where it sees the greatest stress, and when there's no back up system, is not a smart choice. Andy (who knows that every other tube in a bike frame is connected at both ends but the steerer isn't)
__________________
AndrewRStewart
AndrewRStewart
07-15-19, 10:37 PM
#29
Junior Member
Thread Starter
In photo 1 is the shinny surface of the steerer, just behind where the broken off shoulder would have been, a worn spot? The reflections that this worn area seems to show are curved, suggesting that either the surface it is reflecting is curved or that the steerer is curved.
I ask because I have seen more then a few forks with a groove or valley worn into the steerer, usually from the headset cup's skirt end (we see this in rear hub axles more frequently too). Placing a straight edge along the steerer's surface and seeing if there's any gaps between them is a quick and easy test.
If the steerer has been worn to the amount of a reduction of wall thickness/diameter right where it sees the greatest stress, and when there's no back up system, is not a smart choice. Andy (who knows that every other tube in a bike frame is connected at both ends but the steerer isn't)
I ask because I have seen more then a few forks with a groove or valley worn into the steerer, usually from the headset cup's skirt end (we see this in rear hub axles more frequently too). Placing a straight edge along the steerer's surface and seeing if there's any gaps between them is a quick and easy test.
If the steerer has been worn to the amount of a reduction of wall thickness/diameter right where it sees the greatest stress, and when there's no back up system, is not a smart choice. Andy (who knows that every other tube in a bike frame is connected at both ends but the steerer isn't)
I appreciate everyone for contributing to this thread. I am glad that I asked about this. I also have another aluminum bike from this era, Trek 1200 (1989) which came with a cro-mo fork - this makes sense now. I will look for a replacement fork and update. It would be hard to replicate the aesthetic of the original fork, though.
07-27-19, 08:19 AM
#30
Junior Member
Thread Starter
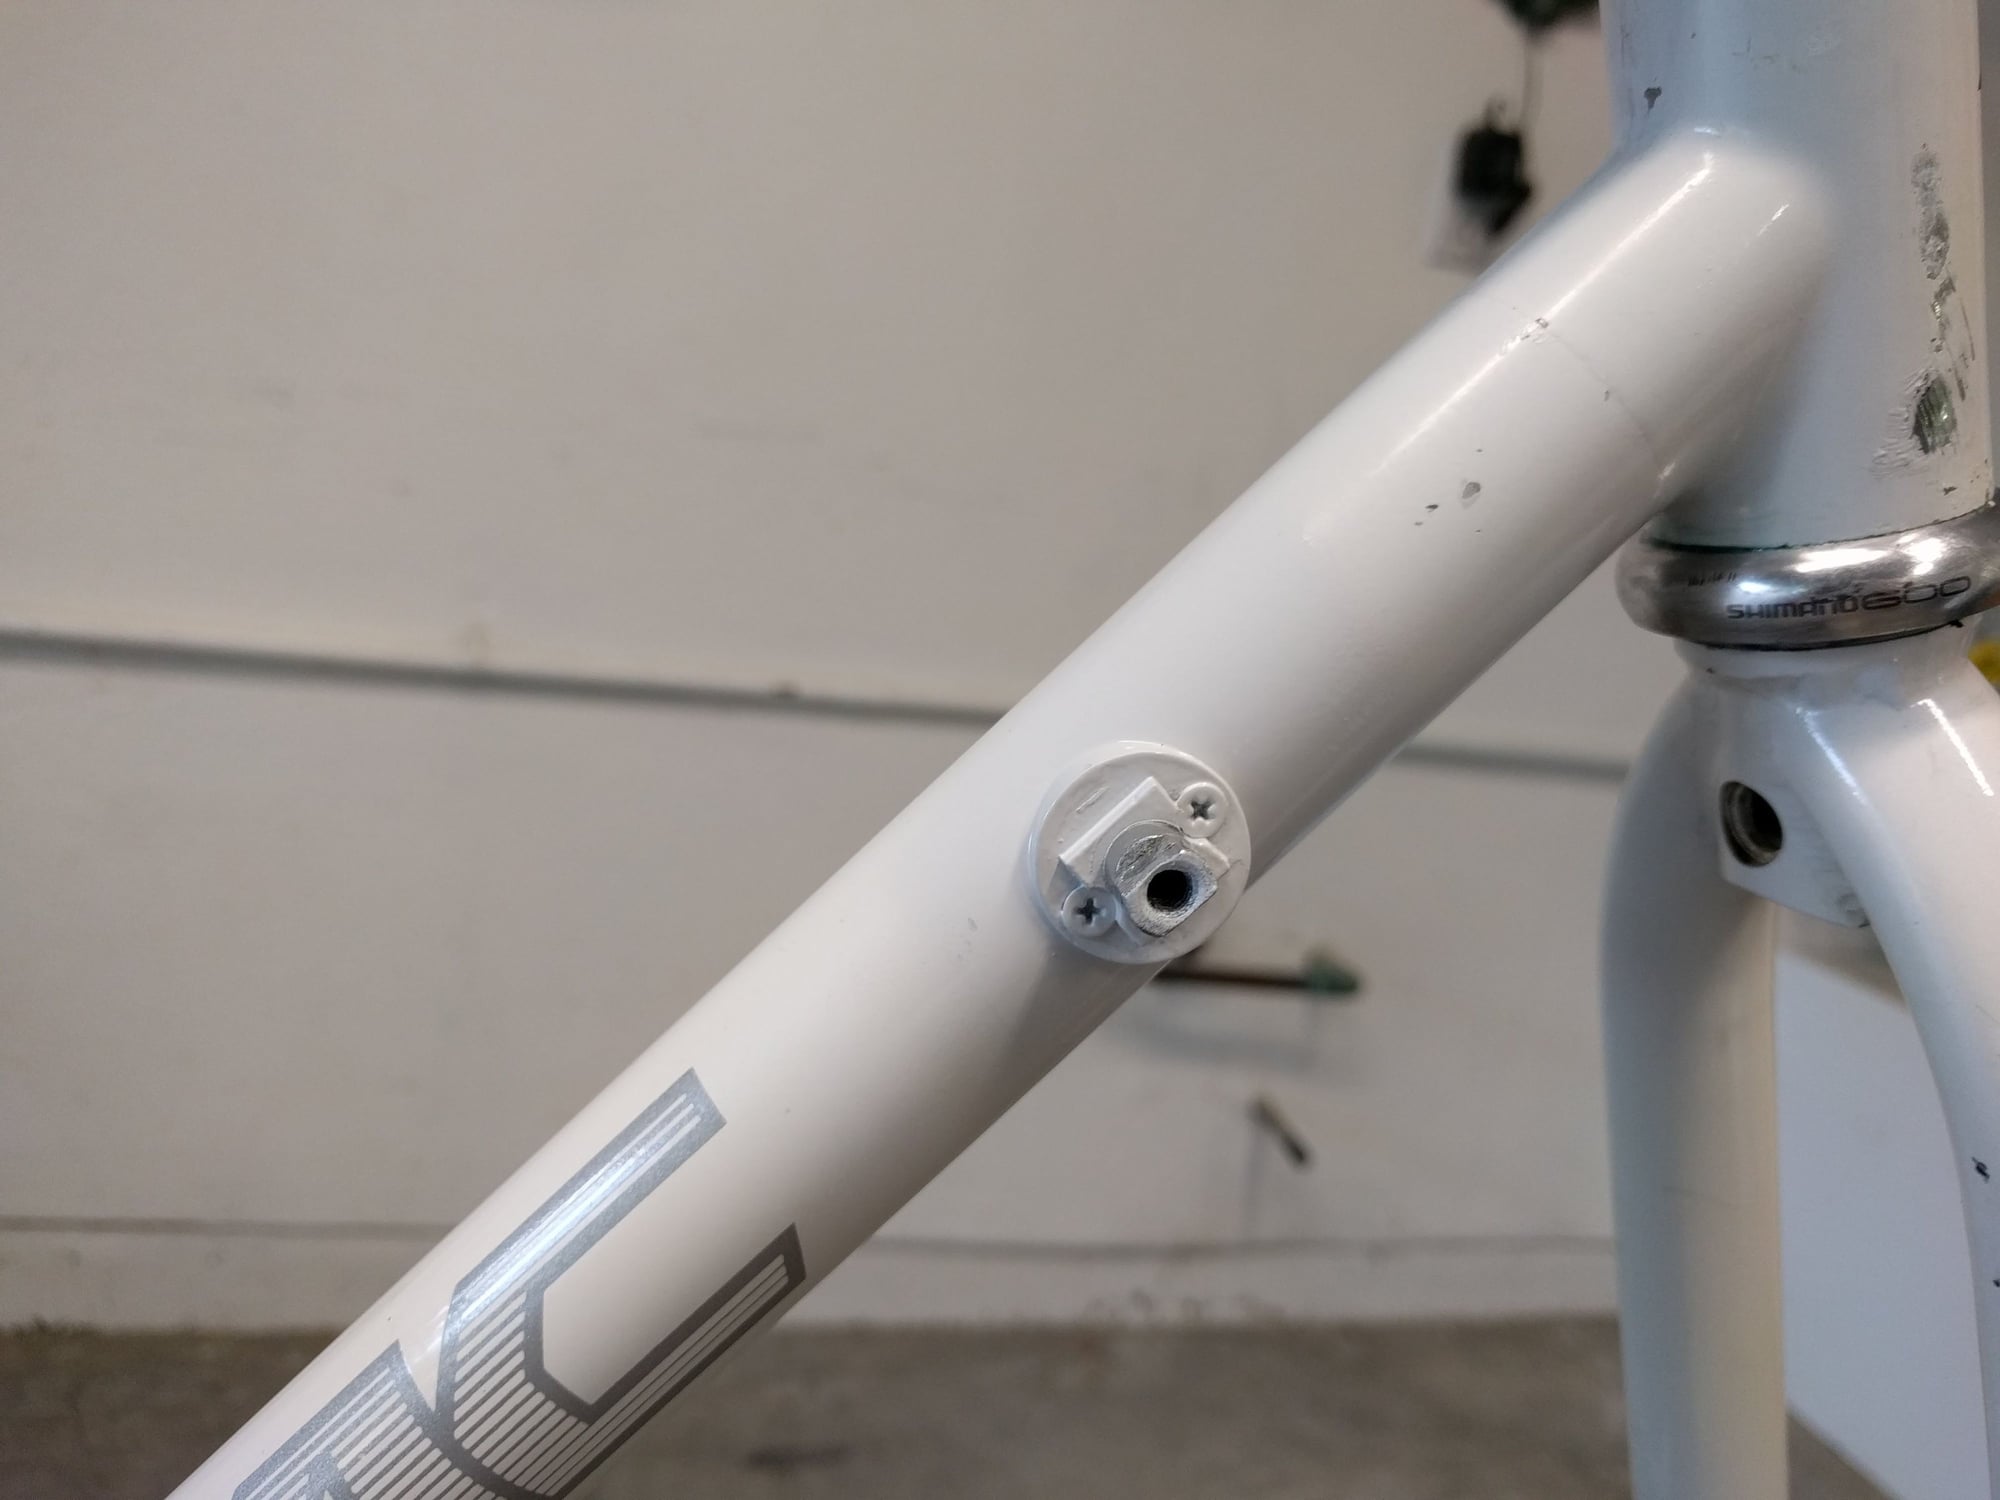
update: repair on shifter boss
While I was inspecting the rest of the frame, I found the right side shifter boss was little loose. There is a sign of repair with epoxy of some sort. This appears to be pretty common failure of this era of aluminum frames, and found a number of threads on this issue, as well as my other recently acquired Trek 1200 aluminum frame also had the same, albeit on the left side. This is a view from the underside, which is worst - there is a little gap.
I drilled the rivets and came off easily. The rivet holes were then tapped for M3 screws - thought it may help to align and hold while epoxy cured. Cleaned it first, but the boss was not sitting flush with the curvature of the downtube so placed a sand paper on the down tube and sanded the contact area of the boss - I think it helped. Finally, glued it back on with 3M DP460 (also used a clamp to hold), then touch up paint.

I drilled the rivets and came off easily. The rivet holes were then tapped for M3 screws - thought it may help to align and hold while epoxy cured. Cleaned it first, but the boss was not sitting flush with the curvature of the downtube so placed a sand paper on the down tube and sanded the contact area of the boss - I think it helped. Finally, glued it back on with 3M DP460 (also used a clamp to hold), then touch up paint.
07-27-19, 08:28 AM
#31
Junior Member
Thread Starter
update: fork
I found a used fork on eBay. This fork is from Miyata (also aluminum frame from the same year, but they used a steel unicrown fork) and matches the white on the frame.

07-27-19, 08:29 AM
#32
Senior Member
Join Date: Jan 2009
Location: San Diego, CA
Posts: 3,670
Mentioned: 10 Post(s)
Tagged: 0 Thread(s)
Quoted: 836 Post(s)
Liked 1,061 Times
in
745 Posts
While I was inspecting the rest of the frame, I found the right side shifter boss was little loose. There is a sign of repair with epoxy of some sort. This appears to be pretty common failure of this era of aluminum frames, and found a number of threads on this issue, as well as my other recently acquired Trek 1200 aluminum frame also had the same, albeit on the left side.
07-27-19, 09:26 AM
#33
Junior Member
Thread Starter
That's a really nice repair you did on the shifter boss. If you find it comes loose again try one of these. The through bolt is a little stronger setup. https://www.cycle-frames.com/bicycle...-AL-FRAME.html
11-29-19, 11:15 AM
#34
Junior Member
Thread Starter
Another aluminum fork
Just an update on the Bridgestone Radac. I have been using it as a commuter.
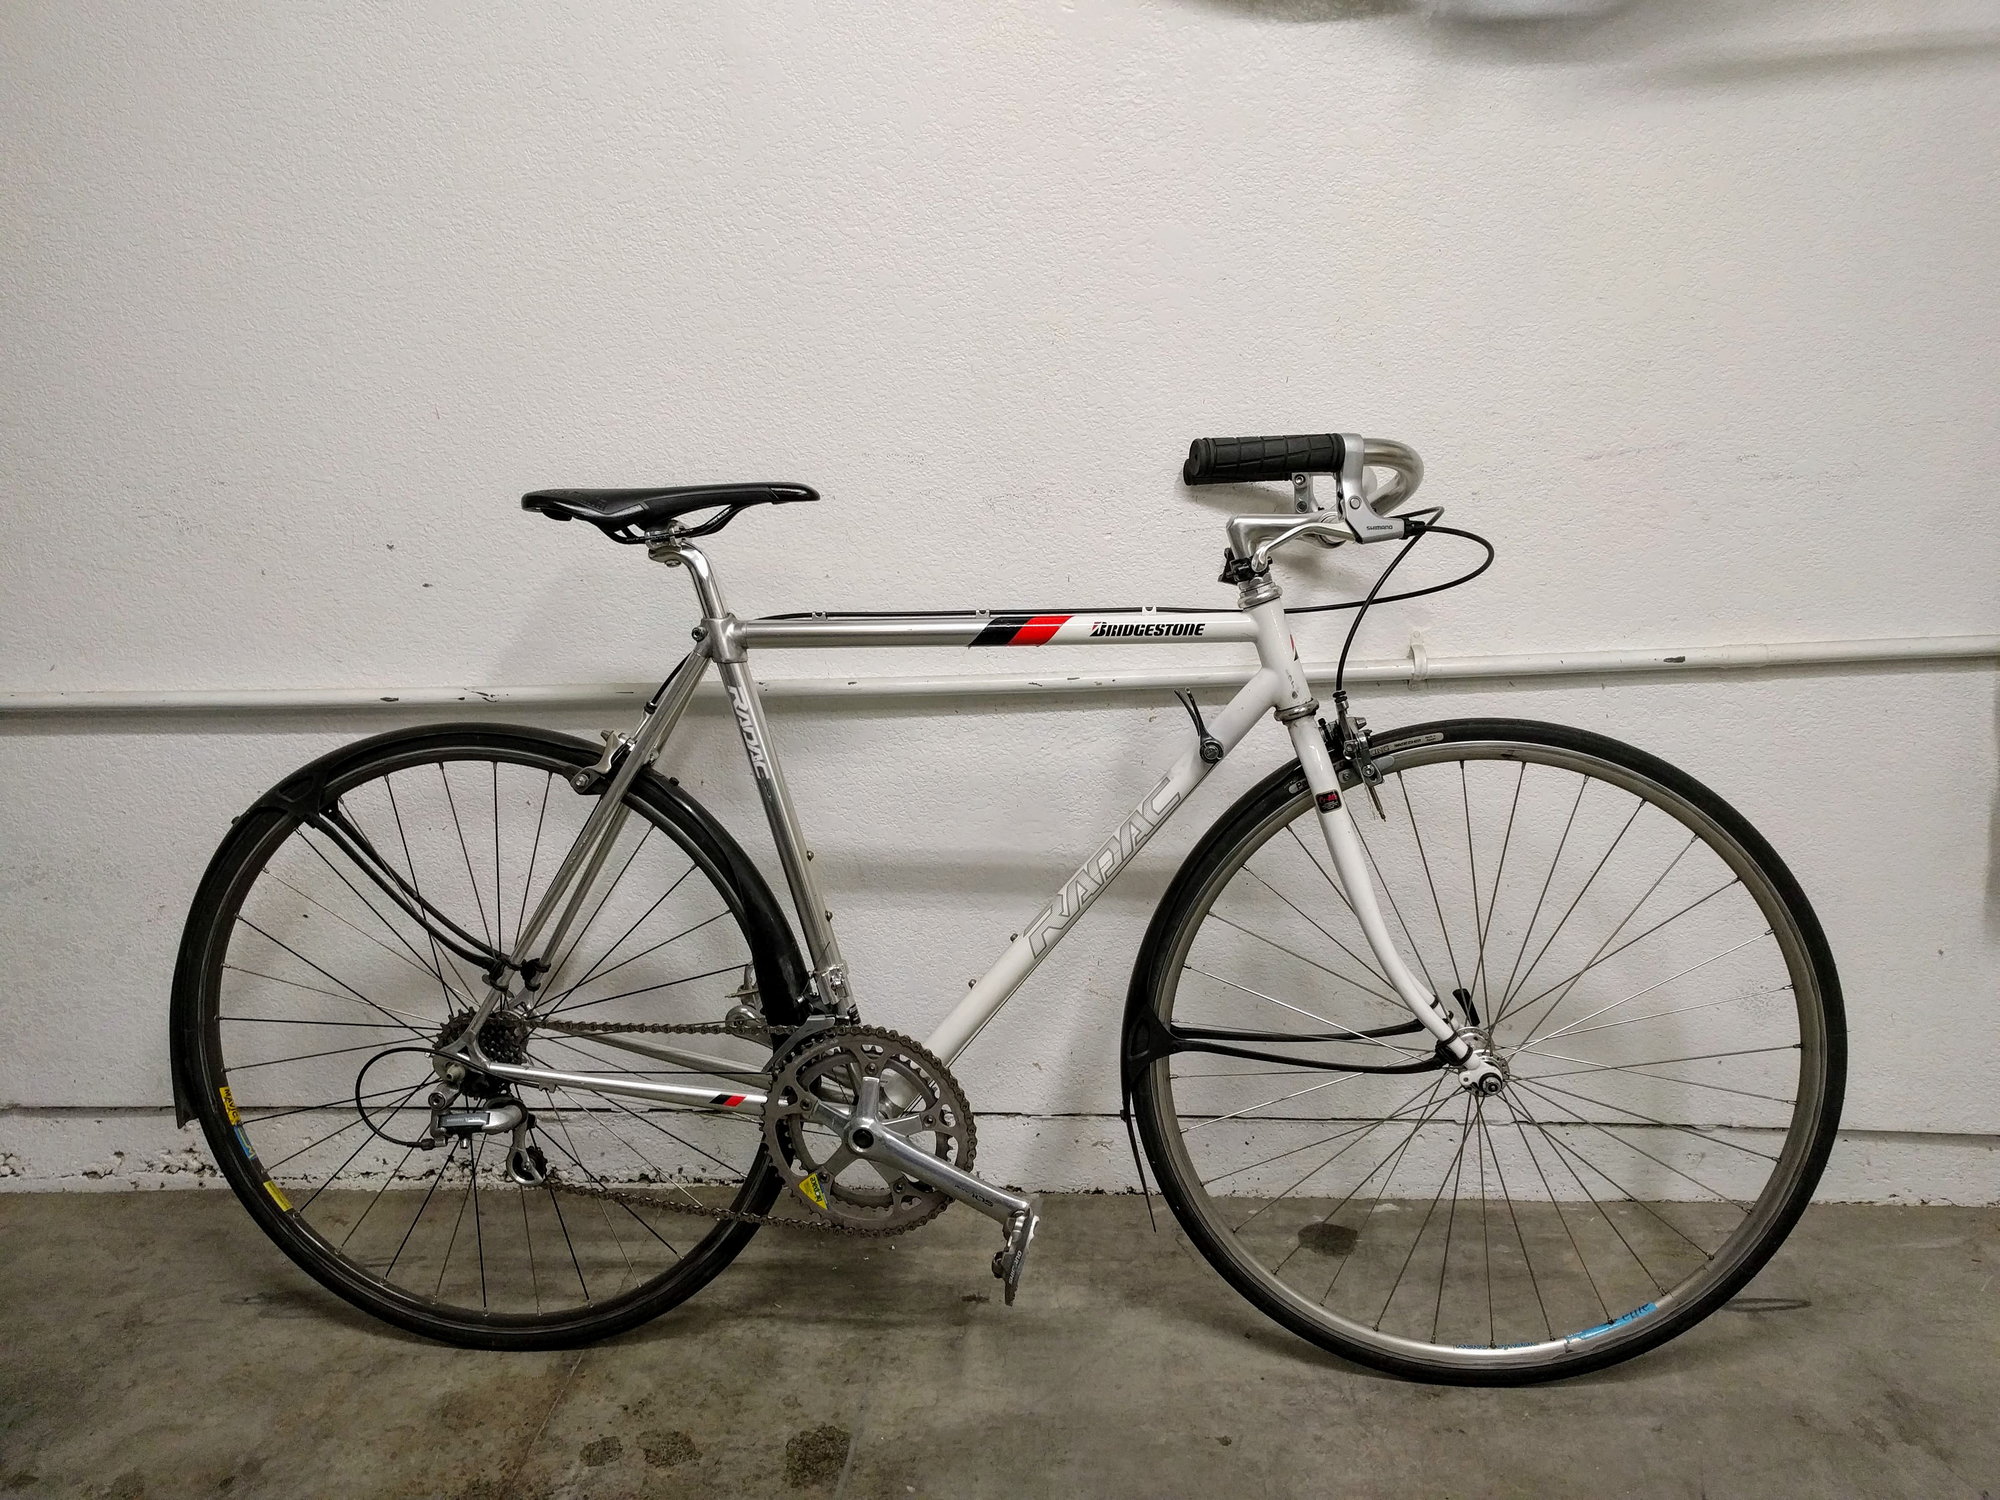
Since then, I acquired another frame with an aluminum fork. This fork seems to be constructed very differently from the previous one. It has an additional sleeve over the steel steerer. This fork came from 1993 Miyata Team.

Since then, I acquired another frame with an aluminum fork. This fork seems to be constructed very differently from the previous one. It has an additional sleeve over the steel steerer. This fork came from 1993 Miyata Team.
11-29-19, 03:51 PM
#35
Mother Nature's Son

Join Date: Mar 2016
Location: Sussex County, Delaware
Posts: 3,115
Bikes: 2014 Orbea Avant MD30, 2004 Airborne Zeppelin TI, 2003 Lemond Poprad, 2001 Lemond Tourmalet, 2014? Soma Smoothie
Mentioned: 15 Post(s)
Tagged: 0 Thread(s)
Quoted: 853 Post(s)
Liked 1,434 Times
in
816 Posts
Hope it has all worked out for you. I would not have felt comfortable with that fork, ever. Nice job on the boss repair.
11-29-19, 04:23 PM
#36
Junior Member
Thread Starter
One thing that I noticed during the headset install (with the new fork) was that both upper and lower headtube race parts were loose fit - this is Shimano 600 headset (used). I think this was also true with the previous headtube race (Shimano STX headset) that was installed in this frame, and that they came out rather easily. When I installed the upper headtube race, it was so loose that I needed to shim it with a thin cutout piece from soda can. The lower race went in without any tool but was snug, so I left it at that. Since I build this up and riding every weekdays, the headset did come loose once, but this could be due to me not tightening it enough. I wonder this was the cause of the damaged crown shoulder.
11-30-19, 07:38 AM
#37
Senior Member

Join Date: May 2008
Location: Fredericksburg, Va
Posts: 9,579
Bikes: '65 Frejus TDF, '73 Bottecchia Giro d'Italia, '83 Colnago Superissimo, '84 Trek 610, '84 Trek 760, '88 Pinarello Veneto, '88 De Rosa Pro, '89 Pinarello Montello, '94 Burley Duet, 97 Specialized RockHopper, 2010 Langster, Tern Link D8
Mentioned: 73 Post(s)
Tagged: 0 Thread(s)
Quoted: 1607 Post(s)
Liked 2,216 Times
in
1,103 Posts
IMHO - Yup. If the top of the assembly is loose, the bottom will act as a fulcrum with variations in force. Like taking a paper clip and bending back an forth. That is why the crown race area was damaged. The top of the head tube may have been stretched. Digital caliper measurements between top and bottom of the HT ID might be revealing!
__________________
Bikes don't stand alone. They are two tired.
Bikes don't stand alone. They are two tired.
11-30-19, 11:00 AM
#38
Generally bewildered
Join Date: Aug 2015
Location: Eastern PA, USA
Posts: 3,037
Bikes: 2014 Trek Domane 6.9, 1999 LeMond Zurich, 1978 Schwinn Superior
Mentioned: 20 Post(s)
Tagged: 0 Thread(s)
Quoted: 1152 Post(s)
Liked 341 Times
in
251 Posts
I'm not considering JB Weld as a structural component, but rather a limited compression spacer which it should be able to hold up to.
Perhaps one could make a washer/ring that would do the same thing. Cut off all the aluminum, all the way around. Then heat up and press on a brass ring. Get a shop with the seat tool to finish it to size.
Perhaps one could make a washer/ring that would do the same thing. Cut off all the aluminum, all the way around. Then heat up and press on a brass ring. Get a shop with the seat tool to finish it to size.
Another method occurs to me for fastening a steerer tube to a separate fork crown. This would be an interference fit. The hole in the crown is machined undersized, and the steerer tube is oversize. The crown is heated and the steer tube is cooled. Assembly is very quick, using a press to ensure that you get proper fit before the temperatures equilibriate. This method is also used to install bearings on shafts - they sell "Bearing heaters" which are just heated cones you set a bearing on. Industrially, in the old days, huge steam engine crankshafts would be assembled this way. When I say huge, I'm talking 10 inch main bearing journals installed in 10 inch thick plates, with the assembly having 18 inches of throw. One warning: if both steerer and crown are aluminum this method is very dodgy. Aluminum on aluminum galls terribly and the temperatures equilibriate fast. This method is probably only practical for a steel tube in an Al crown.
If the OP wants to salvage the fork I think that he might want to use a machine shop. Figure out the material of the steerer tube and buy slightly oversized. Bore out the old steerer tube and discard. Bore the fork crown out very slightly larger than before (to ensure that you turn a true complete hole) and face the top of the crown very slightly. Bore/drill the new steerer tube to size. Turn it down to nominal diameter except at the end and near the end. Turning the threads on a lathe at that point will be more accurate than using a die later. At the oversize end, turn the tube end down to slightly undersized (for glue) or oversized (for interference fit) leaving a "collar" that is slighly oversize to match the crown bearing race. Reassemble. A key point in all this is that fixturing (creating the mechanical contrivance that holds the fork crown in position for boring) is critical. This is not something you do as a first project on your Harbor Freight or Grizzly mill. I don't think that the view is worth the climb, but I do think that you'd get a strong joint.
One point I'd make is that even though the bike was a design masterpiece, the fork crown joint is sub-par. The thin collar from the fork is clearly a failure mode waiting to happen. With the above design, the steerer tube collar and the faced top of the fork crown provides the bearing mount surface.

