


Mid-'40s René Herse tandem
 05-21-20, 09:52 AM
#126
Junior Member
Join Date: May 2020
Location: Near London, GB
Posts: 17
Bikes: Herse, Singer, Barra, Pitard, Goeland, Ferrand etc..
Mentioned: 1 Post(s)
Tagged: 0 Thread(s)
Quoted: 11 Post(s)
Likes: 0
Liked 11 Times
in
8 Posts
1st option, eminently doable with minimal equipment, but riskier and a weaker joint: Use some silver-bearing tin solder (typically 6% silver and the rest tin) and killed-acid (HCl/ZnCl2) flux, and a torch. Wet rags around the area as a heat sink. Get in and get out fast. The solder will hold and you can build a fillet (I've done bottle dynamo mounts with this stuff) and is low enough temperature to require the bare minimum of heat. Of course you could also use higher silver like a 56% silver which is used for standard framebuilding, and with a hot oxy/ace torch and a quick hand, it might not even take that long to get in and out. The metal involved is quite thin indeed.
2nd option, and what I would prefer: TIG braze it. You'll need to find someone with TIG equipment and who is familiar with brazing. This process is high-temp but low-total-heat. You hit it with the arc and it's red hot in a fraction of a second. Zip the filler in and you're done before the zone around it has a chance to heat up and bake the paint. Move the wet rags in to cool things down. File down and repeat as needed. No messing around with flux. MIG brazing might also work, but I don't know enough about this technique to be able to say one way or the other.
In both cases, the strategy I would take would involve trying to dump the majority of the heat into the braze-on and then just "flicking" it over to the frame, barely enough to get it to draw the filler metal away. I learned this from welding exhaust systems, because usually the hanger bracket is thick and the pipe or muffler is thin, so you want almost all the heat to go into the hanger bracket and just barely tie into the thin metal.
I just published a blog post on my similar tandem. I got the date wrong in my previous comment here. Jan thinks 1944/5, with modifications in 1947/8.
https://vintagebicycle.wordpress.com...tandem-c-1944/
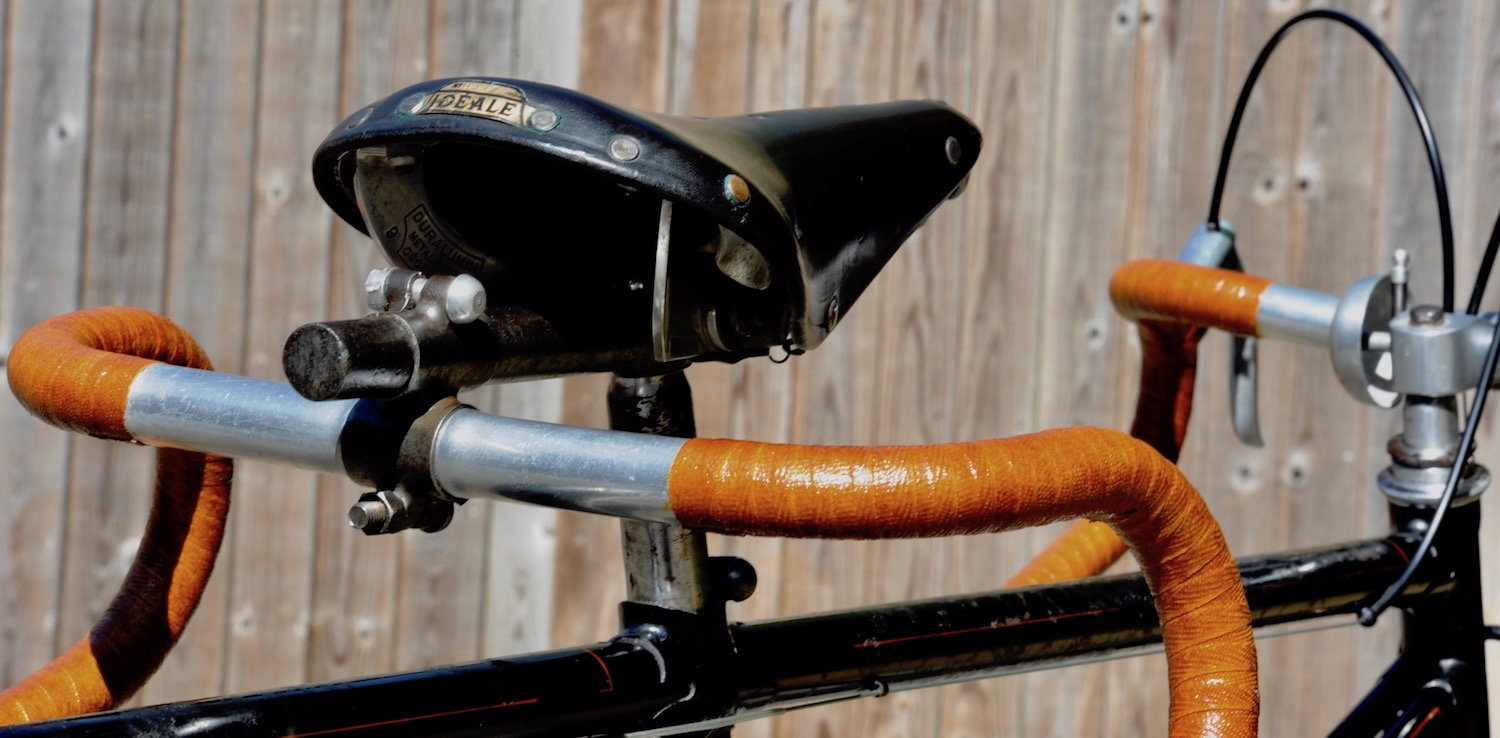
And here is the stoker stem on mine, for reference. The stem is fillet brazed to the saddle clamp. It's very nicely done, and it has a Herse alloy clamp bolt so I'm inclined to think it's original:
I like your comments about the learning process...."like a virus"!
Last edited by timdaw; 05-22-20 at 02:38 AM. Reason: corrections

Likes For timdaw:
05-21-20, 11:16 PM
#127

Senior Member
Thread Starter

Join Date: Jun 2010
Location: Medford MA
Posts: 2,089
Bikes: Ron Cooper touring, 1959 Jack Taylor 650b ladyback touring tandem, Vitus 979, Joe Bell painted Claud Butler Dalesman, Colin Laing curved tube tandem, heavily-Dilberted 1982 Trek 6xx, René Herse tandem
Mentioned: 80 Post(s)
Tagged: 0 Thread(s)
Quoted: 964 Post(s)
Liked 1,451 Times
in
723 Posts
Many thanks for the useful suggestions for the FD. I've already experimented with the heat sink material on a wreck frame and it works much better than wet rags, so should save as much paint as possible. I'll give your suggestions very serious consideration. Your offer offer of details on the FD is very helpful, thank you, i'd really appreciate it!
First off, mine is a 28/48 double, so all distances are going to be different if the chainrings are different sizes.
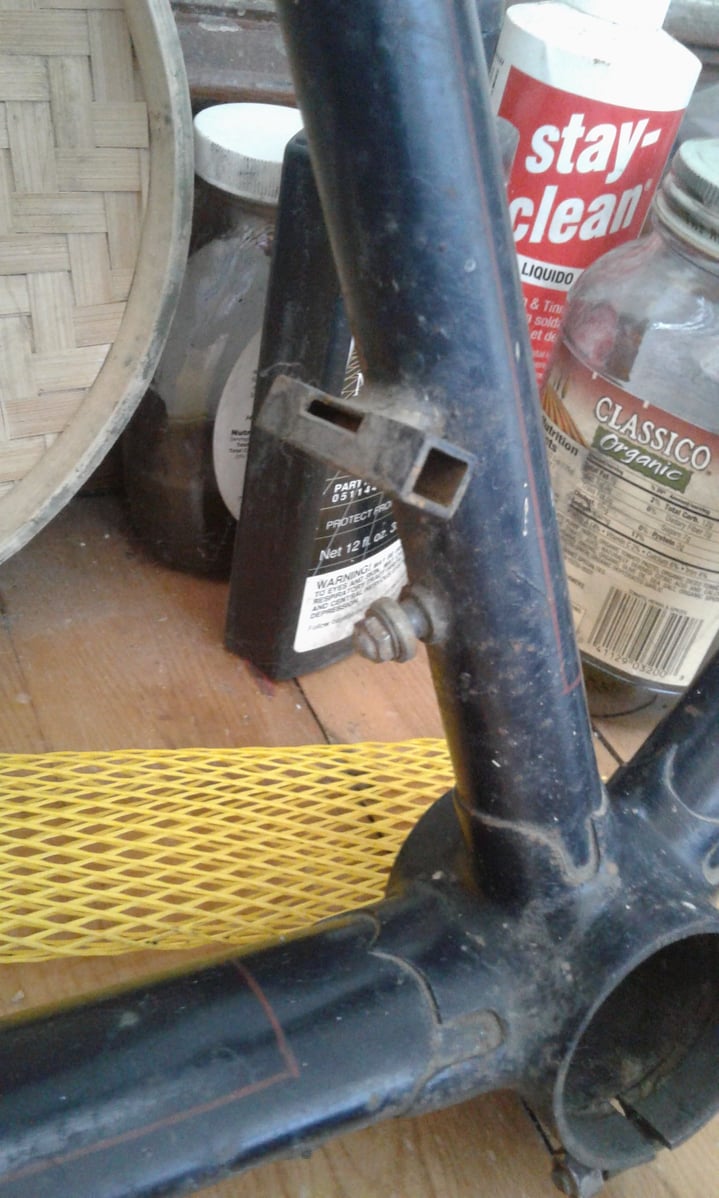
The square sleeve-tube brazed to the frame is a piece of 10mm square tubing, with 1.5mm thick walls, for an inner dimension of 7mm square.
The derailleur cage is made of 2mm thick steel, and it is brazed to a 7mm square tube with wall thickness of 1mm.
The tube is brazed to the frame 129mm from the center of the front eccentric shell to the center of the square tube.
The cage is 9.5mm wide on the inside.
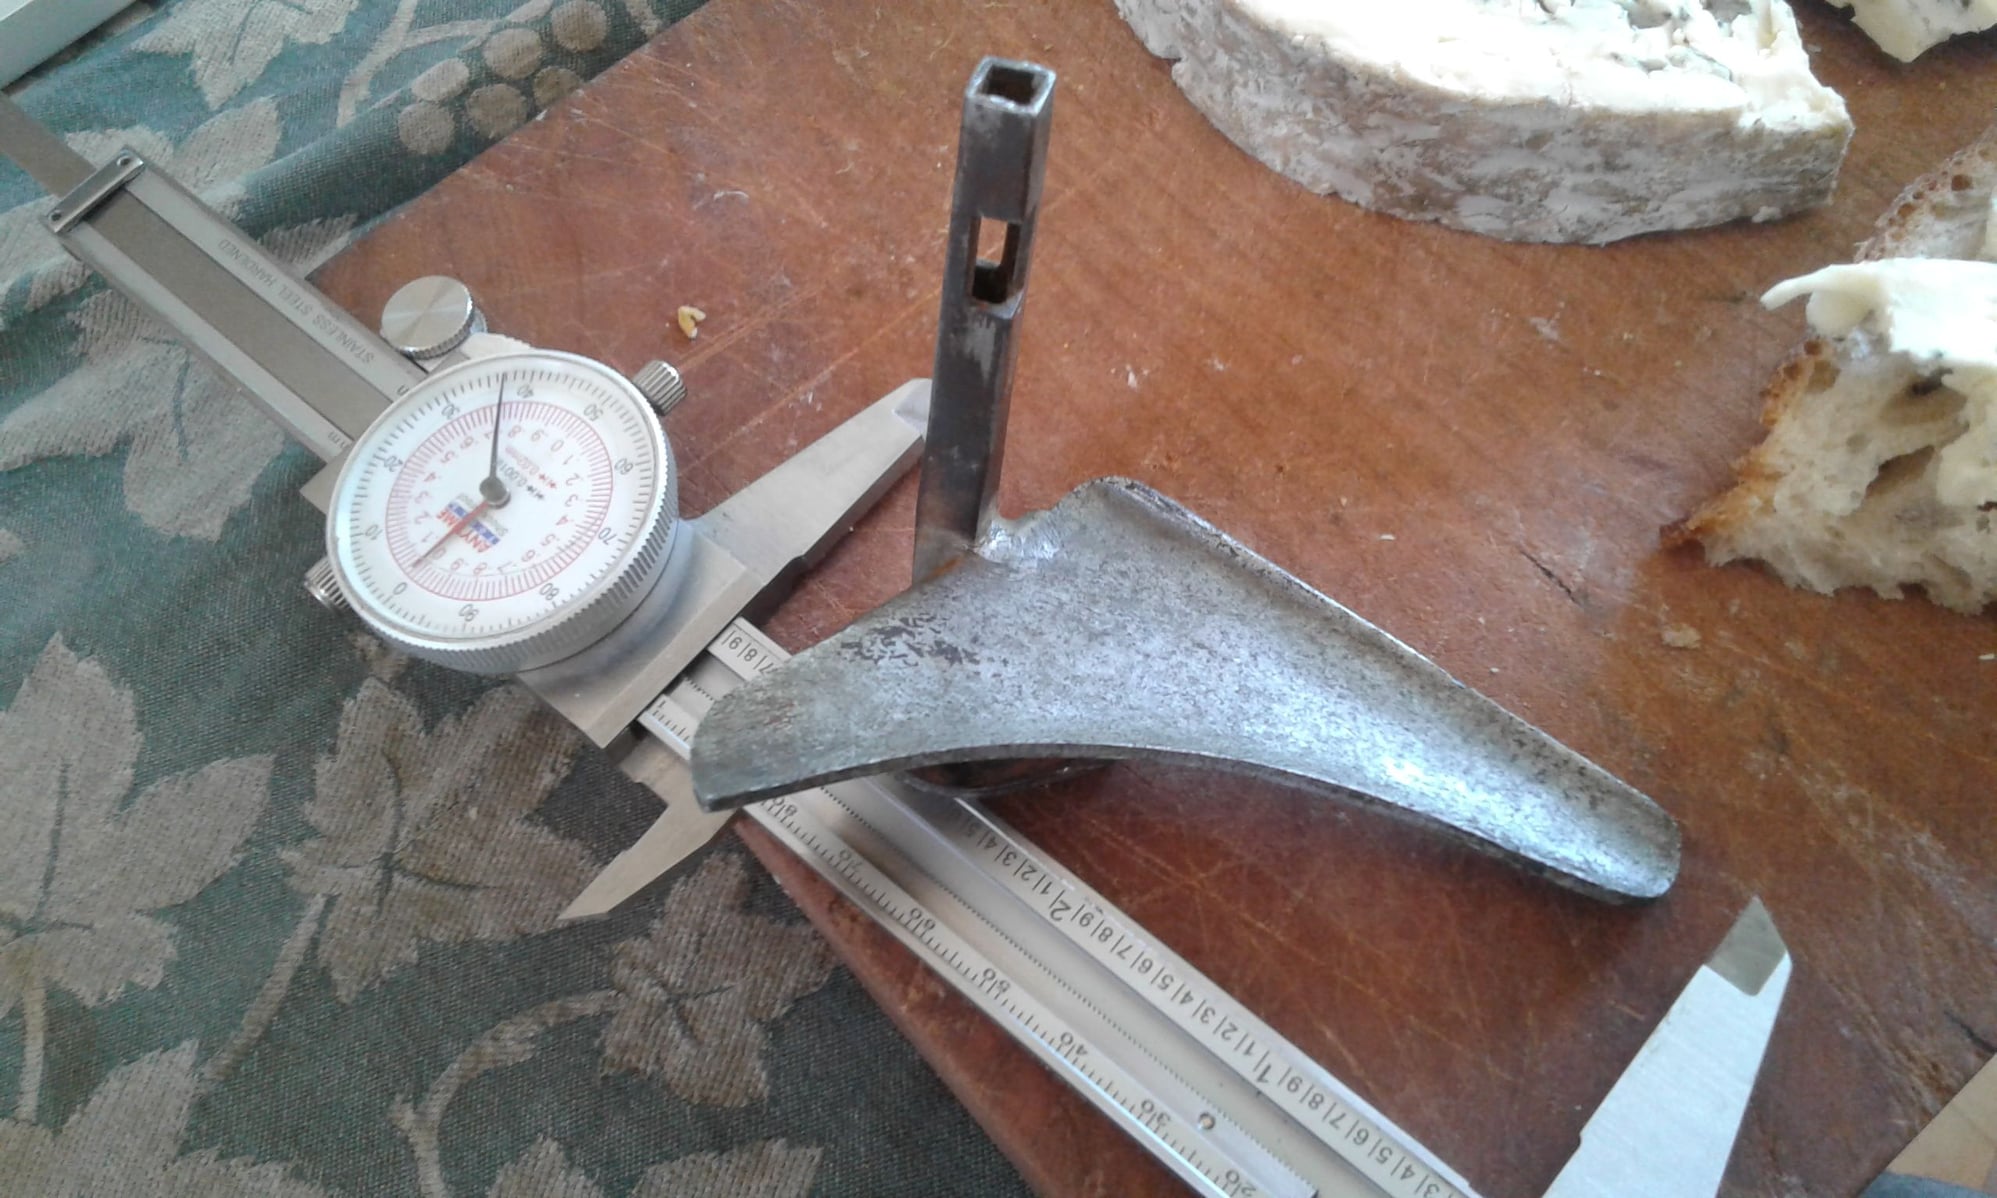
The outer cage plate measures approximately 27mm wide x 26mm high at the rear, tapering down to 20mm high at the front.
The inner plate measures approximately 61mm at its widest at the top, tapering down to 14mm at the bottom, and 72mm high at the back tapering to 12mm at the front, following a 98mm radius centered at the center of the eccentric.
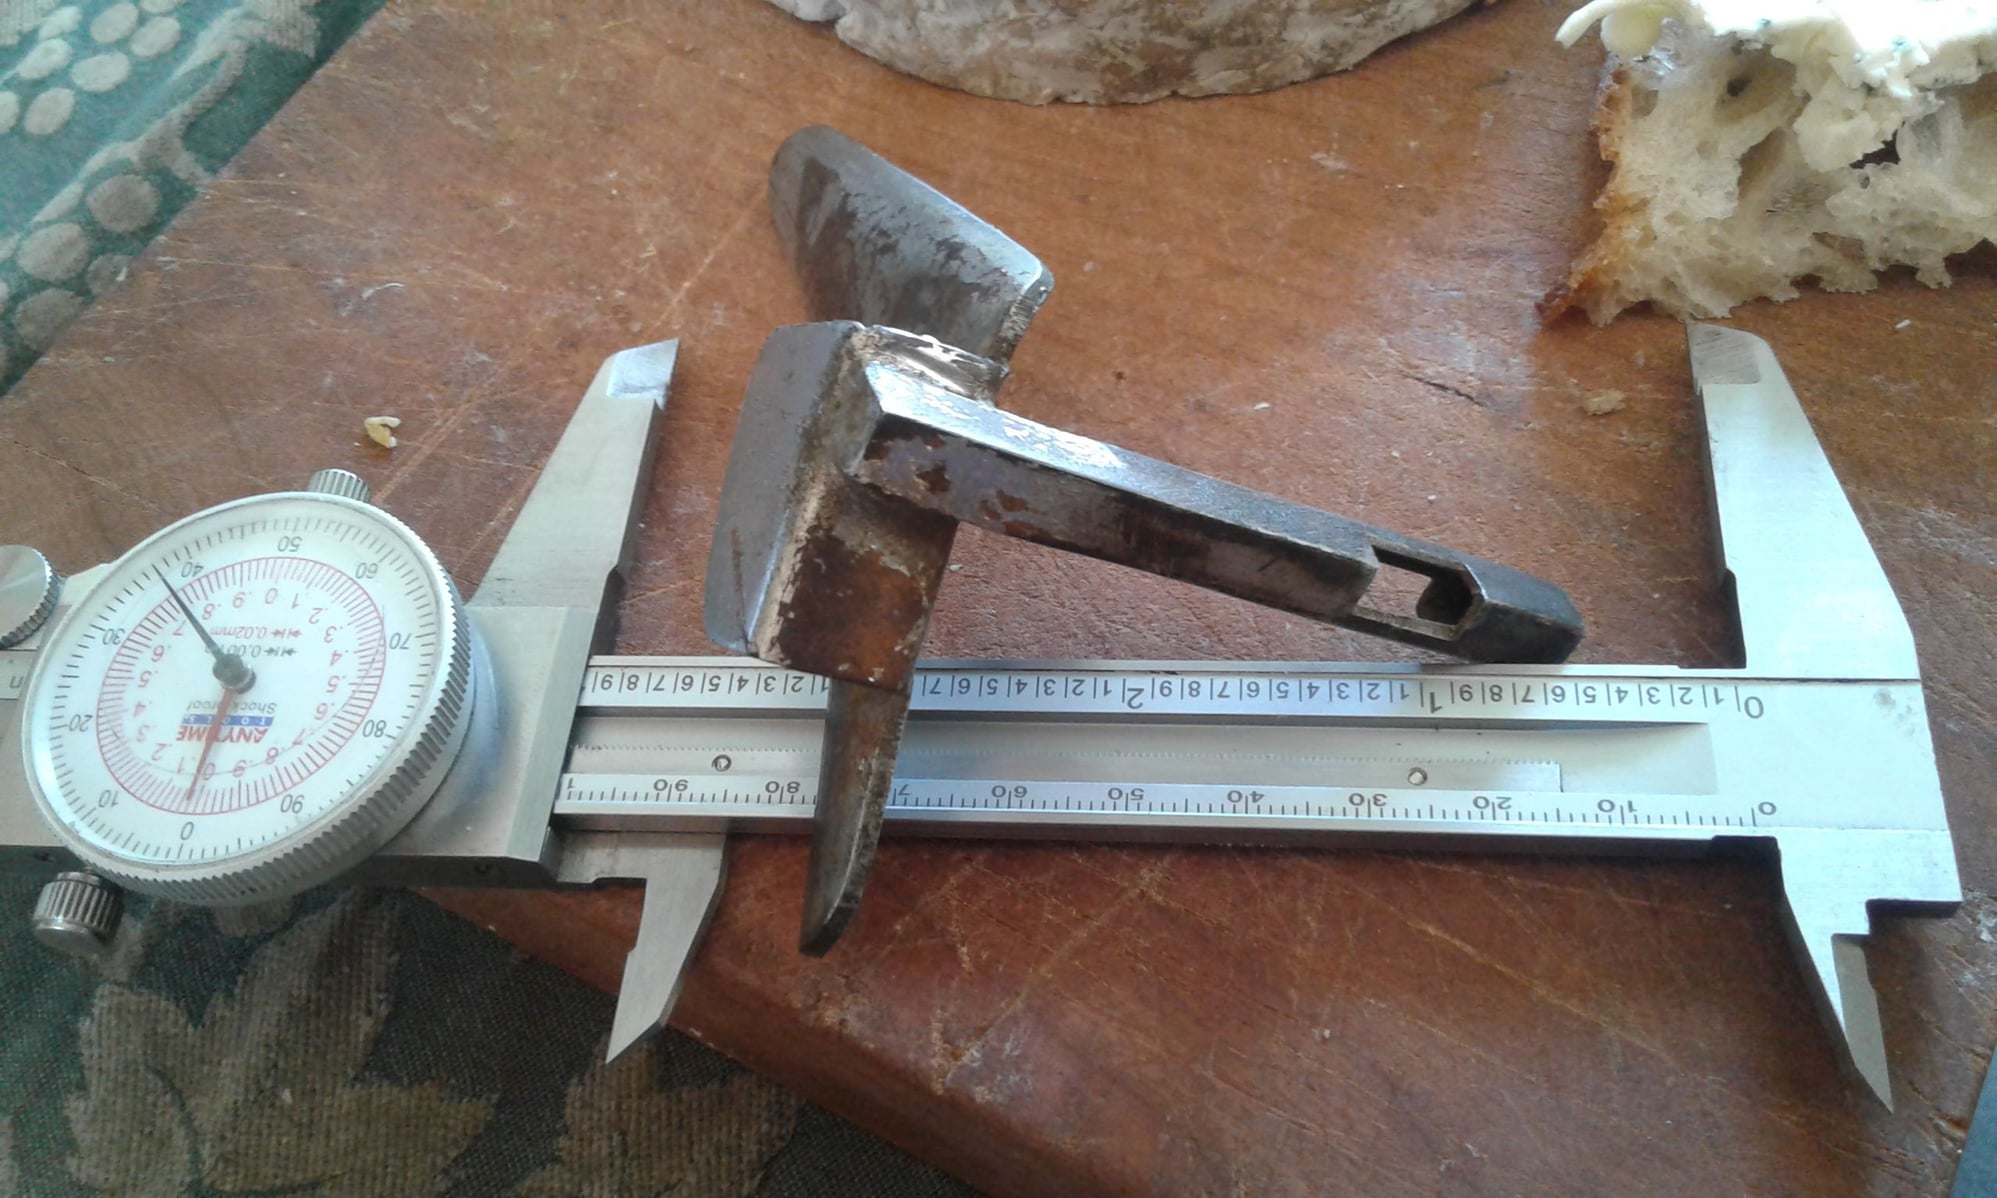
The lever hole in the derailleur push tube is 10.5mm x 4.5mm. The derailleur push tube is 67mm long in total. The edge of the hole in the push tube is 46mm from the outer cage plate.
The lever hole in the sleeve tube which is brazed to the frame is 19.5mm x 4.5mm. The sleeve tube brazed to the frame is 52mm long in total, with the hole's right edge 18mm from the right side.
The distance between the pivot bolt and the sleeve tube brazed to the frame is 38mm center-center.
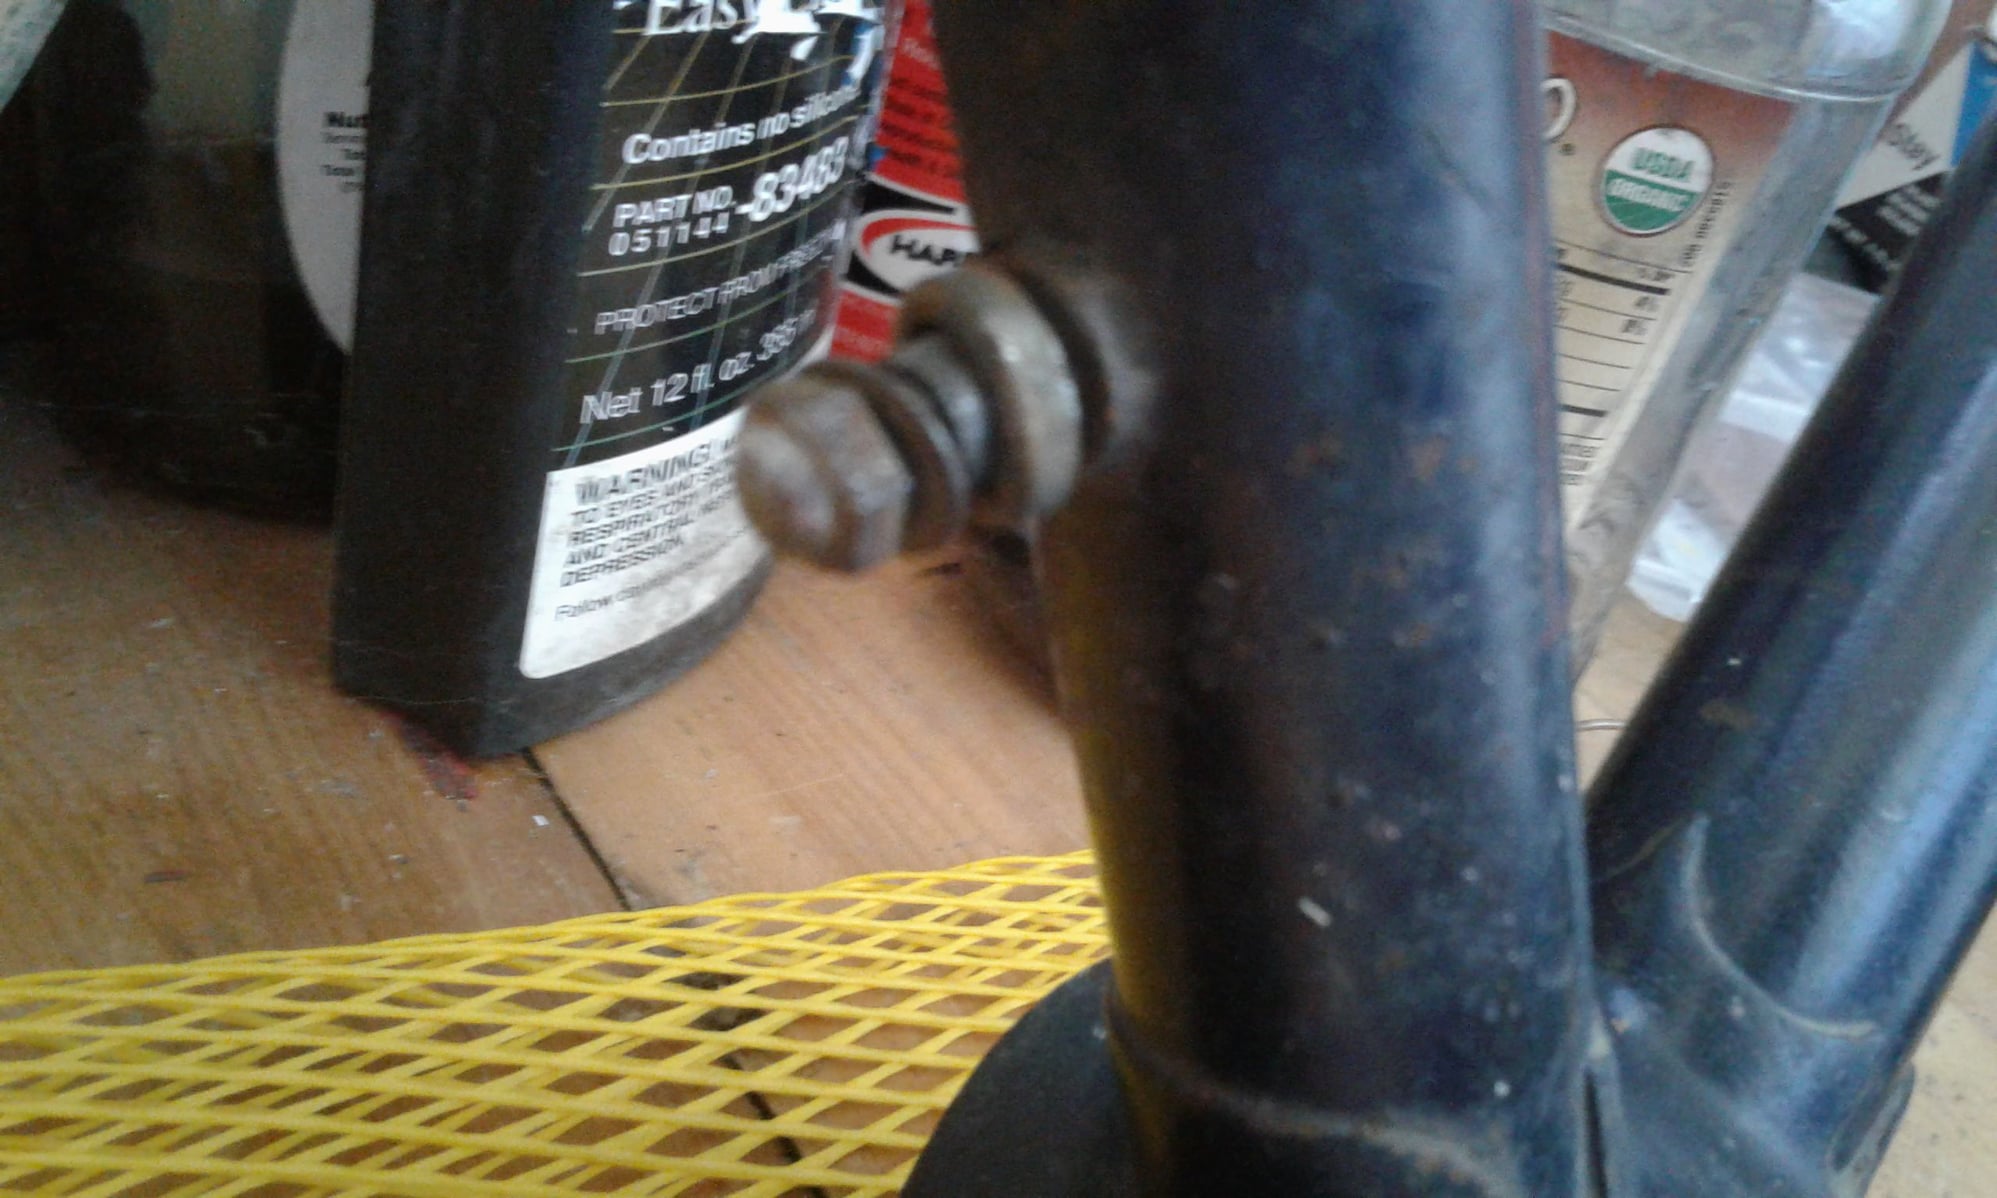
The pivot stud is 7mm OD and accepts a m5x0.75 bolt. You could use an m5x0.8 and I promise I won't tell anyone.
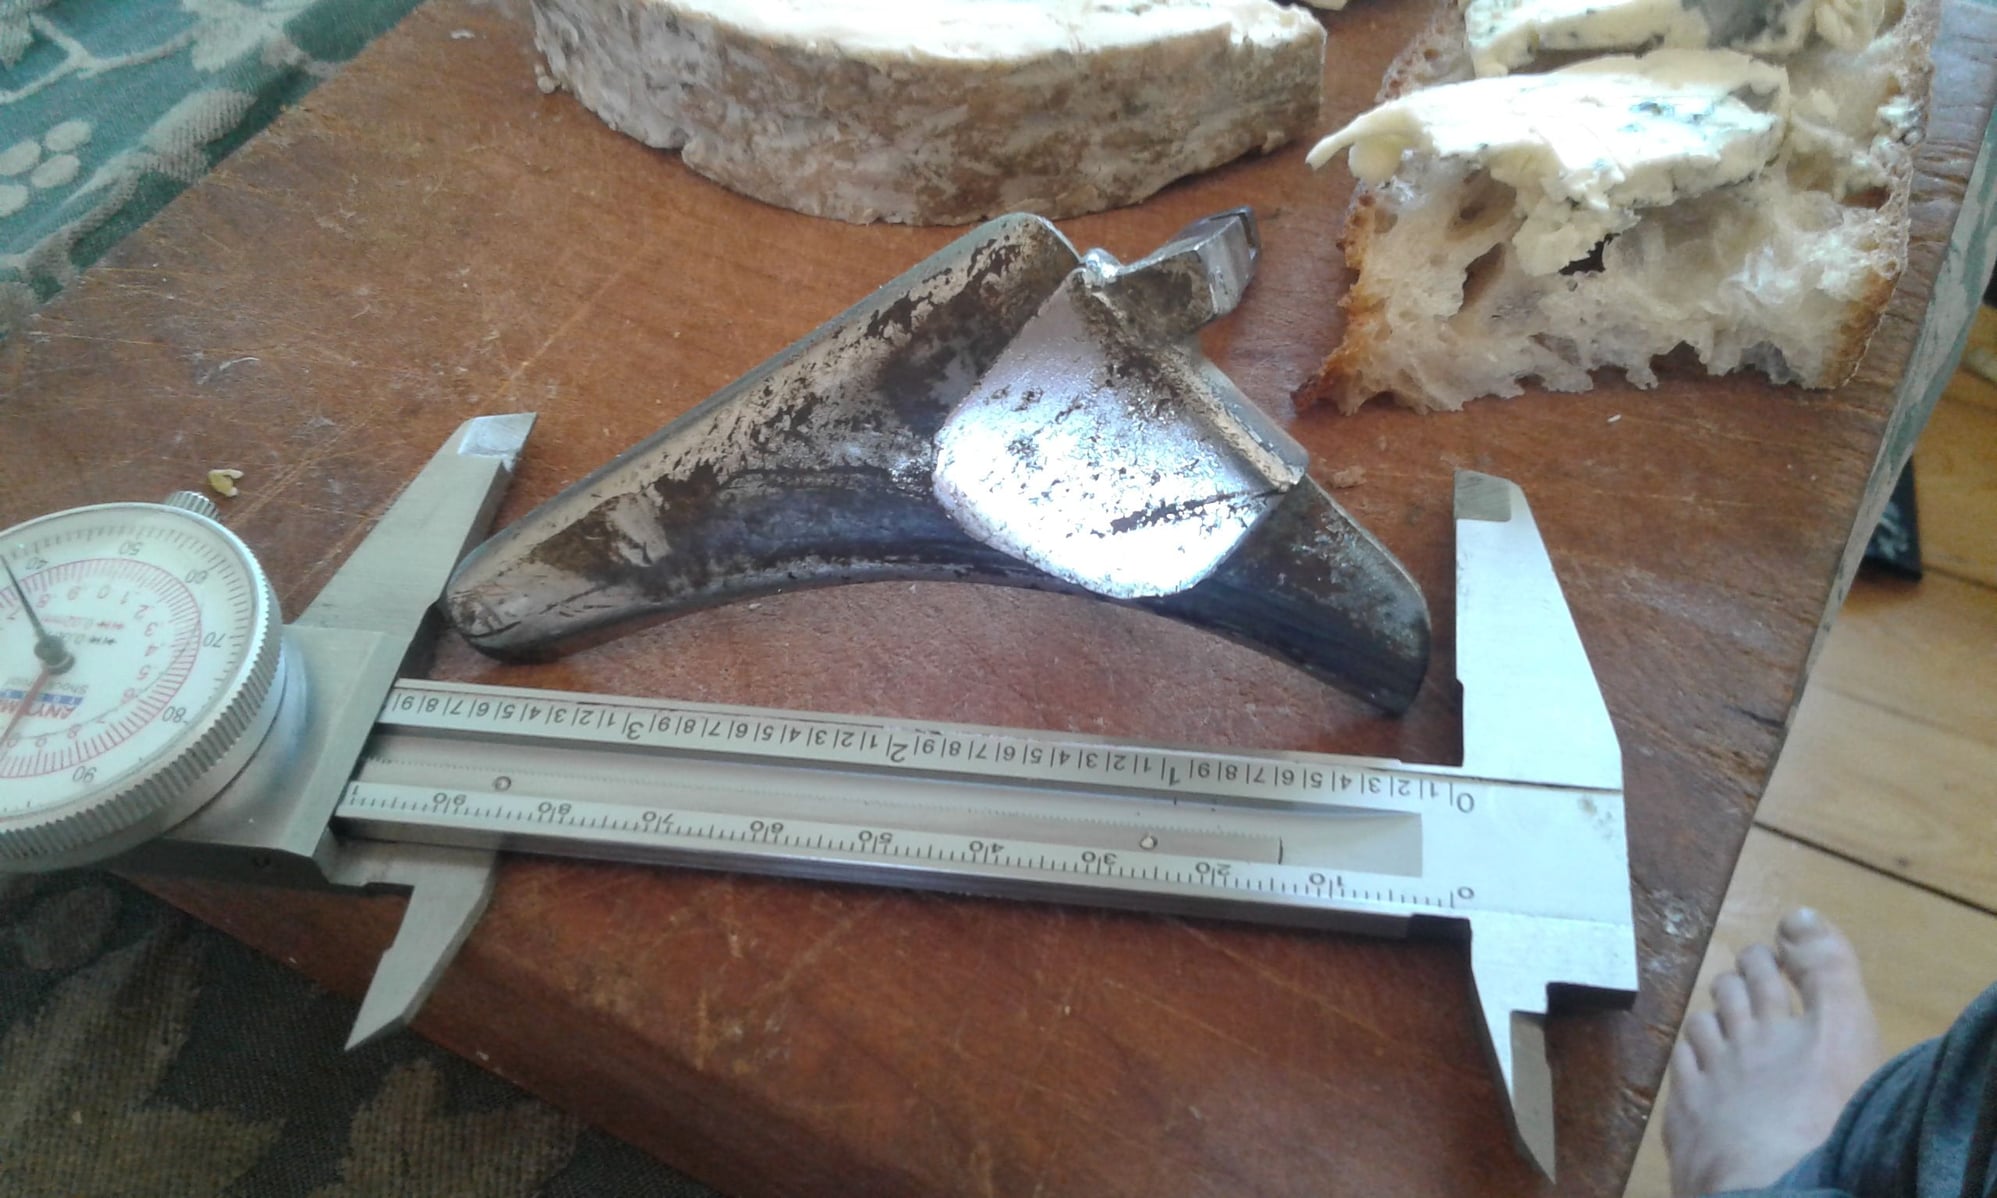
The lever measures 176mm in total length. The part with rectangular cross-section is 10mm x 4mm and 67mm long, and the part with circular cross-section is 6mm in diameter. The ball end is also 10mm in diameter. I think this was made first on a lathe, starting with a 10mm bar. The bar was turned down to 6mm for the round shaft, but left at 10mm for the ball end and the rectangular end. Then the rectangular end was filed down to become a flat paddle 4mm thick.
Here are some pictures. Calipers in photo are set to 100mm.


I just published a blog post on my similar tandem. I got the date wrong in my previous comment here. Jan thinks 1944/5, with modifications in 1947/8.
https://wordpress.com/block-editor/p...press.com/3769
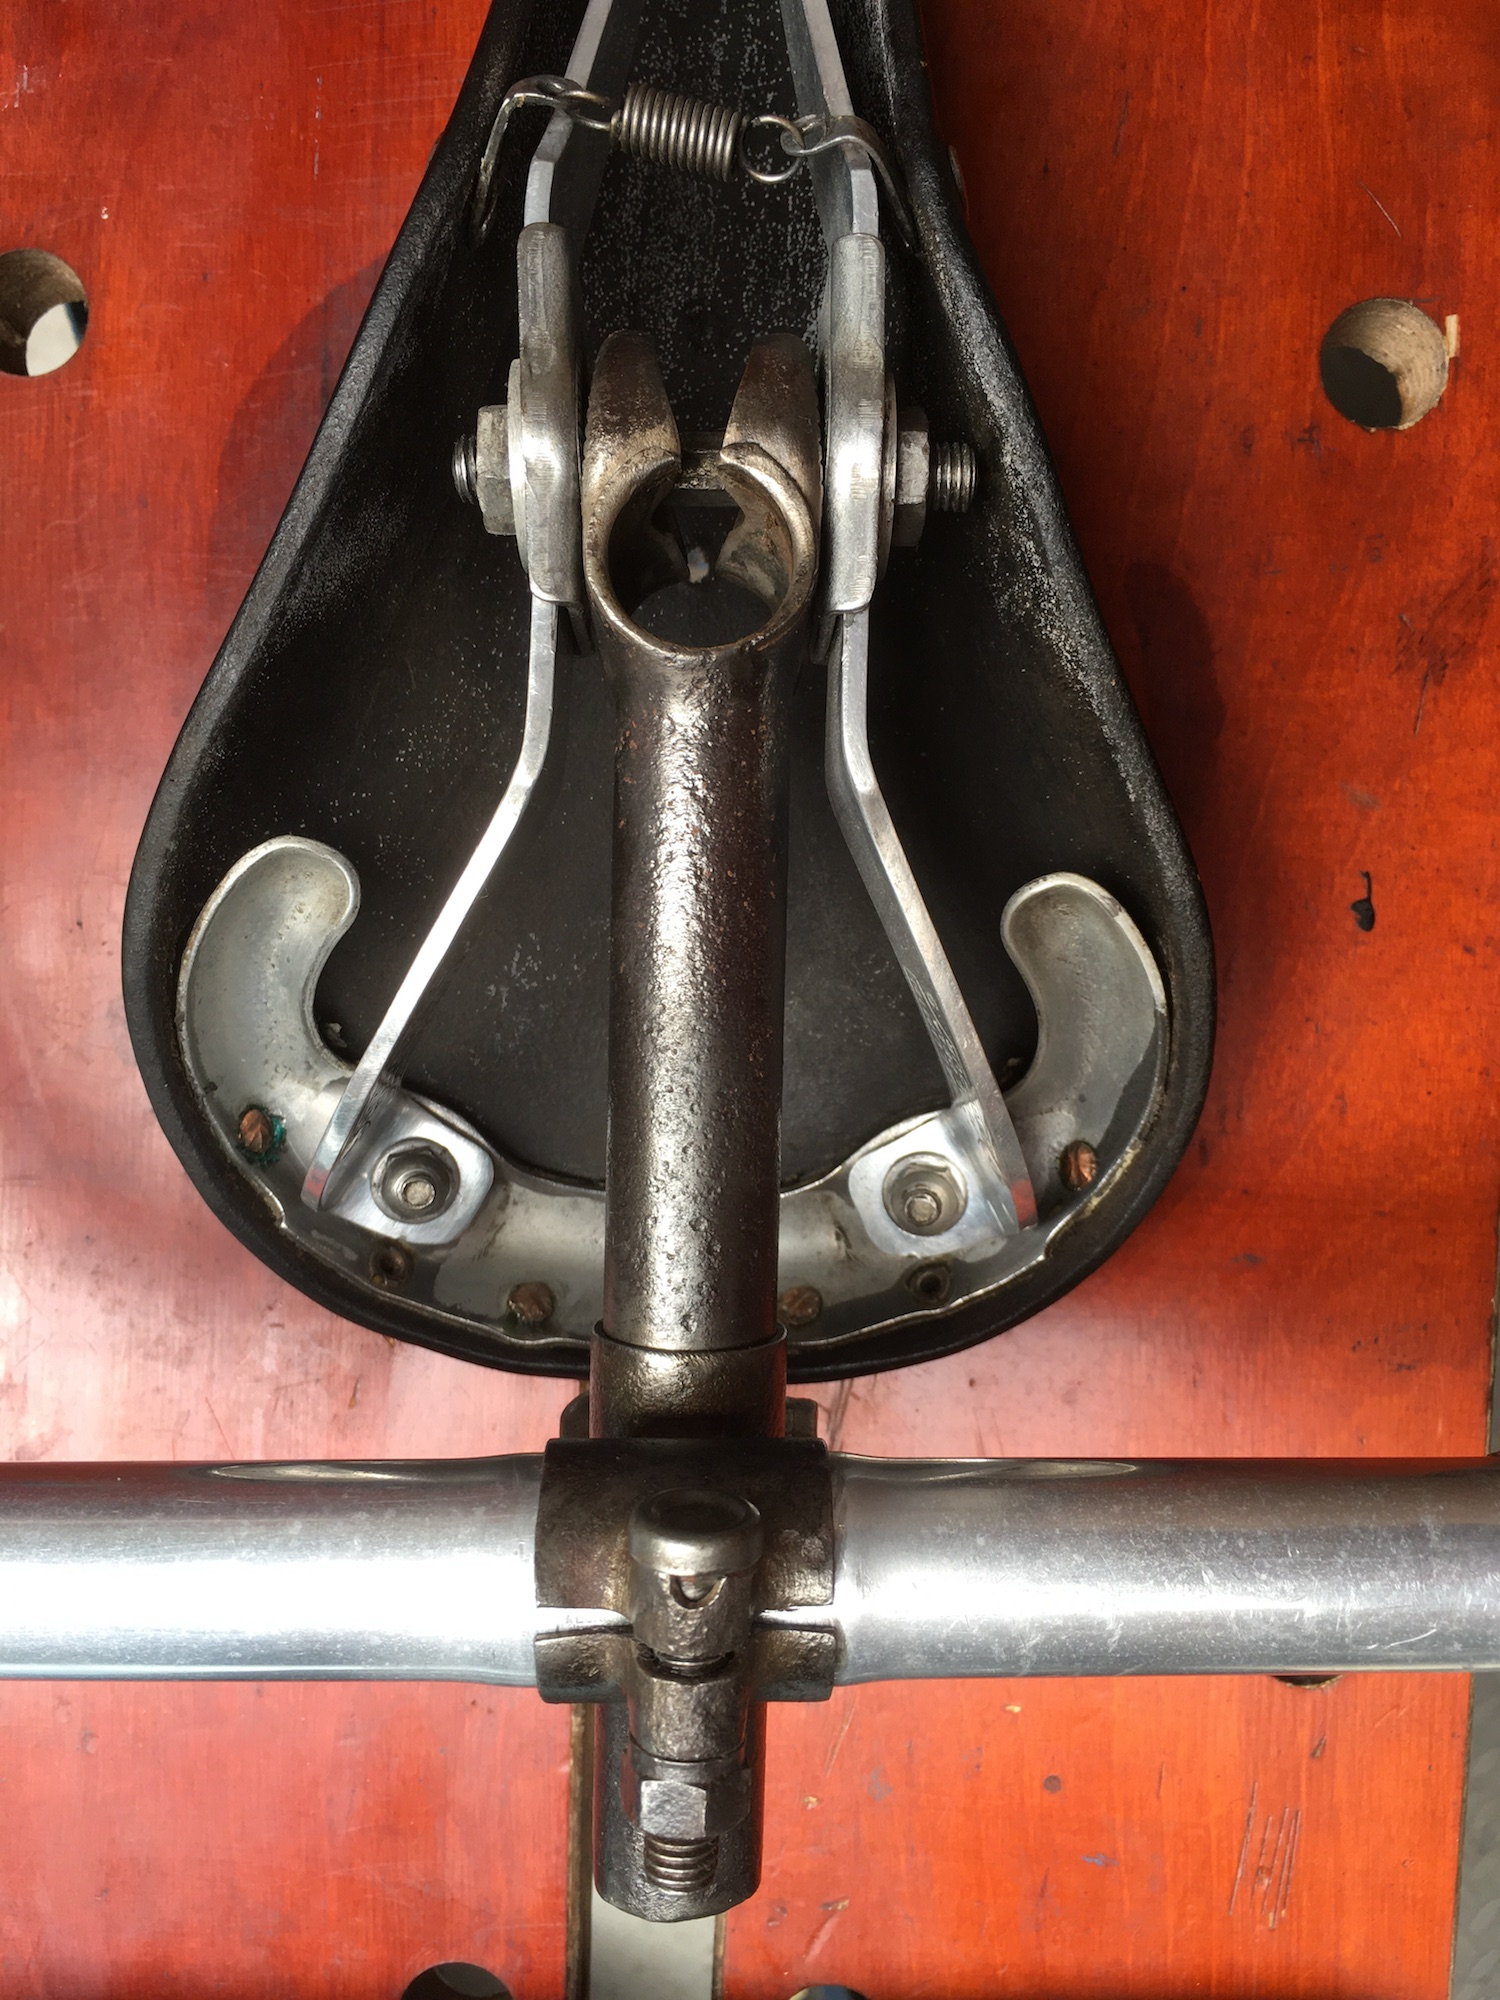
And here is the stoker stem on mine, for reference. The stem is fillet brazed to the saddle clamp. It's very nicely done, and it has a Herse alloy clamp bolt so I'm inclined to think it's original:
https://wordpress.com/block-editor/p...press.com/3769
And here is the stoker stem on mine, for reference. The stem is fillet brazed to the saddle clamp. It's very nicely done, and it has a Herse alloy clamp bolt so I'm inclined to think it's original:
That stoker stem is very cool, and potentially something I could do just for fun with an old saddle clamp and my torch and some tubing. An interim solution, perhaps. Could you show me a close-up of the brazing in there, so I can see where exactly it was attached?
__________________
Owner & co-founder, Cycles René Hubris. Unfortunately attaching questionable braze-ons to perfectly good frames since about 2015. With style.
Owner & co-founder, Cycles René Hubris. Unfortunately attaching questionable braze-ons to perfectly good frames since about 2015. With style.
Last edited by scarlson; 05-21-20 at 11:55 PM.
Likes For scarlson:
05-22-20, 12:50 AM
#128
Senior Member
Join Date: Oct 2015
Location: PDX
Posts: 13,038
Bikes: Merz x 5 + Specialized Merz Allez x 2, Strawberry/Newlands/DiNucci/Ti x3, Gordon, Fuso/Moulton x2, Bornstein, Paisley,1958-74 Paramounts x3, 3rensho, 74 Moto TC, 73-78 Raleigh Pro's x5, Marinoni x2, 1960 Cinelli SC, 1980 Bianchi SC, PX-10 X 2
Mentioned: 267 Post(s)
Tagged: 0 Thread(s)
Quoted: 4511 Post(s)
Liked 6,378 Times
in
3,667 Posts
scarlson
 Almost all my engineering skills are self-taught, or learned by observation. I have very little formal training. Ten years ago, I taught myself to arc weld by borrowing a welder and looking up videos on youtube. If I want to learn a process, that's often where I start. I find they have synergy: you learn one process and it helps you learn two others, like a virus they propagate and take over your brain. On the other hand, I'm nearly always dissatisfied with professionals' explanations of their work, and this alienates me especially given my lack of credentials.
This is the crux of this sort of thing, many times formal training does not prepare you for unknown original out of the box thinking because there was no box.
The original creator caused his vision to become reality because he was skilled and made it happen through synergy and willpower, you have to decide to be the authority on your own to get it done, especially if you want it done your way.
If you are not skilled in a particular skill you may have to try your hand or compromise in some way by a workaround you can live with. This can lead to a completely different fix or resolution, necessity being the mother of invention.
Almost all my engineering skills are self-taught, or learned by observation. I have very little formal training. Ten years ago, I taught myself to arc weld by borrowing a welder and looking up videos on youtube. If I want to learn a process, that's often where I start. I find they have synergy: you learn one process and it helps you learn two others, like a virus they propagate and take over your brain. On the other hand, I'm nearly always dissatisfied with professionals' explanations of their work, and this alienates me especially given my lack of credentials.This is the crux of this sort of thing, many times formal training does not prepare you for unknown original out of the box thinking because there was no box.
The original creator caused his vision to become reality because he was skilled and made it happen through synergy and willpower, you have to decide to be the authority on your own to get it done, especially if you want it done your way.
If you are not skilled in a particular skill you may have to try your hand or compromise in some way by a workaround you can live with. This can lead to a completely different fix or resolution, necessity being the mother of invention.
Likes For merziac:
05-22-20, 07:46 AM
#129
Junior Member
Join Date: May 2020
Location: Near London, GB
Posts: 17
Bikes: Herse, Singer, Barra, Pitard, Goeland, Ferrand etc..
Mentioned: 1 Post(s)
Tagged: 0 Thread(s)
Quoted: 11 Post(s)
Likes: 0
Liked 11 Times
in
8 Posts
Many, many thanks for the pictures and dimensions of the FD on your Herse. I agree with you that information should be public and had I a Nivex derailleur I would have been delighted to provide you with information you needed.
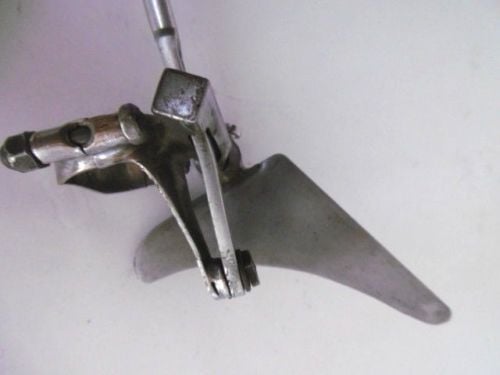
Here is the stoker stem on my tandem. It measures 170mm to centre of the seat post, and is of 22mm tubing. Looks like electric welding rather than braze, beautifully filed, which suggests Herse to me:

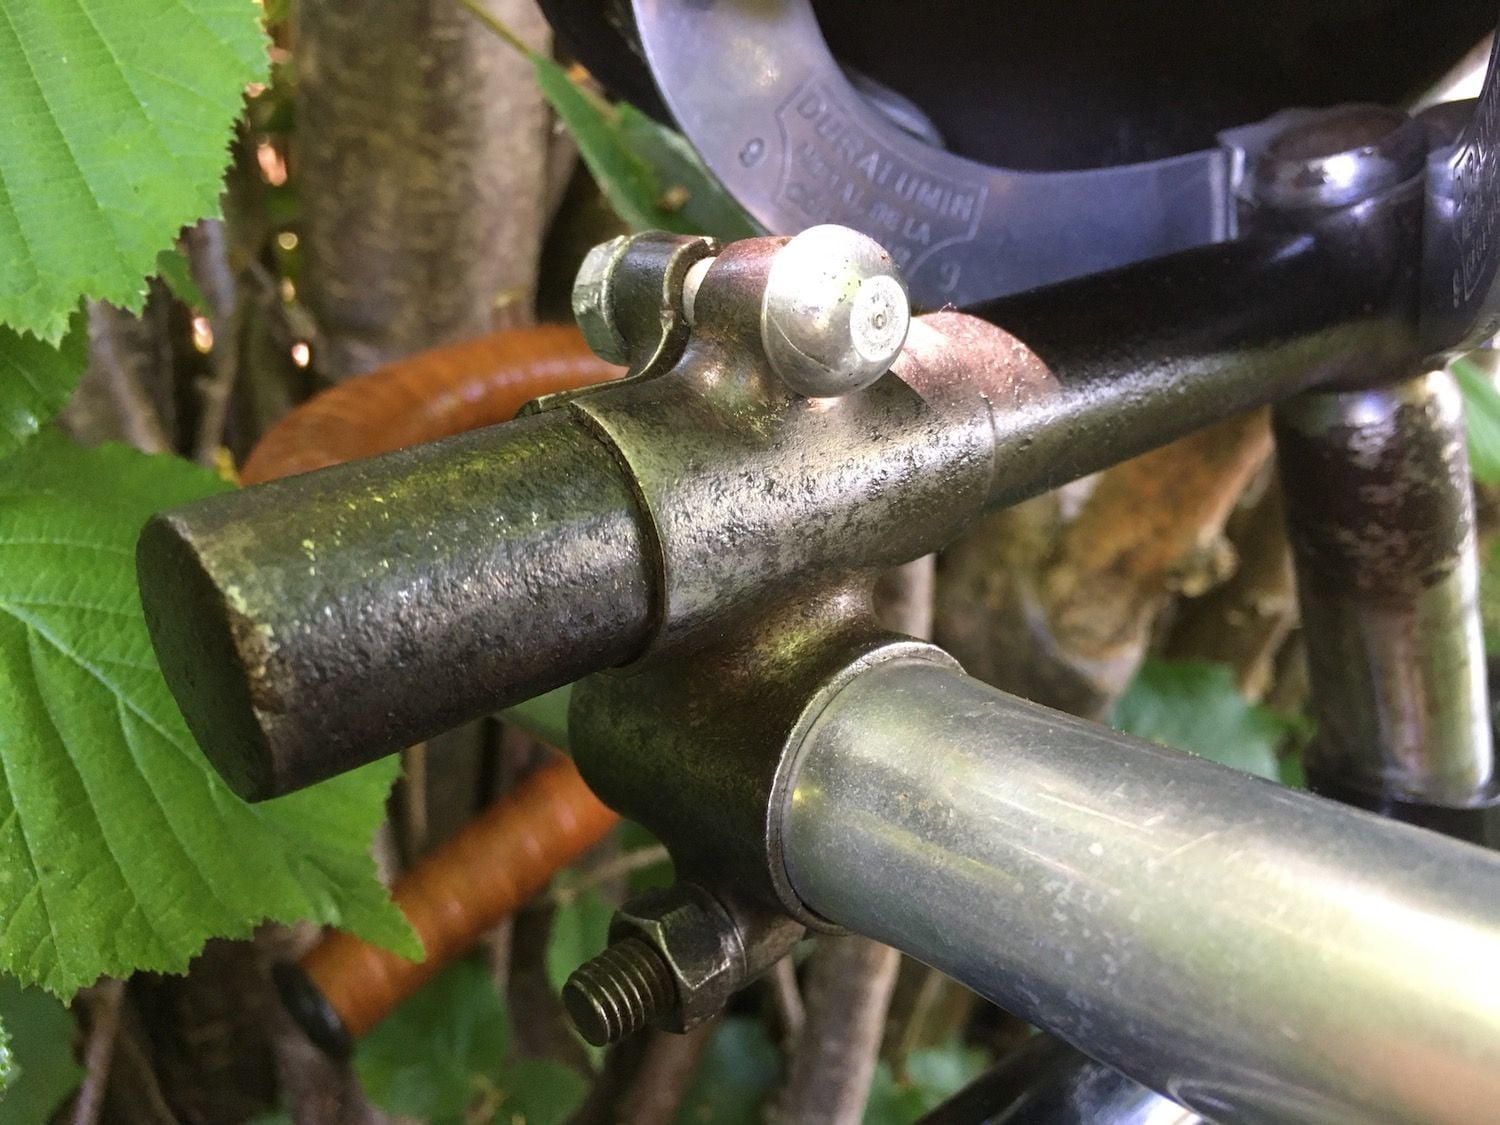
Here is the stoker stem on my tandem. It measures 170mm to centre of the seat post, and is of 22mm tubing. Looks like electric welding rather than braze, beautifully filed, which suggests Herse to me:
Last edited by timdaw; 05-22-20 at 07:47 AM. Reason: correction
Likes For timdaw:
05-22-20, 11:07 AM
#130
Senior Member
Thread Starter
Join Date: Jun 2010
Location: Medford MA
Posts: 2,089
Bikes: Ron Cooper touring, 1959 Jack Taylor 650b ladyback touring tandem, Vitus 979, Joe Bell painted Claud Butler Dalesman, Colin Laing curved tube tandem, heavily-Dilberted 1982 Trek 6xx, René Herse tandem
Mentioned: 80 Post(s)
Tagged: 0 Thread(s)
Quoted: 964 Post(s)
Liked 1,451 Times
in
723 Posts
Many, many thanks for the pictures and dimensions of the FD on your Herse. I agree with you that information should be public and had I a Nivex derailleur I would have been delighted to provide you with information you needed.
Here is the stoker stem on my tandem. It measures 170mm to centre of the seat post, and is of 22mm tubing. Looks like electric welding rather than braze, beautifully filed, which suggests Herse to me
Here is the stoker stem on my tandem. It measures 170mm to centre of the seat post, and is of 22mm tubing. Looks like electric welding rather than braze, beautifully filed, which suggests Herse to me
Could even be gas welding, who knows! Skillful in any case, given that the base metal is so thin. I could do it with TIG and stainless filler, fairly easily, but filing it down would take forever.
Anyone who's got a Nivex rear, feel free to chime in. I will draw it up in Fusion 360 and put it on Thingiverse so the masses can 3d-print them or cut them out of alu with a coping saw or whatever.
__________________
Owner & co-founder, Cycles René Hubris. Unfortunately attaching questionable braze-ons to perfectly good frames since about 2015. With style.
Owner & co-founder, Cycles René Hubris. Unfortunately attaching questionable braze-ons to perfectly good frames since about 2015. With style.
05-24-20, 08:49 AM
#131
Junior Member
Join Date: Oct 2013
Location: Miami, Florida
Posts: 11
Bikes: Too many to list. Favorites include 1976 Rene Herse, 1968 Alex Singer, 1972 Alex Singer tandem, Late 60’s Jo Routens, early 70’s Masi 3V, Cinelli MX.1 BMX, my many steel Colnagos, ...
Mentioned: 0 Post(s)
Tagged: 0 Thread(s)
Quoted: 5 Post(s)
Liked 5 Times
in
2 Posts
It is me indeed! I haven’t been “active” in that particular Facebook “Treasure Cycles” page in quite a while though...got turned-off by all things “Facebook”.
05-24-20, 09:02 AM
#132
Junior Member
Join Date: Oct 2013
Location: Miami, Florida
Posts: 11
Bikes: Too many to list. Favorites include 1976 Rene Herse, 1968 Alex Singer, 1972 Alex Singer tandem, Late 60’s Jo Routens, early 70’s Masi 3V, Cinelli MX.1 BMX, my many steel Colnagos, ...
Mentioned: 0 Post(s)
Tagged: 0 Thread(s)
Quoted: 5 Post(s)
Liked 5 Times
in
2 Posts
I also kept away from this forum and didn’t realized (to my pleasant surprise) that it had picked up Again and with some wonderful Posts by not only you but also “timdaw”. It’s great to see friends share all the knowledge we possess without needlessly holding “secrets” back. Speaking of which; I didn’t quite catch the original thought about the need for “Nivex rear derailleur”, but in the spirit of sharing (and feeling part of the brotherhood of vintage quality French bicycle restoration), I’d like to volunteer any and every piece of information I hold and let you know that I currently own a Nivex rear derailleur that still hasn’t been installed onto my Alex Singer tandem, and would be willing to not only take measurements but more than that lend it out to you, my already good friend “Scarlson” so that you (Having the proper engineering skills can take your own measurements In order to share it with others that may want it in order to produce aluminum replicas of the same. I know I would personally love to own one of those! Also, I have a real need for a replica of a stoker stem such as the one our friend posted on here from his Rene Herse tandem in order to replace the smaller, less comfortable Phillipe stem currently on my tandem IF anyone gets to duplicate this.
05-24-20, 09:57 AM
#133
Senior Member
Thread Starter
Join Date: Jun 2010
Location: Medford MA
Posts: 2,089
Bikes: Ron Cooper touring, 1959 Jack Taylor 650b ladyback touring tandem, Vitus 979, Joe Bell painted Claud Butler Dalesman, Colin Laing curved tube tandem, heavily-Dilberted 1982 Trek 6xx, René Herse tandem
Mentioned: 80 Post(s)
Tagged: 0 Thread(s)
Quoted: 964 Post(s)
Liked 1,451 Times
in
723 Posts
I also kept away from this forum and didn’t realized (to my pleasant surprise) that it had picked up Again and with some wonderful Posts by not only you but also “timdaw”. It’s great to see friends share all the knowledge we possess without needlessly holding “secrets” back. Speaking of which; I didn’t quite catch the original thought about the need for “Nivex rear derailleur”, but in the spirit of sharing (and feeling part of the brotherhood of vintage quality French bicycle restoration), I’d like to volunteer any and every piece of information I hold and let you know that I currently own a Nivex rear derailleur that still hasn’t been installed onto my Alex Singer tandem, and would be willing to not only take measurements but more than that lend it out to you, my already good friend “Scarlson” so that you (Having the proper engineering skills can take your own measurements In order to share it with others that may want it in order to produce aluminum replicas of the same.

The main reason I need to reproduce a Nivex is for my "probably-Dujardin." Someone chopped off the Nivex hanger, and filed the dropout to take a normal axle, but I am going to put it back right. And I will put the plans up for download by anyone who wants them, because that is the right thing to do.
I know I would personally love to own one of those! Also, I have a real need for a replica of a stoker stem such as the one our friend posted on here from his Rene Herse tandem in order to replace the smaller, less comfortable Phillipe stem currently on my tandem IF anyone gets to duplicate this.
__________________
Owner & co-founder, Cycles René Hubris. Unfortunately attaching questionable braze-ons to perfectly good frames since about 2015. With style.
Owner & co-founder, Cycles René Hubris. Unfortunately attaching questionable braze-ons to perfectly good frames since about 2015. With style.
05-24-20, 10:17 AM
#134
Bike Butcher of Portland

Join Date: Jul 2014
Location: Portland, OR
Posts: 11,635
Bikes: It's complicated.
Mentioned: 1299 Post(s)
Tagged: 0 Thread(s)
Quoted: 4679 Post(s)
Liked 5,797 Times
in
2,282 Posts
The main reason I need to reproduce a Nivex is for my "probably-Dujardin." Someone chopped off the Nivex hanger, and filed the dropout to take a normal axle, but I am going to put it back right.
Fixie idjits hacking hangers was done decades ago.
__________________
If someone tells you that you have enough bicycles and you don't need any more, stop talking to them. You don't need that kind of negativity in your life.
If someone tells you that you have enough bicycles and you don't need any more, stop talking to them. You don't need that kind of negativity in your life.
05-24-20, 10:21 AM
#135
Junior Member
Join Date: Oct 2013
Location: Miami, Florida
Posts: 11
Bikes: Too many to list. Favorites include 1976 Rene Herse, 1968 Alex Singer, 1972 Alex Singer tandem, Late 60’s Jo Routens, early 70’s Masi 3V, Cinelli MX.1 BMX, my many steel Colnagos, ...
Mentioned: 0 Post(s)
Tagged: 0 Thread(s)
Quoted: 5 Post(s)
Liked 5 Times
in
2 Posts
Thanks for posting! It looks like an old-fashioned version of the modern ControlTech adjustable stoker stem. I have seen something similar for tandem stokers, made by CoMotion!
Could even be gas welding, who knows! Skillful in any case, given that the base metal is so thin. I could do it with TIG and stainless filler, fairly easily, but filing it down would take forever.
Anyone who's got a Nivex rear, feel free to chime in. I will draw it up in Fusion 360 and put it on Thingiverse so the masses can 3d-print them or cut them out of alu with a coping saw or whatever.
Let me know how I can send pics of my Nivex so that you can confirm if it’ll be good enough to duplicate.
05-24-20, 10:26 AM
#136
Junior Member
Join Date: Oct 2013
Location: Miami, Florida
Posts: 11
Bikes: Too many to list. Favorites include 1976 Rene Herse, 1968 Alex Singer, 1972 Alex Singer tandem, Late 60’s Jo Routens, early 70’s Masi 3V, Cinelli MX.1 BMX, my many steel Colnagos, ...
Mentioned: 0 Post(s)
Tagged: 0 Thread(s)
Quoted: 5 Post(s)
Liked 5 Times
in
2 Posts
Mine is the “clamped-on” to the chainstay instead of the “bolt-on” one. I can”t
picture if this would completely help you figure out How to redo the hacked-off brace, but my offer stands for letting you borrow it.
picture if this would completely help you figure out How to redo the hacked-off brace, but my offer stands for letting you borrow it.
05-24-20, 11:24 AM
#137
Senior Member
Thread Starter
Join Date: Jun 2010
Location: Medford MA
Posts: 2,089
Bikes: Ron Cooper touring, 1959 Jack Taylor 650b ladyback touring tandem, Vitus 979, Joe Bell painted Claud Butler Dalesman, Colin Laing curved tube tandem, heavily-Dilberted 1982 Trek 6xx, René Herse tandem
Mentioned: 80 Post(s)
Tagged: 0 Thread(s)
Quoted: 964 Post(s)
Liked 1,451 Times
in
723 Posts
The websites not allowing me to comment until I have 10 posts (most unfortunate). I would love to have a similar stem in your best engineering impression. After all, “beggars cant be choosers“. LOL
Let me know how I can send pics of my Nivex so that you can confirm if it’ll be good enough to duplicate.
Let me know how I can send pics of my Nivex so that you can confirm if it’ll be good enough to duplicate.

And we'll talk about this stem thing.
Plus ça change, eh?
__________________
Owner & co-founder, Cycles René Hubris. Unfortunately attaching questionable braze-ons to perfectly good frames since about 2015. With style.
Owner & co-founder, Cycles René Hubris. Unfortunately attaching questionable braze-ons to perfectly good frames since about 2015. With style.
05-24-20, 12:31 PM
#138
Junior Member
Join Date: Oct 2013
Location: Miami, Florida
Posts: 11
Bikes: Too many to list. Favorites include 1976 Rene Herse, 1968 Alex Singer, 1972 Alex Singer tandem, Late 60’s Jo Routens, early 70’s Masi 3V, Cinelli MX.1 BMX, my many steel Colnagos, ...
Mentioned: 0 Post(s)
Tagged: 0 Thread(s)
Quoted: 5 Post(s)
Liked 5 Times
in
2 Posts
I see you sent me a private message but the site is STILL restricting me from opening it due to not enough posts. In any case, I don’t mind sharing mine with you here.
It is:
docray@comcast.net
Looking forward to working with you on this and any other “ancien velo” project!
It is:
docray@comcast.net
Looking forward to working with you on this and any other “ancien velo” project!
05-24-20, 06:35 PM
#139
Full Member

Great to see this level of detail for rare parts!
Timdaw, I was surprised to see a "skirt spring" spanning the underside of your Ideale saddle. Was THAT a stock item, or perhaps a custom addition by Herse, or other bike owners?
Timdaw, I was surprised to see a "skirt spring" spanning the underside of your Ideale saddle. Was THAT a stock item, or perhaps a custom addition by Herse, or other bike owners?
05-26-20, 05:36 PM
#140
Junior Member
Join Date: Oct 2013
Location: Miami, Florida
Posts: 11
Bikes: Too many to list. Favorites include 1976 Rene Herse, 1968 Alex Singer, 1972 Alex Singer tandem, Late 60’s Jo Routens, early 70’s Masi 3V, Cinelli MX.1 BMX, my many steel Colnagos, ...
Mentioned: 0 Post(s)
Tagged: 0 Thread(s)
Quoted: 5 Post(s)
Liked 5 Times
in
2 Posts


Here are the pics of my Nivex derailleur. Hope they are to everyone’s liking.
Likes For Treasure Cycles:
05-31-20, 11:53 AM
#141
Senior Member
Join Date: Mar 2016
Location: GTA
Posts: 51
Bikes: Jack Taylor Tandem, Oscar Egg Routier
Mentioned: 1 Post(s)
Tagged: 0 Thread(s)
Quoted: 21 Post(s)
Likes: 0
Liked 16 Times
in
11 Posts
Hi Treasure Cycles,
Beautiful Nivex derailleur. It is the clamp on version. I had search for a Nivex for my Singer tandem. Now have a short arm converted to a long arm. Also found that the spring tension has to be strong enough to handle the weight of the long drive chain.
Now have the pivots out to be drilled out and bushed. There is too much play from misalignment of the pivot spacing during manufacture. Must of been a bad day at the Nivex shed, I mean factory.
Reid Harding
Likes For ReidH:
05-31-20, 12:01 PM
#142
Senior Member
Join Date: Mar 2016
Location: GTA
Posts: 51
Bikes: Jack Taylor Tandem, Oscar Egg Routier
Mentioned: 1 Post(s)
Tagged: 0 Thread(s)
Quoted: 21 Post(s)
Likes: 0
Liked 16 Times
in
11 Posts
Hi Sam,
If you need some pictures of an unmolested rear Nivex dropout, I have a bike that I can take some pics of. Of interest is the Singer tandem doesn't have rear Nivex dropouts and the Baillieu that has Nivex dropouts has a Cyclo derailleur.
BTW, the Nivex rear axle for regular hubs, not Maxi-CAR is a interesting thing.
Cheers,
Reid
05-31-20, 12:21 PM
#143
Senior Member
Join Date: Oct 2015
Location: PDX
Posts: 13,038
Bikes: Merz x 5 + Specialized Merz Allez x 2, Strawberry/Newlands/DiNucci/Ti x3, Gordon, Fuso/Moulton x2, Bornstein, Paisley,1958-74 Paramounts x3, 3rensho, 74 Moto TC, 73-78 Raleigh Pro's x5, Marinoni x2, 1960 Cinelli SC, 1980 Bianchi SC, PX-10 X 2
Mentioned: 267 Post(s)
Tagged: 0 Thread(s)
Quoted: 4511 Post(s)
Liked 6,378 Times
in
3,667 Posts
 06-03-20, 04:09 PM
#144
Senior Member
Join Date: Mar 2016
Location: GTA
Posts: 51
Bikes: Jack Taylor Tandem, Oscar Egg Routier
Mentioned: 1 Post(s)
Tagged: 0 Thread(s)
Quoted: 21 Post(s)
Likes: 0
Liked 16 Times
in
11 Posts
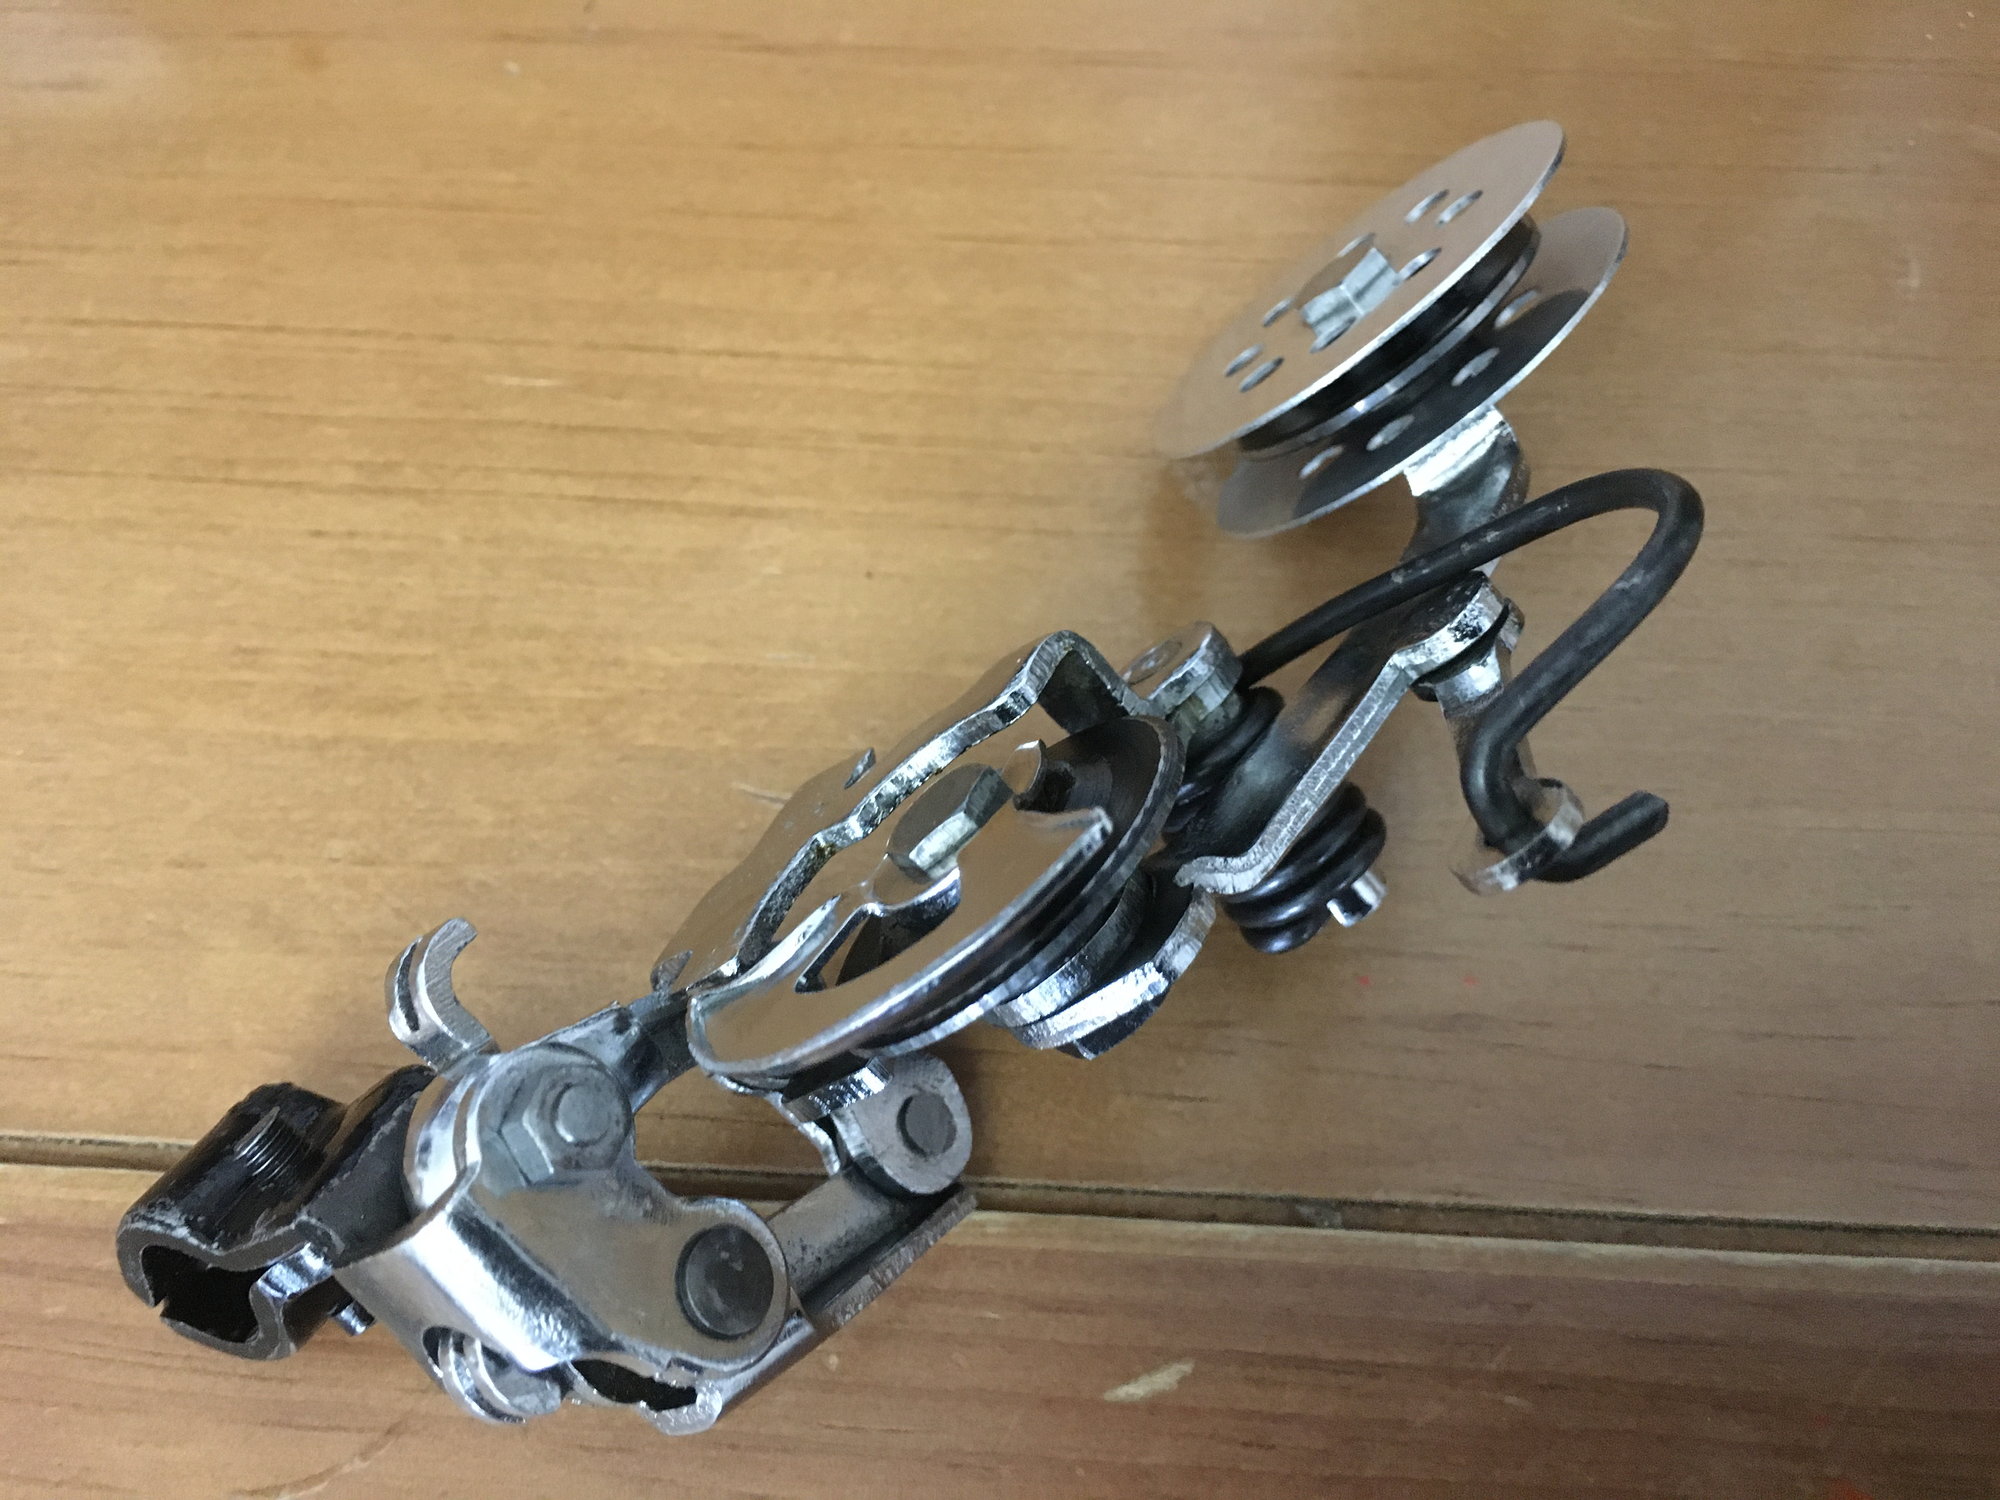
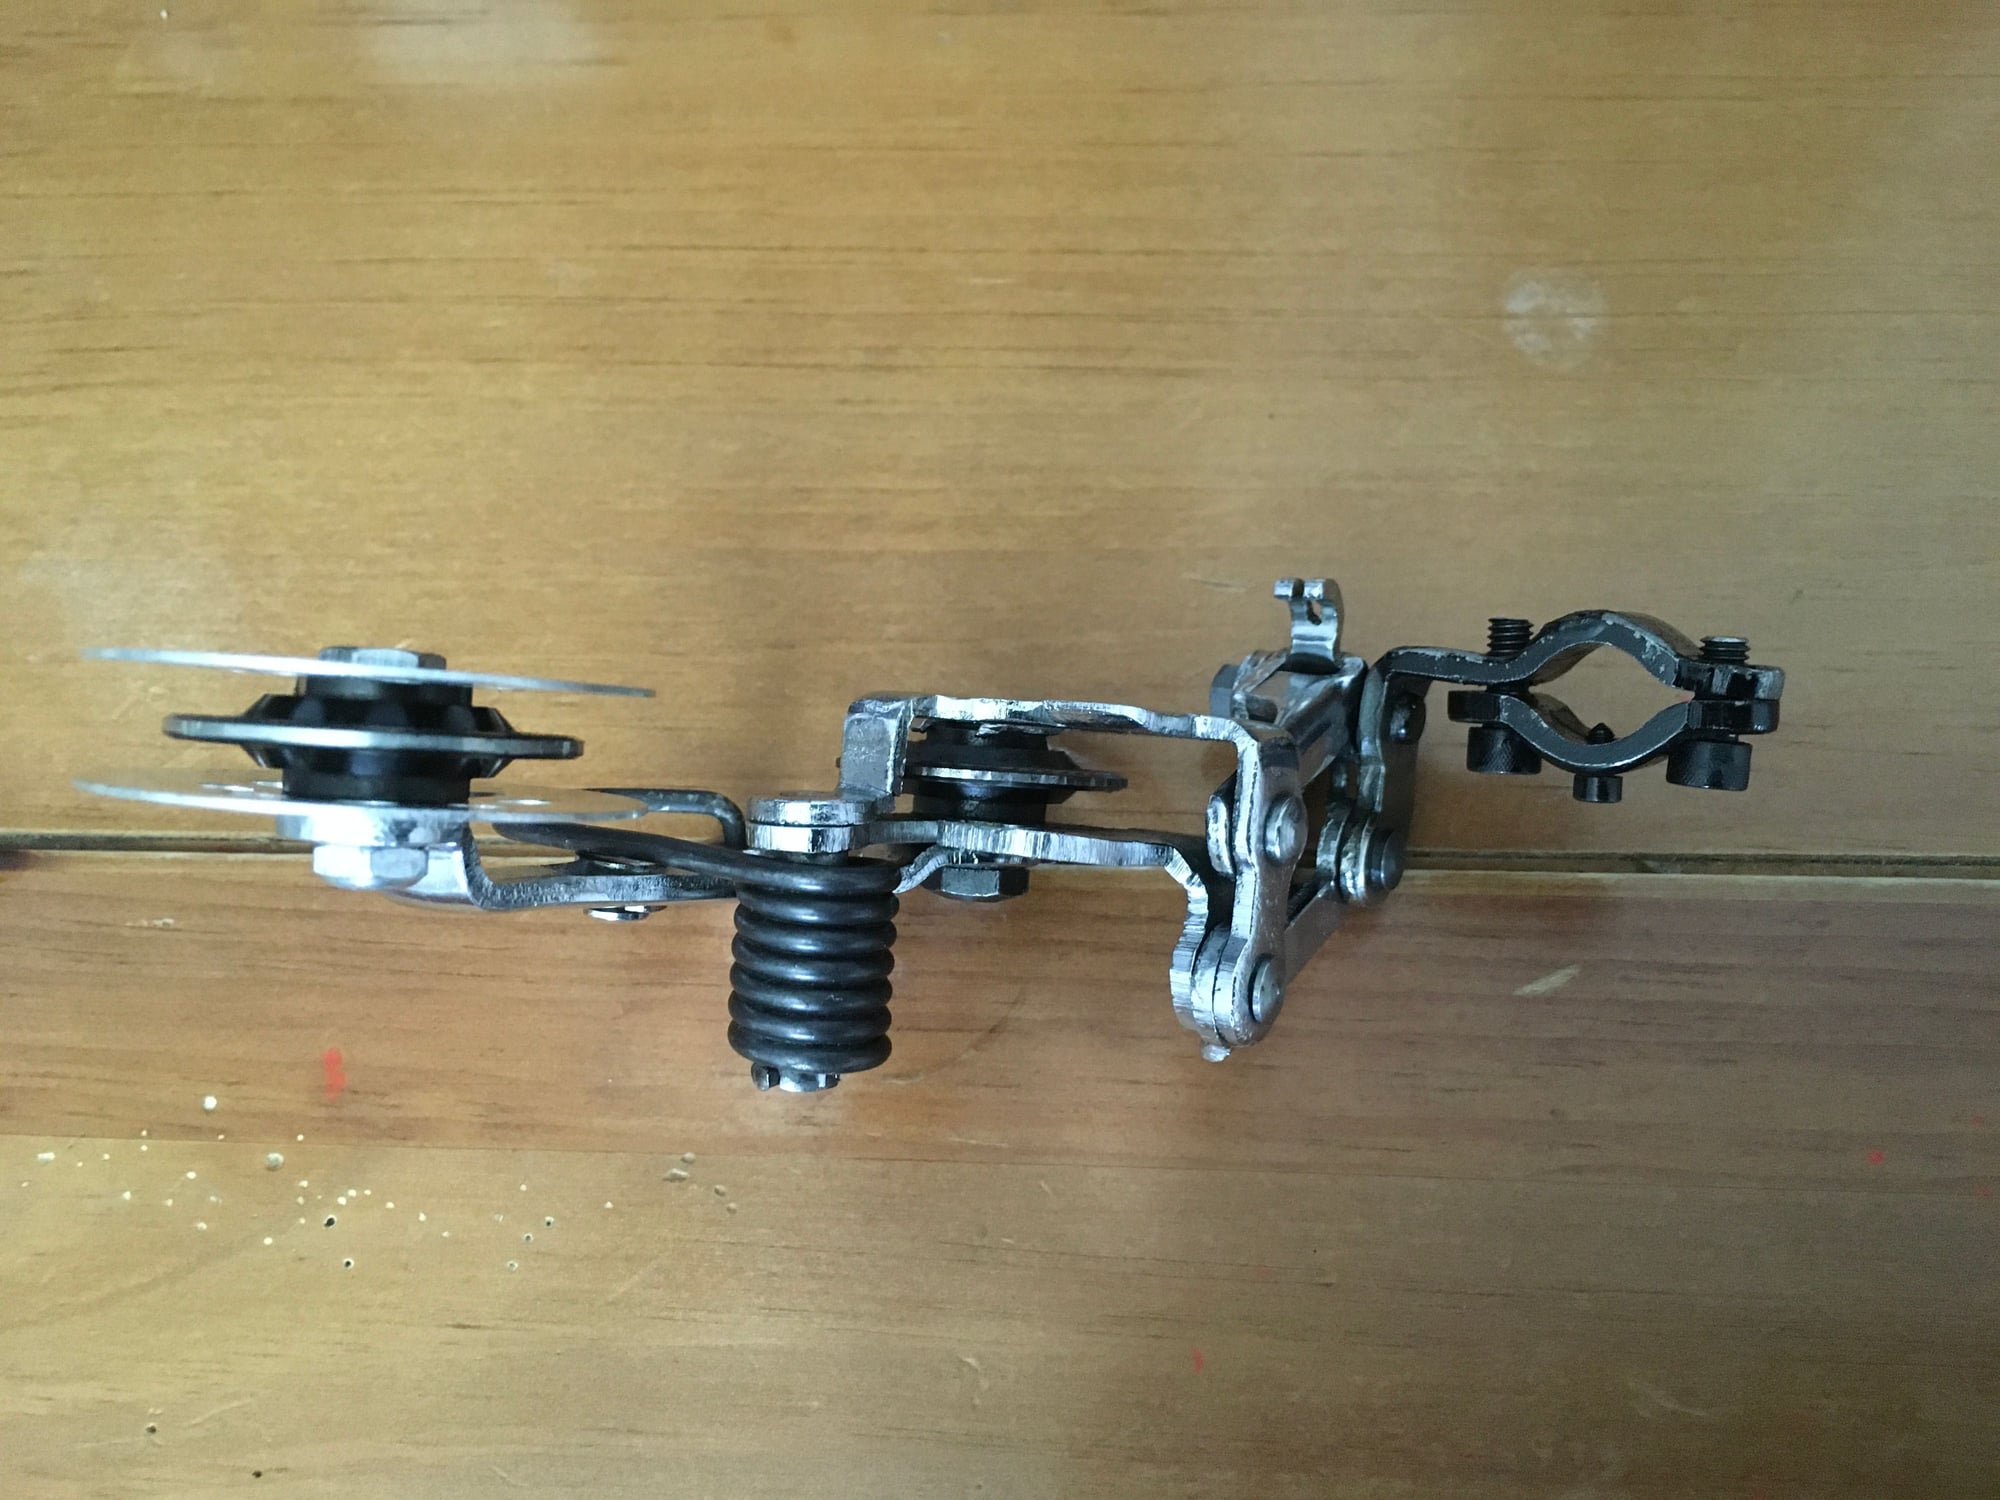
One method to reinstate a Rene Herse front derailleur to a tandem that has had it sawn off is to build a clamp on version. There are pictures of an very early Herse tandem in Jan Heine's Rene Herse book of just such a thing. To add to that, I have pictures of just that sort of clamp on derailleur taken off a Herse. Maybe the same derailleur as the pictures. It appears to have many adjustment features that the brazed on versions didn't, which leaves me to believe it was a prototype or designed to be more flexible to changes in chainring size.
The pic's are from Ebay. I wish I won that auction. I need one for my Herse tandem that suffered many desecrations in it's life.
Reid


The pic's are from Ebay. I wish I won that auction. I need one for my Herse tandem that suffered many desecrations in it's life.
Reid
06-03-20, 08:02 PM
#145
Senior Member
Thread Starter
Join Date: Jun 2010
Location: Medford MA
Posts: 2,089
Bikes: Ron Cooper touring, 1959 Jack Taylor 650b ladyback touring tandem, Vitus 979, Joe Bell painted Claud Butler Dalesman, Colin Laing curved tube tandem, heavily-Dilberted 1982 Trek 6xx, René Herse tandem
Mentioned: 80 Post(s)
Tagged: 0 Thread(s)
Quoted: 964 Post(s)
Liked 1,451 Times
in
723 Posts
One method to reinstate a Rene Herse front derailleur to a tandem that has had it sawn off is to build a clamp on version. There are pictures of an very early Herse tandem in Jan Heine's Rene Herse book of just such a thing. To add to that, I have pictures of just that sort of clamp on derailleur taken off a Herse. Maybe the same derailleur as the pictures. It appears to have many adjustment features that the brazed on versions didn't, which leaves me to believe it was a prototype or designed to be more flexible to changes in chainring size.
The pic's are from Ebay. I wish I won that auction. I need one for my Herse tandem that suffered many desecrations in it's life.
Reid
The pic's are from Ebay. I wish I won that auction. I need one for my Herse tandem that suffered many desecrations in it's life.
Reid
Wait, am I going to get roped into building these? I just did one for my Trek, but it was not an exact replica, because when I started building it, I hadn't yet gotten the real thing. It was pretty hard to do, but it shifts well.
__________________
Owner & co-founder, Cycles René Hubris. Unfortunately attaching questionable braze-ons to perfectly good frames since about 2015. With style.
Owner & co-founder, Cycles René Hubris. Unfortunately attaching questionable braze-ons to perfectly good frames since about 2015. With style.
06-04-20, 10:15 AM
#146
Senior Member
Join Date: Mar 2016
Location: GTA
Posts: 51
Bikes: Jack Taylor Tandem, Oscar Egg Routier
Mentioned: 1 Post(s)
Tagged: 0 Thread(s)
Quoted: 21 Post(s)
Likes: 0
Liked 16 Times
in
11 Posts
Hi SCARLSON,
An on demand build would be nice, especially now that you have a actual derailleur on your tandem to work out the important details.
I would buy one as I need one for my Herse Tandem. The clamp on mech allows more fiddling with adjustments to shift better, chainring size changes and the ability to change from two to 3 chainring, if necessary. All without risk of disturbing the soon to be new paint on the tandem.
Reid
06-04-20, 06:33 PM
#147
Newbie
Join Date: Oct 2011
Posts: 2
Mentioned: 0 Post(s)
Tagged: 0 Thread(s)
Quoted: 1 Post(s)
Likes: 0
Liked 0 Times
in
0 Posts
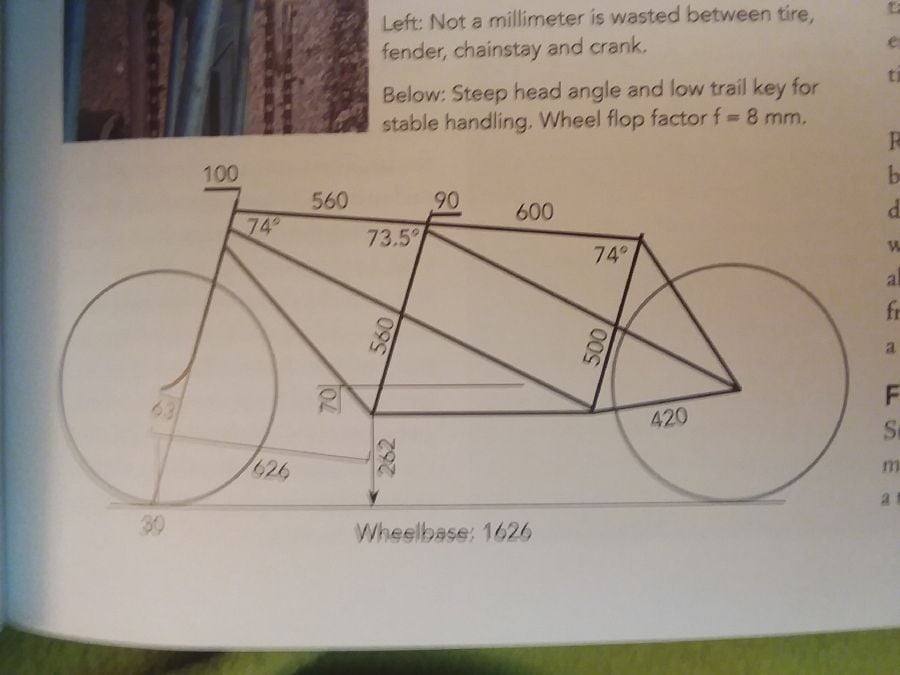
Frame geometry?
Hi. Awesome project. Love these old machines.
I was wondering if you’ve measured the frame geometry? I’m working with a builder on a tandem and would love to incorporate the old geometry...
headtube angle, fork offset, bb heights, wheelbase and distance between the bottom brackets would be really helpful in a comparison to a modern tandem.
seems like the biggest change is in the head tube angle and the bb-bb distance, between the old french ones and the average modern tandem.
thanks!
06-04-20, 09:49 PM
#148
Senior Member
Join Date: Mar 2016
Location: GTA
Posts: 51
Bikes: Jack Taylor Tandem, Oscar Egg Routier
Mentioned: 1 Post(s)
Tagged: 0 Thread(s)
Quoted: 21 Post(s)
Likes: 0
Liked 16 Times
in
11 Posts
Hi, a Rene Herse tandem geometry can be found in bicycle quarterly 62.
One significant geometry difference from a modern tandem is the low trail found on these classic French tandems.
Reid
One significant geometry difference from a modern tandem is the low trail found on these classic French tandems.
Reid
06-05-20, 06:19 AM
#149
Senior Member

Join Date: Sep 2011
Location: Baltimore MD
Posts: 3,332
Bikes: '72 Motobecane Grand Record, '72 Gitane tandem, '72 Raleigh Super Course, '73 Raleigh Gran Sport, '73 Colnago Super, '76 Fiorelli Coppi, '78 Raleigh SBDU Team Pro, '78 Trek 930, '81 Holdsworth Special 650B, '86 Masi GC, ’94 Bridgestone RB-T
Mentioned: 67 Post(s)
Tagged: 0 Thread(s)
Quoted: 786 Post(s)
Liked 520 Times
in
281 Posts
 09-30-20, 05:19 PM
#150
Senior Member
Thread Starter
Join Date: Jun 2010
Location: Medford MA
Posts: 2,089
Bikes: Ron Cooper touring, 1959 Jack Taylor 650b ladyback touring tandem, Vitus 979, Joe Bell painted Claud Butler Dalesman, Colin Laing curved tube tandem, heavily-Dilberted 1982 Trek 6xx, René Herse tandem
Mentioned: 80 Post(s)
Tagged: 0 Thread(s)
Quoted: 964 Post(s)
Liked 1,451 Times
in
723 Posts
Some updates come forth!
I have been let back into the machine shop on a somewhat limited basis. Here's some of what I've done.

Drilled and counterbored clamp bolt holes.
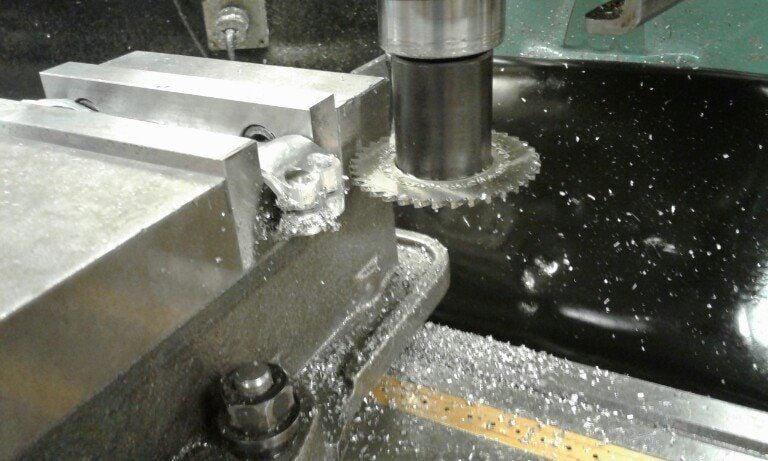
Slit the bar clamp with a slitting saw. I asked for, and got, some training from a career machinist on how to slit properly. He says the problem I encountered last time I was slitting (the screwdriver slot on a Brampton pedal dust cap reproduction) was using slitting saws with too fine of teeth, and ganging them, plus feeding too aggressively for this work (using a mill with a power table so I couldn't easily control by hand). The fine teeth can't handle the chip load under aggressive feeds, so the chips go wherever. This forced aluminum chips between the blades and caused them to bind in the slit.
So this time, I used a coarse saw and was on a different, older mill, and everything went great!
Whenever I'm using a slitting saw, I feel like I'm using this:

And I feel like this will happen, to my face:

Slowly getting over my fear!!
One interesting thing: the original René Herse stem was bored to 25.6mm for the bars and 22.4mm for the steerer tube (yes, it's round - it hasn't just been stretched open during removal of the bars), even though the steerer measures 22.0 and the bars measure 25.0. Mine's made with American tooling, so measures 25.4 and 22.2, and will work somewhat better than the original I'm thinking!
Edit: I will also add that the handlebar clamp bolt holes are 15mm center-center, as opposed to Jan Heine's 17mm Herse decaleurs, and that the original slits appear to have been done by hand with a hacksaw or ganged hacksaw, and maybe some light filing.
I will have to also produce a stoker stem. I will make one of aluminum to be true-to-original, and then maybe also make an adjustable thing of steel brazed to a seat clamp as in @timdaw 's picture. This will give me options for different stokers, one adjustable and one absolutely correct.
I have been let back into the machine shop on a somewhat limited basis. Here's some of what I've done.
Drilled and counterbored clamp bolt holes.
Slit the bar clamp with a slitting saw. I asked for, and got, some training from a career machinist on how to slit properly. He says the problem I encountered last time I was slitting (the screwdriver slot on a Brampton pedal dust cap reproduction) was using slitting saws with too fine of teeth, and ganging them, plus feeding too aggressively for this work (using a mill with a power table so I couldn't easily control by hand). The fine teeth can't handle the chip load under aggressive feeds, so the chips go wherever. This forced aluminum chips between the blades and caused them to bind in the slit.
So this time, I used a coarse saw and was on a different, older mill, and everything went great!
Whenever I'm using a slitting saw, I feel like I'm using this:
And I feel like this will happen, to my face:
Slowly getting over my fear!!
One interesting thing: the original René Herse stem was bored to 25.6mm for the bars and 22.4mm for the steerer tube (yes, it's round - it hasn't just been stretched open during removal of the bars), even though the steerer measures 22.0 and the bars measure 25.0. Mine's made with American tooling, so measures 25.4 and 22.2, and will work somewhat better than the original I'm thinking!
Edit: I will also add that the handlebar clamp bolt holes are 15mm center-center, as opposed to Jan Heine's 17mm Herse decaleurs, and that the original slits appear to have been done by hand with a hacksaw or ganged hacksaw, and maybe some light filing.
I will have to also produce a stoker stem. I will make one of aluminum to be true-to-original, and then maybe also make an adjustable thing of steel brazed to a seat clamp as in @timdaw 's picture. This will give me options for different stokers, one adjustable and one absolutely correct.
__________________
Owner & co-founder, Cycles René Hubris. Unfortunately attaching questionable braze-ons to perfectly good frames since about 2015. With style.
Owner & co-founder, Cycles René Hubris. Unfortunately attaching questionable braze-ons to perfectly good frames since about 2015. With style.
Last edited by scarlson; 09-30-20 at 05:58 PM. Reason: clarity and further information
Likes For scarlson: