


Dura Ace 7400-era freehub removal and reinstallation - how?
 12-20-19, 12:33 AM
#1
Member
Thread Starter
Join Date: Apr 2015
Posts: 48
Mentioned: 0 Post(s)
Tagged: 0 Thread(s)
Quoted: 9 Post(s)
Likes: 0
Liked 0 Times
in
0 Posts
Dura Ace 7400-era freehub removal and reinstallation - how?
Hello,
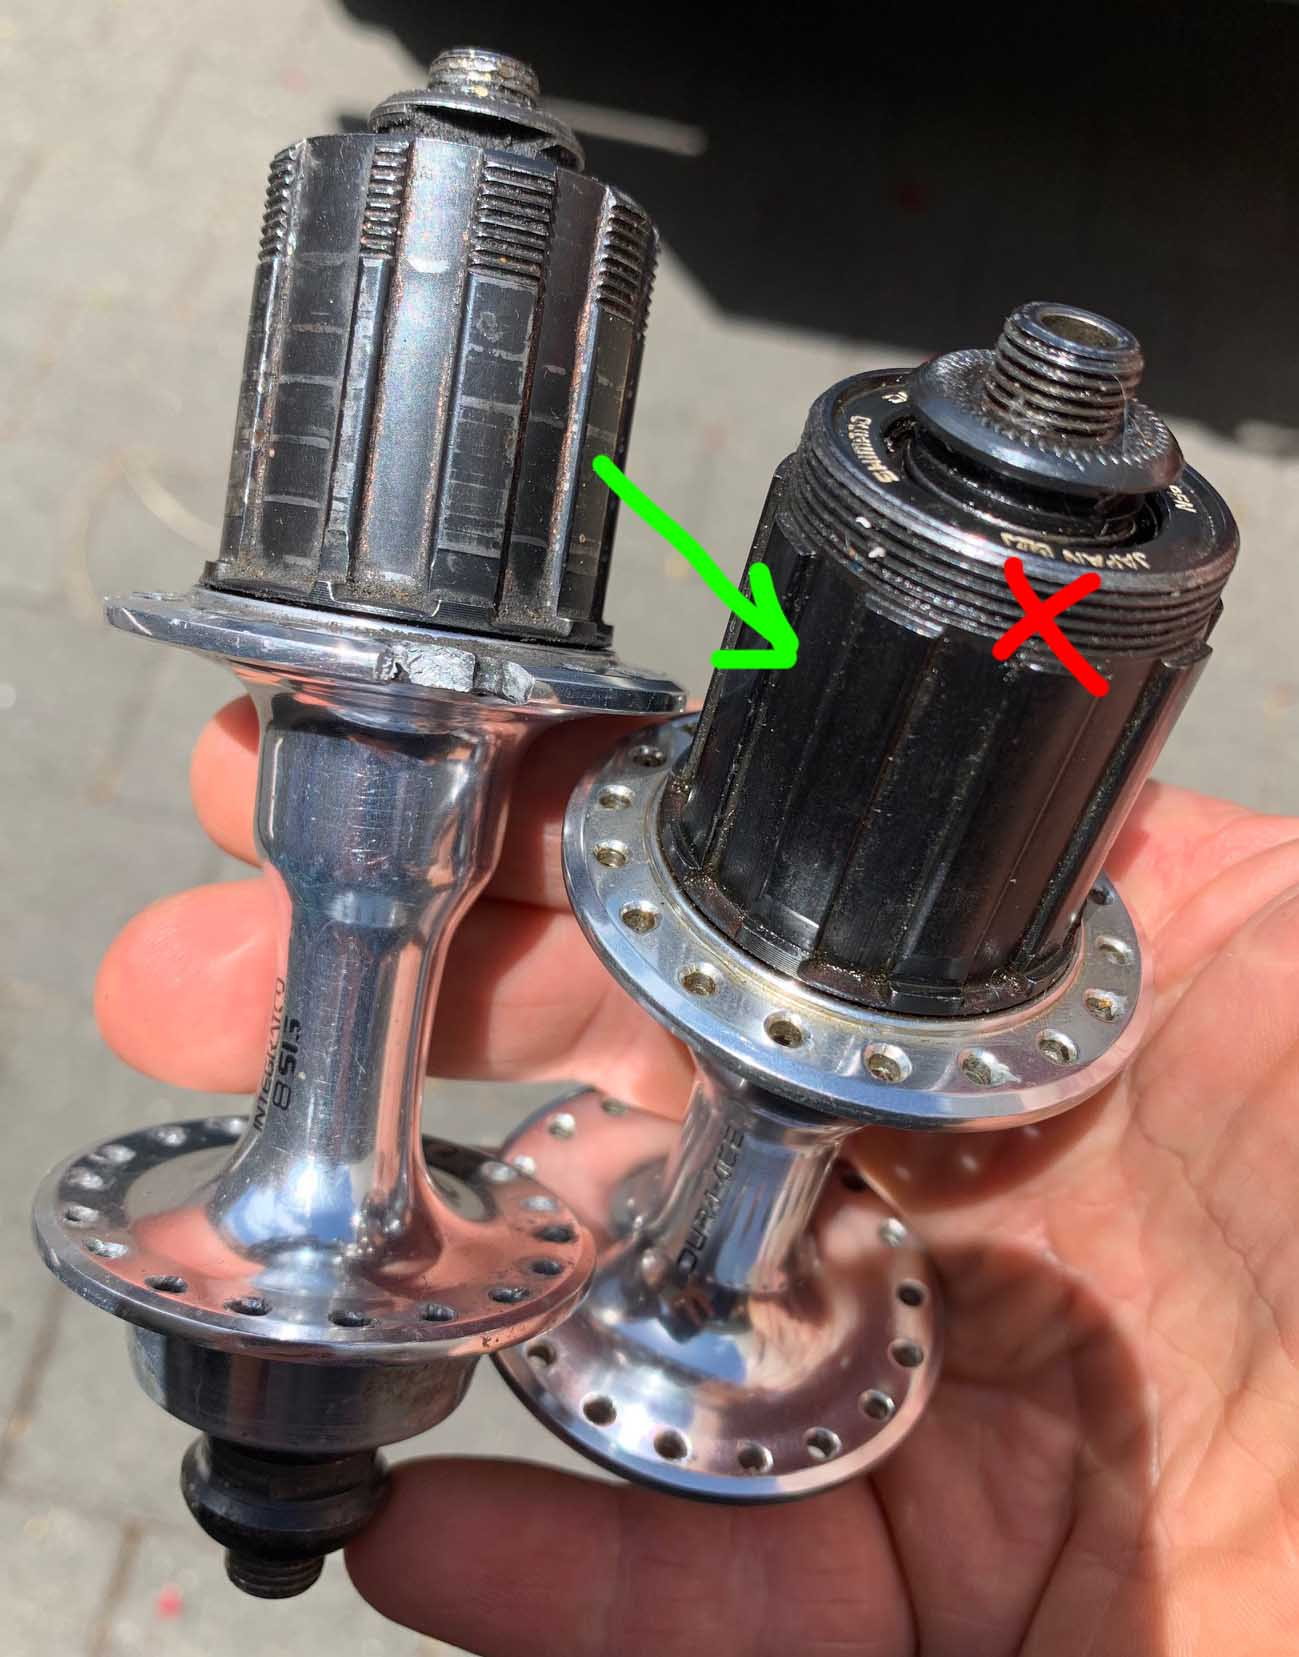
I have two rear hubs here, both are 7400 era, but the freehubs are different. I'd like to remove the freehub on the broken hub and swap it to the other hub (that has a freehub that I cant use on it).
What is the process?
I haven't tried too hard at this stage, but can say that the rings with the pin spanner holes in them just seem to spin, thought I best get the process down before I go and ruin them 👍. My next step would be to remove the bearings and see if the extra access revealed anything.
Any help appreciated!
Thanks
 12-20-19, 12:42 AM
#2
Senior Member
Join Date: Mar 2008
Posts: 8,688
Mentioned: 46 Post(s)
Tagged: 0 Thread(s)
Quoted: 1074 Post(s)
Liked 295 Times
in
222 Posts
Haven�t taken apart any D-A hubs.
But the general approach for Shimano freehub bodies is to pull the axle. Then there is a hollow-core Allen type of bolt which the axle runs through that holds the f/h to the hub. Usually - but not always - it�s loosened from the DS. Regular thread.
The rings with the holes should be a dust shield, and spin with the splined shell of the f/h body. Try holding the splined shell steady and turn the ring in the marked direction if you need to get it out.
Last edited by dabac; 12-20-19 at 12:48 AM.
12-20-19, 02:47 AM
#3
Senior Member
I'm the unfortunate owner of a few of these hubs: the Dura-Ace 740X series.
The freehubs are unlike anything Shimano made before or since, and are actually screwed into the hub shell with a threaded male protrusion. Not attached with the usual 10mm hollow bolt.
In order to remove the freehubs you'll need to remove the axle and bearings of course, and then apply the exceedingly rare special remover tool. Since the freehubs tighten with pedaling torque, you'll need to build these both hubs back into complete wheels in order to get enough torque.
Replacement freehub bodies are almost impossible to source, but not as impossible as the remover.
12-20-19, 09:51 AM
#4

Senior Member
Join Date: Feb 2012
Location: Rochester, NY
Posts: 18,081
Bikes: Stewart S&S coupled sport tourer, Stewart Sunday light, Stewart Commuting, Stewart Touring, Co Motion Tandem, Stewart 3-Spd, Stewart Track, Fuji Finest, Mongoose Tomac ATB, GT Bravado ATB, JCP Folder, Stewart 650B ATB
Mentioned: 0 Post(s)
Tagged: 0 Thread(s)
Quoted: 4204 Post(s)
Liked 3,861 Times
in
2,309 Posts
Some of us have the tool for these early DA freehub bodies Where is the OP located? Andy (who just had a couple of these hubs in hand and will again soon to finish off the build up for a friend)
Where is the OP located? Andy (who just had a couple of these hubs in hand and will again soon to finish off the build up for a friend)
__________________
AndrewRStewart
AndrewRStewart
12-22-19, 12:45 AM
#5
Member
Thread Starter
Join Date: Apr 2015
Posts: 48
Mentioned: 0 Post(s)
Tagged: 0 Thread(s)
Quoted: 9 Post(s)
Likes: 0
Liked 0 Times
in
0 Posts
Thanks for the info, dang seems like nothing is easy with the era of bikes I've chosen to love! But I think that's likely confirmation bias at play, so many times I've ridden past Di2 crap-outs, creaky bottom brackets and then placed higher in races by sneaking up on riders with my relatively silent freewheels - ha ha ... anyway, back on topic:
I am located in Auckland, New Zealand over the xmas break, then back to Melbourne, Australia for the new year (via Chengdu, China, in the unlikely case that's helpful
)Alternatively, does anyone have a picture and dimensions of the tool? I work in a place that might be able to fabricate something workable 👍 (depending on its complexity)
12-22-19, 01:37 AM
#6
SE Wis
Join Date: Apr 2005
Location: Milwaukee, WI
Posts: 10,513
Bikes: '68 Raleigh Sprite, '02 Raleigh C500, '84 Raleigh Gran Prix, '91 Trek 400, 2013 Novara Randonee, 1990 Trek 970
Mentioned: 40 Post(s)
Tagged: 0 Thread(s)
Quoted: 2747 Post(s)
Liked 3,394 Times
in
2,056 Posts
THe tool and the alternatives are in this thread
https://www.bikeforums.net/classic-v...0-freehub.html
https://dt6110.web.fc2.com/parts/TL-FH10.html
https://www.bikeforums.net/classic-v...0-freehub.html
https://dt6110.web.fc2.com/parts/TL-FH10.html
Last edited by dedhed; 12-22-19 at 01:42 AM.
12-22-19, 03:12 AM
#7
Member
Thread Starter
Join Date: Apr 2015
Posts: 48
Mentioned: 0 Post(s)
Tagged: 0 Thread(s)
Quoted: 9 Post(s)
Likes: 0
Liked 0 Times
in
0 Posts
This page for the win: https://dt6110.web.fc2.com/parts/TL-FH10.html
Always nice when there are an even amount of splines 👍
Thanks everyone.
Always nice when there are an even amount of splines 👍
Thanks everyone.
Last edited by agentmulder; 12-22-19 at 03:54 AM.
12-22-19, 08:47 AM
#8
SE Wis
Join Date: Apr 2005
Location: Milwaukee, WI
Posts: 10,513
Bikes: '68 Raleigh Sprite, '02 Raleigh C500, '84 Raleigh Gran Prix, '91 Trek 400, 2013 Novara Randonee, 1990 Trek 970
Mentioned: 40 Post(s)
Tagged: 0 Thread(s)
Quoted: 2747 Post(s)
Liked 3,394 Times
in
2,056 Posts
This page for the win: TL-FH10 7400 �J�Z�b�g�t���[ ���� �f�����G�[�X
Thanks everyone.
Thanks everyone.
https://www.bikeforums.net/classic-v...n-minutes.html
12-22-19, 12:16 PM
#9
Member
Thread Starter
Join Date: Apr 2015
Posts: 48
Mentioned: 0 Post(s)
Tagged: 0 Thread(s)
Quoted: 9 Post(s)
Likes: 0
Liked 0 Times
in
0 Posts
Ah that's good too, but I'm not sure how easy that will be to source in metric land (unless key stock is imperial as standard?).
11.11mm rounded to a likely 12mm looks like a lot more work and 11mm isn't a number you often see in spec but I'm pretty sure there will be something rattling around the machine shop that I can make happen, got to wait until later in Jan though until I'm back at homebase/work though.
As for having to build up the old hub to a semblance of a wheel to get the torque on the unit, I'll make a good flat on the damaged side of the flange for a vice to grip, the tool side I can get a large wrench on 👍
Last edited by agentmulder; 12-22-19 at 01:34 PM.
12-27-19, 07:24 AM
#10
I never finish anyth

Join Date: Jul 2010
Location: Western KY
Posts: 1,114
Bikes: 2008 Merckx LXM, 2003 Giant XTC mtb, 2001 Lemond Alpe d'Huez, 1997 Lemond Zurich, 1989 Cannondale ST, 1988 Masi Nuovo Strada, 1983 Pinarello Turismo
Mentioned: 63 Post(s)
Tagged: 0 Thread(s)
Quoted: 294 Post(s)
Liked 137 Times
in
86 Posts
I have the proper tool for working with the 7400 hubs, and I'll mail it to you. All you need to do is return it to me and cover my shipping. Be careful with the 7400 freehubs, as you probably know they are almost unobtanium.
__________________
Dale, NL4T
Dale, NL4T
12-29-19, 06:55 PM
#11
Member
Thread Starter
Join Date: Apr 2015
Posts: 48
Mentioned: 0 Post(s)
Tagged: 0 Thread(s)
Quoted: 9 Post(s)
Likes: 0
Liked 0 Times
in
0 Posts
I'll be in touch via PM closer to when I'll be back in Melbourne 👍. I'll also remind myself to bring a fair amount of used spokes for a temp lace up if required.
12-29-19, 07:50 PM
#12
Senior Member
Join Date: Oct 2005
Location: SW Ohio
Posts: 3,682
Bikes: Puch Marco Polo, Saint Tropez, Masi Gran Criterium
Mentioned: 25 Post(s)
Tagged: 0 Thread(s)
Quoted: 1163 Post(s)
Liked 442 Times
in
315 Posts
This page for the win: TL-FH10 7400 �J�Z�b�g�t���[ ���� �f�����G�[�X
Always nice when there are an even amount of splines 👍
Thanks everyone.
Always nice when there are an even amount of splines 👍
Thanks everyone.
I can�t remember if you said you have the Uniglide only 7402 8-speed freehub body or the combo UG/HG freehub body that takes HG cassettes in 8, 9 or 10 speeds.
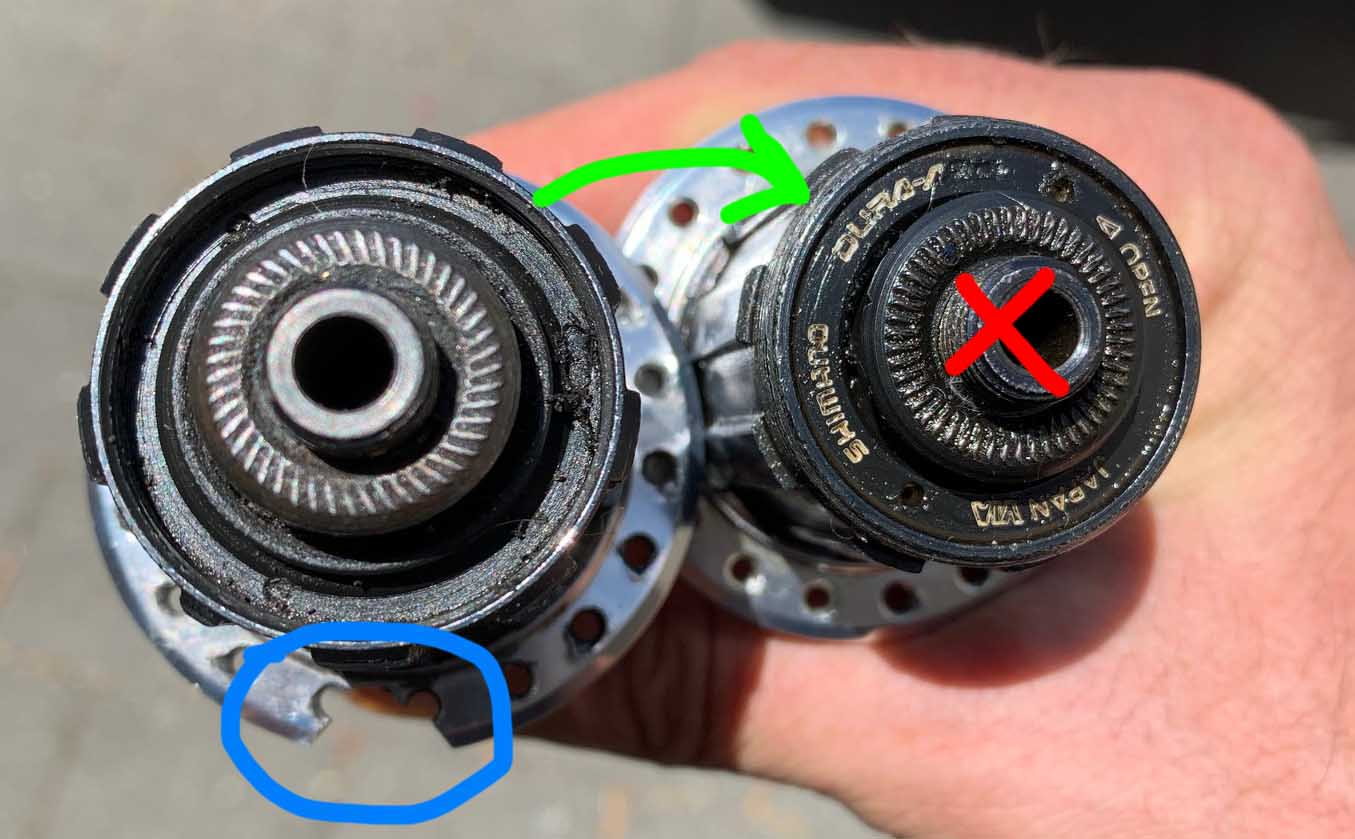
These are hubs to survive an entire lifetime, BTW. Extremely heavy but just as pretty and durable even when broken in with some �shop wear�. The dust seals BTW have this clever overlapping labyrinth seal that clicks to conceal 2 little micro grease gun pores. The axle locknuts are Campy quality and lock down very positively on the cones with fine threads on the axle permitting fine bearing preload adjustments to be finalized once the wheel is mounted in the frame and the quick release skewer snugged down to compress the cones slightly and creep up on that final bearing adjustment permitting zero free play but smooth spinning.
12-29-19, 09:15 PM
#13
tcarl
Join Date: Dec 2010
Location: St. Louis, MO
Posts: 561
Bikes: Roark, Waterford 1100, 1987 Schwinn Paramount, Nishiki Professional, Bottecchia, 2 Scattantes, 3 Cannondale touring bikes, mtn. bike, cyclocross, hybrid, 1940's era Schwinn
Mentioned: 2 Post(s)
Tagged: 0 Thread(s)
Quoted: 27 Post(s)
Liked 9 Times
in
7 Posts
I was once in the exact same situation as you're in - a broken DA hub that I wanted to get the body off to put on to a good DA hub. The broken hub was unlaced from a wheel and I did what you're suggesting - putting it in a vise. Yes, I did destroy the hub shell in the process but did get the FH body off. My local bike shop had the special tool and let me borrow it. The good hub was laced into a wheel so no problem there. I'm going to agree with others that you'll need to lace the good hub up to get its FH body off.
12-30-19, 01:22 AM
#14
Member
Thread Starter
Join Date: Apr 2015
Posts: 48
Mentioned: 0 Post(s)
Tagged: 0 Thread(s)
Quoted: 9 Post(s)
Likes: 0
Liked 0 Times
in
0 Posts
Chrome does as good job of translating that page, but as you point out, the photographs tell the story.
I have a UG freewheel on a good hub body that I'd like to replace with an HG compatible freehub from a damaged hub (spokes pulled through the flange while I was racing a criterium!). See the pictures on the first post 👍.
I have a UG freewheel on a good hub body that I'd like to replace with an HG compatible freehub from a damaged hub (spokes pulled through the flange while I was racing a criterium!). See the pictures on the first post 👍.
12-30-19, 01:40 AM
#15
Member
Thread Starter
Join Date: Apr 2015
Posts: 48
Mentioned: 0 Post(s)
Tagged: 0 Thread(s)
Quoted: 9 Post(s)
Likes: 0
Liked 0 Times
in
0 Posts
12-30-19, 01:47 AM
#16
Senior Member
Join Date: Oct 2005
Location: SW Ohio
Posts: 3,682
Bikes: Puch Marco Polo, Saint Tropez, Masi Gran Criterium
Mentioned: 25 Post(s)
Tagged: 0 Thread(s)
Quoted: 1163 Post(s)
Liked 442 Times
in
315 Posts
Chrome does as good job of translating that page, but as you point out, the photographs tell the story.
I have a UG freewheel on a good hub body that I'd like to replace with an HG compatible freehub from a damaged hub (spokes pulled through the flange while I was racing a criterium!). See the pictures on the first post 👍.
I have a UG freewheel on a good hub body that I'd like to replace with an HG compatible freehub from a damaged hub (spokes pulled through the flange while I was racing a criterium!). See the pictures on the first post 👍.
Gotcha, understood. Since you know the transplant can be done, I would say go ahead and have your wheel built with the UG Freewheel hub (which I’m assuming is the 7402, 8 speed freehub body one which is is the same width as the 7403 UG/HG, 8 speed one you are replacing - and not the slightly shorter 7400, 7 speed Uniglide one which would have the shorter axle and be limited to 6/7 speed gearing).
Once the replacement wheel is built with the Uniglide only freehub, then remove the axle set, remove the bearings and wipe out the grease and use the dedicated removal tool (Shimano TL-FH10) mounted on the appropriate metric socket (19mm?) then onto a long-ish T-bar or short breaker bar. Carefully back out the freehub bolt (I forget if it is “righty-tighty/lefty loosey” or reverse threaded) because as has already been noted, the FH bolt threads are knife-like coarse threads that are installed dry. I have a theory as to why this is BTW. I believe the purpose during assembly is to keep the connection grease free to prevent over-torquing which could damage the protrusion on the hub shell.
Then just re-install the UG/HG freehub body from the damaged hub in reverse order. It would probably be best also to be sure and transfer the same axle-set over as well since the 7403 UG/HG one is open on the HG lockring end and I think Shimano gives the outer cone an O-ring seal that the UG one might not need since it has a full dust cap on the FH body end.
Last edited by masi61; 12-30-19 at 01:51 AM.
12-30-19, 02:07 AM
#17
Member
Thread Starter
Join Date: Apr 2015
Posts: 48
Mentioned: 0 Post(s)
Tagged: 0 Thread(s)
Quoted: 9 Post(s)
Likes: 0
Liked 0 Times
in
0 Posts
I'd say it'll be a right hand thread from drive side perspective, so that normal riding fastens it 👍.
I'm lacing these wheels myself, thinking now I may throw on some old spokes/nipples to get the UG freehub off, that way if there are any unforeseen issues I will minimise time and wheel hardware wasted (that's the pessimist in me ha ha 😄 . Haven't thought too much on it, but I imagine as long as it's relatively balanced the lacing pattern can be much simpler too.
Might do it first as well.
I'm lacing these wheels myself, thinking now I may throw on some old spokes/nipples to get the UG freehub off, that way if there are any unforeseen issues I will minimise time and wheel hardware wasted (that's the pessimist in me ha ha 😄
. Haven't thought too much on it, but I imagine as long as it's relatively balanced the lacing pattern can be much simpler too.Might do it first as well.
12-30-19, 02:28 AM
#18
Senior Member
Join Date: Oct 2005
Location: SW Ohio
Posts: 3,682
Bikes: Puch Marco Polo, Saint Tropez, Masi Gran Criterium
Mentioned: 25 Post(s)
Tagged: 0 Thread(s)
Quoted: 1163 Post(s)
Liked 442 Times
in
315 Posts
I'd say it'll be a right hand thread from drive side perspective, so that normal riding fastens it 👍.
I'm lacing these wheels myself, thinking now I may throw on some old spokes/nipples to get the UG freehub off, that way if there are any unforeseen issues I will minimise time and wheel hardware wasted (that's the pessimist in me ha ha 😄. Haven't thought too much on it, but I imagine as long as it's relatively balanced the lacing pattern can be much simpler too.
Might do it first as well.
I'm lacing these wheels myself, thinking now I may throw on some old spokes/nipples to get the UG freehub off, that way if there are any unforeseen issues I will minimise time and wheel hardware wasted (that's the pessimist in me ha ha 😄
. Haven't thought too much on it, but I imagine as long as it's relatively balanced the lacing pattern can be much simpler too.Might do it first as well.
Also, I understand that Criterium riding can put a lot of torque on a wheel but if any hub could take it, I would have thought that the Dura Ace 7400 era hubs could take the torque and extreme abuse better than most any other brand hub out there.
BTW: what drilling are these (how many spoke holes)?
12-30-19, 03:31 AM
#19
Member
Thread Starter
Join Date: Apr 2015
Posts: 48
Mentioned: 0 Post(s)
Tagged: 0 Thread(s)
Quoted: 9 Post(s)
Likes: 0
Liked 0 Times
in
0 Posts
I'm about 95% sure the UG is 8 speed, but I'll certainly check, no use otherwise.
They're 36 hole. I ride 3-cross 36h rear and 2-cross 32h on the front, except my Campagnolo c-record and track bike groups where I'm strictly 32 (don't have the funds to double up on 36h).
I've noted that the campgy flanges have more material on the perimeter of the flange (relative to the holes), and I guess 32h will have slightly more material between holes around the circumference, but then, more force per spoke as well. But yes, I agree 7400 series is great stuff.
Still though, it broke... I'm 97kg, putting a fair bit of load on these wheels - with 3-cross I'm keeping the forces more tangential, and I did make sure to realign the spoke bends with the already pitted areas of the holes (1/4 chance of doing that randomly anyway ha ha), but yeah, it happened regardless. It actually didn't noticeably affect the race, I just noticed a slight wiggle afterwards, the flange split later when I tweaked the spokes by hand.
