


Is there a way to see the gap between truing stand and wheel better?
 11-14-18, 12:56 PM
#1
Senior Member
Thread Starter
Join Date: Jul 2015
Posts: 586
Mentioned: 7 Post(s)
Tagged: 0 Thread(s)
Quoted: 120 Post(s)
Likes: 0
Liked 0 Times
in
0 Posts
Is there a way to see the gap between truing stand and wheel better?
I built two rear wheels, a winter wheel and a summer wheel. I'm about to swap wheels for the winter. I always plan on truing them earlier but it ends up that I true them fairly shortly before swapping wheels.
I've got a decent Park truing stand. It's got the white strip on the bottom and I stick paper or something white where I need the angle.
I've been truing by moving the truing stand into a room, on the floor, along with a stool. Standing is probably better but I'm not sure where I'd do that.
If I'm looking at vertical and horizontal truing, I'm gradually making finer adjustments with the wheel rim coming closer to the pieces on the stand. That gets down to me hunched over, squinting at the gap between the stand piece and rim, sitting just right so I can see that sliver of a gap that's left. Although by then it's less visual and more of using my ear to hear when the rim rubs a bit.
I wouldn't mind seeing that gap better though.
Question -- Is there any way to 'zoom in' or enlarge the visuals on that gap? If I'm positioned just right I can clearly see the gap and it's very helpful. It just an awkward position after a while.
Maybe something like.... Magnifying goggles? Or a light shining on that, projected to a wall or something larger? Or zooming in with a webcam? I'm not sure what would work for me, but it seems like there's probably some way to make that gap easier to see.
 11-14-18, 01:05 PM
#2
Banned
Strong Reading Glasses?
Better Lighting? Bifocals?
others offer pictures...
/..
others offer pictures...
/..
Last edited by fietsbob; 11-14-18 at 04:16 PM.
11-14-18, 01:07 PM
#3


Senior Member
Join Date: Sep 2014
Posts: 3,893
Mentioned: 20 Post(s)
Tagged: 0 Thread(s)
Quoted: 1062 Post(s)
Liked 665 Times
in
421 Posts
Granted, I'm just an amateur, and have 6 builds under my belt, using a homemade stand.
For me the best results have come from just doing it by ear -- listening for the rim to rub against the indicators. I can easily get within half a mm of truth. I've thought about writing software that uses a webcam to measure the rim position, but the level of motivation isn't there yet. I've written a fair amount of basic video analysis software for my day job.
For me the best results have come from just doing it by ear -- listening for the rim to rub against the indicators. I can easily get within half a mm of truth. I've thought about writing software that uses a webcam to measure the rim position, but the level of motivation isn't there yet. I've written a fair amount of basic video analysis software for my day job.

 11-14-18, 01:38 PM
#5
Senior Member
Join Date: Sep 2014
Posts: 3,893
Mentioned: 20 Post(s)
Tagged: 0 Thread(s)
Quoted: 1062 Post(s)
Liked 665 Times
in
421 Posts
I've tried a dial indicator, and unless the truing stand is perfectly rigid, I find that it wiggles around enough that it's not really helpful. YMMV of course.
11-14-18, 01:42 PM
#6
Senior Member

Join Date: May 2008
Location: Zang's Spur, CO
Posts: 9,083
Mentioned: 11 Post(s)
Tagged: 0 Thread(s)
Quoted: 3375 Post(s)
Liked 5,513 Times
in
2,856 Posts
11-14-18, 02:12 PM
#9
Senior Member
Join Date: Feb 2012
Location: Rochester, NY
Posts: 18,073
Bikes: Stewart S&S coupled sport tourer, Stewart Sunday light, Stewart Commuting, Stewart Touring, Co Motion Tandem, Stewart 3-Spd, Stewart Track, Fuji Finest, Mongoose Tomac ATB, GT Bravado ATB, JCP Folder, Stewart 650B ATB
Mentioned: 0 Post(s)
Tagged: 0 Thread(s)
Quoted: 4201 Post(s)
Liked 3,857 Times
in
2,305 Posts
First comment is about what's good enough. How perfectly molder are tires (and that's not mentioning sew ups)? I've worked to about 1mm of trueness. I balance this with the spoke tension evenness. Both are factors to a good wheel. The trueness is what's judged right away. The spoke evenness is what is noticed later, many mile later.
Try back lighting the indicator/rim gap. Looking for a sliver of bright light is more black and white then looking for a dimmer white back round growing and receding.
I agree with the dial indicators not being everything to all. The stand's rigidness is vital to minimize the needle shake. How the tip and rim is dealt with also influences the needle's jerkiness or shake. I've used dials a few times over the years and the same issues repeat. Recently I got the Park set for my TS-2.2 (not the TS-3 the set was made for). I modded the mounts and once again played with a dial set up. Once again I find the same issues that made me not bother with them for decades. (But if one doesn't revisit the past the lessons learned back then can be forgotten). I will absorb the dials into my other fabricating stuff.
Don't overthink truing too much. By the time you've put on a few miles that "within x thousandths" becomes a lot more with real life. It's the wheel's stability (it's remaining relatively true, round and dished) that really maters, not how true it is when on the stand. Andy
__________________
AndrewRStewart
AndrewRStewart
11-14-18, 02:21 PM
#10
Nigel
Join Date: Mar 2011
Location: San Jose, CA
Posts: 2,991
Bikes: 1980s and 1990s steel: CyclePro, Nishiki, Schwinn, SR, Trek........
Mentioned: 12 Post(s)
Tagged: 0 Thread(s)
Quoted: 384 Post(s)
Likes: 0
Liked 6 Times
in
6 Posts
My choice also, with a very rigid home built stand, made from 8020 aluminum extrusions. My eyes are not that great, but with the dial indicator I achieve �.003" both radially and axially on my wheels..
8020 sells cutoff pieces on ebay for about 10% of the original price - my stand cost about $50- in materials, and less than an hour of my labor.
8020 sells cutoff pieces on ebay for about 10% of the original price - my stand cost about $50- in materials, and less than an hour of my labor.
 11-14-18, 02:50 PM
#12
Senior Member

Join Date: Nov 2014
Location: Eugene, Oregon, USA
Posts: 27,547
Mentioned: 217 Post(s)
Tagged: 0 Thread(s)
Quoted: 18373 Post(s)
Liked 4,508 Times
in
3,351 Posts
My VAR stand can do quite a good job. While there is a little flex in the stand, it is generally made of a lot of steel and does a good job and holding things steady.

I had to do an adjustment to the indicators.

Var Truing Stand, PreciRay, before adjustment.
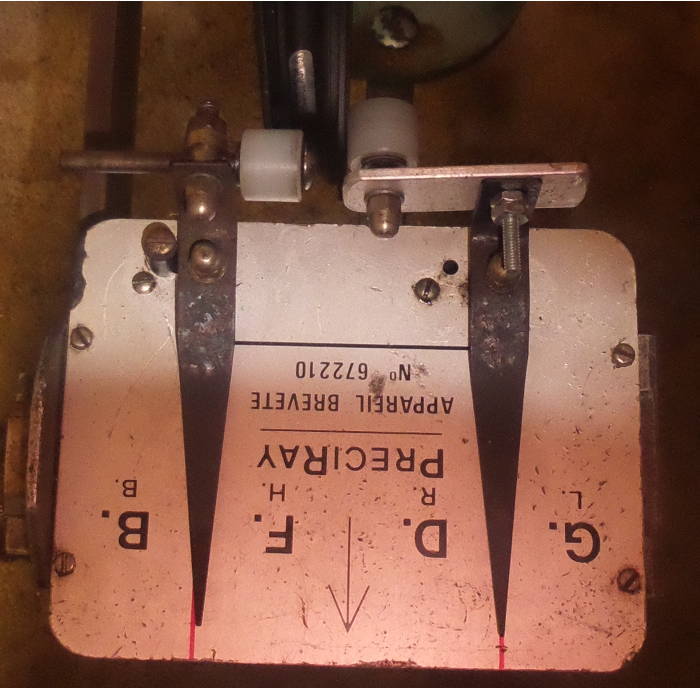
Var Truing Stand, PreciRay, after adjustment.
Adding the bar to the right indicator makes the left indicator much more accurate with minimal effect to the right one. I can get the hop adjusted to the point where I can pick up the wheel distortion from right/left tension inequality from dishing.
The whole stand is simple enough that one could potentially make a copy of the stand, although the machining is tight.
I had to do an adjustment to the indicators.
Var Truing Stand, PreciRay, before adjustment.
Var Truing Stand, PreciRay, after adjustment.
Adding the bar to the right indicator makes the left indicator much more accurate with minimal effect to the right one. I can get the hop adjusted to the point where I can pick up the wheel distortion from right/left tension inequality from dishing.
The whole stand is simple enough that one could potentially make a copy of the stand, although the machining is tight.
11-14-18, 03:24 PM
#13
Senior Member
Join Date: Feb 2012
Location: Rochester, NY
Posts: 18,073
Bikes: Stewart S&S coupled sport tourer, Stewart Sunday light, Stewart Commuting, Stewart Touring, Co Motion Tandem, Stewart 3-Spd, Stewart Track, Fuji Finest, Mongoose Tomac ATB, GT Bravado ATB, JCP Folder, Stewart 650B ATB
Mentioned: 0 Post(s)
Tagged: 0 Thread(s)
Quoted: 4201 Post(s)
Liked 3,857 Times
in
2,305 Posts


So here's a shot on my current but soon to change truing stand set up. The dials, as mentioned, will come off and go to the machining side of my shop. The dark brown lump in the backround is one of the work lights that are aimed at the stand, the other is overhead. I've also included a shot of the most solid stand I have had the pleasure to use (and own). The VAR is a bit awkward as it's so heavy and won't work with a tire mounted, but gosh it's so robust and the tripling of the run out with the indicator levers (the radial one lost it's spring decades ago so I just use an allen wrench now for the indicator). And the best thing is the surface with the name is a great beer bottle shelf
 Andy
Andy
__________________
AndrewRStewart
AndrewRStewart
11-14-18, 03:40 PM
#14
Senior Member
Join Date: Nov 2014
Location: Eugene, Oregon, USA
Posts: 27,547
Mentioned: 217 Post(s)
Tagged: 0 Thread(s)
Quoted: 18373 Post(s)
Liked 4,508 Times
in
3,351 Posts
I usually like to pull the tires anyway, but was doing something with a sewup that I didn't want to reglue.
11-14-18, 04:22 PM
#15
Senior Member

Join Date: Dec 2007
Location: San Jose, California
Posts: 3,504
Bikes: 2001 Tommasini Sintesi w/ Campagnolo Daytona 10 Speed
Mentioned: 5 Post(s)
Tagged: 0 Thread(s)
Quoted: 145 Post(s)
Likes: 0
Liked 35 Times
in
30 Posts
All you need is a piece of electrical tape....
...and a white surface and near background with decent lighting.
Dial indicators aren't really necessary...they usually end up being paper weights.
=8-)
__________________
5000+ wheels built since 1984...
Disclaimer:
1. I do not claim to be an expert in bicycle mechanics despite my experience.
2. I like anyone will comment in other areas.
3. I do not own the preexisting concepts of DISH and ERD.
4. I will provide information as I always have to others that I believe will help them protect themselves from unscrupulous mechanics.
5. My all time favorite book is:
Kahane, Howard. Logic and Contemporary Rhetoric: The Use of Reason in Everyday Life
Last edited by mrrabbit; 11-14-18 at 07:46 PM.
11-14-18, 06:31 PM
#16
Senior Member
Join Date: Sep 2014
Posts: 3,893
Mentioned: 20 Post(s)
Tagged: 0 Thread(s)
Quoted: 1062 Post(s)
Liked 665 Times
in
421 Posts
First comment is about what's good enough. How perfectly molder are tires (and that's not mentioning sew ups)? I've worked to about 1mm of trueness. I balance this with the spoke tension evenness. Both are factors to a good wheel. The trueness is what's judged right away. The spoke evenness is what is noticed later, many mile later.
Try back lighting the indicator/rim gap. Looking for a sliver of bright light is more black and white then looking for a dimmer white back round growing and receding.
I agree with the dial indicators not being everything to all. The stand's rigidness is vital to minimize the needle shake. How the tip and rim is dealt with also influences the needle's jerkiness or shake. I've used dials a few times over the years and the same issues repeat. Recently I got the Park set for my TS-2.2 (not the TS-3 the set was made for). I modded the mounts and once again played with a dial set up. Once again I find the same issues that made me not bother with them for decades. (But if one doesn't revisit the past the lessons learned back then can be forgotten). I will absorb the dials into my other fabricating stuff.
Don't overthink truing too much. By the time you've put on a few miles that "within x thousandths" becomes a lot more with real life. It's the wheel's stability (it's remaining relatively true, round and dished) that really maters, not how true it is when on the stand. Andy
Try back lighting the indicator/rim gap. Looking for a sliver of bright light is more black and white then looking for a dimmer white back round growing and receding.
I agree with the dial indicators not being everything to all. The stand's rigidness is vital to minimize the needle shake. How the tip and rim is dealt with also influences the needle's jerkiness or shake. I've used dials a few times over the years and the same issues repeat. Recently I got the Park set for my TS-2.2 (not the TS-3 the set was made for). I modded the mounts and once again played with a dial set up. Once again I find the same issues that made me not bother with them for decades. (But if one doesn't revisit the past the lessons learned back then can be forgotten). I will absorb the dials into my other fabricating stuff.
Don't overthink truing too much. By the time you've put on a few miles that "within x thousandths" becomes a lot more with real life. It's the wheel's stability (it's remaining relatively true, round and dished) that really maters, not how true it is when on the stand. Andy
11-14-18, 06:52 PM
#17
Senior Member
Had a customer back in the 80's that was anal about wheel true. Every month he came in to have his wheel trued to perfection. Only one guy in the shop would do it for him. No gauges on the stand, just his eyes and ears. "Round and true every time" was his mantra. Still builds a fine wheel, too.
Little did the customer understand that as soon as he rode the bike down the road the wheel returned to its previous state, and would be out of perfection until the next visit. Takes all kinds of people to make this world go round.
Little did the customer understand that as soon as he rode the bike down the road the wheel returned to its previous state, and would be out of perfection until the next visit. Takes all kinds of people to make this world go round.
11-14-18, 07:32 PM
#18
Senior Member
Thread Starter
Join Date: Jul 2015
Posts: 586
Mentioned: 7 Post(s)
Tagged: 0 Thread(s)
Quoted: 120 Post(s)
Likes: 0
Liked 0 Times
in
0 Posts
Thanks. I'm still thinking. I was just looking at that Park Tools dial set. $150 though... for maybe a mm difference in work?
I noticed cleaning the rim off from before made the black rim shine and reflect the truing stand arm. Not sure that helped. The back light idea might help, and it's cheaper than $150 for sure.
I noticed cleaning the rim off from before made the black rim shine and reflect the truing stand arm. Not sure that helped. The back light idea might help, and it's cheaper than $150 for sure.
11-14-18, 07:40 PM
#19
Senior Member
Join Date: Feb 2012
Location: Rochester, NY
Posts: 18,073
Bikes: Stewart S&S coupled sport tourer, Stewart Sunday light, Stewart Commuting, Stewart Touring, Co Motion Tandem, Stewart 3-Spd, Stewart Track, Fuji Finest, Mongoose Tomac ATB, GT Bravado ATB, JCP Folder, Stewart 650B ATB
Mentioned: 0 Post(s)
Tagged: 0 Thread(s)
Quoted: 4201 Post(s)
Liked 3,857 Times
in
2,305 Posts
Ones eyes and fingers can pick up on very fine dimensions if you focus and practice. As example placing a finger on the spoke when you turn the nipple. You can feel the point where the spoke's wind up stops and thus when the truing (spoke length change) starts. If you paid attention you can then turn back the nipple to the point where the spoke is under no rotational tension. This reduces the amount of touch up truing after destressing the wheel. Andy
__________________
AndrewRStewart
AndrewRStewart
11-14-18, 09:33 PM
#20
Full Member

Join Date: Sep 2015
Location: Denver Colorado
Posts: 339
Bikes: 2020 Pivot Vault, 1983 Rossin Record, Garneau R1, Mesamods home built gravel/rain commuter bike, 1995 Barracuda A2V modified with Surley single speed dropouts, 1969 Bottecchia junkyard special fixed gear, Cervelo P4, Mesamods 650b klunker
Mentioned: 3 Post(s)
Tagged: 0 Thread(s)
Quoted: 96 Post(s)
Liked 72 Times
in
50 Posts
I usually just throw a piece of white paper or some kind of other contrasting color beyond the white decal on the truing stand if the wheel has a difficult line of sight. It also works well for centering disc brake calipers. Just lay it on the ground below and line it up!
11-14-18, 11:02 PM
#21
Senior Member
Join Date: Jan 2013
Location: Llano Estacado
Posts: 3,702
Bikes: old clunker
Mentioned: 13 Post(s)
Tagged: 0 Thread(s)
Quoted: 684 Post(s)
Likes: 0
Liked 105 Times
in
83 Posts
Had a customer back in the 80's that was anal about wheel true. Every month he came in to have his wheel trued to perfection. Only one guy in the shop would do it for him. No gauges on the stand, just his eyes and ears. "Round and true every time" was his mantra. Still builds a fine wheel, too.
Little did the customer understand that as soon as he rode the bike down the road the wheel returned to its previous state, and would be out of perfection until the next visit. Takes all kinds of people to make this world go round.
Little did the customer understand that as soon as he rode the bike down the road the wheel returned to its previous state, and would be out of perfection until the next visit. Takes all kinds of people to make this world go round.
11-15-18, 03:30 AM
#22
Senior Member
Thread Starter
Join Date: Jul 2015
Posts: 586
Mentioned: 7 Post(s)
Tagged: 0 Thread(s)
Quoted: 120 Post(s)
Likes: 0
Liked 0 Times
in
0 Posts
For dial, someone mentioned having it solid. Right now I'm using the truing stand (Park Tools 2.2P, with the black plastic base) on the floor, on carpet. Does that work better for using dials if it's bolted down, you're saying? Or just that the dials need to be solidly held to the truing stand? It looks like those dials attach to the caliper arm part, so it could still work without being bolted down.... But would it work well like that?