


Brake adjustment help?
 04-04-20, 03:34 PM
#1
Member
Thread Starter
Join Date: Sep 2018
Posts: 25
Mentioned: 0 Post(s)
Tagged: 0 Thread(s)
Quoted: 4 Post(s)
Likes: 0
Liked 0 Times
in
0 Posts
Brake adjustment help?
hi all. having a problem with rear brake callipers. when I apply brakes, only the (left?) calliper pad engages. the right one does engage on first squeeze, but just stays there. I have a video to show it nicely but not sure how to load it? its a .mov file on my ipad. can i use that here? I guess its a simple fix, but I'm pretty clueless...🙁looking for some help?
 04-04-20, 03:39 PM
#2
Senior Member
Join Date: Jun 2002
Location: Montreal, Quebec
Posts: 5,921
Mentioned: 16 Post(s)
Tagged: 0 Thread(s)
Quoted: 1814 Post(s)
Liked 1,692 Times
in
973 Posts
There are several different types of brake callipers, they are not generic. This sort of question leaves people guessing about both your problem and the possible solution. The more details you provide as soon as possible the fewer wrong guesses you will see.
It would be a very long answer if I were to address all the possible solutions for this problem.
It would be a very long answer if I were to address all the possible solutions for this problem.

 04-04-20, 03:41 PM
#4
Member
Thread Starter
Join Date: Sep 2018
Posts: 25
Mentioned: 0 Post(s)
Tagged: 0 Thread(s)
Quoted: 4 Post(s)
Likes: 0
Liked 0 Times
in
0 Posts
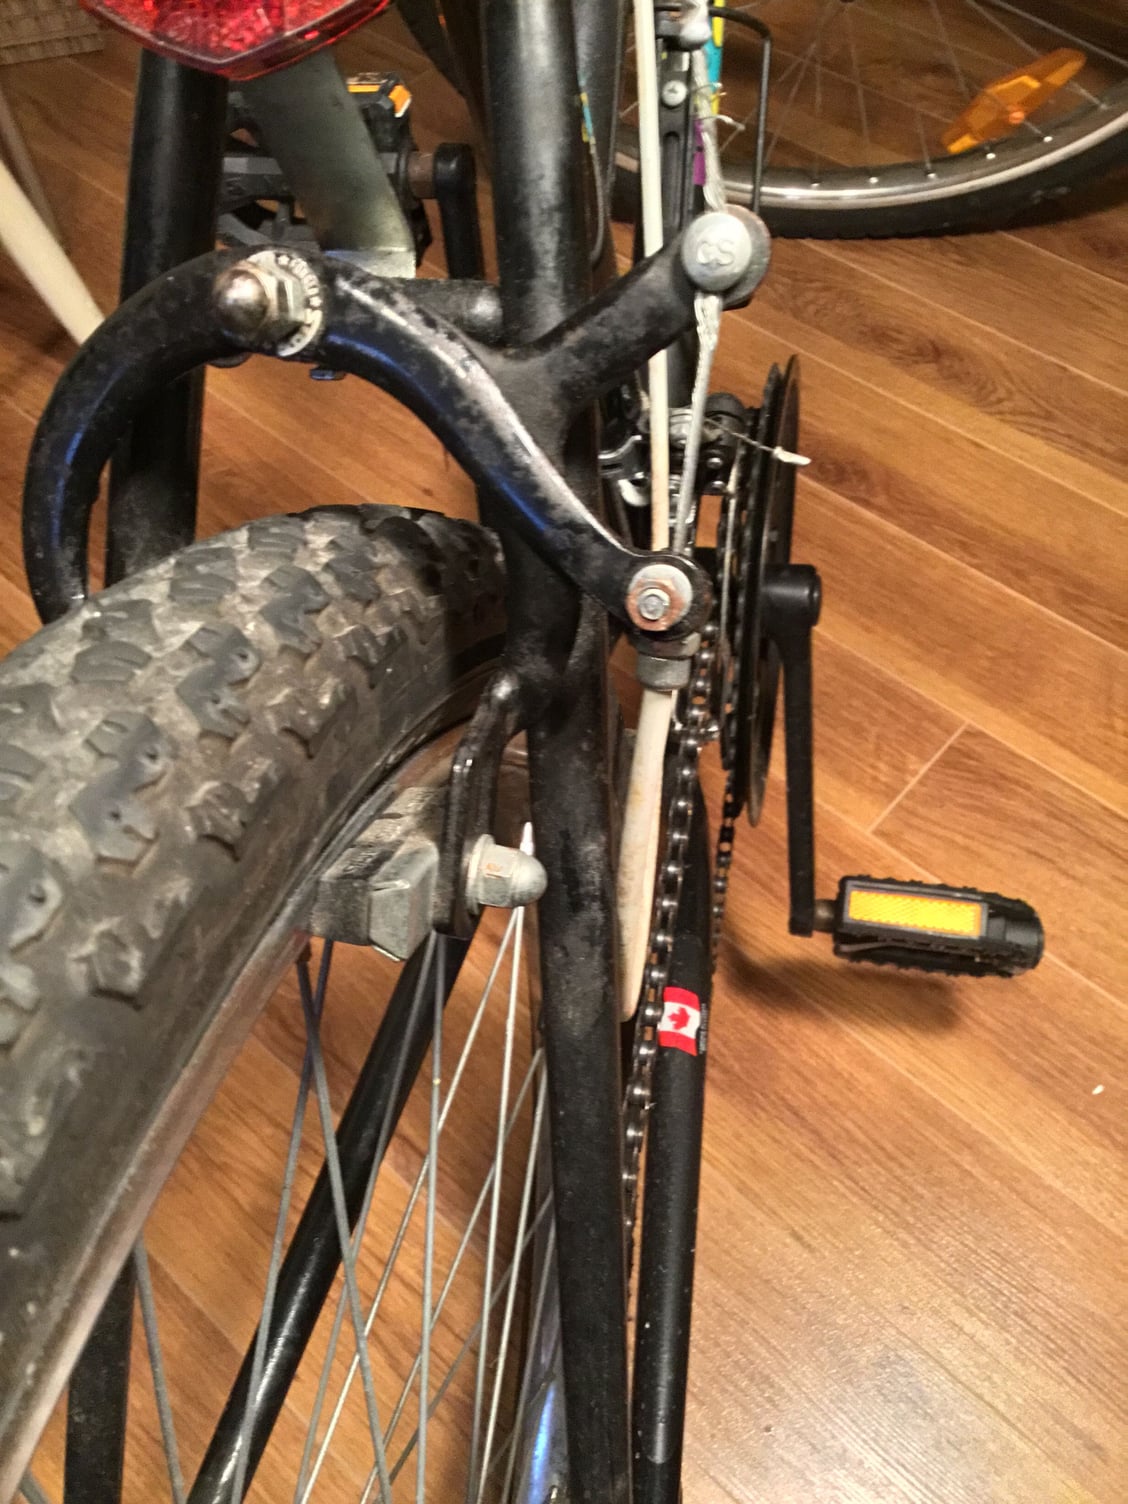
couldnt load the video, but hers 2 pics, before squizzing brake lever , & after.
right pad just stays "in"
does this help?
is there a way to attach an ipad video?
right pad just stays "in"
does this help?
is there a way to attach an ipad video?
Last edited by jargey3000; 04-04-20 at 03:51 PM.
04-04-20, 04:14 PM
#6
Senior Member
Join Date: Jun 2002
Location: Montreal, Quebec
Posts: 5,921
Mentioned: 16 Post(s)
Tagged: 0 Thread(s)
Quoted: 1814 Post(s)
Liked 1,692 Times
in
973 Posts
but your brakes are far too far gone for this method to work properly. The brakes(levers, cables, and callipers) need a full overhaul
04-04-20, 04:16 PM
#8
Senior Member
Join Date: Jun 2002
Location: San Jose, CA
Posts: 3,676
Bikes: Too many bikes, too little time to ride
Mentioned: 2 Post(s)
Tagged: 0 Thread(s)
Quoted: 425 Post(s)
Liked 452 Times
in
311 Posts
Looks like it's centered okay (hard to confirm without seeing the other side simultaneously). Given the condition of the bike new brake cable and housing might help although the brake caliper itself looks to be in rough shape. The return spring in the caliper itself might be faulty.
04-04-20, 04:21 PM
#9
Member
Thread Starter
Join Date: Sep 2018
Posts: 25
Mentioned: 0 Post(s)
Tagged: 0 Thread(s)
Quoted: 4 Post(s)
Likes: 0
Liked 0 Times
in
0 Posts
i didnt get much help from that link above.
i dont want to spend any money on the bikejust thought someone might lead me thru how or which parts to adjust?
i dont want to spend any money on the bikejust thought someone might lead me thru how or which parts to adjust?
04-04-20, 04:38 PM
#10

Senior Member
Join Date: Dec 2014
Location: Central Virginia
Posts: 4,777
Bikes: Numerous
Mentioned: 150 Post(s)
Tagged: 0 Thread(s)
Quoted: 1676 Post(s)
Liked 3,084 Times
in
911 Posts
More than likely the brake is not centered properly. Maybe the bike got laid on it’s side and knocked it off kilter. Anyway, the center bolt can be loosened by an Allen key on the rear side of the brake (other side of the frame brake bridge in the picture. You can readjust the brake, re-center it and tighten the bolt down.
Heres a brake adjustment link
https://www.parktool.com/blog/repair...-brake-service
Heres a brake adjustment link
https://www.parktool.com/blog/repair...-brake-service
__________________
N = '96 Colnago C40, '04 Wilier Alpe D'Huez, '10 Colnago EPS, '85 Merckx Pro, '89 Merckx Century, '86 Tommasini Professional, '04 Teschner Aero FX Pro, '05 Alan Carbon Cross, '86 De Rosa Professional, '82 Colnago Super, '95 Gios Compact Pro, '95 Carrera Zeus, '84 Basso Gap, �89 Cinelli Supercorsa, �83 Bianchi Specialissima, �VO Randonneur, Ritchey Breakaway Steel, '84 Paletti Super Prestige, Heron Randonneur
N = '96 Colnago C40, '04 Wilier Alpe D'Huez, '10 Colnago EPS, '85 Merckx Pro, '89 Merckx Century, '86 Tommasini Professional, '04 Teschner Aero FX Pro, '05 Alan Carbon Cross, '86 De Rosa Professional, '82 Colnago Super, '95 Gios Compact Pro, '95 Carrera Zeus, '84 Basso Gap, �89 Cinelli Supercorsa, �83 Bianchi Specialissima, �VO Randonneur, Ritchey Breakaway Steel, '84 Paletti Super Prestige, Heron Randonneur
04-04-20, 04:40 PM
#11
Really Old Senior Member

Obviously one caliper is frozen in place.
Disassemble, clean & lube the center pivot parts.
Keep track of the parts in order they come off, although that shouldn't be difficult.
Then, it's trying to hit the sweet spot on how much to tighten the acorn nut.
IF you actually get them to function correctly, you won the lottery!
These brakes tend to be very flexy and if the wheel is a bit out of true, you have problems.
In order to keep the pads from rubbing, you have to have them too far apart to get hard braking before you bury the lever into the grip. The wheel has to be true to keep the pads close without rubbing.
I actually got into wheel truing because of these type brakes. I flipped bikes, and I simply needed all the help I could get to makes these brakes work well enough to have a semi clear conscience. Thinner grips sometimes helped.
 04-04-20, 06:57 PM
#13
Really Old Senior Member
04-05-20, 07:51 AM
#15
Member
Thread Starter
Join Date: Sep 2018
Posts: 25
Mentioned: 0 Post(s)
Tagged: 0 Thread(s)
Quoted: 4 Post(s)
Likes: 0
Liked 0 Times
in
0 Posts
moderators(or anyone):
I'm trying to post a video of my brakes from my ipad but i get an error message:
is there a way to post the video on here?
I'm trying to post a video of my brakes from my ipad but i get an error message:
Alert
Your file "IMG_2085.MOV" could not be uploaded. It is not an accepted file type.is there a way to post the video on here?
04-05-20, 10:29 AM
#16
SE Wis
Join Date: Apr 2005
Location: Milwaukee, WI
Posts: 10,495
Bikes: '68 Raleigh Sprite, '02 Raleigh C500, '84 Raleigh Gran Prix, '91 Trek 400, 2013 Novara Randonee, 1990 Trek 970
Mentioned: 40 Post(s)
Tagged: 0 Thread(s)
Quoted: 2740 Post(s)
Liked 3,386 Times
in
2,049 Posts
As previously mentioned cleaning and lubing the pivot as well as the cable.
Here is a good "how to" on centering side pull brake calipers.
Dave Moulton's Blog - Dave Moulton's Bike Blog - Centering side-pull brakes
Here is a good "how to" on centering side pull brake calipers.
Dave Moulton's Blog - Dave Moulton's Bike Blog - Centering side-pull brakes
04-05-20, 06:36 PM
#17
Senior Member
Join Date: Apr 2005
Location: Northern CA
Posts: 741
Bikes: Cannondale tandems: '92 Road, '97 Mtn. Mongoose 10.9 Ti, Kelly Deluxe, Tommaso Chorus, Cdale MT2000, Schwinn Deluxe Cruiser, Torker Unicycle, among others.
Mentioned: 5 Post(s)
Tagged: 0 Thread(s)
Quoted: 279 Post(s)
Liked 205 Times
in
129 Posts
The brake's position, and how much each arm pulls away from the rim, is determined by the center bolt and/or the spring mount on the center bolt. This is adjusted with either 10mm box wrenches, or an 11mm cone wrench, plus or minus. BUT proper adjustment requires proper set-up in the first place! Proper retraction also depends on the caliper arms being properly lubricated and adjusted. It's like a bearing in that it has an adjustable nut and a lock nut on the outside on the pivot bolt. Disassembly and lubrication of the caliper is definitely recommended. But this is not a simple repair, given all of the potential pitfalls. I'd suggest you scour YouTube for caliper brake videos. The more you watch, the more you'll understand and see all of the issues with proper brake adjustment.
Proper brake function also entails cable and housing functioning properly, as well as the brake lever itself. Plus, the brake pads have to be properly located for maximum braking, safety, and squeak avoidance.
And as pointed out, this is the lowest-quality rim caliper you're likely to encounter. No matter how much magic a top technician could do to this brake, it's still marginal. And since it appears you have chrome steel rims: once the rims get wet, they're suddenly even worse! Like deadly worse!!! (The bike wet probably can't meet the minimum requirements of the law - making a tire skid.) So please be aware.
04-05-20, 11:32 PM
#18
SE Wis
Join Date: Apr 2005
Location: Milwaukee, WI
Posts: 10,495
Bikes: '68 Raleigh Sprite, '02 Raleigh C500, '84 Raleigh Gran Prix, '91 Trek 400, 2013 Novara Randonee, 1990 Trek 970
Mentioned: 40 Post(s)
Tagged: 0 Thread(s)
Quoted: 2740 Post(s)
Liked 3,386 Times
in
2,049 Posts
THe bottom up cable routing lets water in and collect to rust in the lower part of the loop as well
04-06-20, 05:38 AM
#19
Member
Thread Starter
Join Date: Sep 2018
Posts: 25
Mentioned: 0 Post(s)
Tagged: 0 Thread(s)
Quoted: 4 Post(s)
Likes: 0
Liked 0 Times
in
0 Posts
thanks for all the input folks!
yes, i realize this is an old clunker relic of a bike. just trying to get it in a more usable state, just to "go around the block" a few times!
I'll keep plugging away at it. thanks.
yes, i realize this is an old clunker relic of a bike. just trying to get it in a more usable state, just to "go around the block" a few times!
I'll keep plugging away at it. thanks.


