


Alignment Table Bottom Bracket Post
 01-19-20, 04:18 AM
#1
Newbie
Thread Starter
Alignment Table Bottom Bracket Post
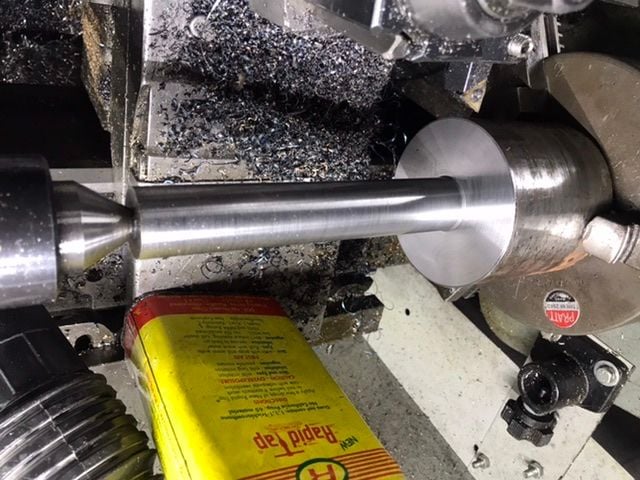
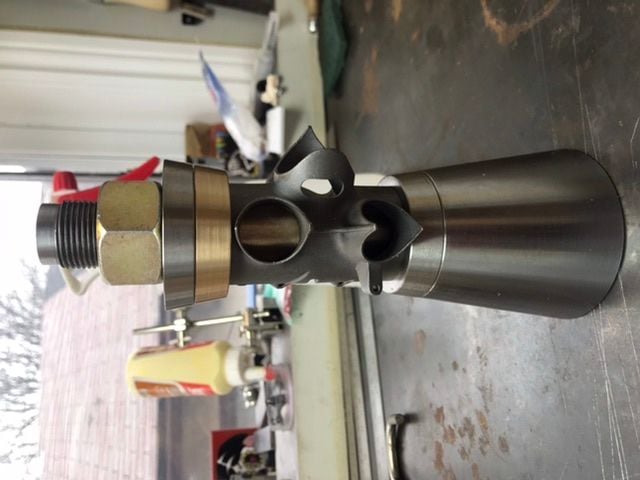
I finally got around to turning a BB post for my alignment table. It is made out of A2 tool steel. It can accommodate a BB shell up to 2” in diameter and 120mm in width. The post is threaded 1”x14 tpi and the bottom is tapped 3/4”x16 tpi. I made a bronze washer that fits into the standard bb so as to center the bottom bracket on the post.


Likes For Tdotbikes:
01-19-20, 08:35 AM
#2

framebuilder
Very nice work Fernando! The bronze washer is a very nice touch. What kind of table is this post on?
01-19-20, 11:37 AM
#3
Senior Member

Join Date: Mar 2012
Location: santa barbara CA
Posts: 1,087
Mentioned: 1 Post(s)
Tagged: 0 Thread(s)
Quoted: 96 Post(s)
Liked 30 Times
in
21 Posts
I finally got around to turning a BB post for my alignment table. It is made out of A2 tool steel. It can accommodate a BB shell up to 2” in diameter and 120mm in width. The post is threaded 1”x14 tpi and the bottom is tapped 3/4”x16 tpi. I made a bronze washer that fits into the standard bb so as to center the bottom bracket on the post.
thanks, Brian
Last edited by calstar; 01-19-20 at 05:34 PM.
01-19-20, 01:17 PM
#4
Newbie
Thread Starter
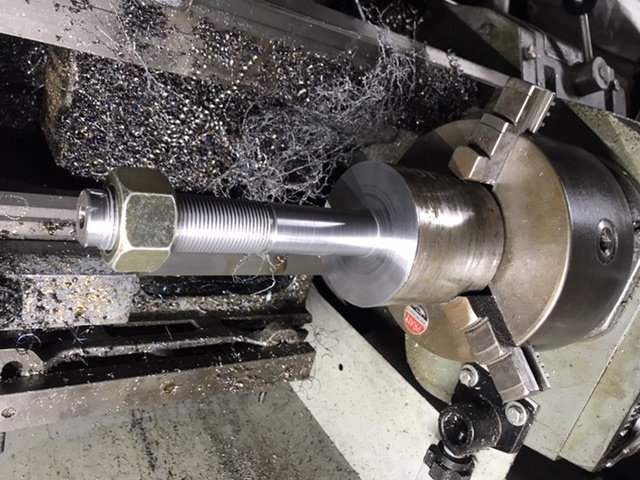
Really nice work, the brass is a very nice detail. Both of the above pics show turning between centers using a rod/tube clamped to the work used as a lathe dog(nice idea), but I don't understand what I'm seeing in the second pic, is that the full dimension brass washer piece you started with and are turning the taper on the left to later be parted off? Did you make the steel taper washer/spacer the same way(between centers)?
thanks, Brian
thanks, Brian
Last edited by Tdotbikes; 01-19-20 at 02:43 PM.
01-19-20, 01:27 PM
#5
Newbie
Thread Starter
 01-19-20, 01:28 PM
#6
Banned.

Join Date: Jun 2004
Location: Torrance, CA
Posts: 3,061
Bikes: Homebuilt steel
Mentioned: 18 Post(s)
Tagged: 0 Thread(s)
Quoted: 2193 Post(s)
Liked 425 Times
in
337 Posts
Nice job!
My post is much simpler, partly because my lathe skills don't measure up. Simple cylinder with a 3/4" hole bored through the center for a piece of threaded drill rod. My alignment plate has a threaded hole for the drill rod. I also use a threaded insert that came with my Bringhelli bottom bracket facing tool; I thread that in before facing and then leave it in while performing alignment work since it supports the BB nicely. Anyway, sorry to twist this thread towards what I did.
 DSC01230 by nessism, on Flickr
 DSC01229 by nessism, on Flickr
My post is much simpler, partly because my lathe skills don't measure up. Simple cylinder with a 3/4" hole bored through the center for a piece of threaded drill rod. My alignment plate has a threaded hole for the drill rod. I also use a threaded insert that came with my Bringhelli bottom bracket facing tool; I thread that in before facing and then leave it in while performing alignment work since it supports the BB nicely. Anyway, sorry to twist this thread towards what I did.
DSC01230 by nessism, on FlickrDSC01229 by nessism, on Flickr
Likes For Nessism:
01-19-20, 03:49 PM
#7
Senior Member
Join Date: Feb 2012
Location: Rochester, NY
Posts: 18,075
Bikes: Stewart S&S coupled sport tourer, Stewart Sunday light, Stewart Commuting, Stewart Touring, Co Motion Tandem, Stewart 3-Spd, Stewart Track, Fuji Finest, Mongoose Tomac ATB, GT Bravado ATB, JCP Folder, Stewart 650B ATB
Mentioned: 0 Post(s)
Tagged: 0 Thread(s)
Quoted: 4201 Post(s)
Liked 3,859 Times
in
2,307 Posts
Interesting post (bad pun).
Comments in general- My surface plate (2'x3' cast steel) is 38" off the floor and with my 5' 6" height it's as high as I would want. I feel that the efforts to establish the post to reference the shell's axis are a lost cause. With the clamping pressure needed for secure holding the shell will be pretty much trapped by it's faces, the lower face will settle flat on the post and the upper face will be what it is. The pressure washer (the brass washer in this example) will slightly cock on the shaft/through bolt as the faces' parallelness dictates. If that washer has enough vertical dimension and is of a snug enough fit to the shaft the it might hold the shell WRT the average of the two faces' parallelness, not what I would want when wailing on the frame as the shell will tend to move about if the faces are not square to the post and washer. IMO the critical spec is the post's two faces being parallel. Of course if your alignment checking method doesn't use the shell at all this doesn't matter. Andy
Comments in general- My surface plate (2'x3' cast steel) is 38" off the floor and with my 5' 6" height it's as high as I would want. I feel that the efforts to establish the post to reference the shell's axis are a lost cause. With the clamping pressure needed for secure holding the shell will be pretty much trapped by it's faces, the lower face will settle flat on the post and the upper face will be what it is. The pressure washer (the brass washer in this example) will slightly cock on the shaft/through bolt as the faces' parallelness dictates. If that washer has enough vertical dimension and is of a snug enough fit to the shaft the it might hold the shell WRT the average of the two faces' parallelness, not what I would want when wailing on the frame as the shell will tend to move about if the faces are not square to the post and washer. IMO the critical spec is the post's two faces being parallel. Of course if your alignment checking method doesn't use the shell at all this doesn't matter. Andy
__________________
AndrewRStewart
AndrewRStewart
01-19-20, 05:11 PM
#8
Newbie
Thread Starter
Interesting post (bad pun).
Comments in general- My surface plate (2'x3' cast steel) is 38" off the floor and with my 5' 6" height it's as high as I would want. I feel that the efforts to establish the post to reference the shell's axis are a lost cause. With the clamping pressure needed for secure holding the shell will be pretty much trapped by it's faces, the lower face will settle flat on the post and the upper face will be what it is. The pressure washer (the brass washer in this example) will slightly cock on the shaft/through bolt as the faces' parallelness dictates. If that washer has enough vertical dimension and is of a snug enough fit to the shaft the it might hold the shell WRT the average of the two faces' parallelness, not what I would want when wailing on the frame as the shell will tend to move about if the faces are not square to the post and washer. IMO the critical spec is the post's two faces being parallel. Of course if your alignment checking method doesn't use the shell at all this doesn't matter. Andy
Comments in general- My surface plate (2'x3' cast steel) is 38" off the floor and with my 5' 6" height it's as high as I would want. I feel that the efforts to establish the post to reference the shell's axis are a lost cause. With the clamping pressure needed for secure holding the shell will be pretty much trapped by it's faces, the lower face will settle flat on the post and the upper face will be what it is. The pressure washer (the brass washer in this example) will slightly cock on the shaft/through bolt as the faces' parallelness dictates. If that washer has enough vertical dimension and is of a snug enough fit to the shaft the it might hold the shell WRT the average of the two faces' parallelness, not what I would want when wailing on the frame as the shell will tend to move about if the faces are not square to the post and washer. IMO the critical spec is the post's two faces being parallel. Of course if your alignment checking method doesn't use the shell at all this doesn't matter. Andy
01-19-20, 07:11 PM
#9
Senior Member
Join Date: Feb 2012
Location: Rochester, NY
Posts: 18,075
Bikes: Stewart S&S coupled sport tourer, Stewart Sunday light, Stewart Commuting, Stewart Touring, Co Motion Tandem, Stewart 3-Spd, Stewart Track, Fuji Finest, Mongoose Tomac ATB, GT Bravado ATB, JCP Folder, Stewart 650B ATB
Mentioned: 0 Post(s)
Tagged: 0 Thread(s)
Quoted: 4201 Post(s)
Liked 3,859 Times
in
2,307 Posts
I use both the BB post supported method and the head tube one depending on what's going on.
With the BB post method I do record the slope (referenced to the flat surface) over a set distance of the ST then aim for this same slope on the HT. So both tubes are parallel (or as close as we can get them). This method allows the BB to be slightly off axis and still deal with the tracking alignment while the frame is held securely enough to do any whipping to the frame.
The HT held method has a set of stand offs on the surface plate which support a through the HT rod, the HT being located with a cone on both ends. Then the ST is supported by an adjustable (machinist's jack screw) at about it's mid point and at a center height equal to the HT. This removes the BB from any influence and for mere checking of tracking alignment I think this is a better/more straightforward way. But the HT isn't held solidly enough for any corrective forces to be applied. So back to the post for the whipping/correcting. I first heard this method referred to as the Bontrager method, not sure if Keith did come up with it or was the first in this interweb time to be known for it.
This thread shows what I'm talking about. https://www.bikeforums.net/framebuil...-question.html Andy
__________________
AndrewRStewart
AndrewRStewart
Likes For Andrew R Stewart:
01-21-20, 06:37 PM
#10
Senior Member
Join Date: Aug 2012
Location: Seattle
Posts: 507
Mentioned: 0 Post(s)
Tagged: 0 Thread(s)
Quoted: 103 Post(s)
Liked 144 Times
in
88 Posts
That's nicely done! A couple things that come to mind:
1- a top nut that has handles is nice as you can hold the frame with one hand and give the handle a swing and the weight will carry it down the threads. The nut you have will require a separate wrench which is inconvenient. I'm sure you can whip something up with your lathe!
2- the relieved threads at the top of the post is well thought out so the nut doesn't fall off every time you take it off. The nut will disengage the threads but remain seated on the post until you remove it. Nice touch!
You may find the extra steel washer at the top is inconvenient as well. Any extra part you have to get on there is another chance to drop something!
__________________
https://www.flickr.com/photos/54319503@N05/
https://www.draper-cycles.com
https://www.flickr.com/photos/54319503@N05/
https://www.draper-cycles.com
01-21-20, 08:08 PM
#11
Newbie
Thread Starter
I use both the BB post supported method and the head tube one depending on what's going on.
With the BB post method I do record the slope (referenced to the flat surface) over a set distance of the ST then aim for this same slope on the HT. So both tubes are parallel (or as close as we can get them). This method allows the BB to be slightly off axis and still deal with the tracking alignment while the frame is held securely enough to do any whipping to the frame.
The HT held method has a set of stand offs on the surface plate which support a through the HT rod, the HT being located with a cone on both ends. Then the ST is supported by an adjustable (machinist's jack screw) at about it's mid point and at a center height equal to the HT. This removes the BB from any influence and for mere checking of tracking alignment I think this is a better/more straightforward way. But the HT isn't held solidly enough for any corrective forces to be applied. So back to the post for the whipping/correcting. I first heard this method referred to as the Bontrager method, not sure if Keith did come up with it or was the first in this interweb time to be known for it.
This thread shows what I'm talking about. https://www.bikeforums.net/framebuil...-question.html Andy
With the BB post method I do record the slope (referenced to the flat surface) over a set distance of the ST then aim for this same slope on the HT. So both tubes are parallel (or as close as we can get them). This method allows the BB to be slightly off axis and still deal with the tracking alignment while the frame is held securely enough to do any whipping to the frame.
The HT held method has a set of stand offs on the surface plate which support a through the HT rod, the HT being located with a cone on both ends. Then the ST is supported by an adjustable (machinist's jack screw) at about it's mid point and at a center height equal to the HT. This removes the BB from any influence and for mere checking of tracking alignment I think this is a better/more straightforward way. But the HT isn't held solidly enough for any corrective forces to be applied. So back to the post for the whipping/correcting. I first heard this method referred to as the Bontrager method, not sure if Keith did come up with it or was the first in this interweb time to be known for it.
This thread shows what I'm talking about. https://www.bikeforums.net/framebuil...-question.html Andy
Thanks so much for sharing your process on checking alignment, I plan on going for perfect alignment on the next one.
01-22-20, 02:54 PM
#12
Newbie
Thread Starter
That's nicely done! A couple things that come to mind:
1- a top nut that has handles is nice as you can hold the frame with one hand and give the handle a swing and the weight will carry it down the threads. The nut you have will require a separate wrench which is inconvenient. I'm sure you can whip something up with your lathe!
2- the relieved threads at the top of the post is well thought out so the nut doesn't fall off every time you take it off. The nut will disengage the threads but remain seated on the post until you remove it. Nice touch!
You may find the extra steel washer at the top is inconvenient as well. Any extra part you have to get on there is another chance to drop something!
1- a top nut that has handles is nice as you can hold the frame with one hand and give the handle a swing and the weight will carry it down the threads. The nut you have will require a separate wrench which is inconvenient. I'm sure you can whip something up with your lathe!
2- the relieved threads at the top of the post is well thought out so the nut doesn't fall off every time you take it off. The nut will disengage the threads but remain seated on the post until you remove it. Nice touch!
You may find the extra steel washer at the top is inconvenient as well. Any extra part you have to get on there is another chance to drop something!
I agree that having the extra washer on top is clunky. I don’t plan on using the post with all of the washers. I made the stainless washer to be used without the brass washer if the occasion arises.
