


Make your own fitting bike
 01-21-21, 08:18 AM
#1

framebuilder
Thread Starter
Make your own fitting bike
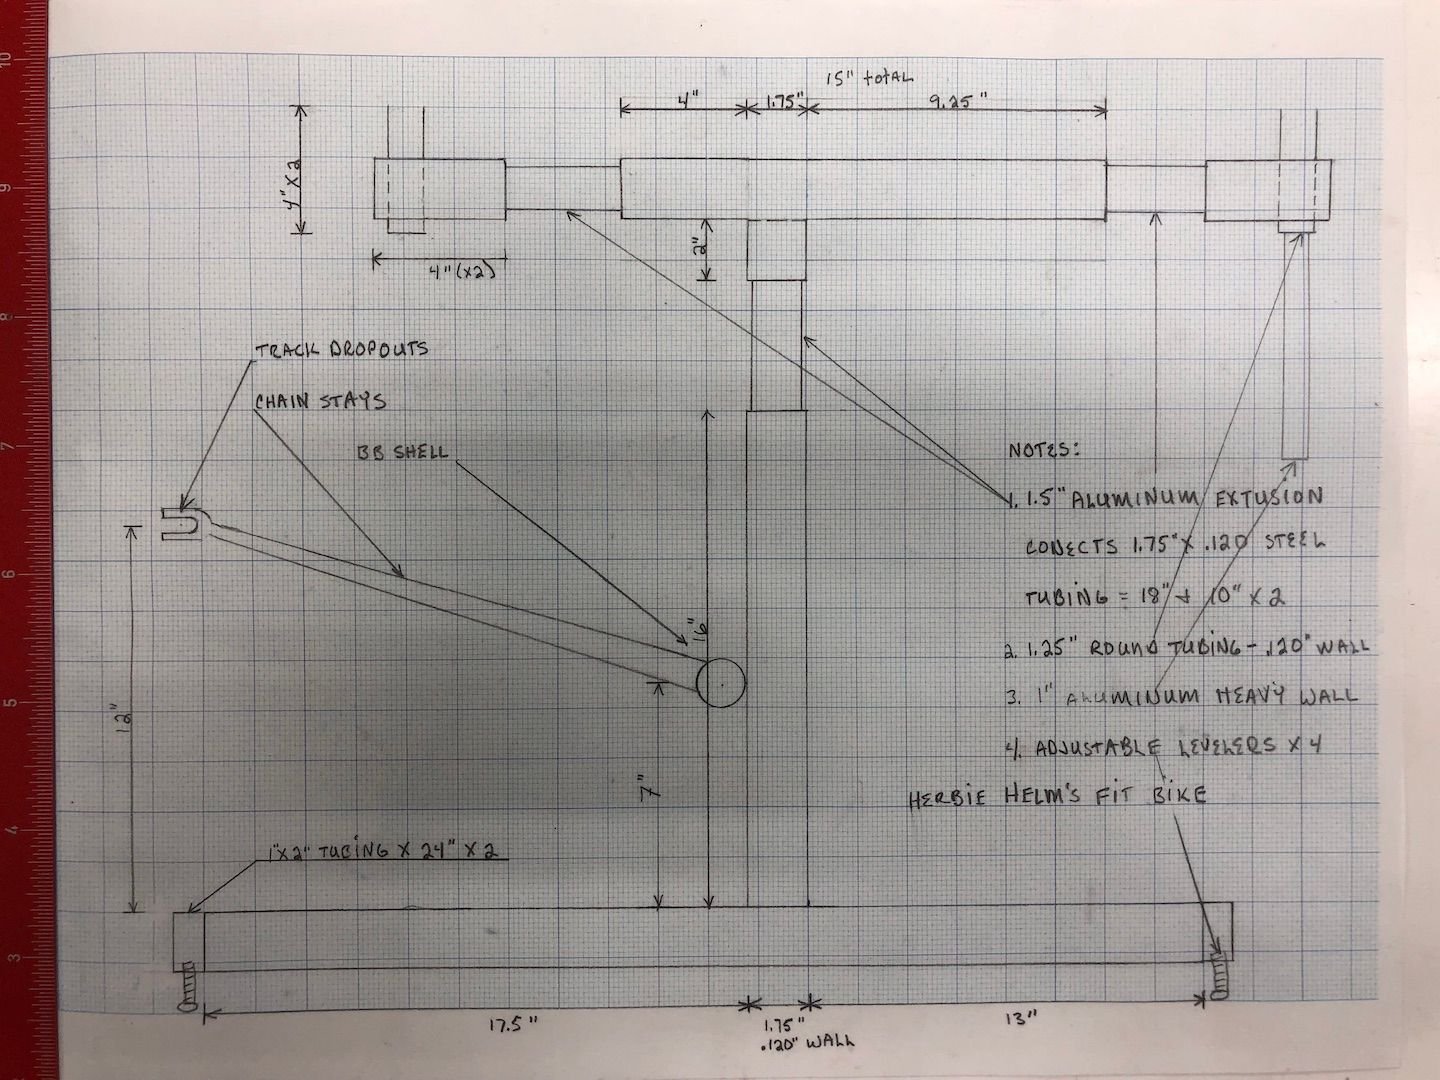
The purpose of this subject thread is to post a design of a stationary fitting bike that someone can make in case they don’t have something like that now. Commercial ones are cooler and easier to use but too expensive for many of us to afford. I drew these plans for a random amateur builder that spotted mine in a photo about something else and contacted me out of blue. Now I'll share the drawing with you guys. Just to be clear Herbie Helm created the fitting bike and all I did was make a drawing of it. Here it is.
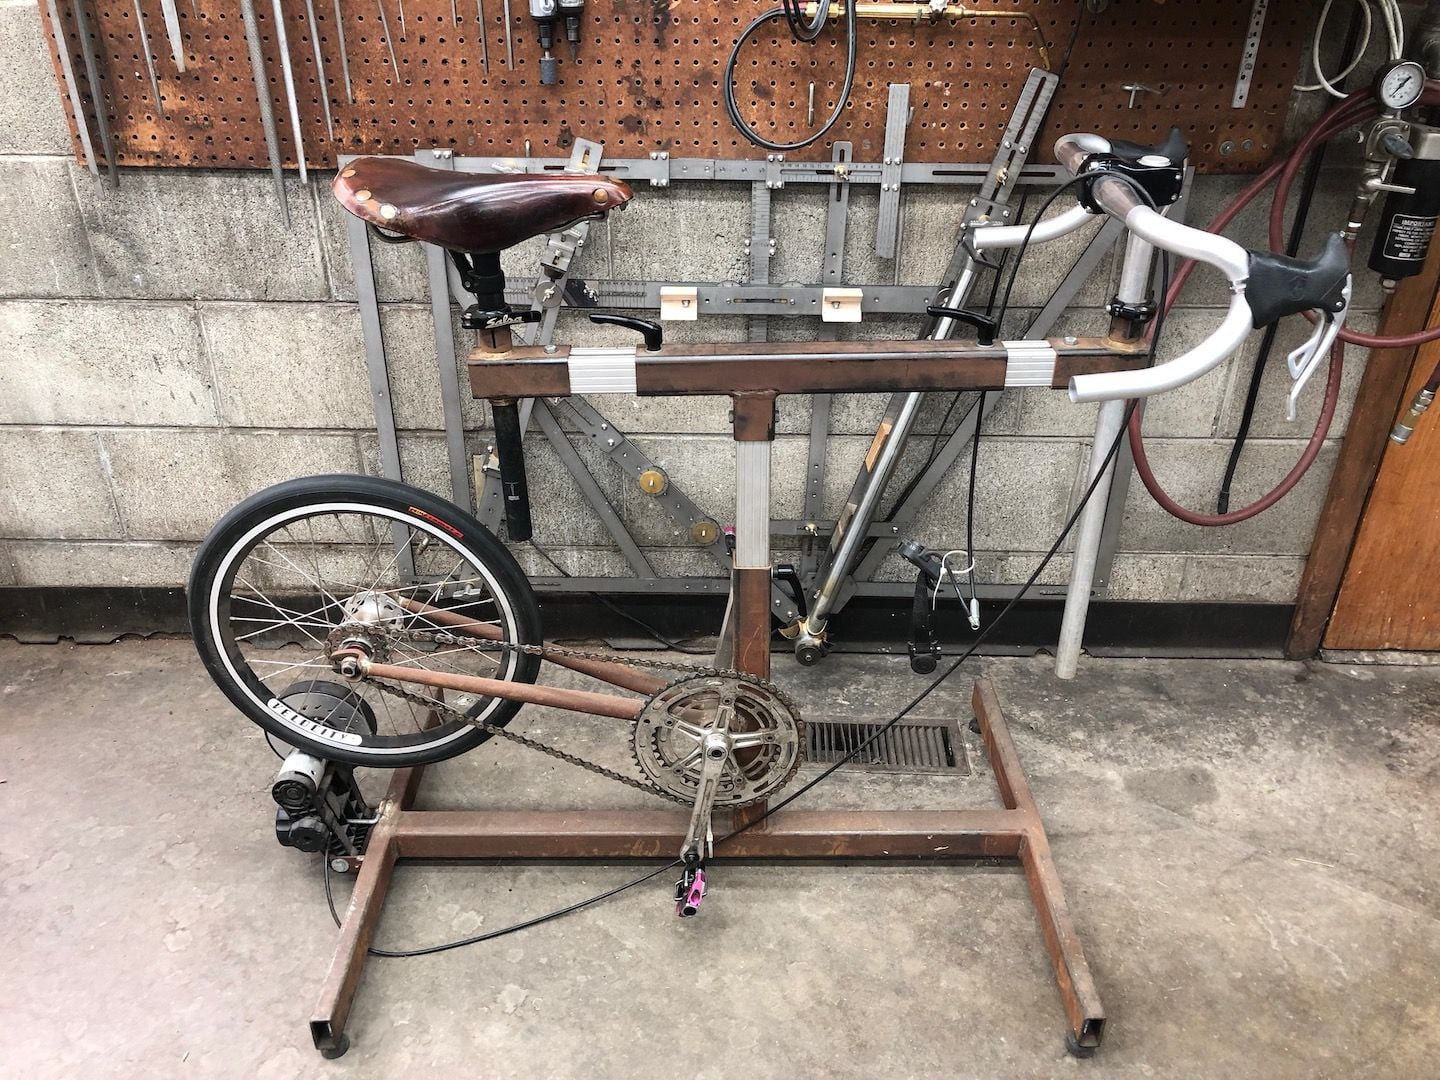
I use 2 primary tools to design a frame. The 1st is a stationary fitting bike to establish or tweak a rider’s position. The 2nd is my Ukrainian stainless steel laser cut and etched frame fixture that can convert the rider’s seat, handlebar and pedal relationship into a frame design. I can place the chosen seat and stem on this fixture and adjust the pieces that represent the frame’s tubes to line up with those components. Body measurements can be helpful (especially when starting) but are secondary to the seat/handlebar/BB relationship. This method also allows me to look at my design life size and make sure everything looks proportional. The same fixture holds the tubes while I spot the front triangle together.
I should preference my comments by saying that my most likely steel frame customers or framebuilding class students are fit recreational cyclists. Racers ride carbon bicycles. When I first started building frames, I discovered that 2 people with similar body measurements can sit quite differently on a bicycle. Experience has shown that a simplified fitting bike can find the cycling position for a normal cyclist fairly easily. Bells and whistles can help and make the process more fun and entertaining but are not necessary to achieve a solid basic fit.
Searching for the best fit involves biomechanical efficiency as well as aerodynamics and comfort. These 3 factors are often in tension with each other. Those seeking a competitive advantage will pay more attention to the first two. The rest of us that just want to enjoy cycling will place more emphasis on the later – which is easy enough to discover on a fitting bike without the need for power meters and wind tunnels. One of the challenges of course is that a good fit is not 3 exact points in space but rather 3 bigger diameter cycles that change as we get fitter or fatter or age.

Likes For Doug Fattic:
01-21-21, 09:22 AM
#2
Newbie
Very cool, what a clever idea with the aluminum extrusion to add saddle setback and TT length. Maybe one day I will try my hand at making one of these, thank you for sharing.
01-21-21, 10:14 AM
#3
Team Beer
Join Date: Apr 2004
Location: Sacramento CA
Posts: 6,339
Bikes: Too Many
Mentioned: 3 Post(s)
Tagged: 0 Thread(s)
Quoted: 114 Post(s)
Liked 159 Times
in
104 Posts
Very cool Doug. Thanks for doing the drawing.
__________________
I'm not one for fawning over bicycles, but I do believe that our bikes communicate with us, and what this bike is saying is, "You're an idiot." BikeSnobNYC
I'm not one for fawning over bicycles, but I do believe that our bikes communicate with us, and what this bike is saying is, "You're an idiot." BikeSnobNYC
01-21-21, 04:15 PM
#4


Randomhead
Join Date: Aug 2008
Location: Happy Valley, Pennsylvania
Posts: 24,383
Mentioned: 0 Post(s)
Tagged: 0 Thread(s)
Quoted: 4 Post(s)
Liked 3,684 Times
in
2,508 Posts
Thanks for sharing Doug. Call it synchronicity, but I was just looking at the Kickr training bike trying to decide if I should make something like this.
 01-26-21, 01:41 PM
#7
Clark W. Griswold
Join Date: Mar 2014
Location: ,location, location
Posts: 13,442
Bikes: Foundry Chilkoot Ti W/Ultegra Di2, Salsa Timberjack Ti, Cinelli Mash Work RandoCross Fun Time Machine, 1x9 XT Parts Hybrid, Co-Motion Cascadia, Specialized Langster, Phil Wood Apple VeloXS Frame (w/DA 7400), R+M Supercharger2 Rohloff, Habanero Ti 26
Mentioned: 54 Post(s)
Tagged: 0 Thread(s)
Quoted: 4322 Post(s)
Liked 3,943 Times
in
2,636 Posts
Dude, rookie mistake...YOUR STEM IS BACKWARDS
This is pretty cool actually and nicely made.
This is pretty cool actually and nicely made.
02-03-21, 01:56 PM
#8
Newbie
Join Date: Dec 2016
Posts: 8
Mentioned: 0 Post(s)
Tagged: 0 Thread(s)
Quoted: 1 Post(s)
Likes: 0
Liked 4 Times
in
3 Posts
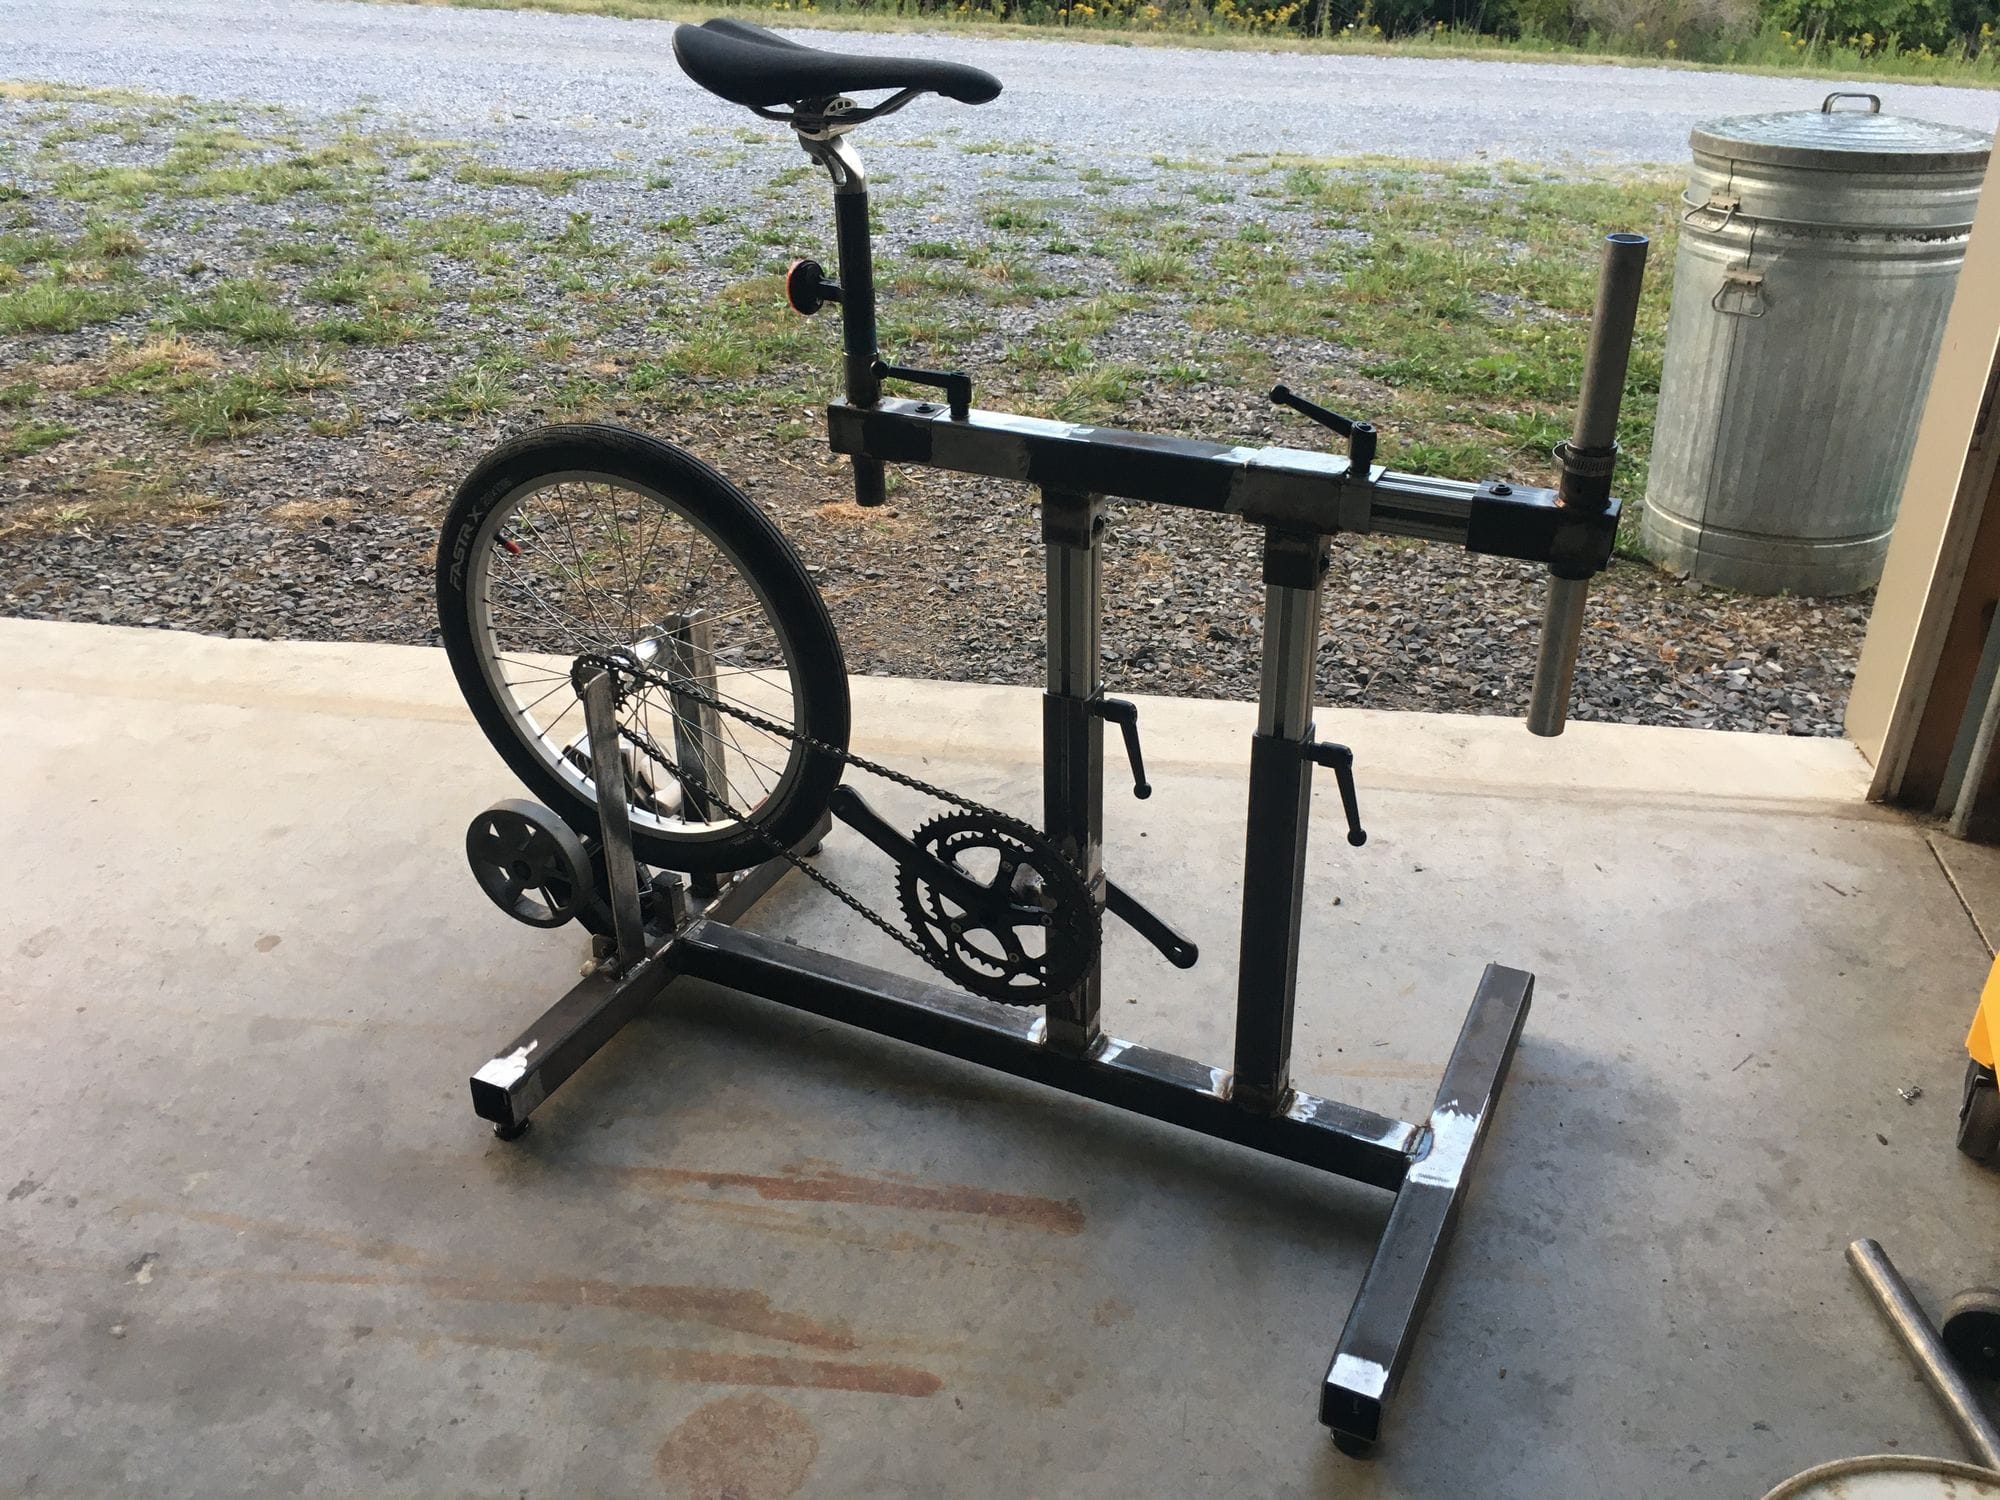
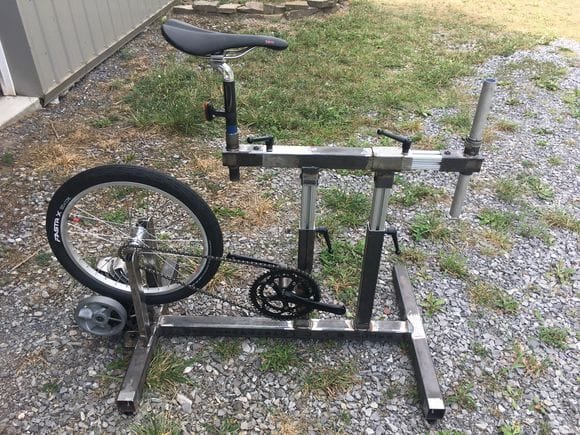
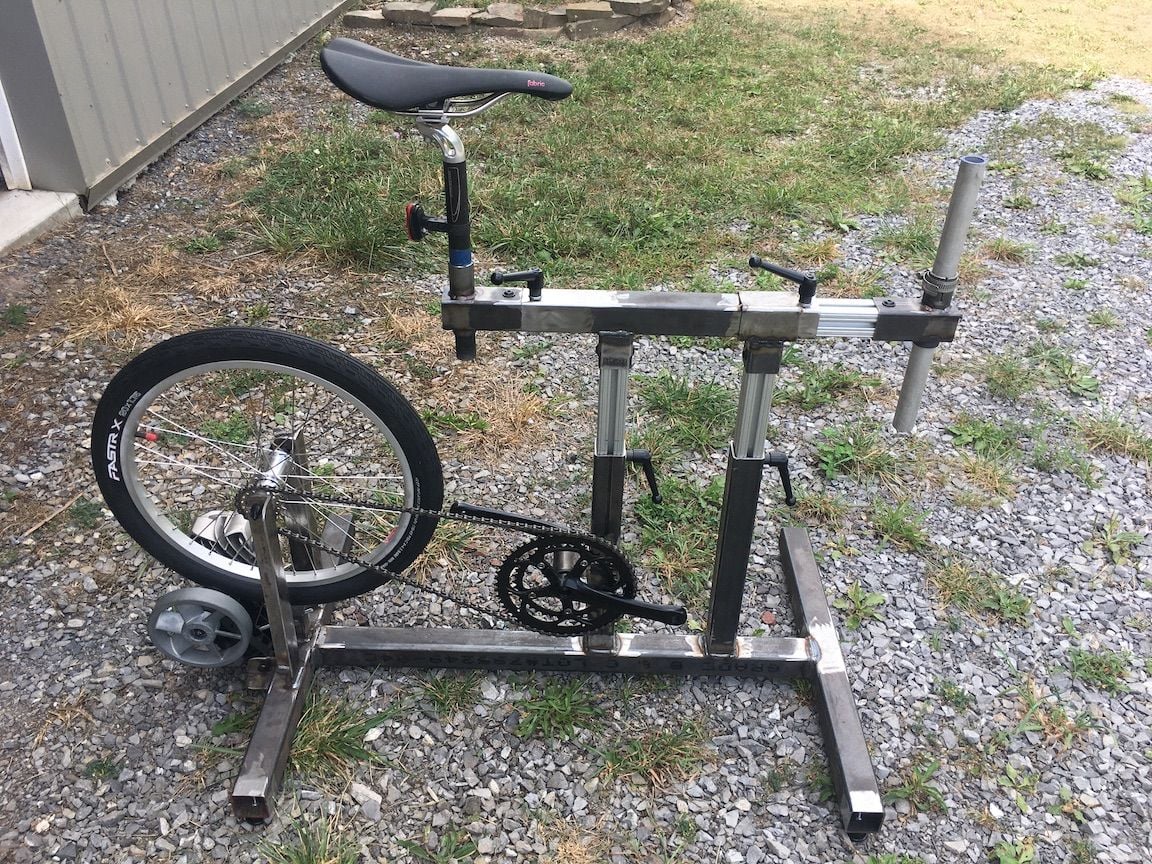
I am the random amateur builder! I had seen Doug's fit bike in a handful of his pictures and always had it in the back of my mind that it would be fun to build one. I got a smart trainer a couple of years ago and my old cyclops trainer was just sitting there. I contacted Doug about his fit bike and he very generously answered many of my questions and even drew up the plan he has shared here. It was a great project! The only significant change I made was to make two vertical supports. This was based on input from Doug indicating the original design allows a little fore/aft movement. I am not allowed to post pictures to the forum yet (less than 10 posts) but would share with anyone else that might want to see them or could post them for me. Thanks, Doug, for all of the information you generously share with the hobby builder world!
Likes For Danielvetpath:
02-03-21, 02:26 PM
#9
Randomhead
Join Date: Aug 2008
Location: Happy Valley, Pennsylvania
Posts: 24,383
Mentioned: 0 Post(s)
Tagged: 0 Thread(s)
Quoted: 4 Post(s)
Liked 3,684 Times
in
2,508 Posts
Welcome to the forum. You can put your pictures in an album in your gallery and we can rescue them.
Likes For Danielvetpath:
02-03-21, 09:05 PM
#11
Randomhead
Join Date: Aug 2008
Location: Happy Valley, Pennsylvania
Posts: 24,383
Mentioned: 0 Post(s)
Tagged: 0 Thread(s)
Quoted: 4 Post(s)
Liked 3,684 Times
in
2,508 Posts
Looks nice, thanks for posting those
02-03-21, 09:40 PM
#12
framebuilder
Thread Starter
Pic assist. This is the fitting bike Daniel made. Good job! Hopefully others can follow his example. Of course it would be way cooler to have something like an expensive Retul, but mine works just fine and is effective. The only problem is that a ritzy customer might expect something that looks more elaborate. Once the XYs are established on a fitting bike, that can form the basis to create the frame design. I consider some version of one of these a foundation tool for anybody making frames for regular people not trying to race.

02-04-21, 10:23 AM
#13
Newbie
Join Date: Dec 2016
Posts: 8
Mentioned: 0 Post(s)
Tagged: 0 Thread(s)
Quoted: 1 Post(s)
Likes: 0
Liked 4 Times
in
3 Posts
Thanks for posting folks! Although I have only used it for my own purposes a little bit so far, I find the ease of use and straightforward measurements great . Also, if get around to a little paint it would look much better. I like that I can throw straight, swept, drop bars, etc on it with ease. I like working up something in Bikecad and trying it out on the fit bike or vice versa to see how things look and feel.
Likes For Danielvetpath:
02-04-21, 09:08 PM
#14
Randomhead
Join Date: Aug 2008
Location: Happy Valley, Pennsylvania
Posts: 24,383
Mentioned: 0 Post(s)
Tagged: 0 Thread(s)
Quoted: 4 Post(s)
Liked 3,684 Times
in
2,508 Posts
I think I would get it powder coated
02-14-21, 09:45 AM
#15

Senior Member
Doug, are you or Herbie still building frames? I'm in the category you're talking about, if we treat fitness an aspirational concept! I would be happy with a bike that has well-considered contact location circles, where I could set up to ride to improve my fitness and make adjustments as I (finally!) achieve some decent fitness.
Likes For Road Fan:
02-14-21, 09:47 AM
#16
Senior Member
02-15-21, 11:09 AM
#17
framebuilder
Thread Starter
Doug, are you or Herbie still building frames? I'm in the category you're talking about, if we treat fitness an aspirational concept! I would be happy with a bike that has well-considered contact location circles, where I could set up to ride to improve my fitness and make adjustments as I (finally!) achieve some decent fitness.
So that leaves little time left over to make a frame for a customer that can't have a solid fixed delivery date. What I have done for some that don't want to make a hobby or business building frames, is that when they take my class, I do more of the difficult parts so they don't have to practice brazing. And we can use light heat treated tubing. That way they can get a true custom made frame based off of a refined fitting. What I have discovered is that most fit recreational cyclists (not interested in competitions or group training rides) need a more relaxed seat angle (like 71� or 72�) to balance their weight over the pedals.
Likes For Doug Fattic:
02-15-21, 11:42 AM
#18
Senior Member
Join Date: Dec 2019
Posts: 953
Mentioned: 3 Post(s)
Tagged: 0 Thread(s)
Quoted: 321 Post(s)
Liked 261 Times
in
212 Posts
I've been thinking a lot about ST angle and have come to the conclusion that a more upright position (which is usually what the less "serious" rider is more comfortable with) is better with a slacker seat angle.
It makes sense really because you're just rotating the whole rider backwards. It also makes it easier to put your foot down and means a plushy seat won't get in the way of your legs.
I may have a taker for a fairly upright bike with almost opafiets-like geometry so I'm starting by making a fitting bike according to the design in this thread (although it will be all-steel with no aluminium) to try out some ideas. I'll post some pictures once it starts coming together.
02-15-21, 12:37 PM
#19
framebuilder
Thread Starter
One of my students that eventually went on to start his own framebuilding business found out about how he fit better with a shallow seat angle (71�) because he had somehow gotten an old British "path racer" frame from the late 40's or 50's. That frame had a 71� seat angle with a 73� head angle.
The reason 73� became the standard is because of toe overlap problems as well as the desire to buy a "go fast" bike. Production company lawyers reinforce the need to avoid toe overlap. When a rider that no longer has 3% body fat and likes to sit more comfortably upright (for example with road handlebars around the same height as the seat), their butt has to go back so their weight is more balanced over their pedals. This of course pushes the saddle back with the resulting need of a shallower seat angle.
A fitting bike is one way to discover where the right weight balance is on a bike for a recreational cyclist (that still may do lots of miles). This tool helps design a custom frame that better serves the requirements of a person that can afford a custom. It is why I started this post. It is quite possible that a carbon bike with its 73� or more seat angle won't best serve their needs. Also some women require a higher handlebar position to take pressure off of their crotch. And of course as their handlebars go up, their seat needs to go back.
Likes For Doug Fattic:
02-15-21, 01:35 PM
#20
Senior Member
Join Date: Oct 2014
Location: Portland, OR
Posts: 12,878
Bikes: (2) ti TiCycles, 2007 w/ triple and 2011 fixed, 1979 Peter Mooney, ~1983 Trek 420 now fixed and ~1973 Raleigh Carlton Competition gravel grinder
Mentioned: 129 Post(s)
Tagged: 0 Thread(s)
Quoted: 4782 Post(s)
Liked 3,899 Times
in
2,536 Posts
Good move! TiCycles has an old Serotta(?) that once looked nice but is so used it is no more impressive now than the photos above! Powder coat would look far better now.
I do something on my CAD drawings that could be done physically here but would require another full freedom of movement. My approach is to base all my frames, owned or projected on a drawing with the BB as the origin. (Each frame/bike gets its own layer that I can turn off.) I make a triangle of the BB, seat and handlebars. That triangle varies little from bike to bike but I rotate it depending on whether it is more of a cruiser, road or fix gear.
I also place my handlebars on a sloped line with a "slope" of 2 cms horizontal and 1 cm in line with the steerer. That line is very close to the arc of my hand as I swing my arm. Bars on that line do not change my shoulder position (within a reasonable distance). I can accommodate about 6 mm of horizontal stem length by altering the headtube/stem height. Using this, I converted my poorly fitting commuter to a dream with a 180 stem to get what I had wit my race bike at 130. Had my custom built around a 120 simply because 120s are easy to get and we all know both God and Eddy ride 120s. Fix gear was designed around 130 though I ended up with different bars and a 135.
Yes, I am aware I should rotate that 1:2 line as I rotate the triangle. I don't. 1:2 is just too neat and easy plus the error is second order and very easily remedied on the road with a 6 mm Allen. (Quills rule!)
I'll never cut the tubes or fire up a torch. That's for others, But I love tinkering with the design in CAD and now have two bikes built to those drawings by TiCyles. First does have speed wobble issues, getting worse as I age and lose strength and confidence. I take full "credit" for that. I was quite specific on what the front end geometry was to be. And I got the fit and steering I love and can ride very long distances on.
02-15-21, 01:56 PM
#21
Senior Member
Join Date: Oct 2014
Location: Portland, OR
Posts: 12,878
Bikes: (2) ti TiCycles, 2007 w/ triple and 2011 fixed, 1979 Peter Mooney, ~1983 Trek 420 now fixed and ~1973 Raleigh Carlton Competition gravel grinder
Mentioned: 129 Post(s)
Tagged: 0 Thread(s)
Quoted: 4782 Post(s)
Liked 3,899 Times
in
2,536 Posts
Seat tube angles. I weighed by bike and me a few years ago and established where my center of gravity is relative to the bottom bracket. Compared that to my old racing bike with handling I loved. (Nearly all the bikes I've owned since are light in the back end and scary on mountain corners on poor pavement. That race bike was rock solid.)
This gave me the ideal weight percentage for the front and rear wheels. For good riding frames, I need both wheels forward. I also like shorter wheelbase frames for their feel; always have. So, short chainstays. If I keep the seat tube straight, this means very close tire-seat tube clearance of a steep seat tube angle. I haven't gone curved yet so i have a bunch of bikes with steep (74 and 75) angles and big setback custom posts. Odd, expensive, but the ride is there, the fit is there! I love it (though I'm talking curved post if I do another).
I had my Mooney built after my head injury as a do-everything bike that would never see a racing number. Peter put long chainstays on it for pannier clearance. Biggest complaint (that I kept quiet about to Peter) was the light rear end. Until - I set the bike up fix gear. Now that marginal mountain corner speed is impossible. Pedal strike happens first! Absolutely love the ride now! Love that I spec'd horizontal dropouts - just so I could. (The bike has done everything over its 41 years. Fast club rides, tours, gravel (before it was "'gravel", very long days ...)
Likes For 79pmooney:
02-16-21, 09:56 AM
#22
framebuilder
Thread Starter
Custom frame design is always a collection of compromises with the rider's primary needs trumping other factors that may be desirable but are in conflict. For example stem length vs toe overlap. Most designs are based on good bicycle handling characteristics for a go fast fit cyclist. Lots of studies have refined both fit and handling to improve their competitiveness.. However for some people age or outside of the norm body dimensions and perhaps injury have taken their toll and what might work best when they were younger in a fast pace line will no longer fit them comfortably when they are getting some miles to try and stay at least a little bit fit. These adjustments from prefect have to be made. It is the great advantage of a custom frame (besides making it beautiful).
One of the possible fit adjustments as factors move us away from the ideal is the need to raise the handlebars. Even young urban riders may like them higher than what would make them go the fastest so they can keep an eye out for coming up traffic signs or parked drivers opening their doors. As the handlebars are raised, that results in the need for the seat to go back. A fitting bike can better allow the builder to assess the rider's position. Of particular importance is sliding the saddle back just far enough to take the weight off his hands on his brifters. When the goal is no longer trying to stay with the fast group or to shave another second to two off of your riding circuit, it just makes sense to be as comfortable as possible.
Experience has shown me that this fitting bike is good enough to accurately establish a position within a centimeter or so. Of course it isn't as good as riding a real bike on the road nor as sexy as using a computer to activate server motors that move the seat and handlebars. But it gets the job done. And can often show that a standard production bicycle is not optimum for the newly discovered position. Lots of my customers and students have said they like their bike position just fine but after a fitting and new frame designed around their new position, they most often say: "oh this is better!".
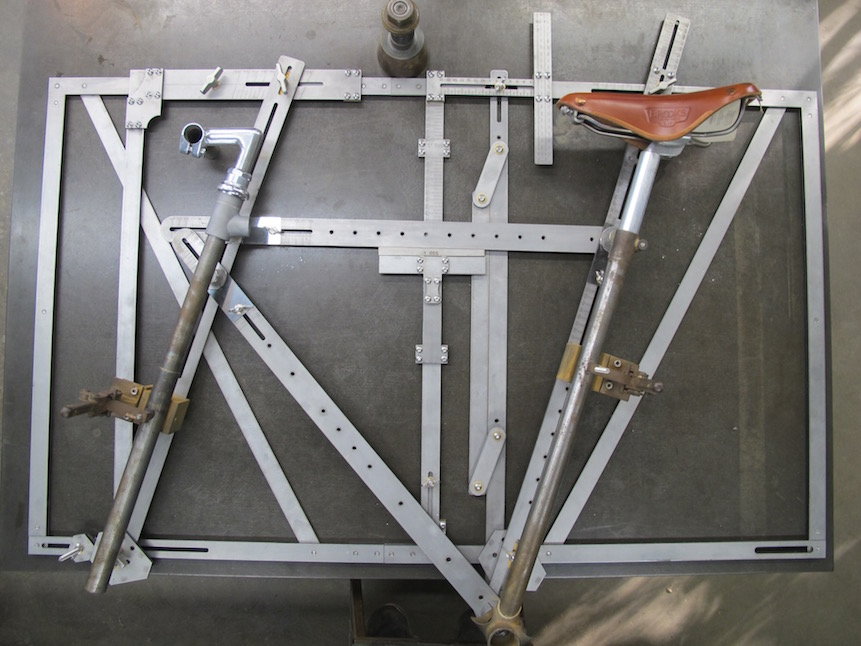
Of course finding a rider's position is only part of the battle. The frame now needs to be designed around that position. It isn't the purpose of this thread to explain about how my fixture helps me design a frame but I'll give you a brief description so you can understand my process. I've spent hundreds/thousands of hours over many years with the help of others designing a fixture to help me convert a bicycle position into a frame design. I have them laser cut and etched out of stainless steel in Ukraine. I don't go out of my way to sell them although I'm sure the company that makes them wishes I did. On the fixture I place the chosen stem and saddle/seatpost in the rider's position and slide the pieces that represent the frame tubes to match those components. During this process, I make the choices that fit the needs of the rider. it is particularly important to me that everything looks proportional so I can, for example, micro adjust the head tube height so there aren't too many spacers or quill stem exposed.
Here is a picture of the fixture holding the stem/saddle to help create a frame design. It's an older version without all of its accessories. It is just for showing how I do a frame design.
One of the possible fit adjustments as factors move us away from the ideal is the need to raise the handlebars. Even young urban riders may like them higher than what would make them go the fastest so they can keep an eye out for coming up traffic signs or parked drivers opening their doors. As the handlebars are raised, that results in the need for the seat to go back. A fitting bike can better allow the builder to assess the rider's position. Of particular importance is sliding the saddle back just far enough to take the weight off his hands on his brifters. When the goal is no longer trying to stay with the fast group or to shave another second to two off of your riding circuit, it just makes sense to be as comfortable as possible.
Experience has shown me that this fitting bike is good enough to accurately establish a position within a centimeter or so. Of course it isn't as good as riding a real bike on the road nor as sexy as using a computer to activate server motors that move the seat and handlebars. But it gets the job done. And can often show that a standard production bicycle is not optimum for the newly discovered position. Lots of my customers and students have said they like their bike position just fine but after a fitting and new frame designed around their new position, they most often say: "oh this is better!".
Of course finding a rider's position is only part of the battle. The frame now needs to be designed around that position. It isn't the purpose of this thread to explain about how my fixture helps me design a frame but I'll give you a brief description so you can understand my process. I've spent hundreds/thousands of hours over many years with the help of others designing a fixture to help me convert a bicycle position into a frame design. I have them laser cut and etched out of stainless steel in Ukraine. I don't go out of my way to sell them although I'm sure the company that makes them wishes I did. On the fixture I place the chosen stem and saddle/seatpost in the rider's position and slide the pieces that represent the frame tubes to match those components. During this process, I make the choices that fit the needs of the rider. it is particularly important to me that everything looks proportional so I can, for example, micro adjust the head tube height so there aren't too many spacers or quill stem exposed.
Here is a picture of the fixture holding the stem/saddle to help create a frame design. It's an older version without all of its accessories. It is just for showing how I do a frame design.
Last edited by Doug Fattic; 02-16-21 at 10:01 AM.
Likes For Doug Fattic:
02-16-21, 02:40 PM
#23
Senior Member
Join Date: Dec 2019
Posts: 953
Mentioned: 3 Post(s)
Tagged: 0 Thread(s)
Quoted: 321 Post(s)
Liked 261 Times
in
212 Posts
On the original diagram it says '18" + 10" x 2' for the aluminium extrusion. Presumably the two pieces at the top are 10" and the vertical piece is 18"?
02-16-21, 04:16 PM
#24
framebuilder
Thread Starter
I have an old Look fit bike made out of all square steel tubing. What they did to hold the 2 telescoping square pieces together in a certain place was to put a stop bolt at a 45� angle on the bigger tube so the end of the screw was hitting the corner of the smaller tube so it didn't mar or yuck up the flat sections.
Likes For Doug Fattic:
02-16-21, 04:28 PM
#25
Senior Member
Join Date: Dec 2019
Posts: 953
Mentioned: 3 Post(s)
Tagged: 0 Thread(s)
Quoted: 321 Post(s)
Liked 261 Times
in
212 Posts
I have an old Look fit bike made out of all square steel tubing. What they did to hold the 2 telescoping square pieces together in a certain place was to put a stop bolt at a 45� angle on the bigger tube so the end of the screw was hitting the corner of the smaller tube so it didn't mar or yuck up the flat sections.
I have also acquired an old steel junker for �10 which is going to donate its BB shell, chainstays, seat and handlebar.
Thanks for confirming the dimensions!

