Installing tubulars today for the first time. Please advise.
 01-24-24, 02:43 PM
#26
Ride, Wrench, Swap, Race

Join Date: Jan 2010
Location: Northern California
Posts: 9,194
Bikes: Cheltenham-Pedersen racer, Boulder F/S Paris-Roubaix, Varsity racer, '52 Christophe, '62 Continental, '92 Merckx, '75 Limongi, '76 Presto, '72 Gitane SC, '71 Schwinn SS, etc.
Mentioned: 132 Post(s)
Tagged: 0 Thread(s)
Quoted: 1565 Post(s)
Liked 1,296 Times
in
866 Posts
 01-24-24, 03:19 PM
#27
Senior Member
Join Date: Oct 2008
Location: Northern NY...Brownville
Posts: 2,574
Bikes: Specialized Aethos, Specialized Diverge Comp E5
Mentioned: 2 Post(s)
Tagged: 0 Thread(s)
Quoted: 242 Post(s)
Liked 455 Times
in
266 Posts
Sewups give the most amazing ride...so supple, so sure footed...such a f'ing pain in the arse to repair when you puncture a brand new Vittoria Corsa CX...lol I don't even know if they still offer this model but it was my all time favorite to race on...120psi and 21mm in a crit...nothing like it back in the '80's when we knew no better lol.
I tried Continental 250 Sprinters and they were crazy fast but just didn't have the supple feel of the Corsas.
I also had a pair of Vittoria "silk" sewups...my goodness I've never ridden a tire that felt so supple and had the most grip I've ever felt leaning into a fast turn in a crit. But holy moly were they expensive.
I still remember how much fun it was to un-sew the section of tire where I was 'sure' the puncture was only to realize it was ten inches away which meant more cutting, patching then resewing the tire back together and gluing the base tape back on.
I had my "race wheels" for just races and a pair of training wheels which were heavier duty and used a less expensive tire and everyone had a cheap "Swallow" spare sewup under their saddle held in place with a toe clip strap...lol those were the days...
Good luck and enjoy the experience...
01-24-24, 04:50 PM
#28
Time Traveler
Thread Starter

Join Date: Jan 2022
Location: Florida, USA
Posts: 326
Bikes: 1983 Ross Paragon
Mentioned: 0 Post(s)
Tagged: 0 Thread(s)
Quoted: 204 Post(s)
Liked 98 Times
in
51 Posts
Sewups give the most amazing ride...so supple, so sure footed...such a f'ing pain in the arse to repair when you puncture a brand new Vittoria Corsa CX...lol I don't even know if they still offer this model but it was my all time favorite to race on...120psi and 21mm in a crit...nothing like it back in the '80's when we knew no better lol.
I tried Continental 250 Sprinters and they were crazy fast but just didn't have the supple feel of the Corsas.
I also had a pair of Vittoria "silk" sewups...my goodness I've never ridden a tire that felt so supple and had the most grip I've ever felt leaning into a fast turn in a crit. But holy moly were they expensive.
I still remember how much fun it was to un-sew the section of tire where I was 'sure' the puncture was only to realize it was ten inches away which meant more cutting, patching then resewing the tire back together and gluing the base tape back on.
I had my "race wheels" for just races and a pair of training wheels which were heavier duty and used a less expensive tire and everyone had a cheap "Swallow" spare sewup under their saddle held in place with a toe clip strap...lol those were the days...
Good luck and enjoy the experience...
I tried Continental 250 Sprinters and they were crazy fast but just didn't have the supple feel of the Corsas.
I also had a pair of Vittoria "silk" sewups...my goodness I've never ridden a tire that felt so supple and had the most grip I've ever felt leaning into a fast turn in a crit. But holy moly were they expensive.
I still remember how much fun it was to un-sew the section of tire where I was 'sure' the puncture was only to realize it was ten inches away which meant more cutting, patching then resewing the tire back together and gluing the base tape back on.
I had my "race wheels" for just races and a pair of training wheels which were heavier duty and used a less expensive tire and everyone had a cheap "Swallow" spare sewup under their saddle held in place with a toe clip strap...lol those were the days...
Good luck and enjoy the experience...
01-24-24, 05:02 PM
#29

Senior Member

Join Date: Jul 2006
Location: San Jose (Willow Glen) Ca
Posts: 9,847
Bikes: Kirk Custom JK Special, '84 Team Miyata,(dura ace old school) 80?? SR Semi-Pro 600 Arabesque
Mentioned: 106 Post(s)
Tagged: 0 Thread(s)
Quoted: 2338 Post(s)
Liked 2,827 Times
in
1,543 Posts
here is the simplest and easy follow instructions on gluing tubulars that I have found https://www.yellowjersey.org/frontwheel.html
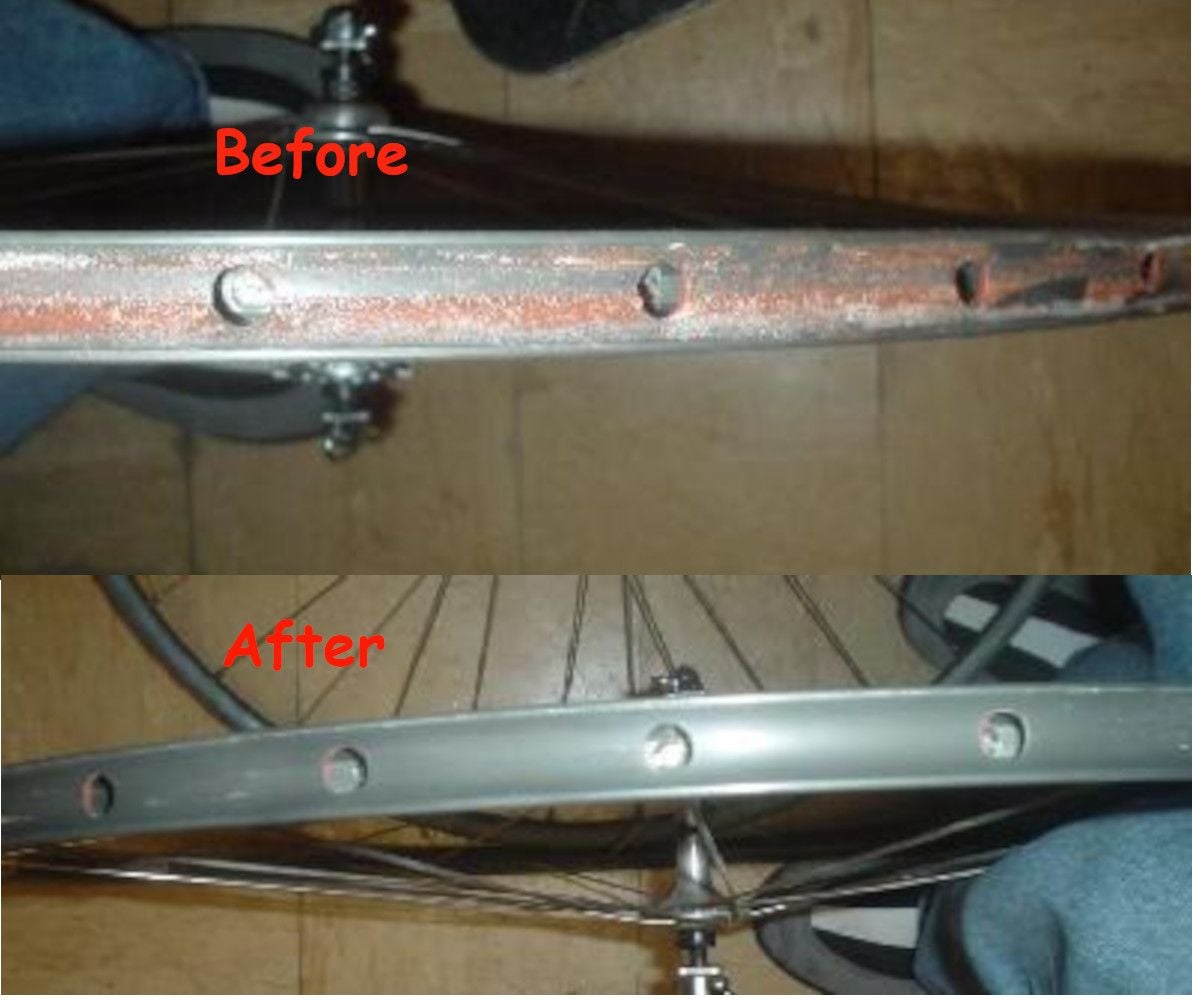
beyond that brass wheel in drill for removing the red glue (wear eye protection)
beyond that brass wheel in drill for removing the red glue (wear eye protection)
__________________
Life is too short not to ride the best bike you have, as much as you can
(looking for Torpado Super light frame/fork or for Raleigh International frame fork 58cm)
Life is too short not to ride the best bike you have, as much as you can
(looking for Torpado Super light frame/fork or for Raleigh International frame fork 58cm)
01-24-24, 05:06 PM
#30

Veteran, Pacifist

Join Date: Dec 2004
Location: Seattle area
Posts: 13,328
Bikes: Bikes??? Thought this was social media?!?
Mentioned: 284 Post(s)
Tagged: 0 Thread(s)
Quoted: 3898 Post(s)
Liked 4,836 Times
in
2,229 Posts
I installed sealant in tubular tires as a precaution, in the past. On about 4 bikes. 3 of the 8 tires developed valve issues. Now I carry the sealant as a roadside repair item. Also have a small supply of spare valve cores.

Tape makes it easier to seat the tubular to avoid lumps/bumps and get the tire centered - over gluing.
A tub of Mastik might prove to be a lifetime supply - unless running 10 or more tubular shod bikes. Mine lasted several years.
__________________
Vintage, modern, e-road. It is a big cycling universe.
Vintage, modern, e-road. It is a big cycling universe.
Last edited by Wildwood; 01-24-24 at 05:13 PM.
 01-24-24, 11:20 PM
#31
Time Traveler
Thread Starter
Join Date: Jan 2022
Location: Florida, USA
Posts: 326
Bikes: 1983 Ross Paragon
Mentioned: 0 Post(s)
Tagged: 0 Thread(s)
Quoted: 204 Post(s)
Liked 98 Times
in
51 Posts
here is the simplest and easy follow instructions on gluing tubulars that I have found https://www.yellowjersey.org/frontwheel.html
beyond that brass wheel in drill for removing the red glue (wear eye protection)
beyond that brass wheel in drill for removing the red glue (wear eye protection)
01-24-24, 11:26 PM
#32
Time Traveler
Thread Starter
Join Date: Jan 2022
Location: Florida, USA
Posts: 326
Bikes: 1983 Ross Paragon
Mentioned: 0 Post(s)
Tagged: 0 Thread(s)
Quoted: 204 Post(s)
Liked 98 Times
in
51 Posts
So today I got as far as dyeing the base tape black so I would have true blackwalls instead of seeing 1/4 " of blonde base tape as my sidewall. It didnt look bad, in fact I rather liked it a lot but it wasnt what I had been envisioning in my mind so I pressed on toward the goal.
I also scraped all the old glue off the rims, sanded them with 220 and wiped them down with mineral spirits.
Tomorrow I was planning to apply the glue to the rim and the base tape and then let it dry 24 hours per intstructions on the can but I just read an article by an expert who seems to do it all at once. Apply glue to base tape and rim, let it setup for 10 minutes and then put the tire on. So not sure what path I will take tomorrow.
I hope the black dye doesnt interfere with the bonding of the base tape to the rim.
I must confess I did take the bike for a short and slow ride with unglued tires today. Looking forward to a successful gluing so I can go full power on tubulars and see what Ive been missing out on all my life.
Then i will continue the restoration of the Nashbar Race SIS and get it ready for the final reveal on this forum.
 01-25-24, 08:09 AM
#34
Senior Member
Join Date: Aug 2010
Location: Utah
Posts: 8,675
Bikes: Paletti,Pinarello Monviso,Duell Vienna,Giordana XL Super,Lemond Maillot Juane.& custom,PDG Paramount,Fuji Opus III,Davidson Impulse,Pashley Guv'nor,Evans,Fishlips,Y-Foil,Softride, Tetra Pro, CAAD8 Optimo,
Mentioned: 156 Post(s)
Tagged: 0 Thread(s)
Quoted: 2324 Post(s)
Liked 4,992 Times
in
1,777 Posts
 01-25-24, 04:00 PM
#35
�Senior� Member
Zip ties used to hold down the tubular on each side of the presta valve stem. Keeps the surfaces in contact during the curing of the cement, if this area won�t pull down and stay put. Not using them full circumference of the wheel.
Even with pulling the tire in place starting at the stem, on each side, this spot seems to not want to settle in completely. YMMV. Just what works for me.
Bill
Even with pulling the tire in place starting at the stem, on each side, this spot seems to not want to settle in completely. YMMV. Just what works for me.
Bill
Mileage varies (;-).
Likes For obuckler:
01-25-24, 06:55 PM
#36
Semper Fi
Join Date: Jan 2008
Posts: 12,942
Mentioned: 89 Post(s)
Tagged: 0 Thread(s)
Quoted: 1172 Post(s)
Liked 358 Times
in
241 Posts
Bill👍
__________________
Semper Fi, USMC, 1975-1977
I Can Do All Things Through Him, Who Gives Me Strength. Philippians 4:13
Semper Fi, USMC, 1975-1977
I Can Do All Things Through Him, Who Gives Me Strength. Philippians 4:13
01-25-24, 07:15 PM
#37
Senior Member
Join Date: Dec 2020
Location: Wake Forest, NC
Posts: 5,794
Bikes: 1989 Cinelli Supercorsa
Mentioned: 11 Post(s)
Tagged: 0 Thread(s)
Quoted: 3513 Post(s)
Liked 2,927 Times
in
1,776 Posts
Honest question from someone who�s never used sew-ups: How are you able to sew the casing back up without puncturing the tube with the needle?
01-25-24, 08:09 PM
#38
Senior Member

Join Date: Feb 2008
Location: Peoria, IL
Posts: 4,476
Mentioned: 86 Post(s)
Tagged: 0 Thread(s)
Quoted: 1829 Post(s)
Liked 3,376 Times
in
1,580 Posts
To be honest, I have more trouble stuffing an inner tube in a clincher while mounting the clincher... but my clinchers fit really tight on my old rims. The tubes in sew-ups tend to be pretty thin and not take up much space.
The other "secret" is to not unstitch much of the sew-up. You only need just enough of a gap to pull the tube out and patch it.
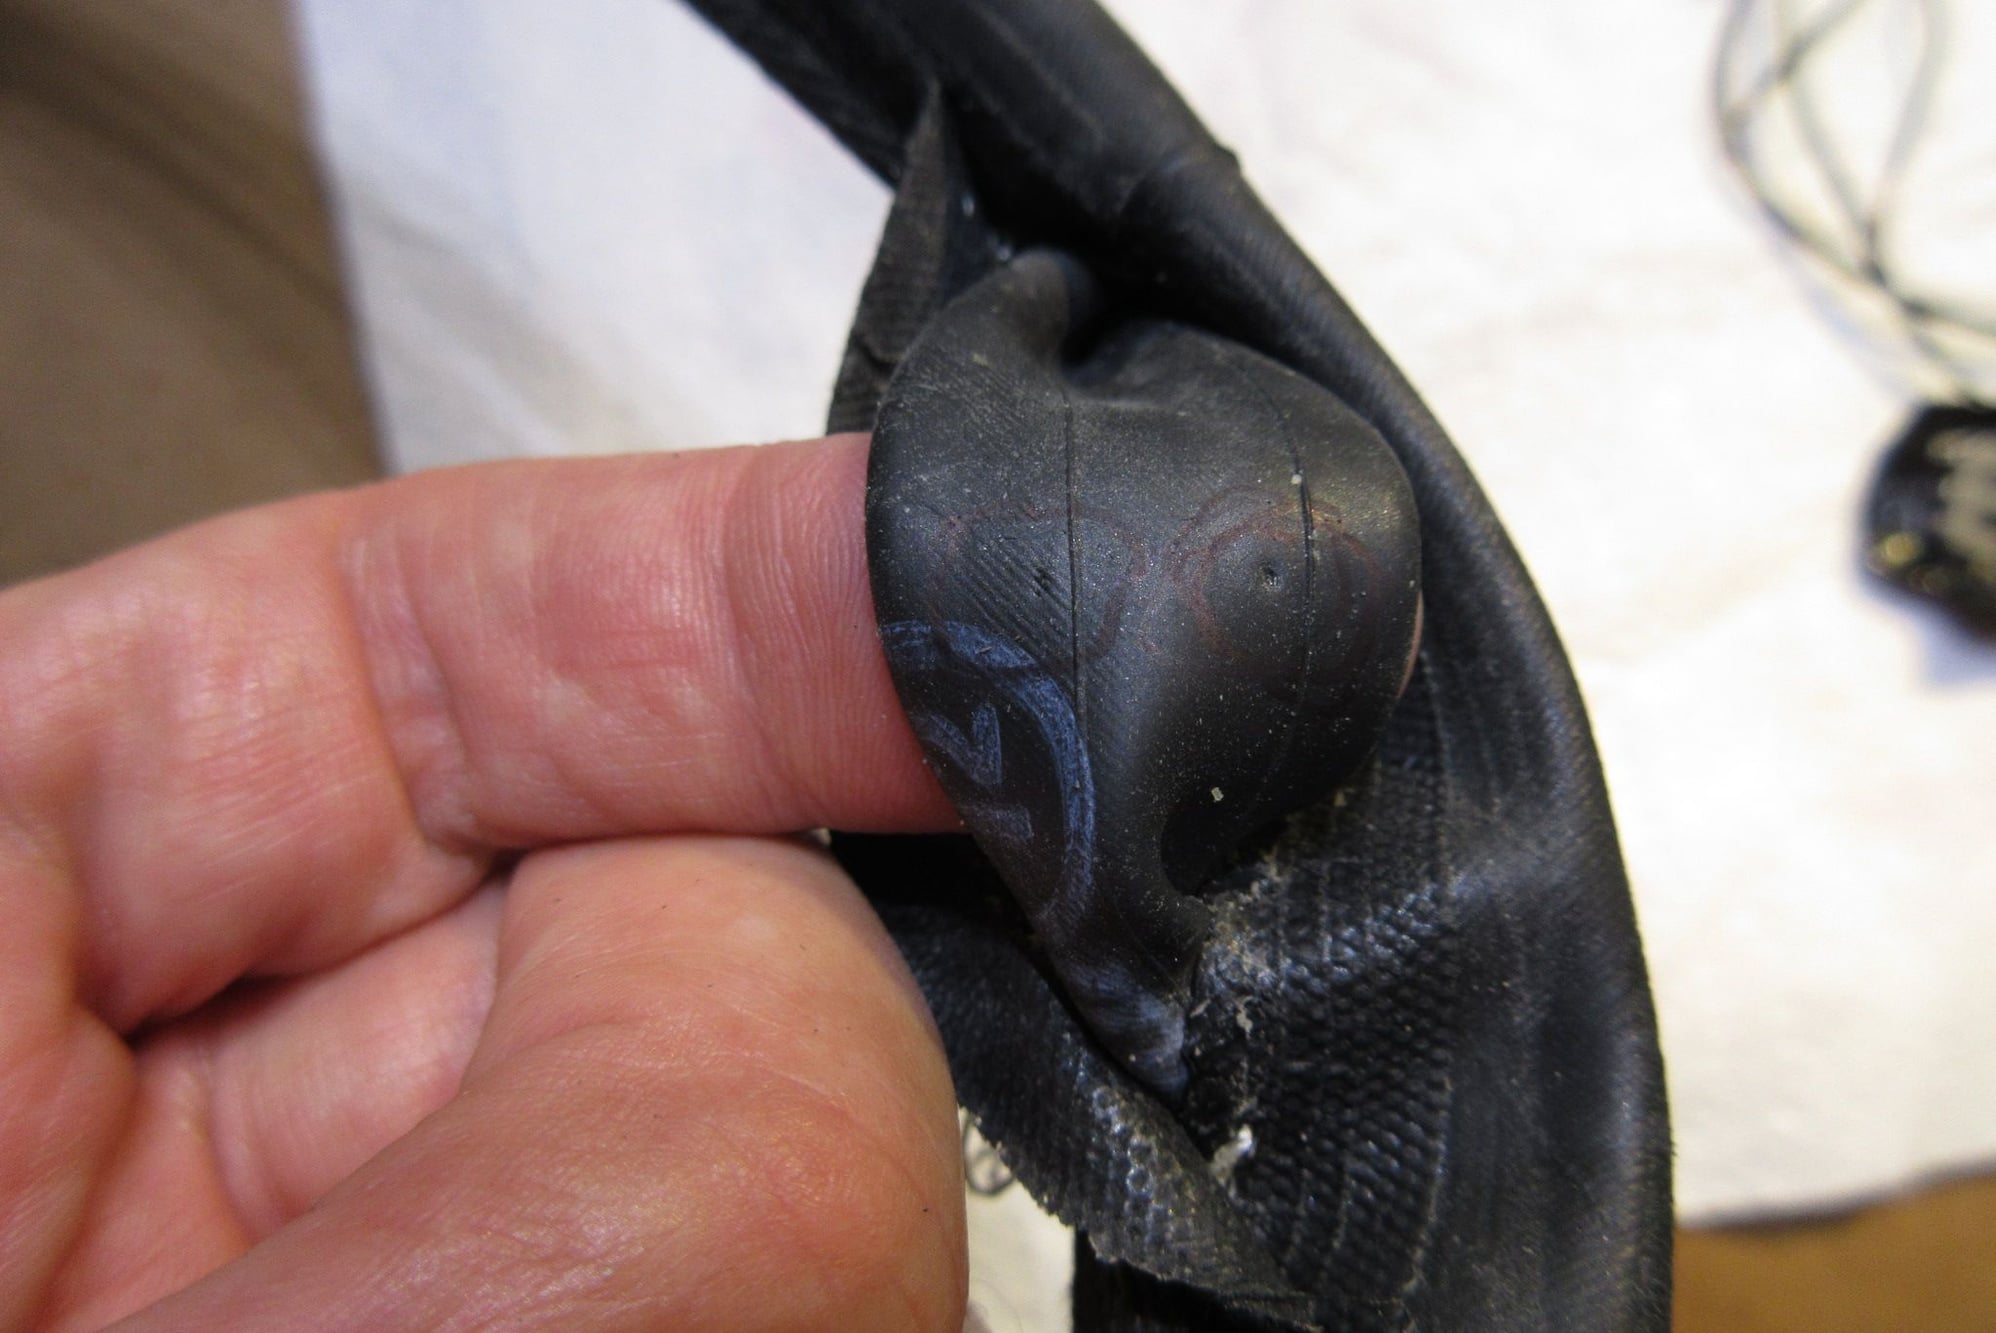
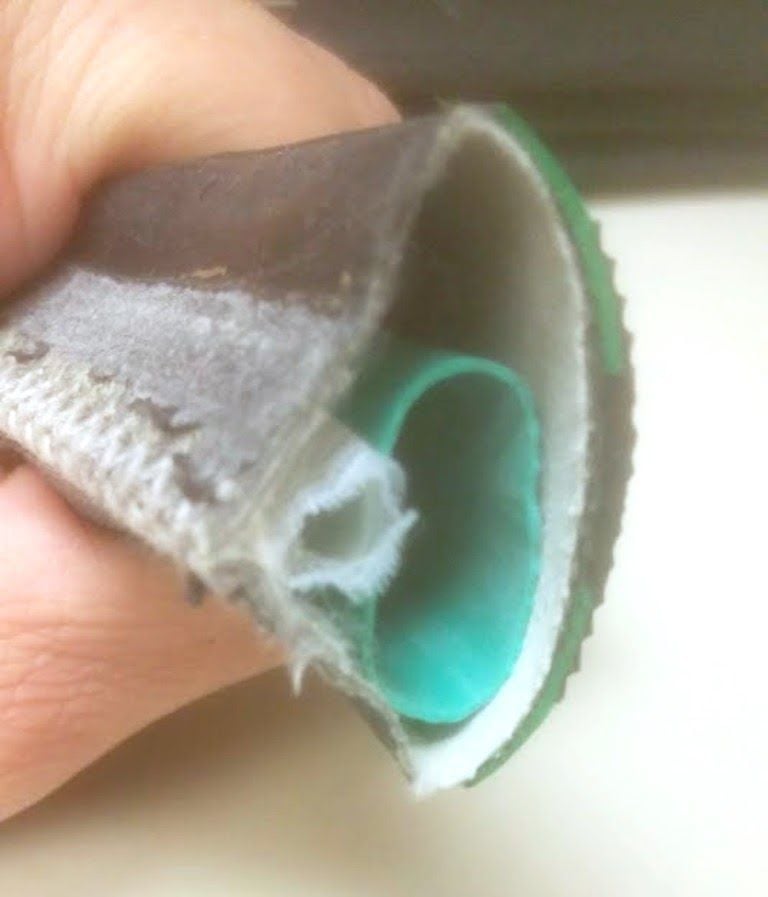
This is a photo of my last puncture, which was a real "snake bite" puncture on a brand new Conti tire. It looks like I might have opened it up about an inch.
Your Needlework May Vary
Steve in Peoria
Likes For steelbikeguy:
01-25-24, 08:12 PM
#39
Senior Member
Join Date: Dec 2020
Location: Wake Forest, NC
Posts: 5,794
Bikes: 1989 Cinelli Supercorsa
Mentioned: 11 Post(s)
Tagged: 0 Thread(s)
Quoted: 3513 Post(s)
Liked 2,927 Times
in
1,776 Posts
I don't recall struggling with it, but I probably just pushed the tube down while stitching it up.
To be honest, I have more trouble stuffing an inner tube in a clincher while mounting the clincher... but my clinchers fit really tight on my old rims. The tubes in sew-ups tend to be pretty thin and not take up much space.
The other "secret" is to not unstitch much of the sew-up. You only need just enough of a gap to pull the tube out and patch it.
This is a photo of my last puncture, which was a real "snake bite" puncture on a brand new Conti tire. It looks like I might have opened it up about an inch.
Your Needlework May Vary
Steve in Peoria
01-25-24, 08:31 PM
#40
Senior Member
Join Date: Feb 2008
Location: Peoria, IL
Posts: 4,476
Mentioned: 86 Post(s)
Tagged: 0 Thread(s)
Quoted: 1829 Post(s)
Liked 3,376 Times
in
1,580 Posts
As for needles, I think curved needles are used for sails and such too. If nothing else, it's probably cheaper than stuff sold for surgery.

I've always used the Velox tubular patch kit, which comes with the heavy thread, a suitable needle, thimble, thin patches and glue. Amazingly, they are still being made!
Steve in Peoria
01-25-24, 09:28 PM
#41
Senior Member
Join Date: Oct 2008
Location: Northern NY...Brownville
Posts: 2,574
Bikes: Specialized Aethos, Specialized Diverge Comp E5
Mentioned: 2 Post(s)
Tagged: 0 Thread(s)
Quoted: 242 Post(s)
Liked 455 Times
in
266 Posts
It's not easy but I was taught to sew when I was a little kid so it was not very hard for me. It does take care and patience and a good needle with the proper thread.
If you're careful it's not too hard.
Likes For Kai Winters:
01-25-24, 09:46 PM
#42
Senior Member
Join Date: Jun 2006
Posts: 20,305
Mentioned: 130 Post(s)
Tagged: 0 Thread(s)
Quoted: 3464 Post(s)
Liked 2,831 Times
in
1,997 Posts
As with my earlier comment, I don't recall it being an issue. I think I just hold the tube away from the opening... i.e. with my left hand that is holding the tire, I've got the tube shoved to the back and am holding it pinched in that position.
As for needles, I think curved needles are used for sails and such too. If nothing else, it's probably cheaper than stuff sold for surgery.
I've always used the Velox tubular patch kit, which comes with the heavy thread, a suitable needle, thimble, thin patches and glue. Amazingly, they are still being made!
Steve in Peoria
A bent Needle, or a curved needle and if one was deftly skilled a speed stitcher sewing awl could make quick work.
big issue was ghost bubbles, a small leak where the air escaped a distance from the actual puncture.
there was a fellow who would ride around and pick up then return tubulars patched. Reasonable for a quality seta tire, he could also do an � inlay� where a width of the diagonal thread casing was replaced all across, including under the tread. $5.50, a deal considering it was saving a $20.+ tire.
Likes For repechage:
01-25-24, 10:19 PM
#43
Full Member
Join Date: Jan 2023
Posts: 486
Mentioned: 0 Post(s)
Tagged: 0 Thread(s)
Quoted: 175 Post(s)
Likes: 0
Liked 452 Times
in
232 Posts
according to that site, he does it all on the same day. He cleans the rims, applies the cement to both the base tape and the rim, waits 10 minutes for it to set up and then he mounts the tire. That what it seems. Can anyone confirm? Is this guy still alive? A lot of the links are dead like to the FAQ that would be nice to read. It would be nice to do it all on one day. The can of glue says to clean the wheel with solvent whatever that means, no particular solvent so could be water for all I know, then sand the wheel, no sandpaper grit is specified, then apply glue to the rim and the tape and let it dry for 24 hours. Then the next day apply glue only to the rim and then mount the tire.
I've often done speed glue up and go ride. Long as you restrain and not do stupid joe wannabe crit racer stunts.
For the cyclo-X running FMB 32's nice and plushy lower psi, a medium tacky glue up is perfect. Never, ever rolled one off.
Not into sealants for fresh and good inner tubes. For slow flat, when back at home base, that's when I'd hit with whatever dose of sealant is on hand. Vitt pit stop or Stan's. Don't use for the top end tubulars that have latex tubes.
(edit for auto typo entrants)
Last edited by chain_whipped; 01-25-24 at 10:23 PM.
01-25-24, 10:38 PM
#44
Time Traveler
Thread Starter
Join Date: Jan 2022
Location: Florida, USA
Posts: 326
Bikes: 1983 Ross Paragon
Mentioned: 0 Post(s)
Tagged: 0 Thread(s)
Quoted: 204 Post(s)
Liked 98 Times
in
51 Posts
YJ site is ancient WYSIWYG and Andrew's style. Not joking here.. ;-\
I've often done speed glue up and go ride. Long as you restrain and not do stupid joe wannabe crit racer stunts.
For the cyclo-X running FMB 32's nice and plushy lower psi, a medium tacky glue up is perfect. Never, ever rolled one off.
Not into sealants for fresh and good inner tubes. For slow flat, when back at home base, that's when I'd hit with whatever dose of sealant is on hand. Vitt pit stop or Stan's. Don't use for the top end tubulars that have latex tubes.
(edit for auto typo entrants)
Today I went out there and I applied one layer of glue to the tape and one layer of glue to the rim. Tomorrow I plan to put one layer of glue on the rim and then wait 10 minutes and mount the tire. Hopefully I will be riding tomorrow without bulges, bumps, or separations.
01-25-24, 10:38 PM
#45
Senior Member
Join Date: Feb 2008
Location: Peoria, IL
Posts: 4,476
Mentioned: 86 Post(s)
Tagged: 0 Thread(s)
Quoted: 1829 Post(s)
Liked 3,376 Times
in
1,580 Posts
The issue of air leaking out of a spot is similar, but I at least knew that I pinch flatted. I can imagine being suckered into opening the tire up at the wrong spot if you just assumed that the leak was where the hole was. I don't suppose you'd do that more than once, though.
Steve in Peoria
01-26-24, 12:13 AM
#46
It's MY mountain

Join Date: Sep 2006
Location: Mt.Diablo
Posts: 10,002
Bikes: Klein, Merckx, Trek
Mentioned: 70 Post(s)
Tagged: 0 Thread(s)
Quoted: 4338 Post(s)
Liked 2,981 Times
in
1,617 Posts
 01-26-24, 10:37 AM
#47
Senior Member

Join Date: Oct 2018
Location: Whittier
Posts: 873
Bikes: 1973 Colnago Super, Litespeed Classic , Automoto , Pinarello Gavia TSX,Eddy Merckx Corsa Extra,Eddy Merckx EMX-5 , 1982 Moser SL, Concorde TSX, Vitus 979 KAS. Diamant SLX,60's Meteor
Mentioned: 23 Post(s)
Tagged: 0 Thread(s)
Quoted: 235 Post(s)
Liked 947 Times
in
327 Posts
I think it was around 1983 when the Avocet FastGrips came along in a size 700X20 and 700X18 , with the flexible bead and the little rubber aero transition to the rim and 120 Psi rating , Total Game Changer. Bye Bye tubulars.
Now , Im thinking of getting back into tubulars for use on my 73' Colnago , Maybe just one set of GP4's.
Lots of good info given here , Good Luck on the mounting experience !
Now , Im thinking of getting back into tubulars for use on my 73' Colnago , Maybe just one set of GP4's.
Lots of good info given here , Good Luck on the mounting experience !
01-26-24, 11:07 AM
#48
Newbie
Join Date: Dec 2023
Location: Western Riverside county, Southern California
Posts: 31
Bikes: 07 Raleigh supercourse, 04 Specialized epic MB, Surly 1x1, Recycled Recumbents Mach 2, 63 jc Higgins racer single speed, early 60�s Armstrong roadster, KHS tandem electric conversion, GT mb electric city bike conversion.
Mentioned: 0 Post(s)
Tagged: 0 Thread(s)
Quoted: 14 Post(s)
Likes: 0
Liked 21 Times
in
14 Posts
No one seemed to mention that you reuse the holes from the thread you removed to sew the tire back up. You don�t make new holes.
Regarding glue, the many tires I glued over the years were glued in one day. Apply a sufficient amount of glue to the rim, apply a very thin layer to the base tape on the tire, then mount the tire. Clean up any glue mess with lacquer thinner. If you needed to remount the tire after a puncture repair I would wipe the old glue with a rag of lacquer thinner, allow the glue to soften and mount the tire. Never had a tire roll, even on the track. The majority of the tires I saw roll during competition were mounted with tape.
just my 2 cents.
01-26-24, 11:54 AM
#49
Time Traveler
Thread Starter
Join Date: Jan 2022
Location: Florida, USA
Posts: 326
Bikes: 1983 Ross Paragon
Mentioned: 0 Post(s)
Tagged: 0 Thread(s)
Quoted: 204 Post(s)
Liked 98 Times
in
51 Posts
No one seemed to mention that you reuse the holes from the thread you removed to sew the tire back up. You don�t make new holes.
Regarding glue, the many tires I glued over the years were glued in one day. Apply a sufficient amount of glue to the rim, apply a very thin layer to the base tape on the tire, then mount the tire. Clean up any glue mess with lacquer thinner. If you needed to remount the tire after a puncture repair I would wipe the old glue with a rag of lacquer thinner, allow the glue to soften and mount the tire. Never had a tire roll, even on the track. The majority of the tires I saw roll during competition were mounted with tape.
just my 2 cents.
Regarding glue, the many tires I glued over the years were glued in one day. Apply a sufficient amount of glue to the rim, apply a very thin layer to the base tape on the tire, then mount the tire. Clean up any glue mess with lacquer thinner. If you needed to remount the tire after a puncture repair I would wipe the old glue with a rag of lacquer thinner, allow the glue to soften and mount the tire. Never had a tire roll, even on the track. The majority of the tires I saw roll during competition were mounted with tape.
just my 2 cents.
Did you then ride the bike right away also or wait a while?
Tires are mounted and seem to be ok. Stems nice and straight. Not.much mess. Cleaning up now, after that will take it down to the bike path. Hopefully they stay on.
01-26-24, 12:39 PM
#50
Old fart

Join Date: Nov 2004
Location: Appleton WI
Posts: 24,790
Bikes: Several, mostly not name brands.
Mentioned: 153 Post(s)
Tagged: 0 Thread(s)
Quoted: 3590 Post(s)
Liked 3,401 Times
in
1,935 Posts