


Weird Sound Inside Colnago Super Fork
 04-01-18, 05:32 AM
#1
Member
Thread Starter
Join Date: Jul 2017
Posts: 49
Mentioned: 3 Post(s)
Tagged: 0 Thread(s)
Quoted: 39 Post(s)
Likes: 0
Liked 4 Times
in
3 Posts
Weird Sound Inside Colnago Super Fork
Hello everyone,
I have question about colnago fork. Now I am cleaning and changing some part of my Colnago. I dismantled the head set and I am about to buy new bearings, clean everything and put it back together.
------------------------------My last topic and link to the photos---------------------------------
https://www.bikeforums.net/classic-v...e-colnago.html
https://www.flickr.com/photos/135948...57677532667115
------------------------------------------------------------------------------------------------------
When I spin with the fork there is something loosened -> (i don't know if this is the correct word form). There is just some piece of something which moves freely in left part of the fork I think. This is mystery for me, because there is no hole to the fork endings so what kind of object can be inside? Maybe some piece from the times when the fork was manufactured?
And another question is what is the little pin inside columbus tube of the fork for? I attached some photos.
Thank you for you questions!
Fork photos:
IMG 6161 ? imgbb.com
IMG 6164 ? imgbb.com
IMG 6167 ? imgbb.com
IMG 6168 ? imgbb.com
 04-01-18, 05:58 AM
#2

Senior Member

Join Date: May 2008
Location: Fredericksburg, Va
Posts: 9,579
Bikes: '65 Frejus TDF, '73 Bottecchia Giro d'Italia, '83 Colnago Superissimo, '84 Trek 610, '84 Trek 760, '88 Pinarello Veneto, '88 De Rosa Pro, '89 Pinarello Montello, '94 Burley Duet, 97 Specialized RockHopper, 2010 Langster, Tern Link D8
Mentioned: 73 Post(s)
Tagged: 0 Thread(s)
Quoted: 1607 Post(s)
Liked 2,216 Times
in
1,103 Posts
@winston - WRT the fork. Likely it is a piece of material from the assembly process (brazing) Shouldn't hurt any thing except you knowing about it. IIRC there is a hole near the bottom of the leg just above the DO on the inside. Might be confusing this with another bike. Often there are holes in the frame to let the expanding gasses from the brazing process escape, otherwise the brazing material might blow out at a joint.
WRT the pin. From your pictures, it is difficult to see where along the tube the pin is located. Is there any indication on the outside of the tube? Can you tap it with a long shaft and dislodge it or is it firmly attached?
WRT the pin. From your pictures, it is difficult to see where along the tube the pin is located. Is there any indication on the outside of the tube? Can you tap it with a long shaft and dislodge it or is it firmly attached?
__________________
Bikes don't stand alone. They are two tired.
Bikes don't stand alone. They are two tired.
04-01-18, 07:17 AM
#3

Senior Member
Join Date: Jun 2006
Posts: 20,305
Mentioned: 130 Post(s)
Tagged: 0 Thread(s)
Quoted: 3464 Post(s)
Liked 2,829 Times
in
1,995 Posts
the pin showing in the steerer is just that, used to keep the steerer snd crown in position while brazing.
the noise is debris of some sort, flux, brazing rod or both. no problem.
the noise is debris of some sort, flux, brazing rod or both. no problem.
04-01-18, 12:26 PM
#4
Member
Thread Starter
Join Date: Jul 2017
Posts: 49
Mentioned: 3 Post(s)
Tagged: 0 Thread(s)
Quoted: 39 Post(s)
Likes: 0
Liked 4 Times
in
3 Posts
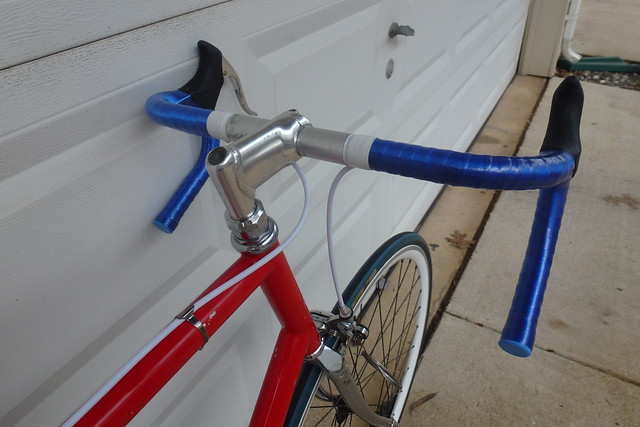
Thanks for your answers, now I am calm 
I have one more question. Do you have some "how to" videos on taping vintage handlebars with vintage handlebar tape? I bought blue Benotto tape and it looks very cool first I have to mount stem and handlebars but soon I will need to tape it. I have the tape still in original package but it seems that there are no "sticky or glue stripes" on the back of the tape. The tape itself is very thin and I am not sure how to tape it around brake levers. If you know e.g. some vintage restoration videos on youtube I would be very glad.
Thank you!
I have one more question. Do you have some "how to" videos on taping vintage handlebars with vintage handlebar tape? I bought blue Benotto tape and it looks very cool
first I have to mount stem and handlebars but soon I will need to tape it. I have the tape still in original package but it seems that there are no "sticky or glue stripes" on the back of the tape. The tape itself is very thin and I am not sure how to tape it around brake levers. If you know e.g. some vintage restoration videos on youtube I would be very glad.Thank you!
Last edited by wiston; 04-01-18 at 12:32 PM.
04-01-18, 12:58 PM
#5
Senior Member
Join Date: Jun 2006
Posts: 20,305
Mentioned: 130 Post(s)
Tagged: 0 Thread(s)
Quoted: 3464 Post(s)
Liked 2,829 Times
in
1,995 Posts
Assuming you have the bar end caps with the tape- you need a lighter and a leather glove, scissors.
Cap first, section of tape to cover the brake lever bands, I have alternately taped those in place ( twinstick) or let the hoods hold.
Your choice to wrap clockwise or counterclockwise, do the opposite side the opposite way. Anchor the tape under itself with the initial wrap at the cap, start the tape underside of bar.
Wrap the tape with a bit of a single layer showing as you go unless it is really cold, the tape should be limber enough to catch both the top and bottom of the lever body in one diagonal wrap, then return to match what was going on below the lever, at the end near the bars... Glove on, heat the underside of the tape and the end a bit using a gloved hand fuse the two with pressure, Magic.
04-01-18, 01:32 PM
#6
Senior Member
Join Date: May 2008
Location: Fredericksburg, Va
Posts: 9,579
Bikes: '65 Frejus TDF, '73 Bottecchia Giro d'Italia, '83 Colnago Superissimo, '84 Trek 610, '84 Trek 760, '88 Pinarello Veneto, '88 De Rosa Pro, '89 Pinarello Montello, '94 Burley Duet, 97 Specialized RockHopper, 2010 Langster, Tern Link D8
Mentioned: 73 Post(s)
Tagged: 0 Thread(s)
Quoted: 1607 Post(s)
Liked 2,216 Times
in
1,103 Posts
 04-02-18, 08:46 AM
#7
Junior Member

Steel fork with rattle
I had a high end Italian steel fork with a rattle in one leg, and it was audibly noticeable on rough roads. And there were no breathing holes on the interior of the legs. I figured the holes were plugged by the builder prior to caroming.
I took the fork to a local building and had him drill new holes in the folk blades. I could do it, but I figured he�d know better where to place the holes without harming the structural integrity, and beside, he�d have sharper drill bits and a drill press so he could get a nice clean hole. He did that.
Then I squired framesaver in that one fork leg. It took a couple of applications, but the framesaver finally secured the loose material. The fork is now quiet.

