


Suntour Superbe Pro Front Derailleur Clamp Removal
 08-21-20, 09:35 AM
#1

Member
Thread Starter
Suntour Superbe Pro Front Derailleur Clamp Removal
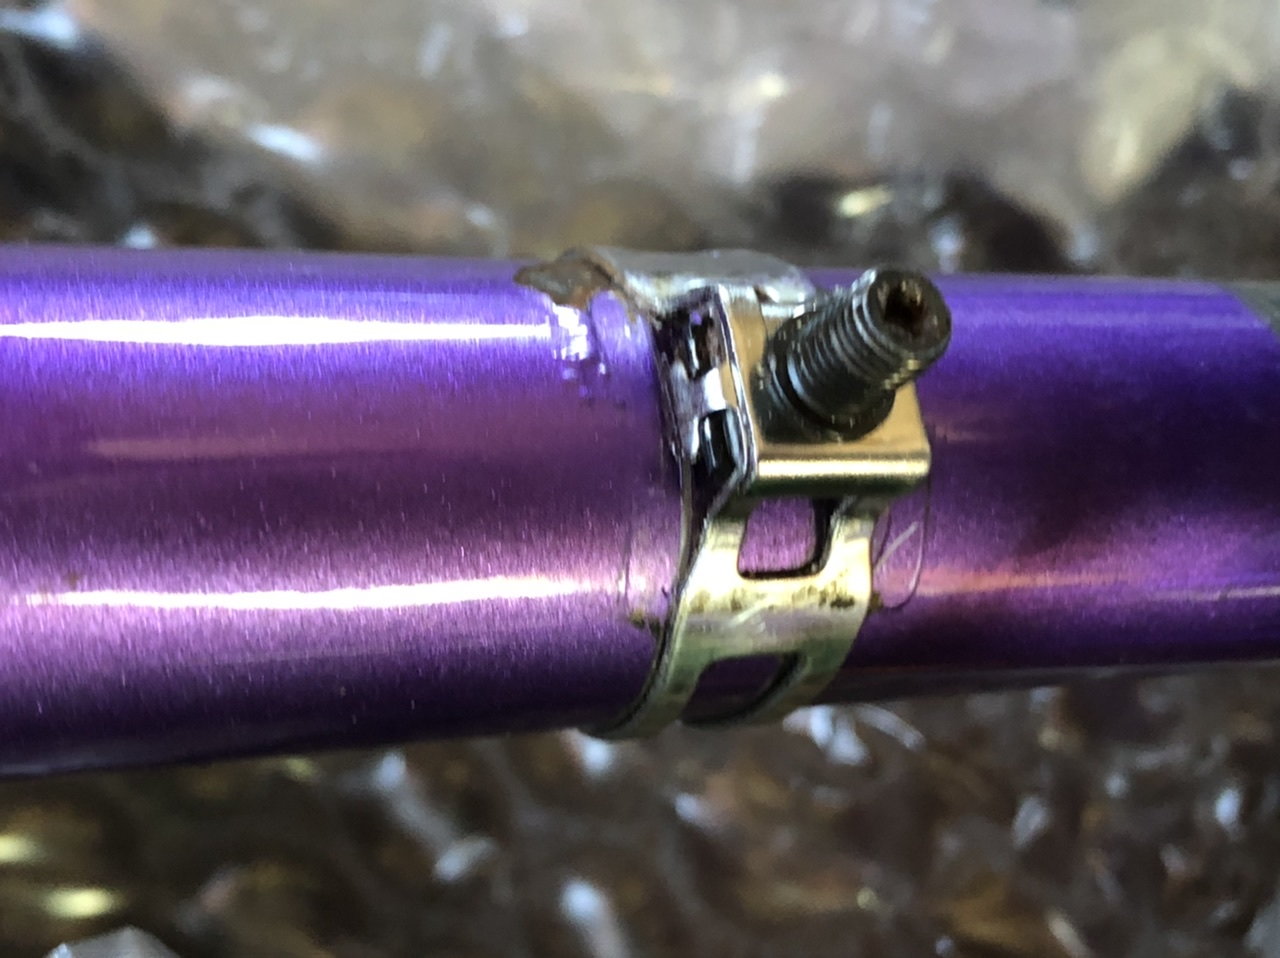
Looking for help on how to remove this clamp. I’m stumped. Thx in advance
.
.

 08-21-20, 10:33 AM
#4
Senior Member
Join Date: Jan 2004
Location: Madison, WI USA
Posts: 6,154
Mentioned: 50 Post(s)
Tagged: 0 Thread(s)
Quoted: 2363 Post(s)
Liked 1,749 Times
in
1,191 Posts
Likes For madpogue:
08-21-20, 12:31 PM
#5
Member
Thread Starter
08-22-20, 10:04 AM
#6
Extraordinary Magnitude

Join Date: Aug 2009
Location: Waukesha WI
Posts: 13,646
Bikes: 1978 Trek TX700; 1978/79 Trek 736; 1984 Specialized Stumpjumper Sport; 1984 Schwinn Voyageur SP; 1985 Trek 620; 1985 Trek 720; 1986 Trek 400 Elance; 1987 Schwinn High Sierra; 1990 Miyata 1000LT
Mentioned: 84 Post(s)
Tagged: 0 Thread(s)
Quoted: 2608 Post(s)
Liked 1,699 Times
in
935 Posts
That's a nice purple!
__________________
*Recipient of the 2006 Time Magazine "Person Of The Year" Award*
Commence to jigglin’ huh?!?!
"But hey, always love to hear from opinionated amateurs." -says some guy to Mr. Marshall.
Commence to jigglin’ huh?!?!
"But hey, always love to hear from opinionated amateurs." -says some guy to Mr. Marshall.
Likes For The Golden Boy:
08-22-20, 10:21 AM
#7
Phyllo-buster

Join Date: Jan 2010
Location: Nova Scotia
Posts: 8,847
Bikes: roadsters, club bikes, fixed and classic
Mentioned: 133 Post(s)
Tagged: 0 Thread(s)
Quoted: 2298 Post(s)
Liked 2,054 Times
in
1,254 Posts
08-22-20, 11:32 AM
#8
Senior Member
Join Date: Nov 2013
Location: Big Apple
Posts: 1,428
Bikes: yes
Mentioned: 17 Post(s)
Tagged: 0 Thread(s)
Quoted: 512 Post(s)
Likes: 0
Liked 409 Times
in
176 Posts
I've got one of these. https://www.amazon.com/Bessel-Vessel...1DN6RCZKMFXRB8
Likes For Vintage_Cyclist:
08-22-20, 11:37 AM
#9
Phyllo-buster
Join Date: Jan 2010
Location: Nova Scotia
Posts: 8,847
Bikes: roadsters, club bikes, fixed and classic
Mentioned: 133 Post(s)
Tagged: 0 Thread(s)
Quoted: 2298 Post(s)
Liked 2,054 Times
in
1,254 Posts
That's interesting because I've only got one special 'Phillips' from a broadcast technicians set that always works and my others do tend to strip. I just assumed it was a Phillips driver but perhaps it's a JIS+2. Cool.
08-22-20, 12:47 PM
#10
Junior Member
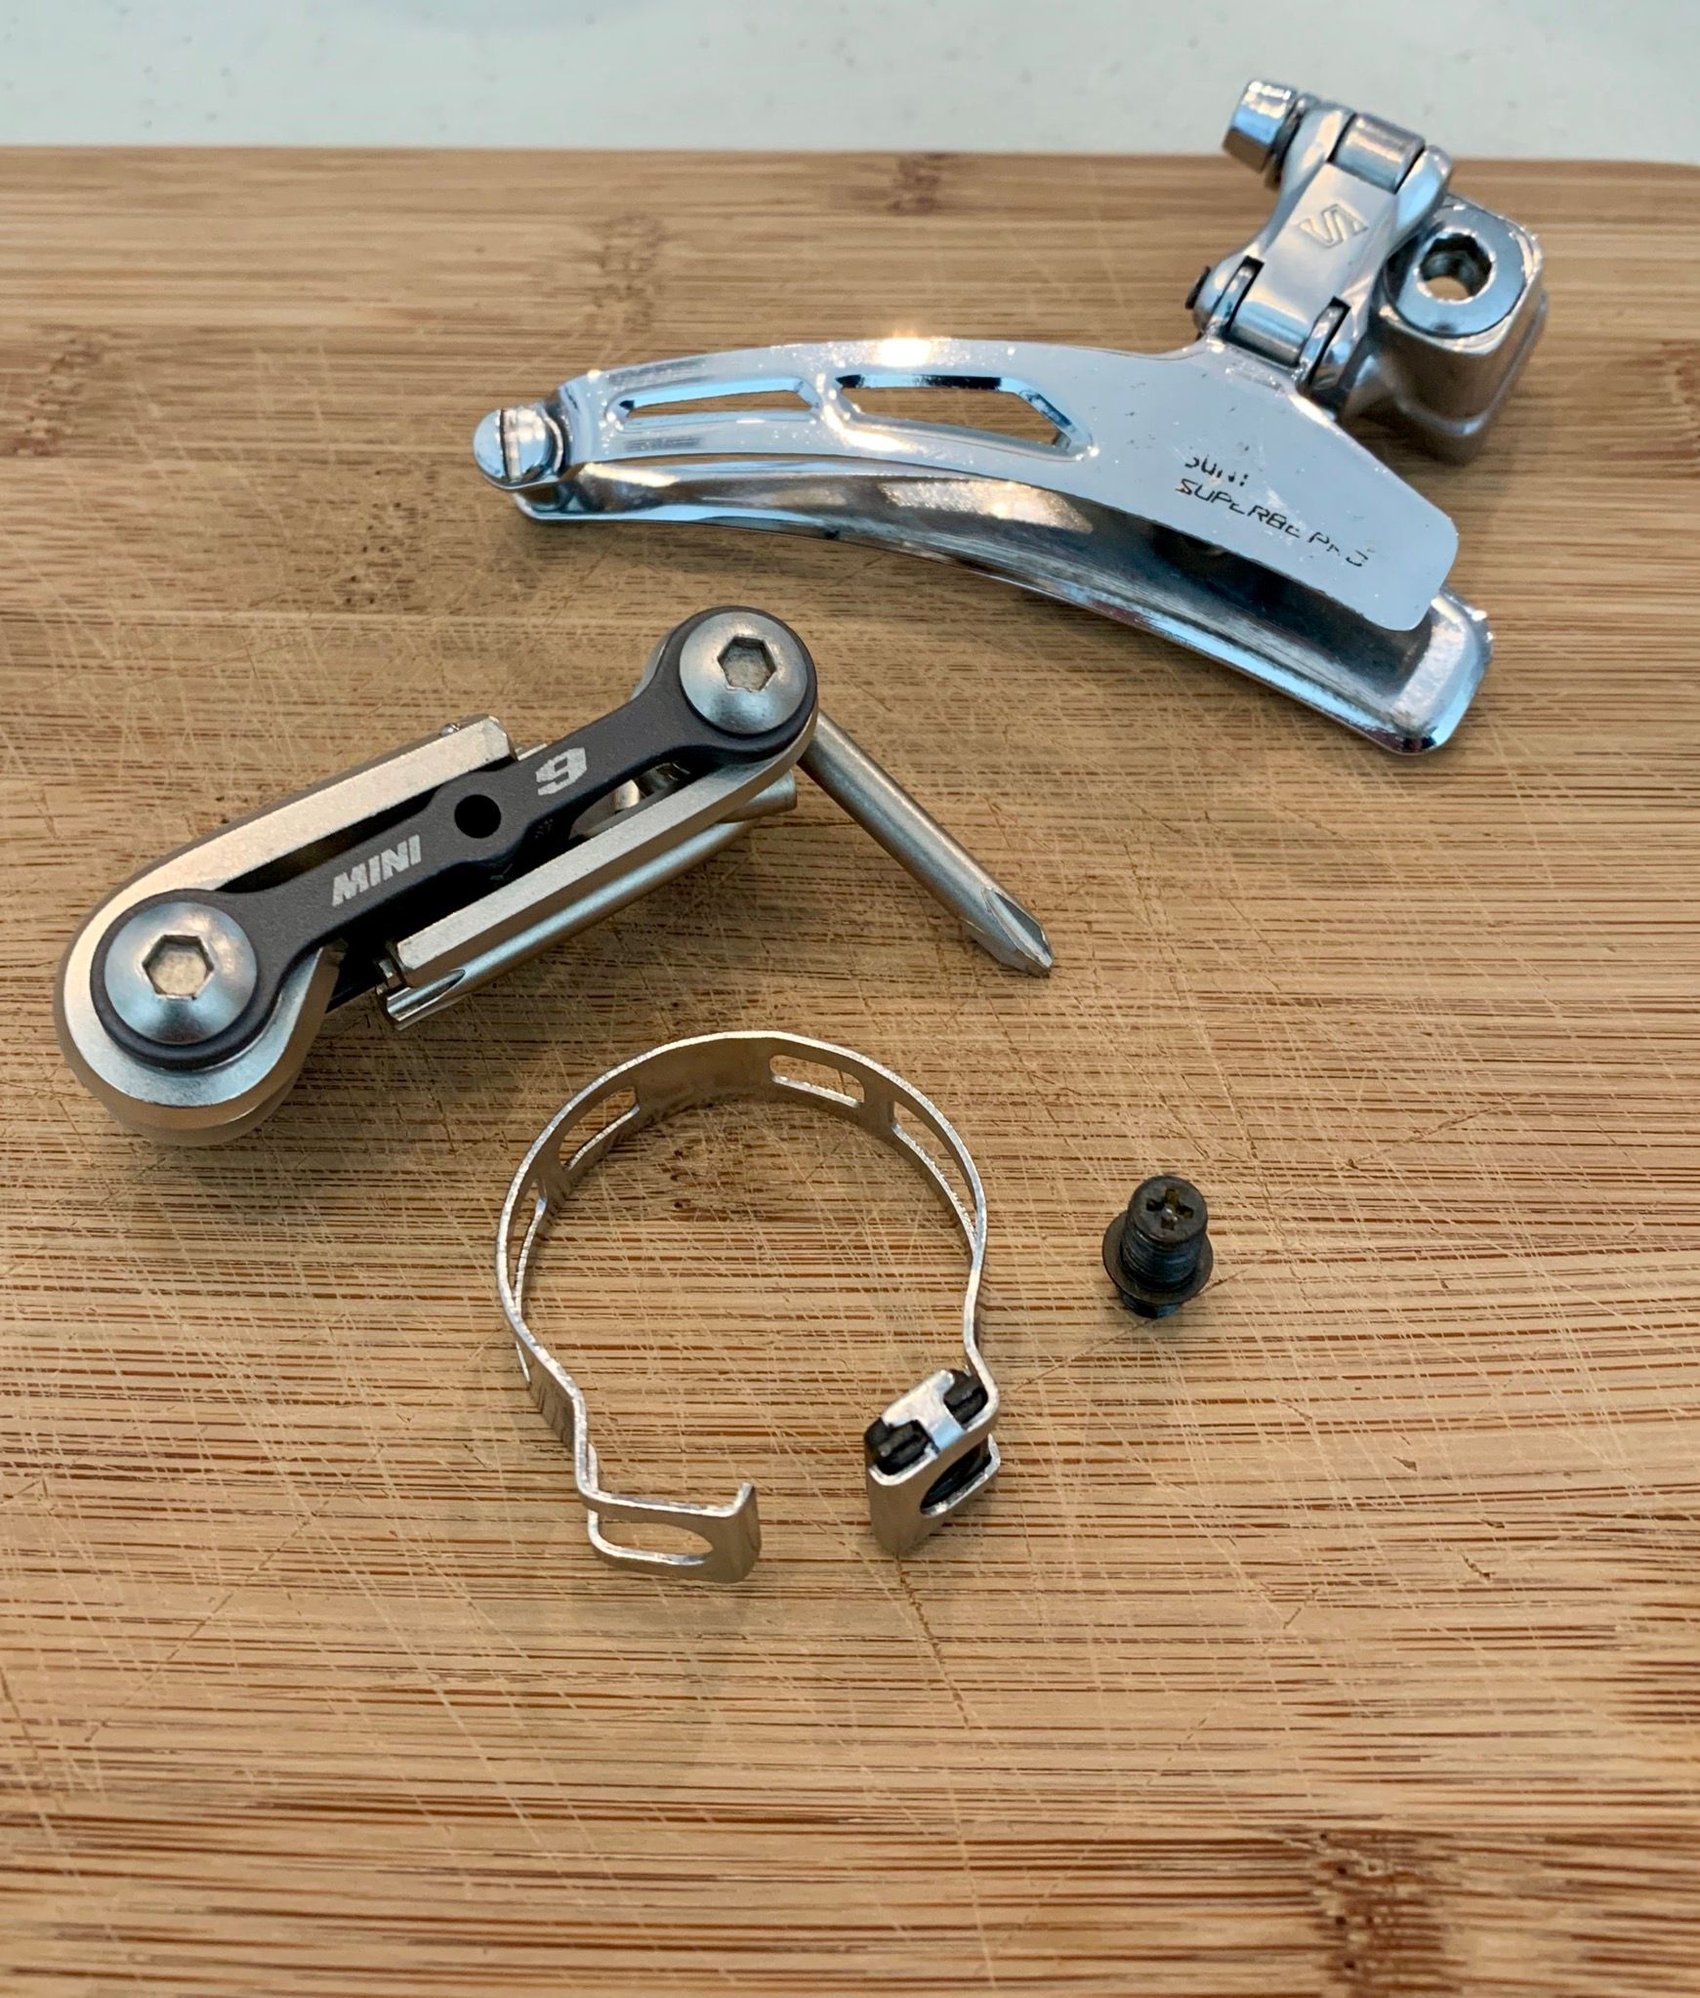
I recently removed this same Suntour component. A regular Phillips screwdriver did not provide sufficient contact to turn the stud bolt. But the screwdriver bit on my Topeak mini tool fit the stud bolt perfectly and easily turned it for removal.
08-23-20, 07:53 PM
#12
Member
Thread Starter
08-23-20, 08:10 PM
#13
Member
Thread Starter
08-23-20, 08:22 PM
#14
Extraordinary Magnitude
Join Date: Aug 2009
Location: Waukesha WI
Posts: 13,646
Bikes: 1978 Trek TX700; 1978/79 Trek 736; 1984 Specialized Stumpjumper Sport; 1984 Schwinn Voyageur SP; 1985 Trek 620; 1985 Trek 720; 1986 Trek 400 Elance; 1987 Schwinn High Sierra; 1990 Miyata 1000LT
Mentioned: 84 Post(s)
Tagged: 0 Thread(s)
Quoted: 2608 Post(s)
Liked 1,699 Times
in
935 Posts
08-24-20, 08:36 AM
#15
Senior Member

Join Date: Feb 2008
Location: Peoria, IL
Posts: 4,476
Mentioned: 86 Post(s)
Tagged: 0 Thread(s)
Quoted: 1829 Post(s)
Liked 3,374 Times
in
1,580 Posts
The clamp does look neat, but I agree that it looks more like something the marketing dept. came up with, and less like an engineer thought it actually solved a problem. This was the era of aerodynamics, and a lot of nutty designs were developed.
Considering how much the clamp deformed the paint in the photo, I'm a bit hesitant about using my Superbe with the band clamp.
Maybe it's not too bad if the paint is fully cured and hardened?
Steve in Peoria
08-24-20, 11:18 AM
#16
Senior Member
 08-24-20, 11:26 AM
#17
Senior Member
I posted something about this design in a recent thread, in which the OP broke an earlier Cyclone/Spb fder clamp.
I think the design was meant to minimize broken clamps, minimize seat tube damage from over-torqued hinged clamps, while also being clever, elegant and lightweight. Also could be used for other applications, like attaching a top-of-toptube aero shifter.
Like a lot of designs in those days in Japan, the engineers assumed that proper tools (evidently a JIS #2 Phillips screwdriver, I never knew that), proper torque and care would be used during installation. They assumed that both shop mechanics and end users would actually read the instructions all the way through before attempting to install it.
Since that's not the way the world works, it did ultimately cause more problems than it solved.
I've got a NIB Superbe front derailleur like this in my parts box... been waiting for a reason to use it. After about 30 years, you'd think that I'd find a chance to install it.
The clamp does look neat, but I agree that it looks more like something the marketing dept. came up with, and less like an engineer thought it actually solved a problem. This was the era of aerodynamics, and a lot of nutty designs were developed.
Considering how much the clamp deformed the paint in the photo, I'm a bit hesitant about using my Superbe with the band clamp.
Maybe it's not too bad if the paint is fully cured and hardened?
Steve in Peoria
__________________
Fuggedaboutit!
Fuggedaboutit!
08-24-20, 12:09 PM
#18
Senior Member
Join Date: Feb 2008
Location: Peoria, IL
Posts: 4,476
Mentioned: 86 Post(s)
Tagged: 0 Thread(s)
Quoted: 1829 Post(s)
Liked 3,374 Times
in
1,580 Posts
I posted something about this design in a recent thread, in which the OP broke an earlier Cyclone/Spb fder clamp.
I think the design was meant to minimize broken clamps, minimize seat tube damage from over-torqued hinged clamps, while also being clever, elegant and lightweight. Also could be used for other applications, like attaching a top-of-toptube aero shifter.
.......
I think the design was meant to minimize broken clamps, minimize seat tube damage from over-torqued hinged clamps, while also being clever, elegant and lightweight. Also could be used for other applications, like attaching a top-of-toptube aero shifter.
.......

one problem with this style of clamp was that the user had to flex the steel band to fit over the down tube, which did fatigue the steel somewhat, and always felt like it was cracking the chrome plating.
the other problem was that the "ears" that the clamp bolt passed through tended to dig into the paint, often breaking the paint and promoting rust.
Like most things in design or engineering, there's no perfect solution. Each method has some sort of flaw or undesired characteristic.
Oh... I do have to apologize for the comment I made about the marketing department in my earlier post. As an engineer, I recognize that the marketing folks help encourage the public to buy products, whether they need the product or not. Those sales help keep us engineers employed, and it's important to acknowledge this.
Steve in Peoria
Likes For steelbikeguy:
08-24-20, 02:27 PM
#19
Senior Member
Join Date: Oct 2005
Location: Upper Left, USA
Posts: 1,915
Mentioned: 50 Post(s)
Tagged: 0 Thread(s)
Quoted: 634 Post(s)
Liked 444 Times
in
298 Posts
I've never actually used the endless band style of clamp, but I did feel like it offered an improvement over the conventional clamp-on shift lever. ...and let me insert a shot of my trusty old SunTour Powershifter as an example....
one problem with this style of clamp was that the user had to flex the steel band to fit over the down tube, which did fatigue the steel somewhat, and always felt like it was cracking the chrome plating.
the other problem was that the "ears" that the clamp bolt passed through tended to dig into the paint, often breaking the paint and promoting rust.
Like most things in design or engineering, there's no perfect solution. Each method has some sort of flaw or undesired characteristic.
Oh... I do have to apologize for the comment I made about the marketing department in my earlier post. As an engineer, I recognize that the marketing folks help encourage the public to buy products, whether they need the product or not. Those sales help keep us engineers employed, and it's important to acknowledge this.
Steve in Peoria
08-24-20, 03:39 PM
#20
Senior Member
The trick to these clamp-mount accessories (bb/downtube-mount cable guides, dt/barcon housing stops) and components (usually dt shifters) is to start in the middle of the clamp and gently open up the radius, working thumb/fingers towards the ends. Kinda like how you spread a metal fender wider to narrow the fender radius around the wheel. What I always did was just grab the clamp ends and yank outwards, and the band would bend at its narrowest/weakest point. The Suntour clamp you show isn't so bad, since the band has a pretty consistent width, but it still often wants to bend sharply just above where the shifters mount.
Campy bands were worse, since they narrow significantly at one point, and always want to bend sharply there.
And the "ears" digging into the underside of the downtube is kinda unavoidable. I've thought about using a file to remove the sharp edges there, but I worry about removing too much metal and potentially weakening the clamp. And if you file away the outer plating, you're inviting more rust.
I've never actually used the endless band style of clamp, but I did feel like it offered an improvement over the conventional clamp-on shift lever. ...and let me insert a shot of my trusty old SunTour Powershifter as an example....
one problem with this style of clamp was that the user had to flex the steel band to fit over the down tube, which did fatigue the steel somewhat, and always felt like it was cracking the chrome plating.
the other problem was that the "ears" that the clamp bolt passed through tended to dig into the paint, often breaking the paint and promoting rust.
Like most things in design or engineering, there's no perfect solution. Each method has some sort of flaw or undesired characteristic.
Oh... I do have to apologize for the comment I made about the marketing department in my earlier post. As an engineer, I recognize that the marketing folks help encourage the public to buy products, whether they need the product or not. Those sales help keep us engineers employed, and it's important to acknowledge this.
Steve in Peoria
one problem with this style of clamp was that the user had to flex the steel band to fit over the down tube, which did fatigue the steel somewhat, and always felt like it was cracking the chrome plating.
the other problem was that the "ears" that the clamp bolt passed through tended to dig into the paint, often breaking the paint and promoting rust.
Like most things in design or engineering, there's no perfect solution. Each method has some sort of flaw or undesired characteristic.
Oh... I do have to apologize for the comment I made about the marketing department in my earlier post. As an engineer, I recognize that the marketing folks help encourage the public to buy products, whether they need the product or not. Those sales help keep us engineers employed, and it's important to acknowledge this.
Steve in Peoria
__________________
Fuggedaboutit!
Fuggedaboutit!
08-24-20, 10:23 PM
#21
Junior Member
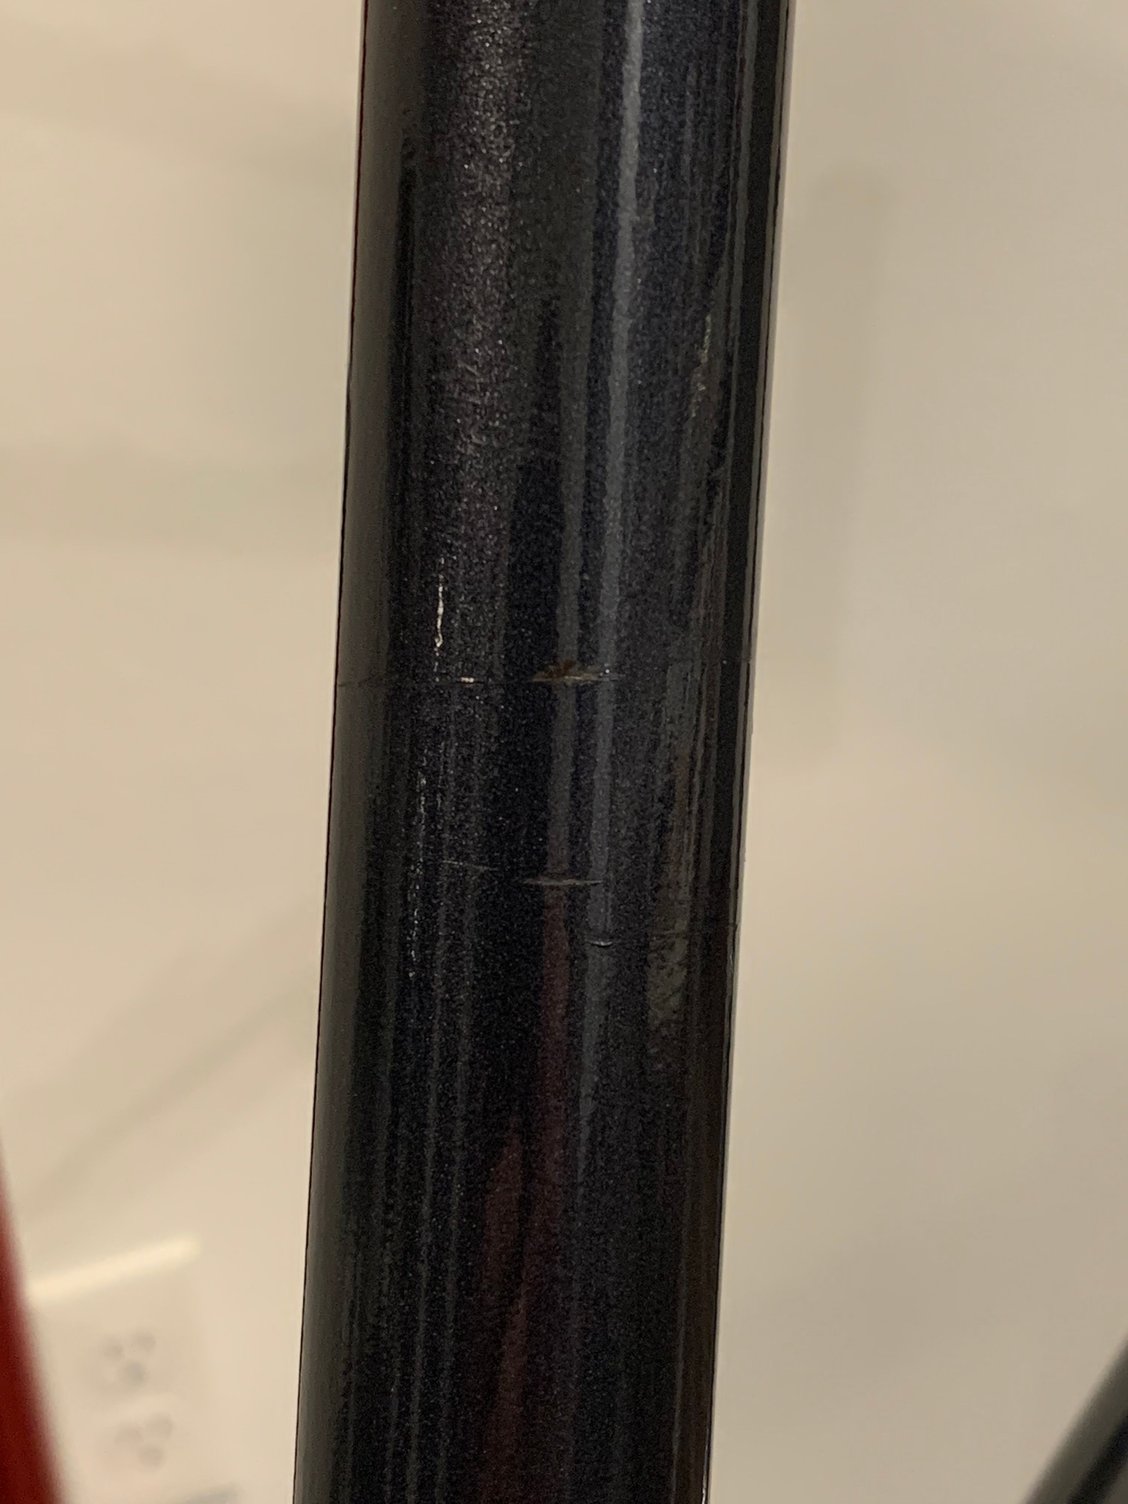
Photo of tube where the Superbe derailleur band was located (tube surface had been cleaned prior to photo). There are minor marks from the band, but really not much...paint color and lighting could also be variables.
It’s worth noting the band was tight on the tube until unsprung for removal. So perhaps another consideration is the ease of placement and adjustment a hinged derailleur clamp affords.
Likes For cv350:
08-28-20, 02:18 PM
#22
Senior Member
The endless band design definitely had a higher potential for damaging paint, especially scratching, and was difficult to reposition, even for relatively minor adjustments.
That said, I've never seen one crimp a seat tube, while I've seen plenty of crimped tubes from regular clamp-mount fders.
That said, I've never seen one crimp a seat tube, while I've seen plenty of crimped tubes from regular clamp-mount fders.
Photo of tube where the Superbe derailleur band was located (tube surface had been cleaned prior to photo). There are minor marks from the band, but really not much...paint color and lighting could also be variables.
It’s worth noting the band was tight on the tube until unsprung for removal. So perhaps another consideration is the ease of placement and adjustment a hinged derailleur clamp affords.
It’s worth noting the band was tight on the tube until unsprung for removal. So perhaps another consideration is the ease of placement and adjustment a hinged derailleur clamp affords.
__________________
Fuggedaboutit!
Fuggedaboutit!
08-28-20, 02:24 PM
#23
Senior Member

Join Date: Jun 2010
Location: Medford MA
Posts: 2,089
Bikes: Ron Cooper touring, 1959 Jack Taylor 650b ladyback touring tandem, Vitus 979, Joe Bell painted Claud Butler Dalesman, Colin Laing curved tube tandem, heavily-Dilberted 1982 Trek 6xx, René Herse tandem
Mentioned: 80 Post(s)
Tagged: 0 Thread(s)
Quoted: 964 Post(s)
Liked 1,451 Times
in
723 Posts
Those endless band clamps are good for funny sized tubing like on French bikes, too. Vitus 979s, especially the early ones, needed a French sized clamp, but the Suntour would also work.
JIS screwdrivers are often used in the antique Honda motorcycle community. The alternative is to either switch to allen bolts, which takes away from the classic look of your motorcycle, or machine your own lookalike screws with ordinary Phillips heads, which I did. You can imagine most people choose to buy the screwdriver! If you have a friend with an old CB and the screws aren't all stripped, either they never work on it or they have the appropriate tool.
JIS screwdrivers are often used in the antique Honda motorcycle community. The alternative is to either switch to allen bolts, which takes away from the classic look of your motorcycle, or machine your own lookalike screws with ordinary Phillips heads, which I did. You can imagine most people choose to buy the screwdriver! If you have a friend with an old CB and the screws aren't all stripped, either they never work on it or they have the appropriate tool.
__________________
Owner & co-founder, Cycles René Hubris. Unfortunately attaching questionable braze-ons to perfectly good frames since about 2015. With style.
Owner & co-founder, Cycles René Hubris. Unfortunately attaching questionable braze-ons to perfectly good frames since about 2015. With style.
08-28-20, 04:17 PM
#24
seńor miembro

Join Date: Dec 2018
Location: Pac NW
Posts: 6,622
Bikes: '70s - '80s Campagnolo
Mentioned: 92 Post(s)
Tagged: 0 Thread(s)
Quoted: 3885 Post(s)
Liked 6,479 Times
in
3,205 Posts
Take an iron file to the sharp edges of the band before mounting. Apply grease to the seat tube. You won't have nearly the same issues with paint damage.
I like the way that big allen key fitting looks like a brazed on fd piece. Perfect for an '80s bike.
I like the way that big allen key fitting looks like a brazed on fd piece. Perfect for an '80s bike.
11-30-20, 08:01 PM
#25
Full Member
Join Date: Aug 2019
Location: North Eastern Ontario, Canada
Posts: 301
Bikes: 1980 Marinoni Special, 1987 Ciocc Microf. C40, 1978 Raleigh Competition GS, 1982 Colnago Super, 1972 Gitane Pro TdF, 1976 Belgian Diamant by Martelly, 1989 Trek 520, 1972 Dawes Galaxy 2014 Cervelo R5, 2020 Salsa Warbird, 2013 Giant Trance X1
Mentioned: 2 Post(s)
Tagged: 0 Thread(s)
Quoted: 91 Post(s)
Liked 61 Times
in
42 Posts