


Help - Welding / drilling seat post to frame
 11-12-23, 05:00 AM
#1
Newbie
Thread Starter
Join Date: Nov 2023
Posts: 4
Mentioned: 0 Post(s)
Tagged: 0 Thread(s)
Quoted: 1 Post(s)
Likes: 0
Liked 0 Times
in
0 Posts
Help - Welding / drilling seat post to frame
Hi all,
struggling to fit a seat post to this frame.
It’s part of a personal refurb job… the frame has been cut too short so cannot use a clamp.
FYI It’s only for light use…
Other than drilling the frame and seat post to put bolts through at different positions, or welding the seat post to the frame… does anyone have any suggestions ??
Thanks for any help.
 11-12-23, 07:09 AM
#3


Randomhead
Join Date: Aug 2008
Location: Happy Valley, Pennsylvania
Posts: 24,419
Mentioned: 0 Post(s)
Tagged: 0 Thread(s)
Quoted: 4 Post(s)
Liked 3,720 Times
in
2,537 Posts
Well, he can't post pics in a thread, but if he posts them in a gallery on his profile, we can move them here.
11-12-23, 09:10 AM
#4
Senior Member

Join Date: Sep 2009
Location: EagleRiver AK
Posts: 1,306
Mentioned: 0 Post(s)
Tagged: 0 Thread(s)
Quoted: 28 Post(s)
Likes: 0
Liked 60 Times
in
33 Posts
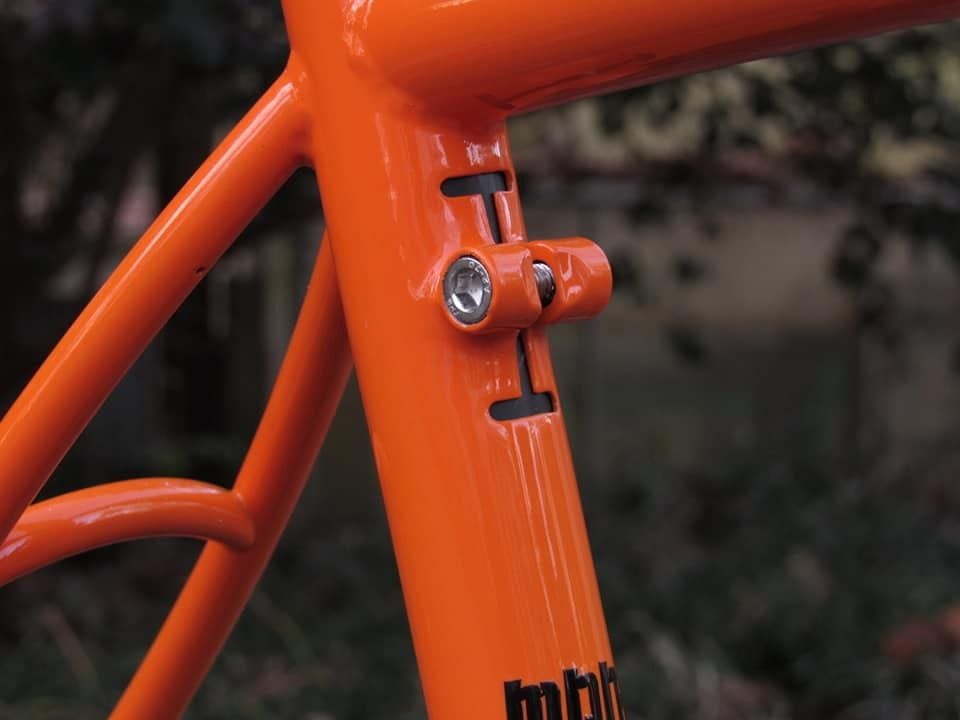
There were a few vintage bikes built which used a seatpost with an internal expander bolt, sort of like used for old adjustable quill stems (before aheadsets). Either search and find a suitable size/length expander seatpost or modify an existing seatpost to work with an expander.
Welding together is a bad idea, especially if dissimilar frame/seatpost metals. Epoxy might be a better one time semi-permanent technique but loosing ability to ever adjust height is just a bad idea. If frame were steel, it should be possible to slot the top of seattube and add a binder bolt however short the seattube were cut.
Welding together is a bad idea, especially if dissimilar frame/seatpost metals. Epoxy might be a better one time semi-permanent technique but loosing ability to ever adjust height is just a bad idea. If frame were steel, it should be possible to slot the top of seattube and add a binder bolt however short the seattube were cut.
11-12-23, 11:01 AM
#5

Senior Member
Join Date: Feb 2012
Location: Rochester, NY
Posts: 18,123
Bikes: Stewart S&S coupled sport tourer, Stewart Sunday light, Stewart Commuting, Stewart Touring, Co Motion Tandem, Stewart 3-Spd, Stewart Track, Fuji Finest, Mongoose Tomac ATB, GT Bravado ATB, JCP Folder, Stewart 650B ATB
Mentioned: 0 Post(s)
Tagged: 0 Thread(s)
Quoted: 4224 Post(s)
Liked 3,917 Times
in
2,336 Posts
There were a few vintage bikes built which used a seatpost with an internal expander bolt, sort of like used for old adjustable quill stems (before aheadsets). Either search and find a suitable size/length expander seatpost or modify an existing seatpost to work with an expander.
Welding together is a bad idea, especially if dissimilar frame/seatpost metals. Epoxy might be a better one time semi-permanent technique but loosing ability to ever adjust height is just a bad idea. If frame were steel, it should be possible to slot the top of seattube and add a binder bolt however short the seattube were cut.
Welding together is a bad idea, especially if dissimilar frame/seatpost metals. Epoxy might be a better one time semi-permanent technique but loosing ability to ever adjust height is just a bad idea. If frame were steel, it should be possible to slot the top of seattube and add a binder bolt however short the seattube were cut.
This!
I've seen (long ago, forgot where) a repair with a machined insert that is bonded in the seat tube. This insert extends above the top tube enough to have it's own binder and slot. The replacement seat post is sized to fit the new insert (or other way around, you get the idea). Not hard to do if you have a lathe. Expensive if you don't
 Andy
Andy
__________________
AndrewRStewart
AndrewRStewart
11-13-23, 04:31 AM
#6
Senior Member
Join Date: Jan 2013
Location: South Jersey
Posts: 2,271
Mentioned: 18 Post(s)
Tagged: 0 Thread(s)
Quoted: 716 Post(s)
Liked 807 Times
in
479 Posts
I posted this seat tube from Nate Zukas in the last thread about this issue. If you have the skills to do this, it is the best solution to the problem.
Likes For dsaul:
11-13-23, 04:52 AM
#7
Newbie
Thread Starter
Join Date: Nov 2023
Posts: 4
Mentioned: 0 Post(s)
Tagged: 0 Thread(s)
Quoted: 1 Post(s)
Likes: 0
Liked 0 Times
in
0 Posts
11-13-23, 04:55 AM
#8
Newbie
Thread Starter
Join Date: Nov 2023
Posts: 4
Mentioned: 0 Post(s)
Tagged: 0 Thread(s)
Quoted: 1 Post(s)
Likes: 0
Liked 0 Times
in
0 Posts
I don’t have the tools to do the above.
(it doesn’t need to be pretty)
thanks
11-13-23, 06:53 AM
#9
Full Member

Join Date: Jul 2023
Location: "Driftless" WI
Posts: 399
Bikes: 1972 Motobecane Grand Record, 2022 Kona Dew+
Mentioned: 3 Post(s)
Tagged: 0 Thread(s)
Quoted: 167 Post(s)
Liked 150 Times
in
111 Posts
Neither do I but it sure is a neat solution to a fairly frequent problem! My '70's era MB GR's seatpost clamp shows its age and results of my efforts to get it secured. Clamp ears are rather close together now after the surrounding metal they're attached to has stretched. At this point there's still enuf clearance between 'em to keep post secured. If I keep riding it I may have to resort to taking a die grinder to the ears' inner edges to bring back a little more space.
Here's your pic BTW:
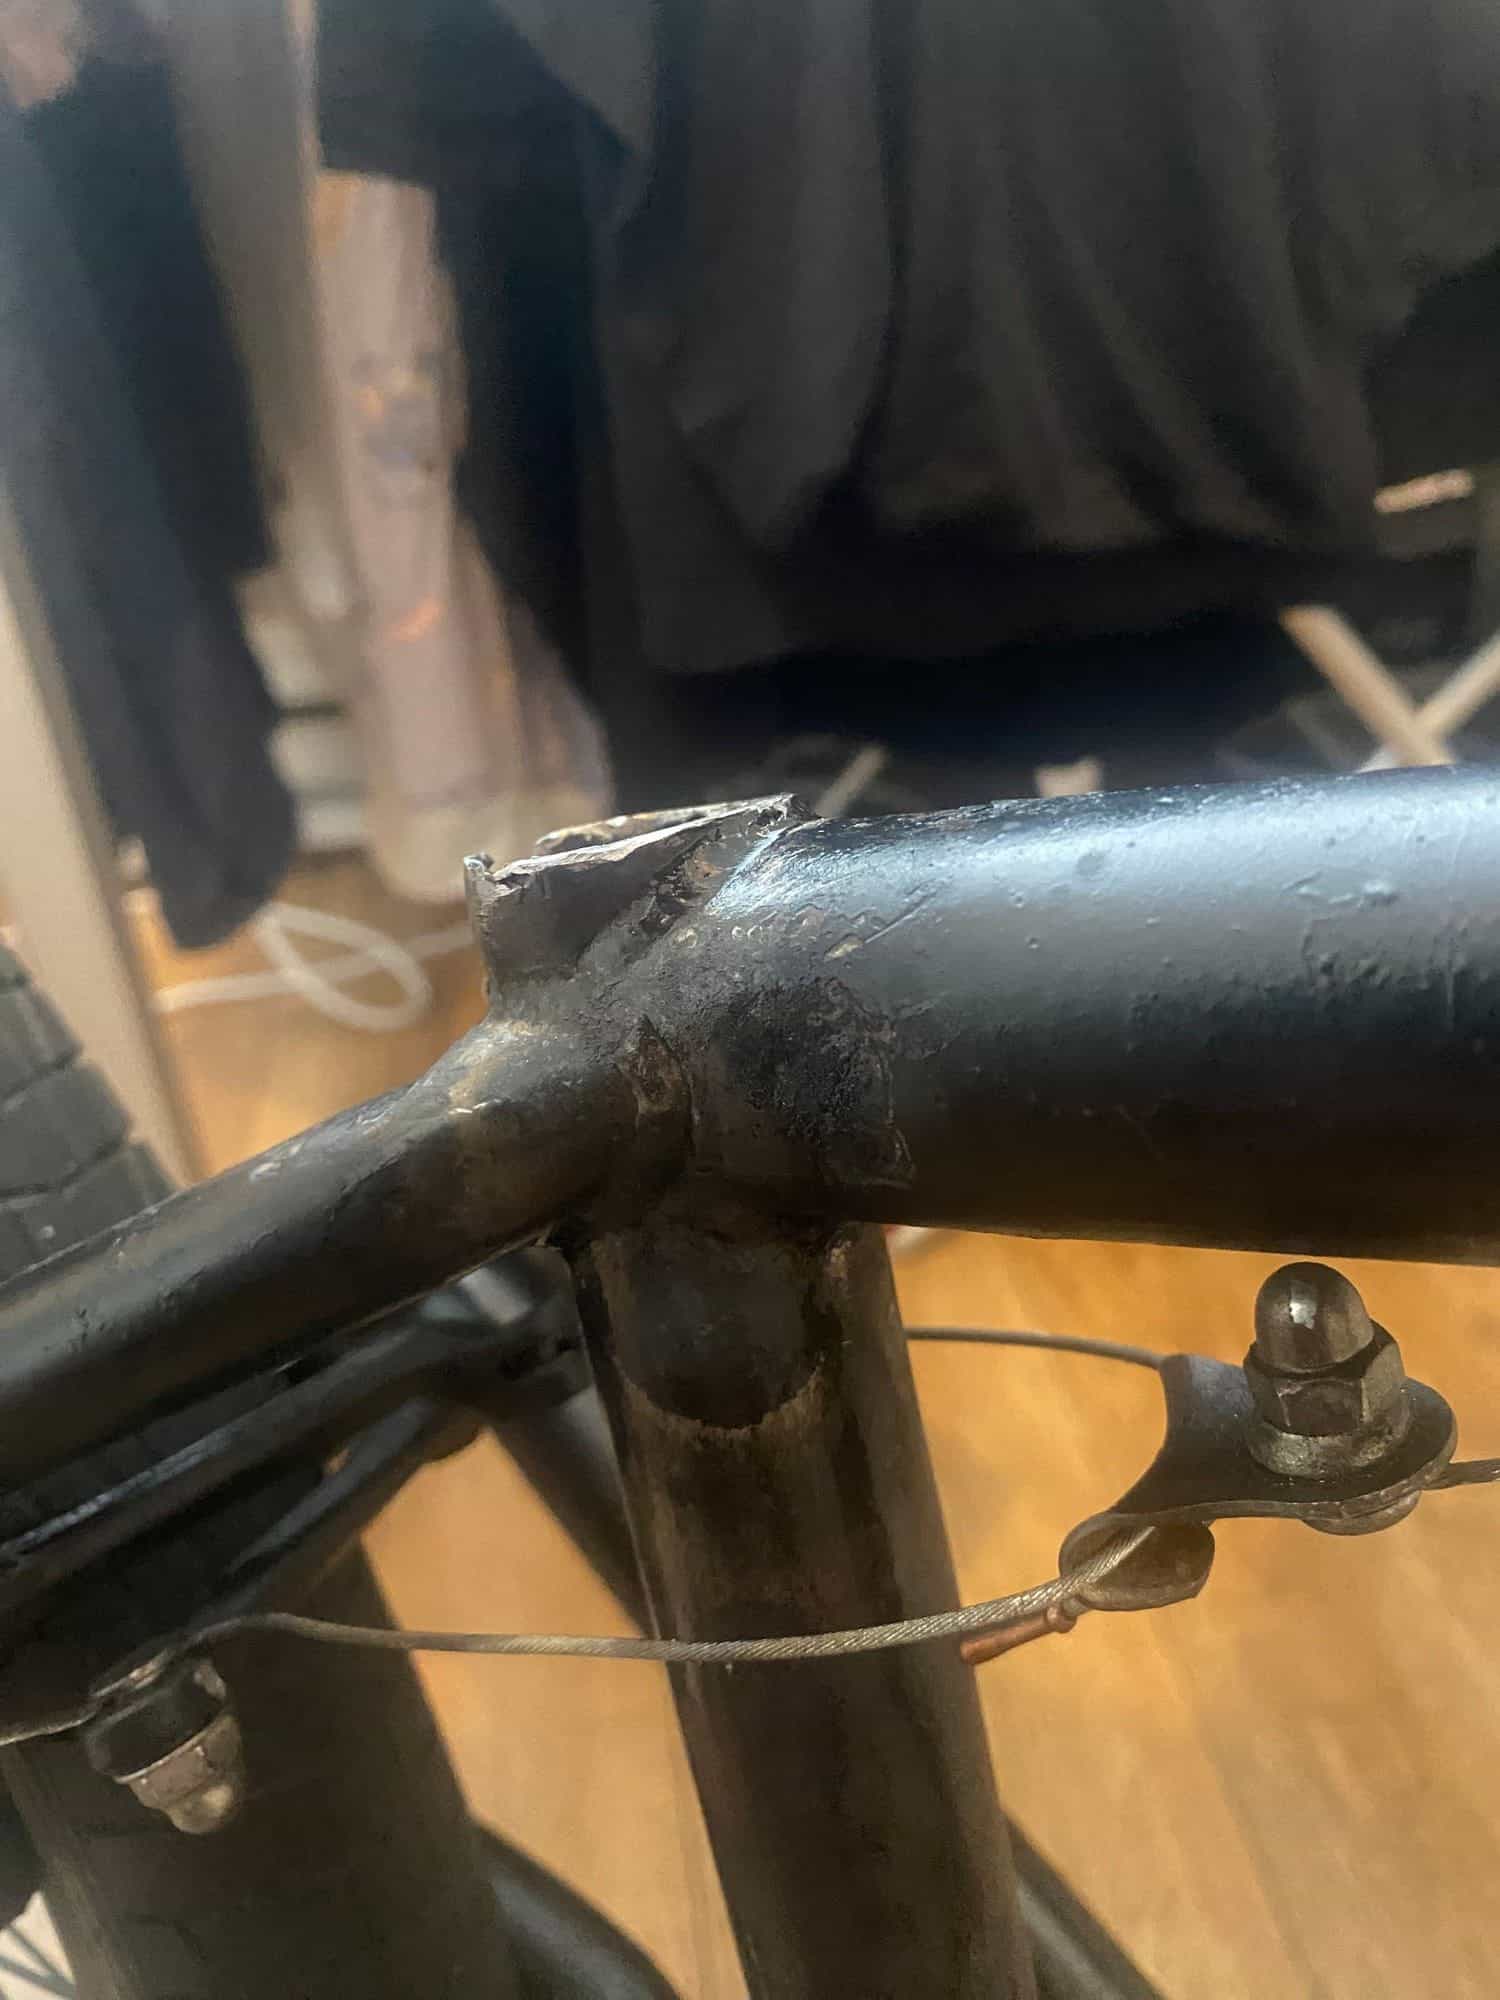
Looks like that frame's seen some bodging for repairs? Evidence of brazing showing, besides the rough texture after attempts at smoothing out fillets?
Last edited by spclark; 11-13-23 at 06:58 AM.
Likes For spclark:
11-13-23, 08:46 AM
#10
Newbie
Thread Starter
Join Date: Nov 2023
Posts: 4
Mentioned: 0 Post(s)
Tagged: 0 Thread(s)
Quoted: 1 Post(s)
Likes: 0
Liked 0 Times
in
0 Posts
Definitely taken some bodging to get the old seat post out.
aluminium post in a steel frame corroded so a combination of heat, cold, drilling and cutting to set free. Work to do to neaten this up.
What about some kind of clamp used lower down the frame to tighten around the frame and post - any ideas if this is possible ?
Thanks!
thanks!
aluminium post in a steel frame corroded so a combination of heat, cold, drilling and cutting to set free. Work to do to neaten this up.
What about some kind of clamp used lower down the frame to tighten around the frame and post - any ideas if this is possible ?
Thanks!
thanks!
11-13-23, 09:24 AM
#11
Senior Member
Join Date: Sep 2009
Location: EagleRiver AK
Posts: 1,306
Mentioned: 0 Post(s)
Tagged: 0 Thread(s)
Quoted: 28 Post(s)
Likes: 0
Liked 60 Times
in
33 Posts
Would but also weaken seatpost a bit. Maybe not enough to worry about, but then...
Neither do I but it sure is a neat solution to a fairly frequent problem! My '70's era MB GR's seatpost clamp shows its age and results of my efforts to get it secured. Clamp ears are rather close together now after the surrounding metal they're attached to has stretched. At this point there's still enuf clearance between 'em to keep post secured. If I keep riding it I may have to resort to taking a die grinder to the ears' inner edges to bring back a little more space.
Here's your pic BTW:
Looks like that frame's seen some bodging for repairs? Evidence of brazing showing, besides the rough texture after attempts at smoothing out fillets?
11-13-23, 02:09 PM
#13

Senior Member

Join Date: Jan 2005
Location: Baltimore, MD
Posts: 5,456
Mentioned: 15 Post(s)
Tagged: 0 Thread(s)
Quoted: 2524 Post(s)
Liked 3,010 Times
in
1,712 Posts
11-14-23, 03:08 AM
#14
Senior Member
Join Date: Dec 2019
Posts: 970
Mentioned: 3 Post(s)
Tagged: 0 Thread(s)
Quoted: 327 Post(s)
Liked 265 Times
in
214 Posts
You could probably braze or weld a pinch bolt on the back where the slot is? I make these on a minilathe: get some round bar, drill and tap it to M6, weld it on, then cut it in half in place, then drill out one half of the threads so the bolt just goes in and threads on the other half.
11-14-23, 07:18 AM
#15
Full Member
Join Date: Jul 2023
Location: "Driftless" WI
Posts: 399
Bikes: 1972 Motobecane Grand Record, 2022 Kona Dew+
Mentioned: 3 Post(s)
Tagged: 0 Thread(s)
Quoted: 167 Post(s)
Liked 150 Times
in
111 Posts
There's a lot of metal in that intersection that'd resist pulling a gap in back much closer together.
Looking at the bodgework done on that tube joint I'd:
1) Find a piece of steel pipe close to the ID needed;
2) Cut a piece maybe 1-1/2" long;
3) Braze (or weld) that onto the cleaned-up stub above that joint.
Then do what you suggest: add a pinch-bolt above the new weld. Lastly cut a new slot into extension tube and pinch bolt with a thin cut-off wheel.
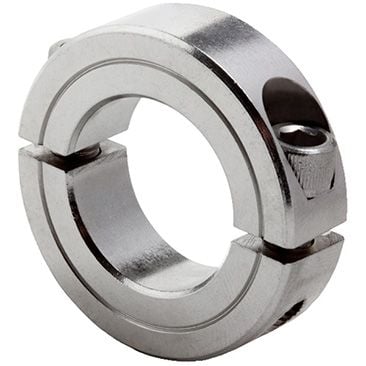
Or maybe just square off that stub end, weld one half of one of these on top, go ride:
Last edited by spclark; 11-14-23 at 07:27 AM.
Likes For spclark:
11-15-23, 09:16 AM
#16
Full Member
Join Date: Dec 2009
Posts: 495
Mentioned: 1 Post(s)
Tagged: 0 Thread(s)
Quoted: 49 Post(s)
Likes: 0
Liked 13 Times
in
12 Posts
That'd work as long as whatever's left of the slot – that we can't see in that pic – is long enough below where you'd fix that pinch bolt bit.
There's a lot of metal in that intersection that'd resist pulling a gap in back much closer together.
Looking at the bodgework done on that tube joint I'd:
1) Find a piece of steel pipe close to the ID needed;
2) Cut a piece maybe 1-1/2" long;
3) Braze (or weld) that onto the cleaned-up stub above that joint.
Then do what you suggest: add a pinch-bolt above the new weld. Lastly cut a new slot into extension tube and pinch bolt with a thin cut-off wheel.
Or maybe just square off that stub end, weld one half of one of these on top, go ride:
They look like a nice clamp for normal use too.
11-15-23, 10:21 AM
#17
Senior Member
Join Date: Feb 2012
Location: Rochester, NY
Posts: 18,123
Bikes: Stewart S&S coupled sport tourer, Stewart Sunday light, Stewart Commuting, Stewart Touring, Co Motion Tandem, Stewart 3-Spd, Stewart Track, Fuji Finest, Mongoose Tomac ATB, GT Bravado ATB, JCP Folder, Stewart 650B ATB
Mentioned: 0 Post(s)
Tagged: 0 Thread(s)
Quoted: 4224 Post(s)
Liked 3,917 Times
in
2,336 Posts
I use shaft clamps on a few of my building and alignment tools. Do know they are pre made in a limited range of inside diameters which need to be very close to what they will be slid onto. There are a wide variety of other aspects, number of splits/bolts, width, materials. I get mine from McMaster-Carr shaft clamps | McMaster-Carr. Andy
__________________
AndrewRStewart
AndrewRStewart
Likes For Andrew R Stewart:
11-15-23, 06:11 PM
#18
Full Member
Join Date: Jul 2023
Location: "Driftless" WI
Posts: 399
Bikes: 1972 Motobecane Grand Record, 2022 Kona Dew+
Mentioned: 3 Post(s)
Tagged: 0 Thread(s)
Quoted: 167 Post(s)
Liked 150 Times
in
111 Posts
Advantage over a pinchbolt being you're using a full-circumference clamping surface rather than pinching a thin-section tube to sustain the friction needed to keep a seatpost in place. There's a lot more metal behind most split shaft collars than in the typical downtube.
11-16-23, 11:39 AM
#19
Randomhead
Join Date: Aug 2008
Location: Happy Valley, Pennsylvania
Posts: 24,419
Mentioned: 0 Post(s)
Tagged: 0 Thread(s)
Quoted: 4 Post(s)
Liked 3,720 Times
in
2,537 Posts
Shaft clamps are a good idea. McMaster has them in 1 1/8", but I suppose the paint would add some thickness.
