


frame-jig: with cool features: Head Tube standoff - with a 45 degree-skip
 09-17-20, 03:21 AM
#1
Newbie
Thread Starter
frame-jig: with cool features: Head Tube standoff - with a 45 degree-skip
good day dear community,
i am in the mid of creating a bike-frame-jig.
the model is oriented at tanner w s jig: https://www.instructables.com/id/Bic...-Building-Jig/
see some the parts (here as Acronyms ) he is using:
note: i found two or three very interesting "hacks" of Tanner W: see the following pictures:
modifications made by Kristofer Henry
a. HT Assembly - The standoffs sit 45 deg.
https://www.flickr.com/photos/blackc...7715964842548/
btw see b. tanner w https://www.instructables.com/id/Bic...-Building-Jig/
and see the following discussion:
Francois Cau: What did you use for the pivot point of the extrusion part ? Is it just a simple screw ? (I'm trying to find a good/precise solutions for Rev2.0 of my jig...)
Kristofer Henry: There is a shoulder bolt that rides on a pressed in bearing. It's pretty smooth and clamping action is good.
queston: - very very interesting .- Why did you change the standoff - with a 45 degree-skip?! Can you compare it with a standard - standoff
another hack: by kolb-Rahmenbau.ch
https://www.flickr.com/photos/186428...th/3228571003/
he uses a very very big plate - see the right side of the spine ...: the plate for the head tube assembly is very very big - much bigger than that one that Tanner W uses.
i guess that this is much more precicely .. he can work with a lower degree of measurement-failures
how do you see this !?
what do you think !?
What else do you like at this bike-frame-jig !? I think it is very very interesting - if we compare it with tanner ws jig!?
look forward to hear form you
yours Apollodriver
btw: see also this arctos jig:
https://photos1.blogger.com/blogger/7...AD-drawing.jpg
https://amhoov.org/2019/08/06/bicycl...lding-the-jig/
see a modified jig - by #diy #bicycleframe #fixedgear
Bicycle Frame Build 10 - Frame Jig Pt.02 - Machining Extrusion
Francois Cau::What did you use for the pivot point of the extrusion part ? Is it just a simple screw ? (I'm trying to find a good/precise solutions for Rev2.0 of my jig...)
Kristofer Henry: There is a shoulder bolt that rides on a pressed in bearing. It's pretty smooth and clamping action is good.
i am in the mid of creating a bike-frame-jig.
the model is oriented at tanner w s jig: https://www.instructables.com/id/Bic...-Building-Jig/
see some the parts (here as Acronyms ) he is using:
Spoiler
modifications made by Kristofer Henry
a. HT Assembly - The standoffs sit 45 deg.
https://www.flickr.com/photos/blackc...7715964842548/
btw see b. tanner w https://www.instructables.com/id/Bic...-Building-Jig/
So here is the HT Assembly pretty much put together with the exception of the bottom "puck" holder and purge fittings. The standoffs sit 45 deg. back from the centerline of the extrusion. This allows me to have access to both sides of the HT/TT/DT area. I'll mount both standoff's on a rotary table and radius the ends to make my hands happy. Now that it is assembled, and I've had some time to stare at it long enough, I'm thinking I may change how the bottom standoff is mounted so it is fixed to the bottom of the extrusion and the whole assembly rotates off of it. Taking a measurement from the top of the main beam will enable an exact measurement to locate the bottom of the HT in space which will be nice.
Francois Cau: What did you use for the pivot point of the extrusion part ? Is it just a simple screw ? (I'm trying to find a good/precise solutions for Rev2.0 of my jig...)
Kristofer Henry: There is a shoulder bolt that rides on a pressed in bearing. It's pretty smooth and clamping action is good.
queston: - very very interesting .- Why did you change the standoff - with a 45 degree-skip?! Can you compare it with a standard - standoff
another hack: by kolb-Rahmenbau.ch
https://www.flickr.com/photos/186428...th/3228571003/
he uses a very very big plate - see the right side of the spine ...: the plate for the head tube assembly is very very big - much bigger than that one that Tanner W uses.
i guess that this is much more precicely .. he can work with a lower degree of measurement-failures
how do you see this !?
what do you think !?
What else do you like at this bike-frame-jig !? I think it is very very interesting - if we compare it with tanner ws jig!?
look forward to hear form you
yours Apollodriver
btw: see also this arctos jig:
https://photos1.blogger.com/blogger/7...AD-drawing.jpg
https://amhoov.org/2019/08/06/bicycl...lding-the-jig/
see a modified jig - by #diy #bicycleframe #fixedgear
Bicycle Frame Build 10 - Frame Jig Pt.02 - Machining Extrusion
Francois Cau::What did you use for the pivot point of the extrusion part ? Is it just a simple screw ? (I'm trying to find a good/precise solutions for Rev2.0 of my jig...)
Kristofer Henry: There is a shoulder bolt that rides on a pressed in bearing. It's pretty smooth and clamping action is good.
 09-17-20, 05:17 AM
#2
Senior Member
Join Date: Jan 2013
Location: South Jersey
Posts: 2,266
Mentioned: 18 Post(s)
Tagged: 0 Thread(s)
Quoted: 714 Post(s)
Liked 800 Times
in
475 Posts
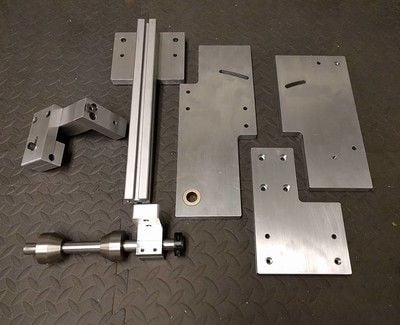
First off, Tanner W. admits that his jig is an inexpensive version of the Arctos jig, but his use of 1/4" plate to support the bottom bracket is a bit flimsy and his short standoffs don't allow much access for tacking.
I wouldn't call Kris Henry's jig a "hack" of Tanner W.'s jig. His jig is also an Arctos based design, but he made some improvements. The most notable improvements are the actual pivot at the bottom bracket, instead of a virtual one and the dummy axle holder that drops out the bottom. This allows you to remove a fully tacked frame from the jig by raising the seat tube and head tube cones and rocking the frame back to remove it from the jig without moving any of the settings. The reason for Kris Henry's angled standoff is better access to the jig side of the frame for tacking the head tube joints. He has since abandoned those angled standoffs and is using straight standoffs.
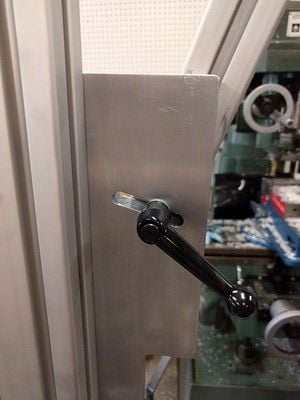
There is a simpler way to make the clamping mechanism for the seat tube and head tube angle adjustments. The curved slots in these plates allow me to attach a handle to the t-slot on the extrusion through the back side of the plate. They don't even have to be curved, since the t-nut will float in the slot when you loosen the clamping handle.
I wouldn't call Kris Henry's jig a "hack" of Tanner W.'s jig. His jig is also an Arctos based design, but he made some improvements. The most notable improvements are the actual pivot at the bottom bracket, instead of a virtual one and the dummy axle holder that drops out the bottom. This allows you to remove a fully tacked frame from the jig by raising the seat tube and head tube cones and rocking the frame back to remove it from the jig without moving any of the settings. The reason for Kris Henry's angled standoff is better access to the jig side of the frame for tacking the head tube joints. He has since abandoned those angled standoffs and is using straight standoffs.
There is a simpler way to make the clamping mechanism for the seat tube and head tube angle adjustments. The curved slots in these plates allow me to attach a handle to the t-slot on the extrusion through the back side of the plate. They don't even have to be curved, since the t-nut will float in the slot when you loosen the clamping handle.
09-17-20, 06:01 AM
#3
Newbie
Thread Starter
hello dear Dsaul
first of all - many many thanks for the quick reply - great to hear form you - i am very glad.
i am curious to get to know improvements - and "hacks" - at the moment i am in the mid of working out the tanner-w model here. I have a machinist that helps me here.
well - great i try to get this notable improvement.
well to make sure if got you right: is this part of the improvement visible here in this picture ?
https://www.flickr.com/photos/blackc...7715964842548/
i want to learn more - and i guess that this is a very very good thing that i should work on - perhaps i can integrate this in (to) my version of tanner ws jig
Note: i am no native speaker - so i am trying to make sure if i got you right - with your ideas on the improvements.
btw: what about the 45 degree _ shift of the standoff!? Not worth to ponder - or to work on..!?
look forward to hear from you
have a great day
regards
apollo
first of all - many many thanks for the quick reply - great to hear form you - i am very glad.
i am curious to get to know improvements - and "hacks" - at the moment i am in the mid of working out the tanner-w model here. I have a machinist that helps me here.
First off, Tanner W. admits that his jig is an inexpensive version of the Arctos jig, but his use of 1/4" plate to support the bottom bracket is a bit flimsy and his short standoffs don't allow much access for tacking.
I wouldn't call Kris Henry's jig a "hack" of Tanner W.'s jig. His jig is also an Arctos based design, but he made some improvements. The most notable improvements are the actual pivot at the bottom bracket, instead of a virtual one and the dummy axle holder that drops out the bottom. This allows you to remove a fully tacked frame from the jig by raising the seat tube and head tube cones and rocking the frame back to remove it from the jig without moving any of the settings. The reason for Kris Henry's angled standoff is better access to the jig side of the frame for tacking the head tube joints. He has since abandoned those angled standoffs and is using straight standoffs.
There is a simpler way to make the clamping mechanism for the seat tube and head tube angle adjustments. The curved slots in these plates allow me to attach a handle to the t-slot on the extrusion through the back side of the plate. They don't even have to be curved, since the t-nut will float in the slot when you loosen the clamping handle.
well - great i try to get this notable improvement.
The most notable improvements are the actual pivot at the bottom bracket, instead of a virtual one and the dummy axle holder that drops out the bottom. This allows you to remove a fully tacked frame from the jig by raising the seat tube and head tube cones and rocking the frame back to remove it from the jig without moving any of the settings. The reason for Kris Henry's angled standoff is better access to the jig side of the frame for tacking the head tube joints. He has since abandoned those angled standoffs and is using straight standoffs.
https://www.flickr.com/photos/blackc...7715964842548/
i want to learn more - and i guess that this is a very very good thing that i should work on - perhaps i can integrate this in (to) my version of tanner ws jig
Note: i am no native speaker - so i am trying to make sure if i got you right - with your ideas on the improvements.
btw: what about the 45 degree _ shift of the standoff!? Not worth to ponder - or to work on..!?
look forward to hear from you
have a great day
regards
apollo
09-17-20, 07:25 AM
#4
Senior Member
Join Date: Jan 2013
Location: South Jersey
Posts: 2,266
Mentioned: 18 Post(s)
Tagged: 0 Thread(s)
Quoted: 714 Post(s)
Liked 800 Times
in
475 Posts
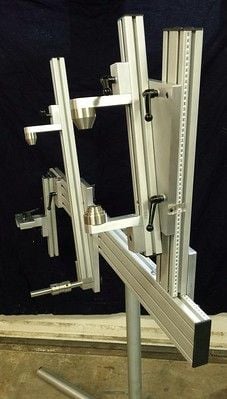
Both Kris Henry and Tanner W. are working from the Arctos design, but I see Kris Henry's changes as improvements and Tanner W.'s as simply a way to make the jig with the methods and materials he has available.
For the bottom bracket, I prefer to have an actual pivot point instead of trying to do the calculations to make a virtual pivot point. You can see the Oilite bushing in my seat tube plate for the 3/4 shaft, that supports the bottom bracket, to pivot on.
For the dummy axle mount, the original requires you to loosen the mount and move it to the rear in order to get a tacked rear end out of the jig. If the axle drops out the bottom, the mount can stay in place and the frame is simply rotated around the bottom bracket to get the frame out of the jig. Its not super important, but easier to do.
I don't know why Kris stopped using the angled standoffs, but they must not have been as useful as he thought they would be.
I like Kris Henry's jig and I copied several parts of it for my own. For my own jig, I decided that I wanted the bottom bracket to be in a fixed position and the front and rear would move separately. This allows me to change any setting without affecting any other setting. With the Arctos design, if you decide to change the distance from the bottom bracket to the head tube, you will also have to reset your chainstay length. My way is more complicated to build and there is more chance for misalignment, so its not necessarily better, just different.
09-17-20, 11:05 AM
#5


Randomhead
Join Date: Aug 2008
Location: Happy Valley, Pennsylvania
Posts: 24,399
Mentioned: 0 Post(s)
Tagged: 0 Thread(s)
Quoted: 4 Post(s)
Liked 3,699 Times
in
2,519 Posts
I need to change my fixture so that the dummy axle drops out of the bottom instead of out the front. Definitely makes things better. I don't want to move the lower head tube holder if I don't have to
Everything on my fixture refers back to the bb. But it's all mic-6 cast/ground aluminum
Everything on my fixture refers back to the bb. But it's all mic-6 cast/ground aluminum
Likes For unterhausen:
09-18-20, 03:55 AM
#6
Newbie
Thread Starter
hello dear Unterhausen hello dear dsaul
many thanks for the explanation and the idea sharing.
bessides this and furthermore..i guess that we can see the bottom bracket & Seat Tube Assembly... with the explanation
Kristofer Henry :: Bottom Bracket / Seat Tube Assembly
https://www.flickr.com/photos/blackc...7715964842548/
above all - i like this great place for all the options of idea sharing and discussing all things regarding frame building
have a great day
many thanks for the explanation and the idea sharing.
bessides this and furthermore..i guess that we can see the bottom bracket & Seat Tube Assembly... with the explanation
Kristofer Henry :: Bottom Bracket / Seat Tube Assembly
Now you can see how all the individual parts come together. Pretty straight forward. But everything can be built from the bottom bracket up as it is a fixed point in space. Will be making the standoff for the ST next along with tapping the BB post and finishing up the end cap for the BB Post.
above all - i like this great place for all the options of idea sharing and discussing all things regarding frame building
have a great day
