


Brompton converting to 2017 integrated shifters, help
 06-24-18, 02:55 PM
#1
Junior Member
Thread Starter
Join Date: May 2010
Location: Edmonton, AB
Posts: 11
Bikes: Dahon Speed D7, Brompton M6R
Mentioned: 1 Post(s)
Tagged: 0 Thread(s)
Quoted: 2 Post(s)
Likes: 0
Liked 0 Times
in
0 Posts
Brompton converting to 2017 integrated shifters, help
Help! I can't figure out how to adjust the derailleur.
I swapped out my 2013 shifters and brake levers for the new 2017 combo set. Used new cables and installed the required new DR anchorage spring set. But I can't get the derailleur to shift properly. It wants to sit in high gear. I have to unscrew the adjuster at the shifter all the way out to get it to almost move to low gear. Any ideas?
I swapped out my 2013 shifters and brake levers for the new 2017 combo set. Used new cables and installed the required new DR anchorage spring set. But I can't get the derailleur to shift properly. It wants to sit in high gear. I have to unscrew the adjuster at the shifter all the way out to get it to almost move to low gear. Any ideas?
 06-24-18, 11:49 PM
#2
Senior Member
Seems that you set the cable tension too low when mounting the new cables. Unscrewing the adjuster at the shifter means raising the tension. If unscrewing it almost full does not do the job screw it in almost fully and tighten the cable at the back end (dog leg). Make sure that the new dog leg is fittet properly to the frame - it is a bit counterintuitive when not looking at the instructions that come with it.
06-26-18, 10:12 AM
#3
Junior Member
Thread Starter
Join Date: May 2010
Location: Edmonton, AB
Posts: 11
Bikes: Dahon Speed D7, Brompton M6R
Mentioned: 1 Post(s)
Tagged: 0 Thread(s)
Quoted: 2 Post(s)
Likes: 0
Liked 0 Times
in
0 Posts
Thanks berlinonaut! Tried what you said but still not enough tension. The cable needs to be shorter.
There's a little slot on the cable connector at the dog leg. If you look on the backside of it (behind the grub screw, with wheel off), there's a slot on the back too and you can see your shifter cable threading through. I used a needle to help guide the cable out of that slot, so that the cable can extend beyond the slotted area. Made my adjustments, tested the shifting, and then cut the cable so that it fit inside that slot. This way you don't need to guess how much cable to cut off.
Brompton post-2017 DR cable anchorage spring set
Last edited by ponglo; 06-26-18 at 10:44 AM.
06-27-18, 02:30 AM
#4
Senior Member
Good to hear that it worked. The way you did it is more or less the way that I intended to hint to: The cable has to be tight on the rear end at the dog leg and achieving this works pretty much the same way as you would do with any derailleur (or brake). The cable is less tight in the higher gear, therefore when fitting the cable it might be appropriate to bring the shifter to the higher gear-postion.
Two additional tipps for those who convert their bike from the old lever to the new ones:
- The mechanism how the shifting at the rear end works mechanically stays pretty much the same. But by the clamping of the shifter-cable at the dog leg there is now the need for an additional mechanism to extend the cable (mechanism) further towards the back end of the dog leg (as it was previously provided by the shifter cable). This is done by a short (second) cable which is clamped by another bolt close to the front end of the dogleg. This is alreday mounted at the factory. I'd recommend checking the tightness of this bolt before mounting the dogleg onto the bike. I had one case where this bolt was not tight enough and the dogleg disintegrated itself when I provided tension by mounting the shifter cable. And as there's a spring inside the dogleg spread itself springloadedly throughout the workshop. Finding and puzzeling together the parts again was no fun, thus: Better check before mounting.
- The second tipp: If all of a sudden your two-speed refuses to shift to the lower gear the reason may be that the attachment of the plastic rear end of the shifter cable on the small wire thing that you can see in Pongo's photo above on the right side came loose as it is just clicked onto that wire. No a common issue as far as I know but I had that on a friend's bike (that came with the new shifters from the factory) after a few months and it took me a couple of minutes to figure out what the issue was. Fixing is a 2-second-job: Just click that thing back onto the wire. So if you suddenly have issues with a usually reliable derailleur shifter check this spot, it may safe you time.
Last edited by berlinonaut; 06-27-18 at 02:35 AM.
06-27-18, 08:32 AM
#5
Senior Member
@ponglo, can you post a pix of how the new shifters/levers look on the old M bars? Also, does the indexing of both derailleur and IGH match and feel good? I might be interested in this mod but thought it needed a longer straight grip section of bar (as the new bars have).
06-27-18, 09:19 AM
#6
Senior Member
07-06-18, 04:25 PM
#7
Junior Member
Thread Starter
Join Date: May 2010
Location: Edmonton, AB
Posts: 11
Bikes: Dahon Speed D7, Brompton M6R
Mentioned: 1 Post(s)
Tagged: 0 Thread(s)
Quoted: 2 Post(s)
Likes: 0
Liked 0 Times
in
0 Posts
@ponglo, can you post a pix of how the new shifters/levers look on the old M bars? Also, does the indexing of both derailleur and IGH match and feel good? I might be interested in this mod but thought it needed a longer straight grip section of bar (as the new bars have).
 07-07-18, 06:25 AM
#8
Senior Member
Thanks @berlinonaut and @ponglo... I want to keep my old version M bars, so I guess the new shifter/brake things are out.
07-07-18, 11:04 AM
#9
Banned
I can throw the over the bar (old M bar ) from 1st to 3rd, 3rd to 1st, shipping past 2nd *
as I gather the new under bar you go just 1 gear at a time so not as quick .
*with a 2 speed crank ,, 3rd is high in low range 4th is low in high range..
...
as I gather the new under bar you go just 1 gear at a time so not as quick .
*with a 2 speed crank ,, 3rd is high in low range 4th is low in high range..
...
01-22-19, 11:59 AM
#10

Senior Member
Join Date: Sep 2005
Location: Michigan
Posts: 3,706
Bikes: Trek 730 (quad), 720 & 830, Bike Friday NWT, Brompton M36R & M6R, Dahon HAT060 & HT060, ...
Mentioned: 10 Post(s)
Tagged: 0 Thread(s)
Quoted: 840 Post(s)
Liked 336 Times
in
251 Posts
If unscrewing it almost full does not do the job screw it in almost fully and tighten the cable at the back end (dog leg). Make sure that the new dog leg is fittet properly to the frame - it is a bit counterintuitive when not looking at the instructions that come with it.
01-22-19, 01:00 PM
#11
Senior Member
@berlinonaut could you by any chance post the instructions that you have? My derailleur anchorage came without any instructions and I have problems fitting it unless I bend the wire welded to the frame. Obviously if I were to tune to that I would rather want to be extra sure that I am on the right track. By googling I could not find no instructions nowhere for the 2017 version. Thanks.
 and to scan it. This clearly may take a couple of days. I'll do my best but this will almost certainly not be a fast answer as my workshop unfortunately is currently in the process of restructuring.
01-22-19, 01:34 PM
and to scan it. This clearly may take a couple of days. I'll do my best but this will almost certainly not be a fast answer as my workshop unfortunately is currently in the process of restructuring.
01-22-19, 01:34 PM
#12
Senior Member
Join Date: Sep 2005
Location: Michigan
Posts: 3,706
Bikes: Trek 730 (quad), 720 & 830, Bike Friday NWT, Brompton M36R & M6R, Dahon HAT060 & HT060, ...
Mentioned: 10 Post(s)
Tagged: 0 Thread(s)
Quoted: 840 Post(s)
Liked 336 Times
in
251 Posts
Thanks! Of course use common sense as to the amount of effort you delegate to this. For the moment I went back to the pre-2017 version and will be parking there.
01-22-19, 02:41 PM
#13
Senior Member
Join Date: Sep 2005
Location: Michigan
Posts: 3,706
Bikes: Trek 730 (quad), 720 & 830, Bike Friday NWT, Brompton M36R & M6R, Dahon HAT060 & HT060, ...
Mentioned: 10 Post(s)
Tagged: 0 Thread(s)
Quoted: 840 Post(s)
Liked 336 Times
in
251 Posts
01-22-19, 03:13 PM
#14
Senior Member
I found this pdf in case this is all you had. It talks about attaching cable to the anchorage, but not about installing the anchorage itself.
 01-22-19, 03:26 PM
#15
Senior Member
Join Date: Sep 2005
Location: Michigan
Posts: 3,706
Bikes: Trek 730 (quad), 720 & 830, Bike Friday NWT, Brompton M36R & M6R, Dahon HAT060 & HT060, ...
Mentioned: 10 Post(s)
Tagged: 0 Thread(s)
Quoted: 840 Post(s)
Liked 336 Times
in
251 Posts
I remember that one had to study the picture of the dogleg intensively rather than reading the text to understand how exactly the parts of the dogleg puzzle together and how and where to mount them. The good thing is: Once you have done it once successfully it is a piece of cake next time.
Update: OK, I think I solved it by playing around off-bike with the pieces (not a Rubik's cube, but something in that direction) - no wire bending necessary. I may post photos after all is mounted on the bike as I have seen others on the web clearly messing it up.
Last edited by 2_i; 01-23-19 at 11:09 PM. Reason: Update
01-26-19, 02:17 PM
#16
Senior Member
Join Date: Sep 2005
Location: Michigan
Posts: 3,706
Bikes: Trek 730 (quad), 720 & 830, Bike Friday NWT, Brompton M36R & M6R, Dahon HAT060 & HT060, ...
Mentioned: 10 Post(s)
Tagged: 0 Thread(s)
Quoted: 840 Post(s)
Liked 336 Times
in
251 Posts
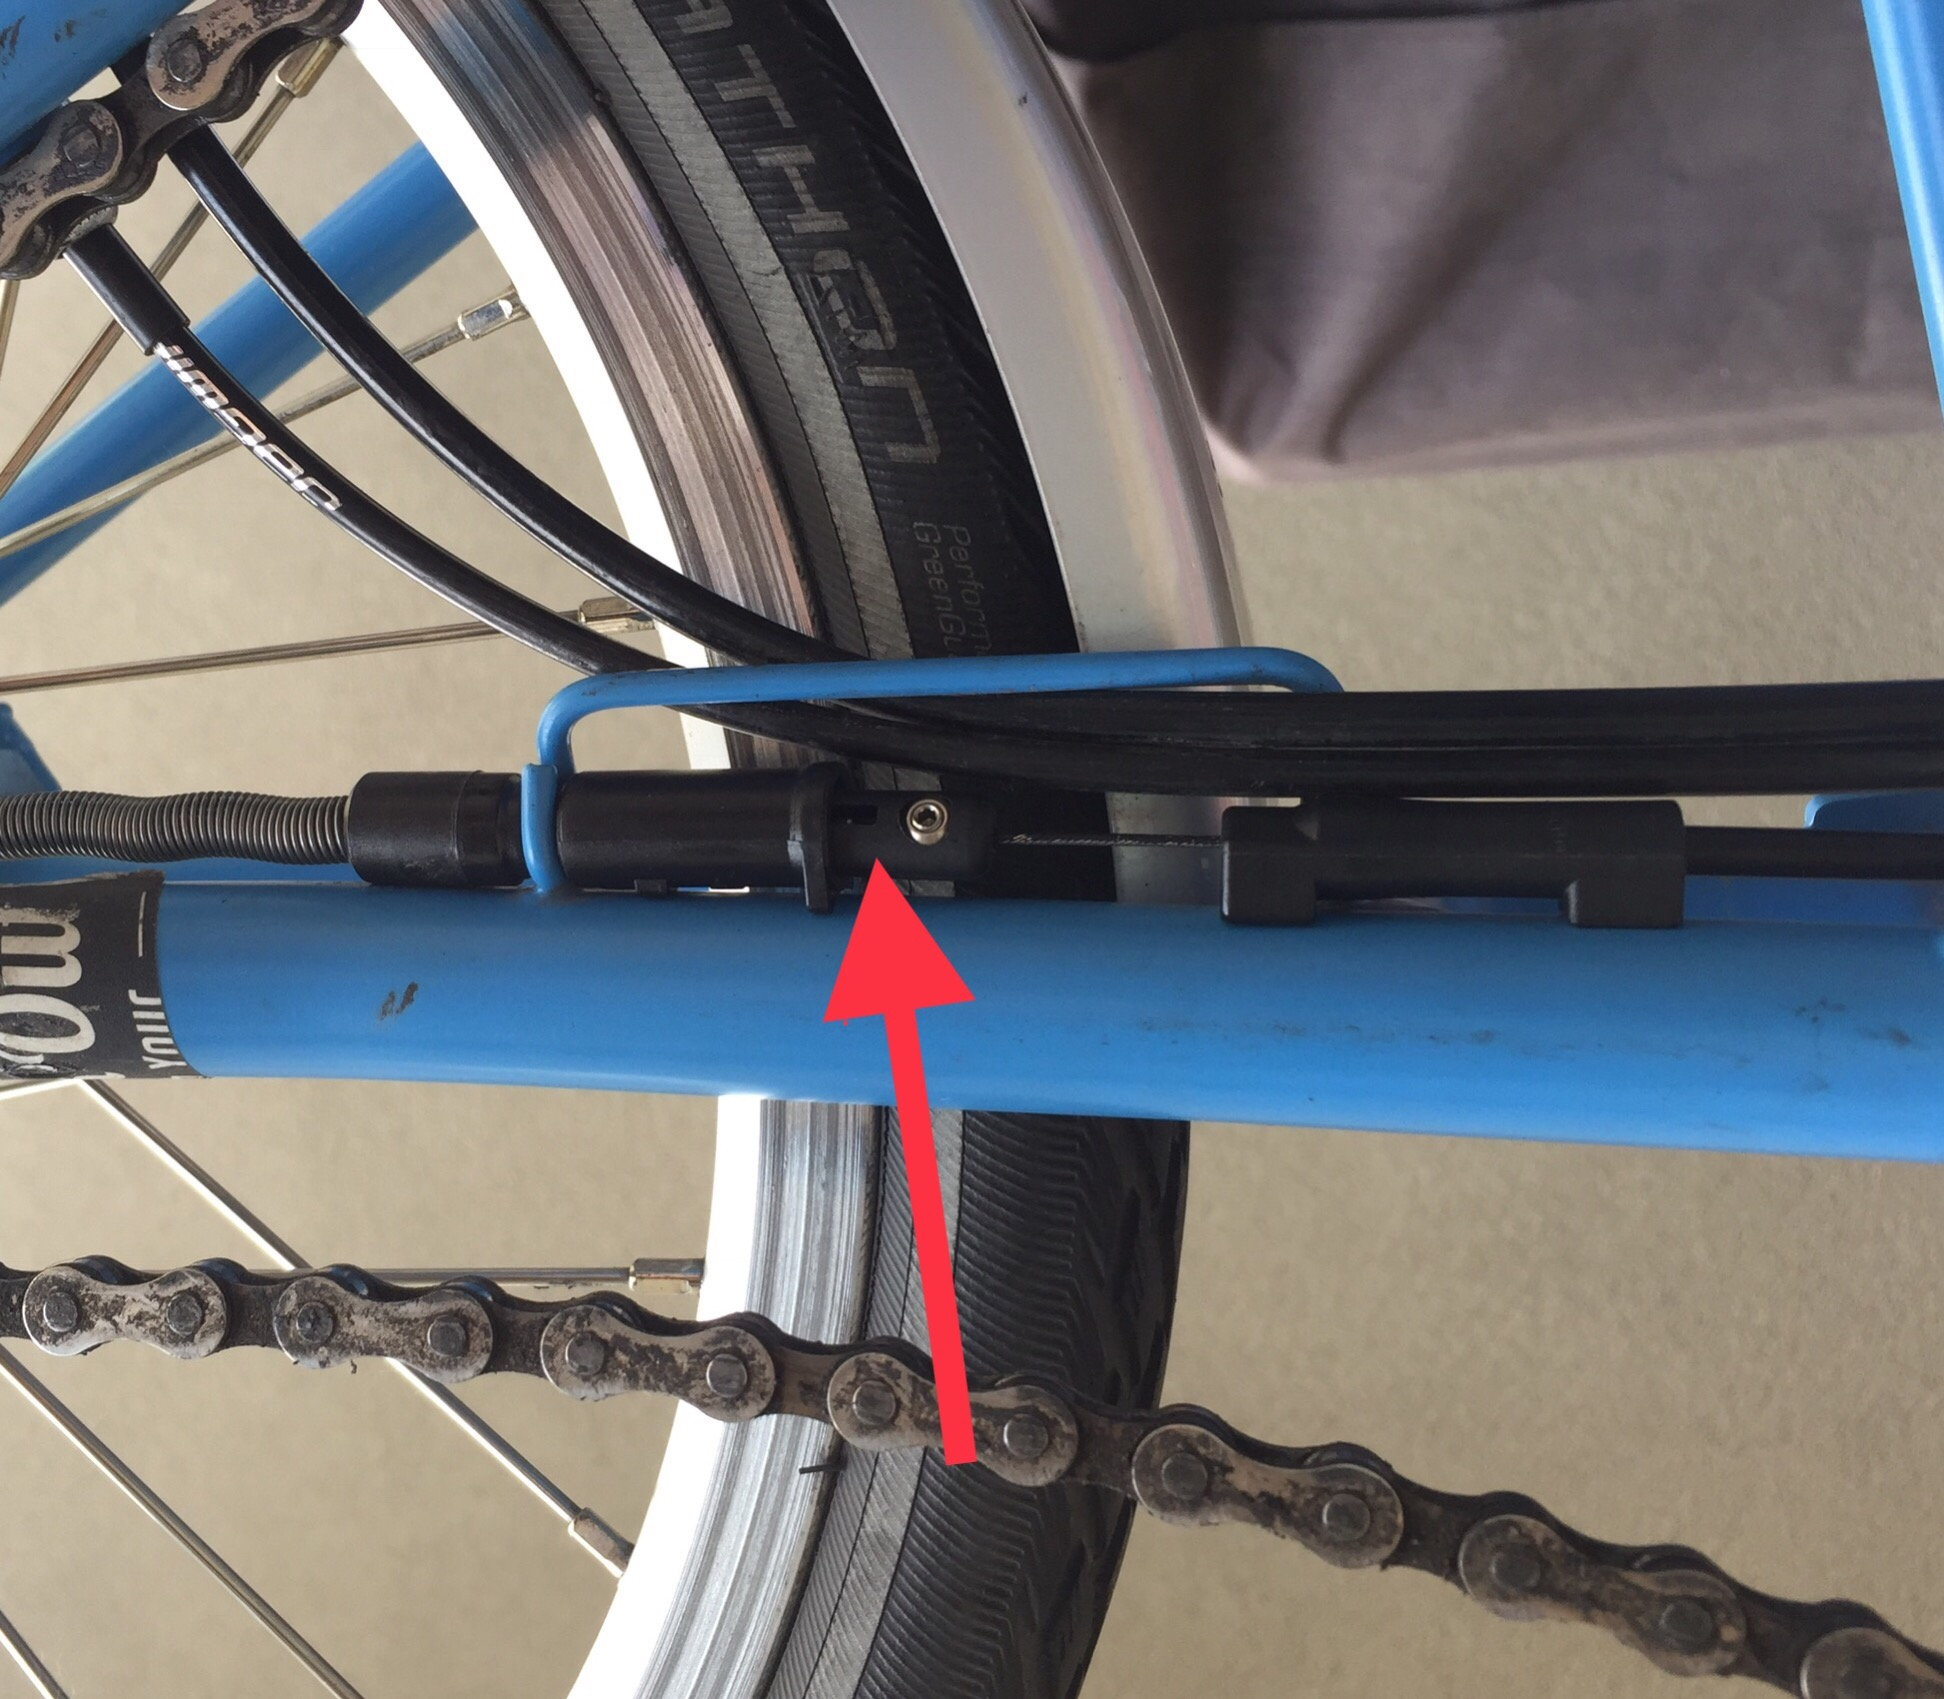
Here are the photos from the stage of attaching the anchorage that baffled me. There are arrows on the barrel that comes from the right and you need to follow them.

Before the barrel comes on, clinching the grip.

After the barrel comes on
Before the barrel comes on, clinching the grip.
After the barrel comes on
01-26-19, 04:23 PM
#17
Schwinnasaur

 01-28-19, 04:40 AM
#19
Senior Member
 01-28-19, 07:25 AM
#20
Senior Member
Join Date: Sep 2005
Location: Michigan
Posts: 3,706
Bikes: Trek 730 (quad), 720 & 830, Bike Friday NWT, Brompton M36R & M6R, Dahon HAT060 & HT060, ...
Mentioned: 10 Post(s)
Tagged: 0 Thread(s)
Quoted: 840 Post(s)
Liked 336 Times
in
251 Posts
Hmm, you do not seem to put the sleeve/barrel over the C-clip, It goes on the clip when the barrel (dachshund) has its legs up into the air and it locks snugly against the wire over the C-clip when you rotate the barrel so that its legs point down towards the chainstay,

Thread
Thread Starter
Forum
Replies
Last Post
Doolittle
Bicycle Mechanics
3
07-10-14 04:54 PM
candylineup
Bicycle Mechanics
19
09-07-12 05:04 PM
